I cut out some more Dogwood pouches the other day. I am using the same sizes (F & J), mostly because I didn’t want to take the time to print more templates. The organization to whom I wanted to donate the set is having their luncheon soon and I wanted to make as many bags as possible. I have only the Superbloom and the Cotton Candy so far.
While working on the Old Town blocks I have been using my grey scraps to add to the Grey Improv donation quilt. I am really enjoying building up the size of this quilt. It takes forever to get the right sized pieces, but all of a sudden it is bigger. It is really fun.
There was no organized Community Quilt project at the Retreat this year as both Community Quilt chair people were otherwise occupied and didn’t attend. Despite that, the group made (or brought) ~15 quilts to hand in. First, I brought the White Strips donation quilt, but couldn’t hand it in, because nobody was there to collect it. Oh well, I’ll hand it in on Saturday.
Lee Ann put the finishing touches on the Improv quilt above. I made a number of the pieces and it was fun to see them. She said it has been sitting around for awhile. I was really glad to see what a great job she did.
Lee Ann’s Flying Geese quilt
Lee Ann also put together a Flying Geese quilt for the Community quilt project that was really interesting.
Peggy gave her the mauve-y red awhile ago and asked her to do something with it. The color wasn’t exactly Lee Ann’s style, but recently she got a layer cake that included fabrics she used for a background. This isn’t a quilt I would make, but I think the combination works really well! Lee Ann did a great job on the piecing. She ran around the room with the quilt fluttering behind her like a cape when she finished! It was a joyful act.
Anna’s heart quilt
Anna also finished a donation quilt that has been hanging around. We all helped her arrange the last few blocks, so she could get the quilt off her UFO list. I thought it was a Pulse quilt that Anna wasn’t able to finish, but she finally figured out it was intended for the victims of the Las Vegas shooting in 2017. In looking through the posts where I communicate the call for victims who need quilts, I was reminded how many times recently there has been some tragedy where a call has gone out. This quilt will make someone very happy. As usual, Anna did a great job.
Melinda was on a binge. She made 10 baby quilts (~34 inches square) from a tub of children’s fabric she can’t remember buying. LOL! I didn’t get any photos of her quilt tops and backs because she was so fast at showing them. She was pleased with how much she got done, but disappointed that she didn’t use up more of the fabric.
Pillowcase donation top
I made a donation quilt with some of the leftover fabric from the pillowcases.
I got the black and white triangle (pinwheel?) fabric from Melinda. She was happy to offload it. I added it to the pillowcase fabrics to make the quilt slightly larger.
As you can see, I messed up the layout somewhere along the way. Someone will like it.
Lynette’s Pillowcase quilt top
I wasn’t that happy with the black quilt once I saw what Lynette made with the other pillowcase scraps. She added a cream background fabric from Melinda to really make the pillowcase scraps shine.
Lynette is a on a potato chip quilt binge. I may have heard of Potato Chip quilts, but I have never made one. I might now that I know how great they can look.
Lee Ann’s special 4-patch donation quilt
Lee Ann found this block somewhere – I didn’t hear the story and made a donation quilt out of children’s fabrics. She added some solids and the quilt top looks really great.
I didn’t bring a scrap bin or my 2.5 inch squares bin and I was sorry. I had to scramble around for leaders and enders and that wasn’t easy. I got quite a bit done using other projects for leaders and enders, but it was difficult. I was shocked at how ingrained sewing with leaders and enders is for me!
After finishing the White Strips #3 donation top, I needed another leaders and enders project.
This grey improv scrap top has hung on my small design wall for almost a year. I am shocked at that! I didn’t realize how much time had flown by.
My grey-black-brown drawer isn’t crammed full, but it isn’t empty either and I decided that I need to work on this project to get it off the design wall and to someone who needs it. Also, it will be a relatively quick win on my fabric used spreadsheet.
At the moment, as leaders and enders, I am sewing together all the scraps that are not strips. I am sewing them into pieces that I can then sew on to the top above. You can see pieces I have placed, but not sewn. They are just temporarily in place until I can add more pieces to them to make a unit large enough to expand the top. It’s a lot of piecing, because the pieces are small.
The main piece I have already sewn together is about 32 inches wide. I need another 10 inches, at least. I’ll probably have to dig into the strips to make the quilt big enough.
I finished White Strips #2 and was able to hand it in to the Community Quilts Committee at the Retreat.
I was not surprised, but rather disappointed that my white scrap bin does not seem to be emptier. As I said before, I have a lot of plain white scraps so I have to decide what do with the plain white scraps. I am going to work on some other scrap quilts until I decide.
The donation blocks continue with more Color Strip blocks, though we all know white is not a color. I am getting down to the solid white strips and am not sure how to continue. I don’t want to make a whole block of just white strips. I am thinking that I will need to leave some of the strips for another time or incorporate them into another white improv quilt. At the moment I am trying to decide if I want to make another white strip quilt or if one is enough at the moment.
I am making excellent progress on White Strips #3. Since I couldn’t get it done for the meeting, I want to get it done for the Retreat. I only had snatches of time between work and taking care of my mom. Even small bits of time make progress.
After sewing the cornerstones and sashing together then sewing to the blocks, I was able to assemble the top. Chunking really makes the whole process go fast.
Now I plan to put some small borders on. It is already, without the borders 43 in. x 47 in. I like my donation quilts on the larger side. I also need to make the back.
The other day I had a sew day with Tim and Cyndi. Cyndi was cleaning out projects while we worked on our own projects. She came up with some pieces from classes she didn’t think she would use, but she wasn’t sure wanted to toss.
I told her she should add some borders and hand it in as a donation quilt. The next thing I knew, she and Tim were cutting up shards and sewing them back together. The quilt looks great! And there is a project weight off Cyndi’s shoulders.
Cyndi’s Donation top-in process
One thing that reminds me that more brains are better than one is this piece.
I probably would have just sewed that blue solid on to make the quilt top big enough. Cyndi wanted a bit of improv piecing in there, so Tim added it. See above.
It really makes the quilt look like the design was thought through. I am really pleased these pieces will end up with someone who needs a quilt.
I made a little more progress on the White Strip #2 donation top. I have most of the top sashings sewn. I have started to sew the blocks to the sashing, as I show in my chunking tutorial.
I started working on it a little more diligently after I put my aunt’s Superbloom together. That project isn’t finished, but I only had a few minutes and needed a break. I think I’ll be able to take the quilt to Sew Day and hand it in.
Today is the guild meeting and I thought I *might* have this top done and ready to turn in. No such luck.
I did stop making new blocks and focused on sewing this top together. I could do both new blocks and the top, but leaders and enders is easier for me if I focus on one project as the leaders and enders piece at a time. Also, I have enough blocks for this quilt and don’t need any more.
As I mentioned in the previous post, I am using the back of a fabric as the sashing. I haven’t turned over all the cut sashing yet, so the pieces near the top are still on the right side. I think it looks good.
As per my ‘chunking tutorial,’ I started at the bottom by sewing a block to a piece of sashing. I quickly realized I had forgotten to cut cornerstones. I am backfilling those as it becomes necessary.
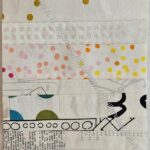
I was thinking about the quilt I talked about a few days ago. I am not liking the gold. The fabric is nice as yardage, but in a white quilt it is pretty overwhelming. I really want this to read as a white quilt and the gold might interfere with that.
Checking out the back
I checked out the back of the fabric and the gold comes through, but is much more subtle.
The vertical sashing on the right is the back of the fabric while the sashing on the far left is the right side of the fabric. I think the back of the fabric might work.
I am letting it sit for a day or two to see what I think.
I finally have enough blocks to get a top on the wall. Well, it isn’t a top yet, but I am getting there.
I am using the fabric I got in the Sew Hungry Hippie box at Christmas as the sashing. It has a lot of gold, which isn’t white, but it might be interesting.
I also planned for the sashing to be 1.5 inches finished. That is a little larger than previous versions of this type of quilt.
After turning in a batch of 16 patches, I switched back to making my white strip donation blocks. I should have done it ages ago as the strip blocks lead directly to quilts whereas the 16 patches lead to someone having to store them until someone takes them to make into a quilt.
I finally dug in last weekend and finished Ends n.21. Honestly, I needed the design wall space! LOL! Still, it is finished and ready to go to the meeting on Saturday.
This design is super easy, so there wasn’t really a lot to do. I just had to sit down and sew. Saturday was kind of a finishing up day as I didn’t have tons of time to sew, so I finished up projects that were already started and didn’t require a lot of thinking. I think this quilt looks fun. It is about 39 inches x 40 inches. Not huge, but a nice playmat size.
Ends n.21 back finished
I also grabbed a piece of fabric out of my backing fabric supply and made a quick back.