Mighty Lucky January Challenge

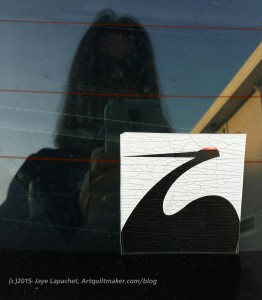
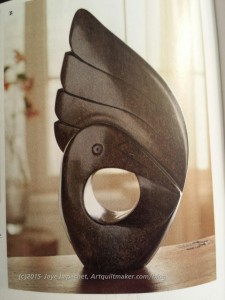
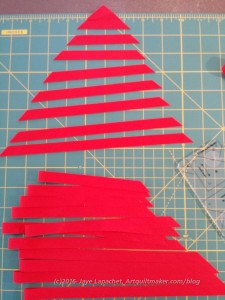
I already wrote a little bit about the February challenge, but look for a full fledged post about it soon. I am just catching up with the January challenge. I am happy with my first effort with bias tape. It was interesting and a good learning experience, but I want to try this picture again. I like the image, but my rendition didn’t come out as I had hoped.

Mighty Lucky January Challenge

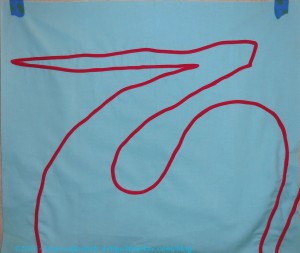
I really like the thin beak of the original picture. I didn’t get the beak as thin as I would have liked. I used a lot of pins, but it was hard to keep the bias in place as I sewed and I am not sure why. The wobble also resulted in all of the straight lines ending up wobbly. This is because I didn’t have the Wonder tape called for in the directions (I have it now). I didn’t add fusible to my bias tape, which was an option I didn’t think about.

Still, I made something for the challenge. I was also expecting progress not perfection. WooHoo!

I was excited about this challenge, because I had been wanting to learn to make bias tape using bias tape makers. It might useful for embellishing or design purposes in the future. This was the perfect opportunity.

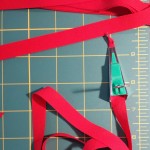
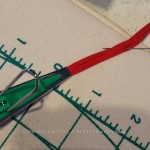
After cutting and sewing the bias, I fed the piece through using a pin and the device started making bias tape! I couldn’t believe it that the process worked. Once I got going, I found it incredibly useful to poke a pin into my pressing surface to hold the bias in place. As I reached the end of my pressing mat with the iron, I had to move the pin.

Bias tape maker seam allowance problem

I was disappointed that the directions did not talk about type of fabric or any challenges that might occur. I found a couple of things that were challenging.

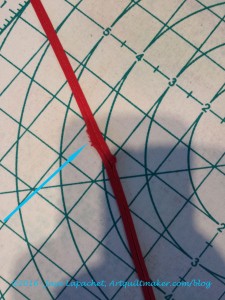
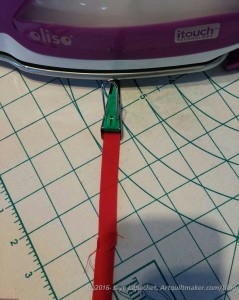
First, I used a Kona Solid for the red bias tape. As I have mentioned in the past there is a lot to like about Kona, but its loose weave is not a bonus. I cut my strips about 1/2″ wide and as I fed them through the bias tape maker to make 1/4″ bias, the seams got hung up on the device. The bias tape maker had a real problem going over them as I pulled the tape through. I ended up helping them with a stiletto, but the seams looked terrible once the tape was made, as you can see in the photo with the blue arrow. The photo is of completed bias tape. You can see that the line is not smooth and there is a marked bump in the tape. Yes, I pressed the seams flat and they are still not attractive. The seams are also already starting to fray.

I am thinking that the problem could have been the fabric, as mentioned, combined with the size of the bias tape I chose to make. I’ll have to experiment some more to see what works. Looser weave fabric might work just fine with a larger sized bias tape maker. I do think I might try this technique with Art Gallery Pure Elements Solids as they are thin and tightly woven. I am not sure if that line has a bright scarlet.

Look How Many Bias Strips!!

Second, there was no way of knowing how much bias tape could be made. There was no chart like a bias binding chart included with the directions. Would a bias binding chart used for binding a quilt work? I tried looking at one, but it don’t go down to a small enough width of tape. I now have about 500 yards of bias tape still to use, which is why I am not concerned about a do over.

Yes, I had to sew all of those tiny strips together, which was another ordeal in itself. I should have used the tube bias method.

Next, I used the 1/4″ bias tape maker. It worked like a charm, but is very small. I would recommend using a 1/2″ or 3/8″ bias tape maker on your first time out.

Fourth, the directions did not talk about using a Point Trimmer. A Point Trimmer helps you line up the edges of the bias tape to sew it together in a long string. You can use it for your binding strips as well if you don’t use the tube binding method. As an aside, if you don’t have Point Trimmer ruler, you really need to get one. I like the Judy Martin version because it helps you trim two types of triangles in one tool BUT there are other manufacturers who make them and almost any are good.

Bias tape makers
Bias tape makers

Fifth, these bias tape makers are not readily available. I went to three stores, checked Amazon, Fabric.com and some other places before I found a full selection at Beverly’s. The quilt stores didn’t have them. Amazon, etc had a few, but not all the sizes and not sold in sets. None of the online places could get them to me in a timely manner. I now have a set of them and won’t need to buy them again, but I was surprised. If I were Lucky Spools, I would have made a deal with some shop to sell kits of the bias tape makers and the Wonder Tape.

Pressing Matters
Pressing Matters

Sixth, there were very few instructions about pressing. The author of this ‘lesson’ did say to keep your fingers away from the hot iron, but not much else. I used a type of stiletto, which prevented me from burned fingers. It is two pronged, which gives me more ‘holding’ surface. I think I bought it at a booth at the county fair or PIQF where they sell every kind of scissor and small metal tool known to mankind.

There is more come on this technique as I will post about my next effort.

Mighty Lucky Member
Mighty Lucky Member

Learning is not a smooth process. I am not complaining about any of the above; I am just telling you my story. One lesson for me is to try different brands of solids. Kona is just so easy to find! I am glad I tried this technique and learned how to make bias tape with these devices.

Mighty Lucky Inspiration

This week turned into an unexpectedly busy week. Nothing bad, just a number of time sucking curve balls. As a result, I still haven’t put bias strips to background for the Mighty Lucky Quilting Club challenge. If I had won the Powerball, then all that busyness could have gone away and I could have immersed myself in sewing. HA!

I can now, at least, make the bias strips since I was able to find the one of the bias tape makers I wanted to play with at Beverly’s. Yes, I did order them from Amazon and I received the 1″, but the 1/4″ tape maker was on back order. I made trips to a couple of quilt stores, knowing I could cancel the online orders, but both Always Quilting and Scruffy Quilts were out of bias tape makers. I guess the MLQC is popular OR making bias tape is popular.

I was out for a walk and stopped in at Beverly’s even though i didn’t have a coupon. They had all the sizes in the Clover brand! Since I had some simple ideas in mind, I bought the 1/4″ tape maker and cancelled the Amazon order.

Aside from the sketches that I made and showed you the other day, I found two pictures that also make me want to make them using bias tape.

Bias tape water bird

I saw the first picture when I was, again, out for a walk (I walk a lot). It is a cool line drawing I saw a on the back of a car. I think I might have mentioned that I love water birds once or twice and this sticker reminded me of an egret. The body is a little fat, but I can adjust that – or not – when I get the bias tape ready.

I could also do an outline of myself, though there is not a lot of detail, because I am bundled up and in shadow. I am not inclined to do that, but the outline is clear enough.

Statue
Statue

Then, yesterday, I was early for a meeting. I didn’t want to announce myself until closer to the meeting time, so I started to organize the photos on my phone. I have too many and I need to off load them, but organizing always calms my nerves. In the course of that exercise, I found another bird statue that would be a great bias tape drawing.

I remember taking the photo from a magazine wanting to remember the swoops and lines of the beautiful piece of art. Sadly, I don’t remember any details about the artist or the magazine. I did not make this statue!

One bird is one thing, but I am not sure I want to make both. If these challenge pieces are just challenges piece, then I can make as many as I want. If they will be a quilt, which is what I was thinking when I was sketching the confetti lines, then I might need to think about how many I make.

I suppose making ONE is the first step. 😉

Mighty Lucky Quilting Club

Mighty Lucky Quilting Club

I talked about the Mighty Lucky Quilting Club in a post on Tuesday. I actually wrote those words a few days ago…before I saw the first challenge at BAMQG on Saturday. At that time I wrote “I am interested to see what they do, but don’t want to put another ‘should’ or ‘must’ on my list. I am also not much interested in playing with negative space or more on improvisation, which is to say that it may not be for me…”

I like the name they have chosen. There is something about the words Mighty and Lucky and that make me feel powerful and capable. Silly, probably.

Then I saw the results a few people brought for the first challenge. The first challenge has to do with making and using bias. The idea of the ‘club’ isn’t, at least in the first month, just how to make nine patches and sew set in seams. Now I was interested.

MLQC challenge sketches - January
MLQC challenge sketches – January

I signed up as soon as I got home and started imagining designs. I have wanted to learn to use one of those bias tape makers, but never took the time. As I let the challenge settle into my brain, the ideas started to come. While I was waiting to pick up my nephew from swimming, I did some doodles, not in a sketchbook as is suggested, but just in my journal, which is fine for me. My doodles stemmed from my thoughts of confetti streamers. I don’t think any of my sketches look like what is in my mind, but they are interesting regardless.

MLQC challenge sketches - January
MLQC challenge sketches – January

Drawing the ideas out in long rectangles made me think of the top of a quilt. The quilt would have blocks of different sizes put together in an interesting way. I was thinking that I would use turquoise as a background, perhaps different turquoises, and then red on top. I know you have seen it a million times, but I am stuck on that combination for the moment.

I received, immediately, a nicely formatted PDF with the information about the challenge.

Yesterday, I got home and went looking for the bias tape makers. I am sure I bought a set and can’t find them anywhere, so, sadly, I bought more. Sadly, because I know I will find them as soon as the new ones arrive. I did not buy a 2″ bias tape maker. For this challenge, I think I will stick to thinner lines.

I hope this is fun and am not adding to the ‘shoulds’ in my life.