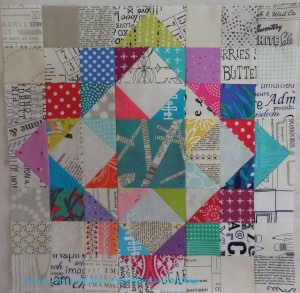
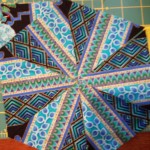
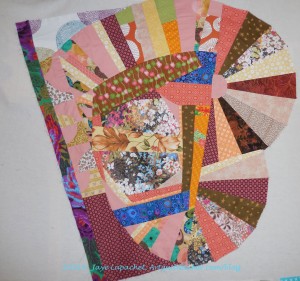
I finally finished another Carpenter’s Wheel block. As I have said there is a lot going on and focus is difficult. Looking back, I found that I posted #7 on March 1 even though March 1 seems like a long time ago from where I am sitting now.
I am pretty pleased with how it came out. Since I have so many blocks, I do think a quilt is in the offing. I have been thinking of layouts and was thinking of something asymmetrical after attending QuiltCon.
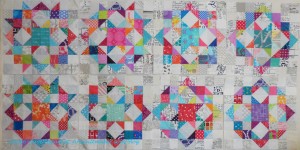
8 Carpenter’s Wheels
However, I put them up on my design wall and really like them jammed together. There is something about them together that looks interesting.
Quilt Christmas table runner – I thought about calling it done, because I was finished except for the very outer border. I was very much inclined to call it done, but thought the outer border would be flapping around while I tried to bind it, so I started to do a little bit of quilting to hold it down. I have about two more rows left.
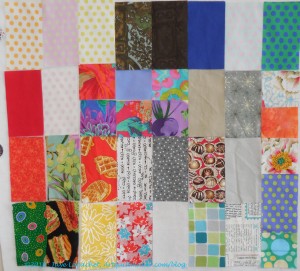
Wash fabric AKA The Great Unwashed-I washed a few loads in the past month and actually spent a couple of hours ironing then cutting. Further progress.
Cut out 3 notepad covers for gifts
Finish cutting out Day in the Park backpack variation
Sew 3rd Petrillo Bag
Sew Bon Appetit apron
Cut out Art supplies pincushion
Sew Art supplies pincushion
Sew purple pincushion
Quilt Thanksgiving tablerunner #2
Quilt Thanksgiving tablerunner #3
Quilt Thanksgiving table mat
Bind Thanksgiving tablerunner #1 – I have pulled a couple of fabrics for binding, but I am not sure which to use. Admittedly, I haven’t spent a lot of time thinking about it. I should do, though since that will add to my finish list.
Pull fabrics for QuiltCon class
**Make binding for Flowerburst
Finished since December 2015 post
Quilt Thanksgiving tablerunner #1
Cut out Anna Maria Horner Multi-tasker tote
Cut out Art supplies Sew Together Bag
Finish cutting out 3rd Petrillo bag
Cut out Thanksgiving tablerunner #1
Cut out Thanksgiving tablerunner #2
Cut out Thanksgiving tablerunner #3
Cut out Thanksgiving table mat
ATCs for CQFA December meeting
Finish sewing Anna Maria Horner Multi-tasker tote -this was a gift I intended to give during Holiday 2013- sigh. Missed 2014 Holiday deadline as well. I made it for birthday 2016 and it was a successful gift.
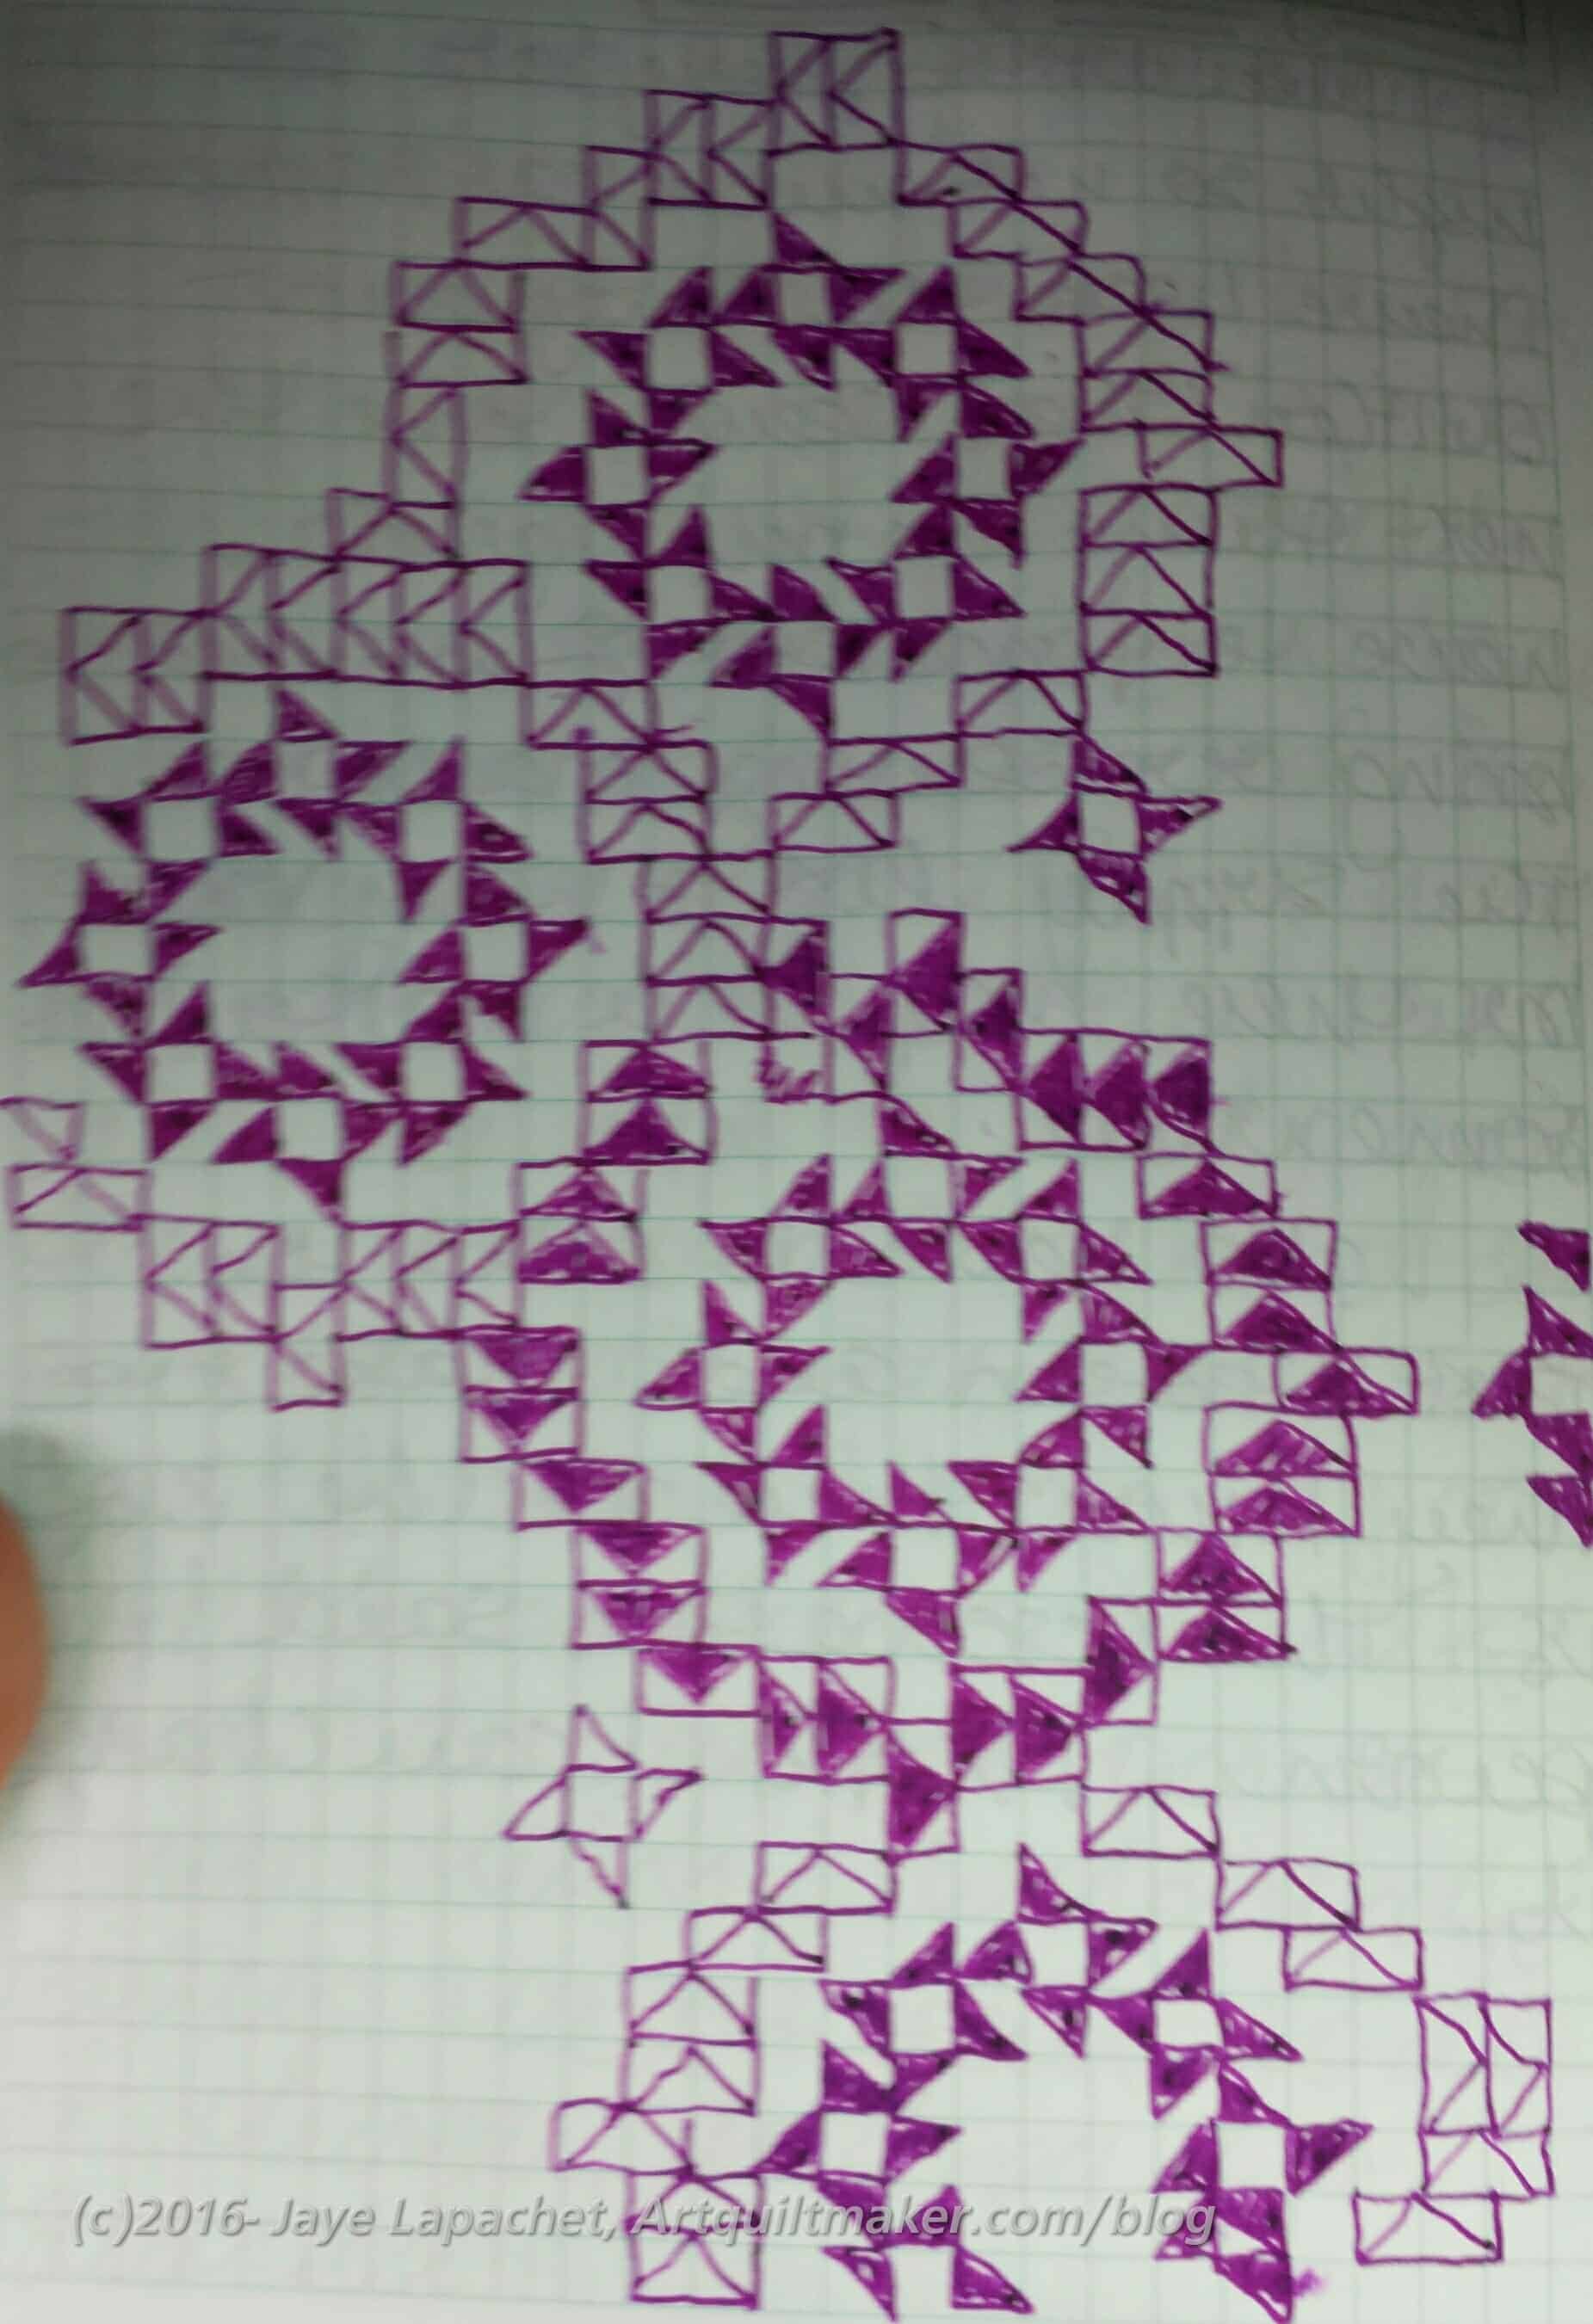
I was thinking about the design for the Flying Geese I have been getting and making for the Flying Geese swap with TFQ. We have been sending each other photos of interesting Flying Geese quilt designs.
Possible Flying Geese Design
The other day I was at In Between Stitches and I saw a version of Camille Roskelley’s Round and Round pattern. I really like the way she combined a bunch of small Friendship Stars into something fantastic. Seeing this quilt and thinking about the Flying Geese gave me an idea. Driving home from the North Coast, I sketched out an idea.
The image left is about the third draft of my design. It isn’t quite the way I want it and there are no sizes involved. Still, the Flying Geese portion is pretty much the way I want it.
Possible Flying Geese Design #2
I don’t want the Friendship Star blocks to be lined up the way they are in the picture above. Draft n.2 is much more asymmetrical than the picture above and more the way I would want the whole quilt.
What I don’t know yet is:
what sizes I will make the Friendship Star blocks
whether I will have half or quarter Friendship Star blocks along the border or only finished ones
if I will fill in more Flying Geese around the edges
Even though I have not decided to make the Flying Geese quilt, I like this idea. I get to use the Round and Round block and the Flying Geese are not lined up. For some reason that appeals to me.
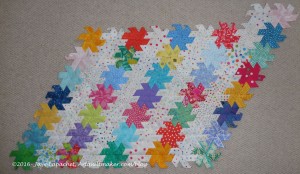
I have made a lot of progress on my English Paper Piecing project. I worked on it a bit during my recent trip to the North Coast.
I am now out of papers and basting thread, though I have more to use. I just didn’t have it with me. The papers are a bigger problem as I need to buy more or unbaste some from that big piece and reuse them. I will work on that.
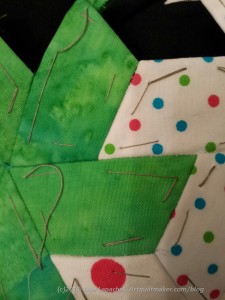
Invisible Stitches from the front
I also tried a different way of stitching the sections together. I used an, supposedly, invisible stitch and I am pretty pleased with the results. The picture with the green star is one of the first tries at this invisible stitch and I can’t see the stitches. I am using Aurifil 50wt in the #2600 color, so I have thinness and a blendy color on my side. It is a bit of a pain to sew the pieces together, because you line them up side by side as they will look when finished. This makes it hard to hold them together while sewing. I can’t use WonderClips to pinch them together. I have resorted to a few stitches at critical points to hold the pieces in place and that seems to be working. I am pleased with the progress.
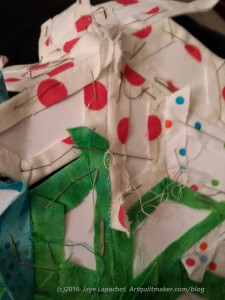
Back of invisible stitches
The back doesn’t look quite as nice. Fortunately, very few people will see the back.
In the photo, you can see my needle (towards the center of the picture by the green rabbit ear). That is how the sections, or stars, get sewn together. For the moment, I have been sticking to this method with big sections only.
I have found that using this method means that I trim more of the excess fabric, frayed threads, etc off the back.
So progress. Next on the list is to lay this on the bed and see how much more I have to make.
I don’t actually have any IRRs right now and I wasn’t at the BAMQG meeting, so I couldn’t take another. I had three in quick succession, with Cheryl’s being the last before my brief hiatus. Ruth‘s and Claire‘s pieces were the other two in the trio.
Michelle and I met at Trader Joe’s again and exchanged IRRs. I took Claire’s to pass along as she wouldn’t be at the meeting either. I headed up to the North Coast again with DH for NSGW/#politicalwifery events and Michelle was headed to Spain. Rhonda was kind enough to take both bags to the meeting for us and I gave them to her at the CQFA meeting.
All of this meant that I had to get Cheryl’s done in time to get it to Rhonda. I had about a day once I figured out all of the timing, so I got down to business.
Cheryl’s IRR – before
Cheryl’s piece looked great when I got it and I was loathe to wreck it, but Michelle had added half a row, so that missing section was perfect for me to complete.
Cheryl’s piece is turning out really well. I love it, thus the feelings of avoiding wreckage. I really wanted to use the Paris map fabric, but couldn’t really fit it in once all was said and done.
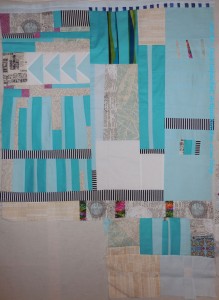
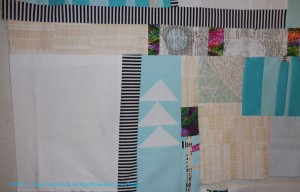
I walked around with it on my design wall for a few days and decided to add some Flying Geese. Yes, I am still in love with Flying Geese.
I also needed to add my signature fabric, but I didn’t want to add a large patch or strip as I have on other pieces, because I wanted to preserve the mainly white and turquoise color story.
There were a few small strips left over from other piecing, so I pieced a few of those together to make another strip large enough to handle my signature fabric. I wanted something that would look like it fit in.
Cheryl’s IRR – my part
I made some Flying Geese. Since those were the main parts, I started working getting Michelle’s strip completed. I added some white and a strip of the black and white stripe, which came to me after looking at the piece.
After making my piece, I think the white on the edge needs to be corralled, but someone else, or Cheryl, will have to worry about that. I am pleased with how my part came out and I think my signature fabric piece fits in well without overwhelming the whole design.
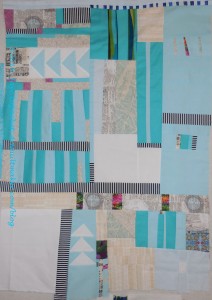
Cheryl’s IRR – finished with my part
I also think the piece needs some space at the top. The bottom is getting to be quite breezy while the top is looking a little cramped. Not fatally so, but a little. It will be interesting to see what happens.
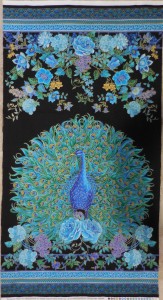
I realize that I have not discussed the One Block Wonder/Peacock quilt recently. The last time I talked about it was last June!!! I can’t believe so much time has passed.
Frankly, I was stuck and needed some hand holding. This is the main reason I get stuck on projects. Since Pam is in Atlanta, though very willing to help via email, I set up a date with Maureen to work through my issues at the Retreat.
TA DAH! The peacock project is finally moving forward. During the time I spent with Maureen at the Retreat she talked me back from the ledge with regard to cutting up my panels.
I had read the One Block Wonder book, but being shown is different than reading. This technique is definitely a challenge to learn from a book. The technique is based on repeats, but since panels are panels, I decided that each of my panels would be one repeat. This worked out pretty well.
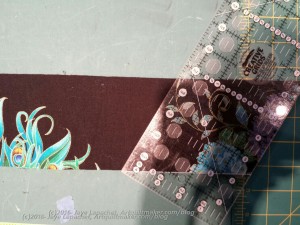
Cutting Blocks
I had decided on a width for the strips with Pam’s guidance (3.75″, in case you are curious), so with Maureen’s help, I lined up the panels and eventually began cutting. It was good to do this at the Retreat, because we had big tables. I know now that I would not have been able to do this cutting in my workroom.
My panels were about 24″ x 44″. I had to lay out the complete panel flat and there are 6 layers stacked on top of each other after you have lined them up according to the directions in the book. It was helpful to have the big table. I put new blade in my rotary cutter and that was helpful. I only had a 45mm cutter. A 60mm cutter would have been very useful, but nobody had one to lend.
The key piece of helpful information during the cutting process was that there was a little wiggle room if I didn’t cut the panels quite right. One of my panels was not printed like the others and was causing me problems. Maureen’s comment helped me relax knowing that everything would be ok.
Another very helpful piece of info, which relates to wiggle room, was that the cut edge of the panel could be squared up before the next cut. The maker cuts through 6 layers of fabric, which is difficult in any case, but even more difficult when juggling a ruler, a big table you can’t reach across all with spectators watching. I had enough leftover to square the edges, but not enough to make another set of full sized blocks.
I did take what was leftover and make some smaller triangles that I will perhaps sprinkle around the edge.
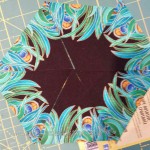
Peacock Hexies
Each set of triangles is pinned together waiting for its turn under the machine. Some of them look like they will make really interesting blocks. Others are mostly black and may not make it into the quilt.
I also have a number of solids that coordinate with the panel and I may sprinkle those throughout the the quilt. I’ll have to see.
I did start to sew blocks together after cutting them up, but I have not yet made very much progress. I had to try each one to see how I wanted to sew it together. Because you are essentially using triangles, there are three layout options for each block.
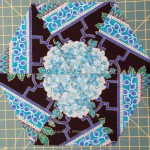
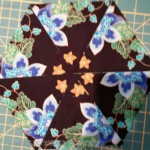
Peacock Possibilities
The above blocks are some samples. They look a little strange, because they are not sewn into hexagons. Three triangles are sewn together, two sets for each hexagon, then they are pinned together until the layout is finalized when all the blocks are sewn together in rows. I could sew the hexagons together and sew them using set in seams, but I am still not over Attack of the Hexies and I don’t want to go there again just yet.
Yes, I did save a panel to use for part of the back.
I am still a bit scattered with my projects. This will be a good leaders and enders project when I don’t have others ahead of it in line.
Quilt Christmas table runner – I spent a lot of time quilting it at the CQFA Retreat. I am not done, but well on my way. Look for a post soon
Wash fabric AKA The Great Unwashed-I seem to be washing loads regularly, because I need certain fabrics. I am not ironing as quickly as I should, but I’ll need to make some progress on that so I can start FOTY 2015
Cut out 3 notepad covers for gifts
Finish cutting out Day in the Park backpack variation
Sew 3rd Petrillo Bag
Sew Bon Appetit apron
Cut out Art supplies pincushion
Sew Art supplies pincushion
Sew purple pincushion
**Quilt Thanksgiving tablerunner #1
Quilt Thanksgiving tablerunner #2
Quilt Thanksgiving tablerunner #3
Quilt Thanksgiving table mat
**Bind Thanksgiving tablerunner #1
**Pull fabrics for QuiltCon class
Finished since December 2015
Cut out Anna Maria Horner Multi-tasker tote
Cut out Art supplies Sew Together Bag
Finish cutting out 3rd Petrillo bag
Cut out Thanksgiving tablerunner #1
Cut out Thanksgiving tablerunner #2
Cut out Thanksgiving tablerunner #3
Cut out Thanksgiving table mat
ATCs for CQFA December meeting
Finish sewing Anna Maria Horner Multi-tasker tote -this was a gift I intended to give during Holiday 2013- sigh. Missed 2014 Holiday deadline as well. I made it for birthday 2016 and it was a successful gift, I think.
Yes, they are coming fast and furious! I got two at the last BAMQG meeting, as I mentioned. I was able to work on Claire’s piece during my last free sewing weekend, but I didn’t get to Ruth’s. While having little time to sew on the weekend, I have had to cram the work into bits of time during the week. Of course, I forgot to take a before picture. 🙁 C’est la vie. If you imagine removing my part, that is the before. 😉
There is something that makes me think of a castle. The ‘mountains’ could be points of a tower and the curved sections could be arches.
My addition to Ruth’s IRR
Ruth’s piece has a clear color story and large curved center with triangles seem to be a design focus. The piece spoke to me immediately after I put it up on my design wall. I saw the triangles on the top that looked like mountains and decided to add something similar on the bottom.
I had to do some fancy sewing with background around the mountains since I didn’t want to cut off the tips. I think the background looks like Mary Mashuta’s Pushed Neutral concept and I like it.
Next on the IRR list was Claire’s piece. Claire was in my original group so I wanted to make sure I worked on all of those quilts. I received her piece at the January BAMQG meeting.
Claire’s IRR was a challenge. The colors are perfect for Claire, but they are not my colors. Also, many of the fabrics had been used up or smaller pieces were left. This is why the project is called a challenge! I did not let these things discourage me.
I put the piece up on my design wall and tried to see the focal point or the place where Claire started. I couldn’t really tell, so I looked at who had worked on the piece and still couldn’t tell what might have been Claire’s start.
Trying out the Grandmother’s Fan idea
I put the focal point aside and looked at the piece. I saw some good curved lines and thought something like the Grandmother’s Fan block might work. I cut some blades and put them up on the design wall.
I really did try to keep, mostly, to the 20 minute rule. I find that rule to be hard as the pieces get larger. Of course, cutting is still a challenge. Also, the curves on Claire’s were not an easy design element. And, right on cue, life got in the way and the piece sat on my design wall for a week or more.
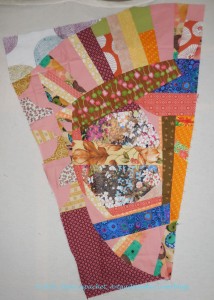
Claire’s IRR – continuing the curves
As I walked in and out of my workroom I decided I did like the curves. At one point, I adjusted the fans so the existing curves would be continued — or give the illusion of being continued.
In the photo, I tried to point out to you, in a very obnoxious color, what I thought of as ‘continuing the curve’. No, the blades aren’t all the same size, but the curve seems to be the most important in terms of design. I hope the curves I added work with the existing curves to create a focal point.
The bad part is that I didn’t square off the fans. I know I should have, but I just didn’t feel like it. I know I can offer to do it later, if push comes to shove. I am hoping that someone else will square them off down the road.
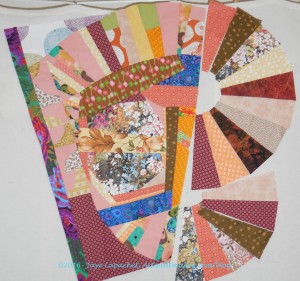
Claire’s IRR with my addition
I am happy with what I did. I gave the piece to Michelle on Thursday and will look forward to seeing what she does.
A week or so ago, I wrote my first Various & Sundry post for 2016. In a comment, BAMQG pal, Annemarie, asked about quilt labels. It occurred to me that I had been meaning to write about quilt labels for a long time and I hadn’t yet done it.
First, I think quilt labels are VERY important. They document the work of women who are not being paid to make things. While you may think that women and their work are valued, I think that we have a long way to go to have handwork (even by machine) valued as much as something such as, for example, a technology infrastructure or a new and successful app.
Second, I think quilt labels are important because they can tell the story of your quilt, if you want. Even if the story includes only:
maker
date
recipient
It is a small story, but a story nonetheless. It can be the starting link of a chain.
Label for Small Items
Third, for bags and small projects, I have a small label I print out in batches of about 20 on a page. It is not personalized to any particular project, but it lets people know who made the item. I even put these on ATCs. While simple and not unique, they can link a small item to my larger quilts. These would be perfect to make on Spoonflower and I might just do that.
Fourth, ALL quilts are important even the baby quilt you whipped up overnight for a baby who came early. The child will look at the label, wonder at and ask about it when s/he is old enough.
I did a little meditation on quilt backs a few years ago. Since I put my labels on the back, is relevant for this post. You may want to take a look.
What to Include
When I make a quilt label, I start with a Word document and save it to the folder on my computer (Google Drive or similar would work as well) that has all of the notes and images for the project. I include the following:
a picture of myself or my avatar
the name of the quilt
the size of the quilt (this is helpful when entering shows as I don’t have to measure the quilt every time)
details about materials and construction, such as if I have embellished the quilt or used special materials. I always put the content of the fabric and thread. Most of my quilts say 100% fabric and thread, but this is the place to put other content information, if relevant
my name, address and phone number
the name and address of my blog
Name and company of the quilter who quilted the quilt for me, starting with “Quilted by” or “Longarm quilted by”. Sometimes my name is in that spot. I feel it is important to differentiate the piecing from the quilting.
If this is a gift, I also include “Collection of Jane Doe”
If many people worked on the quilt, I include their names. This may help historians build connections between me and my guild mates in the future.
Sometimes I will include the pattern name.
If I got the pattern from a publication, I will include that and note changes that I made.
If the quilt was made for a show or exhibition or in response to a challenge, I put it on the label. Again, it helps make connections.
The story, process and inspiration for the the quilt. This is often the same, or similar, information I use on the quilt’s webpage. This information may include why I gave the quilt to this particular person. If I used special fabric or a particular line of fabric, I may include the information in this section. I also include why I made the quilt. It may have been specifically for a person. I may have started it in a class or wanted to try a technique or process
washing instructions, especially if the quilt will be a gift
Yes, the above is a LOT of information. My labels are frequently very large – taking up most of an 8.5″ x 11″ sheet. This is the information I would want to know if I came across a quilt in an antique store.
I often write up the label as I go along, so I only have to do some editing when I am ready for it.
How to Make a Quilt Label
There are as many ways to make a quilt label as there are to make a quilt. You can:
use my process and print on fabric
write with a permanent pen on a plain piece of fabric and sew on to your quilt
write directly on the quilt (watch for bleeding!!!!)
hand or machine embroider
applique’
use stitch lettering on your machine to write out label information directly on to the quilt.
Get sheets of labels already printed on fabric and fill them in with a permanent marker
Use Transfer Artist Paper
Write up your label in Word (or another word processing program), then trace on to fabric with a permanent pen
Create on Spoonflower
Buy personal, pre-cut woven labels (like the ones in your clothes) with your name, blog name, a short message, etc
Insert a triangle of fabric into the binding with your information written on it
embroider (watch for floss that bleeds)
I love the front of a quilt. Sadly, I am happy for the the fairies and magical animals to finish the rest for me. By the time I get to making the back, I want the quilt to be done. My method for making labels is relatively quick, in the grand scheme. Some tips:
print a test page on a piece of paper to check for color and clarity.
Make sure you ink cartridges are at your desired level
Sewing and More Information
My mom’s car was broken into and my niece’s quilt, which was coming to me to be bound was stolen. It had been made at a shower for her mom and many people had drawn, colored and written messages for my yet-to-be-born niece. The quilt was a wonderful scrapbook of heartfelt love and was never recovered. It is one of the saddest events in my quilty world.
I sew my quilt labels into the back of the quilt before the quilt is quilted. I do not applique’ labels onto the back after the piece is quilted. Yes, that means piecing the back. Yes, the quilting can make the words look weird, but I want people to know the maker and owner of the quilt. If the quilt is stolen, then the thief will have to destroy the quilt to remove the label. I think this is unlikely, but in a sick kind of way, I would rather have that then someone passing my work off as their own. If they don’t care, then perhaps every time they see the label, they will feel a little bit ashamed.
Confession Time
I have one quilt that is unlabeled and there are no photos of it. It isn’t a horrible quilt or anything and I do keep meaning to do it. I just don’t seem to get around to it. If I die before I do it, nobody will know anything about it, which is sad.
I really dislike making labels and quilt backs. I do it, because I truly, deep in my heart, believe it is important to document my work. If you don’t feel that labels are important, then you don’t have to make them. The above is not a call to arms, but information on how and why *I* label *my* quilts.
Resources:
This is a small sample of the myriad of information available. For more resources type “quilt labels” into Google and look at the massive amount of resources and images that are retrieved. Everyone has a different process. Find what works for you.
Here is 2016, bold as brass staring at me and daring me to adjust this list. I am tempted to make a list of bag patterns I own and haven’t yet made. Other than that, I am pretty sure I have everything that I want/need to do on this list. Perhaps I’ll get it done and have no more To Do Lists?
Wash fabric AKA The Great Unwashed-I washed a load recently and am working on ironing it
Finish sewing Anna Maria Horner Multi-tasker tote -this was a gift I intended to give during Holiday 2013- sigh. Missed 2014 Holiday deadline as well. The bucket part of the bag is done and I just have to add the straps.
Cut out 3 notepad covers for gifts
Finish cutting out Day in the Park backpack variation
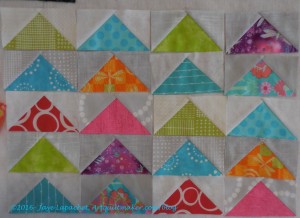
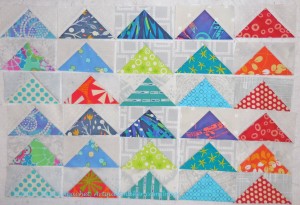
I have been making and receiving Flying Geese all along. I finally decided to do an update as the group was getting kind of large and was taking up space on my design wall. Also, the last update I did was on November 14 and that seems like a long time ago.
If I did the math correctly (50 weeks x 4 geese each week), I have at least 200 right now. It doesn’t seem like enough, though. I think I must have more. I am kind of amazed at how easy it is to make these blocks and to have them add up in number. I really want to sew up all the patches I have cut. I am trying to restrain myself.
Some of these TFQ won’t recognize, because I haven’t send them off yet. They were part of the Wacky Weekend Work I did. Flying Geese make good leaders and enders.
I had two recent opportunities, the IRR post and the BAMQG Meeting post, to talk about my round robin piece, which is still circulating, and missed both of them.
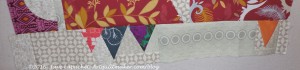
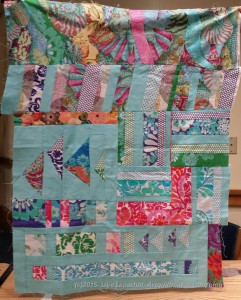
Jaye’s IRR – December 2015
I was able to glimpse the work done on my piece at the meeting last week. I think my piece is looking spectacular. There is a lot of interest because of the improvisational piecing. There is also cohesion because of the limited palette of fabrics.
I am so thrilled that some of that Philip Jacobs (or perhaps Martha Negley??) fabric was added (shells at the top). I love the boldness of it. I would like to take a better look at it as I see some other fabrics tucked into that top section.
As I said before, the pieces are getting quite large and mine is no exception. I think it is probably NICU size right now, or slightly larger. I want it to be larger, but may have to add bits of my own at the end. People from other groups are still working on it, which is great.