Organization

It is very hard for me to accomplish anything if I am not organized. The first thing I do on any project is organize the pieces. I get a lot done, I think, because I am organized. It drives a lot of people close to me insane.

The fabric closet in my workroom had dropped off the organization list sometime in the last century. I have been flinging things into it randomly for some time. There was no space for me to get into to do anything. I knew I had to take everything out [EVERYTHING!!] and start over. There was no possible way I could face such an endeavor alone. TFQ mentioned it last year when she was here for PIQF. It had gotten so bad between times that this trip she convinced me it was time. I also asked her to help me clean it out.

I threw out, recycled, and organized, for Goodwill and Freecycle, a ton of stuff. It felt good. I have been on that binge for awhile in other parts of the house, but this was a major quilt/fabric related effort.

Sadly (or perhaps not), I didn’t take before pictures. I think that is, at least, partially a good thing. I do have the after pictures.

Closet Right Side: Quilts are on pants hangers and hung in the corner. File cabinet was moved closer to the door so I can file paperwork easier. Fabric bins that I use a lot were brought down, so I don’t have to crawl up to get at my fabric quite as much. We didn’t do much with the fabric bins, but have gone through them together in the past. I have also been going through them recently as I work through the bag project. I will go through them again in the future, I am sure.

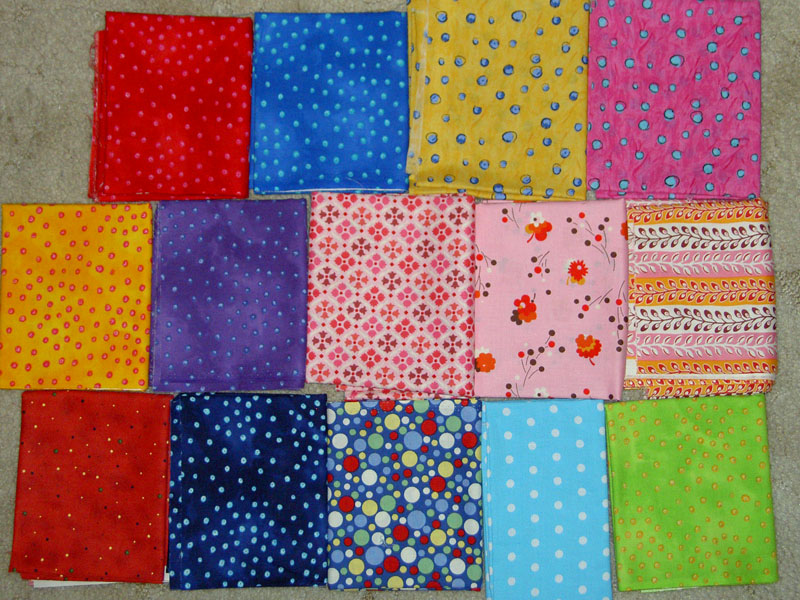
Closet Left Side: The new drawer thingy is full of dots. Closest to the left side of the photo is a continuing part of the project. I have to get some crates to replace the bankers boxes for ‘current’ fabric. In the middle on that upper shelf is a weird bin (the style of the bin is weird) full of projects in process. They are organized, so I can find them, which is a good thing, because I would like to move through some of the projects that have been lingering. I also went through a lot of of my projects that were going nowhere and got rid of them. No point in keeping something that never even made it to my UFO list. A number of them were block exchanges from the early 1990s. Lots of teal went to people I hope will make great quilts for others.

We really needed one more day to get the project completely finished. We didn’t have it, so TFQ sent me to the Container Store with a list of items to buy. Above are the containers I bought to fill with stuff. The clear plastic garbage can is full of rulers now and I want to get another. After I filled it up, and amazingly all of my rulers fit, I decided that I didn’t like the rulers with instructions and packaging in the same container as the regular rulers. The other frosted garbage can was a ruler possibility, but the shape is wrong. I may actually replace one of my garbage cans around he house with it. I am definitely going to get another one of the clear plastic ones.

PS. I surpassed 450 posts yesterday. Thanks for reading!

Fabulous Clementine Fabrics

Camilla, of the famous Clementine’s Dry Goods, posted these picts on her blog. Don’t want a happy birthday banner like that one? I love the fabrics she has chosen for her shop and the crisp white shelves on which she stores the fabric. I want that turquoise cupcake fabric!

  blog it

Tsukineko Inks

I am at loose ends right at the moment…bored actually. This is a new feeling for me as I usually have a zillion things to do and am running around doing them. It is not that I don’t have a zillion things to do, it is that I don’t feel like doing them. Part of the problem is 1) the child woke me up at the crack of dawn for some stupid, trivial (to me, not to him, of course) request and I have been out of sorts all day; 2) I have been working 5+ days a week lately with no time just to veg and that is what I am doing now; and, finally [most significantly?], 3) the Pineapple Problem is growing [probably] out of proportion. I want to sew, but seeing the Pineapples laying on my cutting table paralyzes me. I am thinking of abandoning the whole project, but I had such high hopes. I have so many dots. It seems like a big failure. If I could see the lesson in the failure, then I might do it and start over, but I can’t see the lesson and suspect that there isn’t one.

To combat this unfamiliar and unwelcome feeling, first I checked eBay for my SIL’s discontinued crystal pattern, then I tried to buy fabric on eQuilter. Got an error message and didn’t succeed. I am a master at finding web and software bugs and I don’t even try. This was not the moment to have this particular ‘skill’ rear it’s ugly head. Finally, I went to Melody Johnson’s blog, because I noticed the last time I was there the amazingly large blogroll she has. One of the blogs I found there was Frieda Anderson’s blog. She took a class in Tsukineko inks the other day. (I bet you were wondering when I would get to the point!)

I have been thinking about the T.I. inks sitting abandoned in one of my drawers lately. Thus, I was pleased to see this article about using them. It gives me a more realistic view of how they might work. Clipmarks has a publishing limit, so go to Frieda’s blog and read all about it. Perhaps I can convince Friend Julie to hold my hand while I try this medium sometime.

Tsukineko Inks

Yesterday Judy Coats Perez led a class for the Textile Diva’s at the College of DuPage on Tsukinelo Inks. We had a blast. I had never used these inks and was very interesting in giving them a try. What I discovered is that you need to practice. Big surprise.
Judy demonstrated the various techniques of applying the inks to dry white or light colored hand dyed cottons. Dipping the Fantast/x coloring tool bullet point (nub), either sharp or rounded, into the ink you then rub the nub onto the fabric creating shading and shape. To thin the inks you can use Aloe instead of water. After playing around I found I liked using the Aloe method better as it gave a smoother appearance.
blog it

Stars and Desire

Today I was thinking about stars and thought it would be a good time to show you my Flickr set of stars. I thought I had such a great collection, but when I went to look at it again, it seems paltry. I don’t think it really is; I think my vision is skewed from looking a Judy Martin’s Star blocks recently. She has a ton!!! I am eyeing those Feathered Stars as I think about more dot projects. Then again a project like this in all dots would be quite appealing. Have fun looking at the Stars!

Nina brought this interesting thread to my attention. It is called Desire Memory Thread from DMC. It looks like wire, but says that it is soft. Hhhmmm. It looks promising, but until I feel it, I am not sure how it could be used. I have an idea that I could use my glass beads with it. I would really like to make a bracelet or something with those beads and this might be the piece of the puzzle that pulls the project together.

Nina saw it in Stitch magazine from the UK. I haven’t ever seen that magazine, but may have to seek it out. I used to be able to find such magazines at Marquardt’s in the City, but the last time I went by they had closed. It was one of those great old fashioned newsstands on a corner near Union Square. The huge wonderful neon sign had been left up, which was nice.

Good. Clean. Fun.

MeinkeToy has a clean new look on her website. The books literally burst off the page with fabulous color and, of course, inspiration within. I was specifically pointed to this Lustr’ed Cloth by Alyson Mydgelow Marsden, about which Nina says “now I am not wanting to experiment with metals but sheers, metallic fabrics, shiny patent leathers, or angelina fabrics could be substituted.
It would also enable me to use some of those threads that Cherie dyes so well and that make haunting pleas in my direction..” Take a look at the new site, Deb has done a great job.

clipped from www.meinketoy.com

s
upplies

(and books)

for fiber artists & the fiber
curious

blog it

Using Liquid Paper to Satisfy a Child’s Halloween Dreams

How to Make a Halloween Costume

Supplies and Tools

  • Picture of child’s dream costume
  • Felt (of appropriate color(s)
  • Sewing machine
  • Scissors
  • Shoelaces
  • Timtex
  • Liquid Paper (correction fluid)
  • Aleen’s Craft Glue

The Halloween costume, except for some decoration, which are drying, is finished. The Darling Child is happy and I didn’t have to buy anything except 2 yards of black felt. I like using felt for Halloween costumes, because the raw edges don’t ravel. You can also just cut it off, glue things to it and cut strange shapes out of it with no problem. The costumes are a bit fragile and don’t usually last long. You can see the cloak that I made by looking at this picture from Wikipedia.

I didn’t have any white paint, so I used Liquid Paper to create the whorls on the red emblem the Darling Child needed.


I only had enough red to make five of the emblems, so we had to place them carefully for maximum effect.

It is kind of fun to make the Halloween costumes – to make a child’s Halloween dream come true. It is also fun to kind of figure out how to make something work with what you have on hand. I always buy enough felt to get through the main part of the project, but inevitably, I don’t think farther than that. One costume I made needed a fat tail that stood up. I used a paint stirrer to keep it stiff enough. That was before I knew about Timtex.

Dots and Denyse Schmidt Join the Party. Fabric Leads to Sainthood


In a effort to update the Catholic Church and make it more appealing to a younger audience, I think that requirements for sainthood should be eased. Sending virtually unsolicited fabric to people really should count towards the sainthood list of requirements.

A nice box arrived on my doorstep on Thursday (accompanied by my taxes, which was not so nice) literally stuffed ot the gils with fabric and little prezzies. St. JCN had gathered together my post-Birthday box and it finally arrived. The fabrics above were in it.

I needed a little infusion of new dots for the Pineapple and St. JCN supplied that for me. I am also ready to do the Chocolate Box with the addition of the Denyse Schmidt pinks.

I washed them yesterday (along with some stragglers that had been laying around) This morning I am pressing them and cutting pieces for the Cross Block quilt. Since I am there, why not?

Editing

In my post of October 31, I mentioned the things I was thinking about. One was ‘editing’, a new term used by designers which seems to mean tossing old junk. JCN helped me go through my fabric and junk fabric that I will never use.

Lesson 1: use your precious fabric (or embellishments or paints or supplies) or they may not be so precious to you after awhile.

We took three grocery bags full of fabric to the Children’s Quilt Project drop off place at New Pieces. My fabric closet and studio feel lighter. I don’t feel as oppressed by my stuff.

Lesson 2: choose carefully what you bring into your life.

I have also decided that people like to give me things. Because I have a well developed sense of guilt and cannot give things away? Perhaps? No more. Out went the lacy edging that had been gathering spiderwebs in the corner for 8.5 years.

Lesson 3: save money. Only buy what you love.

Lesson 4: save heartache later. Only take what you love from other people.

As we are getting ready to do some work on our house, I am ‘editing’ more of my space. I meant to clean out my closet over the break, but didn’t seem to get to it. I am off on Wednesday and may try to do it then. I feel that even doing small chunks makes progress. Perhaps I can get the shoes and purses done. We will see. I am ok with doing one drawer or one corner.

Lesson 5: ‘edit’ in small chunks.