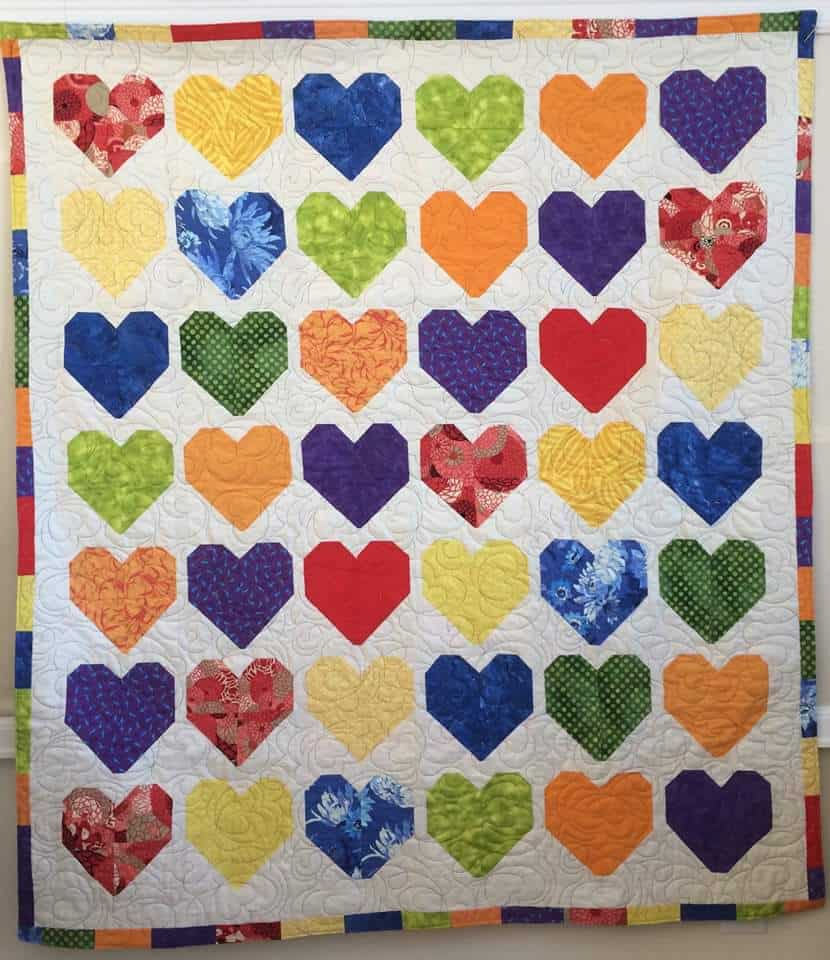
Yay for Bron who made this happy Orlando Pulse quilt! I love the scrappy binding.
This is another one that will be sent off to the Orlando Modern Quilt Guild for the families of victims, survivors and first responders of the Pulse nightclub shooting.
I am behind in posting, but I also don’t want to bore you by posting on one project or topic day after day.
You know that I have been prepping for the Cargo Duffle. It seemed interminable, but paid off. On the first Saturday in August I went to the BAMQG workshop and worked on assembling the Cargo Duffle. I arrived in good time after only getting a little lost*. 😉
Gerre arrived right after I did and we quickly decided to sit together in the back of the room. That way we could have a whole table to ourselves. There was a bit of table shortage because their day camp program was using the long rectangular tables we like. We ended up with two tables, mostly because I decided we needed a separate table on which to layout all the pieces we had prepped. It is always great to work with Gerre. On the day of the workshop, I was on edge (not sure why – a lot going on, maybe) and she kept talking me down off the ledge. I reciprocated the favor by keeping her calm when parts of the bags weren’t going as planned.
It was also good to see that some people had done less of their homework than I did, not to be mean to them; it just reduced my stress a bit.
We started out with the slip pockets and my first problem was with what pieces needed to be used. Jaime helped and once I got that problem sorted, the “which piece was which” problem sorted itself out. Even though I had all the pieces labeled, with this bit of help, I had a frame of reference.
Seeing what other people were doing and having access to a teacher also made me calm down quite a bit.
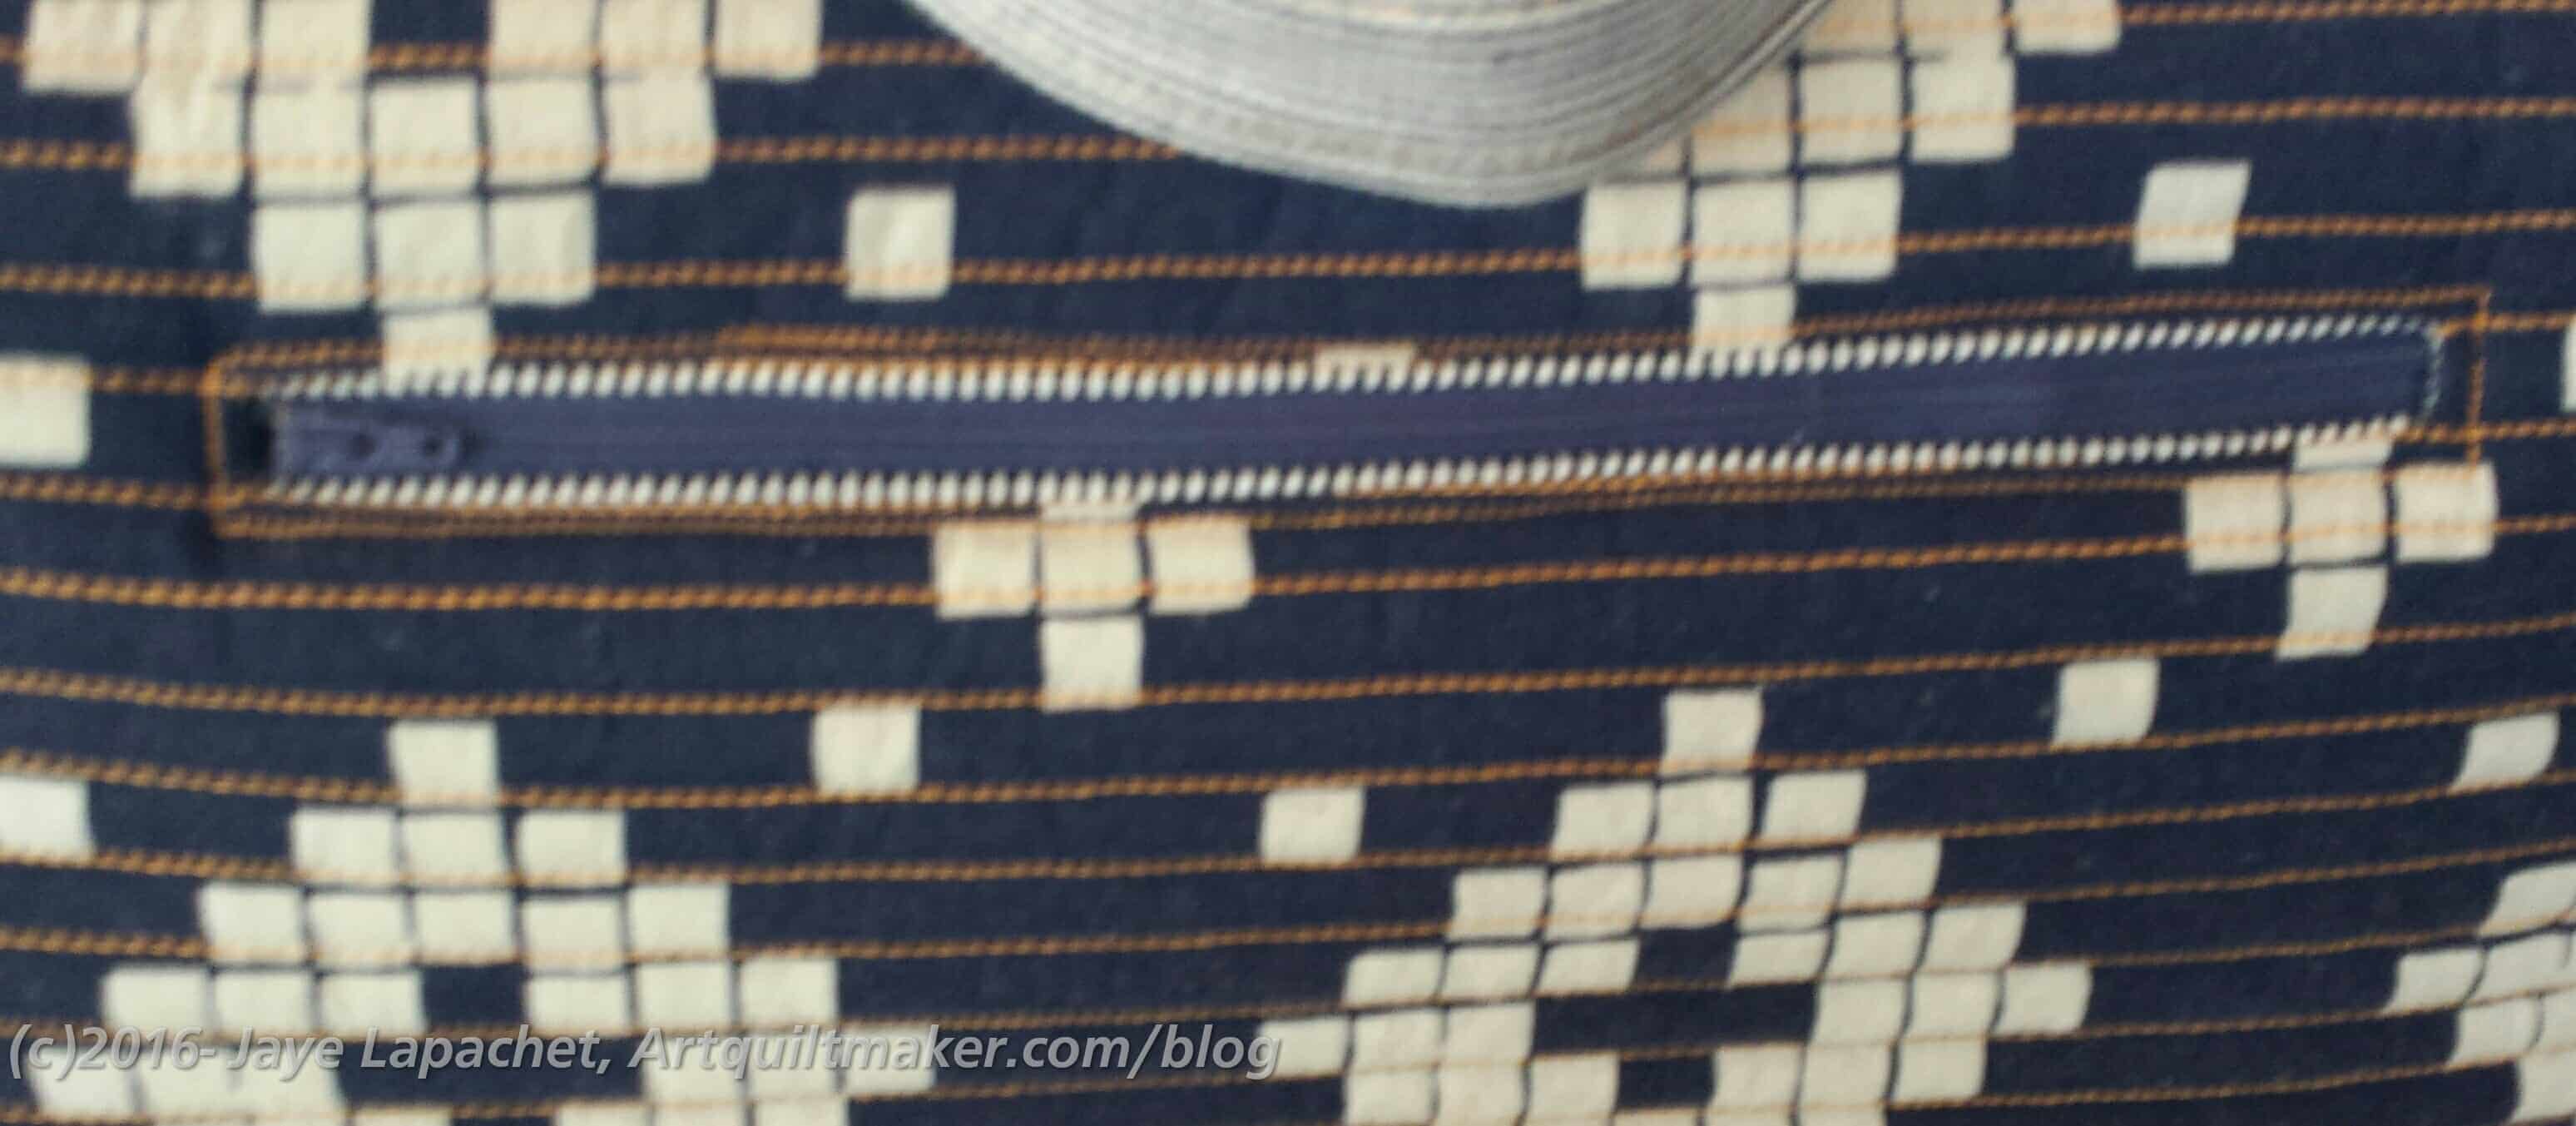
Cargo Duffle lining with interior slip pockets
My first huge accomplishment was finishing the lining. Yes, I finished the interior slip pocket and the interior zipper pocket, which help to make up the lining, but seeing a real 3D item made from all that prep work me very happy.
I made mistakes and had to rip, which I am sure others were doing as well, even though I didn’t see them. I also had to change the way the main zipper worked, which Gerre talked me through. I may post the steps for you later. Not sure, but stay tuned.
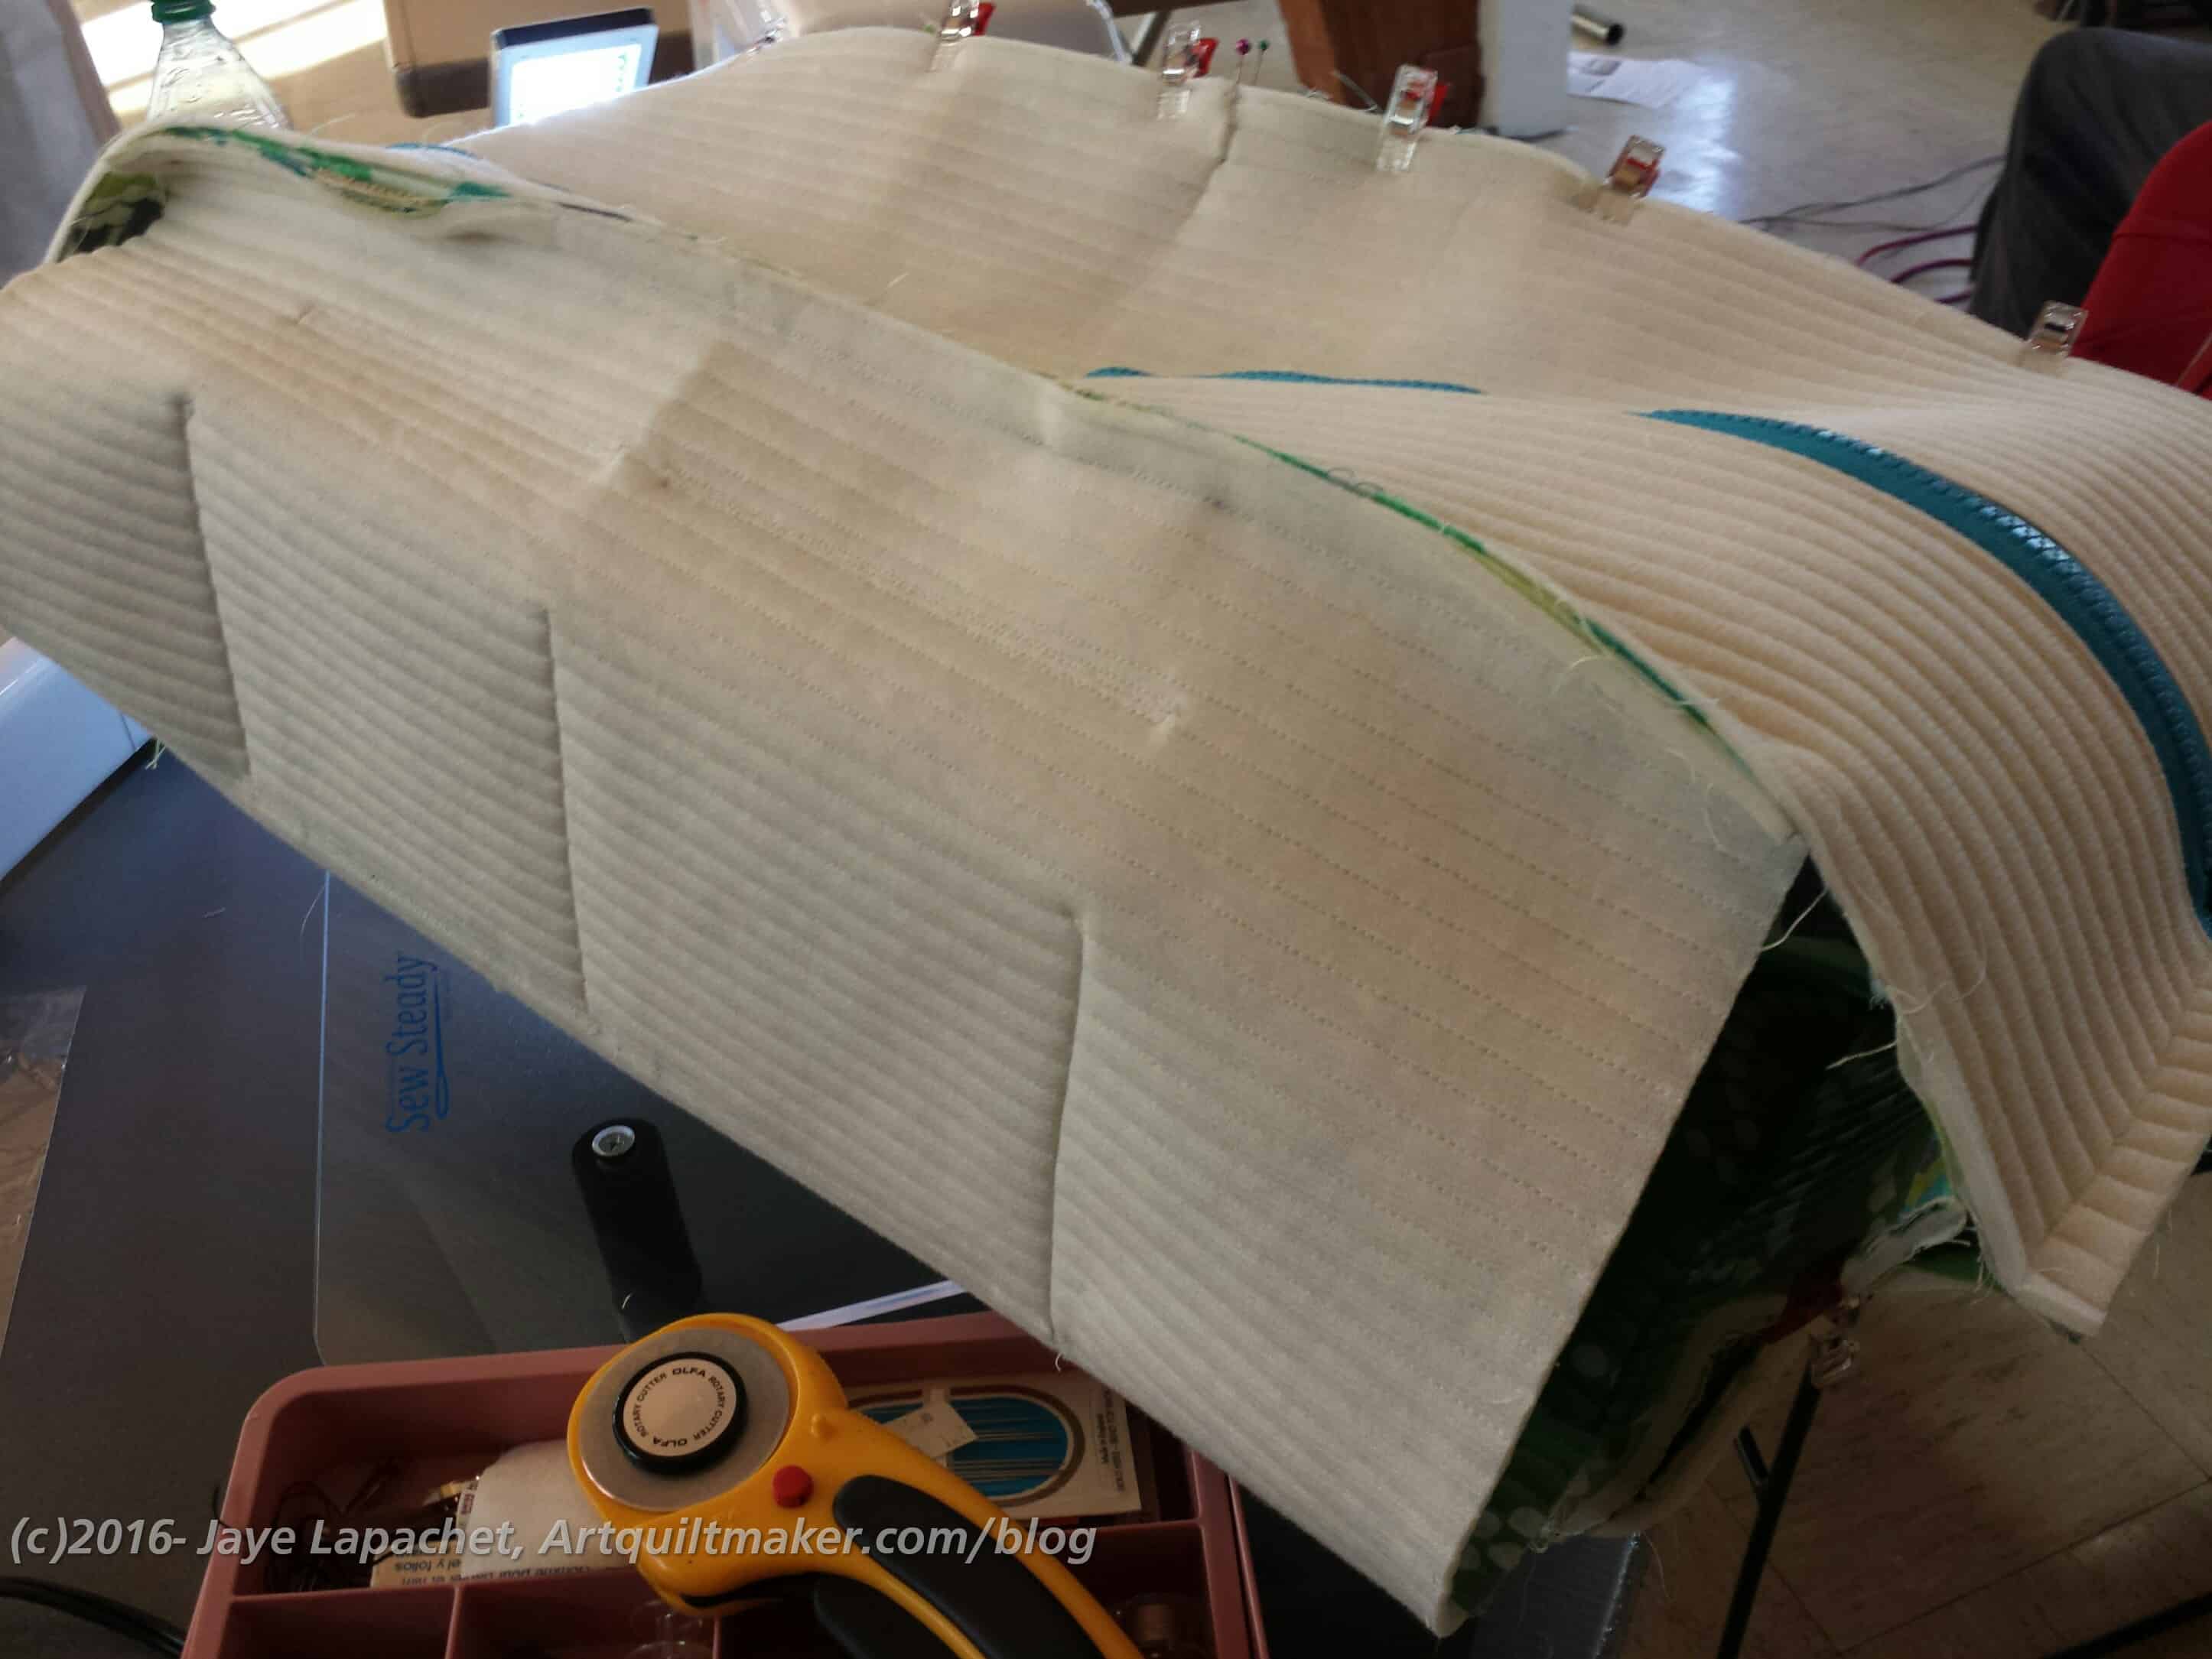
Sewing Cargo Duffle Exterior Together
Still, it was a super long day and I didn’t finish completely, but made really good progress. By the end of the day I only had to sew the rest of the exterior together and then insert the lining. I really don’t have a lot to complete and feel like I accomplished quite a bit by the time the day was over. Do I wish I had finished? Yes, of course, but I have to be happy with what I was able to do.
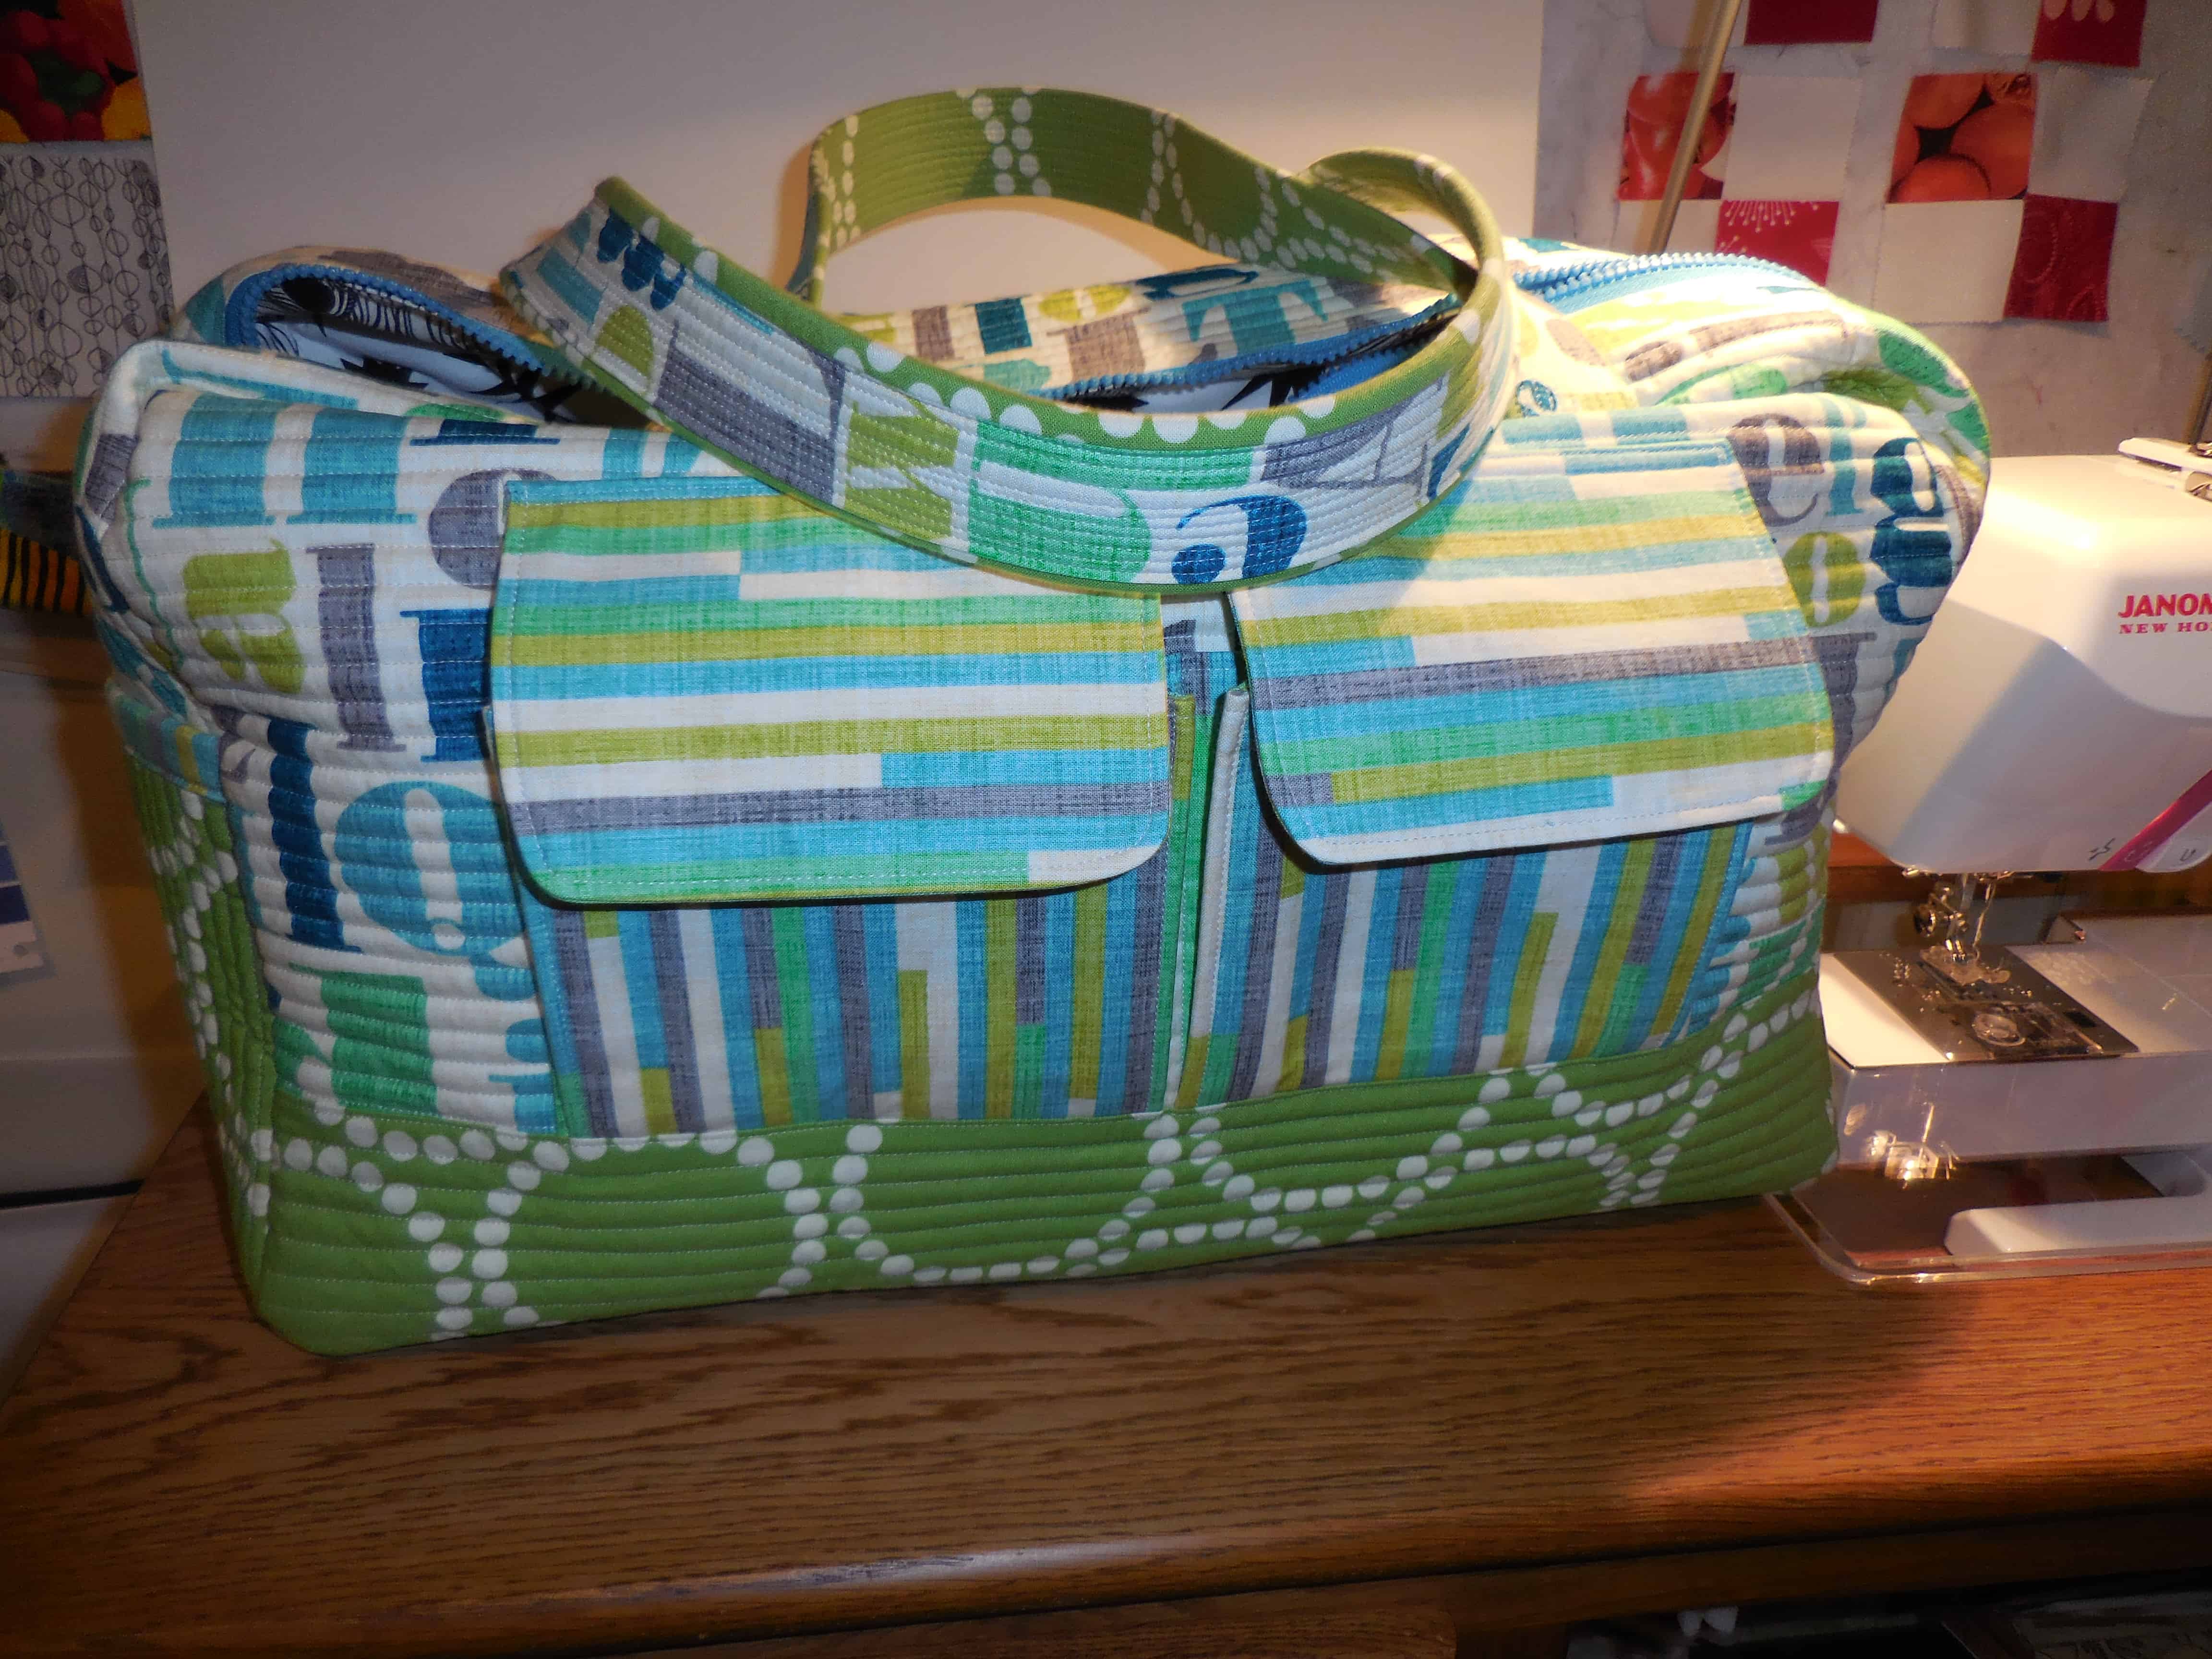
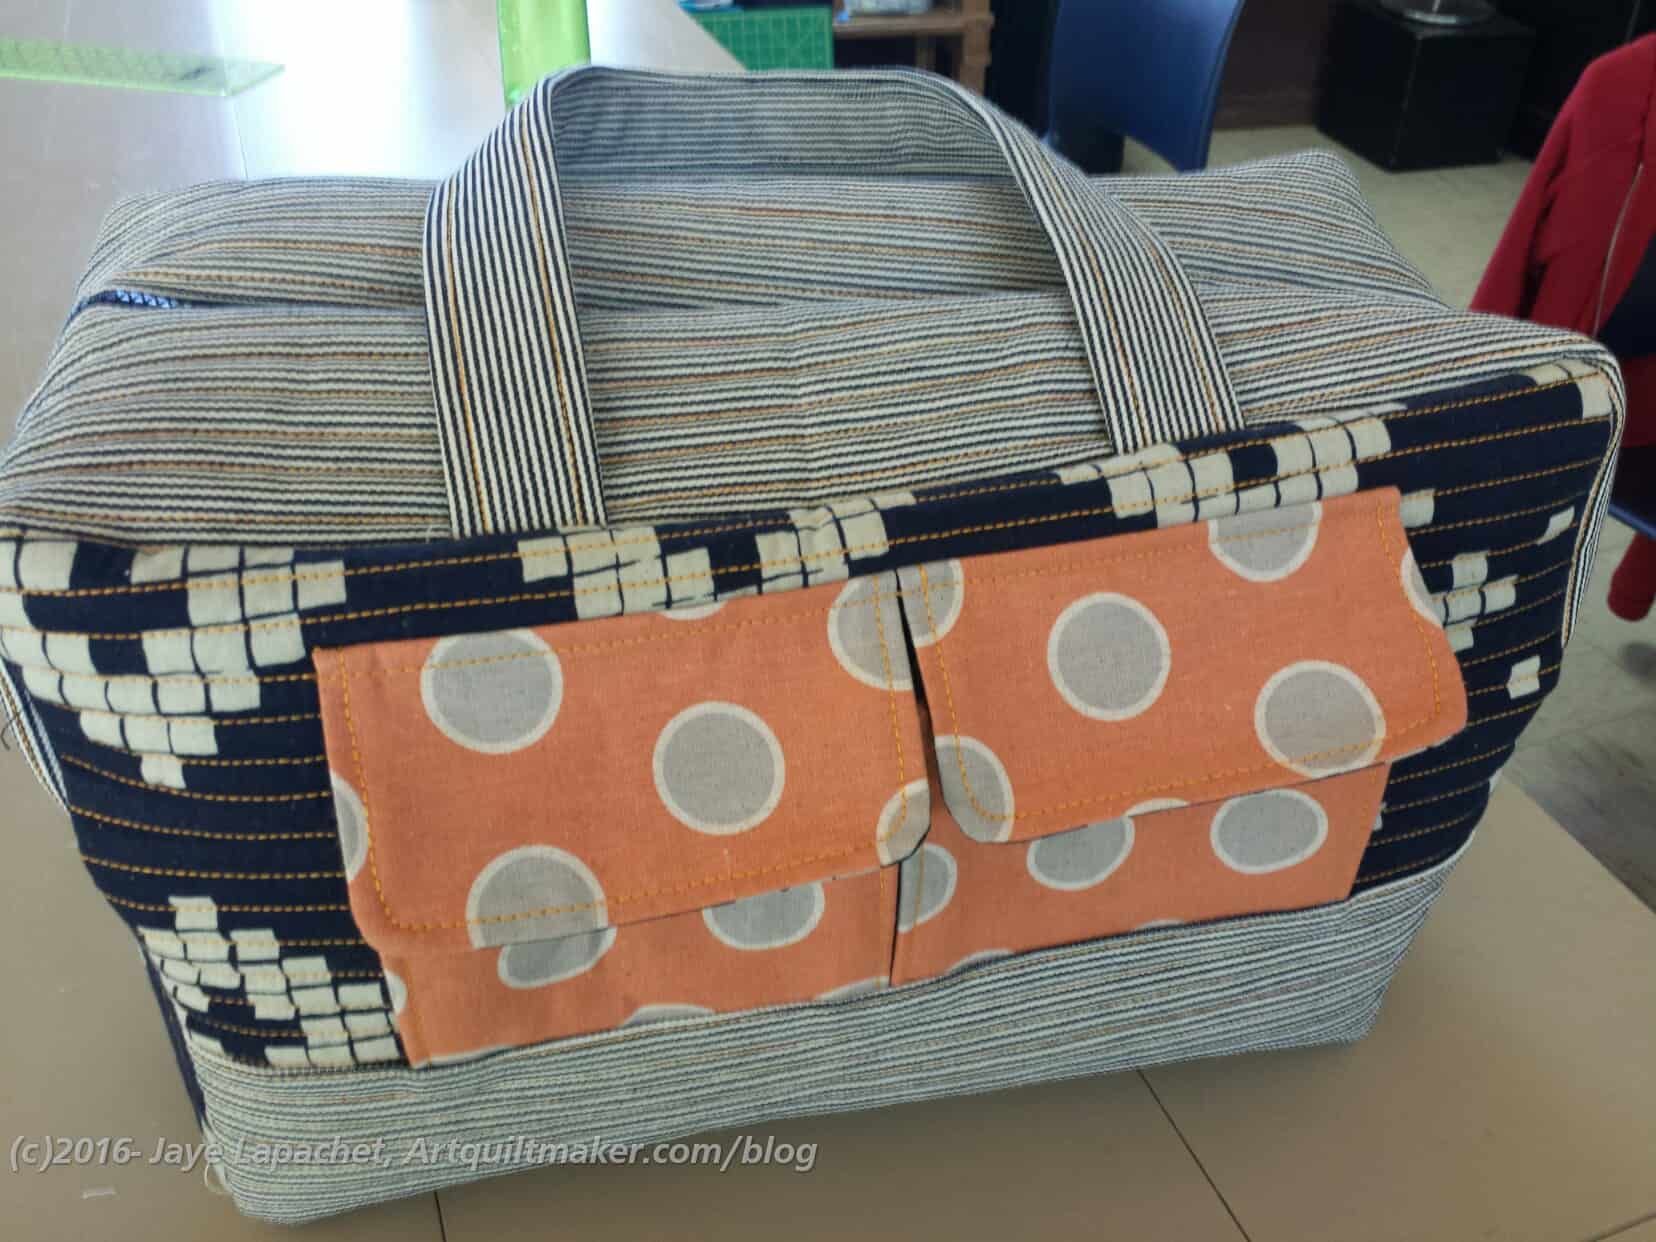
Gerre’s Finished Cargo Duffle
Gerre’s Finished Cargo Duffle
Gerre’s Finished Cargo Duffle
Gerre’s Finished Cargo Duffle
Gerre finished her bag and it looks great! Cheryl, Amanda and Karen all finished their bags as well.
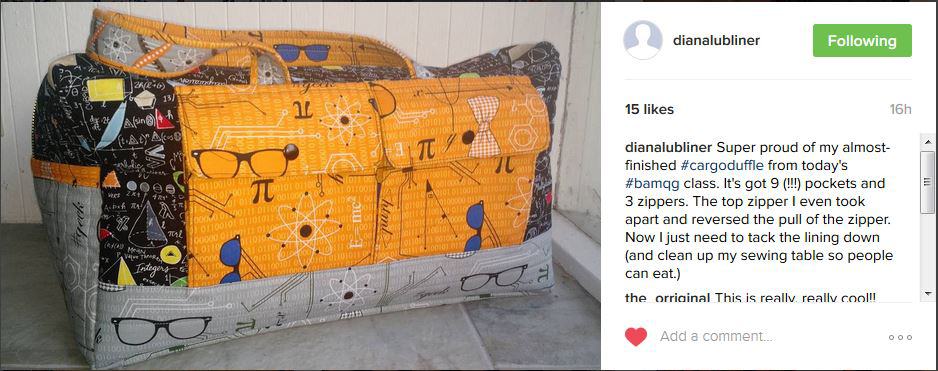
Diana is so close to finishing hers. I love her fabrics.
*I don’t normally get lost a lot, but I seem to always get lost on the mid-Peninsula and in the South Bay. I go there quite a lot and still don’t have a visual map in my mind. Someday, maybe.
I had a great time at the Sew Day yesterday and really got a lot done!
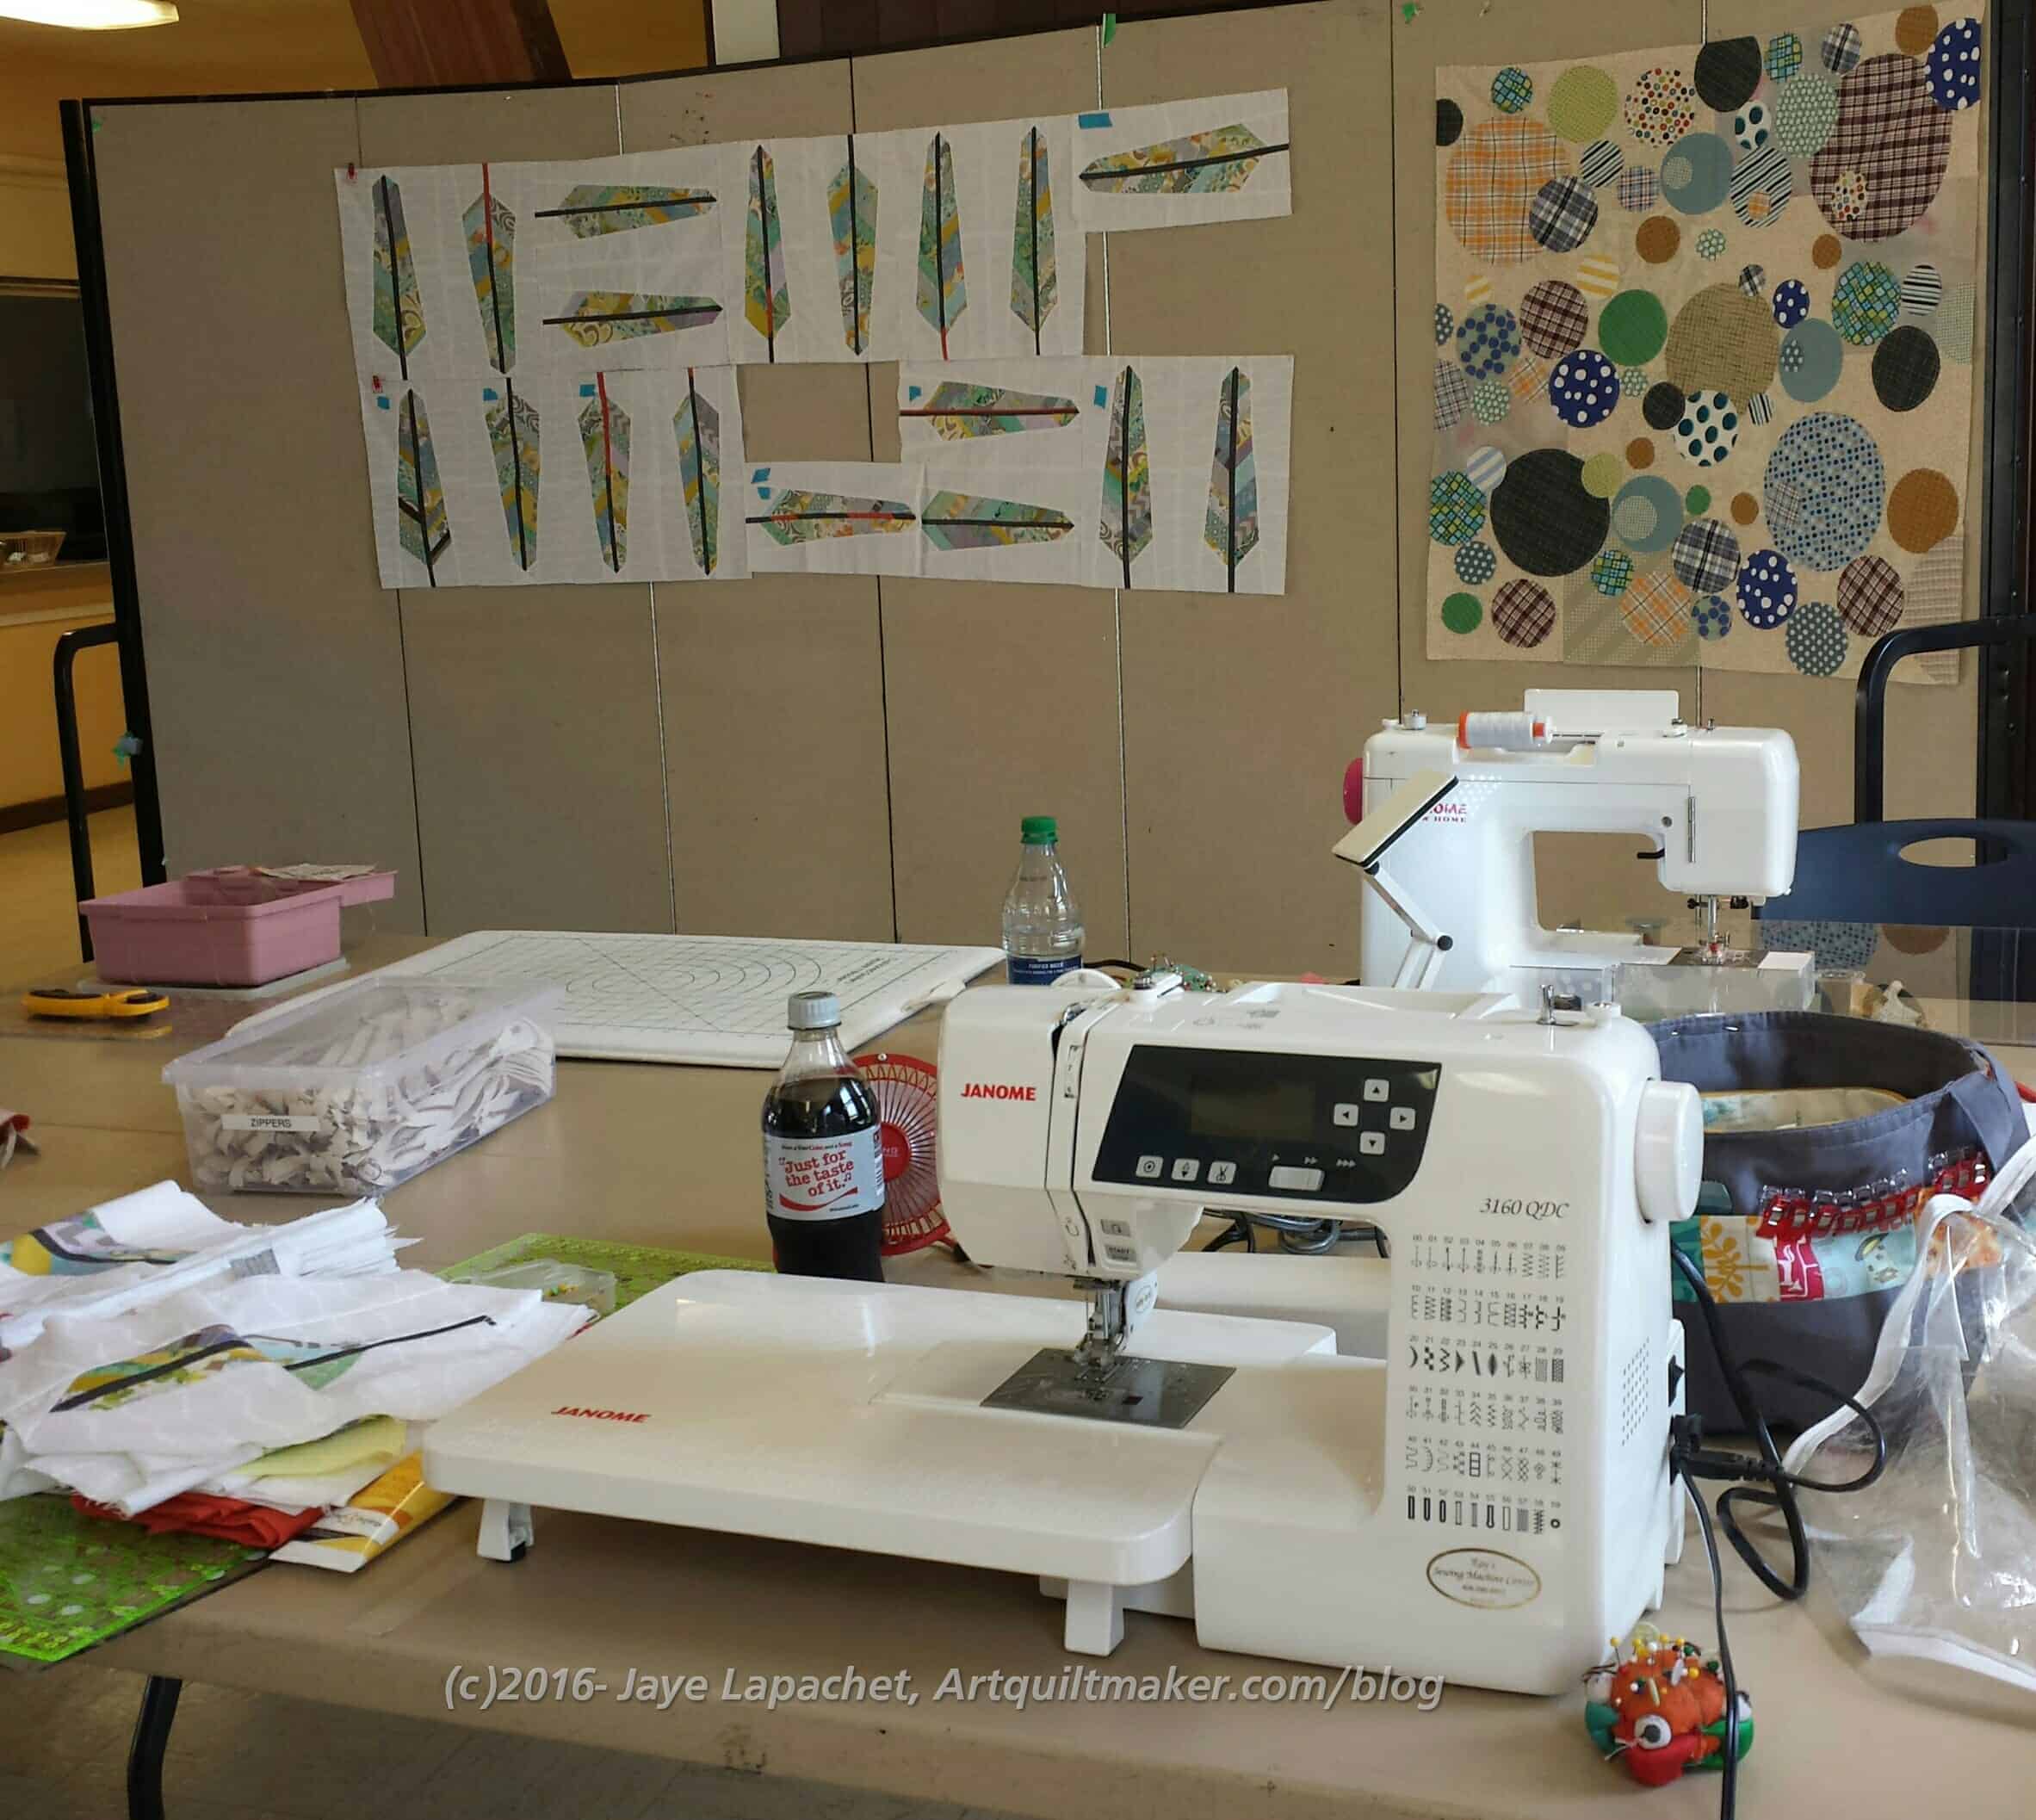
Gerre & Jaye work area
It was a small crowd and I was the second person there! That was shocking since I have to go far to get there, but it was a great opportunity to chat with Mary a little and get to know her better. The tables were all there since camp is over, but they were sticky and dirty, so we spent some time cleaning them. We also set up a few tables and the cutting table. By the time we were satisfied we were still the only people there. We both started to sew and continued to chat. Bang on 11am, others rolled in and the party really got started. 😉
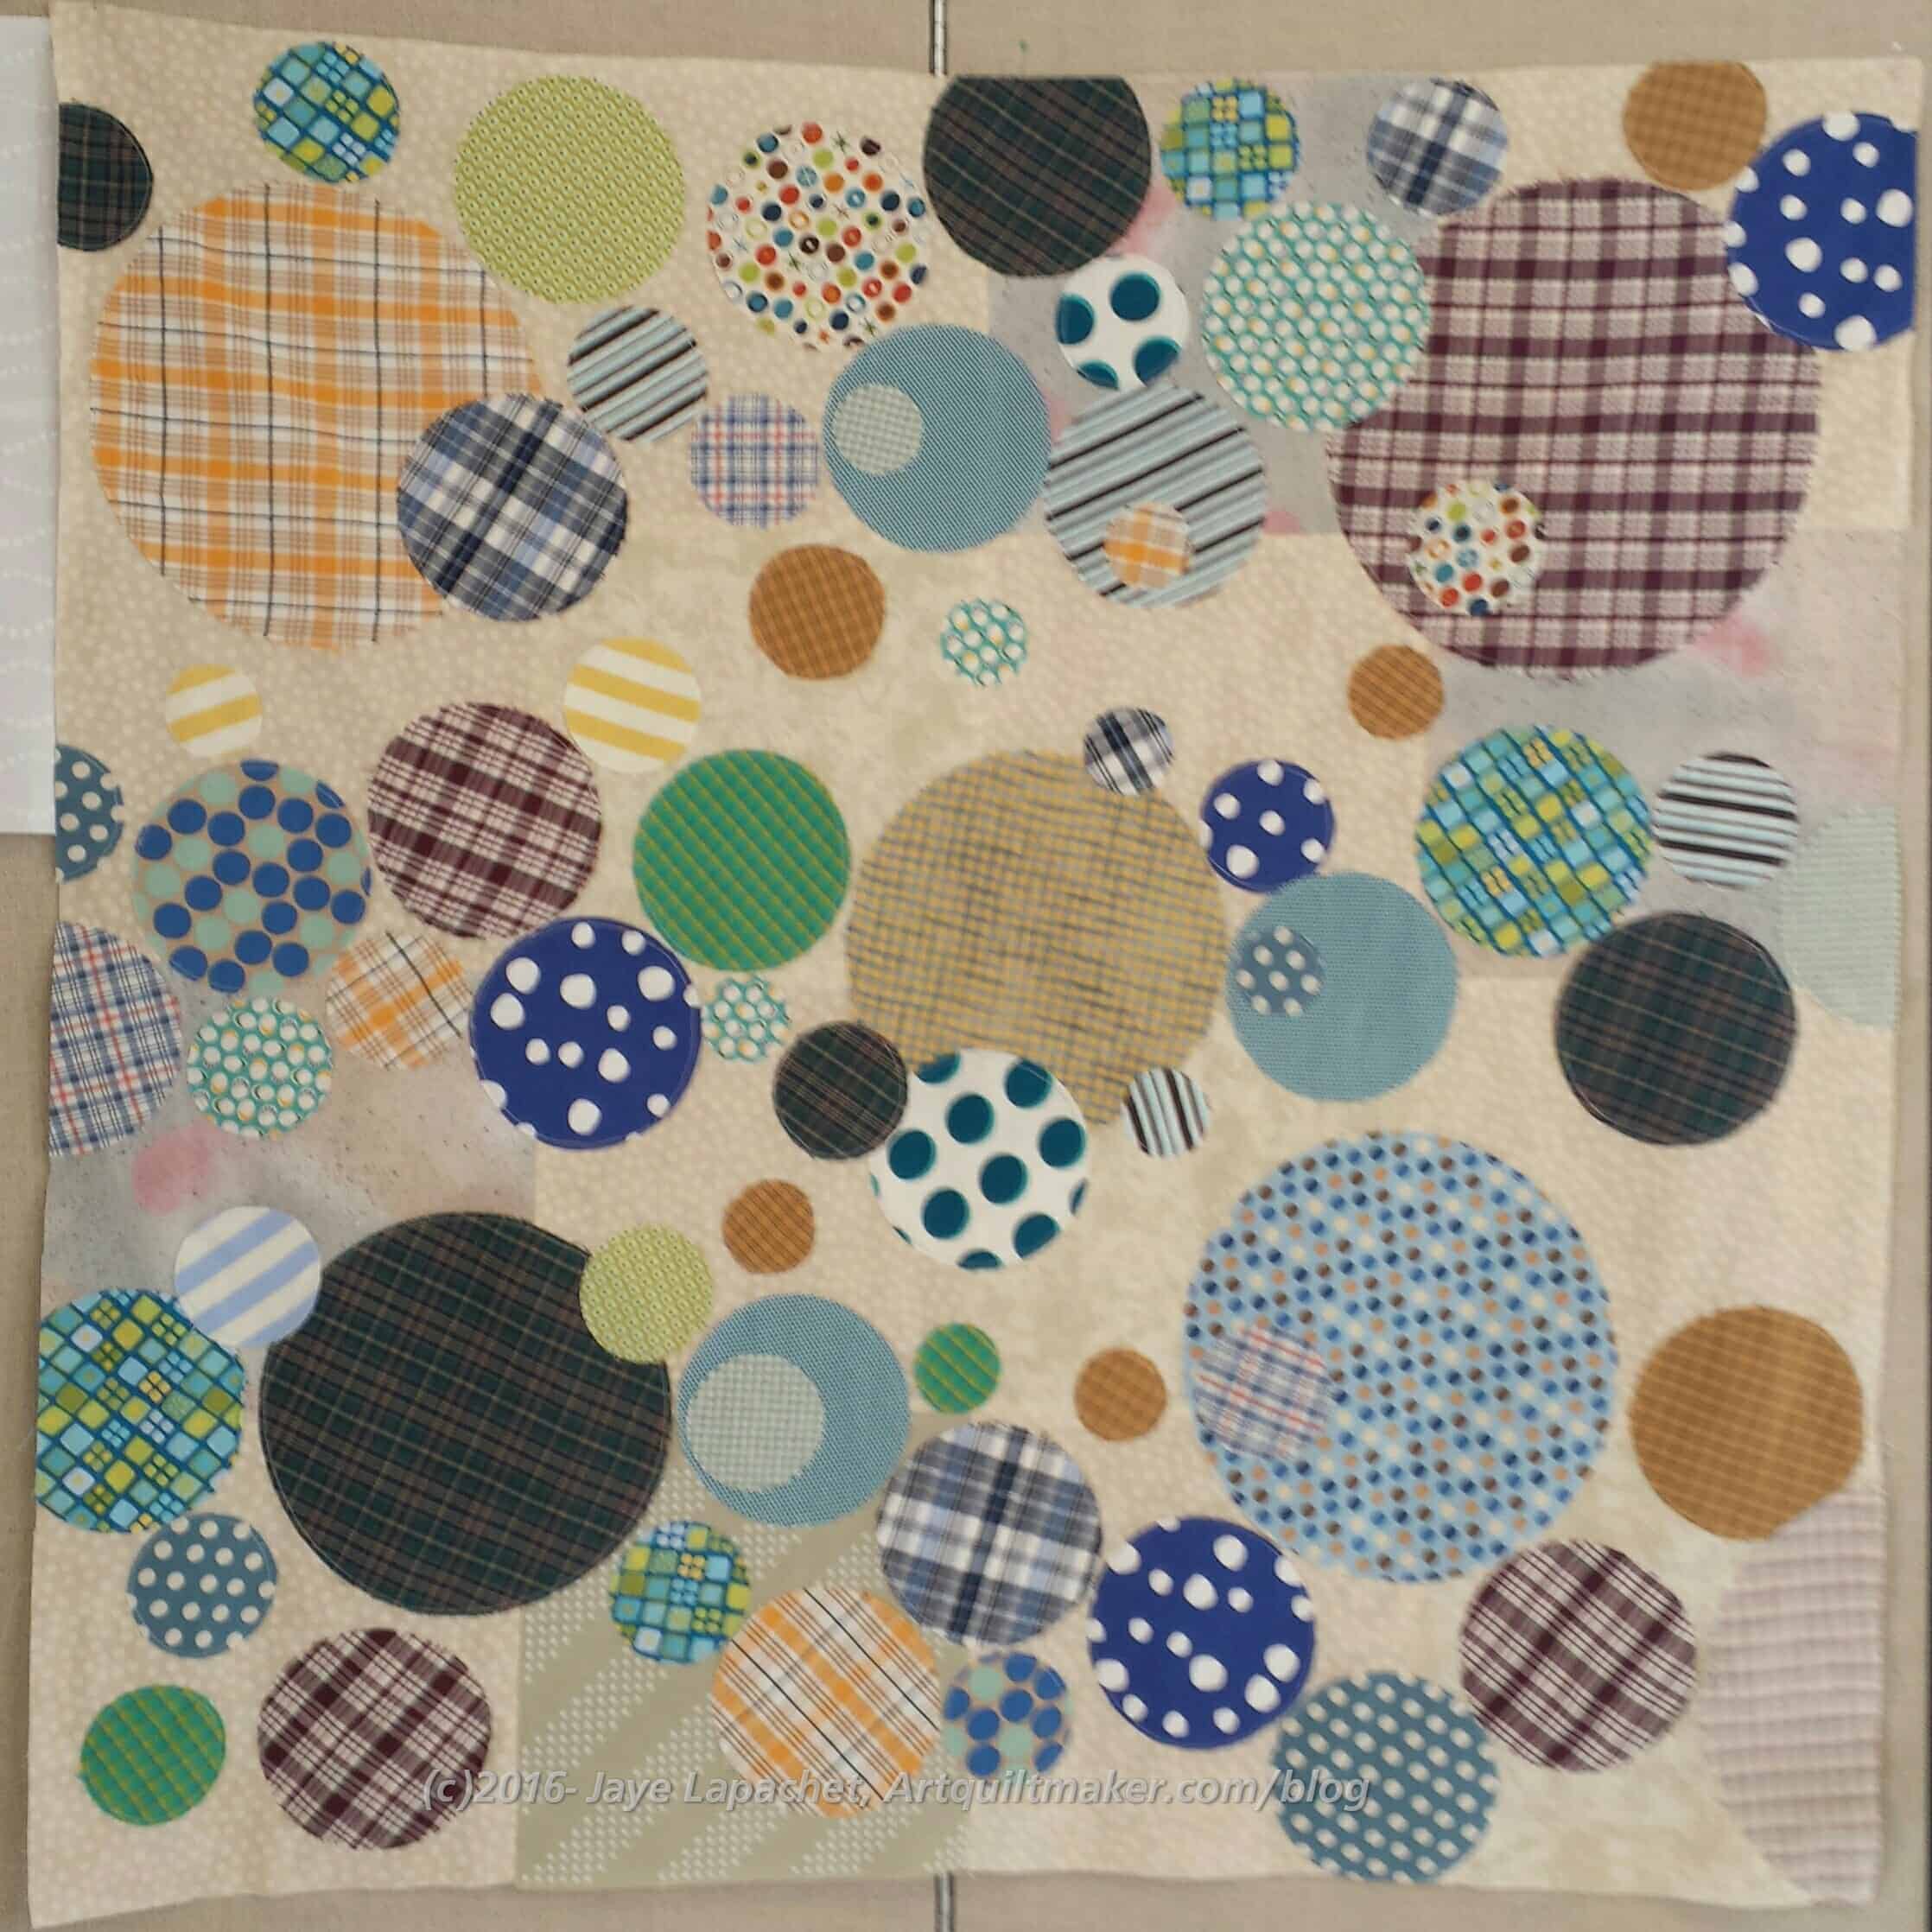
I decided that I would work on projects that were hanging around. First up was the Circles Charity Quilt. Gerre and I started working on it at the May Sew Day. MAY!!! I can’t believe it has been 4 months.
Circles Charity Quilt
I had worked on it a few times after Gerre gave it to me, but it was hanging around not getting done, so I decided I would work on that even if it took me all day. It turned out that I only had a little more to do. I had about 6 circles to applique’, tying off threads and trimming. It didn’t take me very long at all. I pressed it and gave it back to Gerre who will quilt it or give it to the guild to quilt. I am really pleased with how it turned out.
My “reward” was to work on the Petrillo bag that I cut about 15 years ago. Not really, I cut it out, maybe, a year and half ago. It has been on my to do list forever and it was time to sew it, so I started. I don’t know why I waited because the bag started to look like a bag before I left. I was short some supplies, so I skipped a couple of steps, but did as much as I could in the time I had and really made some progress. I am really kicking myself or not getting to this bag sooner and having it take up space in one of my Chubby Charmers.
BAMQG Pulse Quilt Prep
BAMQG Pulse Quilt Basting
Angela basted one of the Pulse quilts the guild made. She is getting ready to quilt it. She was a rock star. She just got on with it and pretty soon the whole quilt was basted. I knew she would be working on it so I checked the Orlando Modern Quilt Guild website to see how they were progressing. They are really making progress. The creativity used in creating the layouts is wonderful. They have a lot of quilts completed and more in progress. I am so glad I was able to contribute.
Lizzie’s IRR – before
Mary worked on the Improv Round Robin project. She had Lizzie’s piece.
Susan worked on her Cargo Duffle and was able to finish that. Patti was sewing doll clothes for her granddaughters.
Karen was working on another quilt in her series of art quilts related to Black Lives Matter.
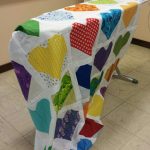
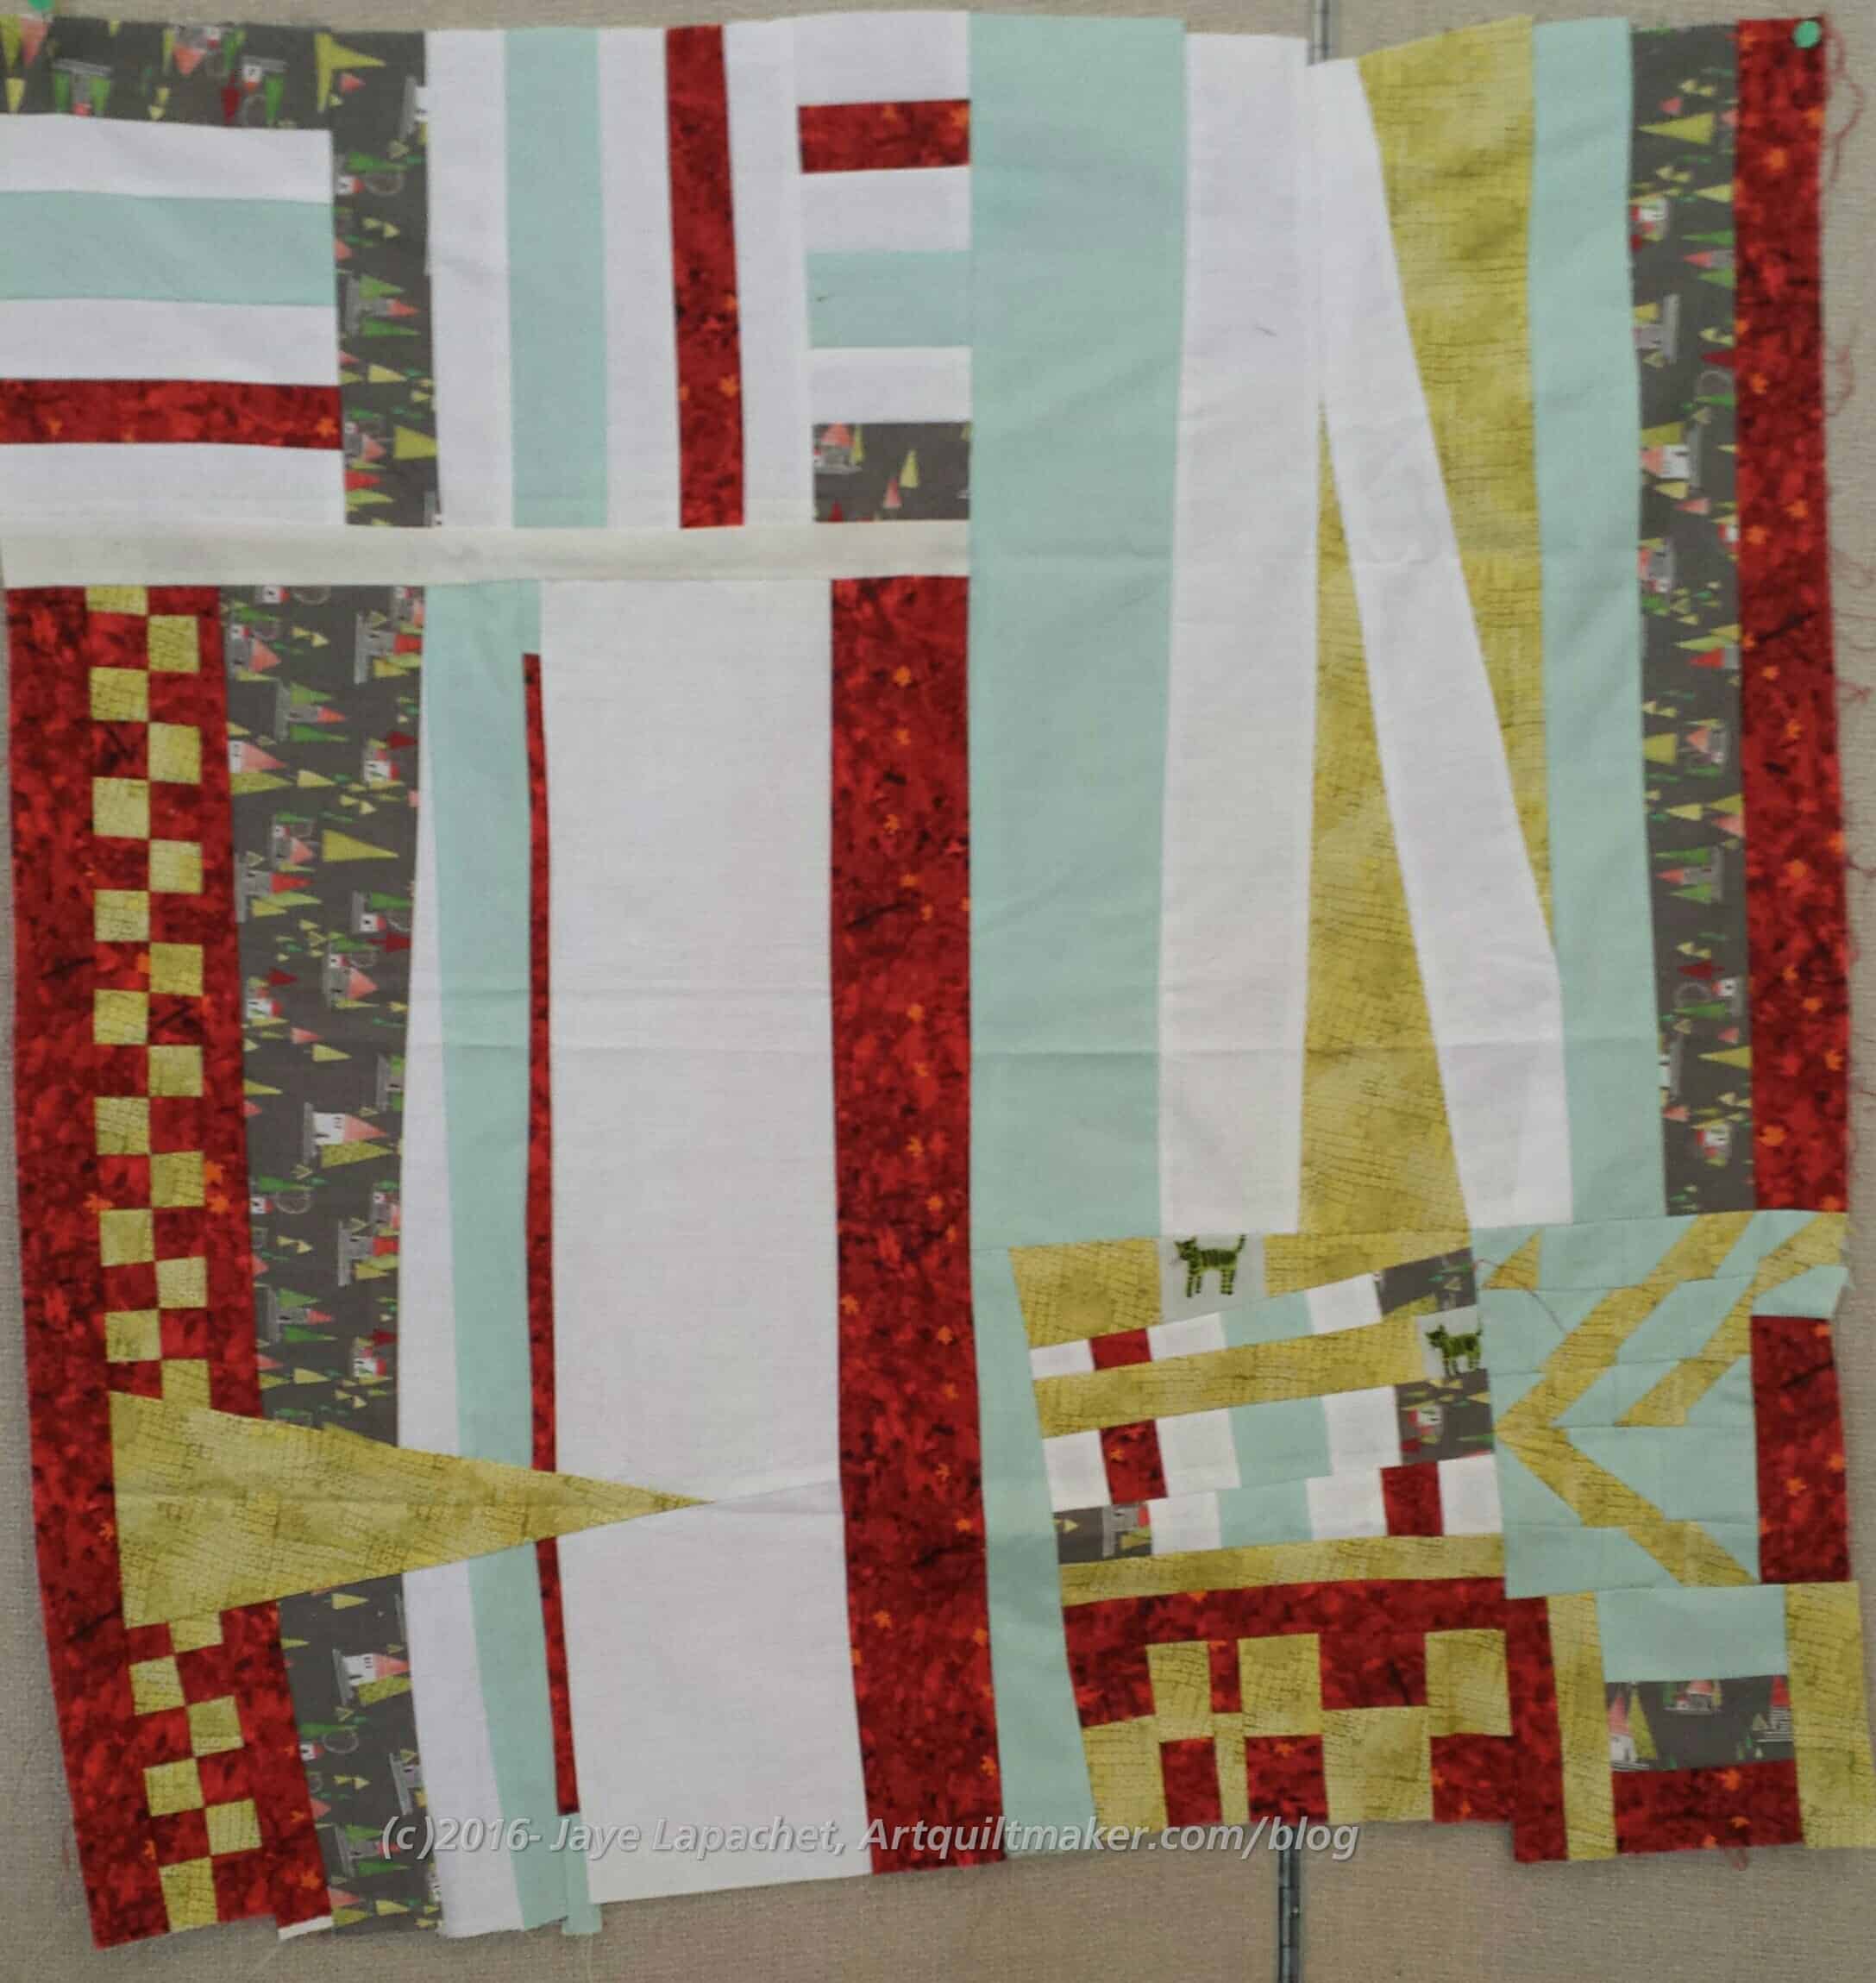
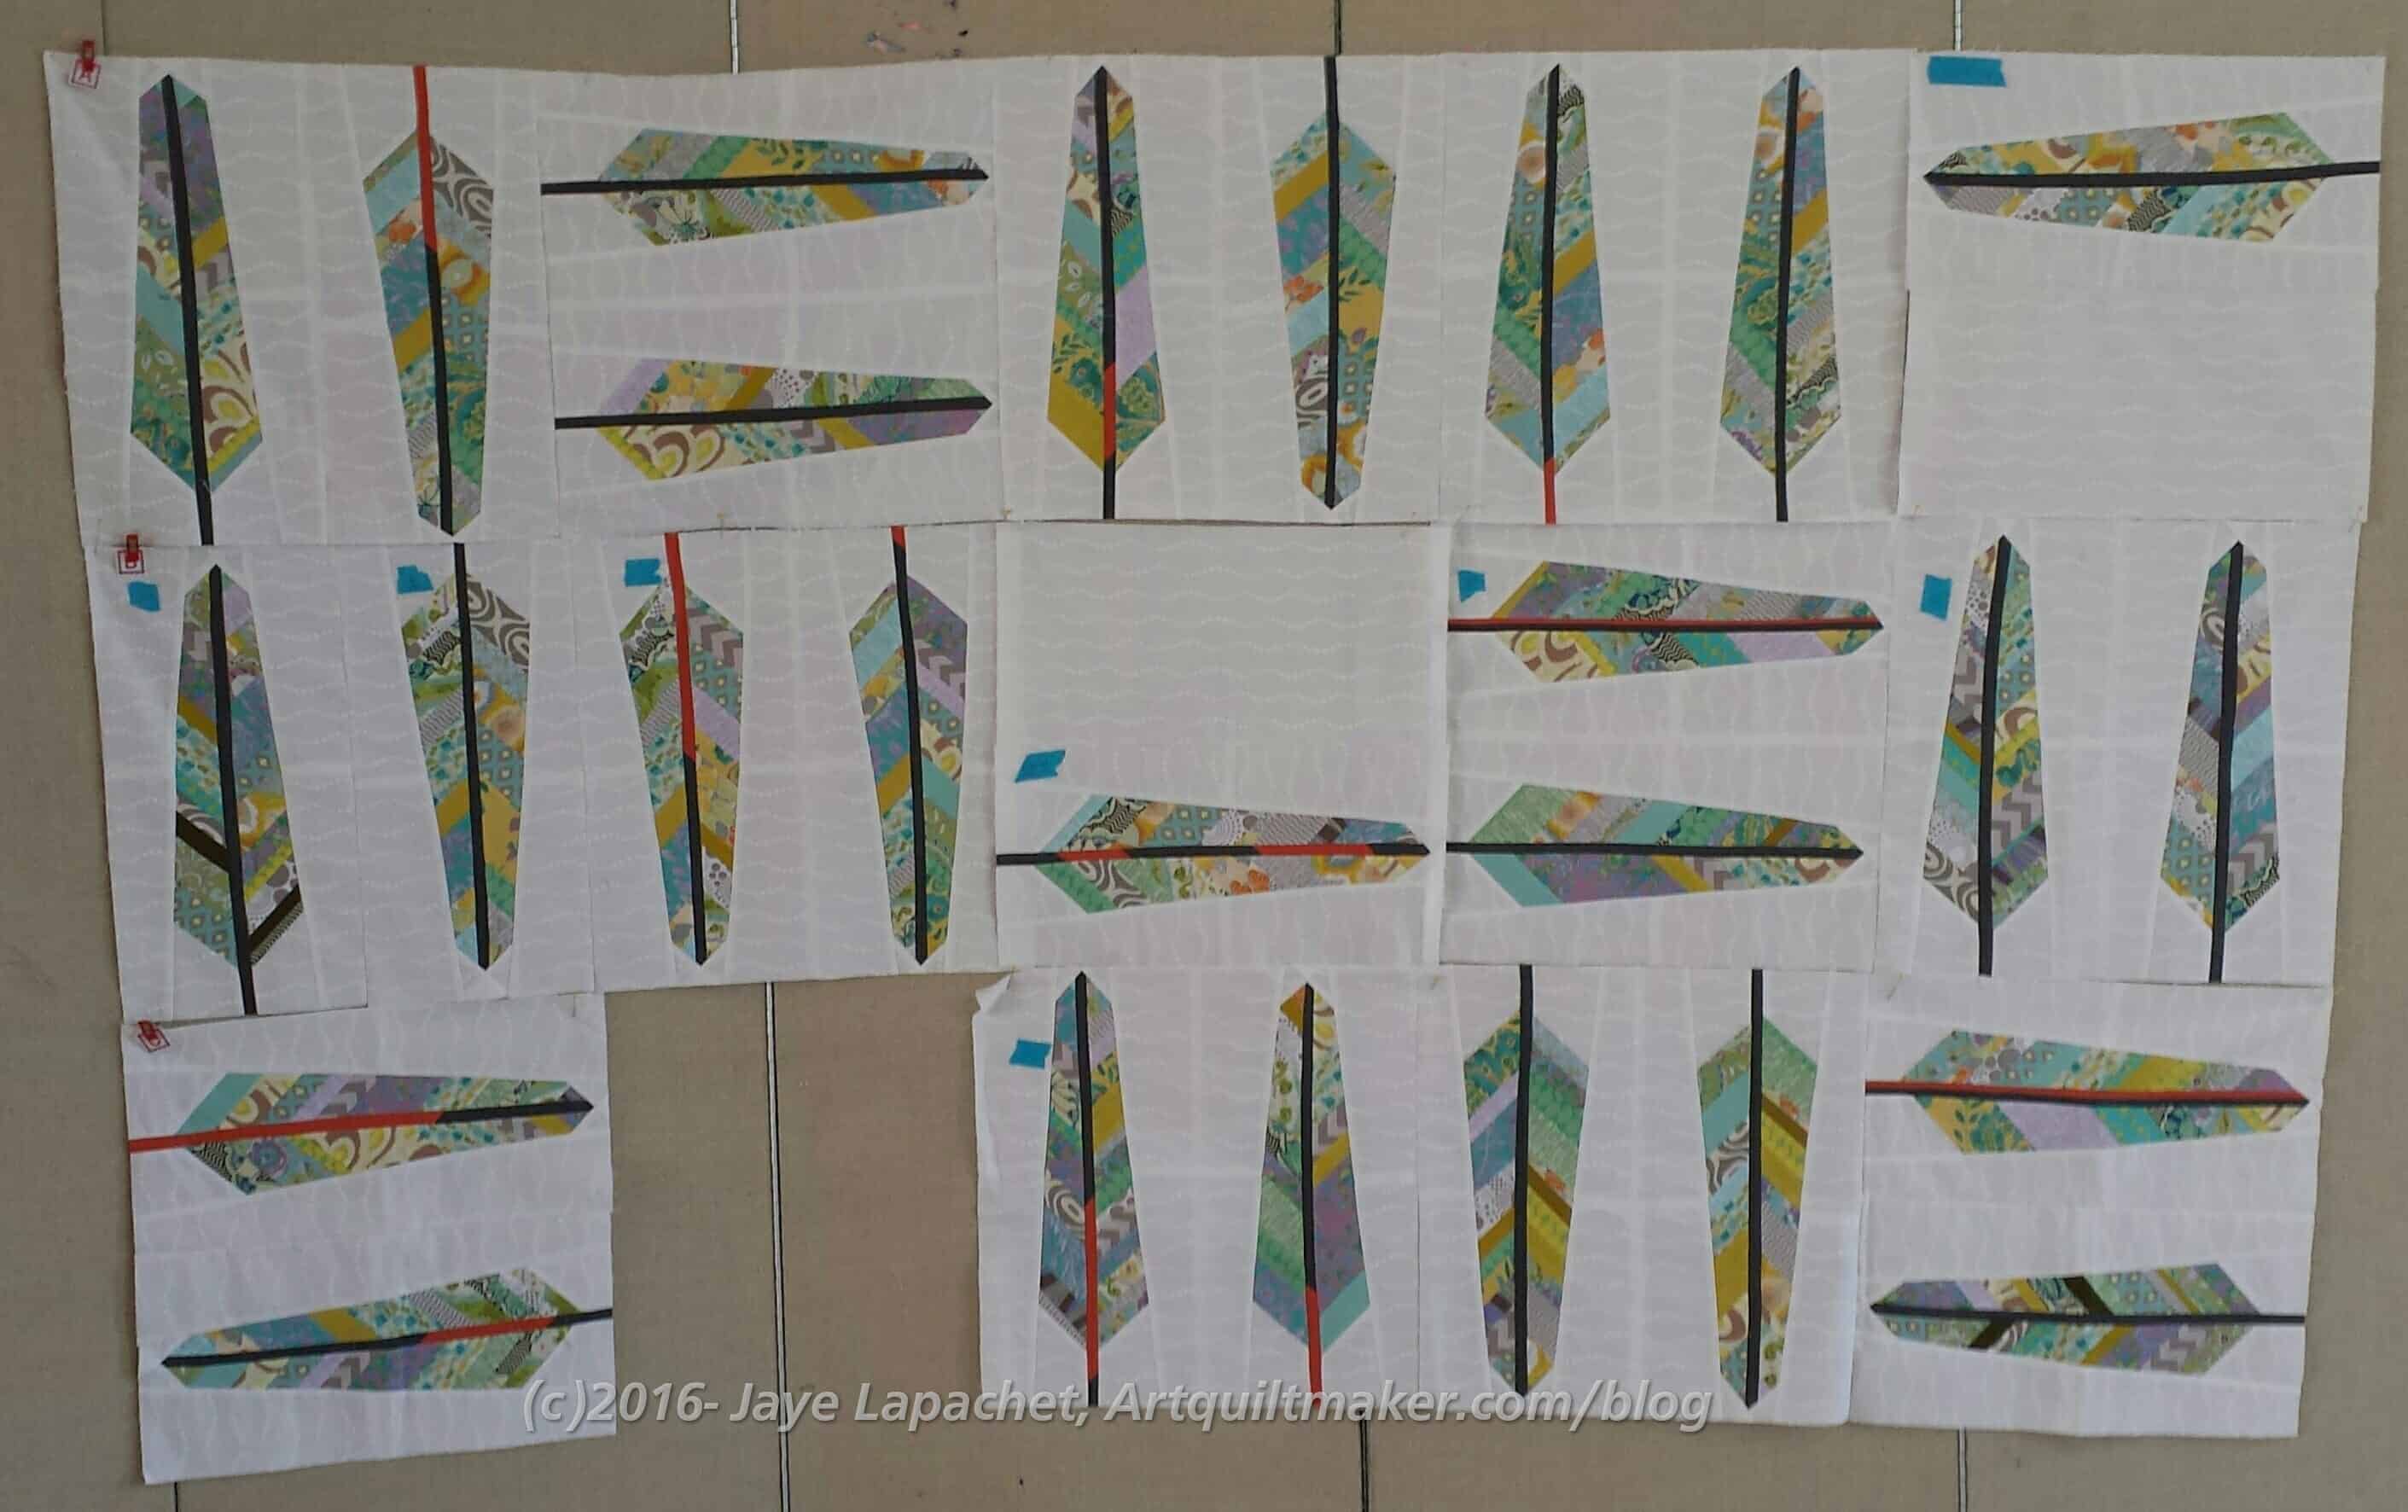
Gerre’s Feathers
Gerre pulled out some AMH feather blocks and was putting them together. She is pretty close as all the blocks are done and just has to finish sewing the rows. This is one of her earlier quilts and I love it.
One fun thing is that we talked about sewing – tips, tricks, techniques, hacks. Someone is thinking of making Sew Together Bags, so we discussed making them just as functional, but a bit easier. All in all, it was a great day and I really enjoyed myself.
As you know I have been working on the homework for the Noodlehead Cargo Duffle*. This is one of the most difficult bags I have ever made, including the Liesl Backpack, though I think the directions are the problem and not the actual bag. Also, there is a lot of prep and, as you know, I like to get straight to the sewing. As I have said, the directions are too brief for me.
In this case, I couldn’t understand the directions for making the handles. I looked at them several times until I decided just to try what they said and see if that worked. I did what the directions said, though they didn’t make sense, and the directions actually worked! Me or the directions? You decide.
Since I think the pattern instructions just need a bit of explanation for those of us who need to know more why in their patterns, I wrote up a tutorial.
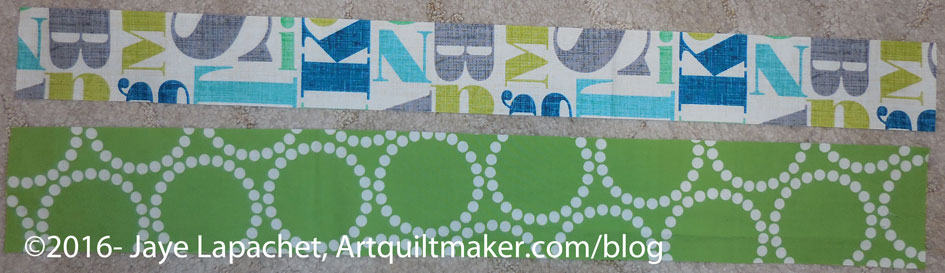
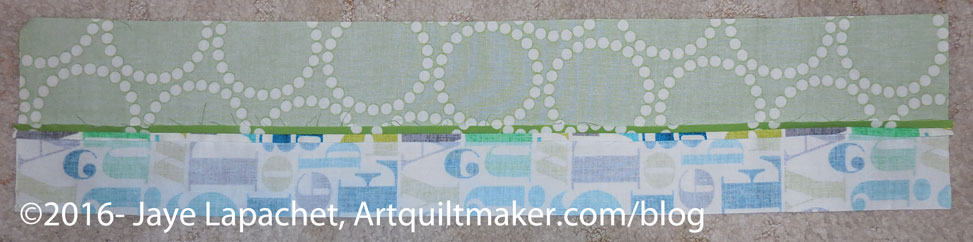
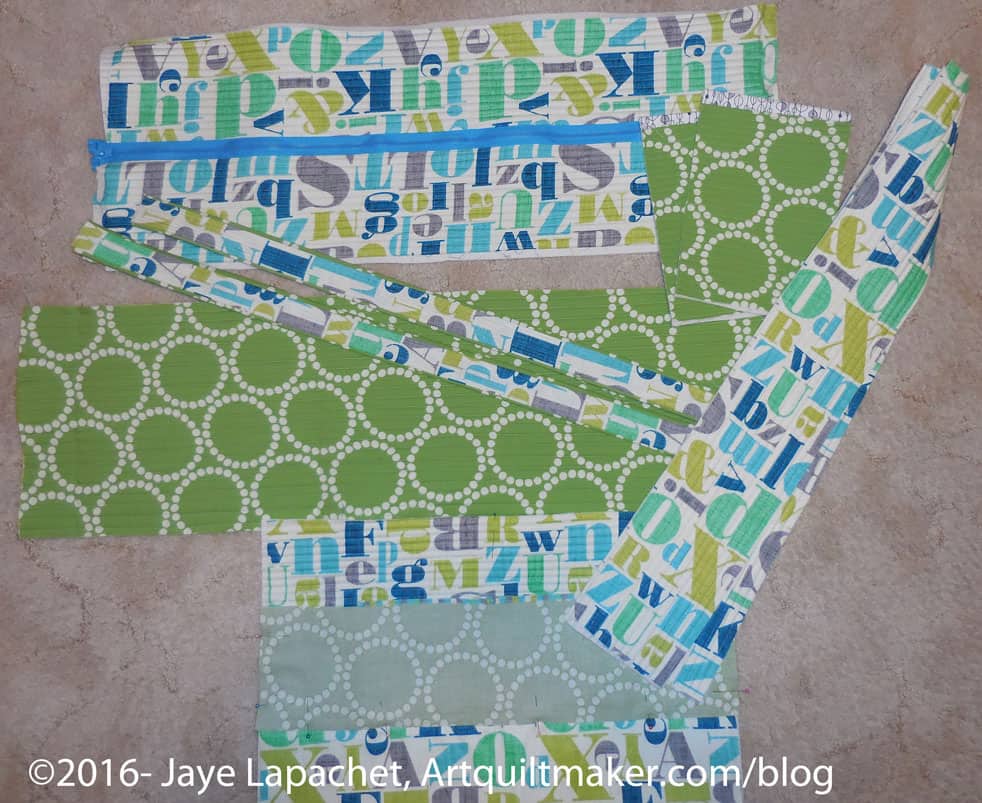
Cut strips according to the directions or according to your needs. I made mine a little longer as I wanted to have more carrying options.
Sew strips together
Sew strips together
2. Sew strips together. They are not the same width so they will not line up, width-wise, exactly.
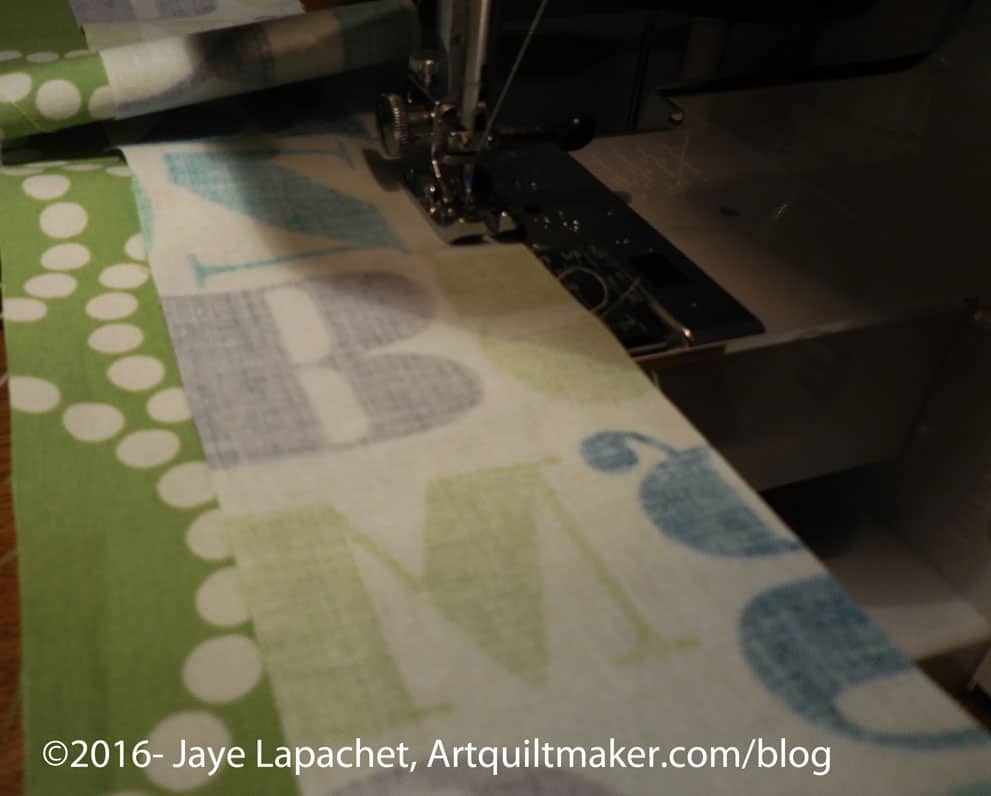
Handles – press seams open
3. Press seams open. This is not critical and if you don’t want to, press how you like. I press seams open on handles, because I want to reduce bulk. You get a lot of bulk in handles, especially if you add some kind of filler like cotton webbing, which I used in these straps, or Soft & Stable or any other kind of interfacing. Pressing the seams reduces bulk.
Optional: At this point you can add some ShapeFlex to the handles to add strength. If you add ShapeFlex, cut a piece that covers both strips and covers the seam. It will add strength to the seam.
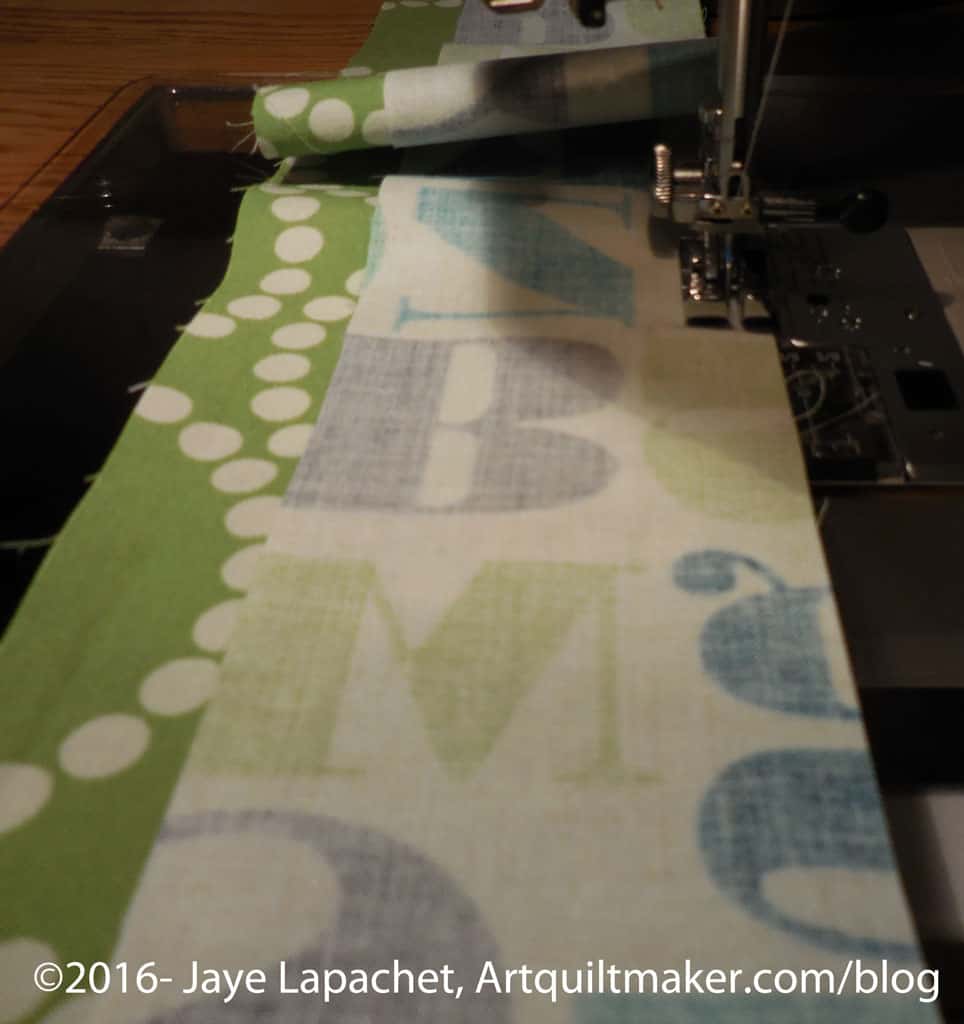
Handles tutorial – Fold raw edge towards the center
4. Fold the long side of the raw edges towards the center seam. I folded the Pearl Bracelets green piece first, but where you start doesn’t really matter, I don’t think.
5. Press fabric so there is a crease in the fold.
Handles – fold towards center
6. Next, fold the second long side, raw edge towards the center seam (yes, it is slightly off center, which is part of what confused me). This is the fabric (text fabric) with the smaller width.
7. Make sure to line both raw edges up with seam you just pressed open. Each different fabric will be a different folded width.
7. Press just folded fabric so there is a crease in the fold.
Handles tutorial – fold narrower fabric up
8. Fold the fabric with the smaller width (mine is the alphabet fabric) up towards the wider fabric (green Pearl Bracelets). There will be some green showing, which is what you want.
9. Press so you have crisp folds. Some of the wider fabric (green Pearl Bracelets, in my case) will show. This detail makes an accent.
10. Now unfold and add your cotton webbing or other stiffener. I used 1/5″ cotton webbing. I had never used this and was pleased at how well my machine sewed through it.
11. Refold so the cotton webbing does not show.
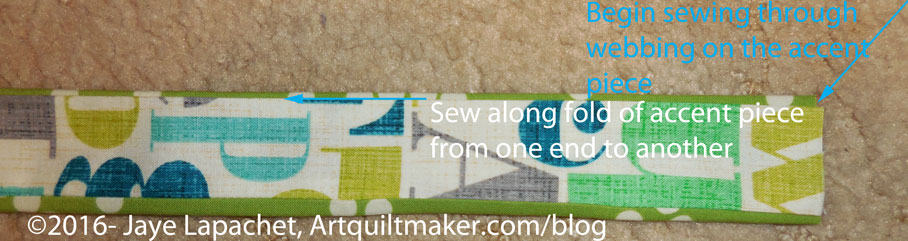
Handles tutorial – densely sew long way
12. Quilt lines lengthwise, approximately 3/8″ apart, starting with the open seam. This will make the handle is very dense with quilting and add to the strength.
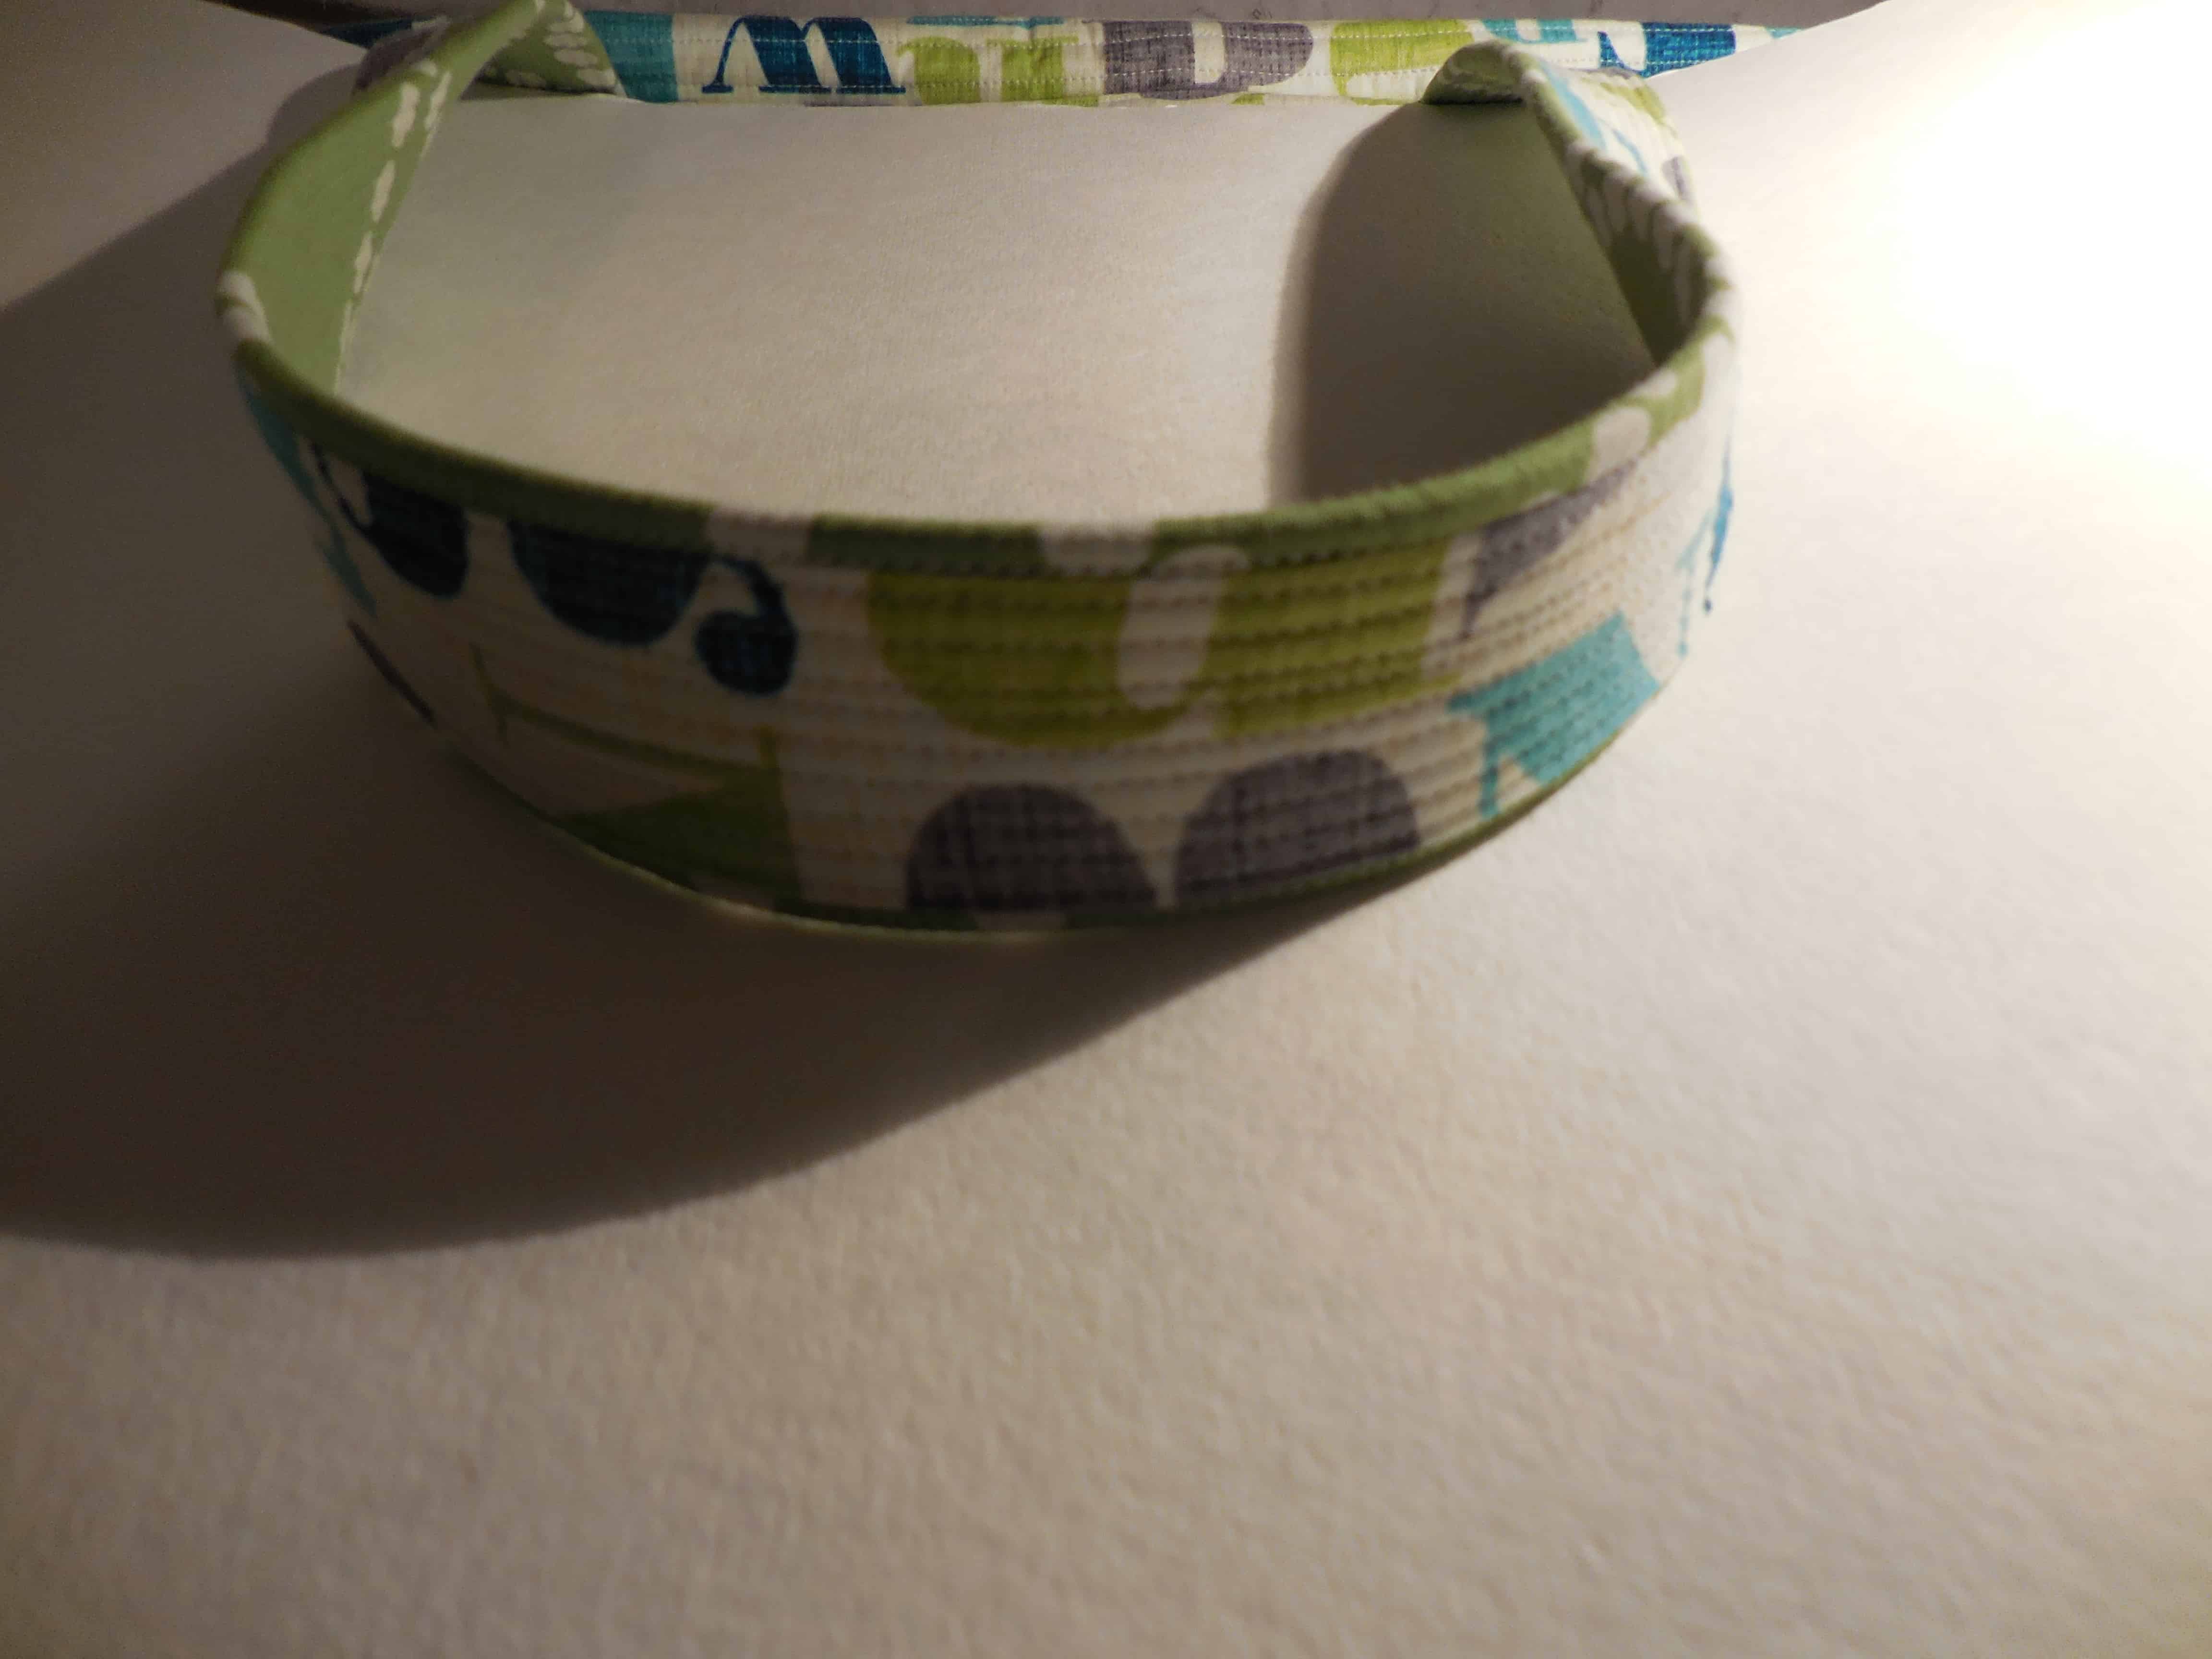
Ta da! You have very nice handles that will be sturdy enough to carry a heavy bag.
Ruth, being the super intelligent woman she is provided a link after I had figured out how to make these handles. I did search, but didn’t come up with the tutorial. I hope you like my instructions for the Cargo Duffle handles, which will, with any luck, come up in search results for others who try to make the Cargo Duffle.
*I really don’t know if the project includes the spelling ‘duffel’ or ‘duffle’. I am going with ‘duffle’ as that is what the dictionary says. You may want to search both, if you do any Google searching in order to get all the results.
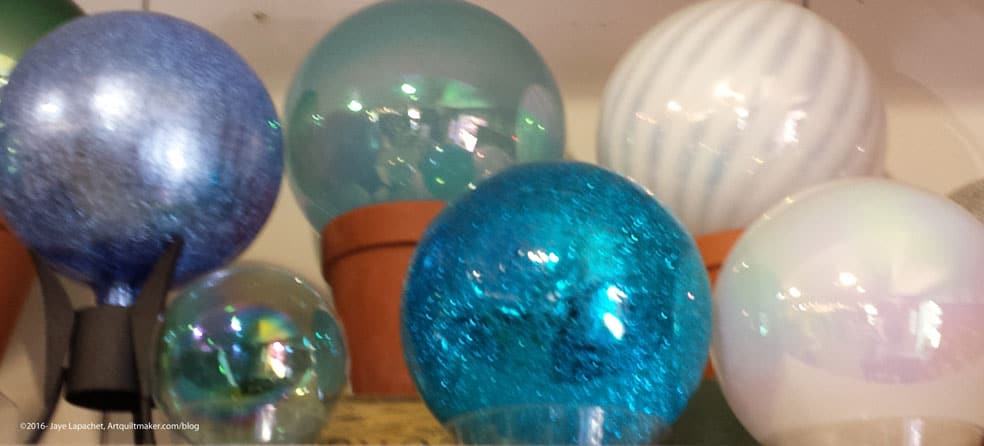
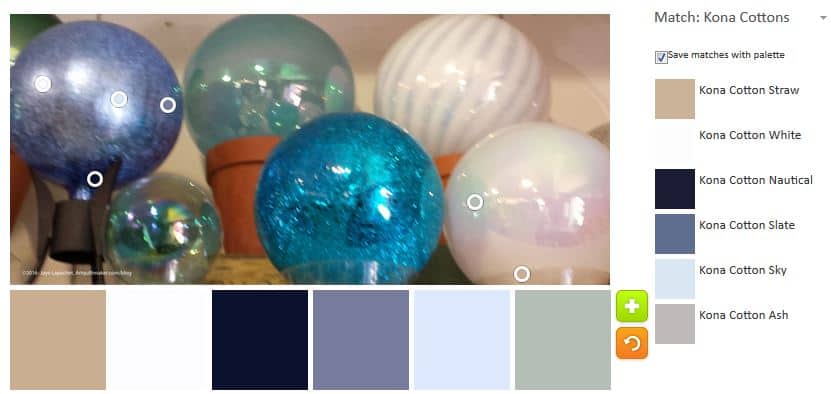
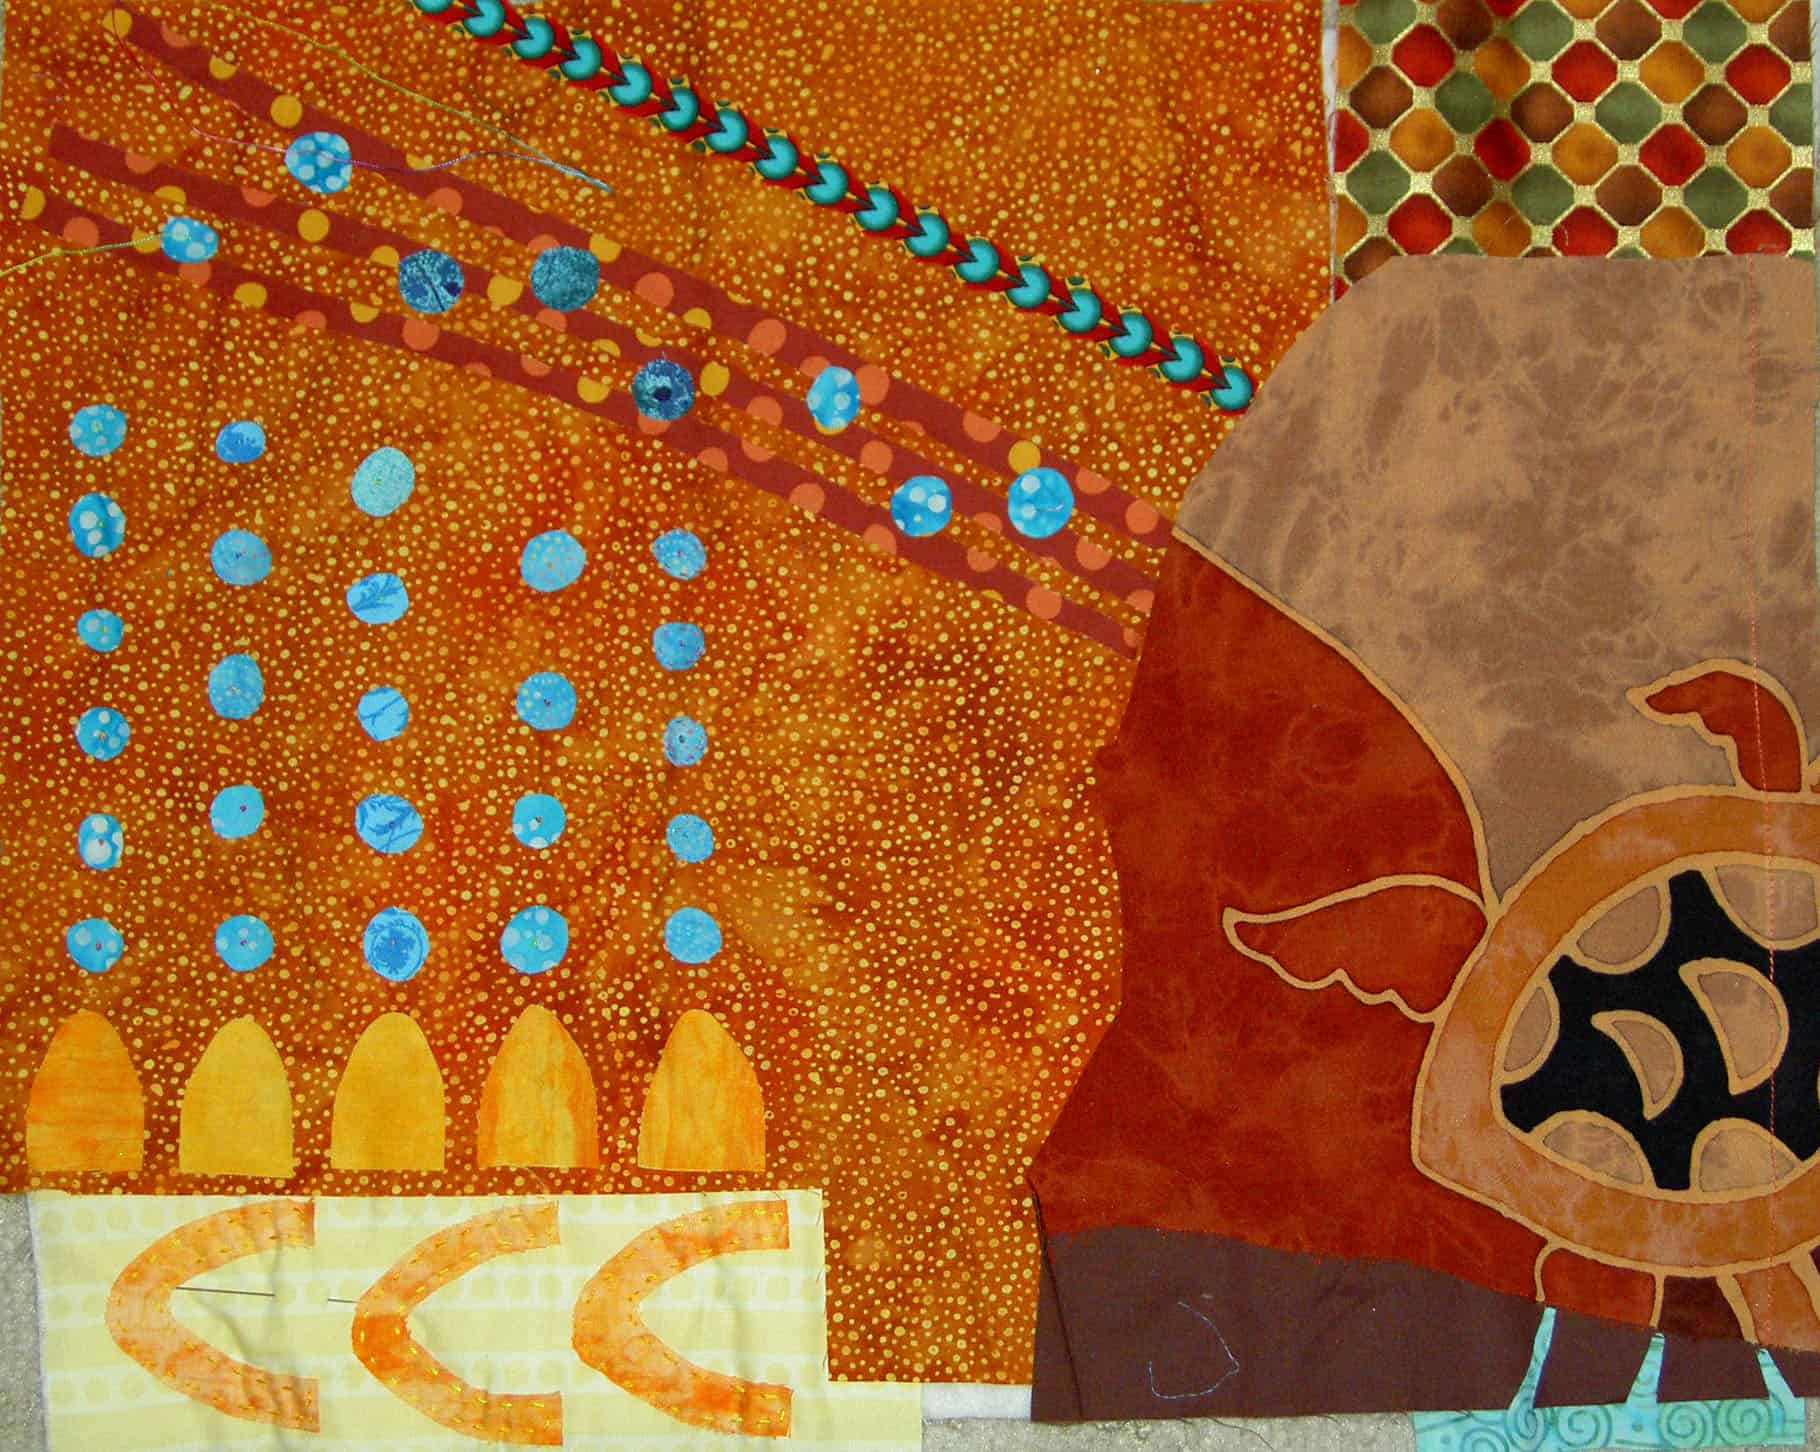
I did something a little different today in that I was interested in how many different palettes I could create using the photo above. You can see that colors in the image are already limited.
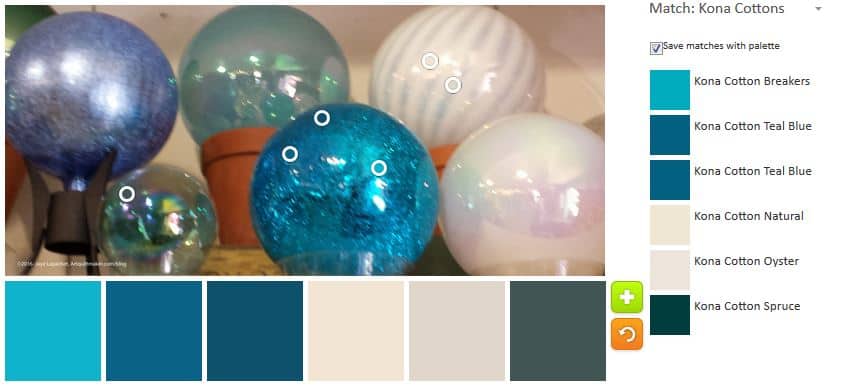
Color Globes – Palette 1
First, I focused on the turquoise globe. I was interested in some of the colors the Palette Builder showed when I first uploaded the photo. I am constantly fascinated with creating a palette that has the right mix of contrasting blues.
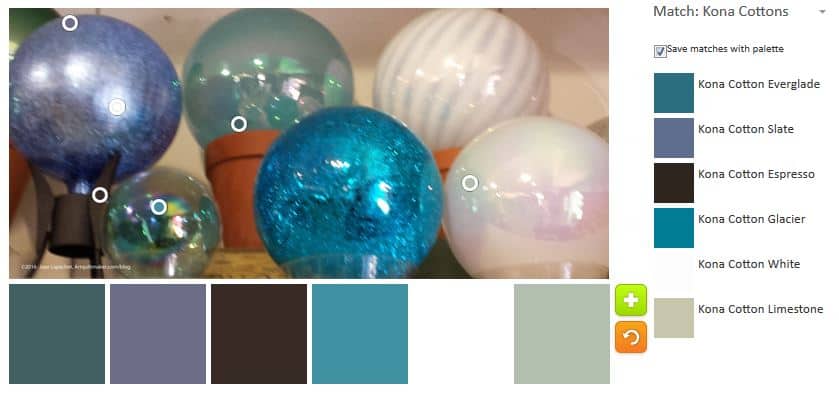
Color Globes- Palette 2
Next, I moved to the more green globes and focused the circles on them exclusively. You can see more green/yellows in the tones of the colors in the palette. It is interesting how many colors there are in this picture.
Color Globes – Palette 3
I could probably play with this one photo ad infinitem. I realized that after my third try and the tool doesn’t even have the color discernment that my eye does.
Color Globes- palette 4
I really couldn’t stop playing with this photo. The colors are relatively limited, but there is still enough of a difference, with the glare and light sources to make the colors slightly different.
I may work with this photo again.
I am wondering what a quilt would be like made from all the colors in the three palettes?
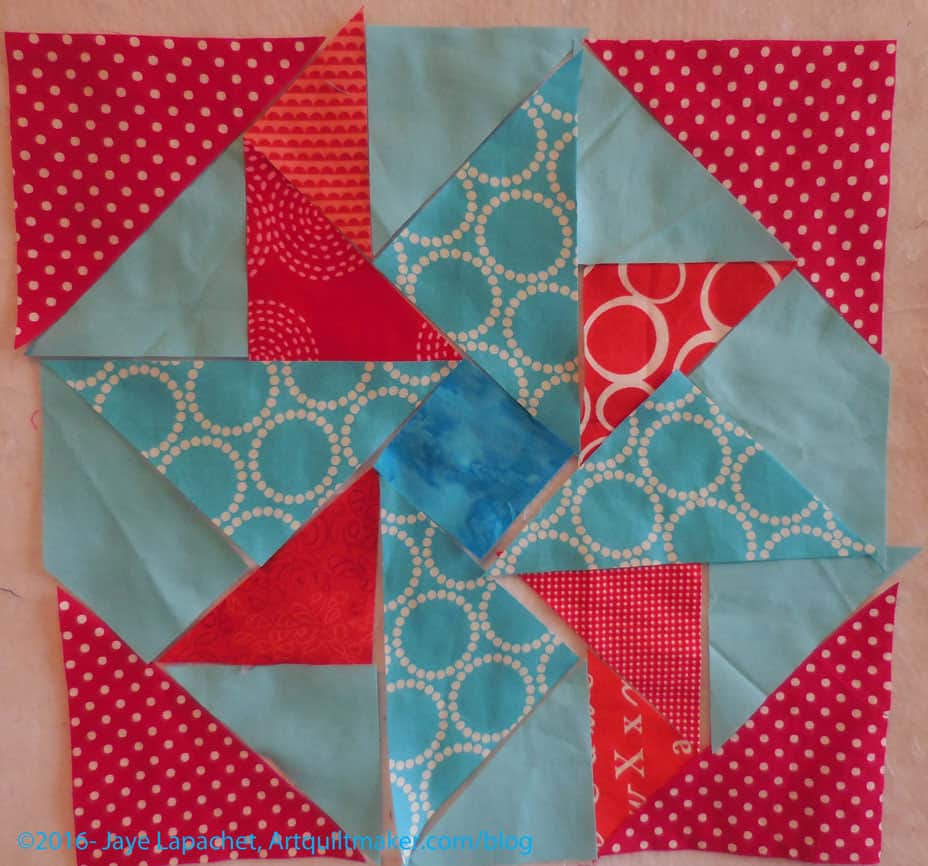
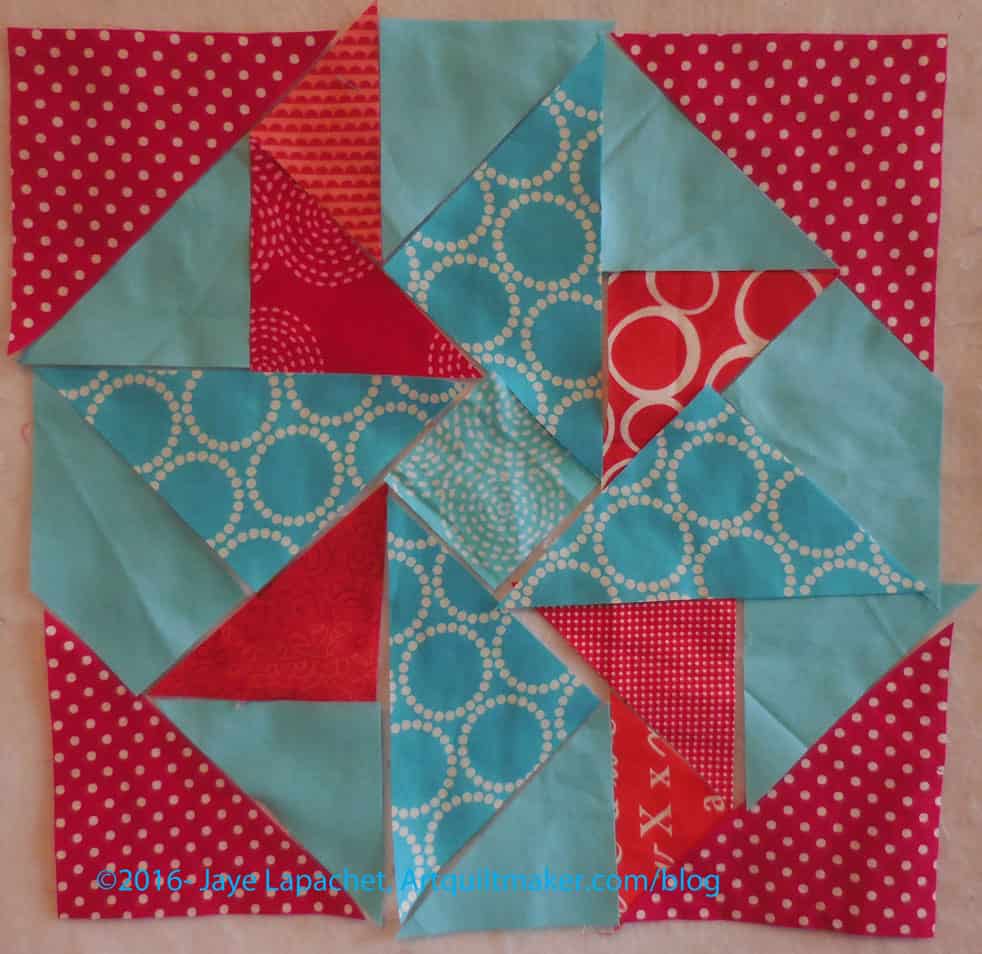
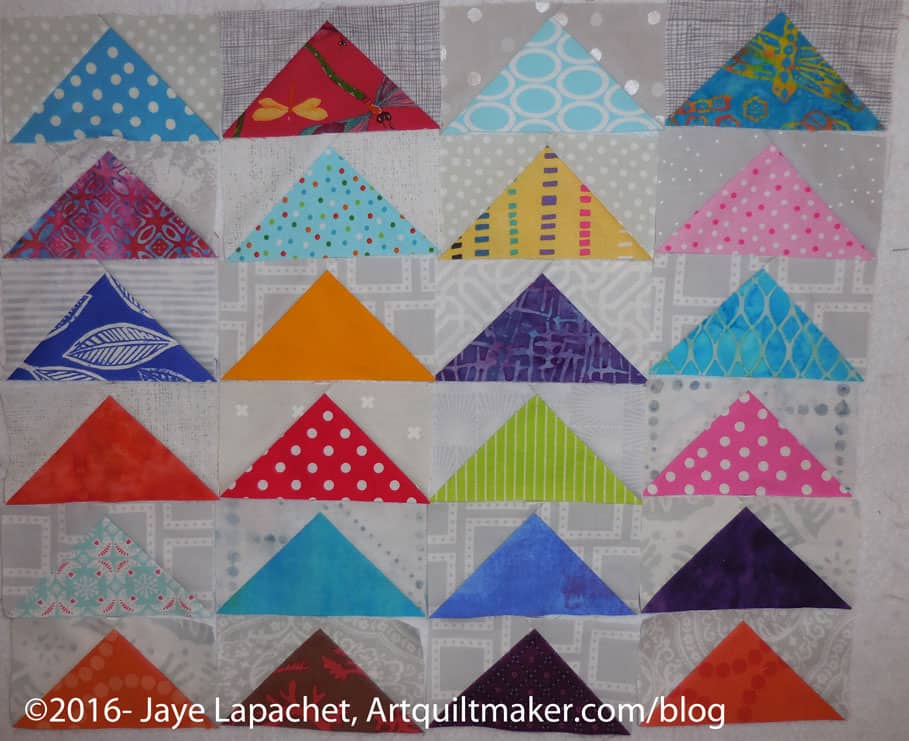
We are going to talk about partial seams. Partial seams are a way to create a more complex looking block without using truly difficult piecing techniques. Even a relative beginner can navigate partial seams successfully.
2. Select fabrics to fit the color scheme of your other blocks. You need contrast between the various pieces.
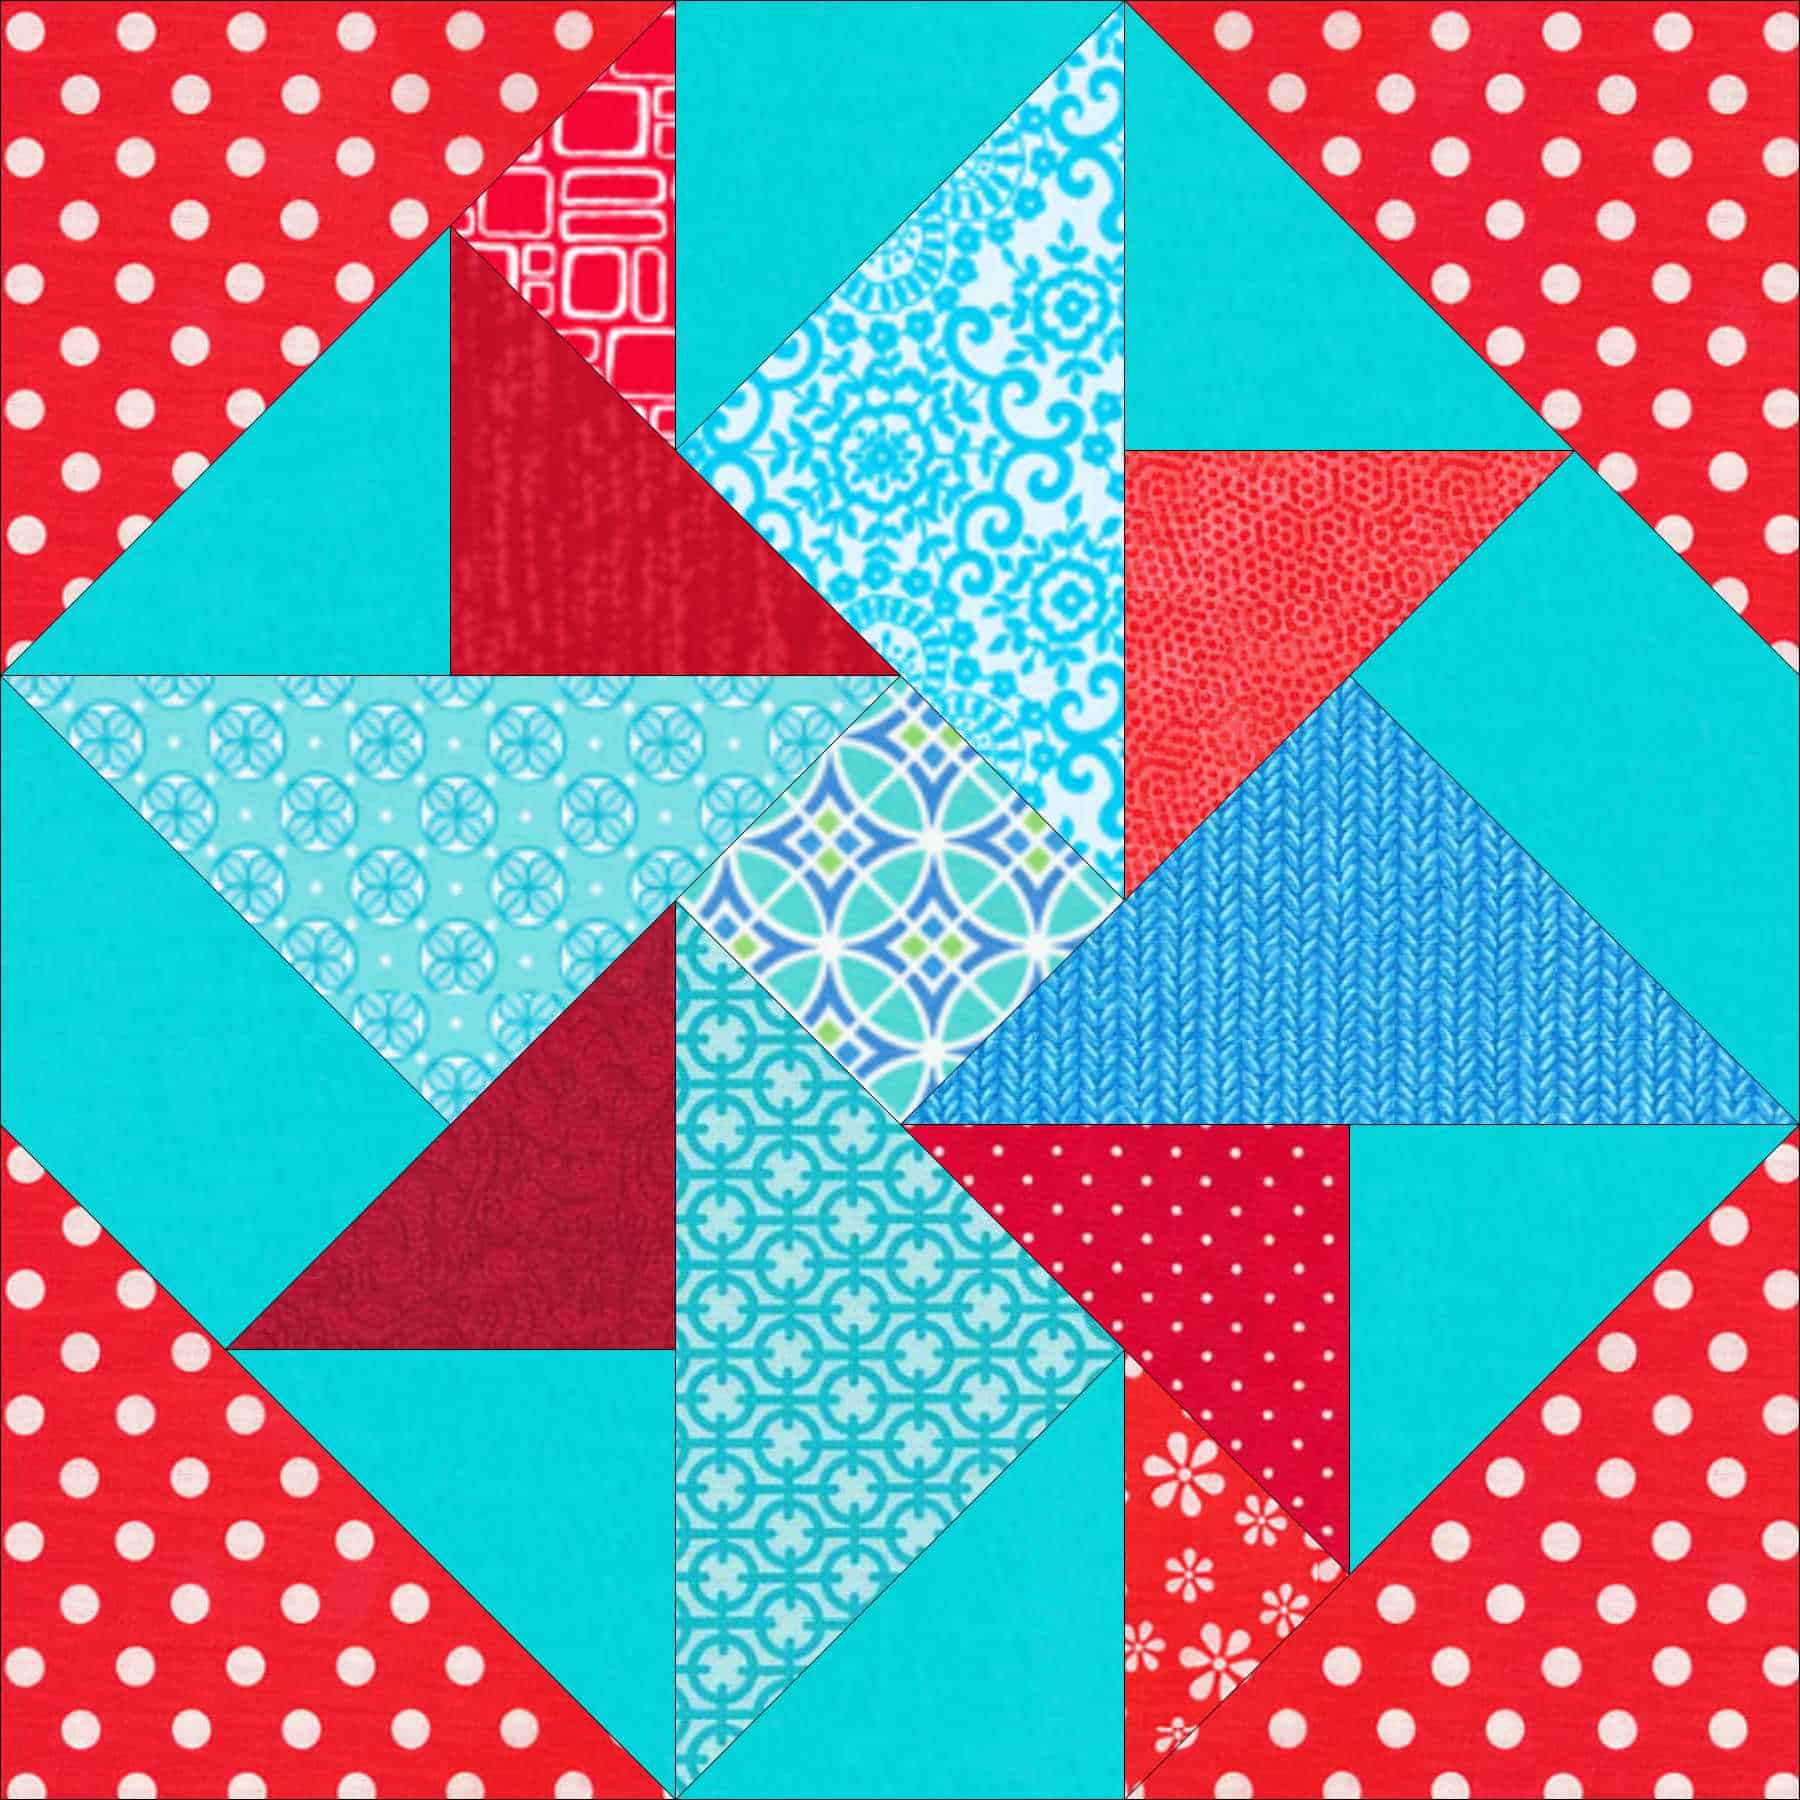
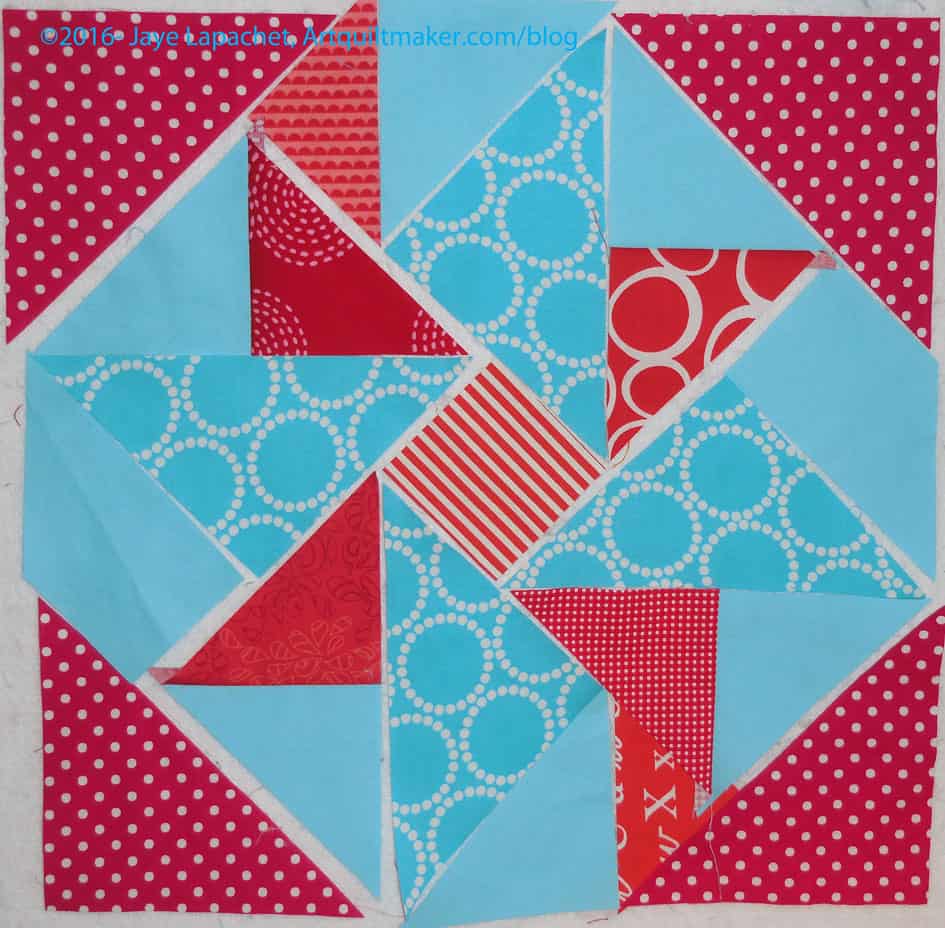
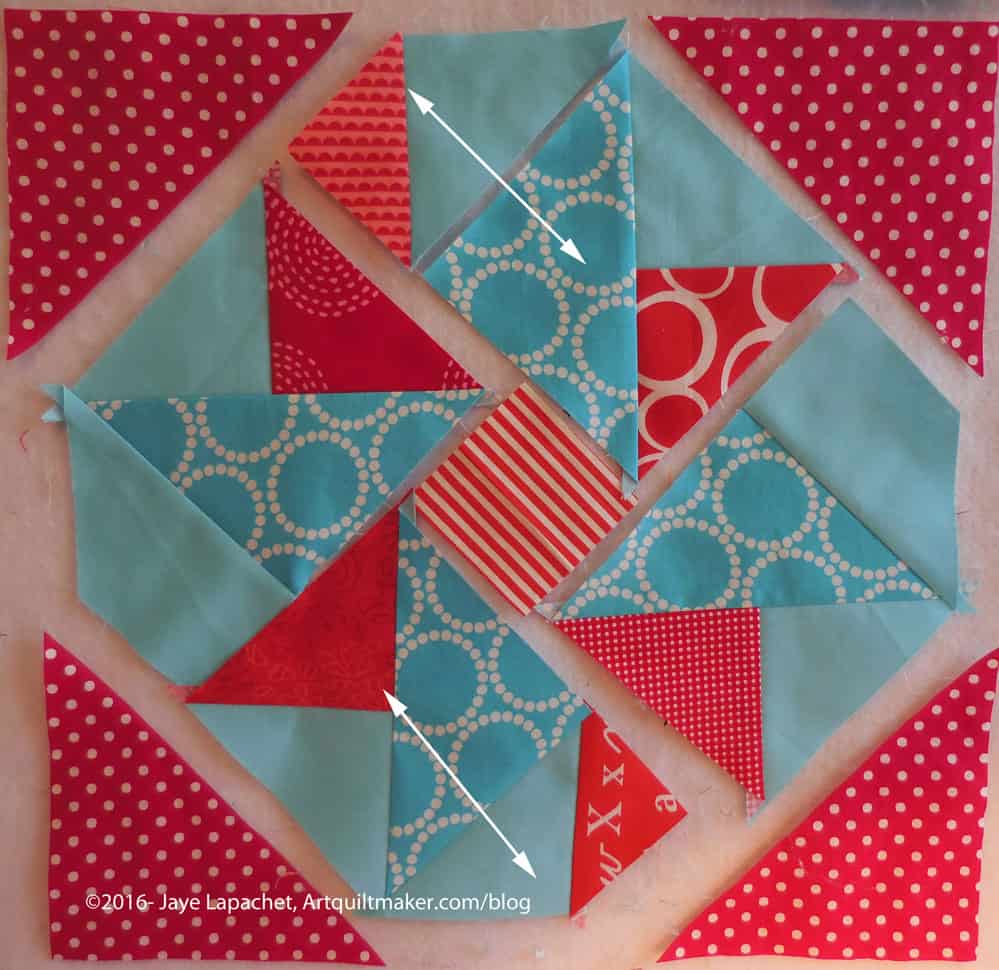
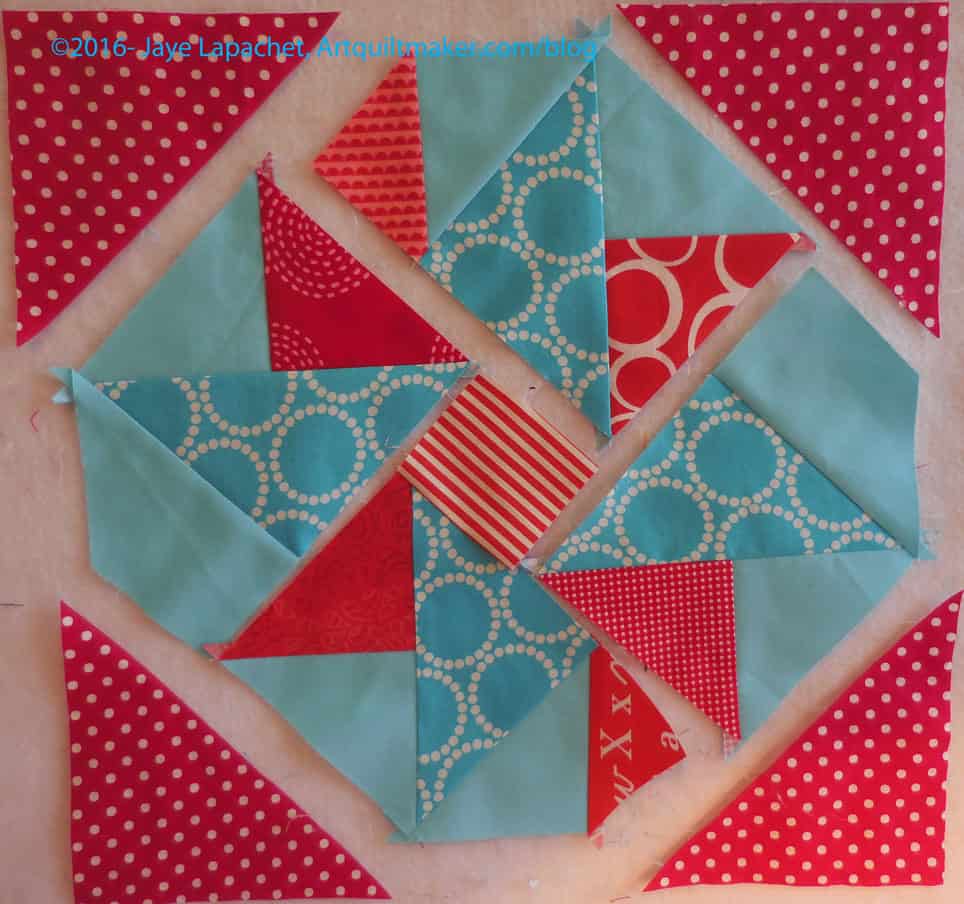
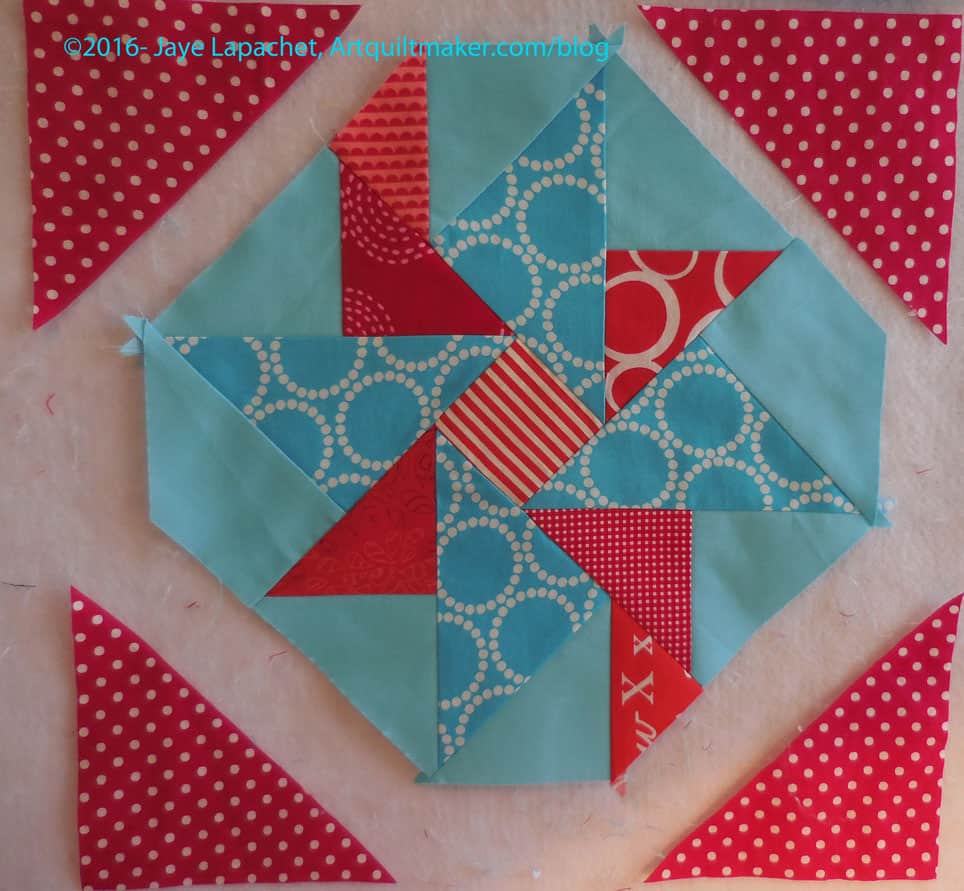
Partial Seam Final Colors
The one red triangle with the white curves might not be exactly right, but it will look fine in the overall quilt.
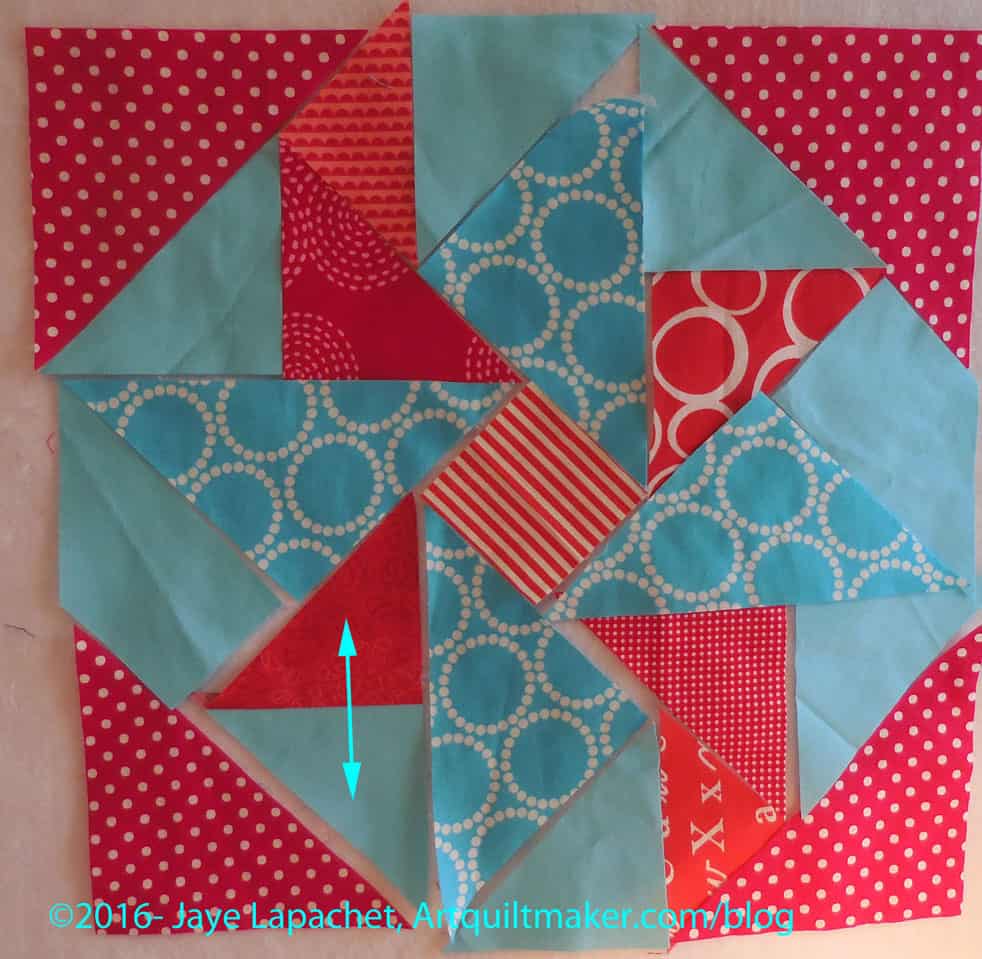
3. Cut out pieces using the chart. Press as you cut if necessary.
Partial Seams: Sew Triangles Together
4. As we discussed before, sew smallest to largest. I started with the matching small triangles. Sew carefully without yanking the bias.
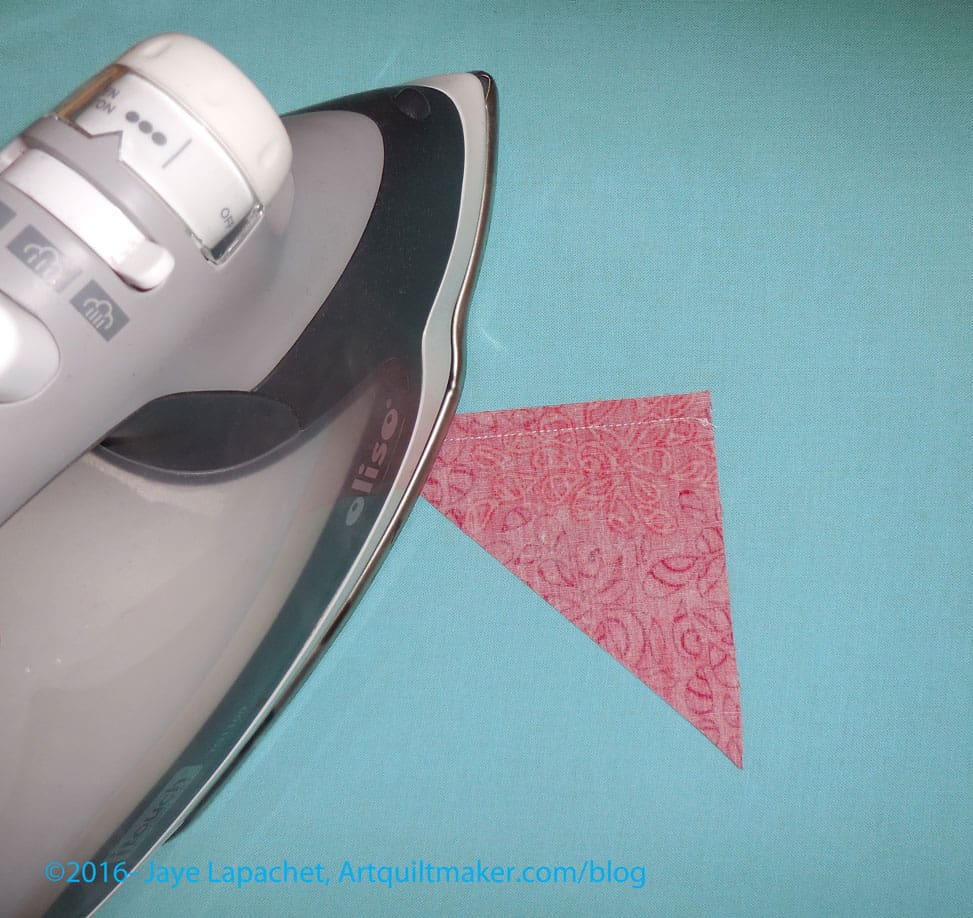
Press flat, then press to the red
5. Press flat and then press to the red. Press carefully without distorting the bias.
Partial Seam Triangles Sewn
6. Place the newly sewn triangles back in position on your design wall.
Partial Seam: Sew other like triangles
7. Sew the similar triangles, press and place back in place.
Remember, you are sewing from smallest to largest. This means that you are creating larger and larger sections until the whole block is done.
Patches Sewn in 4 sections
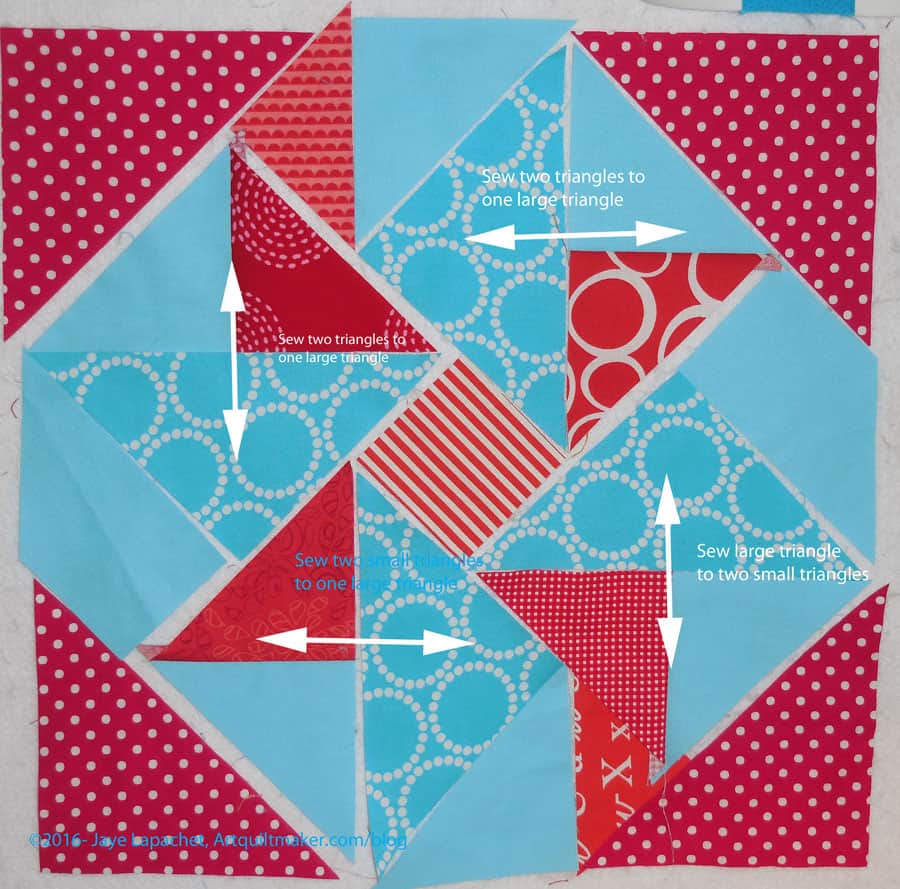
8. Once the newly sewn patches are back in place, it is fairly easy to see the next logical step. The large turquoise triangles (mini-Pearl Bracelets fabric in the example) should be sewn to your two triangles. This will make a square.
Sew small triangles to larger triangle
9. Sew the two small triangles, which are now sewn together (step 4-7), to the large turquoise triangle. This step makes the triangles into a square.
Place sewn squares on to the design wall
10. Press flat and then press to the larger triangle. Press carefully without distorting the bias. Place the squares back on the design wall.
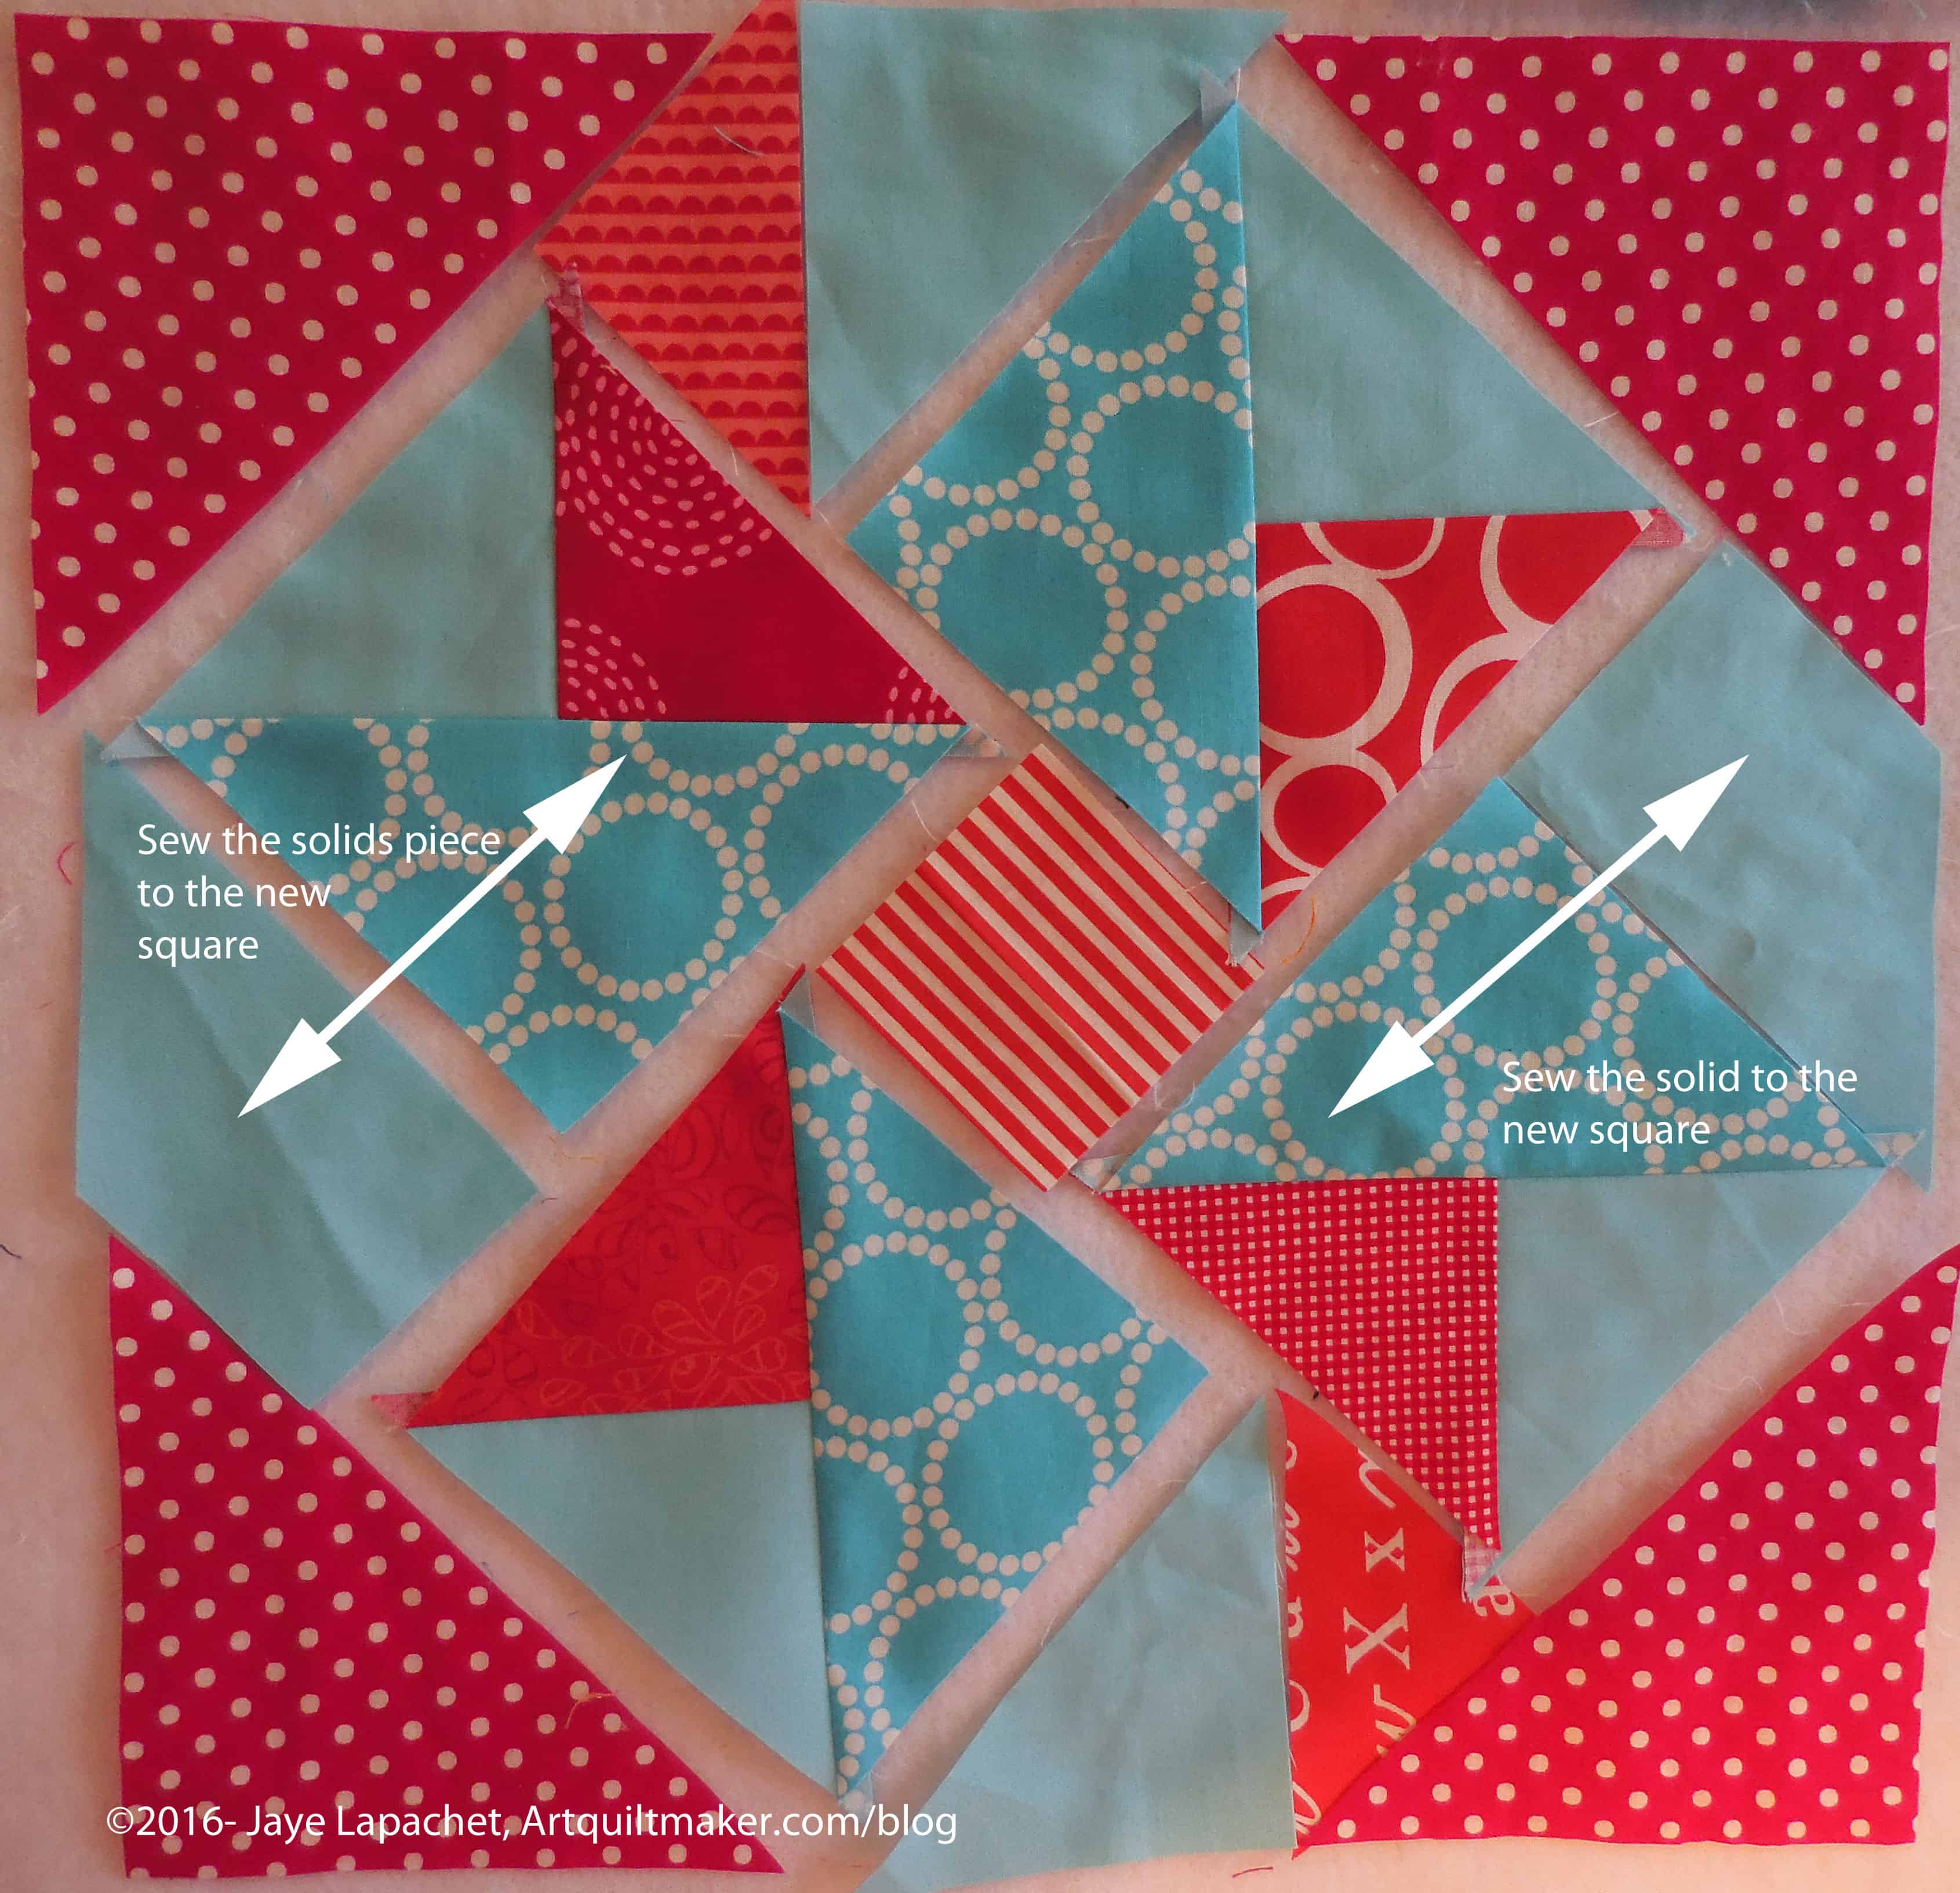
Sew squares to solid fabric
11. Sew the solid, rectangle-ish pieces to the squares you just sewed.
Place sewn sections back on the design wall
12. Place the sewn sections back on the design wall.
Sew small red triangles to solid triangles
13. Sew small red triangles to solid triangles
Sew new section to square
14. Sew new section to your squares.
Place sewn sections back on the design wall
15. Place the sewn sections back on the design wall.
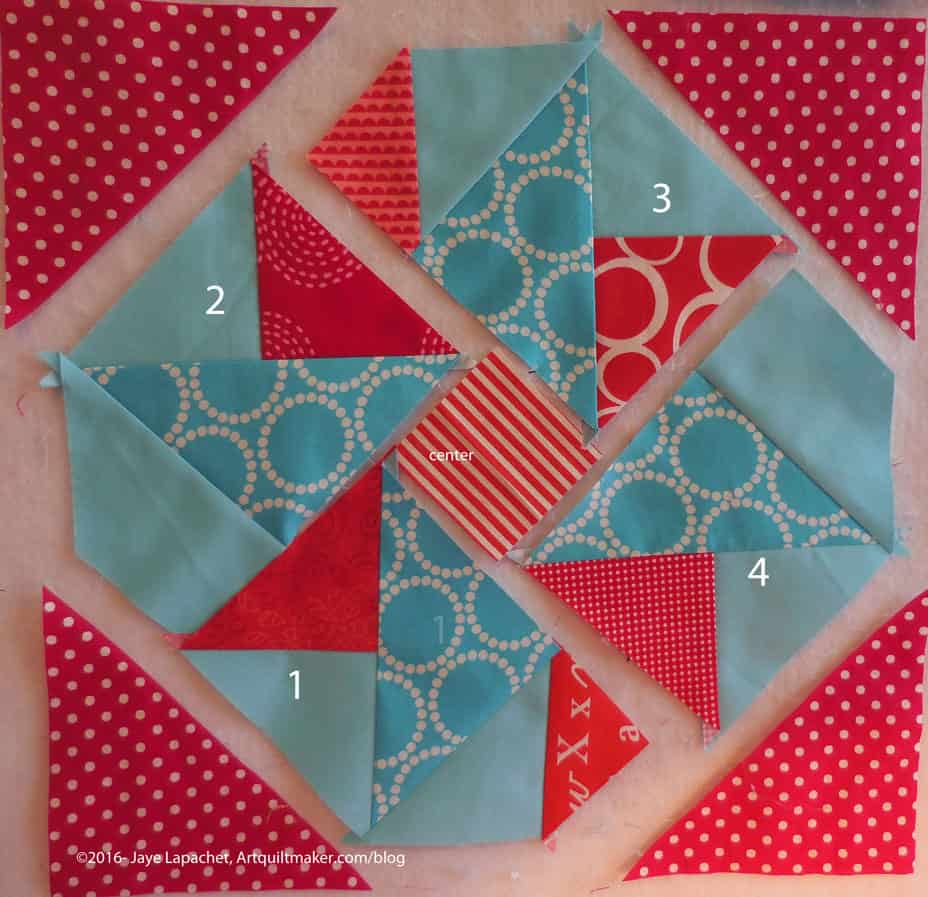
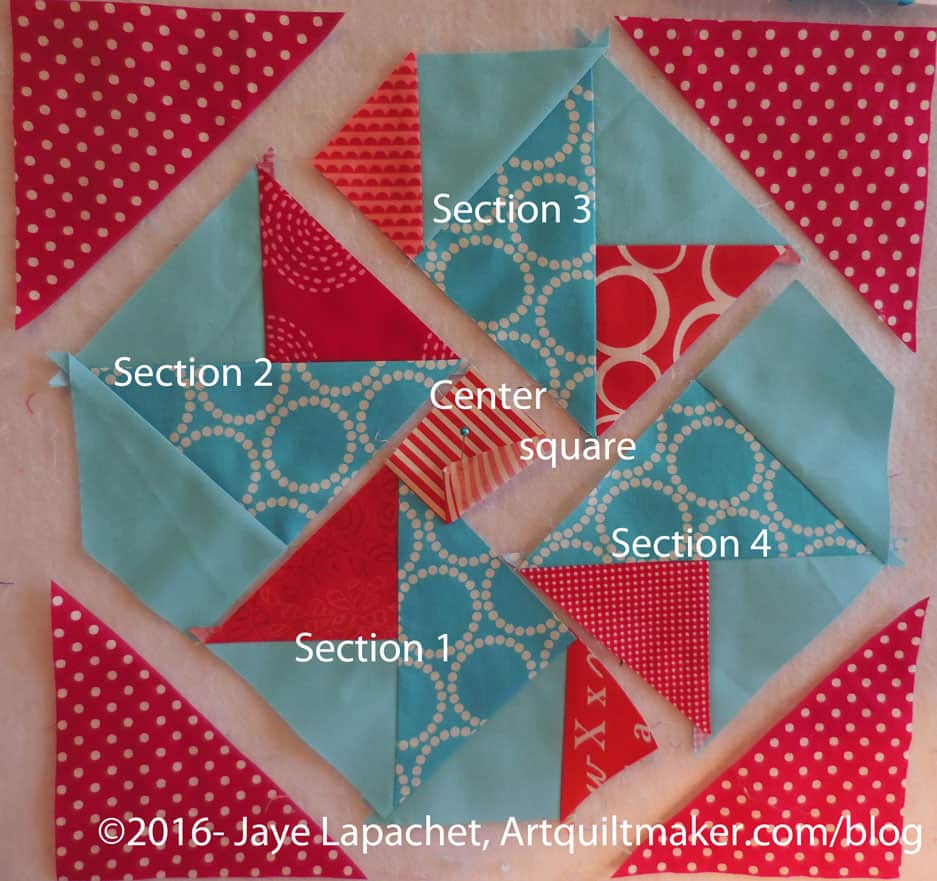
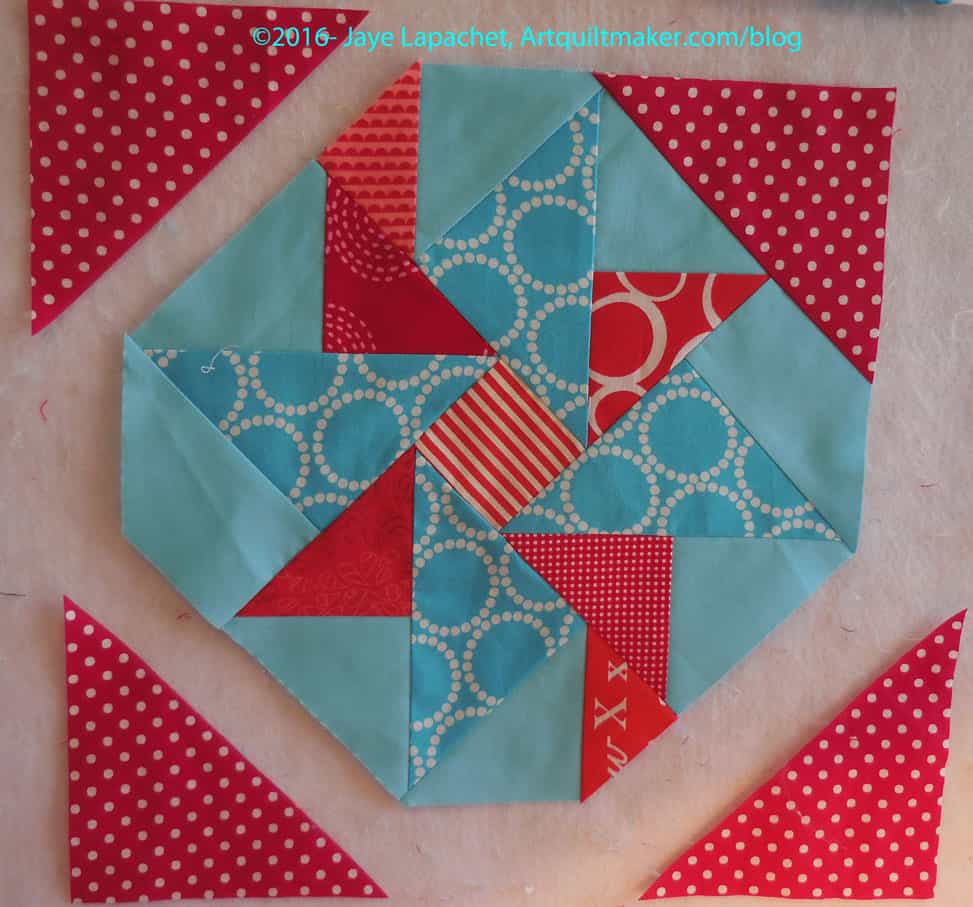
Now you have 4 major sections plus the center and 4 corner patches. Now we are going to get serious with partial seaming.
Take the center and section 1
16. Take the center and section 1.
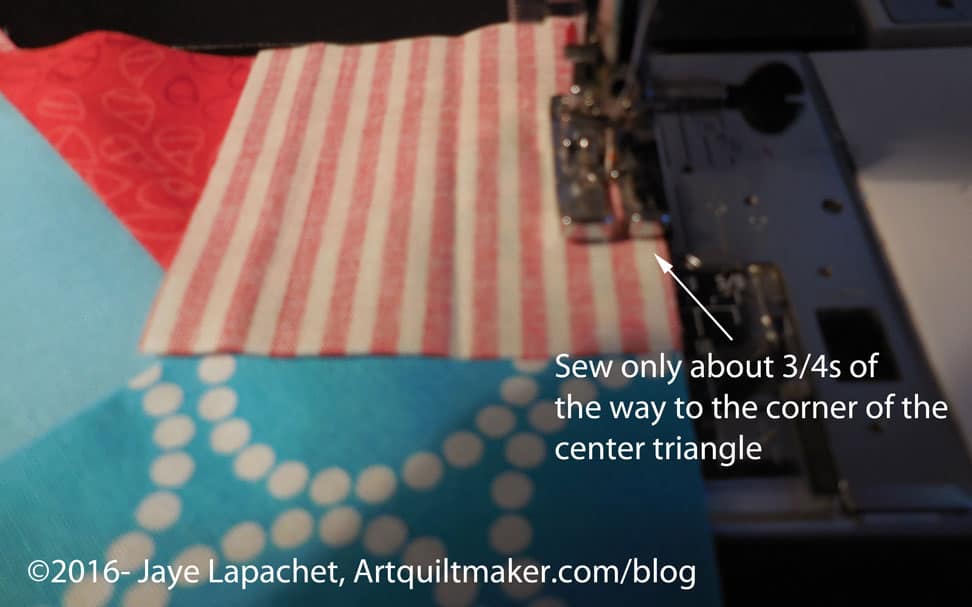
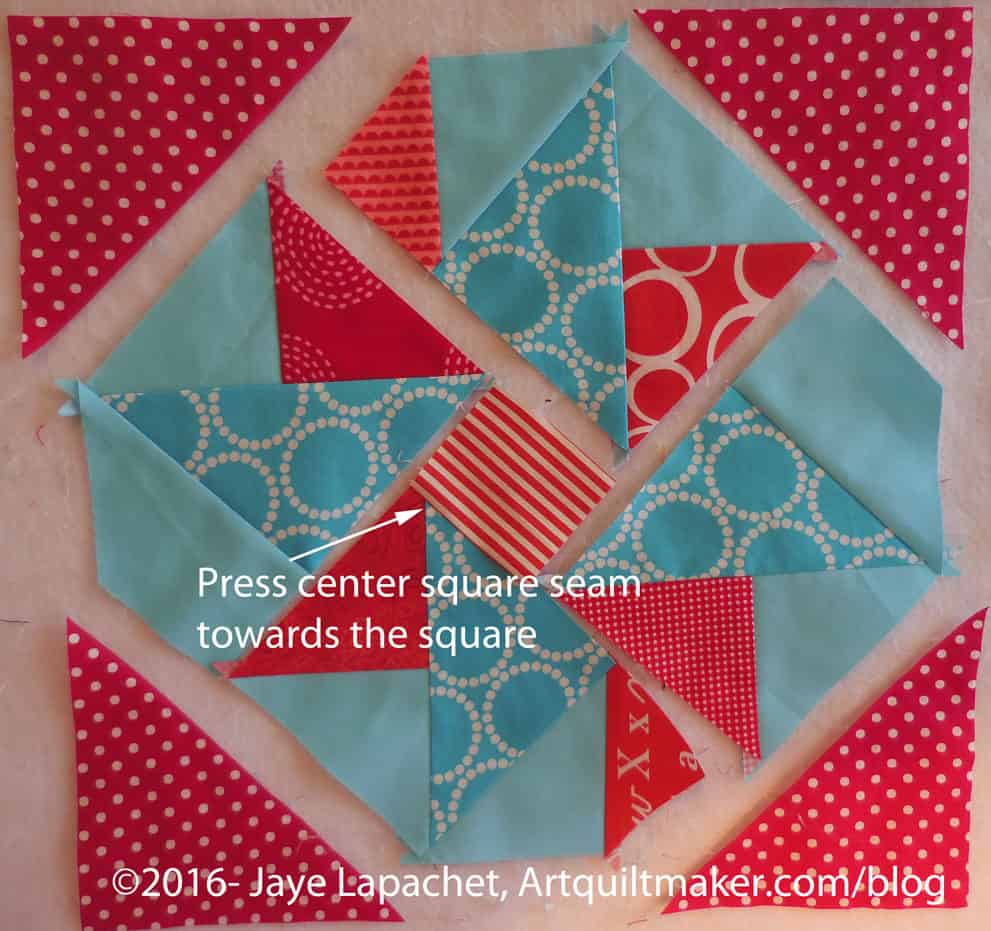
Sew about 3/4s of the way down the center square seam
17. Put section 1 under the needle with the center square on top. Line the center square up with the intersection of the red triangle and the Pearl Bracelets triangle (my fabrics used as a guide).
Backstitch at the end of the seam to secure the seam since you will be playing with it.
Press seam towards center
18. Press seam towards center square. Press carefully since the whole seam isn’t sewn.
Partially sewn seamPartially sewn seam – detail
The sewn piece will flip up. You can see about how much to sew in the picture above.
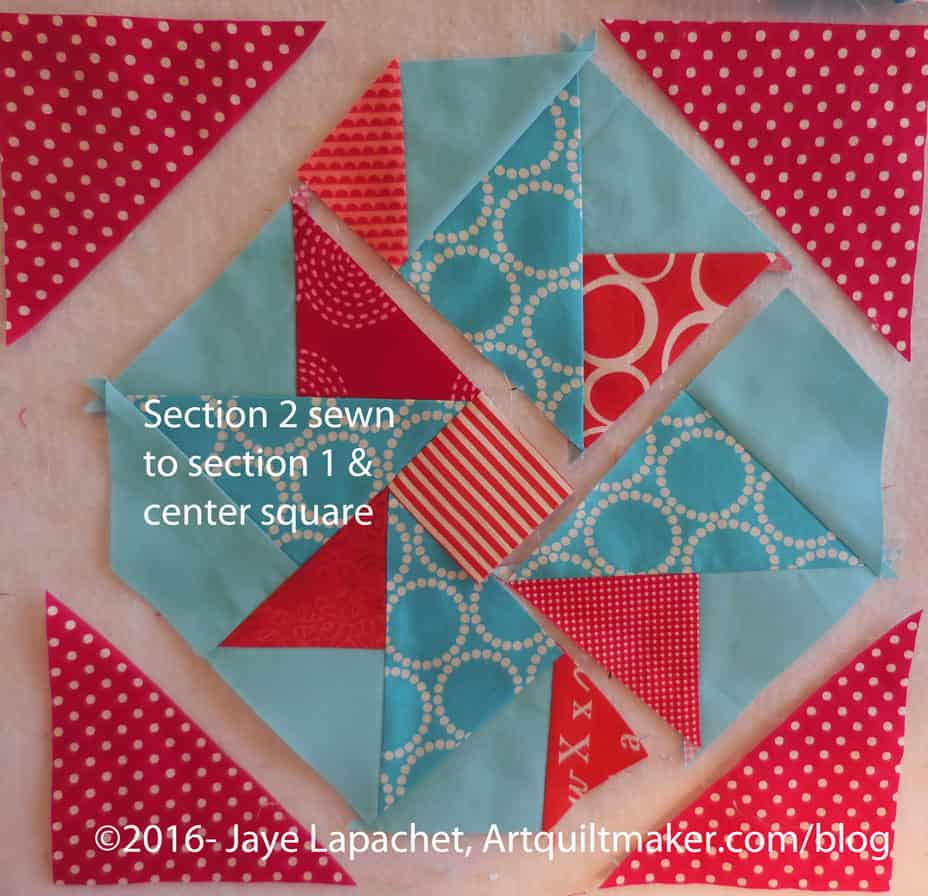
19. Take section 2 and lay it over section one and the center square with right sides together. The lengths should be about the same.
Section 2 sewn to section 1Section 2 sewn to section 1 + center square
Completing the sewing of section 2 makes the section look like it is possible to sew on section 3.
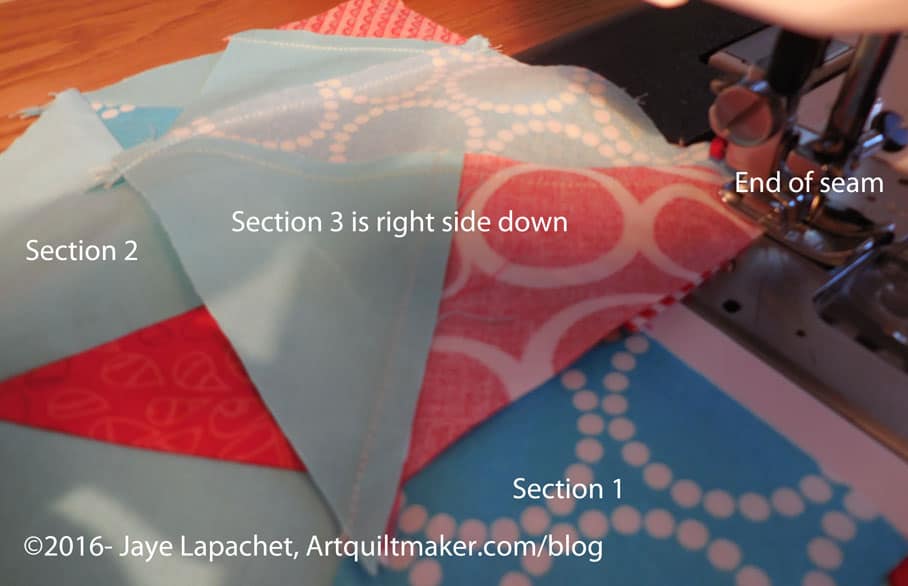
Section 3 right side downEnd of section 3 seam
20. Lay section 3 over section 2 and the center square. Line up the edges so they are event.
Center section almost done
Now your center section is almost done.
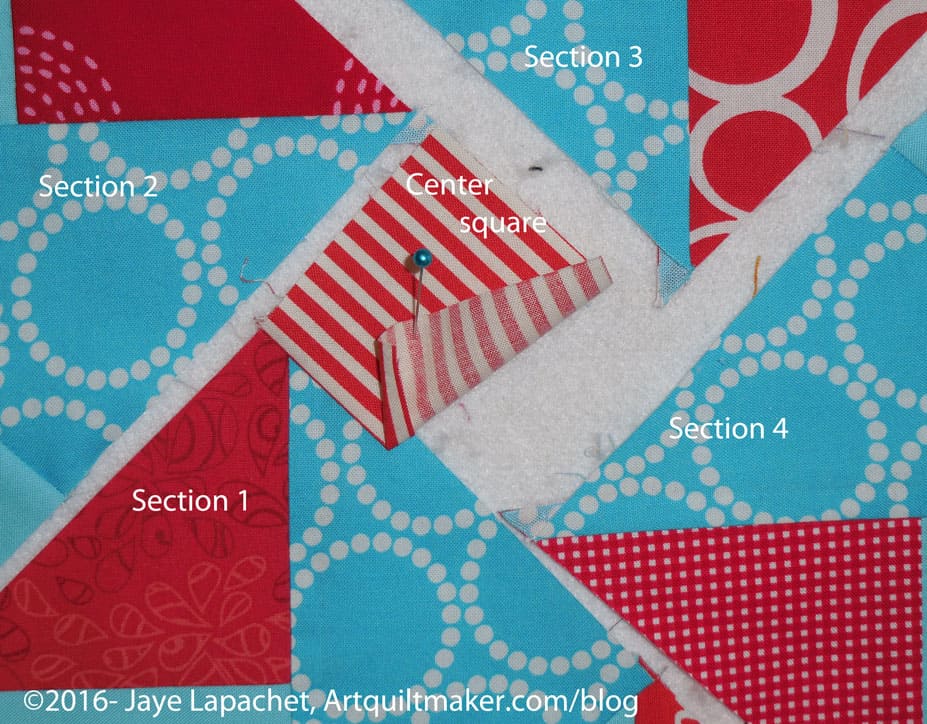
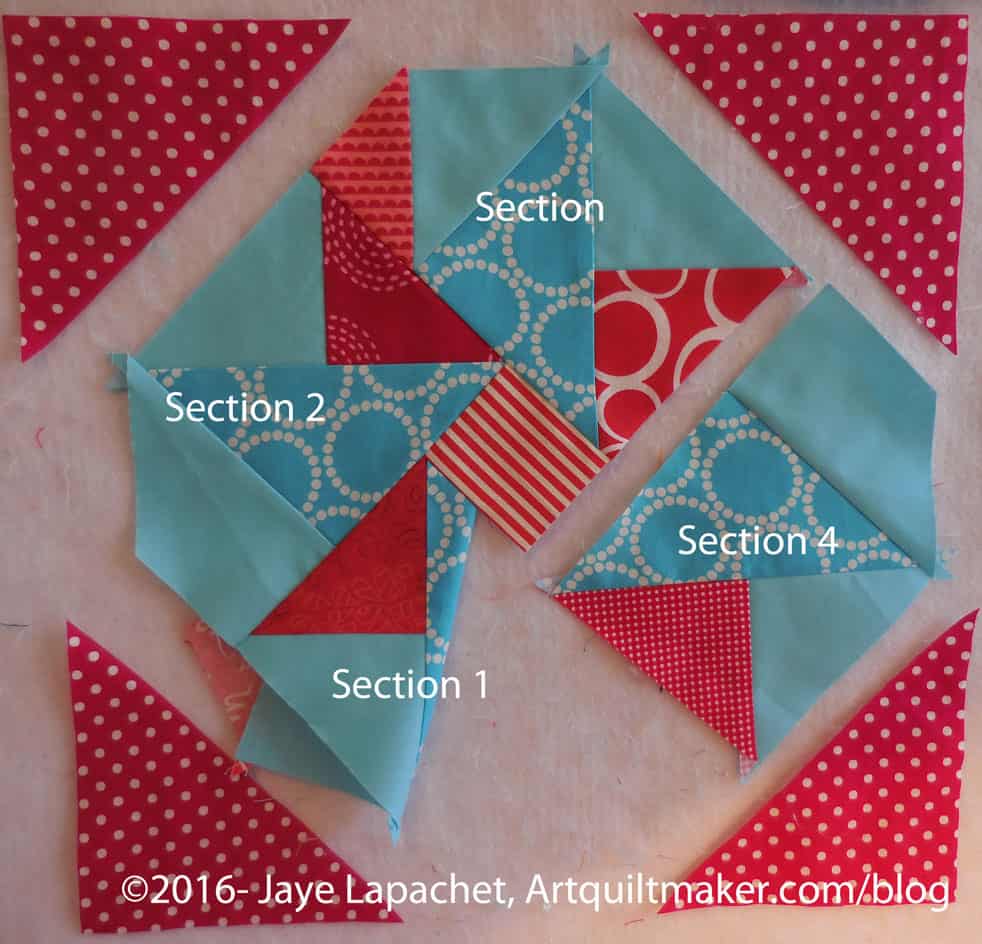
Tuck section 1 under section 2
21. Prepare to sew section 4 to the larger piece you have made by tucking section 1 under section 2. You might want to use a pin to keep it out of the way.
22. Lay section 4 over section 3, right sides together.
Section 4 sewn
Section 4 is sewn. Keep section 1 tucked under and out of the way for the next step. Get ready to complete your partial seam.
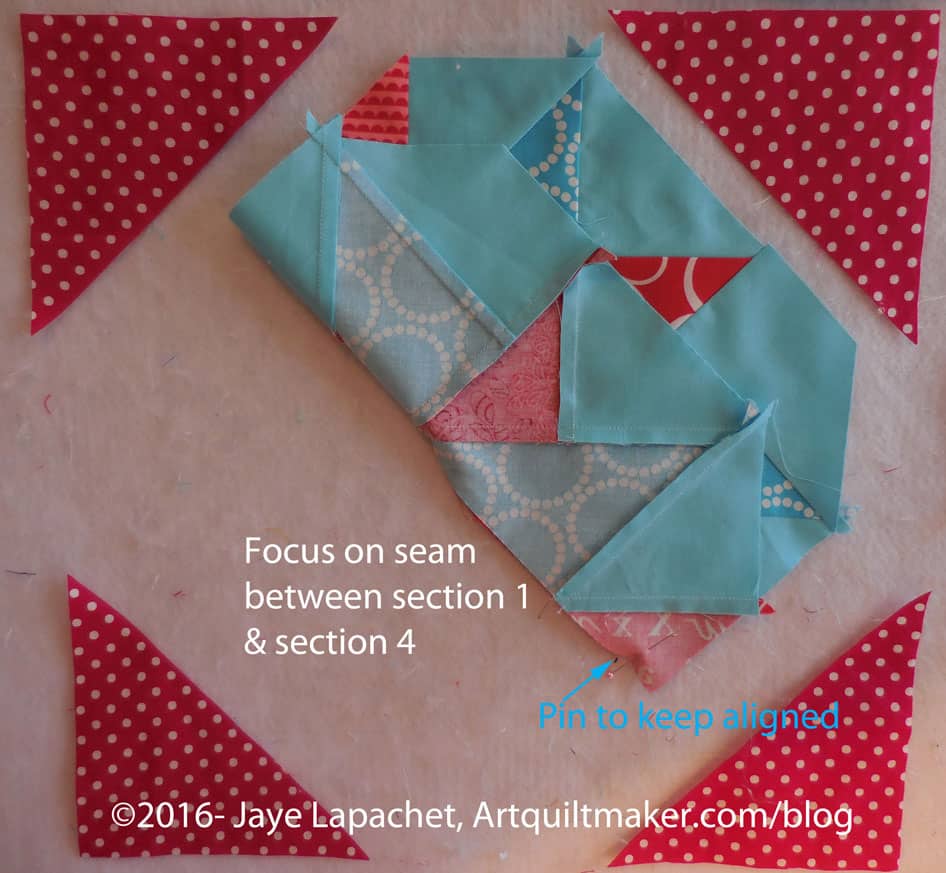
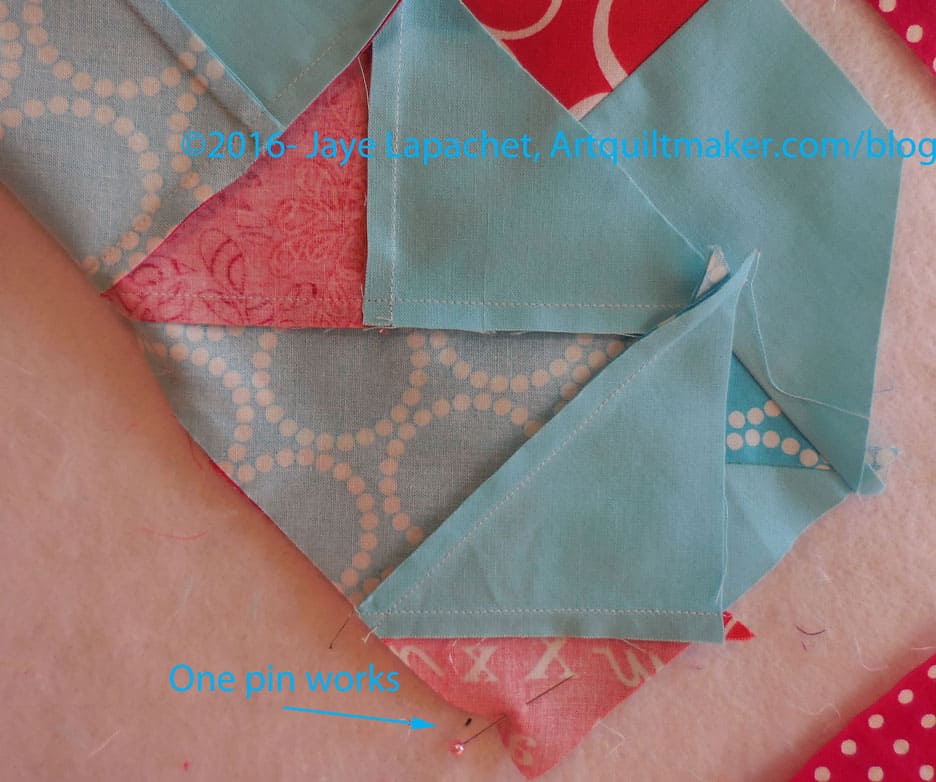
Fold center section upFold section up – detail
23. Fold the raw edges between section 1 and section 4 up like half of it wasn’t sewn. Use a pin near the end of the seam (edge of the section) to keep it in place.
Position piece near pinStart sewing near pin – detail
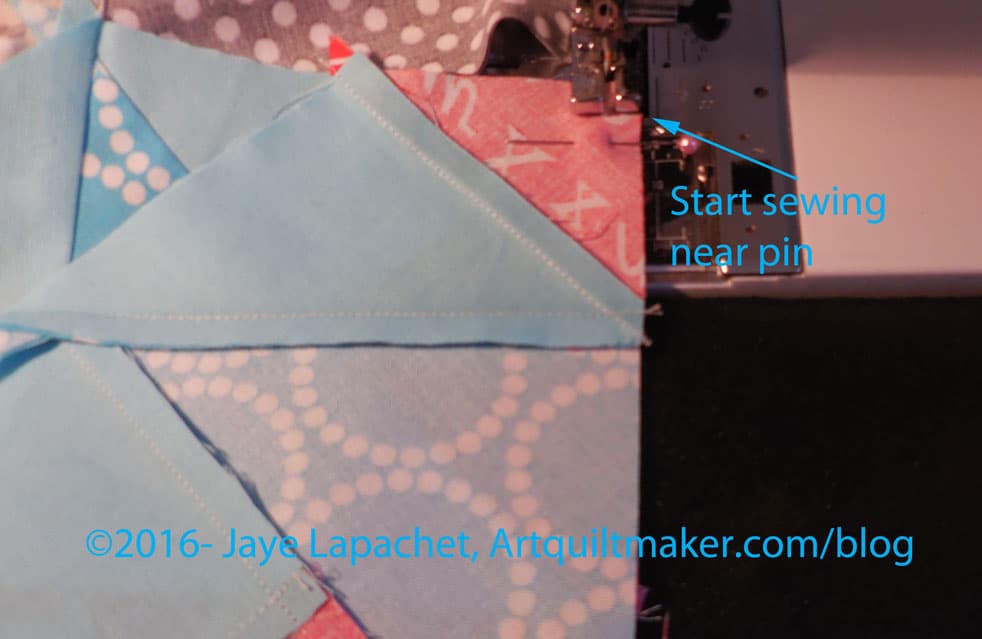
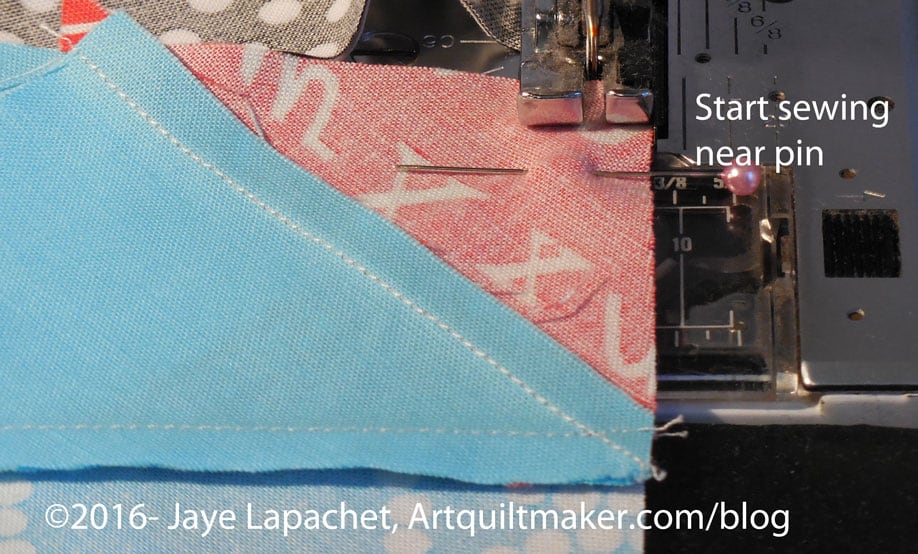
24. Position piece so you start sewing near the pin.
Now you will sew the partial seam.
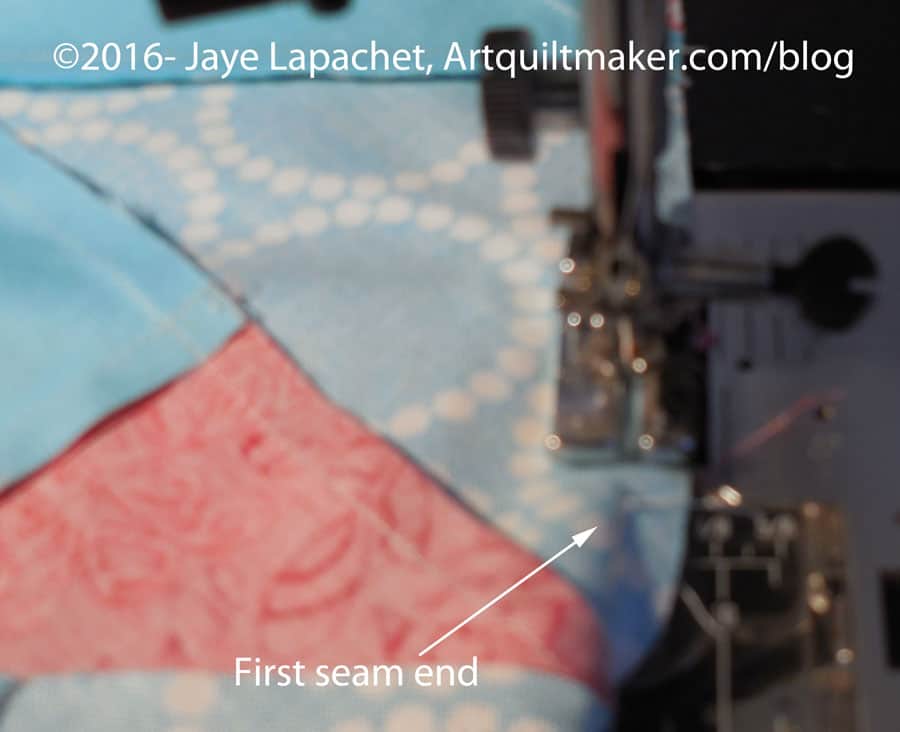
Sew partial seamSew partial seam
25. Once you start sewing from the pin (noted above), you will see the end of the first seam you partially sewed. Sew slowly to the end of previous seam line. To avoid a lump in the middle where the two seams meet, you can tug VERY gently towards your body as you sew. Do this only if necessary.
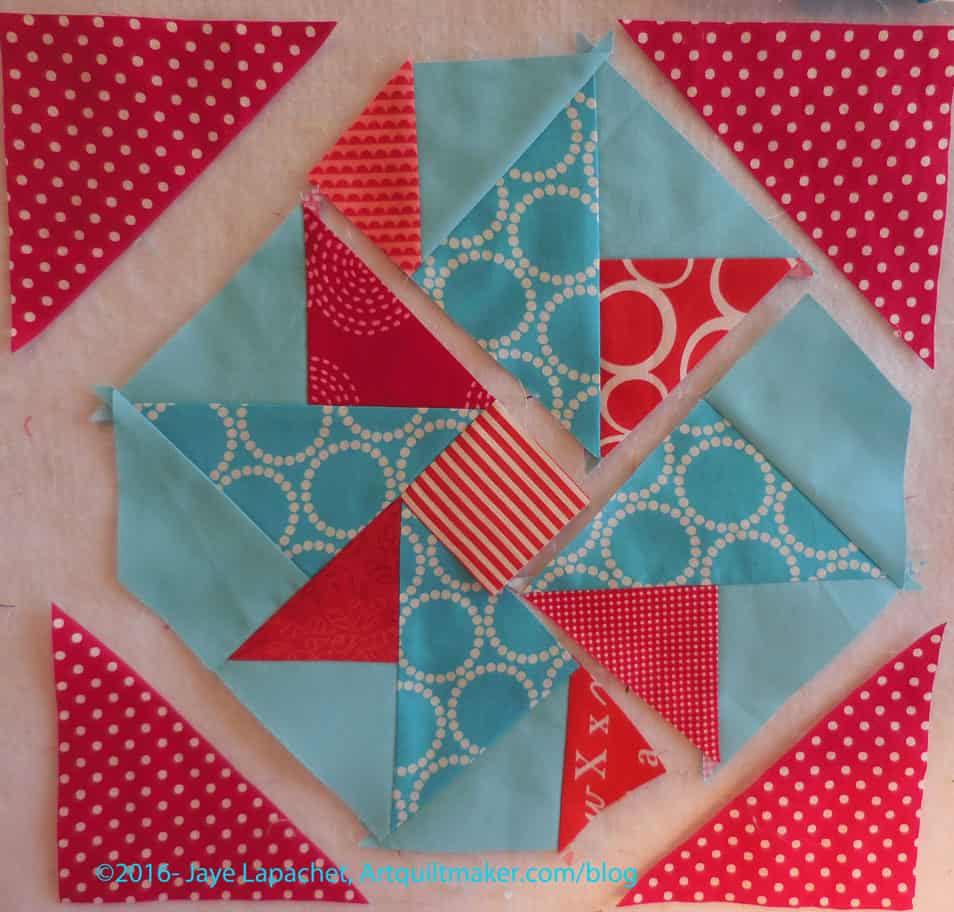
Center section sewn
Hooray!!! You have finished the center section
Now you have to sew the corner triangles to the center section to finish the block.
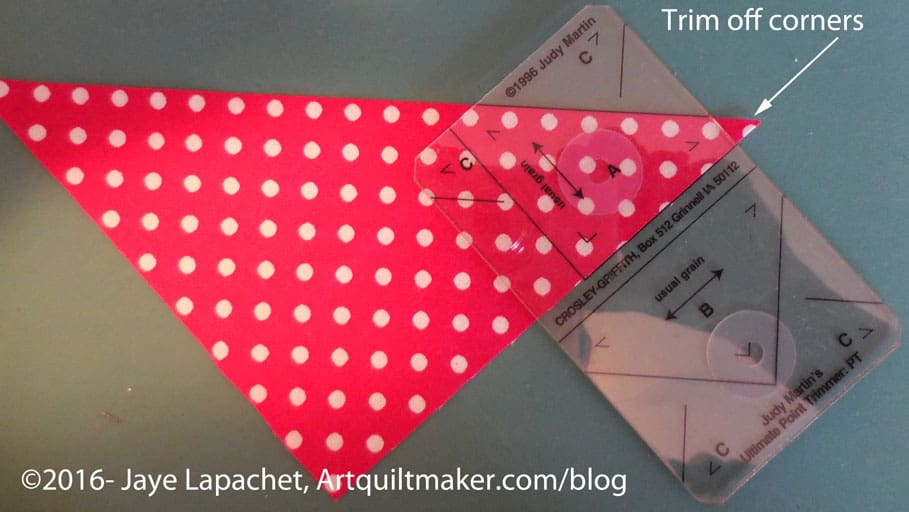
Trim off corners
26. Trim off corners of large corner triangles before you sew them on. You can trim them all at once or one at a time, which is what I do.
Lay out triangle on sewn section
27. Lay triangle on the sewn section, lining up trimmed corners even with edge of sewn section.
First corner triangle sewn
Your piece will look like the above image. Follow steps 26-27 for all corner triangles.
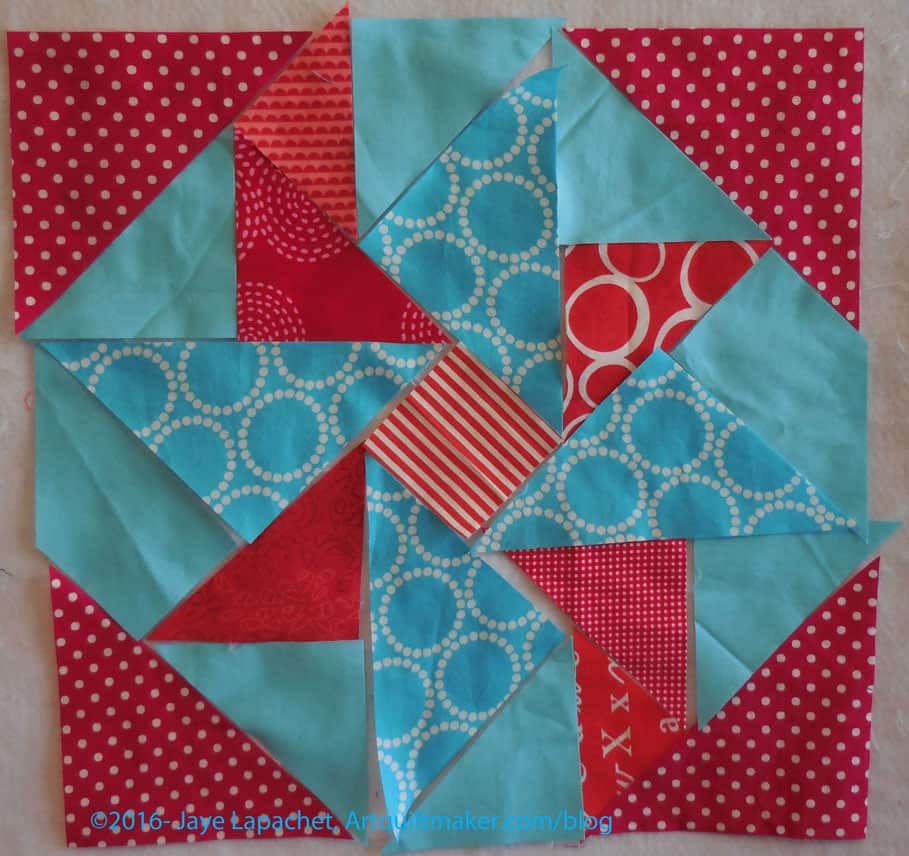
Finished Block
You are now finished! Great job!
___________________________________
Other resources and patterns regarding partial seams:
Laura Nownes tutorial on partial seams. Good tip about avoiding puckering on the last seam. I don’t agree with not pressing the seams until the end. Avoid pressing the first half seam, but press all the rest.
**Obviously, you should shop at local quilt shops and small businesses. However, if you are too busy or can’t find what you need there, I use Amazon affiliate links and may be paid for your purchase of an item when you click on an item’s link in my post. There is no additional cost to you for clicking or purchasing items I recommend. I appreciate your clicks and purchases as it helps support this blog.
The other day I had to go to Santa Clara to take the YM to a one day job. He actually got paid! He could have ridden the train, but Julie and I decided to get together, so it worked out.
We went to lunch and went to Golden State Sewing. I hadn’t been to this store before (sorry no photos), but I had been to their booth at PIQF. The store was crammed with fabric, but in an organized way. I looked at fabric for dress for next Grand Parlor and some upcoming events. They had an excellent selection of Kaffe Fassett fabrics.
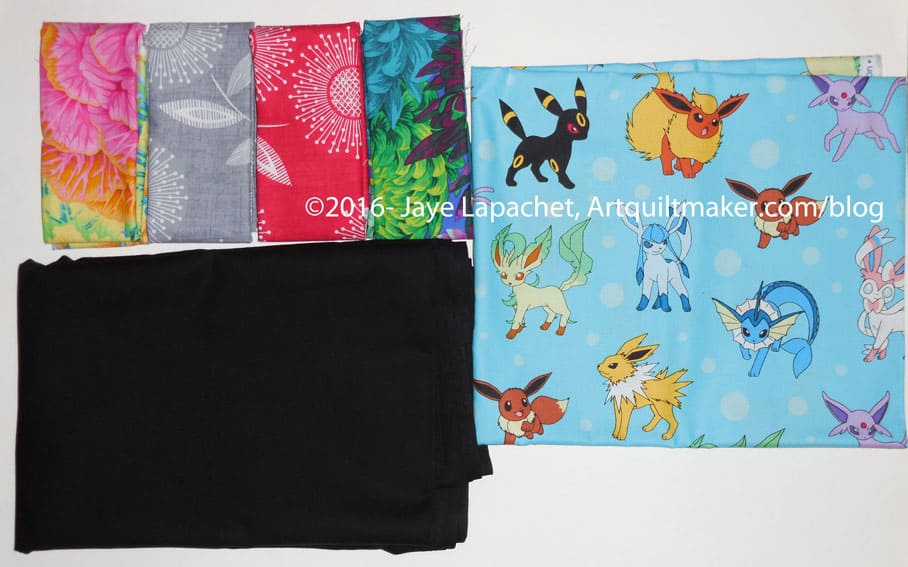
I looked very seriously at a couple of Kaffe prints for dresses, but didn’t end up buying any. I did end up seeing the Pokemon fabric from which I promised to make a pillowcase for the YM’s new roommate.
Golden State Sewing fabrics
I bought a few things. I bought the Pokemon fabric. I also bought a boatload of black solid for the Peacock. The other fabrics are fat quarters. The two Kaffes are the ones I am still considering for dresses. The center fat quarters are similar to the blue I used for the Midi Bag. I had never seen that print in other colors. While I like the blue best, the red and grey are nice, too. The grey is a little too dark for the Flying Geese, but I have to admit to trying it out on a few FGs anyway.
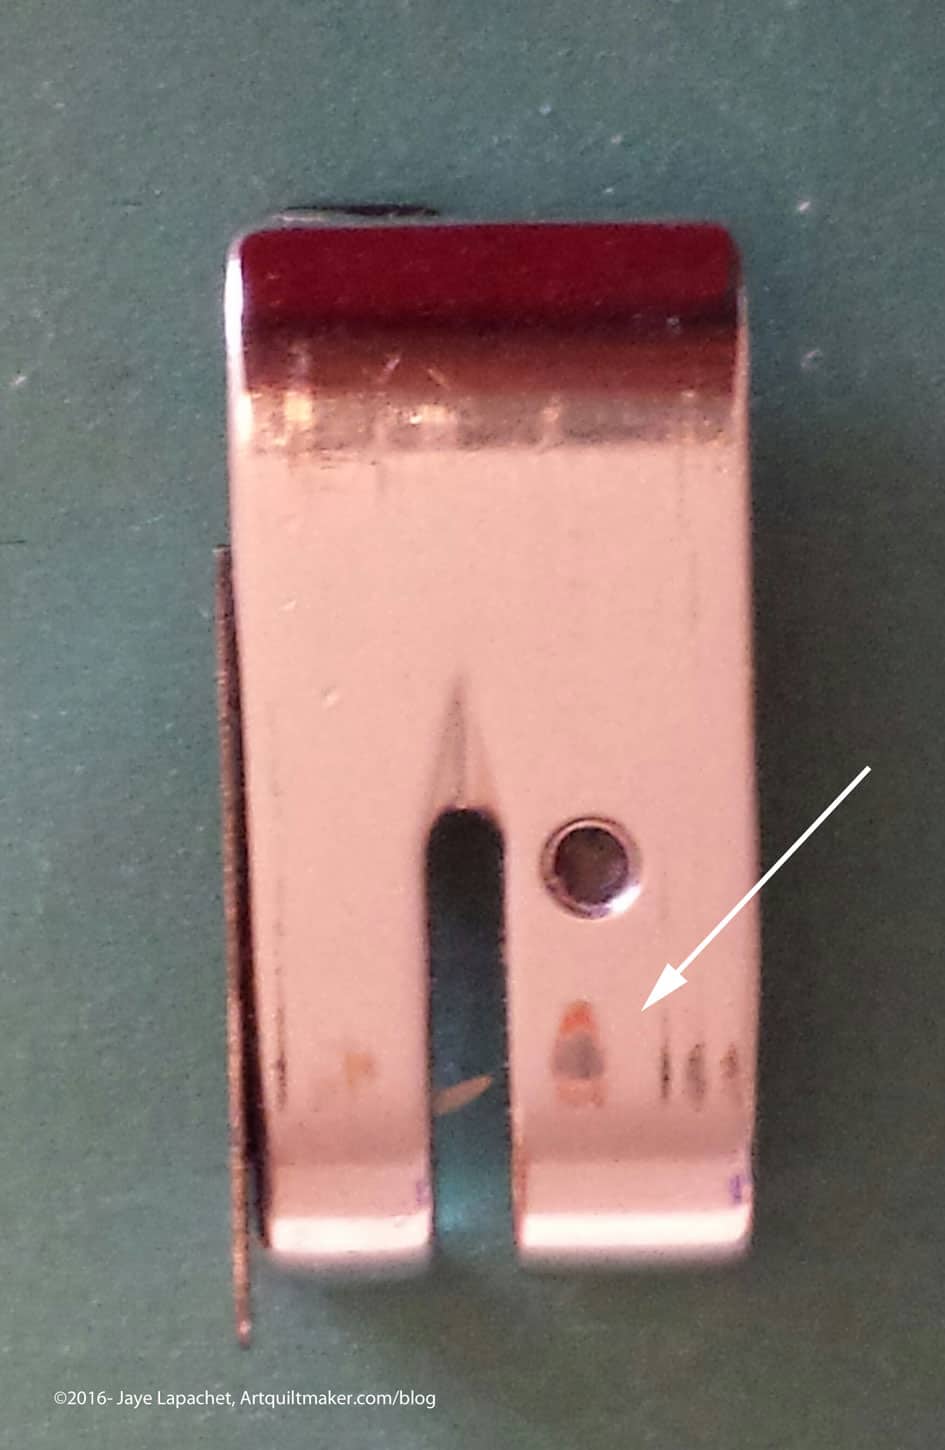
Well, from the”you learn something new every day department” comes word that you CAN wear out sewing machine feet.
The 9k has been acting up. Not badly, but like an old lady who wants attention. First, something electrical with the light went wrong pretty soon after I brought it home. I know it wasn’t the bulb, because, for a time, if I tapped on it, the light would come on, stay on for a bit, then go out.
I also noticed that the machine would feed the fabric unevenly. I thought I noticed it because I was used to the DC5100, which uses newer technology.
I could live with these annoyances, but when the machine stopped working completely, I was had to do something. One day, I turned it on, the machine made a horrible noise, so I turned it off. Then it wouldn’t turn on again. I swapped it out for the DC5100 since I needed to progress with the Cargo Duffle prep.
Since the machine not turning on was major, I texted Angie at the Sewing Machine Place, though I had avoided it until then despite noting a few issues. She suggested a few things. A different cord worked for making the machine work but she needed to look at it to see what could be done about the feeding and the light. I continued sewing on the DC5100 since I was on a deadline.
The YM and I took it in on Tuesday. I needed him for lugging the 50 lb beast. We found a parking spot right by the door, so I really could have dealt with it myself. She checked everything while I waited. I may have to buy a new power cord, but the old one worked at the shop. The big news was that the feeding problem comes from 20 year old feet.
Wear on quarter inch foot
I wore out the two feet I use most frequently. I could not believe what I was hearing. Angie told me that the feet are rubbing up against the feeddogs some of the time, especially the quarter inch foot and that, over time, the metal wears through.
In the photo, you can see the discoloration (I know the photo could be better, but with the glare of the metal the camera had a hard time focusing). That is a spot where at least the first layer is gone.
The foot I use for zig zagging (Janome F) had strips of metal on the plastic bottom and had the same problem. Angie had an F foot so I bought it, but had to go to Always Quilting to get the quarter inch foot. I have been using the DC5100 as I work on the Cargo Duffle so I haven’t had a chance to try out the feeding on the 9k with the new feet. I’ll let you know how it goes.
If you are having feeding problems, check the bottom of your feet.
As you know from a previous post, I have been working almost exclusively on the prep for the BAMQG Cargo Duffle class. I haven’t had tons of time to sew. What I have had I have spent on prep.
I like making bags, because I have something useful at the end of the process. Also, people seem to like them when I give them as gifts. I do not, however, like the prep required, regardless of whether I am just sewing a bag on my own or preparing for a class. In fact, I always swear a lot and then swear I will never make another bag again when I am in the bag prep process.
Part of this feeling has to do with my, well documented for you, difficulty in reading pattern directions and understanding what the designer is trying to say. I’ll take some, but won’t take full responsibility because I believe that the directions for this bag were briefer than necessary. I understand why, especially after working with Alison, because patterns need to be printed and printing 60 pages of directions including photos is daunting.
Cargo Duffle pieces and parts
One of the things I had to do, which was different for this pattern was to quilt a lot of the parts. I understand why, and you will as well after seeing the finished piece, but it made for a lot of extra work.
Friday night I stayed in my workroom until 10pm sewing on this project. Finally, DH called me down to watch the parade of nations for #Rio2016. I decided that I would have to work on whatever I didn’t finish in class. I estimate working on the prep for about 20 hours. I didn’t keep strict track, but I think that is in the neighborhood.
What I really needed was a chart showing the pieces and giving their sizes with arrows pointing to the piece on the finished bag. I really needed that visual. I think it would have made my life a lot easier. I didn’t really understand what a gusset* was, especially in this context, and that added to the confusion of all of the parts and pieces.
I am not criticizing the teacher who was extremely patient on her first outing as a teacher. She responded quickly and non-snarkily each time she got a question on the guild forum from one of the 20+ students.
I would have liked to have seen more meshing of the pattern and the hacks/supplement (by our teacher), including references back and forth to when to go and do a step from the pattern and when to stop. This addition would have required a lot more time on her part and we weren’t paying her so I think that would have been too much to ask. It might have been nice to get together with other students beforehand to work on the prep.
I constantly learn from creating new bags and, though, this isn’t the kind of bag I would tend to use, I am learning quite a bit from making it, not the least of which has to do with gussets. 😉
The definition of gusset didn’t match what I was seeing in the Cargo Duffel pattern so that created some confusion. Wikipedia’s definition is similar to the American Heritage and Merriam Webster. I didn’t didn’t find any of them to be super helpful in the context of this pattern: “In sewing, a gusset is a triangular or rhomboidal piece of fabric inserted into a seam to add breadth or reduce stress from tight-fitting clothing.[1] Gussets were used at the shoulders, underarms, and hems of traditional shirts and chemises made of rectangular lengths of linen to shape the garments to the body.[2][3]
Gussets are used in manufacturing of modern tights and pantyhose to add breadth at the crotch seam. As with other synthetic underwear,[4] these gussets are often made of moisture-wicking breathable fabrics such as cotton, to keep the genital area dry and ventilated.[5][6][7]
The phrase “don’t bust a gusset” (a variation of “don’t blow a gasket”) is an admonition to calm down; becoming so enraged and inflated that one busted a gusset would imply extreme rage and expansion beyond one’s clothing capacity.
Gussets are also used when making three-piece bags, for example in a pattern[8] for a bag as a long, wide piece which connects the front piece and back piece. By becoming the sides and bottom of the bag, the gusset opens the bag up beyond what simply attaching the front to the back would do. With reference to the dimension of the gusset, the measurements of a flat bottom bag may be quoted as LxWxG.[9]
Pillows too, are often gusseted, generally an inch or two. The side panels thicken the pillow, allowing more stuffing without bulging.
Gussets are also used in other areas of manufacturing, e.g. bicycle frames employ gussets to add strength and rigidity.[clarification needed]” (Wikipedia)
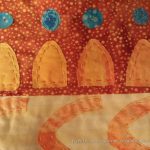
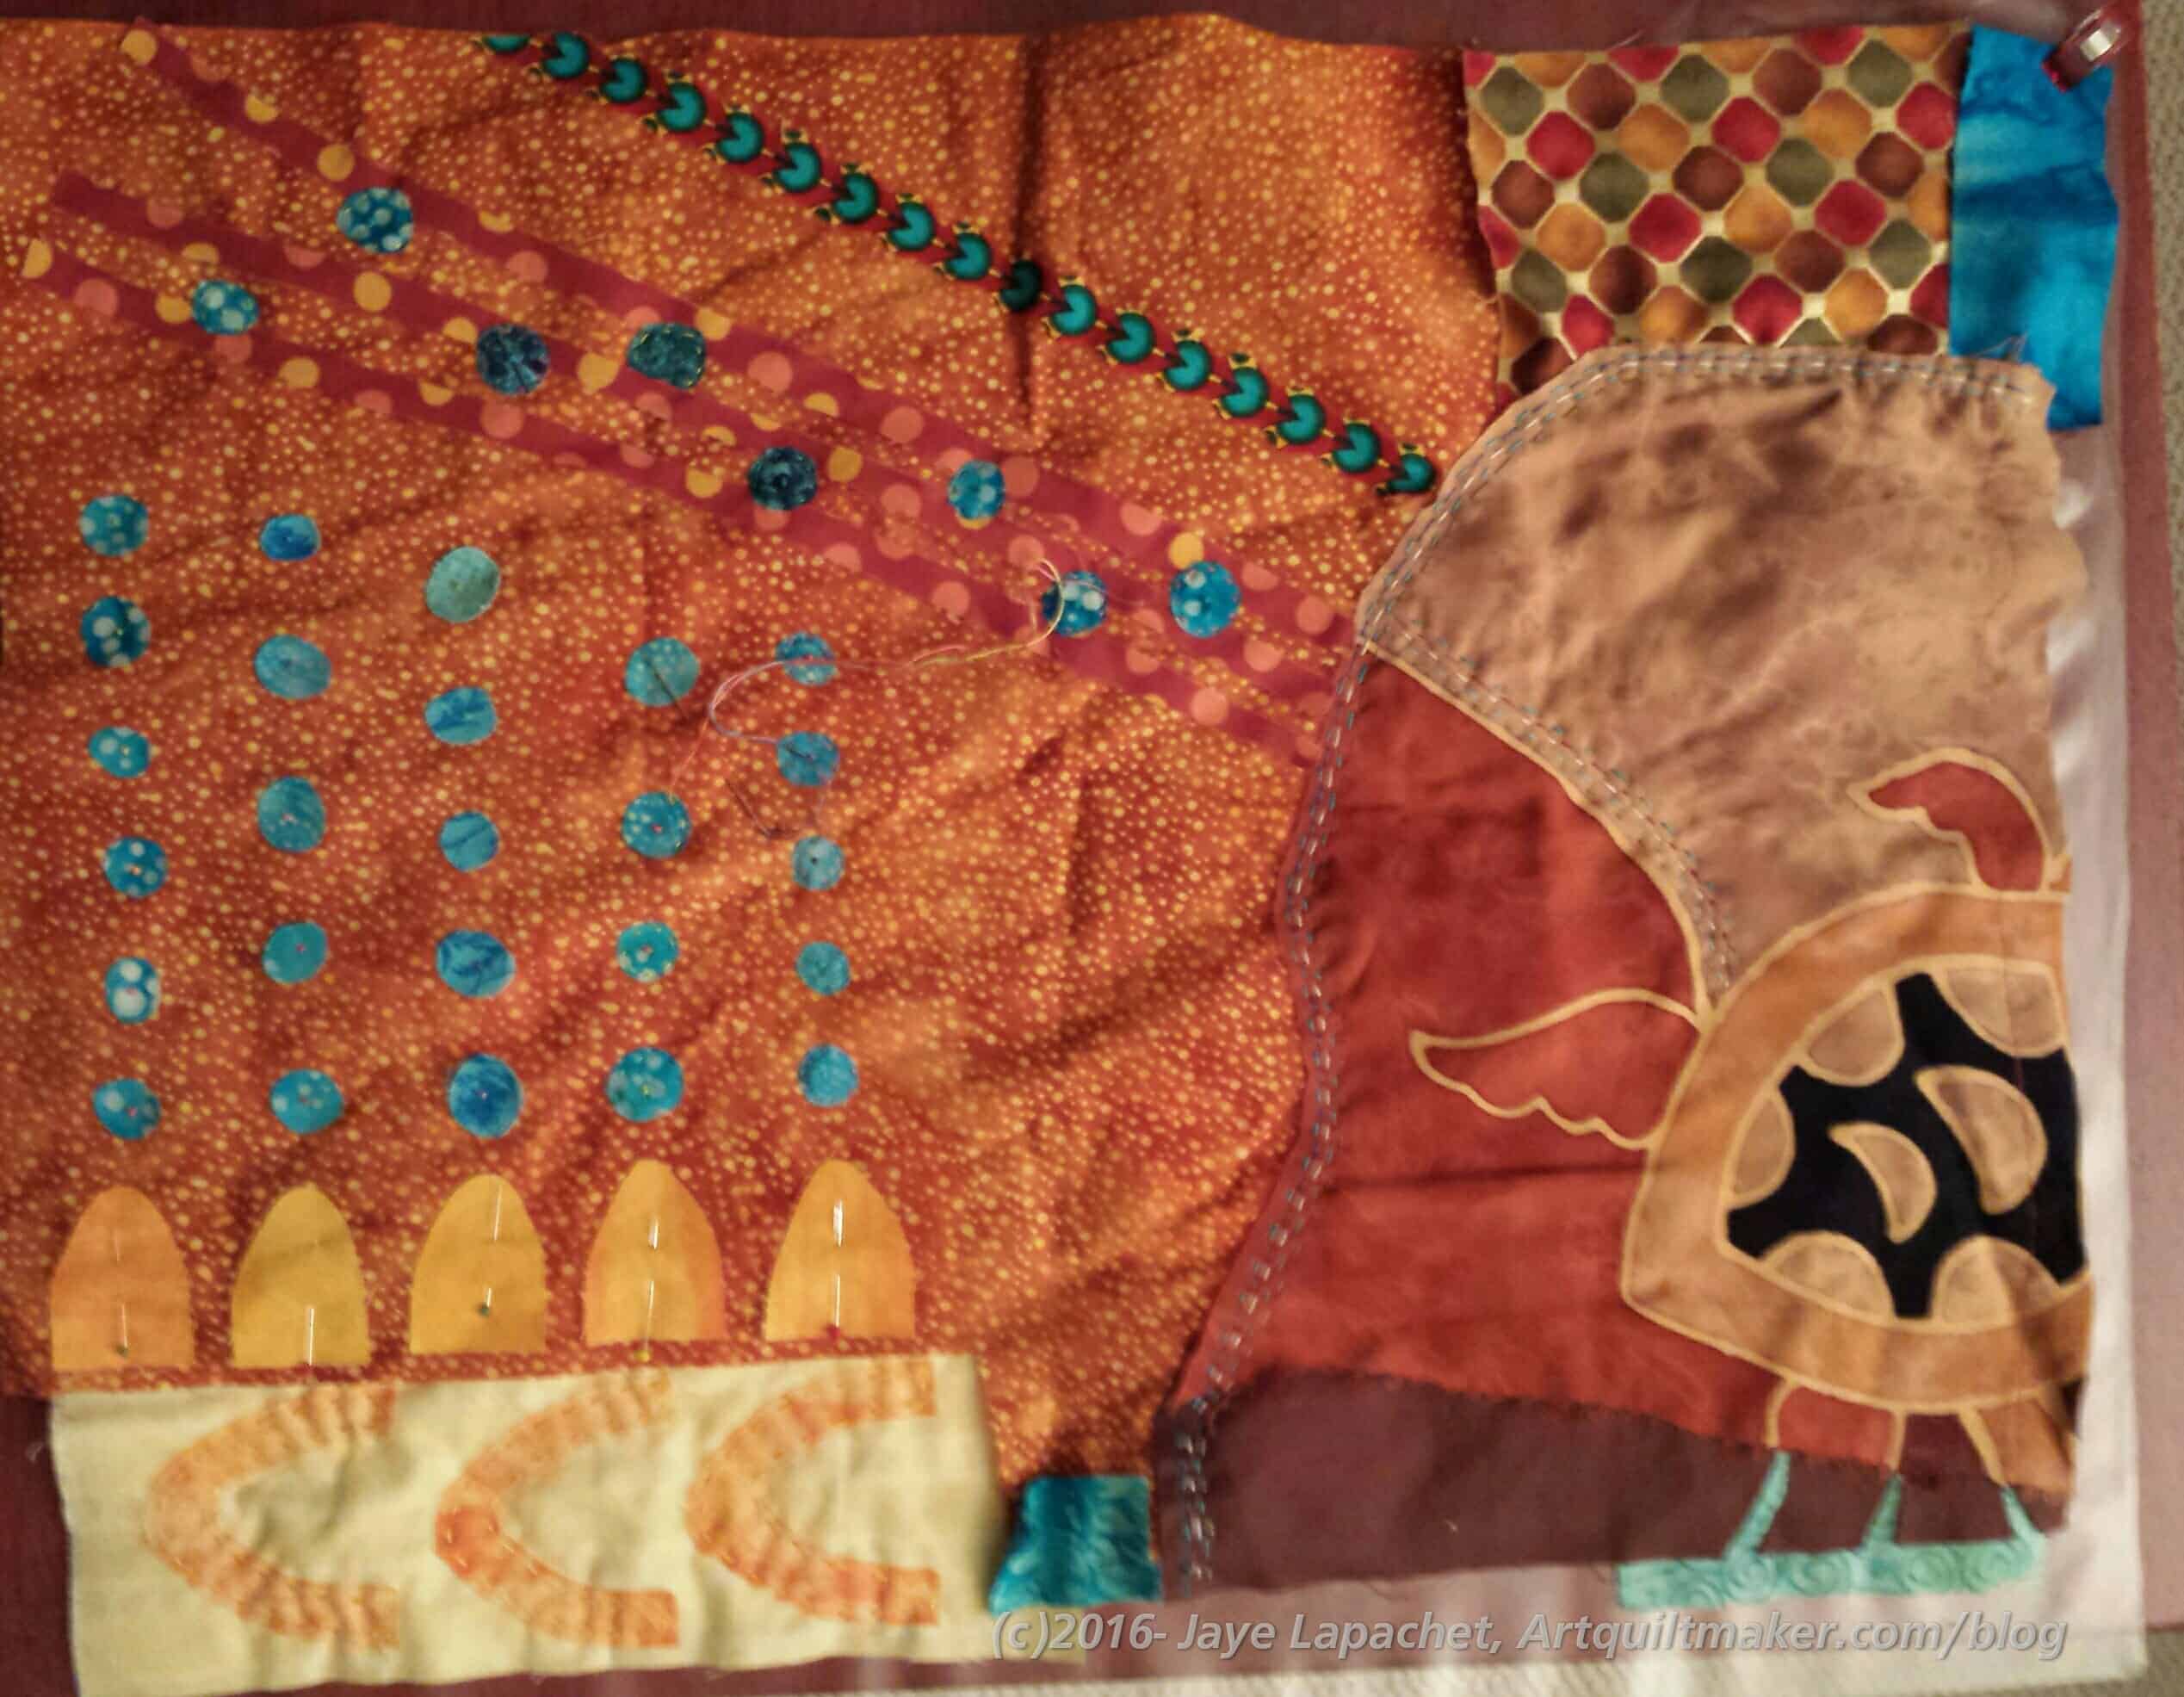
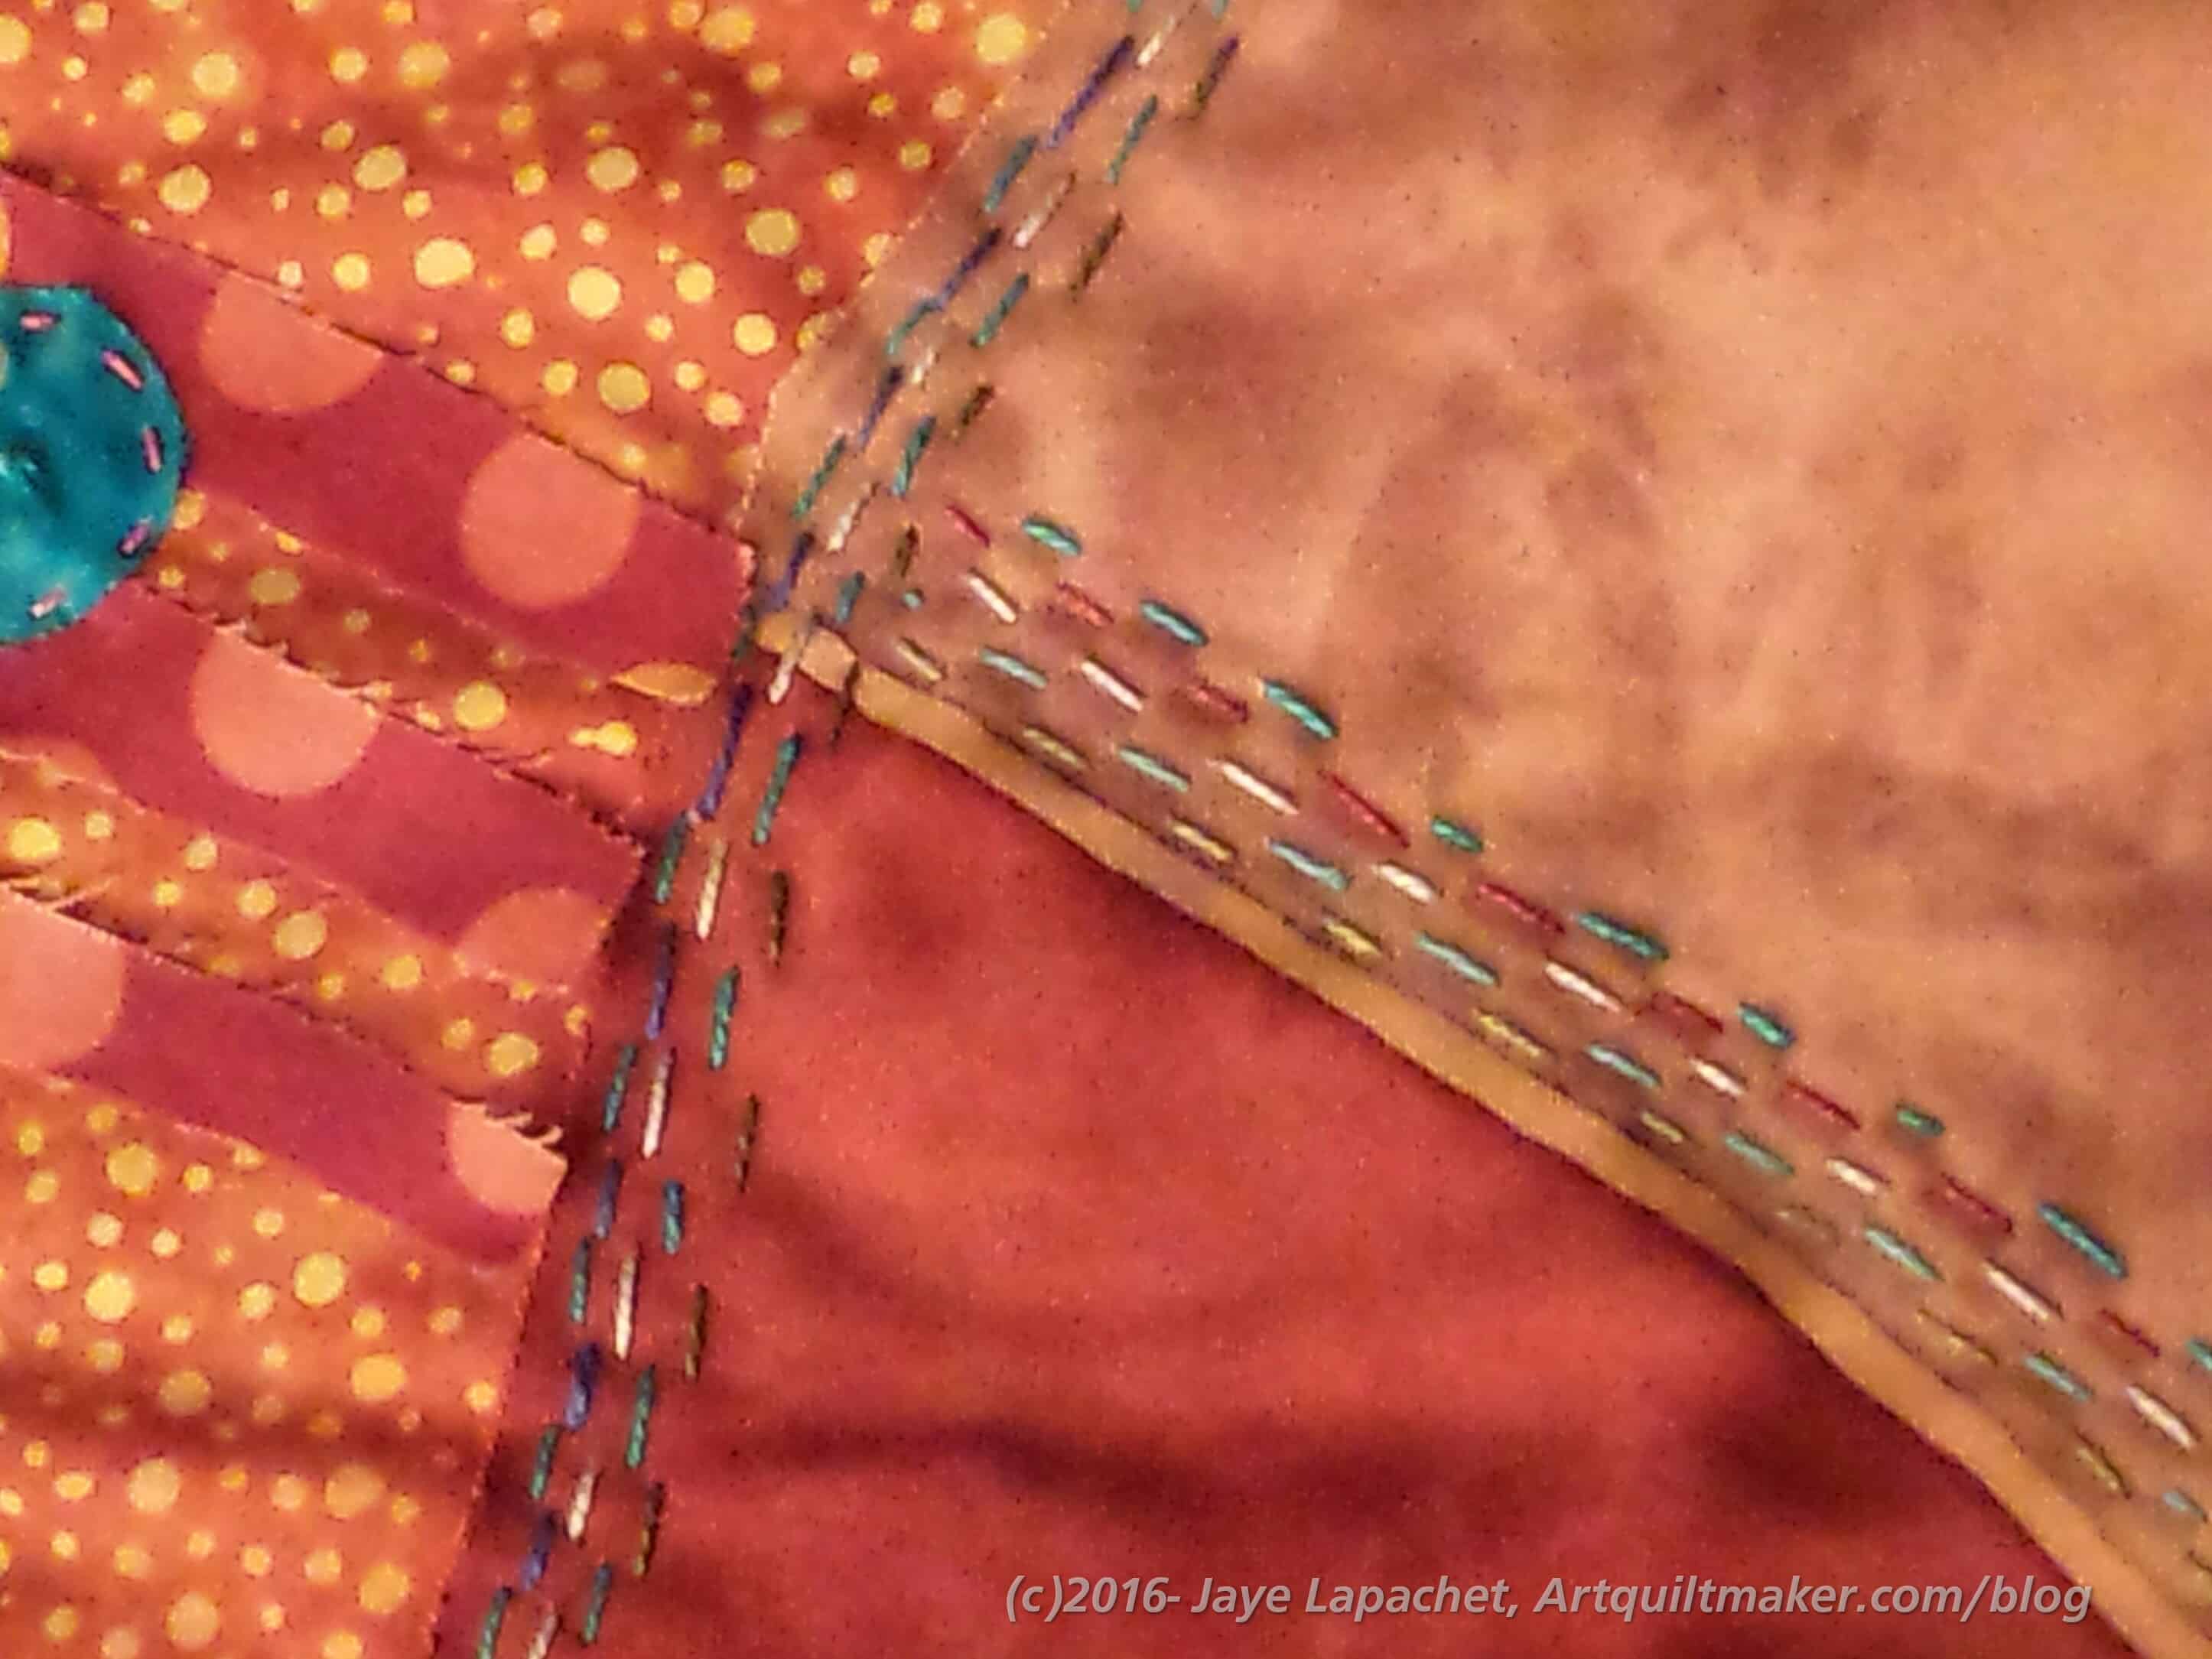
I have been working on Under the Sea pretty steadily in the evenings. It is soothing to do the handwork. I am also surprised at how quickly I can fill up an area with embroidery.
Under the Sea, detail, july 2016
Under the Sea, detail, july 2016
Under the Sea, in process again
Under the Sea, detail, july 2016
Under the Sea, detail, july 2016
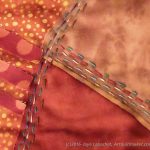
Under the Sea, detail
As I said a few days ago, I am pleased with the work. I am still pleased despite some design challenges.
I want the embroidery to be simple, so that limits the stitches.
I don’t have enough colors, but when will I have enough colors? This should not come as a surprise to anyone who reads regularly.
The browns, rusts and golds are not my favorite, but I am finding that I don’t dislike them enough to toss the project.
Beads or no beads?
I have been pretty tired or working on other things the past two nights, but I’ll get back to this soon.
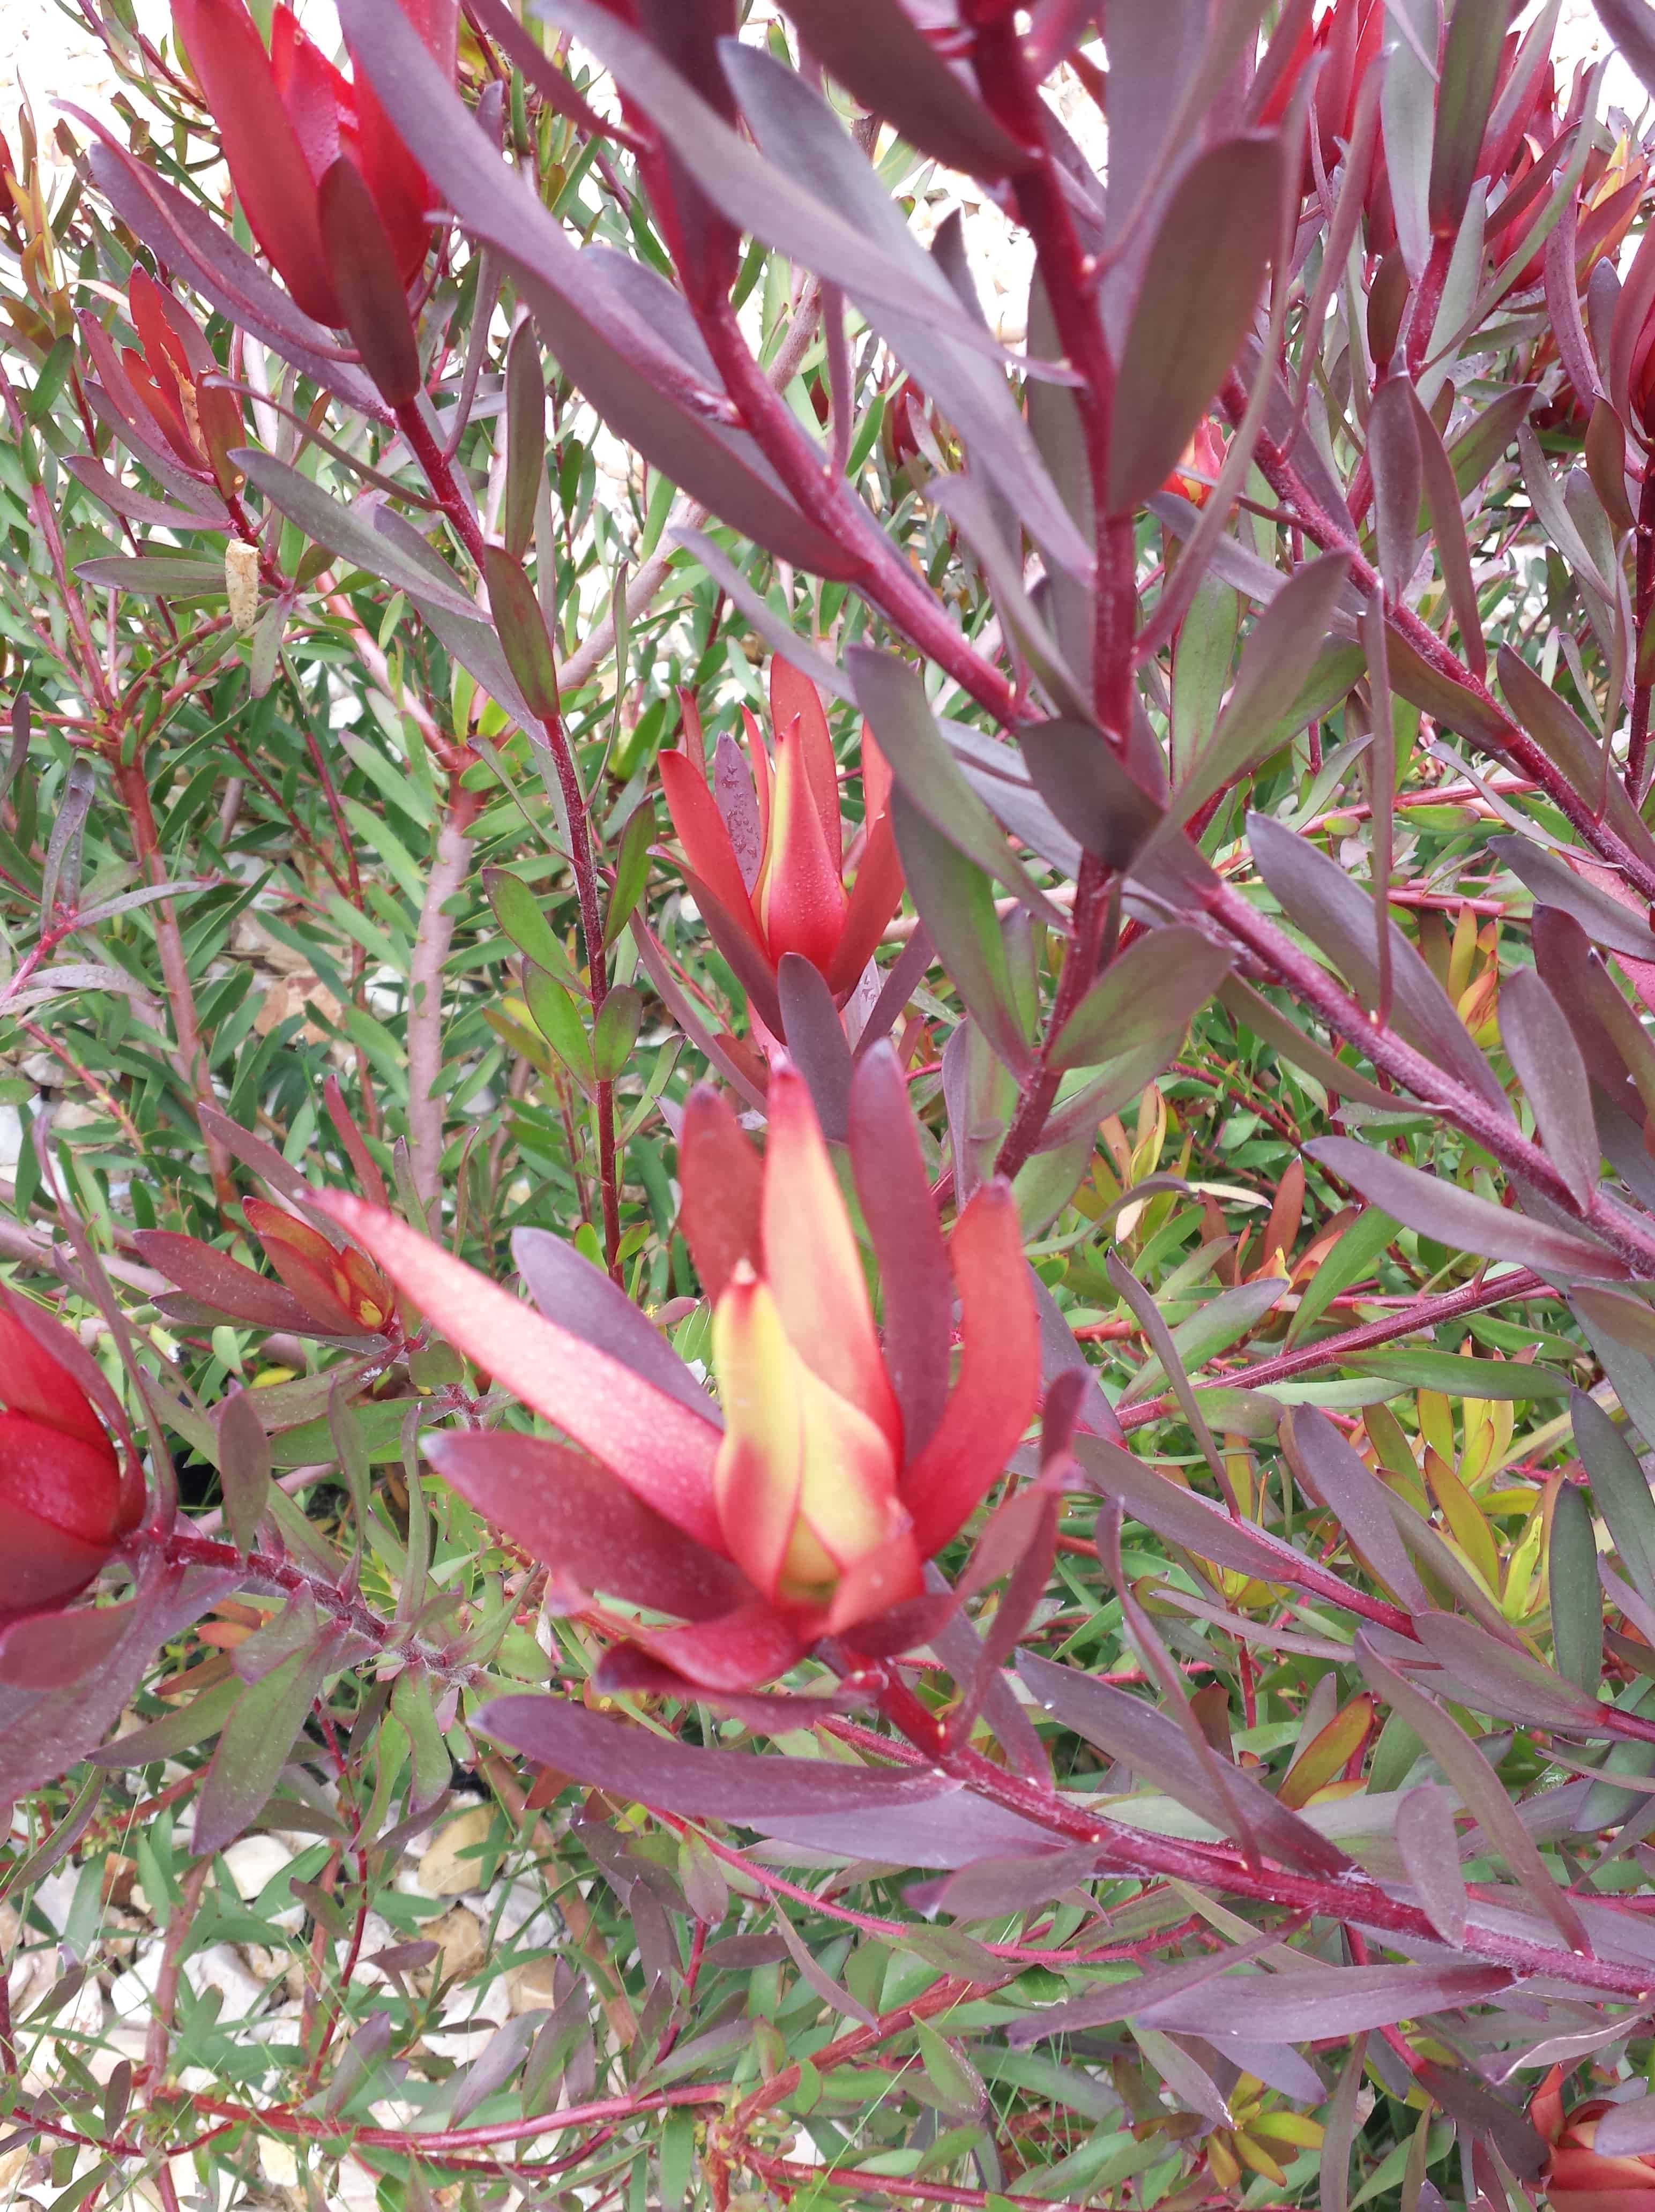
This is another picture I took while doing one of my daily walks. These are not plants that I normally have much interest in, but the red color caught my eye. When I look at the plant, I see red. When I look at this picture with my eyes, I see red.
The computer sees something different. The computer sees more green and grey than I do initially. Of course, when I really look, I do see the greens and greys, which make me wonder about what catches my eye vs what catches they eyes of other people.
Color Friday with Bella Solids
Color Friday with Kona Solids
Click on the photos to make them larger. I was surprised that the color selections weren’t that different. The color names are different, but the colors look very similar.
Of course, this tool is too much fun, so I couldn’t stop with the above. I moved the circles around to highlight different parts of the photo to see what I could get. I have to be honest that I skewed the results towards the red tones to see what the tool would come up with. It is interesting to consider the palette without the greens and greys.
Color Friday: Kona 2d try
Color Friday-Bella 2d try
Despite the fuchsia issues I had before, I love this combination of pinks and reds.
Under the Sea has been on my 26 Projects list for a long time. I started it in 2009 in a class with Pamela Allen. I started it at the same time I started the Flower Garden. I finished The Flower Garden in 2013.
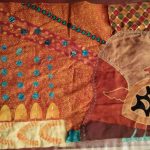
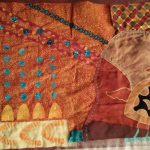
Despite my best efforts, this piece has been on my mind. After my Special Whine, I picked it up and have been embellishing it with Perl cotton and other types of embroidery thread in the evenings while I watch TV.
Under the Sea, in process again
I am pleased. Doing the embroidery, though simple, has calmed down my creative crisis, if just for the moment.
Of course, I don’t have enough colors of Perl Cotton. When do I ever have enough colors? I am making due for the moment.
Under the Sea, detail
I know these colors are odd colors for me. It is a problem, because I keep wondering where to add pink. The turquoise additions do help.
I am trying a combination of greys with the turquoises and blues to see how that looks. I am not sure if it makes any difference, in the way my mind wants, because so much of the piece is made up of browns and oranges.
The piece is small and I think I will make it into a cushion cover and give it away. Not my colors, you know. We’ll see.
As you know, I am not a big fan of patterns. Patterns weren’t available in large numbers, if at all, when I learned to make quilts and I never really learned to use them. Yes, of course, there were quilt patterns in magazines, but the packaged stand-alone quilt patterns were not available back in the dark ages.
I do admire the possibility of small business owners creating patterns and making them available. That there are so many indie / women-owned businesses is one of the great things about the quilt industry.
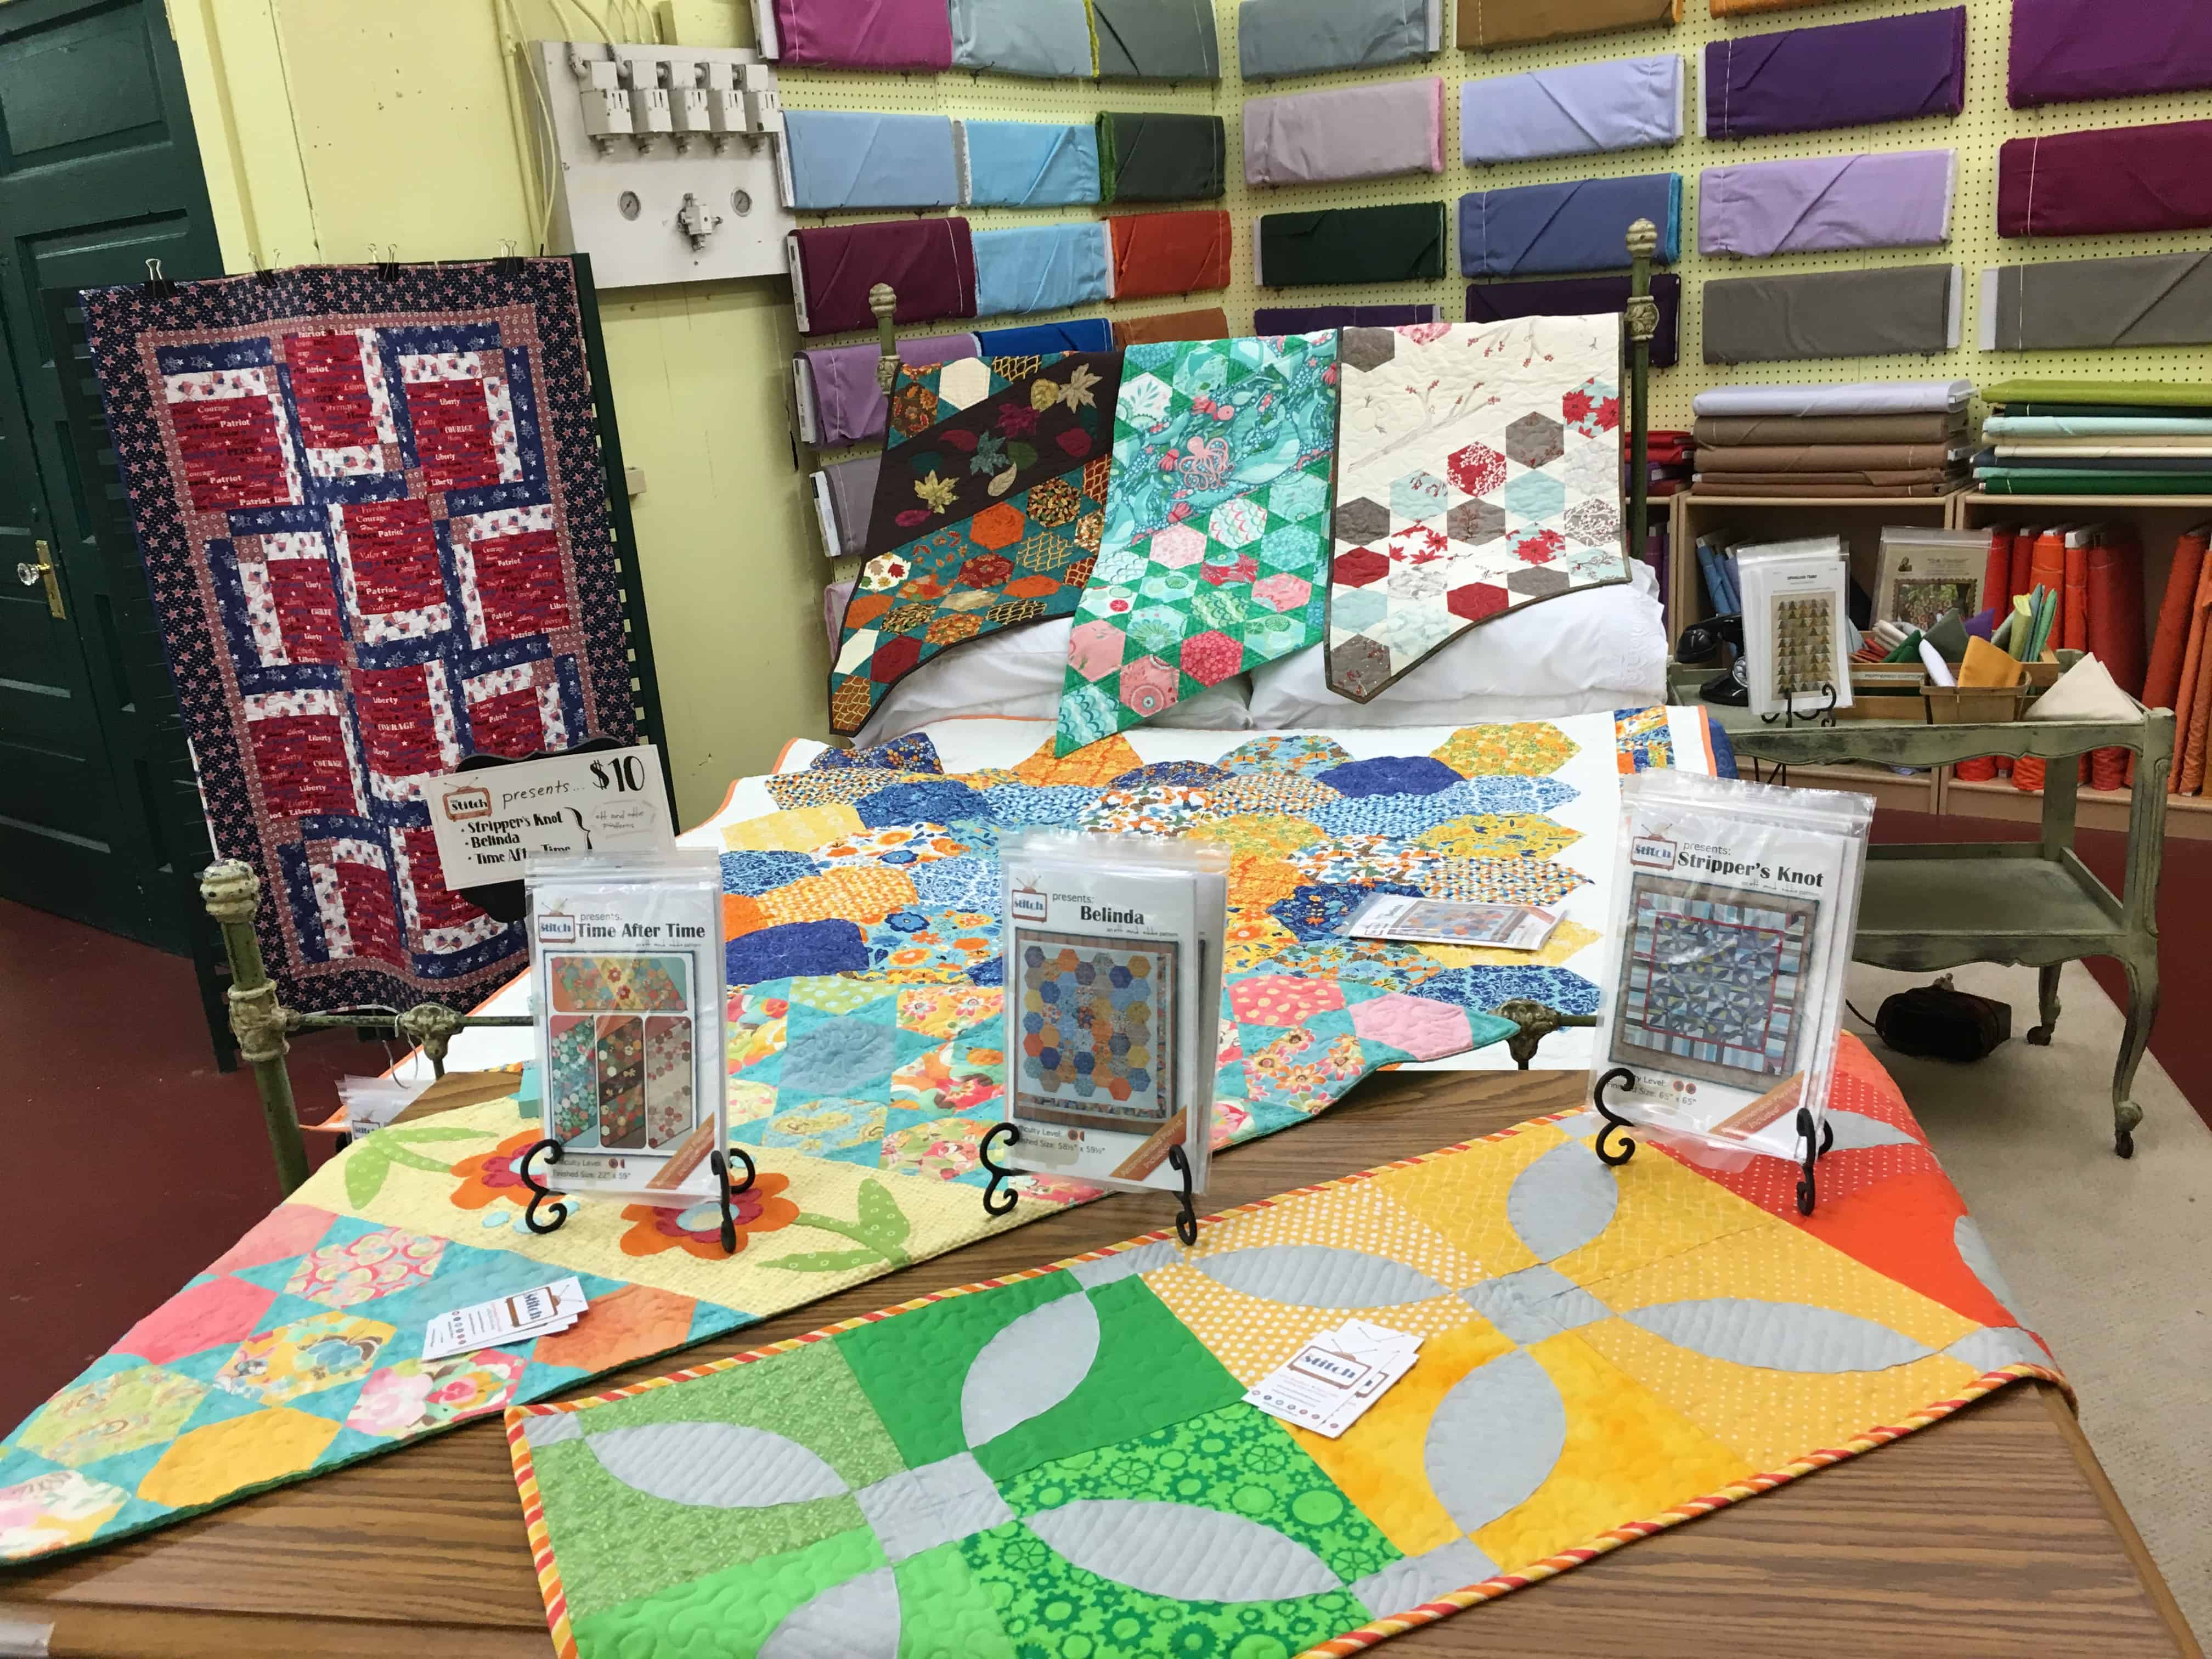
The StitchTV company, Ed & Eddie LLC, is one of those small businesses. One of the things I noticed about the Stitch TV pattern samples were the different fabrics used. In the photo above, you can see at least 4 different fabric groups. While this grouping does not comprise all the possible fabric combinations, it does give the shopper a good idea of how the design will look in different fabrics.
There are so many patterns now. All of us have a quilt ‘to do’ list that extends beyond our lifetime, so we have to be more choosy about adding new things to the list. Marketing patterns with a variety of samples is imperative now.
Thanks to Holly Anne Knight, who blogs at String & Story, for reporting on the StitchTV Show Pattern launch (and telling us a little about herself!) when I couldn’t be there in person.
________________________________________
Stitch TV Pattern Selection
The Stitch TV Pattern Selection (Belinda)
My name is HollyAnne Knight. I’m a wife and mama of two little boys, and I am a brand new quilter. After about 8 months of experience with rag-style t-shirt quilts, I decided it was time to give “real” quilting a shot. In May, I simultaneously discovered Pam Cobb’s Hip to Be a Square quilting podcast and her quilting talk show, The Stitch TV Show, which is co-piloted by Lynn Rinehart. I listened each night as I plugged away on my own projects, gleaning tips and sharing in the laughs. While I’ve been creative all my life, I’ve done most of my creating in isolation. Now, all of a sudden, I felt like I had friends—funny, encouraging, quilty-friends.
On the June episode of The Stitch TV Show, Pam and Lynn talked about the July Stitch-In and their pattern release which would be just a day apart. I gathered my courage and decided that I would attend both because I wanted to meet and begin getting to know these new friends. I was a little embarrassed at the stitch-in, with my beeping machine and loud trucks outside, but Pam, Lynn, and the others were so patient and welcoming. They laughed at my jokes and answered my questions, and I had a really lovely time connecting faces and voices and names.
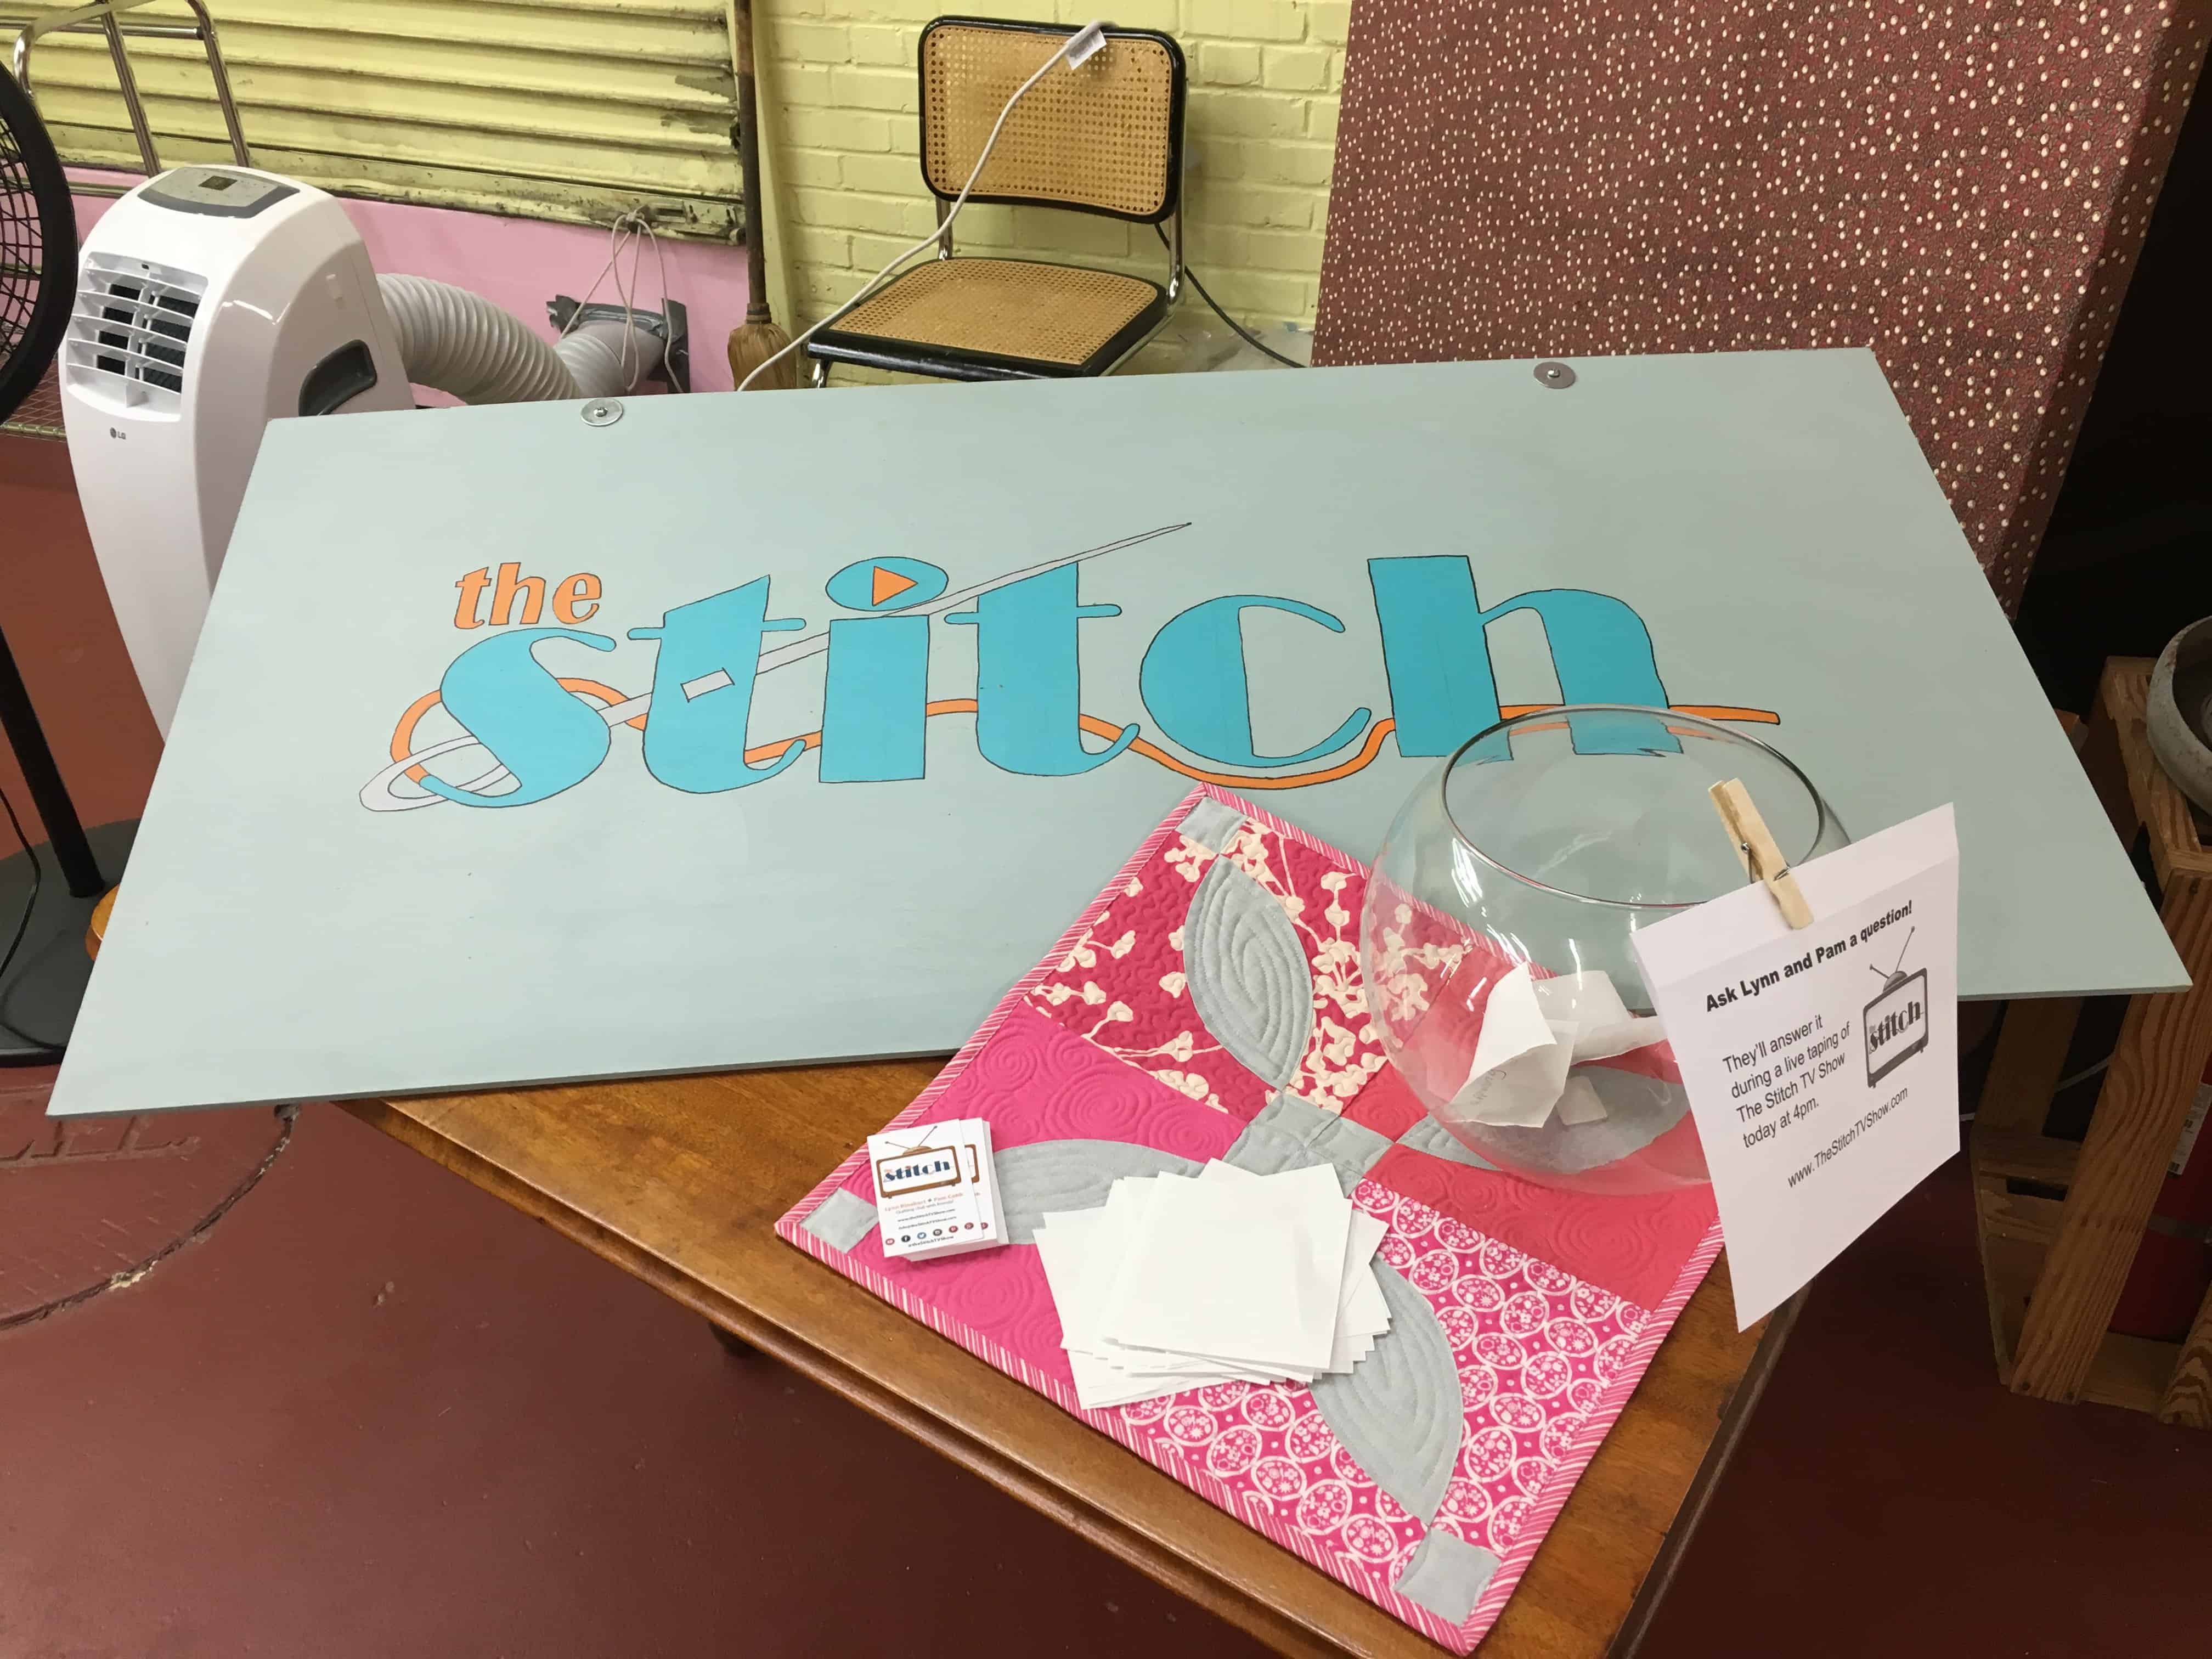
Stitch Logo
Still encouraged from from what I decided to count as a “successful” introduction on the stitch-in, I gathered my 4 month old, Ian, and the diaper bag and drove the 20 miles to Red Hen Fabrics for the pattern release—determined to make some new friends and have a fun “big girl outing” with only ONE baby! Yippee! I must have frozen just inside the door because I remember one lady behind the counter motioning and saying, “Come on in!” Red Hen Fabrics was my first quilt shop experience, and I’m not sure if I enjoyed the fabric or the atmosphere more thoroughly.
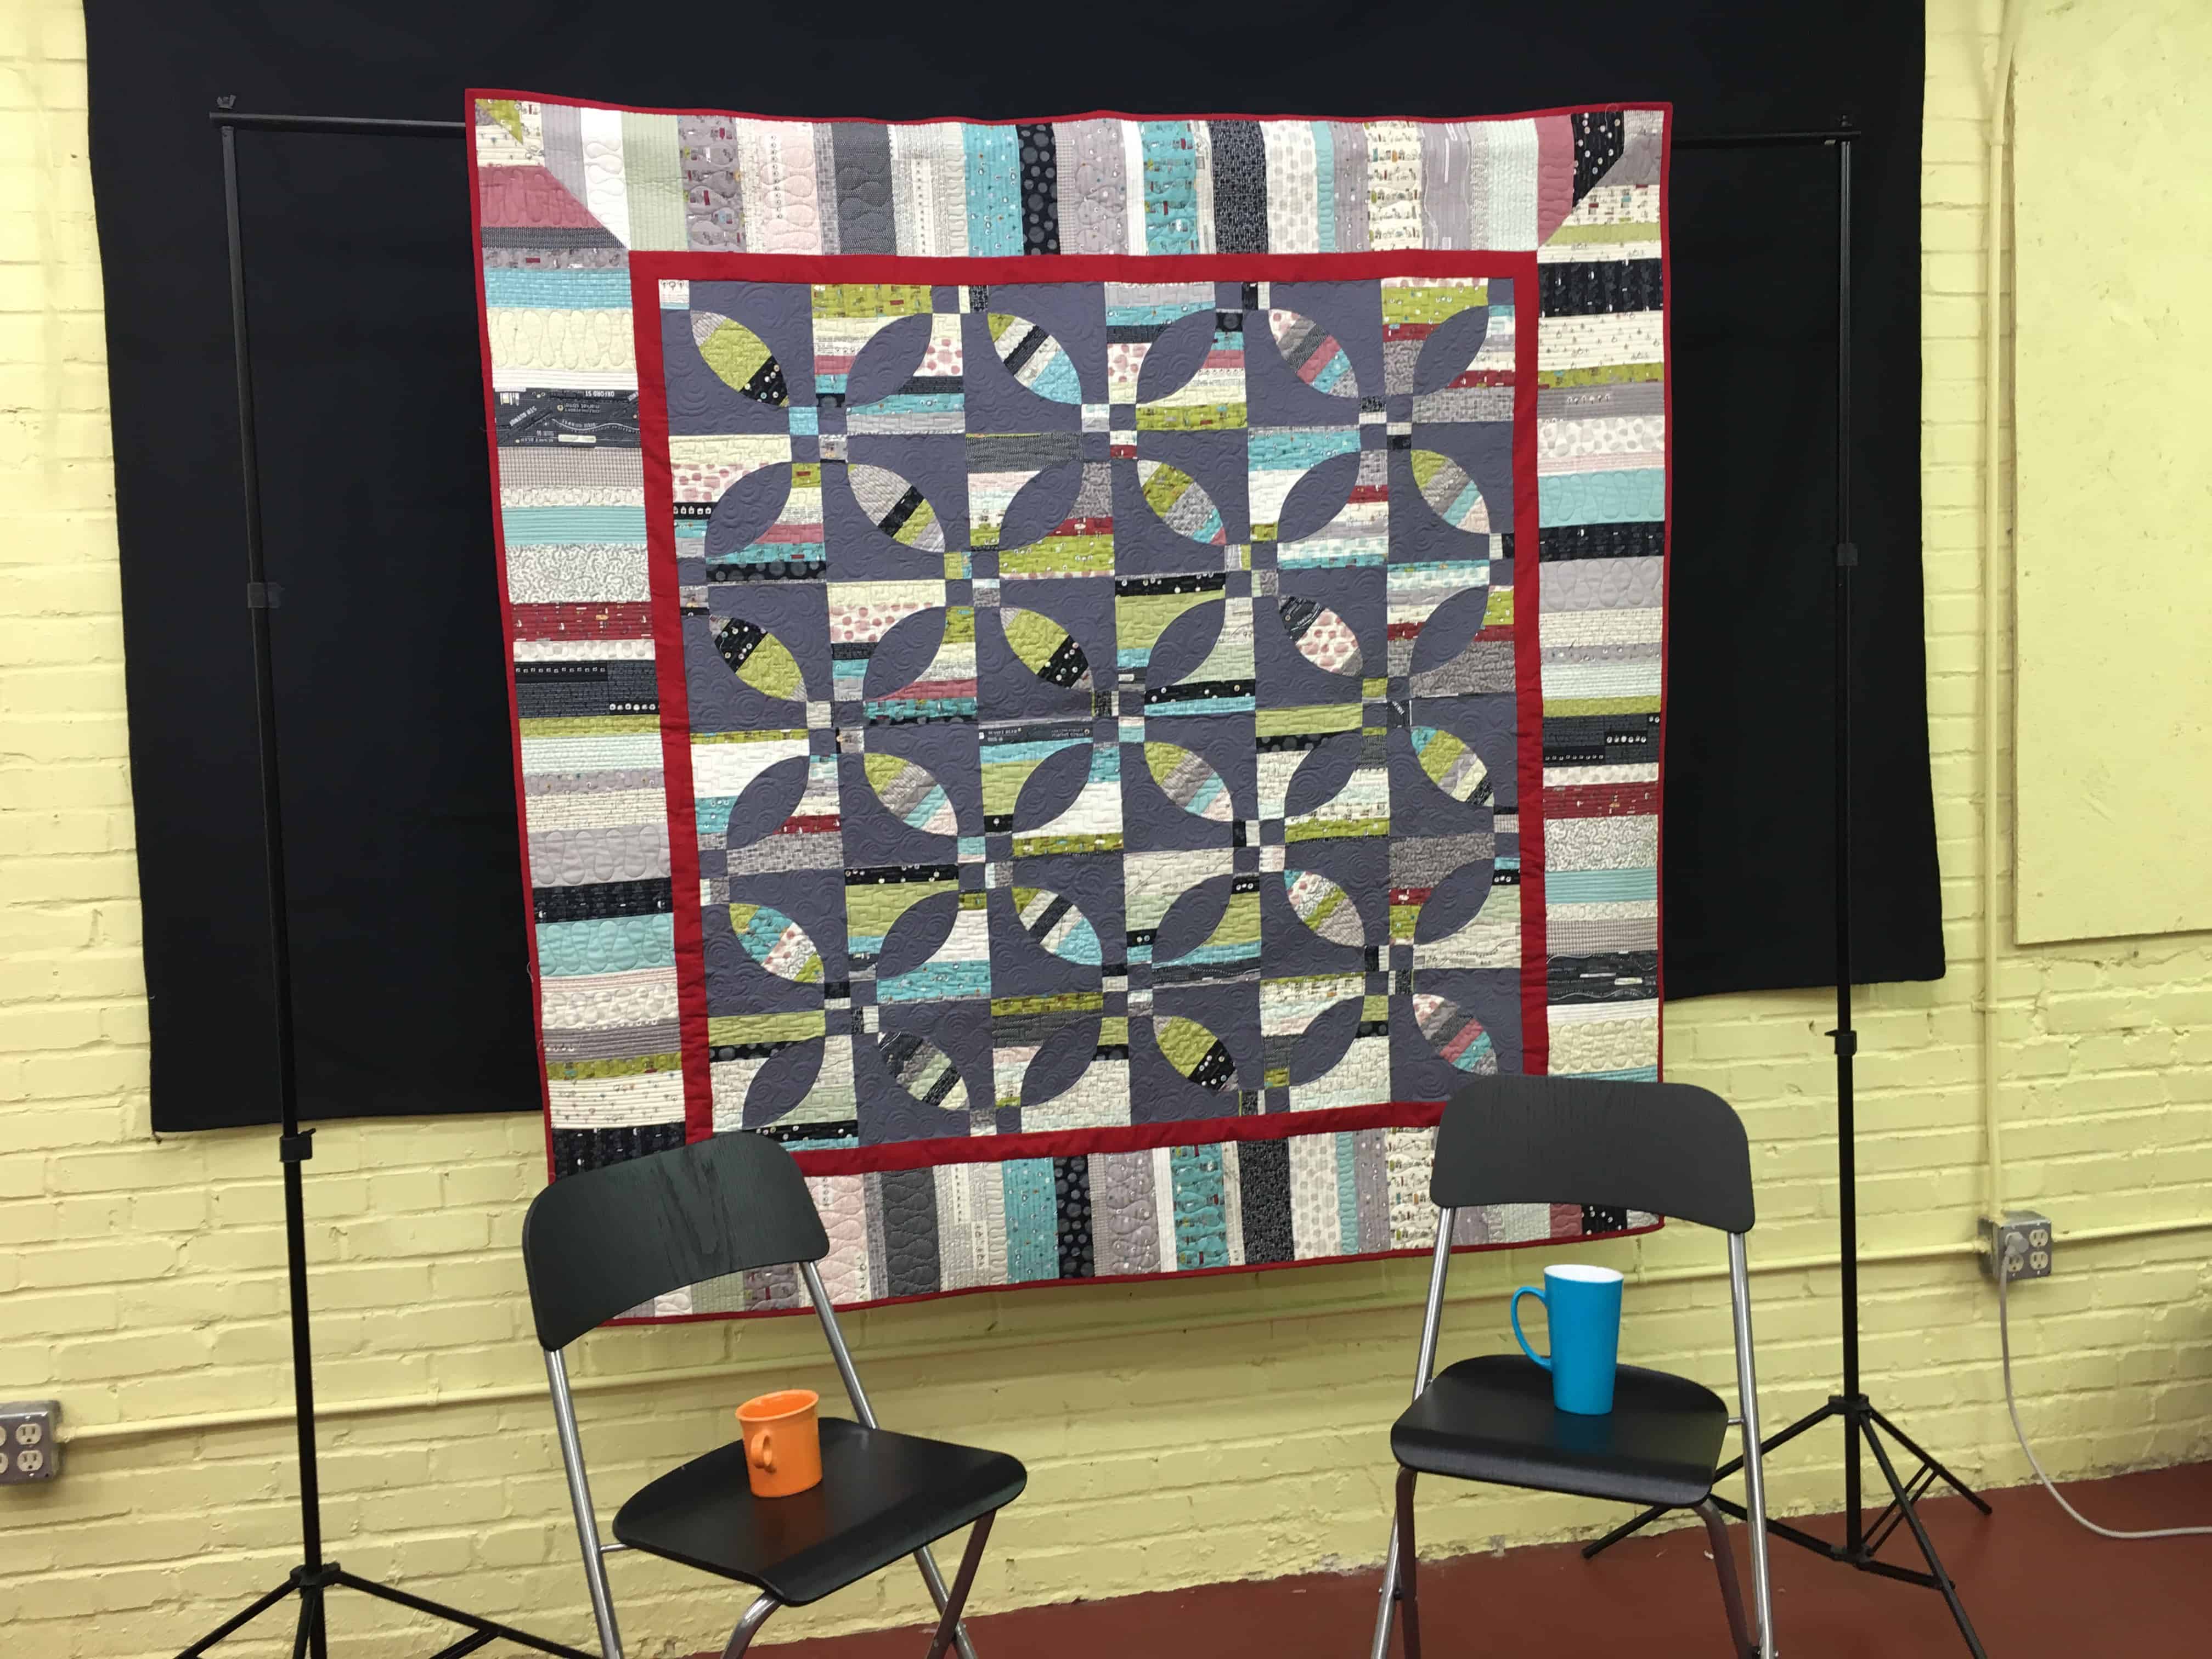
Stripper’s Knot Pattern
Pam and Lynn are engaging, funny, and kind, and their quilts are BEAUTIFUL. “The Stripper’s Knot” was hanging behind their Stitch TV Show set, and if I hadn’t been quite so self-conscious, I think I could have gotten lost in the piecing and quilting for hours. I loved seeing the variations of the “Time After Time” table runner and the asymmetrical border of “Belinda” (a copy of this pattern is hanging happily over my sewing machine now!). Rae, Kelly, and Mike comprise The Stitch’s production staff, and I enjoyed talking to them as well (over delicious cake no less!). Rae and I talked quite a bit about pattern editing and production. Speaking of, if you are an Indie designer looking for a way to get your quilt patterns into the world, go look her up at 77Peaches!
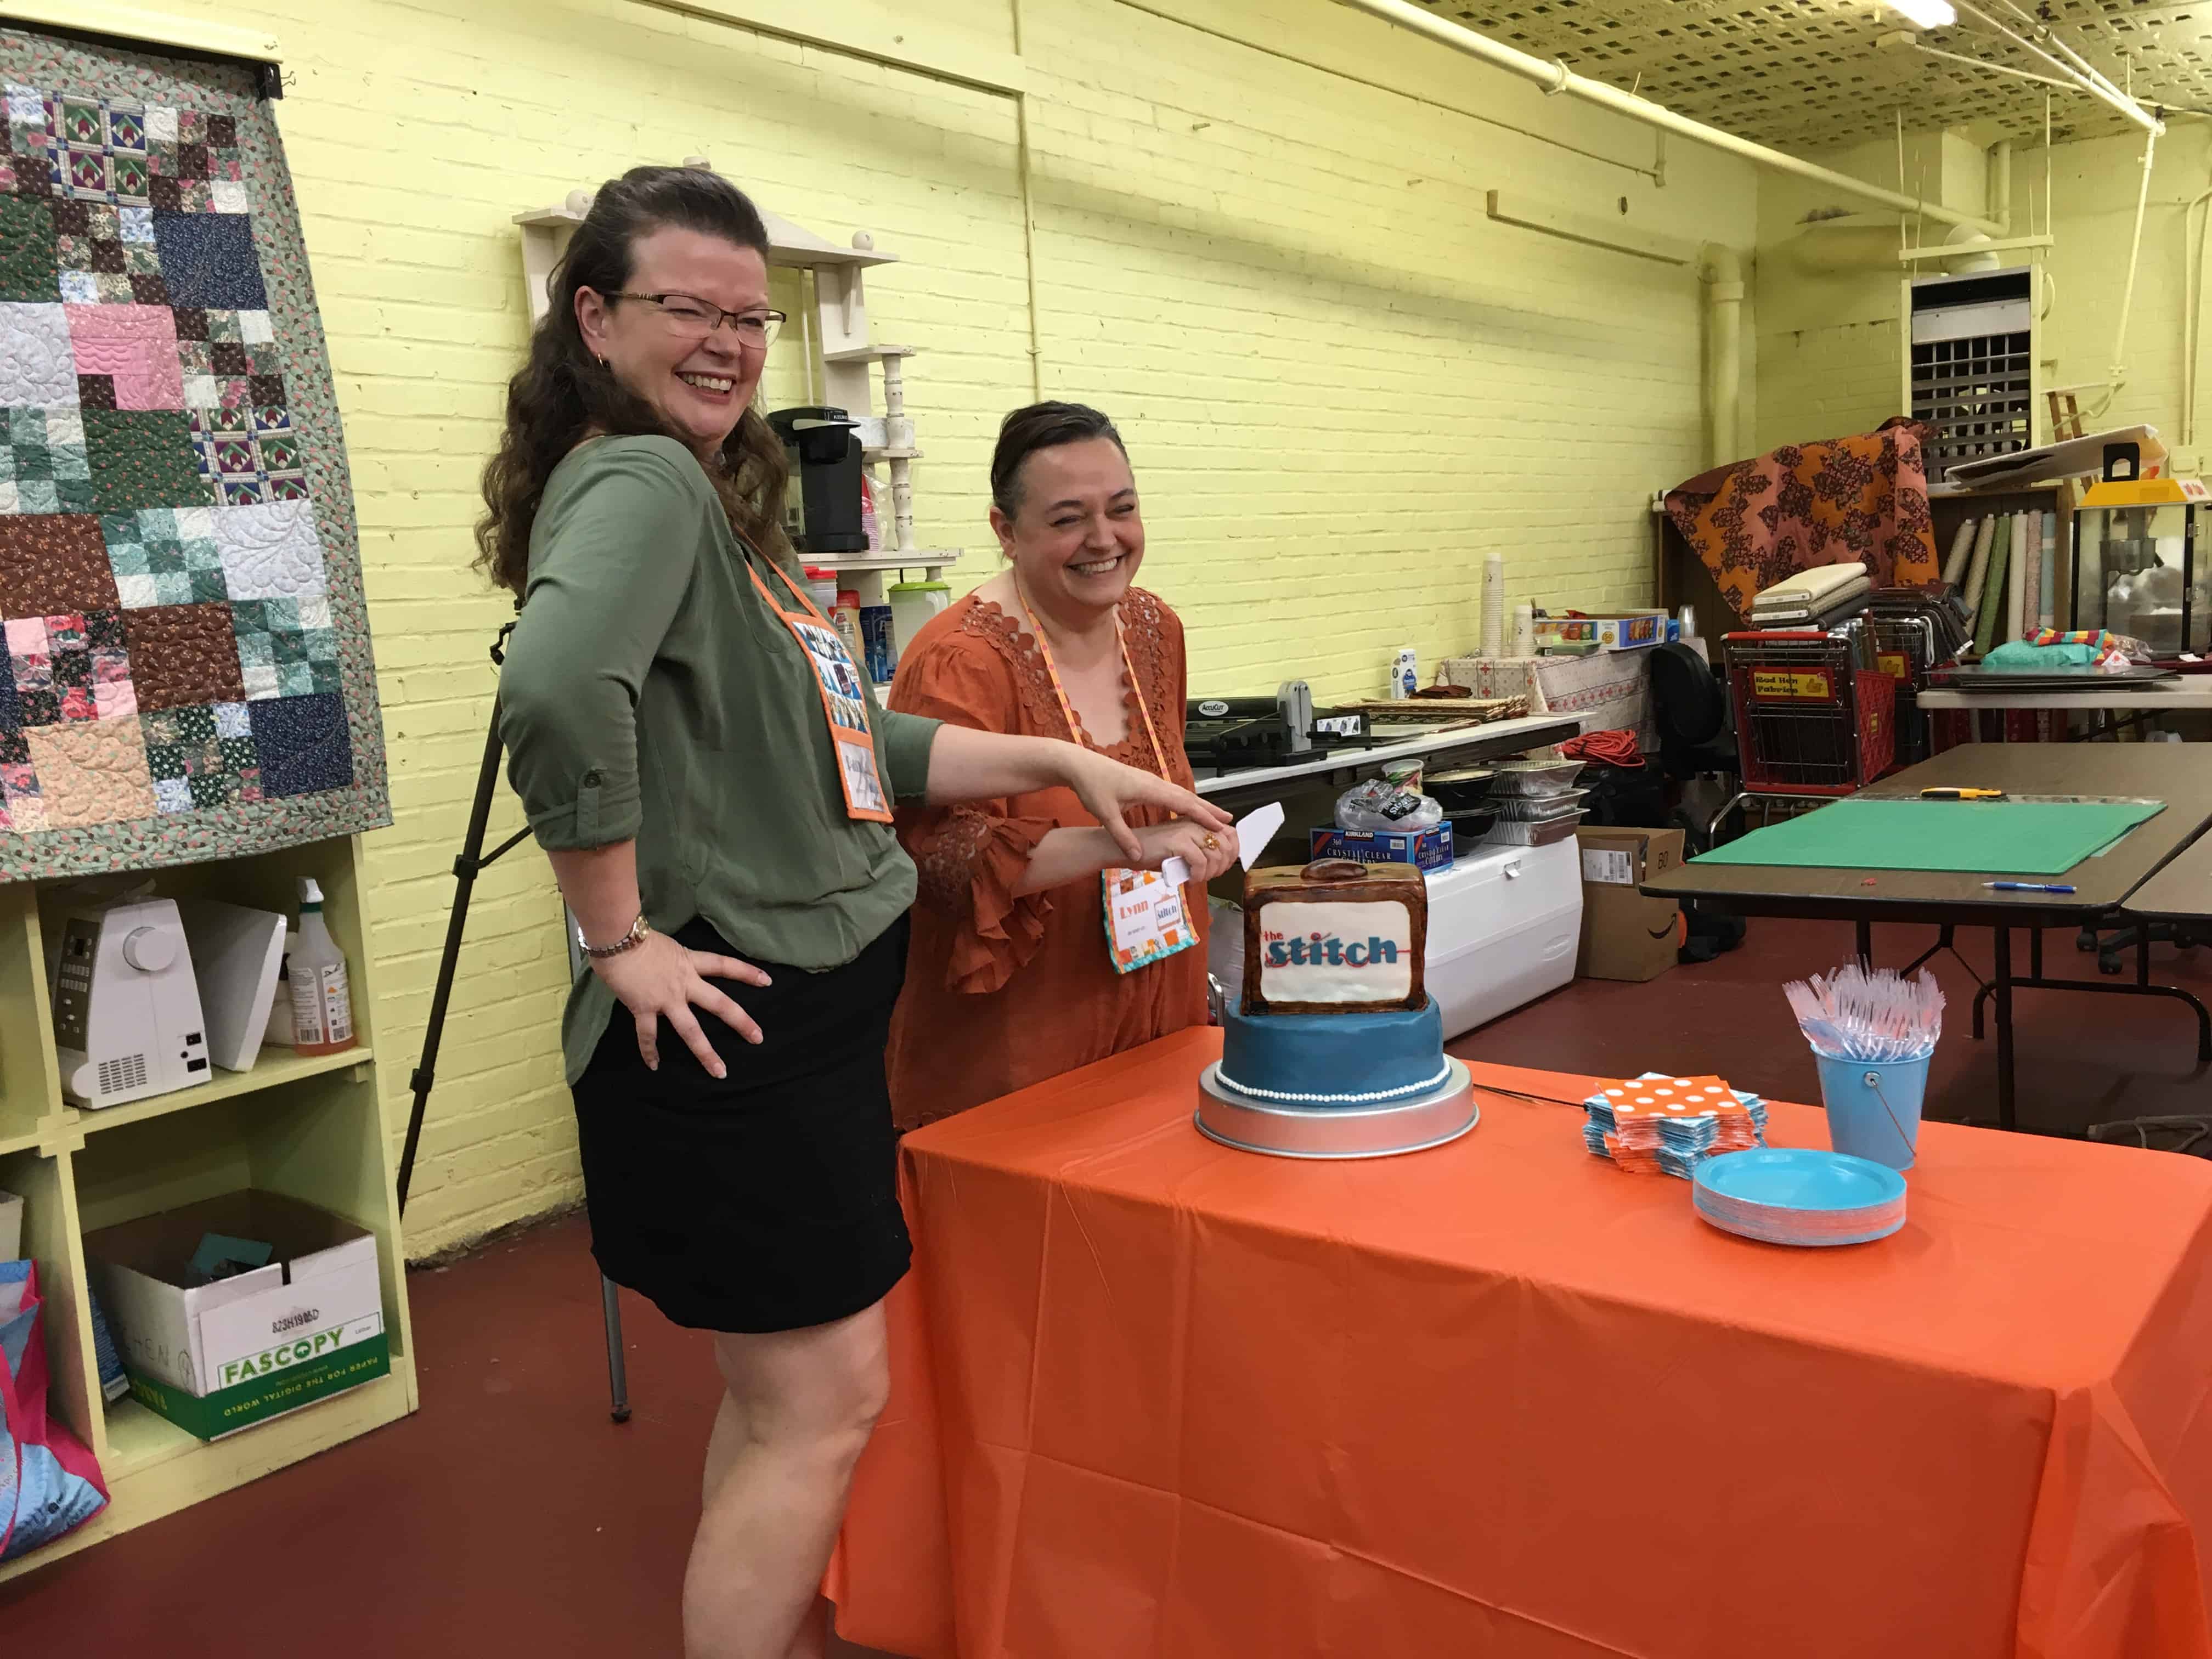
Pam and Lynn with cake
Before I left, I was sure to get some pictures of Pam and Lynn doing their thing—posing with quilts, laughing, and generally having a wonderful time. Congrats, y’all, on a fabulous pattern release, and thanks for welcoming this “newbie” into the party!
Bio:
HollyAnne Knight is a 20-something wife, mama, and artist. She has a life-long background in visual arts, over a decade of knitting experience, and training in several types on dance from classical ballet to ballroom to Zumba. She has been married to the Hubster (John) for 3 years, and they have two boys, Jem (December 2014) and Ian (March 2016). They live in the Greater Atlanta Area near Holly Anne’s parents and enjoy being outside, sharing meals and adventures with friends, and singing silly songs.
While Holly Anne’s first exposure to machine sewing was at the young age of 8, it was much more recently that she returned to it. She began with a t-shirt quilt for her Mama, and she continues to make t-shirt quilts for customers all over the United States. She also sews modern quilts and is the first Modern Impressionist Quilter, combining the imagery of art quilts with the functionality of other modern quilts. Her style of quilting is strongly influenced by her love of Impressionist and Post-Impressionist painters, her own work with paints, and her familiarity with knitting patterns
Holly Anne can be reached on Instagram at @mesaventureshak and at @stringandstory or via email at stringandstory [@] gmail.com.