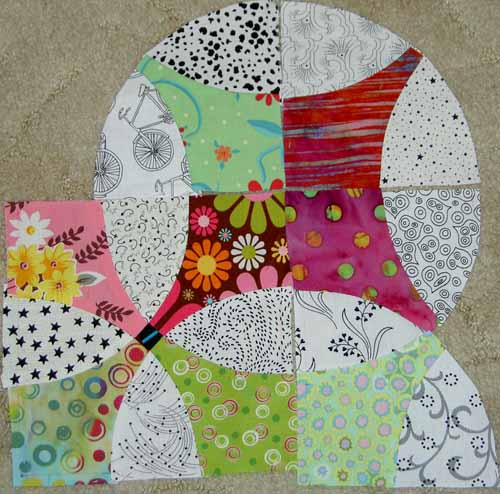
 Here is the latest installation of the Flowering Snowballs project. I think that the green (upper left) is a feedsack fabric. I have only a small piece of it and the weave doesn’t seem to be a modern weave. Not that I know anything about feedsacks or the weave of fabric and whether it can be tied to an era!
Tag: Flowering Snowball
Snowball and Fabric
I wonder if blogging can get to be like drinking – too much of a good thing? Well, I hope not, though I do feel a bit hungover at all the posts I have contributed lately and am hoping I am not starting to repeat myself. I haven’t even started to post some of the photos I have taken with my phone. Deirdre should be happy about that as she was looking forward to these “on the go” photos and I have not lived up o the possibilities of mobile blogging. Immerhin!
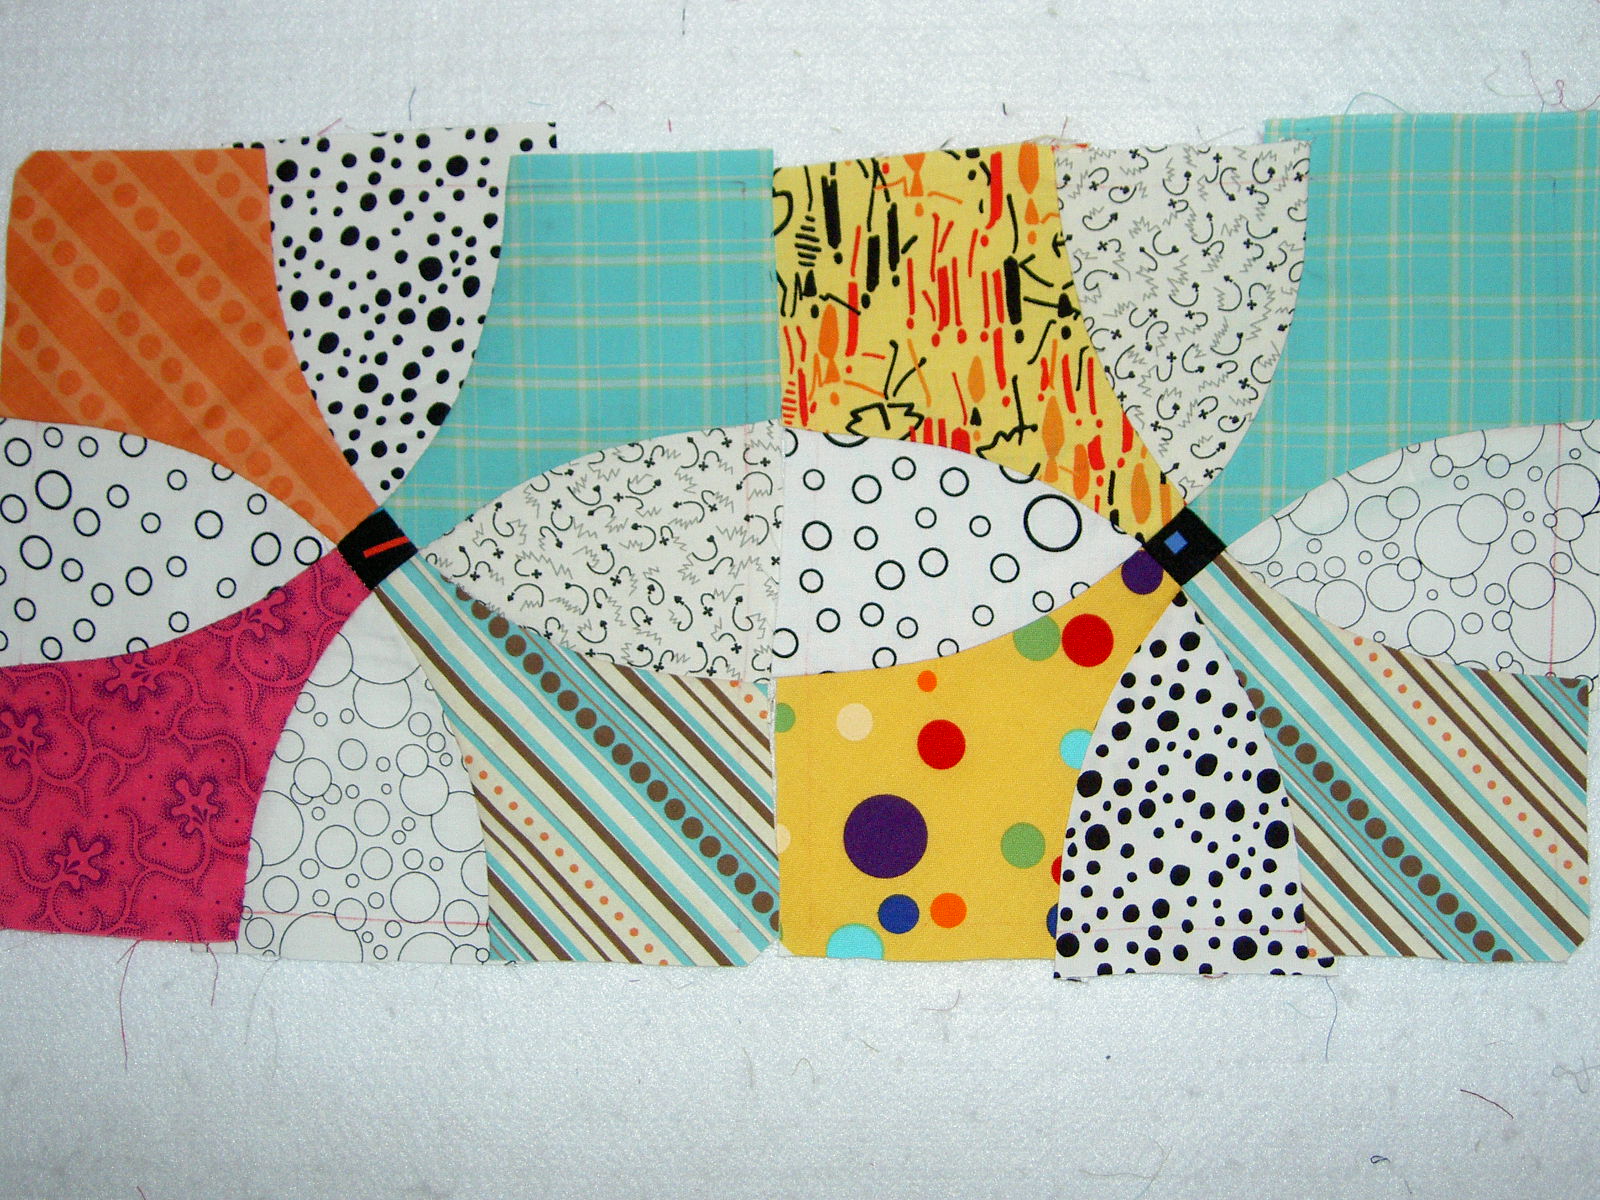
 Though I added one measly block, the Flowering Snowball (Cross blocks) piece looks much bigger than it did last time.
 I got a FQ pack of the new P&B Pop Parade from Quilting Adventures. Joyce, kindly, allowed me to not buy some of the fabrics from the line that were not cheerful. I want to make something out of just these fabrics, but I am no sure what. I also neglected to decide on the borders and background and buy extra for those. Oh well, I have a bit of time to decide before they discontinue this fabric, forcing me to go on a web/shop hunt for specific fabrics.
As Promised, Completed Flowering Snowballs

Flowering Snowballs
Had a cruddy day at work today, but came home to some Pineapple blocks on the wall and that made me smile. They weren’t new ones, but I really had a good look at them and was reminded how much I like dots!
 In between working like a complete dog on the weekend clearing out my aunt’s craft room, I sewed a tiny bit on some Flowering Snowball (Cross Blocks). I did most of the sewing on the plane, but some in the morning over my coffee. I decided just to do corners, except for one block, because I was running out of the colored pieces and had mostly greens and pinks left. It is a scrap quilt, but I don’t want to have too many greens and pinks. It’ll be a balanced scrap quilt. 😉
When I got home I pressed all of the pieces and, on a whim, counted the finished blocks. I have a total of 22 finished Cross Blocks thus far. WOW! How did I get so many? Just plugging along, I guess.
My next task for this project is to cut blue, purple, orange and yellow corner pieces to round out my choices a bit.
I also talked to AJA this weekend. She lives near where I was working, but we couldn’t fit it in to get together. I didn’t e-mail her in time at the beginning of the week to remind her and she forgot to write it on her calendar. Not sure when I will be back, but we had a good chat. We discussed doing the next color Bullseye quilts. Purple, I think. She put me in charge. I will have to talk to JulieZS and see what we can work out.
A Little More Progress
I spent a lot of the day playing with Flickr, adding a lot of quilt photos so I could organize them in different ways. As a result, it meant that I didn’t sew much.  I did finish another Flowering Snowball while watching some TV and worked a little on the Pineapples.
 I am working on four at a time and I really should cut back to two, but I’d like to get them finished.
Snowballs Really Flowering
 I spent the weekend in LA. No machine. I brought my handwork with me and was able to sew four Cross blocks (Flowering Snowballs)! I have said that each one takes me an hour and a half, but these, except perhaps the first, did not take me an hour and half each. I really blew through them.
One has two pinks, but I tried hard on the others to make all the corner pieces different colors. I started to run out of greens and really need to add some violet or purple to the mix. I’ll work on cutting some different colors this weekend.
 Now that I have a good amount of blocks, I decided to lay them out. They are really looking good! I just love the design that is made when the blocks are set together.
Making Cross Blocks (Flowering Snowballs) Tutorial
Judith asked about making the Flowering Snowball blocks, so here is a visual tutorial. Please note that this is the “Jaye-Way” and may not get you an prizes at Houston.
I would suggest that you read the book by Jinny Beyer on handpiecing, as she has a lot of good tips, though she doesn’t recommend using a felt tip. You can use a mechanical pencil to mark, if you want.
I am using templates and handpiecing them. I use a black or red Pilot (formerly SCUF) ultrafine point felt tip pen to mark around the templates. I use grey Aurifil thread and a thimble. Sometimes I put wax on the thread to keep it from tangling. Use whatever needles you like. I use betweens for piecing.
Practice with the felt tip on fabric. You want a thin line with no blobs at the end. I usually run over the end of the template a little and start lessening pressure on the tip right at the end of the template. If you leave it in one place too long, you get a blob. Blobs are bad for precise handpiecing and they look ugly, too.
 Trace around the templates on a hard surface. In this case, I am using the book as hard surface. Trace on the back/wrong side of the fabric.
 That tiny print says to flip the template 180 in order to get the most pieces out of your fabric. I was cutting 4 pieces from each fabric, but found that to be too many. I will use the ones I have, but am now only cutting one or two. I am trying to keep this quilt to a reasonable size (HA!) and to have as much variety in the fabrics as possible. If I like the fabric, I can always go back and cut more of it, right?
 I trim around the templates by eye. I don’t measure the seam allowance. I try to keep it to arounda quarter of an inch and not to get too close.
 Detail of trimming.
 Here are the pieces cut out.
 Here is the pinning. First, I pin right in the corner just inside the drawn line. I poke it through the foreground (colored) fabric first.
 This is the back of the pinning. Same deal goes here. I come up through the back. Get the pin right in the corner where the drawn lines intersect and just inside. Remember you have drawn around the template, so the drawn line is a little larger than the template. This is why I try to pin AND sew just inside the drawn line.
 Here (above), the pinning is done. Note that I put two pins close together at the beginning, but I take the first one out right when I am ready to sew, so I can start. The second one holds the pieces together while I get started. I try to make small, even stitches that are evenly spaced. Remember to look at the back as you sew so that you are poking through the back right inside the drawn line.
It is ok that the piece is wrinkly, because you want to match up two curves that are going in opposite directions. Use the bias to make them match.
How the Pieces Go Together
My whole philosophy, which I am pretty sure is a general quiltmaking philosophy, is to go from smaller to larger. This means to build the blocks by making the smallest patches into larger units and then putting the larger units together to make a whole block.
 First, take one corner piece and one background piece and sew them together. Sew/pin with right sides together. Curves require, at least for me, a lot of pinning. For pinning, start at each corner and put pins in by lining up the corners of each piece with each other.
 When you sew the corner and background together you will have a unit that looks like the above unit. You can see how the felt tip lines show through, which is another reason to sew just inside the drawn lines. They won’t show on the front of the quilt if you keep them in the seam allowance.
Seeing the felt tips lines here also allows you to see how they line up, if you do the piecing correctly.
 Add another background unit. Note: I am trying to use all different fabrics in each position in the block, but you don’t have to do that.
 Now you have quite a large unit. You will need two of these units per block.
 Sew the center patch to one of the corner (foreground) units.
 Here is how he unit looks once the middle patch is attached to a corner.
 Sew a second corner to the center patch.
 With this unit complete, you are ready to attach the side unit to the center.
 So, just do it. Attach a side unit to the center.
 Once you add that unit to the middle piece you are nearly there. The above piecing is the hardest part (but not like you are taking the SATs without a prep course), because the seam is long and the middle section is quite floopy. It also takes a LOT of pins. Make sure you sew through where the seams match several times to keep it strong and make sure the seams line up. I care about that stuff, but you don’t have to match your seams.
I don’t always press the patches after I sew them, because I am sitting on the couch watching TV while I sew (why do you think I have a hand project?) and am too lazy to trudge upstairs to press. It makes the piecing a lot nicer if you press as you go.
 Add the last unit and you are done!
 Completed square. I usually trim the block after I am done with the hand piecing. Make sure you don’t cut over any of your seam lines, because your piecing will unravel if you do. This is not machine piecing.
Project Progress

I now have 15 Cross Blocks (Flowering Snowball). I could have laid them out in a 3×5 grid, but it didn’t look that good.
MavMomMary and I took the Pineapple Quilt Class together back in January. She is already putting her quilt together. I haven’t seen it since she had only done a few blocks and was thrilled to see it today. I think it looks fantastic. And very different from mine.
 And a detail.
More Various and Sundry

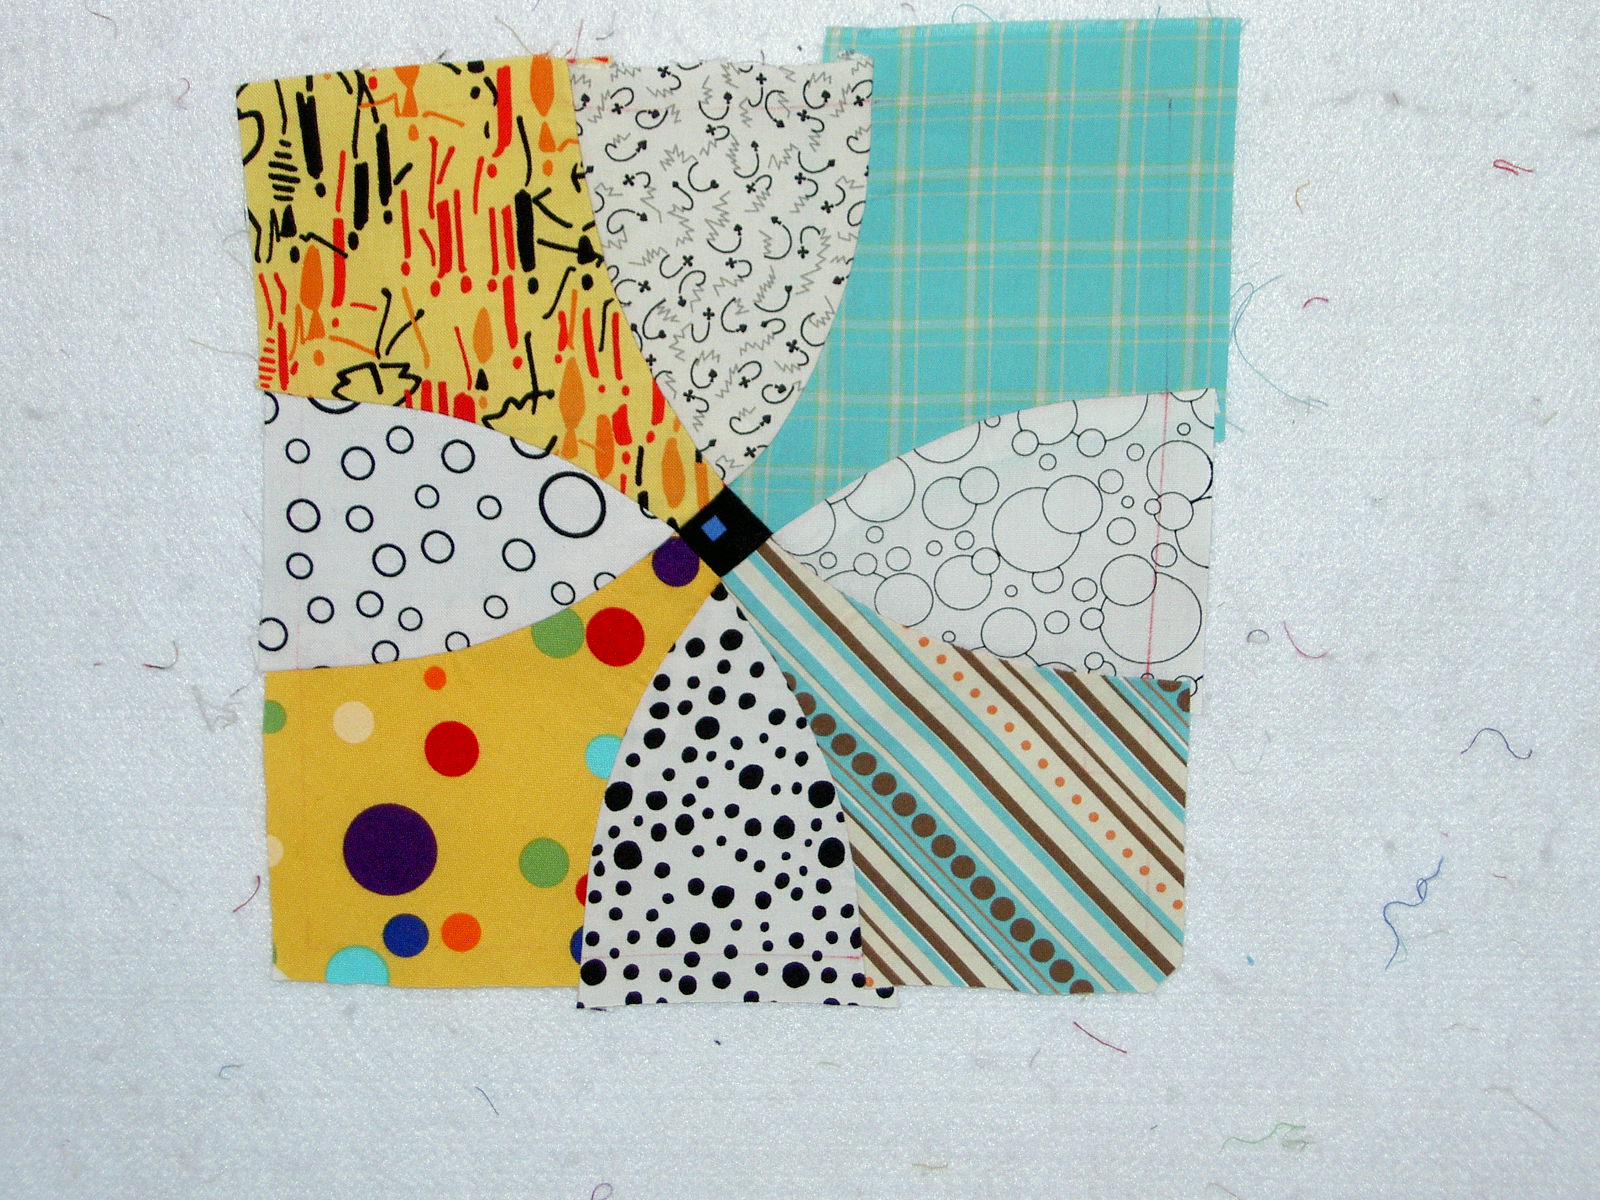
These are the two hand pieced blocks that I made last week. Different sort of look. Not so cheerful, but not depressing, either. I am not sure what I was thinking when I put the two dot fabrics in the same block? I thought I wasn’t using dots in this piece. Oh well. It is a scrap quilt, so who cares?

More dots.
I went to Britex today to get some fabric for pants. I was on the second floor and remembered that they have quiltmaking fabric. While the girl was cutting my pants fabric, I took a quick peek at the quilt fabrics. Lo and behold! They had dots! Hooray! I picked up the two above. They also had the Robert Kaufman Tropical Pimatex dots in both sizes. I have enough so I didn’t buy any, but it was good to be reminded that they are downtown and do have fabric. DUH! I also stopped at the Container Store and found these project cases. I have been thinking about something like this since I read Be*mused‘s piece on the scrapbook project cases she found (I looked for the article, but couldn’t find it and can’t find her search button either-DUH!). They are 12 1/2 wide and 17 and something long. I bought two of them just to see how they would work. I filled up one with the Cross Blocks (Flowering Snowballs) + the fabric for the center pieces, which I don’t want to “put away” and never be able to find it again.
I was told today to look at other kinds of art besides quilts to see what I am inspired by. I have some books. I guess I will look at those and see what I see.
I am still thinking about black and white line drawings in a new visual journal. I haven’t done anything about it yet.
The photos of some of the quilts to which I linked (to Artquiltmaker.com) in the past week looked really crappy and I was embarrassed after I posted them. I took 4 quilts including Ocean Ave, Get the Red Out, the Punk Rock Quilt and the Mary Whitehead quilt to be photographed. I want to put better pictures on my website.
The latest baby quilt, which my mom made and I paid to have quilted, is done. It has to be picked up from the quilter soon. She is quilting the Nosegay next.
Creative Journals
I have been feeling, for a long time, how I would like to work on a visual journal – painting, sketching, colored pencils…something. I am an inveterate journal keeper. I have been keeping a journal since about 1980. Perhaps earlier. I have scads of them everywhere. I used to put snippets of things in them and they would get quite fat and I would have to keep it in a big ziploc bag in order to ensure that the bits and pieces wouldn’t fall out. An old boyfriend spent the day reading my journals once and that was the end of him. Jerk. My journals are for my mental health and NOT for sharing. They are not nice, not always pretty, but they are a fantastic exercise.
Anyway, enough boring background.
Lately I have been writing bits and notes in my journal about Thr3fold journal in order to remind myself what I want to write in the review. Putting the notes in my journal keeps all the parts together. Today, I was reading an article in Cloth Paper Scissors. Jane Lafazio, Keeping Creative Sketchbooks, pg.24-27, March/April 2007 issue, writes a little lesson on drawing and the whole article is illustrated with pages from her notebooks. The images are fresh, alive, colorful drawings. They make me want to get closer, to know more. She also writes “The journaling makes my sketchbook more than a series of paintings; it becomes my illustrated personal story.” What a lovely thought. I love the thought of something being my personal story.
 Darling Boy made a deal with me to draw every day. This is his picture. Of course it is about war, but I love the little alien in the upper right hand corner. I am tempted to enlarge it and paint it. Something about it appeals to me, perhaps the googly eyes.
Tonya showed a picture of one of her visual sketchbooks, so I have been reinspired all day to figure out how to do this.
 And finally, I finished another Cross Block (Flowering Snowball). Two in one week! I am thrilled!
How do you like the fabric with the faces?
Cross Block (Flowering Snowball)
 This one is a little dark, but will mix up with the others nicely. I like the way you can fussy cut quite large motifs and have them show up well.
Flowering Snowball (was Cross Block)
I am a researcher at heart. After Sarah started my mind spinning quickly, Leslie just added to the melee in my head about the real name of the Cross Block. When I couldn’t take it anymore, I started rummaging around in Barbara Brackman’s Encyclopedia of Pieced Quilt Patterns and the Kansas City Star books to see if I could find the block. I hadn’t gotten very far when I decided to e-mail the AQSG list and see what they had to say. They found both blocks (mine and Leslie’s grandma’s) right away.
According to Barbara Brackman my block is called Flowering Snowball (#3081 in the numbering system of BB’s book). It is from Aunt Kate and has the reference 7/65 next to it. Accordng to BB, Aunt Kate’s Quilting Bee was published between July 1962 and July 1967. In is part of Pattern Category #16: Nine X.
The block that Sarah found and Leslie’s grandma made are Raleigh from Hearth and Home OR Tennesse Circles from Prairie Farmer, Bk.1, 1931 (#3083). There is another one (#3084) that is exactly like Raleigh from Hearth and Home with slightly fatter proportions called The Royal (Ladies Art Company #282) OR Grecian Cross from Rural New Yorker 5/23/31 OR [ta da!] Royal Cross from Carrie Hall.
I saw this picture of ladies working on a Cross Block/Flowering Snowball quilt. It is really the only piture of this block in a quilt on the web, though there is a ClubEQ project that includes the Flowering Snowball (Cross Block) block in it.
I am thrilled and I’d like to know more, but thanks for starting me on the journey!
Cross Block and Royal Cross
The research of the real name of the Cross Block started with a stray comment I made on a list saying I wondered what the real name of my block was.
That sent Sarah on a frenzy of Googling, where she found that the Library of Congress has quilt photo called Royal Cross that has similar bones to the Cross Block. Sarah also found that Tazzie has a pattern for the Royal Cross.
))
Then Leslie chimed in with the sudden realization that she had a quilt from her Grandma in this [Royal Cross] pattern. She posted the pics, which I have reproduced here.
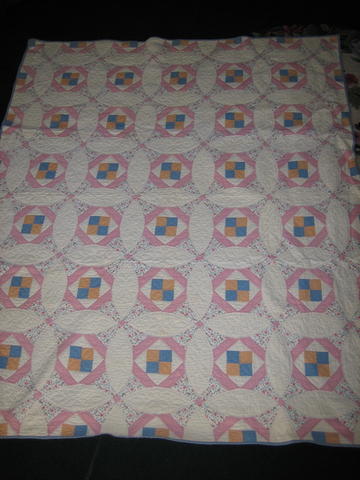
Full quilt

Detail

Comparison between the Royal Cross and the Cross Block.
Blocks are constantly modified to suit the needs of the maker and I am sure that these blocks are no exception. My block and the Royal Cross look similar in the middle, but the outside of the Royal Cross looks like it is meant to draw attention to those squares in the corner. I can’t say much about that as I went on and on in one post about the center of this, among other patterns, not actually being the center. I’ll have to look through the Barbara Brackman book and the Kansas City Star books and see what I can find. If all else fails I’ll post a picture on the AQSG Yahoogroup and start sending photos around to various quilt historians.
Sunday, Monday and Tuesday
I started work on the back of the Nosegay on Sunday. This is how far as I got – a strip approximately 5ft by 2ft. UGH! I cursed the size of this quilt the entire time. Something about this piece makes it seem so much harder. Still, I am determined to soldier and use up those 1930s fabrics. I am hoping that some miracle will make it go faster this weekend. Perhaps a change of attitude?

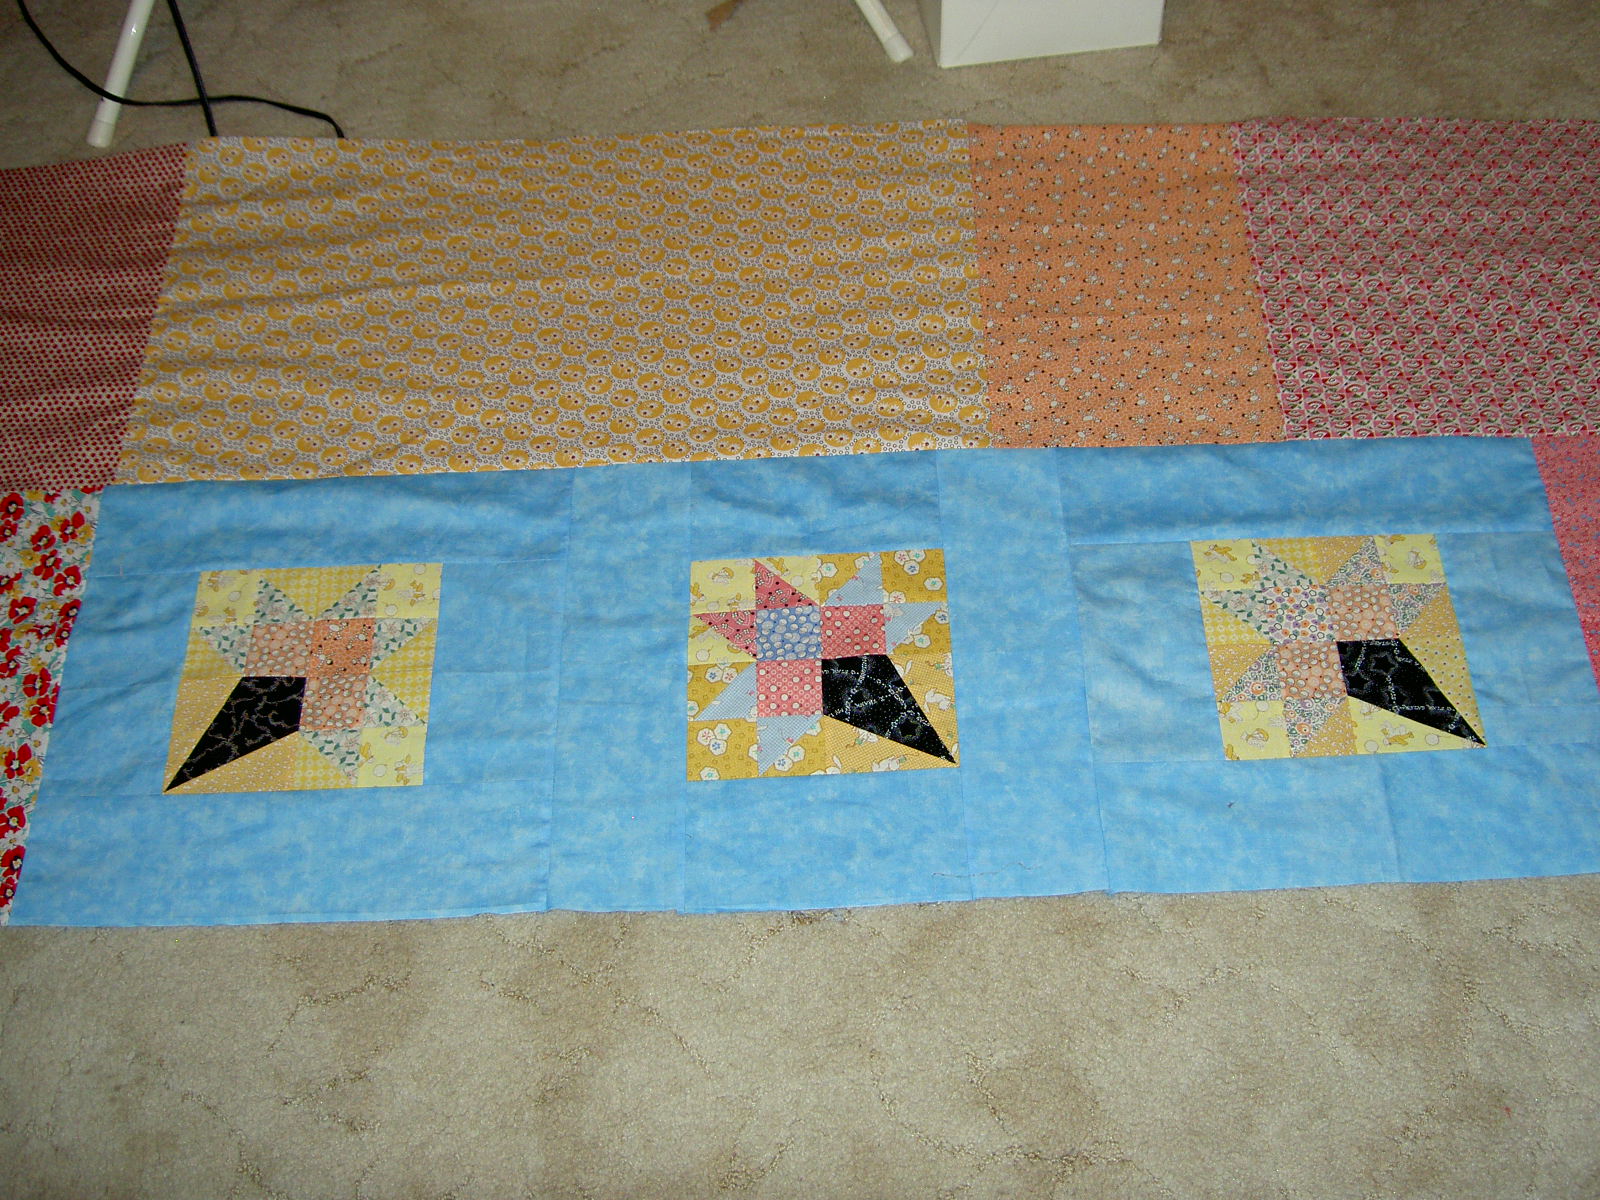
The fun thing I did on Monday was finish blocks 5 & 6 for the Pineapple. I have been slowly adding strips in between working on the backs of various quilts and other projects. A little work goes a long way.

I couldn’t resist setting them all together and taking a photo. I worried about the corners being too close in color, but I think they look OK. I have since moved the top middle block 90 degrees, but left it in the same spot and I am happy with it.
I finished another one of the Cross Blocks on Monday at Craft Night. I probably should not have put the two yellows together, but I did. After I make a few more blocks, I will look at the effect and see if want to take the second yellow piece off.
I decided to take Laume’s advice and do the scrappy look like she suggested in Cross Block Redux. This means that I have more flexibility in using and placing fabrics, which is a great relief. Whatever I do, these two blocks need to be far apart in the quilt. That stripe is very noticeable.
Cross Block Redux
By the time this quilt is finished, I will probably have named 137 posts Cross Block Redux n.1…..n.137. We’ll see how interesting this quilt stays.
In response to the post Quiltmaking is a Journey Not a Destination, fellow quiltmaker and blogger, Laume wrote:
“There is a third option – make each block scrappy, but not planned so that the colors in each secondary “stretched out square” is matched. You would get rid of the matched “X’s” in the second option you think look unfinished. Whether the background circles would still come to the fore like the second option, or whether they secondary pattern of dark stretched out squares would come to the fore like the first option, I don’t know. You’d have to try it on paper and see.”
I had no idea what Laume was talking about. I knew it couldn’t be terribly complicated, but I am visual person and the words just didn’t translate. I sent Laume a line drawing of the quilt and she was kind enough to color it in.
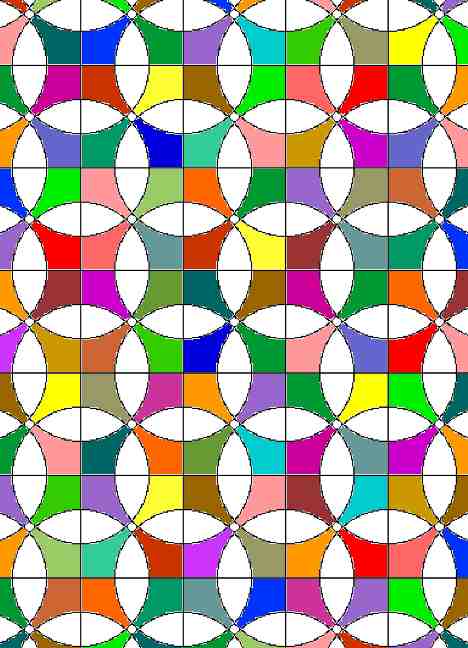
Basically, she was saying to make the Xes totally scrappy and just match the curved background pieces. I was leaning in the direction as I had just realized that I used a piece of fabric for the back of Serendipity Puzzle that I really wanted to use in this quilt.
Laume’s idea is an excellent one, because the parts of the Xes really do take up quite a bit of fabric, which means I can’t use as many scraps as I would like. However, I will still have to cut into yardage, regardless, so perhaps it doesn’t matter?
Stay tuned!