I started Latifah Saafir’s Triumphant Mystery quilt. It is a lot of cutting and I have to re-learn how to use the HuRTy ruler. Well, there are three of them in use for this quilt, so HuRTys!
I cut a bunch of pieces wrong, because of my misunderstanding of the instructions. Fortunately, I have enough fabric to make a few mistakes. I am struggling to get the flip of the ruler(s) from A pieces to B pieces correct. I am trying to be more careful as I don’t have infinite fabric.
DH was out of town all week with the Native Sons at Grand Parlor. I didn’t go as I had to work and hold down the fort at home. Instead of cooking dinner (hooray for microwaves!) I sewed and the Old Town second border is now complete.
I keep looking at this piece and marveling at how different it looks with borders. OMG! So much better. Who knew a border could do so much?
I continued to work in dribs and drabs to get another border on Old Town. This one is a pieced checkerboard border.
I considered stopping work on this quilt at the plain border. I decided to soldier on because I already had made hundreds of 4 Patches.
I am amazed at how different the quilt looks after adding that checkerboard border. I know I only photographed half of the quilt. I stood and looked at it for a long time trying to figure out why that one border made such a difference.
Yes, I got through all of my goals over the weekend, including putting a border on Old Town. This is the first of three borders, so don’t celebrate too much yet, but I am making progress!
As mentioned, we are all about starting projects here at AQ!
Yes, I am doing the Latifah Saafir Mystery quilt. My time has not become more free, but I am doing it anyway. It uses the HuRTy and this is a good way to get the tool into my bag of tricks.
It is a little unclear to me whether you can still join, but here is a link and you might be able to navigate your way from there.
Latifah is at H&H in Chicago (whatever that is!), so participants have a little time. I have two selections of fabric that I am contemplating. The quilt needs 7 fabrics including a contrasting background.
Fabric Pull – Guicy Guice
First, is all fabrics that I bought recently.
Most of them are from Guicy Guice, but there are a few from Alison Glass and that white is Seasons from Figo fabrics.
This is mostly cool colors, which should come as no surprise. I am not sure if there is enough contrast, but I like all the fabrics, so I am willing to go with it.
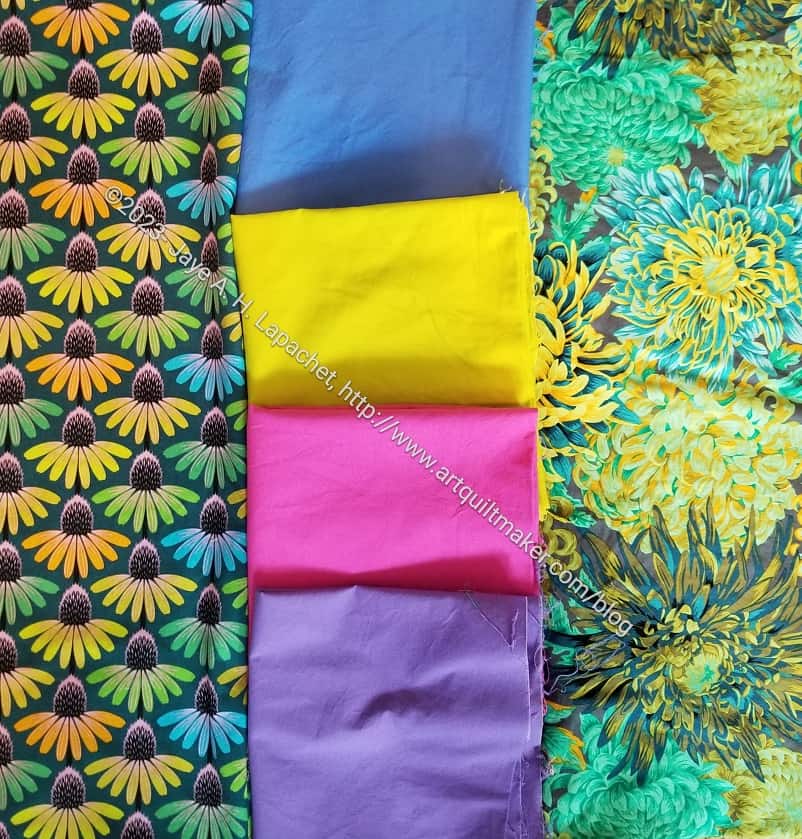
Coneflowers & Chrysanthemum Fabric Pull
The second option is an old fabric pull for which I am still seeking a project.
I still really like this group of fabrics. I am just not sure if pointy HRTs would work with the Coneflowers & Chrysanthemums.
I do feel like there is something missing and I can’t quite figure out what. Dots, maybe?
I spent last weekend putting the blocks for Old Town together. I didn’t have the whole weekend, but the center is now complete and I like the way it turned out.
I am not sure I put the blocks together in the order I originally intended, but I never do.
Next step is the borders. I have the HSTs sewn, but not pressed or trimmed.
Since all the blocks and sashing are finished, I put them up on my large design wall. They barely fit!! You can see some blocks for my next donation quilt hanging on the right side of the design wall.
I keep moving blocks around, but I am about to start sewing the blocks and the sashing together. The different values of the pinks and blues make various parts of the quilt stand out. I also think the different fabrics move the eye around the piece.
I visited Cyndi for a Sew Day last weekend and was able to get the Old Town sashing to a good place. I had a lot of 1.5 inch squares to cut and then a lot of trimming to make a house shaped rectangle. It was a lot better to do all of that work with a friend. We were able to chat while I did the tedious parts and that was great.
I got out the Simply Folded Ruler** again to create the flippy corners of those house shapes. That ruler is a gem. I always forget, but it really makes those flippy corners easy to sew. I didn’t have to draw diagonal lines on the squares, which would have made the process even more tedious. AND there was no trimming afterwards which meant no opportunity to cut off the wrong triangle. I haven’t tried one of the Simply Folded patterns (actually Antler Quilt Designs). I remember seeing one that was interesting at the Granary, but thought I was too busy to buy it. I was surprised at how many patterns the company has. I remember them being kind of country colors and having weird looking angles, but that isn’t true. There are a variety of patterns, some with brighter colors and fewer weird angles.
The good part about Bonnie Hunter Mystery quilts is that she suggests different methods of making the various units. I was reintroduced to the Simply Folded Ruler** through this project. It is good to be reminded of how I can use different tools.
Work has been very busy. It is stressful and I have been sewing a bit at lunch and after work. I haven’t had much time, but my effort at the Retreat at block making has gotten the process down to a science. I can make each block in about half an hour. Still, it has taken me several days to make this batch.
With this group, I only have four more left to make.
I didn’t have much time to sew on Sunday due to my caregiving duties. Between Sunday and Monday, however, I sewed two more Old Town blocks. I really like having my design wall on which to lay them out.
Old Town block #16
Old Town block #17
These two blocks were possible because, first, I sewed all the HSTs I would need to finish the block assembly. Now it is just laying them out and sewing the pieces together.
I made really good progress on Old Town at the Retreat.
I was able to piece 15 (of 25 total) blocks. Each block has 69 pieces so that was a LOT of piecing. I was SUPER happy to be doing that piecing, I have to tell you.
Julie helped me put them up on the design wall so we could look at them.
Even with out much sashing, there is a distinct secondary design going on.
Old Town Retreat progress – detail
I sewed a little bit of the sashing and put that up as well, so we could kind of see what was coming.
I finished a few Flying Geese over the past few days and decided to try some on the block that has been on my design wall. The Flying Geese have been missing and seeing them missing has been incentive to finish them.
I chose some light pink Flying Geese to finish this block. The block is not sewn together, so I might choose different options. I think this looks ok, though. The pink HSTs might fade a little too much into the background.
In general, I like the whole block and am pleased with how it is coming out.
I sewed the first few seams of the million HSTs I need for Old Town a few weeks ago. I used the tutorial for making 8-at-a-time, thus the added cuts, and then the stack languished.
Old Town HSTs
Finally, the other night I used scissors to cut the 8 HSTs apart. I wasn’t sure it would work, but it did. I cut the original squares generously, so I have enough wiggle room to trim to the exact size. I have a small, 2.5 inch ruler** tucked into my handwork bag that is kept in the living room. It worked really well for confirming that I had enough extra to ensure the HSTs were the right size. I haven’t really used that ruler much. It came with a set and I find it too small to use with a rotary cutter. For measuring, however, it worked really well!
It sounds stupid, but it was great to realize I could cut these with scissors! I made sure I used my sharpest pair of scissors, the ones I bought this summer with the titanium (or something) blades. I, also, was really careful to cut straight.
Now I have to press and trim all of those HSTs, but I am a bit closer to putting the blocks together.
**N. B. : Obviously, you should shop at local quilt shops and small businesses. However, if you are too busy or can’t find what you need there, I use Amazon affiliate links and may be paid for your purchase of an item when you click on an item’s link in my post. There is no additional cost to you for clicking or purchasing items I recommend. I appreciate your clicks and purchases as it helps support this blog.