I am really sad that the weekend is over. I really could use another day or two off.
There was lots of cooking and baking and visiting and guests. We also went and saw a movie, had 6 boys over, destroyed and fixed our network (sort of) and talked to Grama on the phone. It was a busy weekend.
November Pillowcases
I had hoped to make lots and lots of things. In reality I was only able to finish three pillowcases. For some reason, I couldn’t put one of these together without ripping out significant portions. I had problems with all of them. I have to admit that I just took the ripping in stride and dealt with it.
I have three more pillowcase burritos pinned and ready to sew, but haven’t done it yet. My nephew came over and he started a pillowcase also. He has to sew the front and do the French seam and then he will be done.
The Young Man gave the pillowcase he made to his friend who lost everything in the San Bruno fire. He was able to, finally, make the gift this weekend. The friend’s mom almost started to cry. I was glad we could do something small for them.
So, it was a big pillowcase weekend. What did you make?
Here is the finished (completed! done!) Red Journal that I started on Halloween at A Work of Heart. I went to the second (and last) class on Sunday and finished. I could have done a lot more embellishing on the pages, but my ephemera wasn’t that good and I wanted space to write. Yes, I want to use this as a journal and not just a scrapbook. If my ephemera was more personal, then it would have been a good scrapbook making project, but I like the idea of writing in something that I made.
Red Journal - page 1
Above is the first page. You can also see the Malka Dubrowski fabric that TFQ gave me as a gift. I like the idea of see it more often. I may not really like writing in the Red Journal, but it is only 40 pages, so I can blow through it fairly quickly. What pen to use will be an issue. I see a Sharpie in my future.
Red Journal - pink crayon
The pink page looks like it was made with a crayon. I don’t remember doing it, but it came out of a big box of paper I had saved. I like it. We’ll see if I can write on it.
Red Journal - Star12
I really can’t say what possessed me to make the pages the way I did. It just seemed like the right thing to do at the time.
I had homework and kept putting it off. After class last time, I knew there was no way I could finish all the sewing if I waited until the next class (Sunday’s). I was finally able to get to my Red Journal project in a serious way on Friday afternoon and evening. Essentially, in between the Frosted Stars and Frosted Stars Leftovers I worked on the pages of the signature.
Red Journal Signatures - in progress
I was particularly happy with this page, which was made from just an image that I had been saving for awhile. I was happy because I finally got to use it.
Red Journal Signatures - in progress
Making the pages took a lot of sewing. There are 2 signatures of 10 pages each, folded in half to make a total of 40 pages.
I really want to make another one of these journals. I can think of two people who would really like them as gifts. It is a ton of work, so I would only be able to make them for people who would really appreciate the time and effort. We’ll see.
As I have probably said 42,000 times, the outside of this journal is made from fabric I made by sewing scraps of red fabric together a la Shannon Williams.
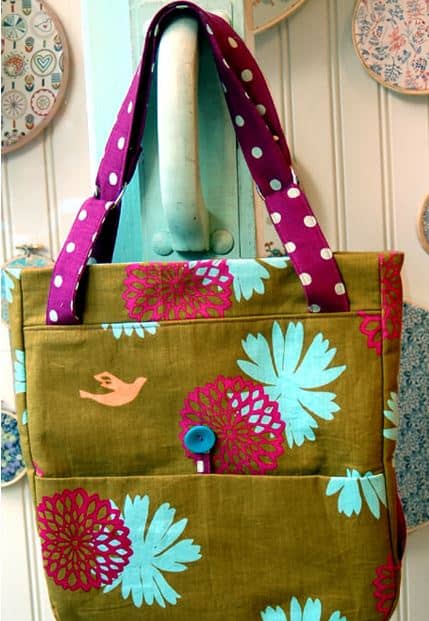
Remember this bag? I was reading the Martha Stewart blog and saw it referenced again there. This version by Liesl of City Weekend fabric by Moda and her own company, Oliver + S. I am not a big fan of that green, but the whole look really works. I need to get the pattern out and make it! I have all hardware and have for awhile. Love those dots. I wonder if I have them? 😉
Saturday was the ATC swap at CQFA. I didn’t really like to make ATCS when the group first started swapping, but lately I have found the creative outlet to be a good one. I really enjoyed making my swap ATCs (lower right picture) this time and may make more of them. I found that I could make something unusual in a small format and not have to make try the idea in a large quilt piece. People really seemed to like them as well. I received a lot of nice comments. Diane’s (upper left) are more of her silk painting and I see intention in these ATCs. I didn’t ask her if she painted the pieces specifically for ATCs or if they were leftovers or what. I really like them and hope she makes more like this. Trudi hadn’t been to the meeting in awhile, so hers were snapped up quickly.
RevaVirginia
The environmental theme that is pervading the group (because of the show) is very evident in Reva and Virginia’s pieces. I have been enamoured with leaves lately and it is very interesting to me to see how many different ways people can depict them. I didn’t ask Virginia if she painted her leaves, but they look painted.
BronJaye
One of the things I love about Bron’s ATCs is that she does something different each time. I was disappointed that I didn’t get an ATC paper doll last time and was hoping that she would make more, but, alas, it was not to be. She did the lovely green abstract that look at bit like leaves. Mine (right), as usual, were nearly impossible to photograph. I made an extra so I could keep one for myself.
My trades-Nov. 2010
Above are the ones for which I swapped, except mine, which I just kept. They will look great in my collection.
TFQ and I spent a fewer days at PIQF this year, because we wanted to sew. I think that was a good choice, though we didn’t really find a quilt we wanted to make together. I enjoy it when we work on blocks together. I always learn a lot and think we do good work together.
Grab Bag by Sandy's Designs
As I mentioned I bought a bag pattern called Grab Bag from Sandy’s Designs. I wasn’t able to find a website, but I found it at the Cranberry Quiltworks booth. When we returned, I worked on this bag and got advice from TFQ while she pressed fabric.
When looking at the bag from this angle, it is a great bag. I thought this pattern was a little bit fiddly. I didn’t really like making the patchwork for it. I think that is just a personal preference and not a problem with the bag pattern. Fortunately the designer gives directions on making the bag with longer strips. I want to try that. If I make these in any large scale way, I wouldn’t make a patchwork inside.
The designer gives options for different sizes and ideas for fabric placement.
The triangles used in the bag are all half square triangles. They are cut in that manner so that the bias is along the hypotenuse. The top of the bag is no exception. I think the pattern would be stronger if the designers suggested that people cut those pieces in the manner of cutting quarter square triangles so that the bias is not along the top of the bag. Granted, the makers sews the top right away.
The bag looks good in the photo, because I stuffed it full of batting to make it look good. I am not sure I like the unstructured nature of the bag as a whole. I am also having a hard time imagining how I would use it. It would be a good gift bag.
I added a little batting to the handles, too, and applied them using the method described in the Chubby Charmer pattern.
Jane Market Tote
I also, finally, tried the Jane Market Tote pattern from Posy Gets Cosy. The pattern is a downloadable PDF, so you can go right now and buy it. I bought the Martha Negley fabric some weeks ago. I had been searching for the violet colorway, which I found. At the same time, the shop also had this black colorway. I couldn’t tell if it was black or a very dark purple before I bought it. When it came, I found the colorway to be a little grim. Still, it is a good fabric for tote bags, especially for boys moving out on their own. I do like the design of the vegetables scattered over the fabric.
Martha Negley Fabric
Anyway, TFQ has made a number of these bags. She uses them as the wrapping for gifts when she gives new parents receiving blankets. She encouraged me to make the bag while she was here, so I could ask her questions. I learn a lot better when someone shows me what to do as opposed to trying to figure things out from reading a pattern.
This is a great pattern. Lots of good instructions, no mistakes or weird things happening with the instructions. There are some nice little touches the designer uses to make the pattern a little more finished.
I do want to use some interfacing in the bottom just to give it a bit more structure. I’ll try it out and see how that works for me.
I think the bag is a little small. It is much smaller than a grocery bag. In a way that it is good, because it means I won’t fill it up completely and not be able to carry it.
I applied the put them on applied the handles using the method described in the Chubby Charmer pattern.
I plan to make a few more of those bags with the black Martha Negley fabric.
I had an hour on Monday and, still in cleaning mode, I needed to get that ‘C’ off of my desk. It was the bottom of the Leaning Tower of Paper Pisa and the Leaning Tower was not getting any more stable. It needed to go. I wanted it on the wall, so I just put it up. I didn’t look for a stud or make perfect other letters. I just did it.
Create Supplies
When I arrived home from work, I immediately went down to the computer with the printer and printed letters that I thought might be big enough to see. The font ended up being 700 pt! I did try 800 pt and 900 pt, but they were too big and I didn’t know how to center one letter on the paper.
Create in process
After printing one letter on each page, I cut the letters out and traced them on scrapbook paper.
This started a long time ago with a photo I saw via another member of the Creative Mom Podcast Circle and a photo that she posted. Then I saw more possibilities in Anna Maria Horner’s Handmade Baby book. I talked about it back in June or so. AMH’s are more fiber related. I haven’t done either, except take this first step. Immerhin.
Other ideas:
I may put some paper behind the letters to make them stand out a bit more at night. During the day I can see them well enough. At night, they kind of blend into the life sucking beige.
One could just print out letters on a sheet of paper and put them up on the wall as a stop gap measure.
One could print out letters on fabric and embellish.
I finished the Frosted Stars blocks as I mentioned, so I was a bit at loose ends for what to do next. I am planning to go out of town so I didn’t want to unwrap the Jelly Roll, which is required in the next step of the Frosted Stars quilt project, until I had time to press all of the strips with Mary Ellen’s Best Press. As I mentioned, with the Zig Zaggy quilt, it makes the Moda strips much easier to handle.
I looked around the workroom, which needed to be tidied in a BIG way, and saw a few half done household and charity projects.
Perfect.
I got to work.
The first was one napkin from the four (or 6?) that I cut out at the end of July/beginning of August. I don’t like making cloth napkins, but I like using cloth napkins. I also like the fabrics, most of which I would use for quilts.
Anyway, I straight stitched around the two FQs and then proceeded to perform the most odious task of napkin making, which is to press the seams, so that when I turn it inside out the bottom fold is the same width as the top fold. It never works and for some reason this drives me crazy. It takes me forever to even get it to a point where I can stand to use the napkins. Once I get this part done, it is ok. I find it especially humorous that the one person in our house not old enough to drink loves the Martini napkin. Very entertaining.
Anyway, this napkin is done. I have a yard and a half of 3 different kitchen related fabrics that are waiting to be napkins. I can’t wait.
Merit Badges October 2010
The Court of Honor was on Friday and the Young Man was awarded 4 new merit badges. It took me forever to sew his last batch of merit badges on to his sash. In fact, I believe I did it the day of the Court of Honor. Since I was clearing off surfaces anyway, I sewed on the merit badges and resewed his troop numbers on. The handsewing I had done when he first joined the troop was coming undone and looked crappy.
He was awarded another 100 year special merit badge so I unsewed the one he had already received and sewed them on in such a way that they were symmetrical.
Anal, I know. I want them to look good, especially if I have to sew on all of these badges. Don’t get me started on my well developed and long rant about the BSA not having a sewing merit badge as an Eagle requirement. It is crazy to have a bunch of sewing that needs to be done and no merit badge to teach them how to do it. Another commentary for another day. I do need to remember to find some thread that matches the the shirt – a beigey color that I would never normally buy.
Million Pillowcase Challenge Pillowcase
After doing a bit of unearthing, I found the parts for another pillowcase, so I sewed that together as as well. As I was doing the French Seam (remember Twiddletails directions for the burrito pillowcase?), I started wondering if I could do a French seam on the gift bags I make. I really like those French seams and am glad I learned how to do them.
I had a piece of fabric purchased recently for a gift bag. I thought I could make it quickly, so it had been hanging on the arm of my chair for a month or more. Since I was finishing things up, I decided today was the day to get that fabric off the arm of my chair.
Ribbon Candy Gift Bag
I also decided it was the day to try a French seam on a gift bag. I am pleased with the way it came out.
French seam with Ribbon Tie
My one concern was the ribbon tie. I insert a piece (usually recycled cloth ribbon) into the seam and reinforce it. I didn’t want the French seam to mess up the ribbon. I need the ribbon to close the bag. I couldn’t quite imagine how it work in my mind, so I tried it out. The key turned out to be just keeping the ribbon out of the way of the needle and inserting it properly in the first place. Above is the inside of the bag after I sewed the second seam.
Inside/Outside of Gift Bag
Above is the bag with the right side facing out, but with the top folded back so you can see the French seam. I like the fact that there are no raw edges anymore. These bags get a work out even if it is just once a year and the French seam will make the ones with these seams last longer. You can also see how perfectly the ribbon comes out of the side. YAY!
This process kind of freshened up the process of making gift bags for me as well. I have a lot of Christmas fabrics needing to be made into gift bags, so perhaps I will do it now. I could make some for my SIL as a treat.
The other day I wrote about the CQFA meeting and the activities in which we participated. I finally processed all the photos. They aren’t great, because there were a lot of people swapping this time. I came into the room late and everyone was ready to go, so I had to be quick about the photography.
Caroline
I picked the 2d one from the right. I liked the spiral.
Very Picnic-y
I don’t remember who made these, but they were made from oilcloth.
Maureen
Maureen doesn’t usually make sets. I got one of hers as well: the one in the upper left hand corner.
Nancy?Bron & Sue
I would have loved one of Bron’s paper dolls, but they went quickly!
Julie
I also missed out on Julie’s. Hers had some plastic covering some loose art materials.
Virginia
Virginia also made a bunch for the show.
Dolores
Dolores always does fabulous work. I picked the one shown in the bottom left hand corner. I love her beading.
Sue - detail
I was able to choose one of Sue’s as well. The one on the far left now lives at my house. she used a great technique. I wish I could remember the name. She might show us how to do it at an upcoming retreat.
Diane?
Nobody really liked mine – or else everyone else’s were such high quality that my shaving cream marbling technique was overshadowed. I don’t know. I don’t think mine were crappy.
This is the larger size of the Anna Maria Horner Multi-tasker tote. I wanted to make a bag that worked with the Moda Half Moon fabric after the Mini Multi didn’t turn out as expected. I am pretty pleased how this one turned out.
Half Moon Tote – detail
I might be done with this pattern. I dug the Cruzer & Little Cru pattern out and may start working on that.
One of my first serious craft undertakings was cross stitch. Counted cross stitch. I started cross stitching when I escaped to Denmark for a week during a difficult year. I went to visit my Danish sister and her family. Ulla, my Danish sister’s mother, treated me like her long lost daughter. One of the things we did was go to downtown Copenhagen and buy a cross stitch pattern. The pattern I bought, daffodils, was Eva Rosenstand / Clara Waever brand, as is the one above. It was the perfect for a long, cold, snowy winter project. Ulla showed me how to follow the pattern and make perfect stitches.
I finished that daffodil wallhanging and gave it to her. The next time I went to see the family, my little cross stitch was hanging, framed, in a place of honor in her dining room. It made me feel so good.
Cross Stitch Sampler Top/Middle
I bought this pattern years later. I think I bought it in Solvang and it was wildly expensive. I worked diligently on it and was so proud when the border came out perfectly.
Cross Stitch Sampler Top Corner
I have never created a quilt border that perfectly. You can tell it is Danish, because of the extra letters from the Danish alphabet. No, I do not speak Danish.
I gave it to my grandmother as a gift fo her birthday. I didn’t have the money to have it framed, which was a shame, because the presentation would have been a lot better. She opened it and before she got the whole thing out of the box, her husband said “WHAT are we going to do with THAT?” I felt so deflated and I never saw the piece again. I worked so hard on it and I was sure that it went to Goodwill in one of the regular purges that my grandmother loves.
Cross Stitch Sampler Bottom
Last week, my mom gave me a small package wrapped in lime green tissue. I wanted to go to Solvang on the way to or from Long Beach to get another cross stitch pattern from the shop there. It just didn’t get high enough up on the priority list.
When I opened the package I almost cried. My grandmother had sent me back this sampler. She hadn’t gotten rid of it! I was thrilled. I really did a nice job on this project and I am going to get it framed and hang it in a place of honor.
This is one of the totes that made over the past week or so. I think I bought the fabric when I was in Maryland a few years ago. I bought the fabric specifically for a tote bag. It has been in my tote bag fabric box for awhile. I started to wonder why I bought it and then I found a great use for it. I like the fabric, but it turns out not to be a fabric that I would carry around. I think I bought it at the beginning of my tote bag making mania when I didn’t have a lot of tote bag fabrics.
I had to finish something this weekend aside from the interminable pressing and patch cutting. I pulled out one of the pillowcases I had prepared when The Child was making his and finished it. These pillowcases are soooo unbelieveably easy. The worst part is cutting the fabric. I think I have one more prepared and then I’ll have organize more fabric to make a few more.
TFQ is making a bunch and she tried sizing down the Twiddletails pattern slightly. She said it came out fine and she didn’t have to cram the pillow into the case. I want to avoid that at all costs. I want the pillow to slide in so it is a 2 second linen changing job rather than a 20 minute pain and torture session.
One of the best things about this particular pillowcase is that the seam where the cuff, trim and body of the pillowcase all come together matched up! I was really excited about that!
Matching Seams
I know it is silly, but I really like doing the best job possible so that people don’t say that I didn’t pay attention. Since these are going to kids with cancer, I really want mine to be the best they can be.
On another, but slightly related note, my mom loved her Sweet Dreams Pillowcase. She left SoCal almost as soon as she received it, but she said she used it at least once.
I am still working on a number of projects on which I have made incremental progress. That is one reason I needed to whip out the pillowcase. I needed to finish something!
The Child and I worked on and finished his pillowcase. I wanted him to do several, but we won’t be doing that. My original idea was that he work on a project during the summer that was not screen related and would help or benefit someone else.
Lining Up the Pieces
We started on Thursday of last week. There are 3 pieces in the Twiddletails pattern: the cuff, the trim and the main body of the pillowcase. The pain part of this project is lining up the 3 pieces.
Pinning
The whole process was a challenge for him. Sewing is not high on the list of interesting activities for a 13 year old. The prospect of helping kids with cancer kept him there, but he had a hard time with the various parts of the process.
It was interesting and a good lesson for me to show him what to do. Everything was so foreign to him. Pinning took forever and it started with me showing him how to stick a pin in the fabric layers to keep them all together. I was surprised that I found it so incomprehensible that he didn’t intuitively know this basic concept. Almost all of the steps of sewing are so ingrained in my being that working with someone who had no experience was an eye opener. It gave me some insight into some of what beginner quilters know and don’t know.
Sewing the Burrito
Running the machine was not an attraction for my darling. He sewed carefully and slowly…for awhile. He had a hard time with the concept of not pushing the fabric through the machine, but letting the feed dogs do the work.
As You Sew, So Shall You Rip
He didn’t pay attention and wandered off where the seam line should be. He learned how to rip out his stitches.
First Success
He was able to finally finish sewing the burrito. If you can make it through the pinning and sewing with this pattern, the burrito creates the cuff, trim and body of the pillow case as one large piece. The Child had some trouble with the trim, but I didn’t feel like making him rip it out again. It is good enough. I plan to pin a note to this pillowcase saying that a teenager made it and it was his first sewing project.
As You Sew, So Shall You Rip 2
After he sewed the burrito, I had him sew the first line of the main part of the pillowcase. He sped the machine up a little (I had it set to super slow) and his mind wandered. The seam, which started out a 1/4″ away from the edge of the pillowcase ended up near the middle of the main part of the taco fabric. I didn’t look before I told him to backstitch, which ended up as a square spiral, also in the middle of the pillowcase. More ripping and unsewing. I did half for him and we took a week long break.
Following the Line
Yesterday, we got back to it. I drew a line on the pillowcase that he could follow while sewing. Brilliant! The line was much easier for him to follow.
Crazy Pillowcase Maker
Yes, his hair has a life of its own, but here is The Child with his finished pillowcase. He left my workroom so fast I was surprised my head didn’t spin. Now I need to think of a new project for the rest of the summer.
Since I returned from Long Beach, I have been trying to sew a lot. I have a lot of new fabric and I want to play with it. I don’t feel like I am sewing enough, but I am trying.
One of the first things I do is wash and press the fabric. This is a big bottleneck right now. The washing, as I may have mentioned, is done. Since I am not finished pressing so I am, basically, pressing as I need a certain fabric.
The first thing in my sewing adventure I did was cut out and prepare pillowcases for sewing. there is a lot of pinning in the Twiddletails pattern. So far, I have made a total of 3 pillowcases and have two more cut out and ready to sew. I wrote about this a little bit in my post entitled Pillowcase Party. This is ongoing. I have a lot more pillowcases in me, but I am dealing with incremental progress on a number of projects right, so I have very little to show for it.
“Incremental progress on a lot of projects” means that I am working on a lot of different projects and haven’t settled down to one yet. I have been cutting pieces for the Frosted Stars quilt, cutting diamonds, working on tote bags, cutting various patches, trying things for the Zig Zaggy Quilt, etc.
Napkins & Pillowcases (8/2010)
The robot pillowcase (middle), which will be donated, is new. I finished that one quickly yesterday. The two pieces on the right are napkins. I saw the pie fabric and had to get it for napkins. I make pies at Thanksgiving and Christmas and it fits into our family culture. The martini fabric was just fun and not something I would use in a quilt, so napkins again.
I don’t really like making napkins, because the seams don’t press well for me. I LOVE using cloth napkins though. I love seeing different fabrics. I love people’s comments when they sit at my table. I love choosing which one I am going to use for the next few days. I also think it is great way to spread fun fabrics throughout my life.
The napkin fabrics won’t be in FOTY 2010, because I only bought a half yard of each and I use two FQs for each napkin. I like generous napkins and I don’t want to square them up. This time I used two new fabrics (the pies and martinis) and found two fabrics that had been around for awhile with which to pair the new fabrics. When I brought them downstairs the boys were already claiming their favorites.
I finally made the sleeve for the Chocolate Box, so that quilt is nearly done.
Blue Janus Quilted
I also went longarming last week. I am not longarming a monster quilt again. The process didn’t go smoothly and only a small part of it was because of the size. I think it is good to find my limitations. For longarming, I think mine limit is a twin sized quilt.
The shop is having problems with their machine, but it was still functional. We spent two hours working through the machine not working. I quilted about 4 blocks (6″ finished) and we had to rip out all that quilting. Evelyn, my helper, was awesome. We talked about our quilting while we worked on the machine. She told me about her family. Another lady came in to help. No dice. The machine wasn’t working. Finally, one of the owners came in and told us we were using the crappy thread that couldn’t be used with the longarm machine.
My question was why was that thread in the longarm room if it wasn’t to be used for longarming? If it was in the room, I would certainly choose it!
We changed the thread and the machine worked like a charm. Sigh.
The good part is that I got a lot of practice stopping and starting, which I needed.
I was too tired to trim the quilt, so it still needs to be trimmed and it needs the binding of course.
There is more to do and I need about a week to just sew with no other obligations.


")
