Gift Post #8: Multi-tasker Tote

TFQ Multi-tasker Tote

I put this Multi-tasker Tote on my list in 2013 or even 2012, maybe. It feels like it has been on that list forever. Fortunately, it doesn’t matter, because the pattern worked the same in 2015 as it did when I made it last time.**

I couldn’t carry my machine and prepping projects seemed like a good idea. I decided to cut out the bag when I went to Reno. Cutting out bags is very time consuming for me. I found it hard. I felt sad and depressed after I finished the cutting, though having Julie, Kathleen and Mrs. K there made it better.

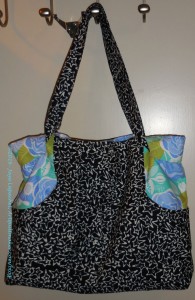
The following weekend, Thanksgiving weekend, for #BFSI, I started sewing this bag together. The Multi-tasker Tote pattern is such a great pattern and it is a joy to make (the sewing part, not the prep part). I felt so much better after I started it. You should click on my link, buy it AND make it!

I worked on it late at night and within a short amount of time, the bag started to look like something. It was such a thrill.

Large inside pocket
Large inside pocket

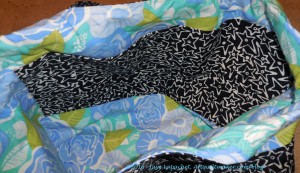
I did a couple of things differently. First I made a the inside pocket really large. I wanted the pocket to accommodate a journal to keep it safe and away from a water bottle or other wet things.

I wanted contrast so I made the pocket out of the outside black batik. I really like the black batik, though I might have thought differently if I had made the matching Sew Together Bag first (see post about that soon). I didn’t have enough of the black to make the outside of the Sew Together bag, which was a disappointment. I have a thing about making sets of matching items.

AMH MTT key ring loop

I also made the key ring flatter. I wasn’t sure why beyond not wanting to sew through so many layers of fabric and interfacing. It turns out that TFQ can clip some of her zipper bags (she is making them now and selling them at select craft fairs and by order), using a carabiner or a key ring clip or something to this bag. I have a sprongy chain so I can clip my keys to my handbag and I may try and make something like that with a piece of elastic in a later bag. We’ll see.

I used quite a bit of Shapeflex to give the bag some structure. You know I don’t like floopy bags. It looked stiff, though, which wasn’t ideal.

I gave TFQ the bag for her birthday on Monday and she liked it, or I thought she liked it. I’ll look forward to seeing how it works for her when it softens up a bit with use.


**Nota bene: I don’t actually know if the link to the bag is the last time I made a AMH MTT. It seems like a long time ago and I thought I had made one more recently.

New Bag for Me!

Half Moon Tote
Half Moon Tote

This is the larger size of the Anna Maria Horner Multi-tasker tote. I wanted to make a bag that worked with the Moda Half Moon fabric after the Mini Multi didn’t turn out as expected. I am pretty pleased how this one turned out.

Half Moon Tote - detail
Half Moon Tote – detail

I might be done with this pattern. I dug the Cruzer & Little Cru pattern out and may start working on that.

New Bag

Blue Flower Tote
Blue Flower Tote

This is one of the totes that made over the past week or so. I think I bought the fabric when I was in Maryland a few years ago. I bought the fabric specifically for a tote bag. It has been in my tote bag fabric box for awhile. I started to wonder why I bought it and then I found a great use for it. I like the fabric, but it turns out not to be a fabric that I would carry around. I think I bought it at the beginning of my tote bag making mania when I didn’t have a lot of tote bag fabrics.

I used a tea pot fabric for the inside.

Blue Flower Tote Bag - detail
Blue Flower Tote Bag – detail

Mini Multi-tasker Tote

I was on a mission to start using some of the fabric I bought on my recent trips. I decided that after hauling the regular sized AMH MTT around for a couple of weeks that it was time to test out my mini version.

AMH Mini Mult-tasker Tote

Bottom line: I don’t like it. My basic problem is that it is handbag sized, not tote bag sized. What I really wanted was the AMH MTT in a slightly smaller tote bag size. I definitely did not want a handbag. I use leather handbags, because I am brutal on them. This bag looks fine, especially from this photo angle, but looks slightly out of proportion to my exacting eye.

It went together pretty well until I had to insert the lining into the exterior. I found out that the lining was much too big (did I forget to downsize?). I used tucks to make it work.

I used the pink straps instead of the straps I had originally made for this tote. I really liked the straps I made and only had a half yard of that fabric. When I decided I didn’t like this tote, I decided to save the straps for a different bag. I think the pink looks nice against the black and white. You’ll see the second version soon!

AMH Mini Mult-tasker Tote (detail)

The fabrics are fabulous and I have enough of the Moda Half Moon large dot to make another regular sized tote. I don’t have anymore of the lining fabric. It reminded me of a 1940s bathing suit fabric.

AMH Mini Multi-tasker tote (size comparison)

Above you can see the size comparison to the regular sized AMH MTT. I thought I only cut off 1″ on each size of the Mini MTT, but must have cut off more.

My mom had a good idea, which was to take the original pattern sheets to a copy place and have them reduce the size proportionally. It is a great idea and I wish I had thought of it sooner.

I have a bunch of other small projects that I have made and will post soon.

Springy Bag Complete

You might remember about a week ago I talked about selecting bag fabrics. I just couldn’t decide so, instead, I started on a different bag where the selections were already firm in my mind.

AMH MTT in Progress

I really enjoyed working with these fabrics. I loved the colors and the feel. I finished the bag on Saturday and took it out with me on Sunday. I have to admit that even if I give bags away, I try most of them out. I intend to keep this one, but tote bags flow through my life so quickly that who knows?

Spring Tote Bag - completeThese are fabrics that I bought in Ferndale and the large flower print is by Martha Negley. I do love that color, a reddish pink tending towards salmon. It is a cheerful color.

Spring Tote Bag - complete

This is the first time I have made the pocket panels the same color as the exterior of the bag. They are the pieces right under the dot fabric you can see peeking out of top left and right.

It made the fabric selection process a lot easier. The pocket panels aren’t highlighted at all; they look like part of the exterior. I don’t know yet if that bothers me. I did a lot of work on the bag and wonder if I need people to see the pocket panels? I’ll have to think about it and let you know.

Spring Bag - insideI like to make the inside of the bag a light color, so I can see what is hiding inside the bag. I really like that dot fabric! I got some a long time ago with a chartreuse-y / olive background. This colorway works very well for the inside of a bag.

I realize that this is another non-quilt project. Yes, I have quilt projects; I just don’t seem to be working on them. Two quilts, Chocolate Box and Passionate Purple are ready at the quilter and I haven’t gone to get them yet. I also finally called for a longarming date. I could have had March 26, but have to work that day, so FOTY 2009 will be quilted on April 23. Don’t give up! Some quilts are coming.

New Year’s Day Work

AKA Gift Post #6

I am pleased [with myself] to say that 2010 started out with a sewing bang. I finished the bag for my aunt (she never reads this blog as far as I know, so I don’t feel bad about posting it even though I haven’t sent it off yet).

Jeri's Bag
Jeri’s Bag

I started this bag way back in December 2009, but with one thing and another wasn’t able to finish it until Friday. I feel bad, because it was intended to be a Christmas gift. My aunt really loves purple, so I made this bag in purple for her. In terms of fabric selection I had a couple of things I wanted to accomplish and some limitations to deal with. First, I was limited in my fabric choices because of the size of the pieces of fabrics I had available. For a long time I have purchased half yards and FQs. These are fine for quilting, but I am finding that they are barely adequate for bag making. I intend to try the Mini-Multi (AMH’s pattern for the Multi-tasker tote that I resized)This limitation directed me to more plummy colored purples.

Also, I wanted to try a bag where I didn’t use fabrics with a ton of contrast. I think Marilyn’s Multi-tasker was pretty successful. That one wasn’t boring to make. Thus, I wanted to try another interesting combination of fabrics that were also not wacky looking and my aunt wouldn’t feel bad about carrying around.

I am pretty happy with the way this bag turned out. It looks nice and does not look wacky. I made the pockets and straps at the beginning of the process even though AMH says to make the straps at the end of the process, right before I am supposed to attach them. I think my process worked better for me, because once I got past the tedious, fiddly parts, I was able to put the bag together relatively quickly. I like to get all the fiddly parts done, so I can move through the process quickly as I tend to get bored if I have to keep going back to the fiddly bits periodically throughout the process.

Jeri's Bag - detail 1
Jeri’s Bag – detail 1

I think the combination of fabrics is a good one. The colors work well together and there is some interest in the combination. They are all older fabrics, so an added bonus is that I delved into the fabric closet and used some stuff that has been hanging around. I think Auntie would have preferred less plummy and more purply colors, but the bag is what it is.

Jeri's Bag - detail 2
Jeri’s Bag – detail 2

AMH does not make her pockets fully lined. Another change that I have made is that I make them fully lined [by cutting a piece of fabric, folding it in half (right sides together), sewing around, turning] before sewing them on to the bag. I think this method makes a nicer finished product and doesn’t take much longer. I want to remember next time to add a label to the pocket. It seems like a good place to include a label.

Jeri's Bag - detail 3
Jeri’s Bag – detail 3

I am still liking the cell phone pocket, which I learned to make from the Sweet Harmony bag, so I added one to this bag as well.

Cloth Napkins
Cloth Napkins

I have bought some of the fruit and vegetable fabrics, that seem to be popular, recently. I had a joint project with my mom in mind, but decided I liked certain ones too much to give away, thus I made napkins. Perhaps I am making a series after taking a look at the raspberry napkin I made in 2009? The cake fabric and the pots and pans fabric is from my collection of fabric for backs. Those pieces are large, so I can make FQ napkins with no problem and no piecing. In general, I don’t really like making napkins. Turning the pieces and getting the seam crisp are really frustrating and I am generally not successful at it. I tried a couple of different methods this time and am progressing. I do enjoy using the new napkins! I also enjoy looking at the cake fabric. My sister wants a set, but I don’t know if I have it in me to make a SET. Perhaps I can make one a month for her, then give her a set of 12 for Christmas? We’ll see.

In a way I wanted to set a trend for 2010 of major league sewing. In 2010 I want to make major progress in the sewing-quiltmaking-bag making department. I think I did well last year. Still, I want to do better. Not necessarily in terms of numbers of projects completed, but improvement in my processes. Oh, and I would like to see major improvement in my organizational systems. I am not committing to anything on that front, but would like to see it. We’ll see about that.

A Dotty Bag

Dotted Multi-Tasker Tote

Here is my latest Multi-tasker tote. As usual, I made it from the Anna Maria Horner pattern. The more MTTs I make, the easier this pattern gets. Will this be my new tote bag pattern of choice?

I bought the laminated cotton (oilcloth) at the Quilting Loft in Seattle on my week away. As I mentioned, it poured rain part of the time I was there and the regular cotton Julie MTT got wet. When I saw the  dotted laminated cotton, I thought it would be a great winter bag. I made it big, even though I still need to make the Mini Multi to see if it is a better size for my height and shape and the amount of space I usually have on public transport. I had a lot of stuff I was hauling around from cafe’ to cafe’ that week.

Dotty MTT, inside detail

Aside from the laminated cotton, the inside is an old, but still fun and fresh and bright Marimekko print, and the pocket panels are some random turquoise that I had. I am not happy with the outcome of this bag. I am not happy with the pocket panel fabric I chose (the turquoise). It goes well with the other fabrics, theoretically. Made up it just looks wrong. I wish I had used a stripe. I may make another one and use this one for a gift or something else. I have more of the dotted fabric.

One great thing about this project was that I was able to utilize a skill I learned during my week away to add a cell phone pocket to the inside. Apparently, cell phone pockets have a little pleat in them (do they all??). While I don’t know if I would put my cell phone in this bag, I might if my jacket pockets are full of other things. The pocket might also be useful for a Nano, or other small electronic devices. It is definitely a pocket I will use in other bags, mostly because it is cool to make and I feel proud of myself for learning to do it.

After I made this bag and looked at the seven (yes, SEVEN) hanging on my workroom door, I started to wonder if I was giving up quilts and moving on to other accessories? I don’t think so, but the speed with which I can churn out a bag is very attractive and very fulfilling. I will have to put some block making on my agenda for the rest of this long weekend.

Marilyn’s Multi-tasker

I realized that one of the reasons I like making the same tote bag pattern over and over is that I am trying to understand it. I want to understand it so I can change the pattern to suit my needs and also incorporate the techniques into my own design bag of tricks.

Completed Bag, Nov. 2009

The Anna Maria Horner Multi-tasker tote is no exception. As I mentioned in a previous post, I love the way this tote goes together. Above is my completed Multi-tasker tote #2. This will be a gift for a friend of mine. I used Lonni Rossi’s new fabric line in the black and white colorway. You can buy them at Back Porch if you want some.

I used a FQ pack and had to piece some of the fabrics together to make them large enough to fit the pattern pieces. The pattern calls for more yardage than an FQ pack, however I only had a FQ pack of the fabrics and am always up for a challenge.

Nov. AMMTT in progress
Bernina Bliss
Bernina Bliss

I always enjoy using TFQ’s Bernina 1230. It is a tough little machine that has never really given me any problems. Now I know how to wind the bobbin and rethread. TFQ better watch out or I’ll just take it over! 😉

It doesn’t have the bells and whistles that mine does (I miss the auto needle up button!), but it does bags very well. I also like the button holer.

I always have a tough time maneuvering the fabric through the sewing machine as the layers increase. Towards the end of the process I was sewing through about 8 layers of fabric or seams or interfacing. I found that TFQ’s  machine was powered right through with no grunts, groans or complaints.

Nov. Tote, detail
Nov. Tote, detail

The pattern doesn’t call for as much interfacing as I put in, but I like my bags to have some body, so I put interfacing on the exterior and lining pieces. I omitted it from the pocket panels.

I am pretty pleased with how it came out and hope my friend is as well. I am going to size this pattern down so it fits me better. If it doesn’t work, then I probably won’t make anymore of these totes, despite the great way they go together.

I am also working on a Chubby Charmer tote. Stay tuned!

Julie Tote

I spent some time sewing yesterday in between soccer and a movie. As a result, I finished the Anna Maria Horner Multi-tasker Tote. I keep thinking of it as the Julie tote, since Julie looked high and low and found the blue Denyse Schmidt fabric for me. She may get a gift. 😉

AMH MTT, finished!
AMH MTT, finished!

As I mentioned in my review, the construction of this tote is amazingly elegant. Putting the straps on was no exception. There is a part where you fold over the top and that becomes the channel for the straps. I am still completely in awe of AMH and her ability to imagine the construction of this bag.

In the photo below, I tried to show you the channel. Aside from having to turn the straps inside out, which is a big pain in the patootie, I got the straps on and the bag ready to carry stuff in a couple of hours.

AMH MTT, detail
AMH MTT, detail

My only concern is that the way the straps are held on means that I won’t be able to carry heavy stuff in it. I don’t plan to use this for groceries, but I routinely carry:

  1. a journal
  2. my Clairefontaine
  3. a book (can be hardback or paperback)
  4. the Word of the Day book (paperback)
  5. a pencil roll
  6. a water bottle

I don’t think the above list is outrageous…. I do have to have my stuff with me.

I plan to make another one now that I know the drill. I have ideas for different ways of combining fabric. I ended up buying some of the Peltex 2 from SewThankful (I think), so I need to do something with it. This Multi-tasker tote bag is a nice change from the Eco Market tote.