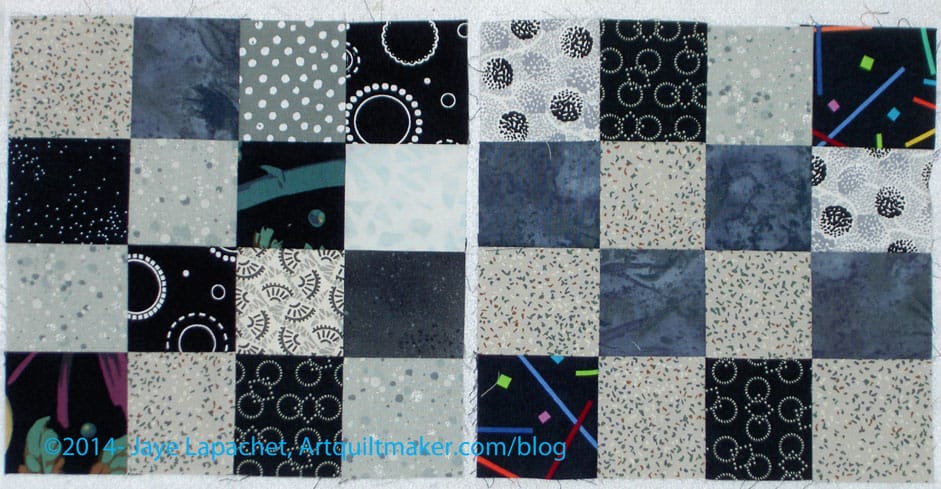
I think I am back in the saddle with the Black & Grey donation blocks. I haven’t really worked on the piece since February 8 of this year. I feel bad about that, but I can only do what I can do. I figure that doing something slowly is better than doing nothing.
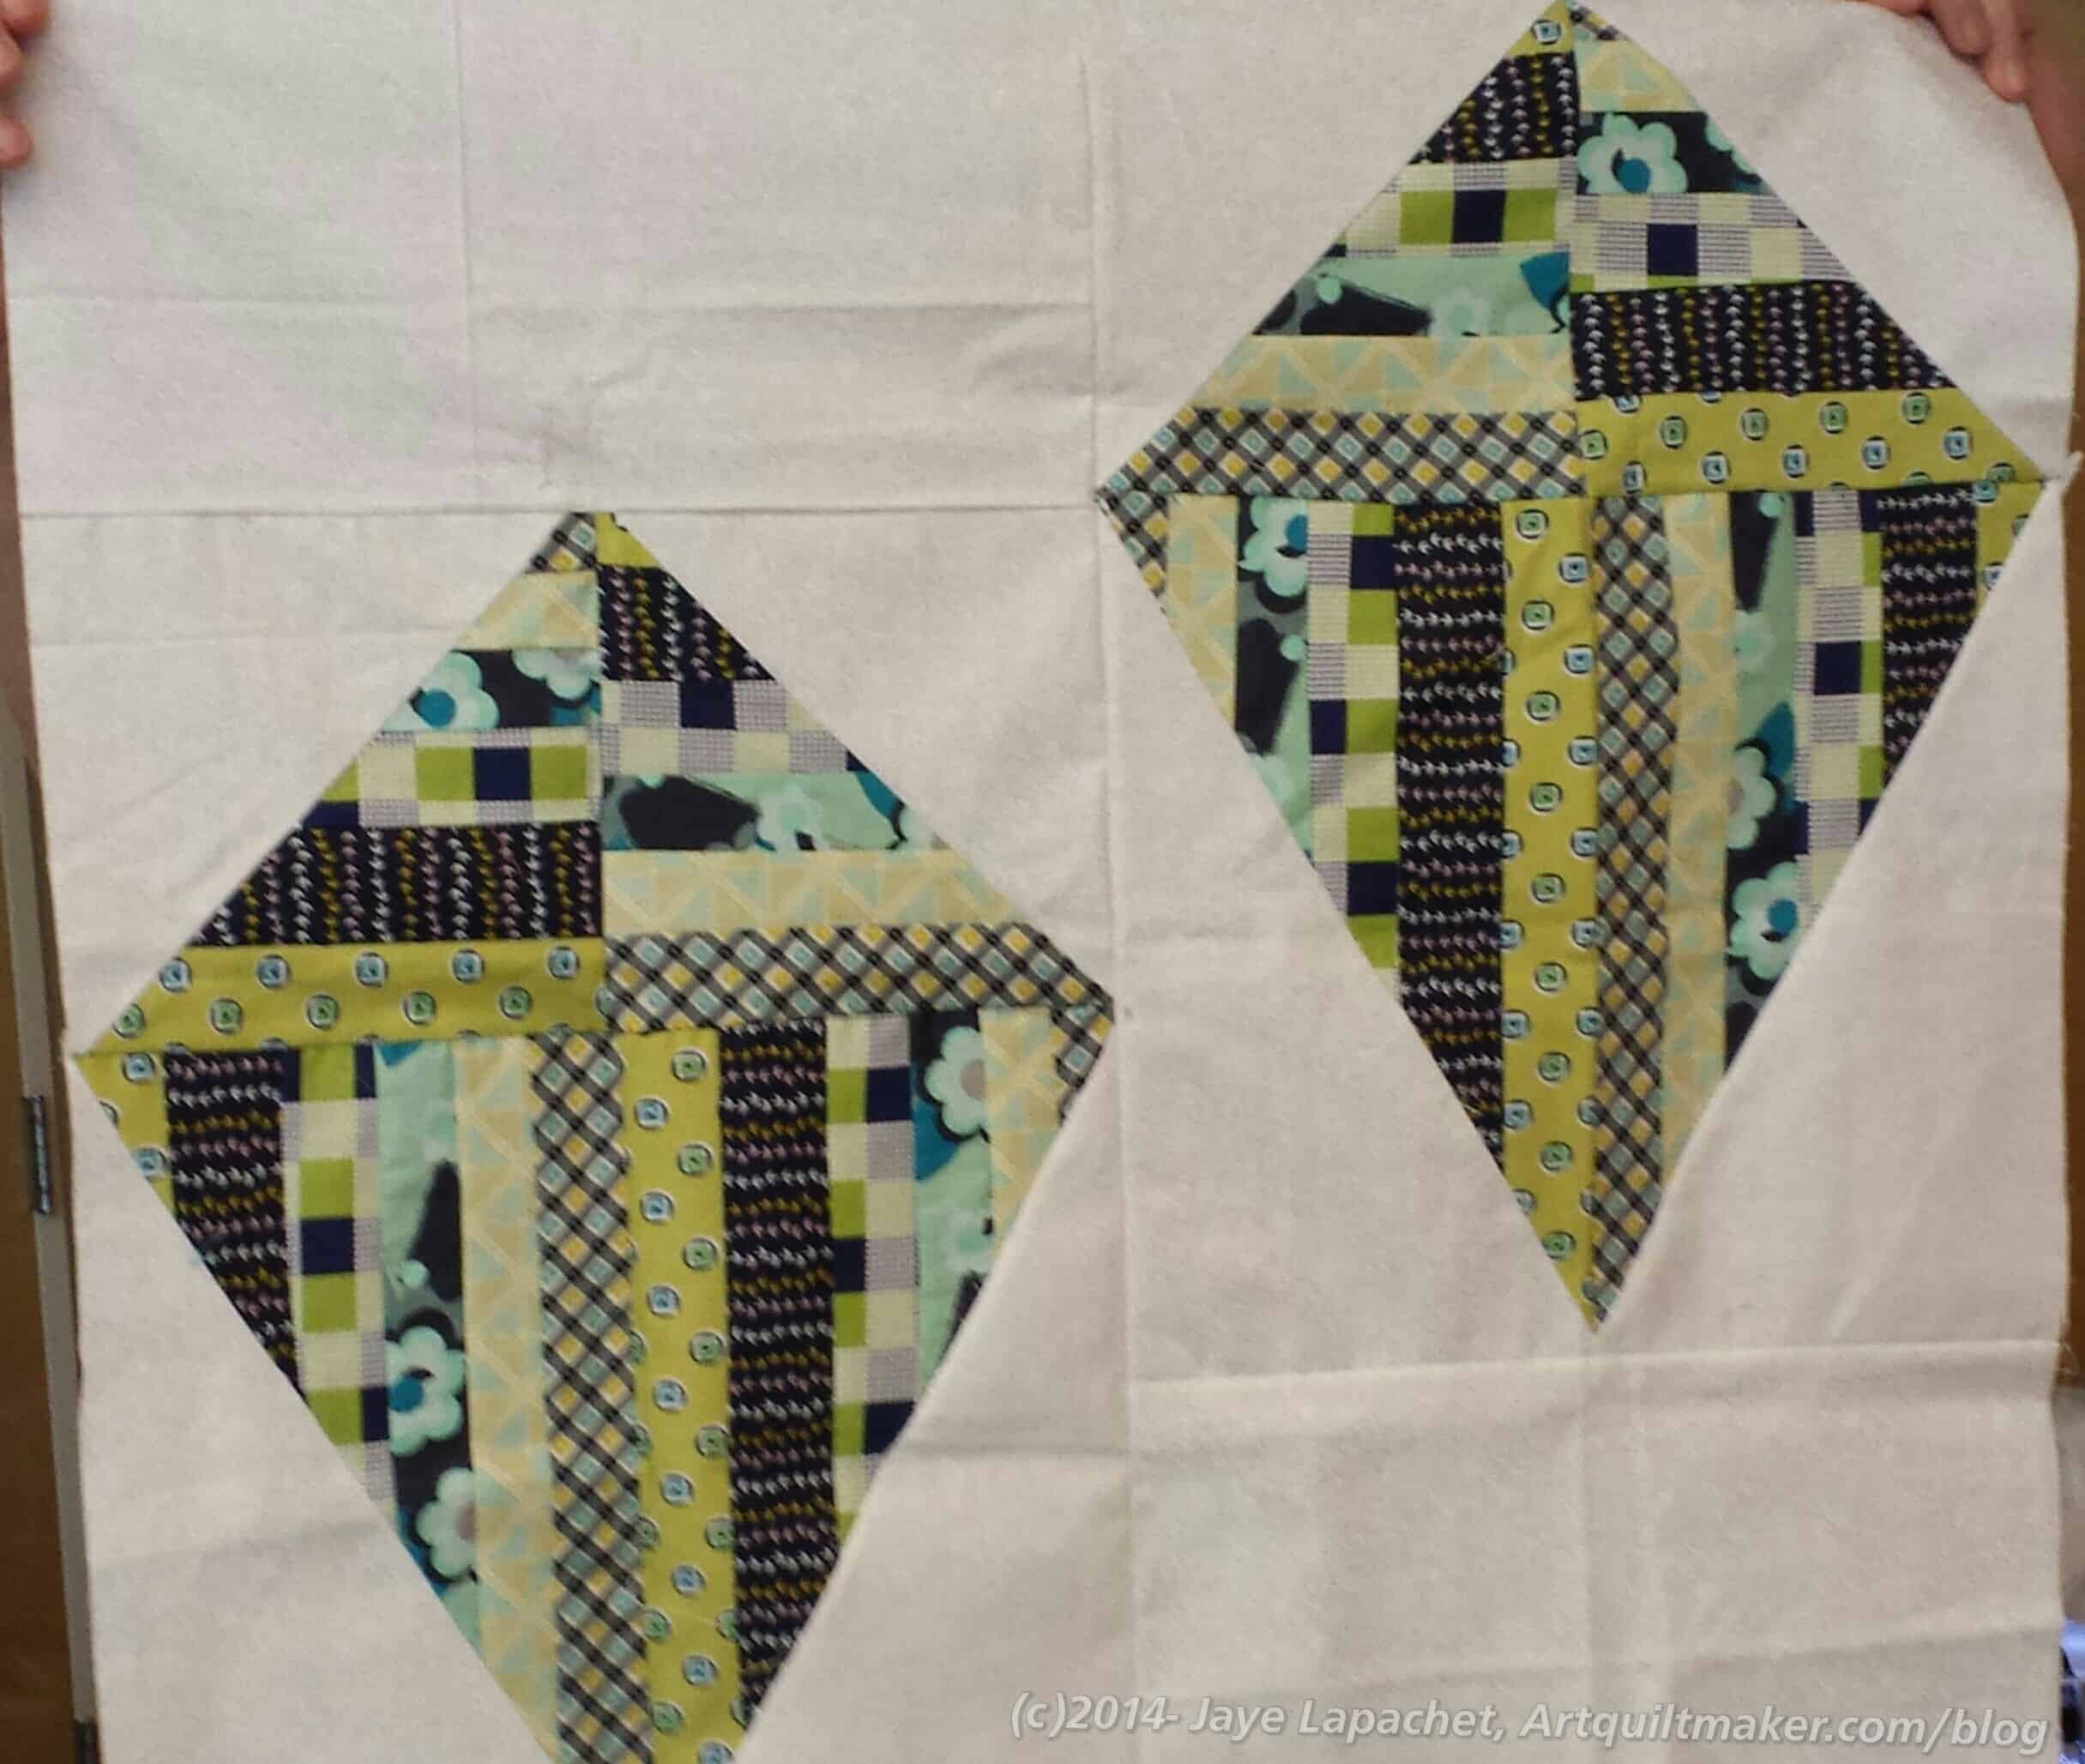
I have about 15 blocks now and am still thinking of making a teenaged boy donation quilt. It feels dauntingly large, though and I don’t know if I can make all of those blocks. Again, I have run out of a lot of choices of different fabrics, which I know won’t matter in 6 months, but now feels constraining.
I’ll just keep plugging away as best I can and see how it comes out. Kelly offered to help and I am hoping she has made some blocks to add to mine to spice up what I have made.
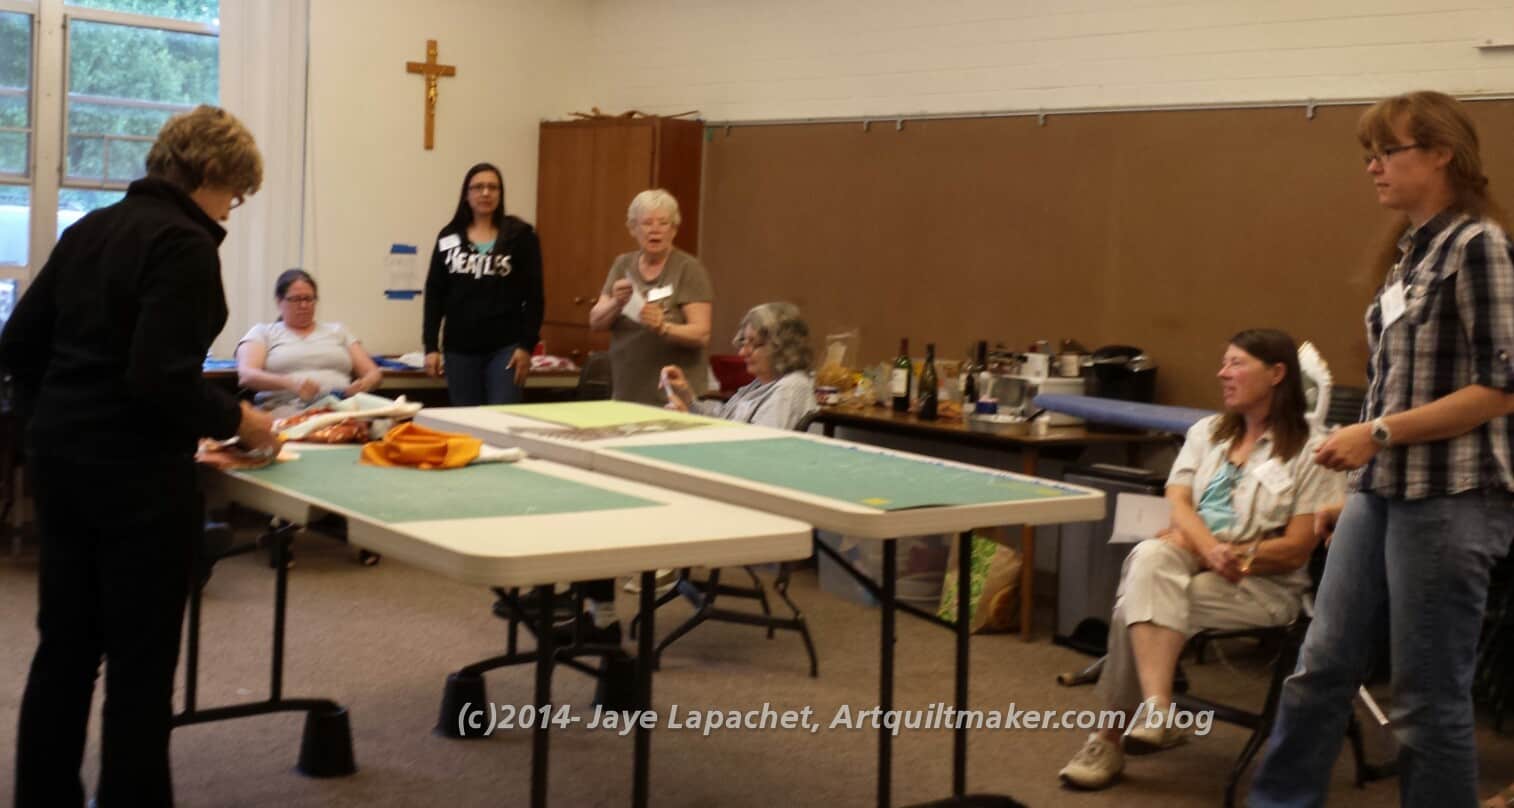
I don’t get to the Sew Days very often, but I am glad I went to the July Sew Day yesterday. I was a basting fiend (for me). I basted two projects that have been hanging around for a long time. This feels like a major step towards quilting and finishing them. Hooray.
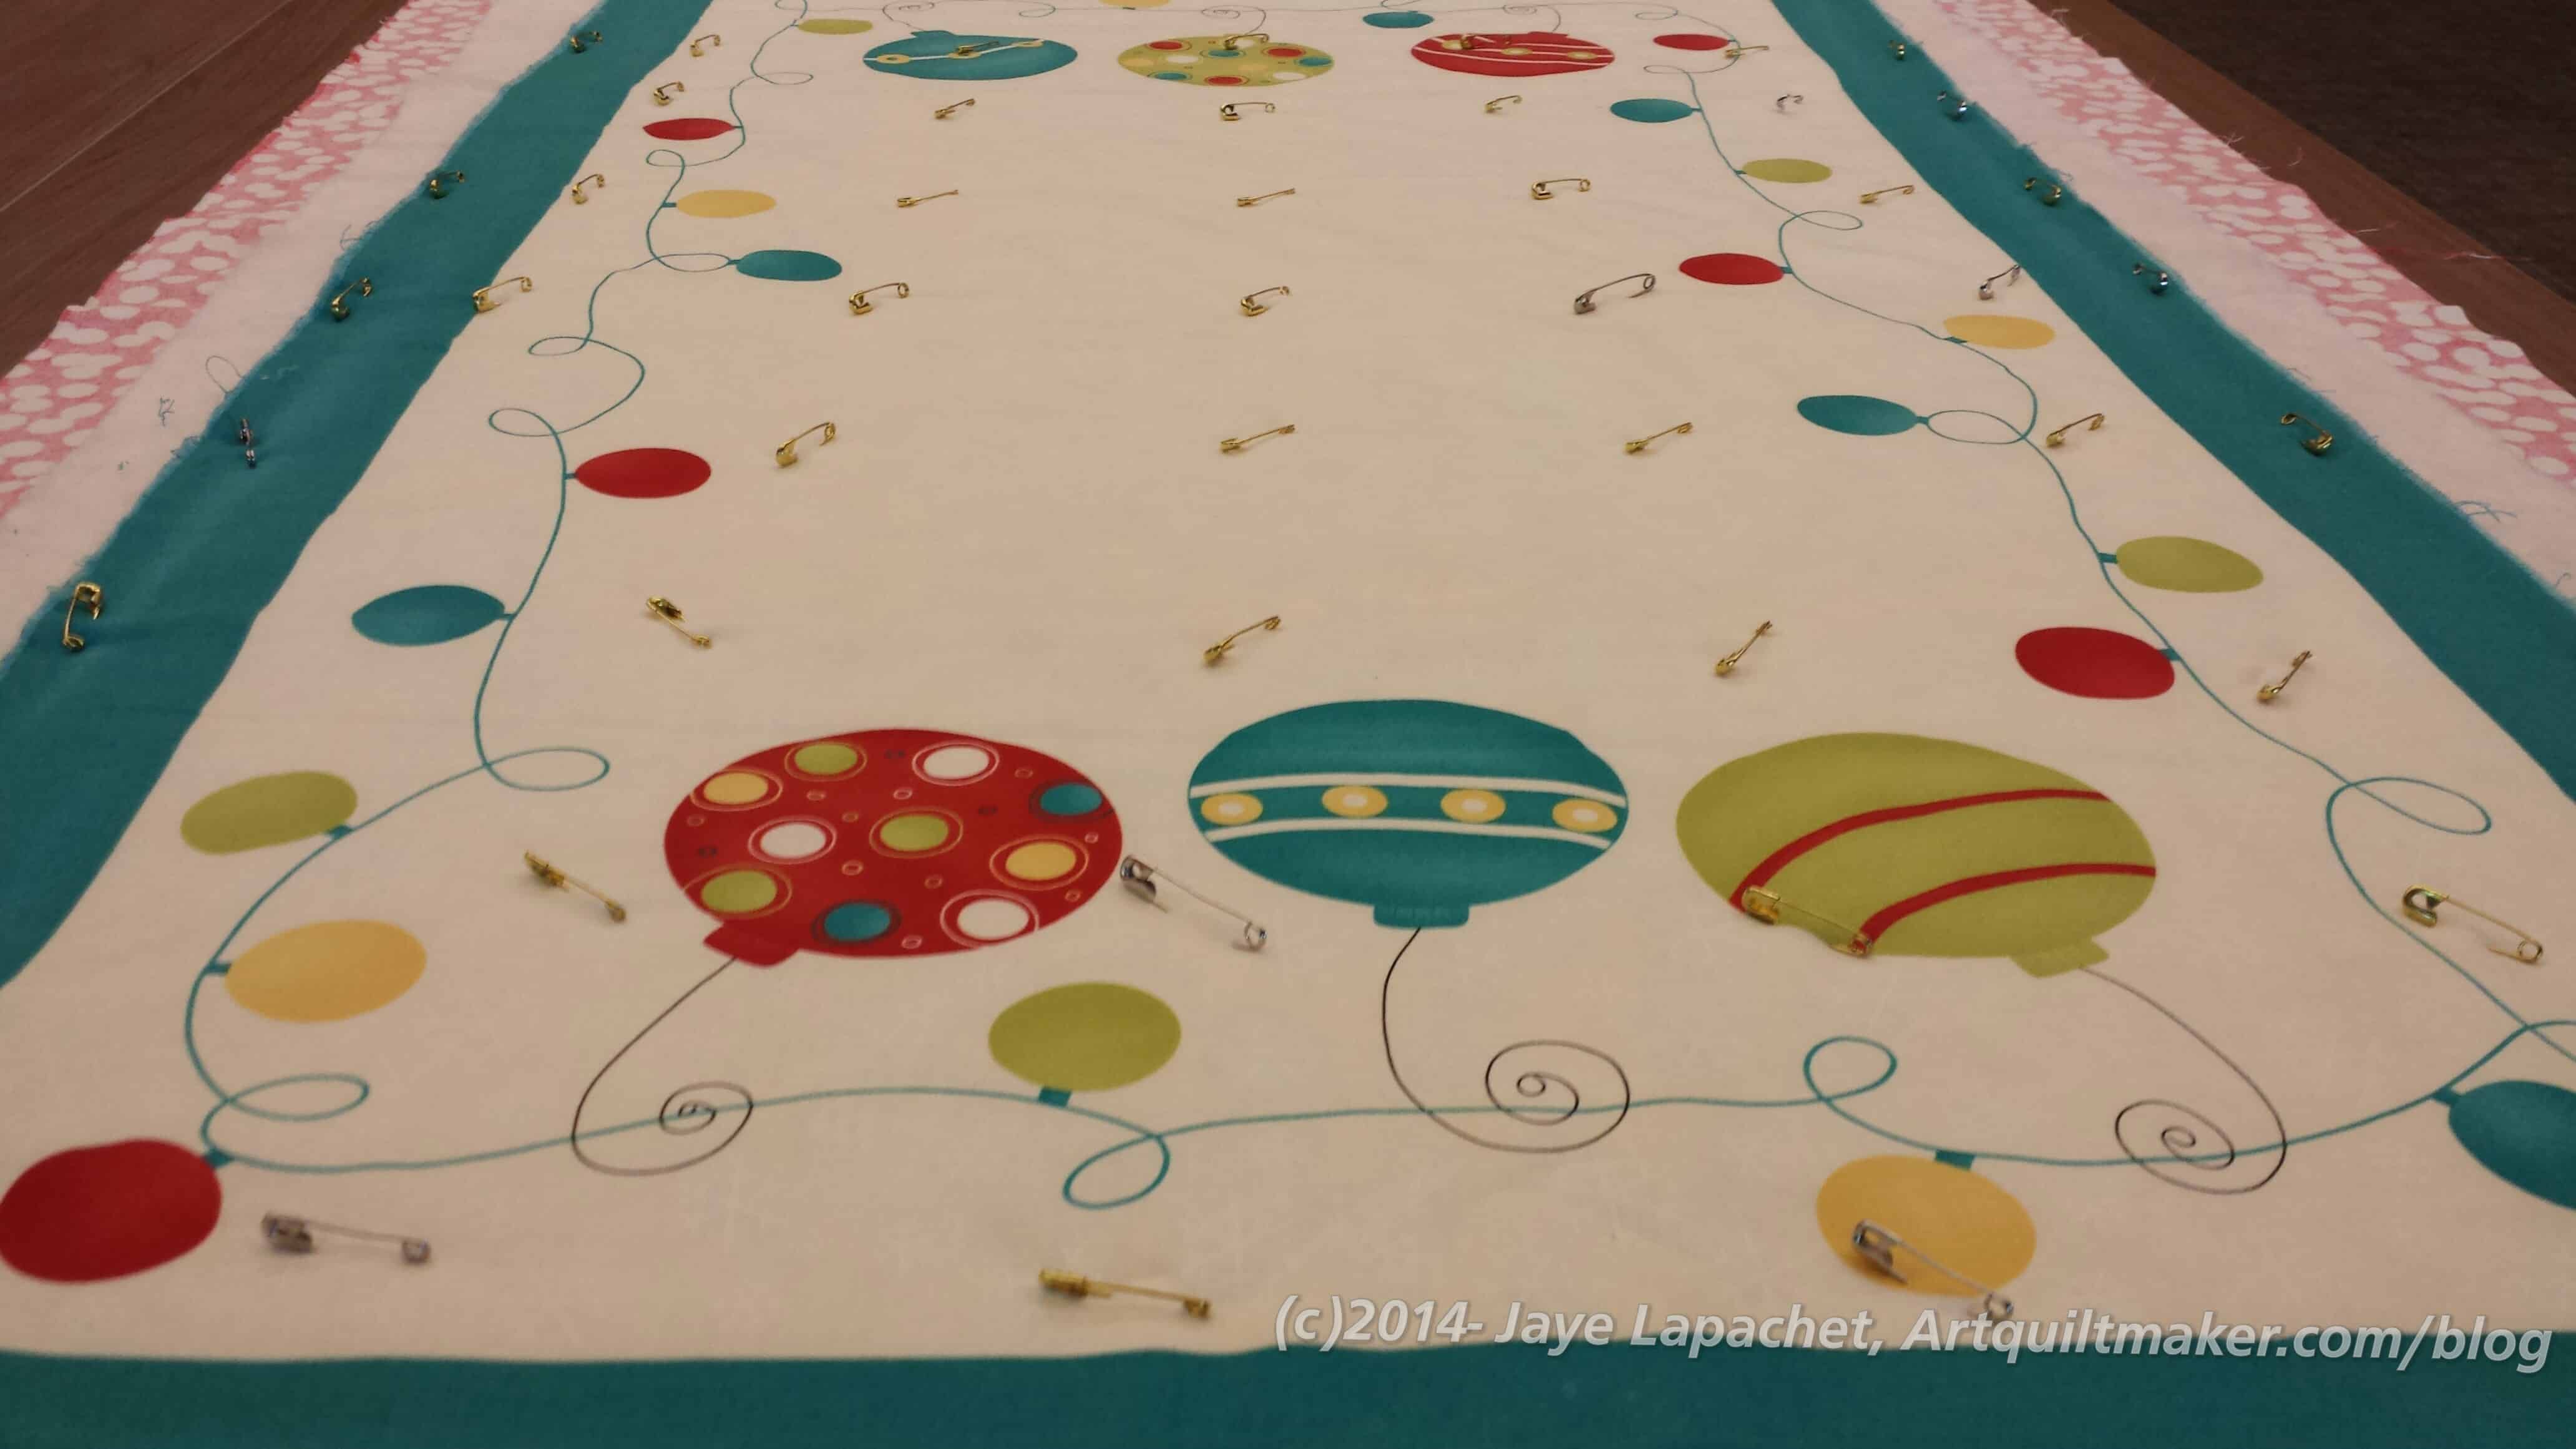
I don’t even remember when I bought this Christmas panel, but I remember buying and it thinking that it would make good practice for free motion quilting. Aside from that, I like it. It is cheerful and the colors are a little off of the traditional Christmas colors.
It has been hanging over my door ever since I bought it. When Kelly mentioned last week that I could baste at the Sew Day, I immediately remembered this project in addition to my Wonky Nine Patch.
Wonky 9 Patch – basted
Since I was planning on working in my workroom yesterday anyway, I thought I might as well baste and cut out projects with my pals rather than alone. Also, the tables at our meeting place are pretty big and it is much easier to baste using large tables than crawling around the floor of my laundry room. Much better on my knees as well.
First, I basted the Wonky 9 Patch. My thinking was that I would suffer through the large project, then zip through the small project. Basting just sucks, but it is a necessary evil. I took my time and put in plenty of pins so that I didn’t have the droopy problem I had with Calm. I think I spent about 2 hours total basting, then I moved on to ripping.
As you might remember, I started a Jane Market Tote for something (BAMQG officer gifts??) and my 9K stopped working in the middle of the last decorative stitch. Recently, Mom asked for something for her church auction and I thought of this bag. It was, after all, almost done and meant I didn’t have to start a new project. Perfect. Photos when I finish it!
Kelly’s Swap Star
I had barely started to rip when Kelly, who was working on the binding of a small swap wall hanging, offered to rip for me, in exchange for sewing on her binding. She doesn’t like hand sewing much and I was planning to be sitting there anyway, so we swapped projects. I hand sewed her binding and sleeve onto her swap project while she ripped out the decorative stitching on my bag. It was pleasant sitting there stitching and a good break from standing.
We both finished at about the same time, though I finished a little bit after Kelly because I offered to sew on the sleeve as well. I think Kelly was pleased and I was pleased not to have to rip out that line of stitching.
[Update: 7/7/2014] Kelly is heading off to the Fat Quarterly Retreat and will take a quilt she got from the South Bay Modern Quilt Guild to donate to Siblings Together (a UK charity that keeps siblings together in foster care). After Kelly finished machine quilting it, Lynette took it to trim and bind it, so it’s truly a collaborative effort. BAM’s charity committee has also donated another quilt for this cause! We’ll be well represented next week!!
Lynette, as mentioned, was there, too. She brought me Fresh Fruit and the Whole Cloth Quilt back from the county fair. They had been having a vacation at her house. I thought about them while I was at Disneyland, but completely forgot about them once I got home. Friday afternoon, I remembered that I wanted to hang Fresh Fruit in my office and I put all of the pieces together. I contacted Lynette and fortunately she was coming to Sew Day. I am glad I remembered and she was able to bring them.
Lynette’s Mystery Quilt
Lynette worked on her Retreat mystery quilt and it looks really great. She added an original block to the eight blocks we made as part of the mystery pattern, so she had a large 9 Patch. I think she will also put some borders on it. She said that she had already cut the batting and backing. I look forward to seeing it finished.
Seeing Lynette’s made me think of mine. UGH. I am pretending it doesn’t exist, but I have to do something with it.
Amanda came and was working on her word quilt. It is a gift for friends who have been married for 25 years. All the words have to do with love and marriage. She has been working on it for a long time, yet she finished the last word block yesterday, so I think she is nearing the home stretch. Amanda is super nice making so much effort for a gift. Definitely someone to model myself after.
She didn’t bring Cat Bed kits, but gave me an already-made Cat Bed to fill up. Good thing because my my schnibble bag overfloweth. I feel bad that I haven’t made any recently, but at least a kitty will be comfy on my schnibbles.
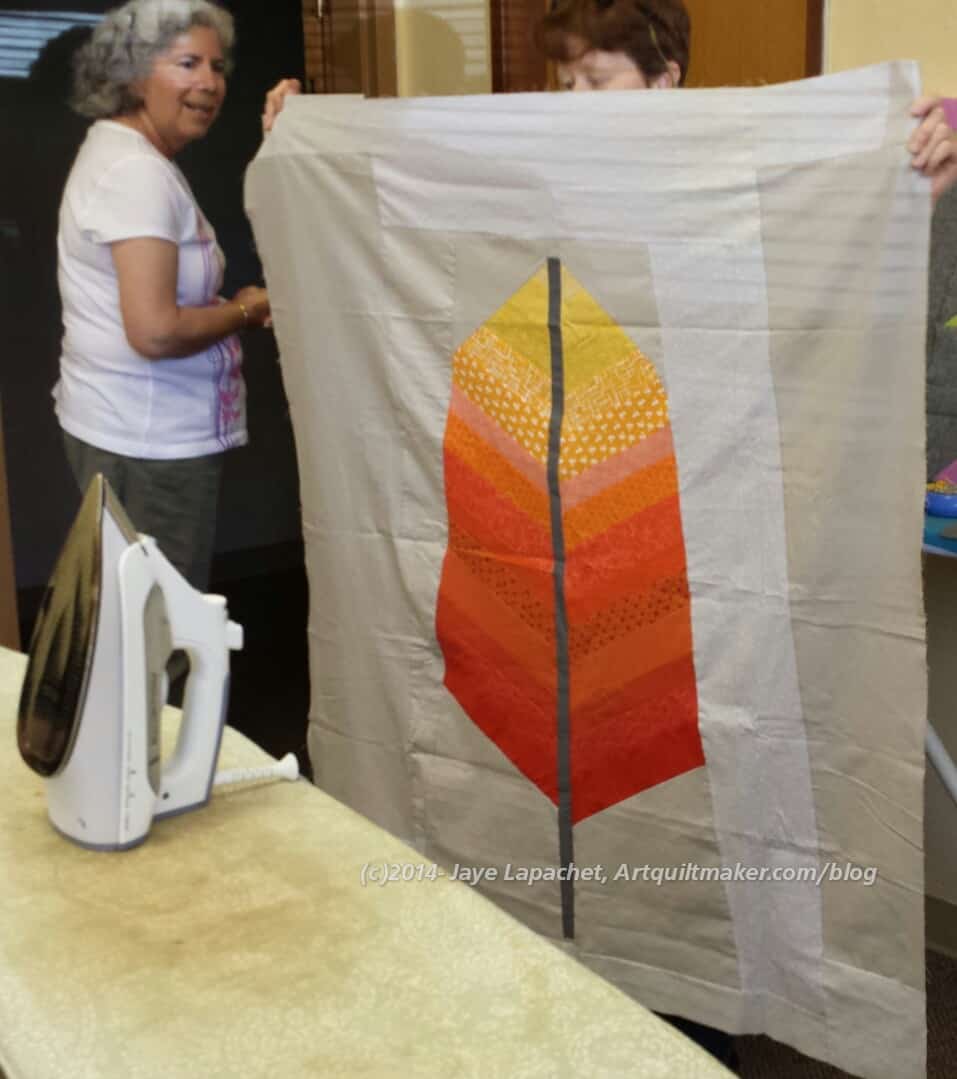
Geri was there making everyone laugh and working on a feather quilt. I am not sure if it was the Anna Maria Horner pattern or another.
Rhonda and Peggy were also there. Rhonda has a new haircut. It is a blunt cut and it looks really great. She gave me a huge hug when I arrived which made me feel great. Rhonda was working on her whole cloth quilt, which is a kind of sampler of free motion quilt stitches that she started for the BAMQG Whole Cloth Challenge. She has the middle all done and was working on quilting the outside of the design, which I would describe as the between sections of the rays of the sun.
Charity Kites
Peggy, the Energizer Bunny of BAMQG, finished a charity top and back, then worked on another top of her own design that was a big hit. She took some blocks leftover (squares and rectangles from strips) from another charity project and cut them in half. She thought they looked like kites and voila’.
I really enjoyed myself and was pleased that it was a small group. I got a lot done and wasn’t as intimidated as I have been at other Sew Days. I tend to take cutting and other non-sewing projects and it feels like I don’t get as much done, but I gave myself a stern talking to about process and how not all of the parts of the project involve sewing.
I am having a hard time getting into the sewing groove. I am pretty sure it has to do with my ‘depression’ over my sewing machine. All the travel I have been doing gets me out of the groove as well. I know that you don’t notice the travel, because I continue to post, but I have been out of town all but 17 days since May 23.
In order to get into the sewing groove again, I decided to work on the City Sampler/Tale of Two Cities block challenge. I spent almost the entire day last Thursday sewing. I don’t feel like I accomplished much, but I keep reminding myself that it is about the process and not the product.
Before I started working on this most recent batch of City Sampler/Tale of Two Cities blocks, I was thinking that this project was fulfilling a goal in my quiltmaking adventure: to make all the blocks in a block dictionary. I never picked out a block dictionary to work from, but always thought I would do the blocks in Around the Block. I didn’t even realize that I had started to work my way through a block dictionary until recently. I guess I wasn’t paying attention. 😉
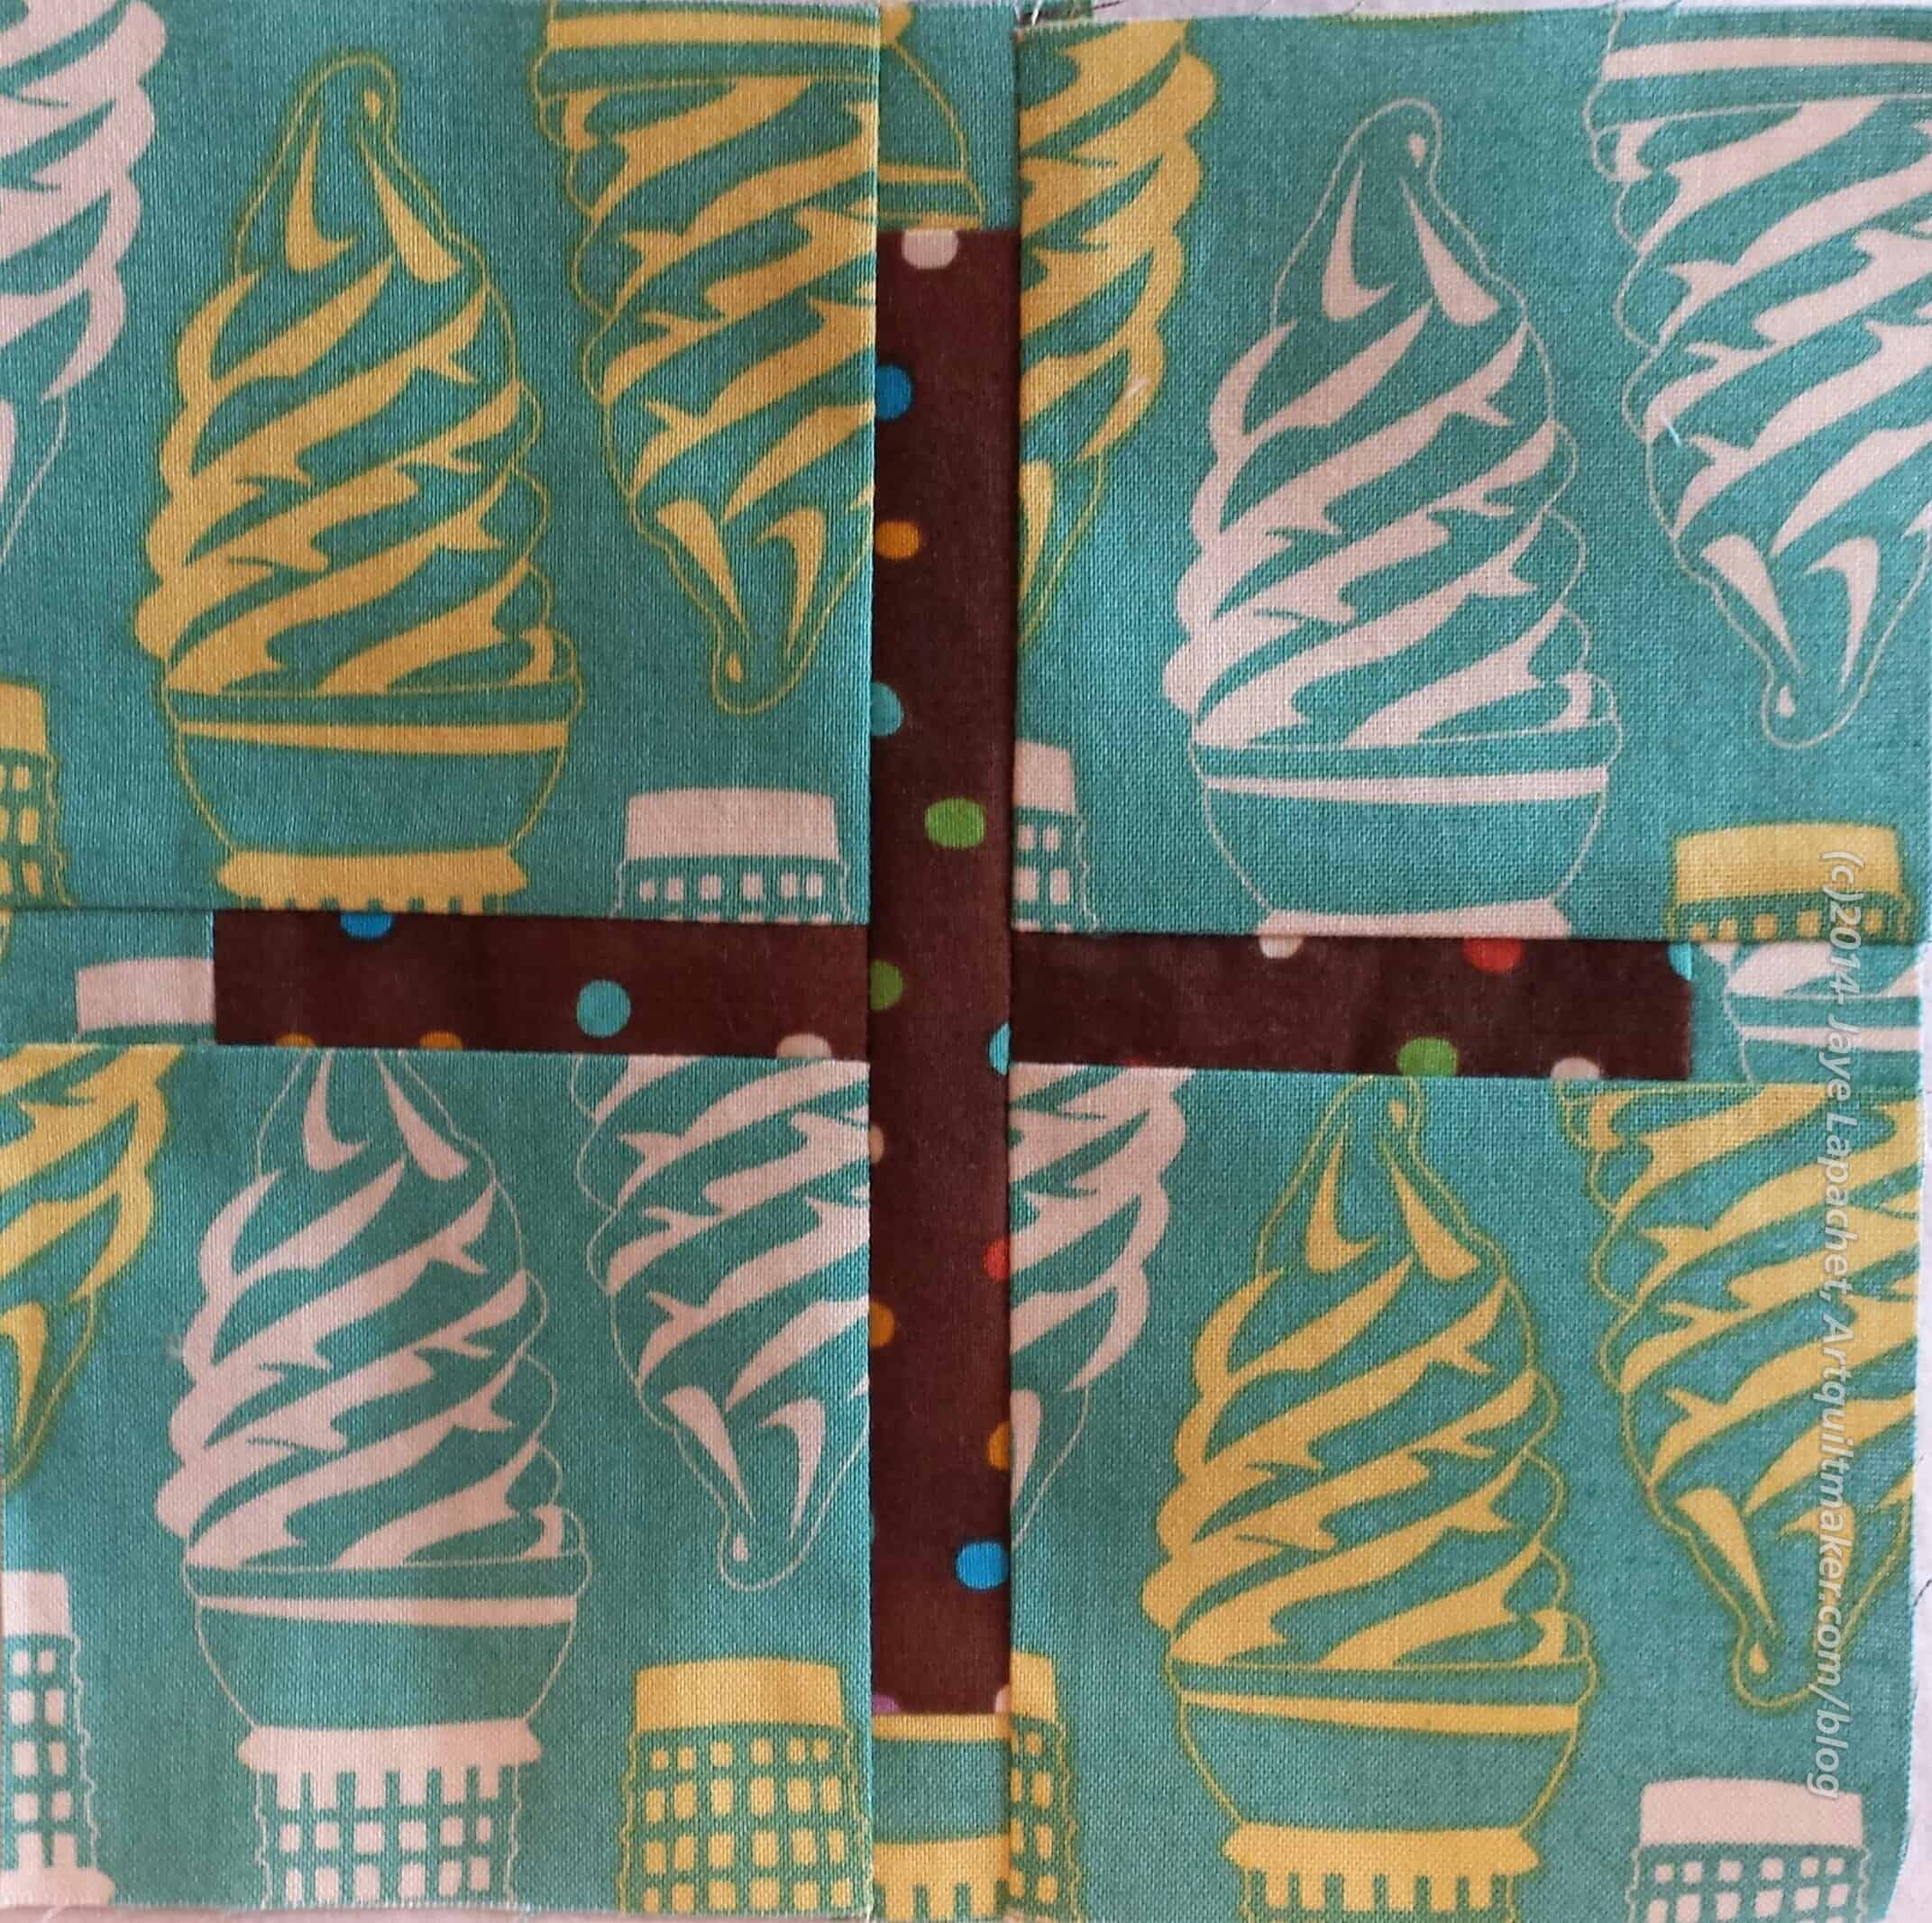
City Sampler no.11
I decided I’d like to make up to no.20 before the next BAMQG meeting. I had made 10 before I started on Thursday. My goal would have meant making 10 more blocks. The first block I made was, obviously, no.11. I am trying to go in order to keep everything straight, though I do veer off sometimes
I am not sure if I like this block. I love the fabrics, but the ice cream cones might be a bit much.
Also, the brown is still a problem for me. This is a similar, but different brown than the brown I used in the City Sampler block no.5. The dots are smaller and I was hoping that would help. I am thinking that the brown part of the background fabric will have to stand on its own in this quilt. I don’t think I will use anymore brown. I don’t know that I will remake the blocks I have made with brown, but we will see.
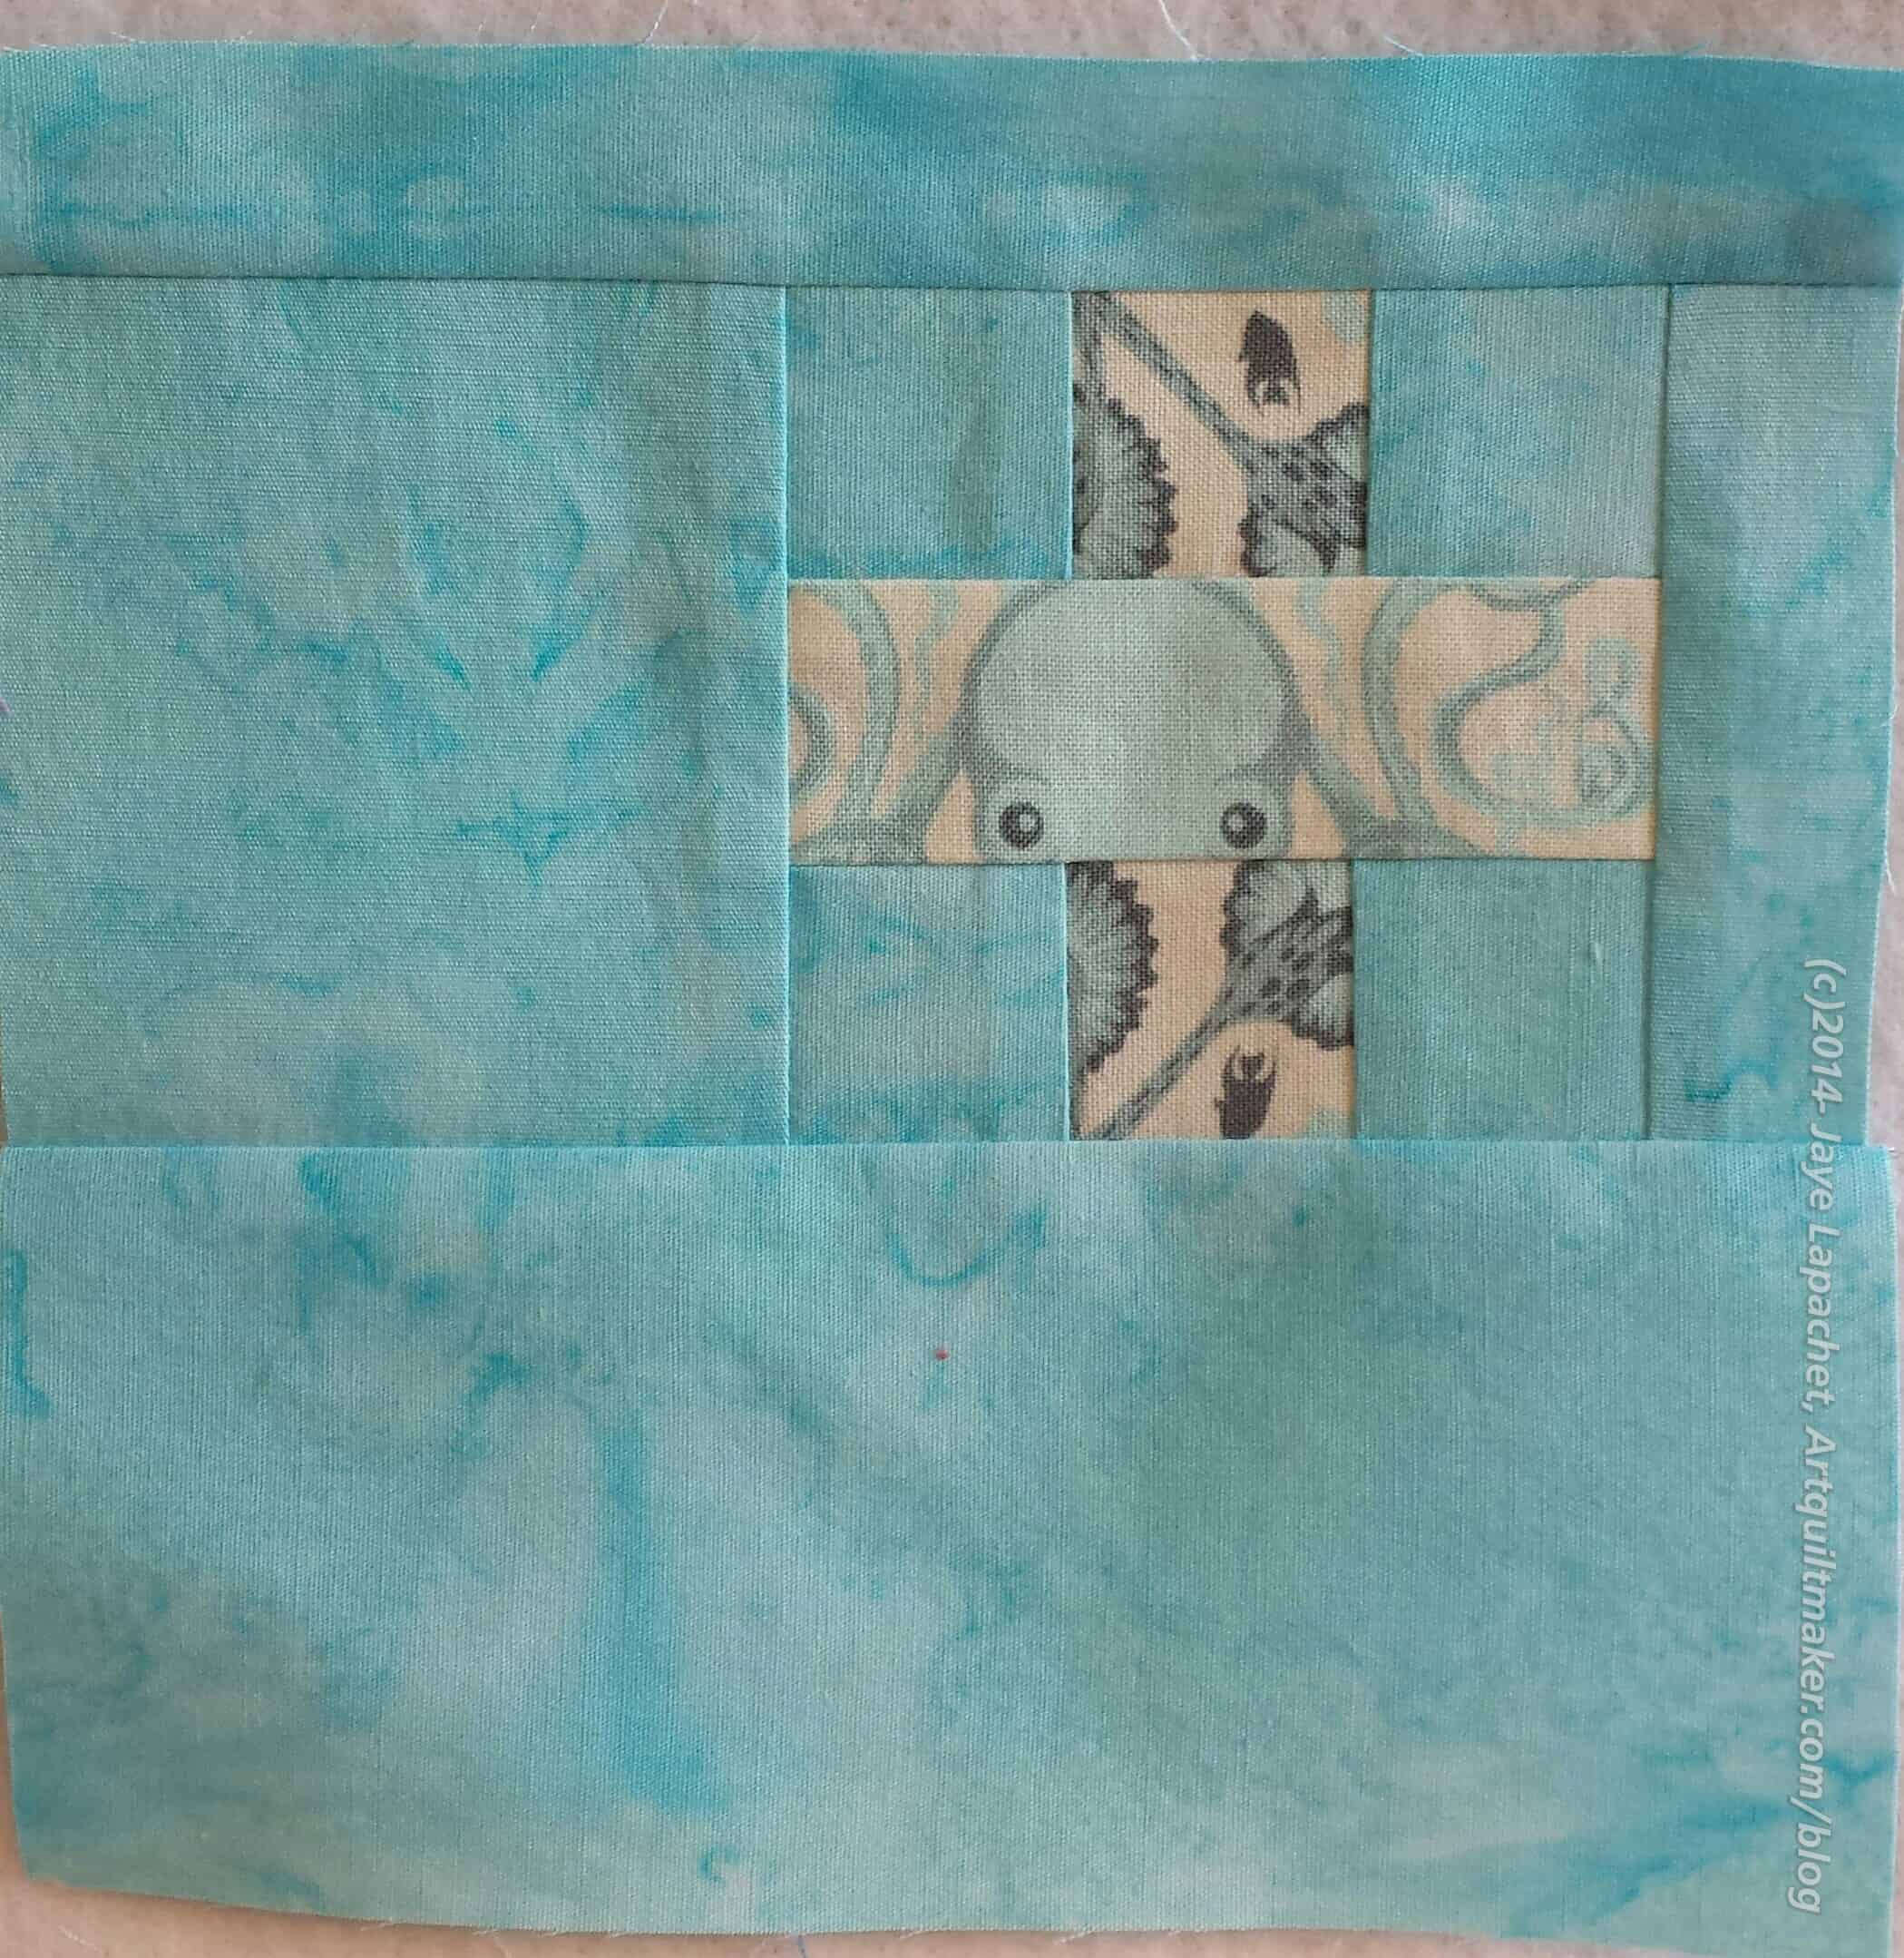
City Sampler no.12
Next up was no.12. I used the octopus fabric again. It is really fun fabric, but I don’t think it is working in this quilt. I actually forgot that I cut the plus pieces and imagined using the background fabric for the plus pieces. When I found I already cut the pieces from the octopus fabric, I put the block together. Then I decided to make it again with the background fabric and see which one I liked better.
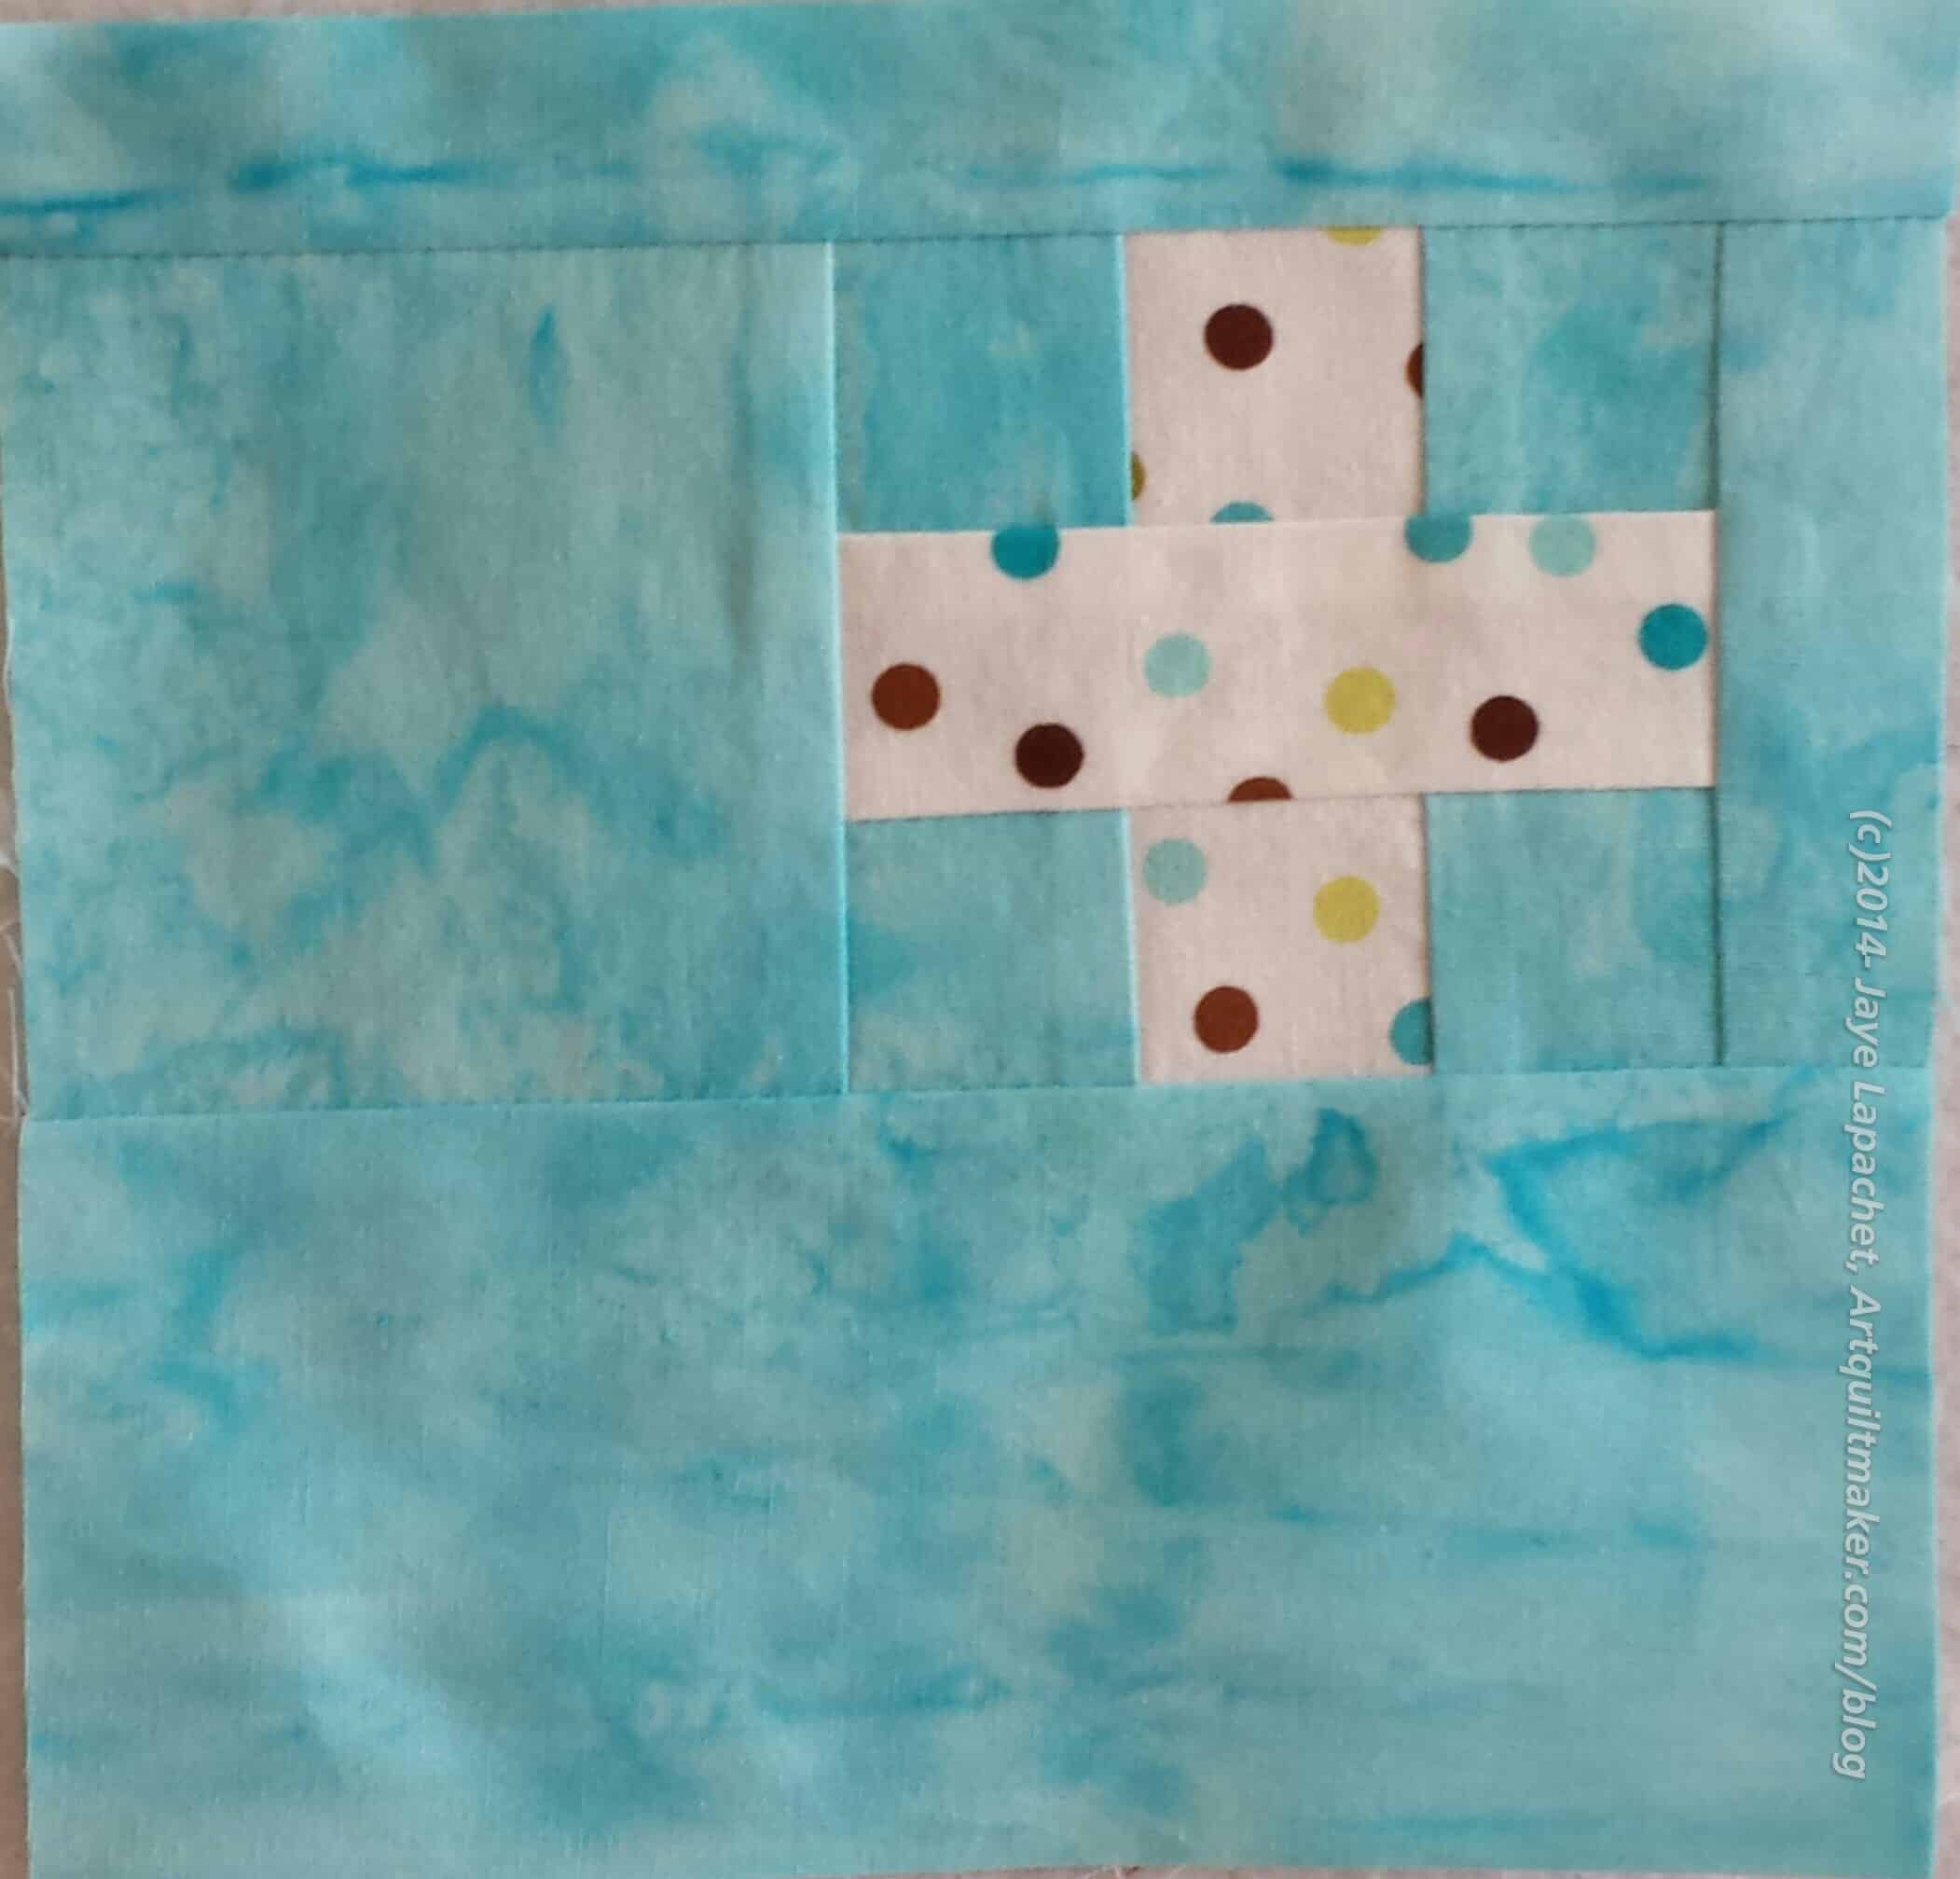
City Sampler no.12 (#2)
I definitely like the one with the background fabric (Remix by Ann Kelle for Robert Kaufman). The background fabric works in this block, because it is surrounded completely with other fabrics, thus the fabric in the plus will not run into the background fabric, should I decide to surround the blocks with sashing or something.
Making sure that the background I use in the blocks doesn’t bleed into the sashing or border is a design choice. I don’t mind using the background fabric in the blocks since I really like it, but I want the blocks to be crisp and distinct. You might make a different choice as you work through design choices in your work. You can create a great effect by allowing one fabric to bleed into another, so don’t be afraid to try it.
City Sampler no.13
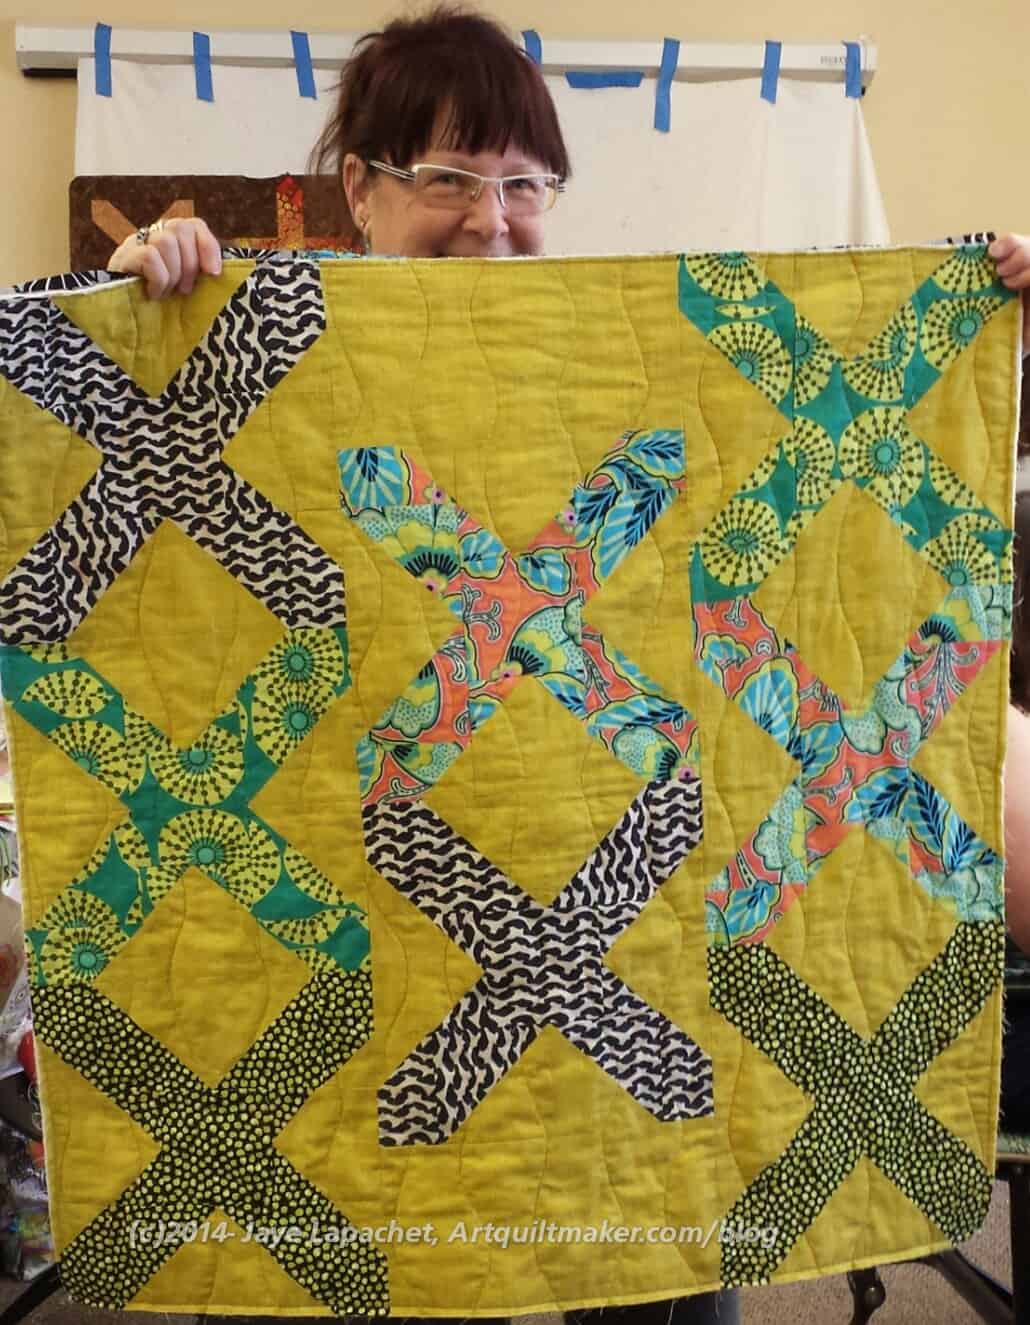
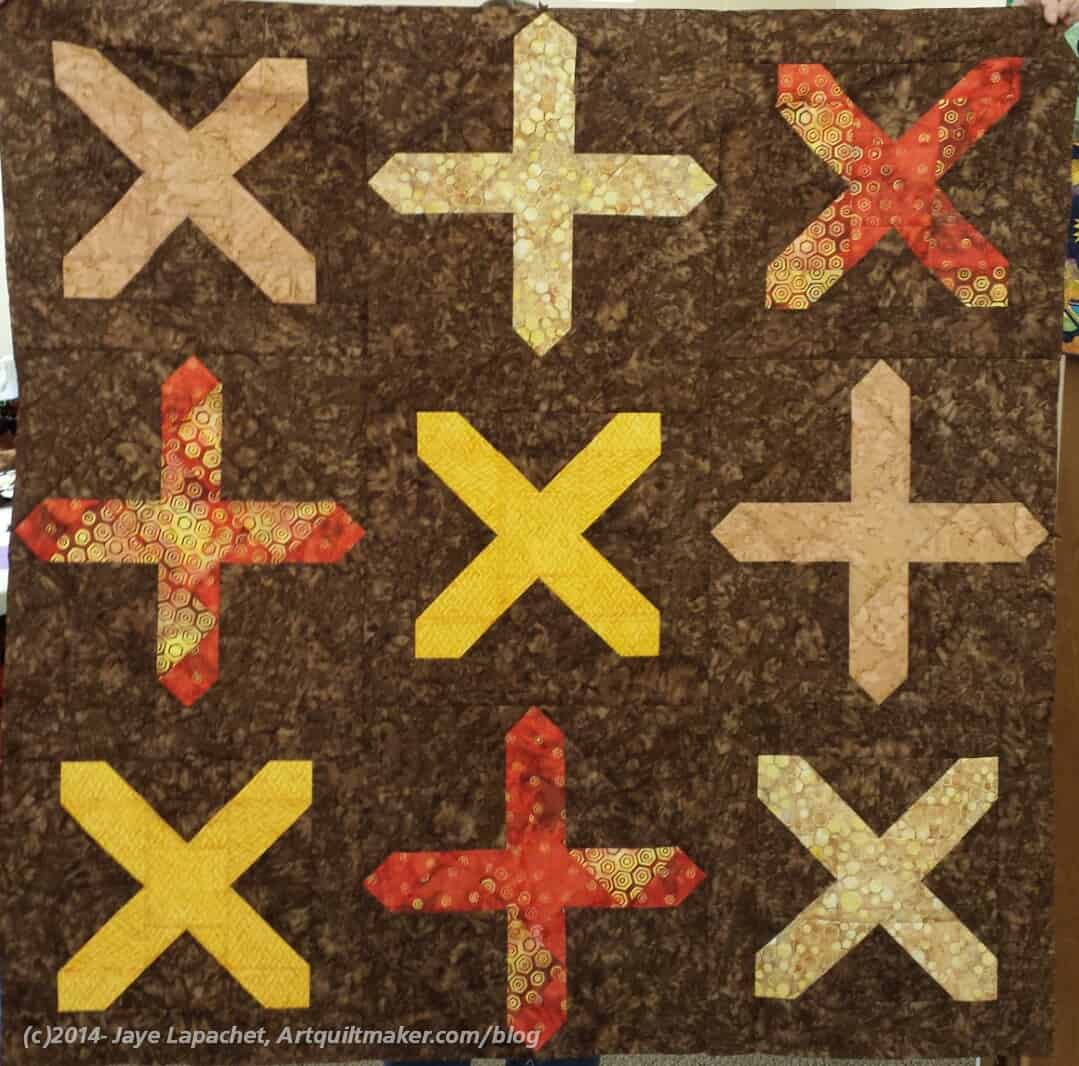
One member of our guild made a few of hte plus blocks and then skipped to the rectangles. She considered the pluses crosses and the motifs bugged her. I thought about this while I was sewing the blocks and I have to say that I didn’t think of them as crosses. I began thinking of them as pluses and continue to do so.
Whether you think of these blocks as crosses or pluses, I think there are enough blocks to remove a few from the running, as you prepare to put the blocks together into a top, to create a look that you really like.
No.13 looks odd to me – off balance or something. I realized that the outside still has a seam allowance so the pluses don’t looked balanced at the moment, but will once I put all the blocks together.
I briefly thought of posting new blocks on a weekly schedule like the Block-a-Long and the Creative Prompt. I don’t think I am quite that organized. We’ll see. For now I’ll just write posts as I sew the blocks.
This is a fun project and it is getting me to sew. I feel a small sense of accomplishment as well. All I have to say is that Friend Julie better be working on her blocks!
Previous Posts
June 5, 2014 – Various & Sundry #5 June 2014 (brief mention)
I started a couple of these blocks at the BAMQG Retreat in hopes of adding to the giant pile, but I just couldn’t get them done. I was using a non-quarter inch foot for the Petrillo Bag and that foot doesn’t work when I need a quarter inch seam.
I had a couple of extra kits at home and a set of 2.5′ squares (green batik, middle of top row), so I ran them through the sewing machine one afternoon and suddenly had 6 donation squares. I’ll bring them to the next meeting.
I have also been working on the grey and black donation quilt. We are getting into our foggy time of year and I may not be able to work on it much longer as it is too depressing. Not good for a donation quilt. I have a lot of squares cut, but enough blocks for a baby quilt. I was just kind of hoping to make a teenage boy sized top as the colors would be better for a teenaged boy. I will keep running the squares through the machine and see what happens.
I had these two blocks mostly cut out before I went to Grand Parlor, but didn’t get around to sewing them until last weekend when, after finally getting my sewing mojo back, I worked hard at avoiding the Petrillo Bag.
These are the next two in the crosses section (Blocks 1-15 of the City Sampler Project). No.9 doesn’t much look like a cross, but No.9 makes me think of a Maltese Cross.
I, unintentionally, used pretty subtle fabrics in No.9. It will be one of the blocks that gives the viewer a reward if s/he comes closer.
I like the way No.8 looks on point and wonder what kind of secondary design the block would make if I made a lot of them and set them right next to each other? Of course, it depends on the fabric. I imagine NOT putting background fabrics in the corner would be key, but I really can imagine how it would look.
Tale of Two Cities, No.10
I usually cut out the fabrics in sets of two, but my design wall was crammed with Russian Rubix blocks, so I did No.10 as a single.
It is also subtle and I had to take the photo a couple of times to make sure I got the piecing. the center is Art Gallery fabric and I just love the feel and the color.
If you want to see how the retreat was set up, some in process and fun shots, check out the post I wrote a few days ago.
Mystery Quilt
I won’t tell you what mystery quilt we did, in case your guild does it. I don’t want to spoil the fun for you, but I will show you some of the examples of what came out of the blocks. Please note that most people basically threw the last two clues (after the blocks were made) out and did their own setting. They did great. All of the tops are really their own. The mystery quilt designer might have a heart attack, but I love the diversity and the creativity. The most of the mystery quilt was that everyone was working together on the same project.
Kelly
The Boss took all of her blocks apart and rearranged them into this piece. She had to add fill-in pieces to complete the background.
Amanda and Cheryl
They became the retreat twins in my mind. They sat across from each other (behind me) and it was fun to see them bounce off each other. Cheryl was the fantastic retreat coordinator and she actually got work done. I borrowed pins from her since I forgot my pincushion ALL THREE DAYS.
Lynnette’s blocks (no layout yet)
It was pretty amazing how Lynnette used different fabrics, but they are really cohesive. I didn’t think they were a line, but I could be wrong.
Ruth & Rhonda
I am not sure Rhonda actually put hers together like the photo, but I wouldn’t be surprised. There was a quite a lot of hilarity going on and the above photo might have been part of the hilarity.
Ruth‘s piece is on top and she did a fabulous job with her final result. I wasn’t fast enough to get a photo.
Michelle’s Mystery
I can’t even believe that Michelle made this quilt out of the mystery pieces.
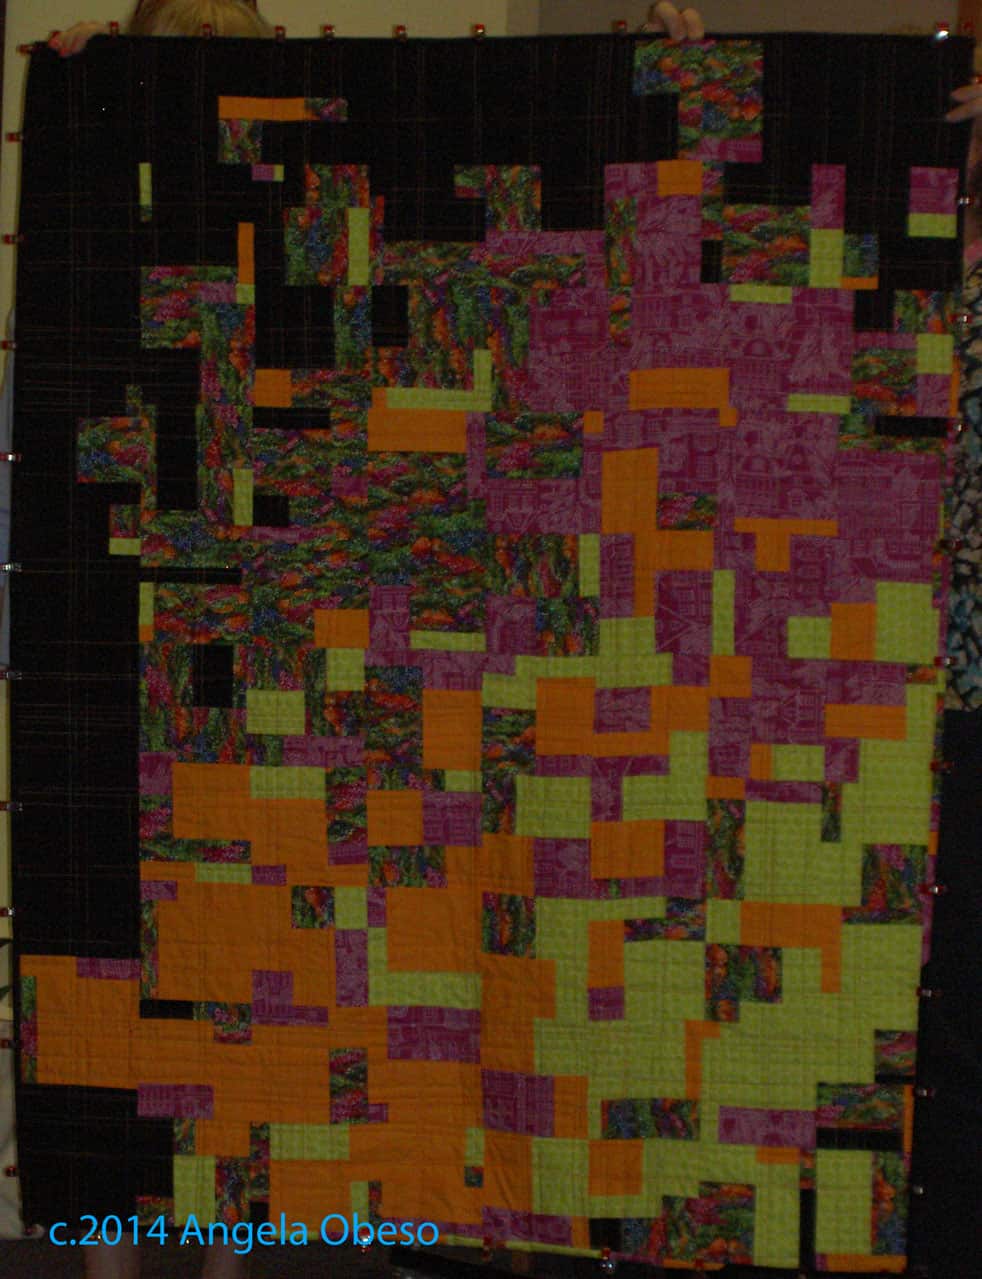
Angela
Angela would not give me her quilt even though it is in my colors. I was mad at myself for not thinking of this color scheme. I love what she did and the photo doesn’t do it justice. The blues are more turquoise.
Gerre
Gerre started and got this whole piece quilted. She only lacked a binding and a label. Amazing!
Diana
Diana was working on a couple of different projects and the ones I saw were made from Autumn-y colors. Isn’t this version cool?
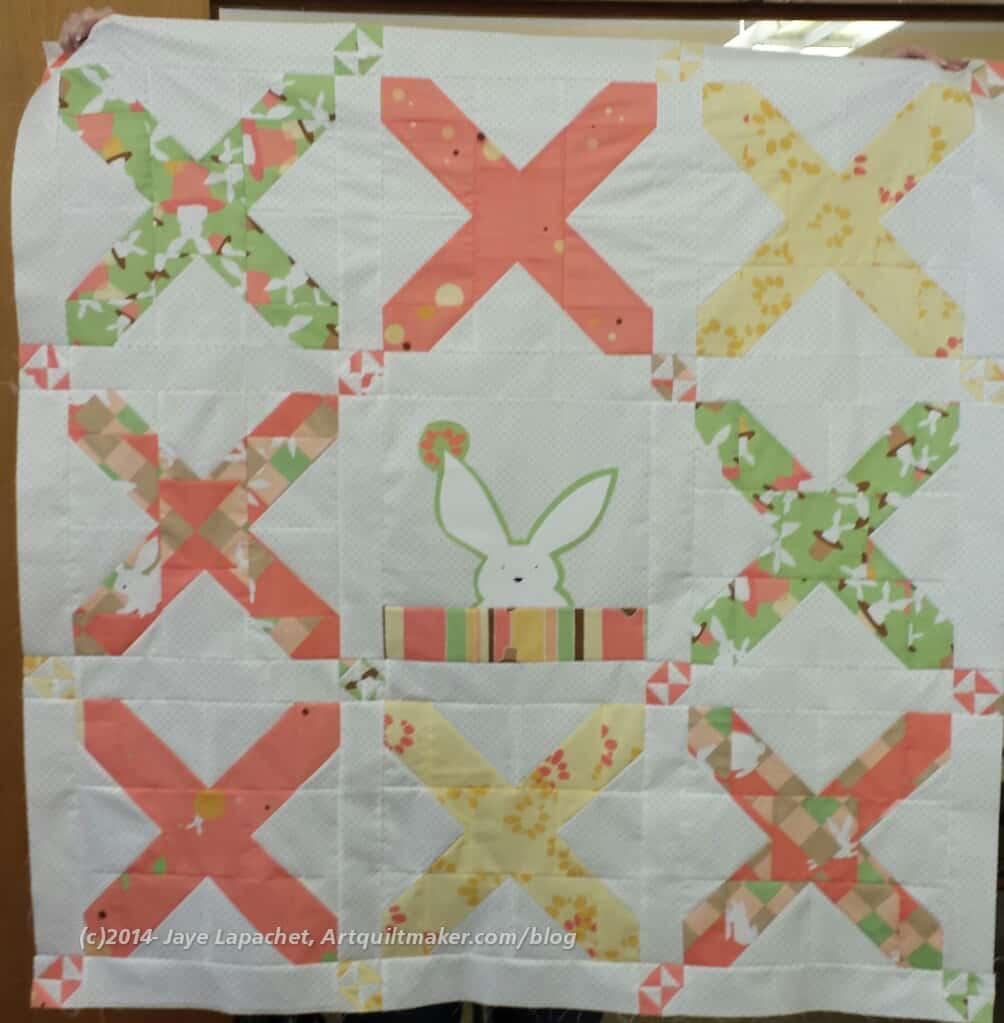
Buff
Buff made this adorable baby quilt. I love the bunny peeking out of the top of the fabric strip.
Charity
Donation block
People worked on donation blocks as well.
To the left is the only donation block I finished, but I had half of another parts of two others done as well. I’ll finish them this week.
Piles of donation blocks
My block is only one of a giant stack of blocks that piled up throughout the weekend. I was amazed that every time I went into the cutting room, more blocks were in the pile.
The great thing is that people just did them. There was no big drama; they just did them and the pile grew.
Peggy’s donation top
Peggy is working on a series of half square triangle quilts. Her latest top was finished at the retreat. She said she is enamored with the diamond offset on the top. I am really glad she is playing with the blocks. It makes me happy to see people having fun.
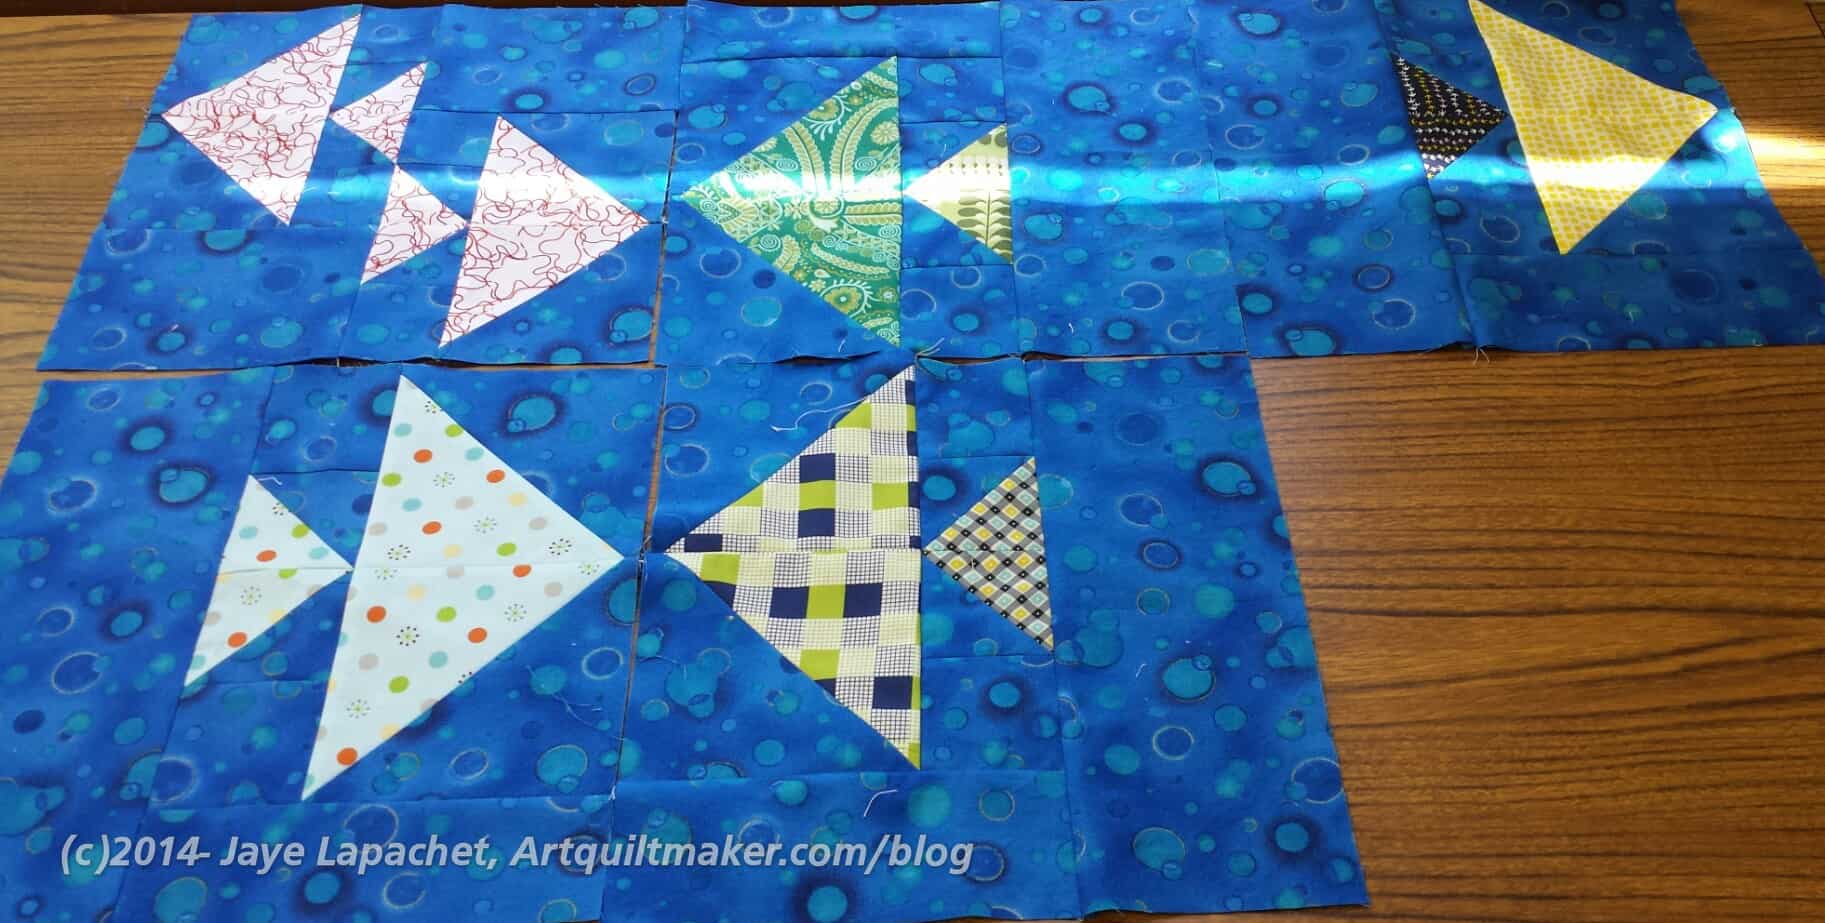
Donation Fish Blocks
I saw that a few fish blocks were made as well. There were a lot of kits available for those. I couldn’t make any as I didn’t bring any blue fabrics that would have been suitable.
Did you see the patterns for these blocks? If you want to make a small quilt and donate it, please do. The guild will be happy to accept it and I am happy to facilitate. They would make a fun baby quilt as well.
Personal Projects
In between the charity quilts and blocks and the mystery quilt, people worked on their own projects. There were finishes (Gerre, Bonnie, Angela, Diana, etc) and major progress that happened. It was fun to see all the projects where people made major progress.
Angela finished her mom’s Mother’s Day quilt. She did some lovely embroidery on the back as her label. You saw the quilt on the post where I talked about the BAMQG meeting.
Diana finished an auction quilt. It is a good thing as the auction already took place and she just needed to finish the quilt! What a hero for making such a big project for a school auction!
Diana’s Auction Quilt -front
Diana’s Auction Quilt -backRhonda’s Round Robin
Rhonda worked hard on quilting and binding her Round Robin piece. I love the spiky border on this one. The quilt is actually a lot brighter than the photo shows.
Cheryl’s Giant Feather
Cheryl brought out a giant feather quilt. She said that she wondered what the Anna Maria Horner feather would look like super sized. If you were wondering that, too, now you know. Isn’t it cool? I almost want to make one of those feathers (in a much smaller size)!
Cheryl’s Table Runner
Finally, Kelly made a thank you for Cheryl while at the Retreat! It uses Cheryl’s favorite Tula Pink fabrics.
I am not sure if I will get through all of the retreat info in one post. It might just be too much. We’ll see.
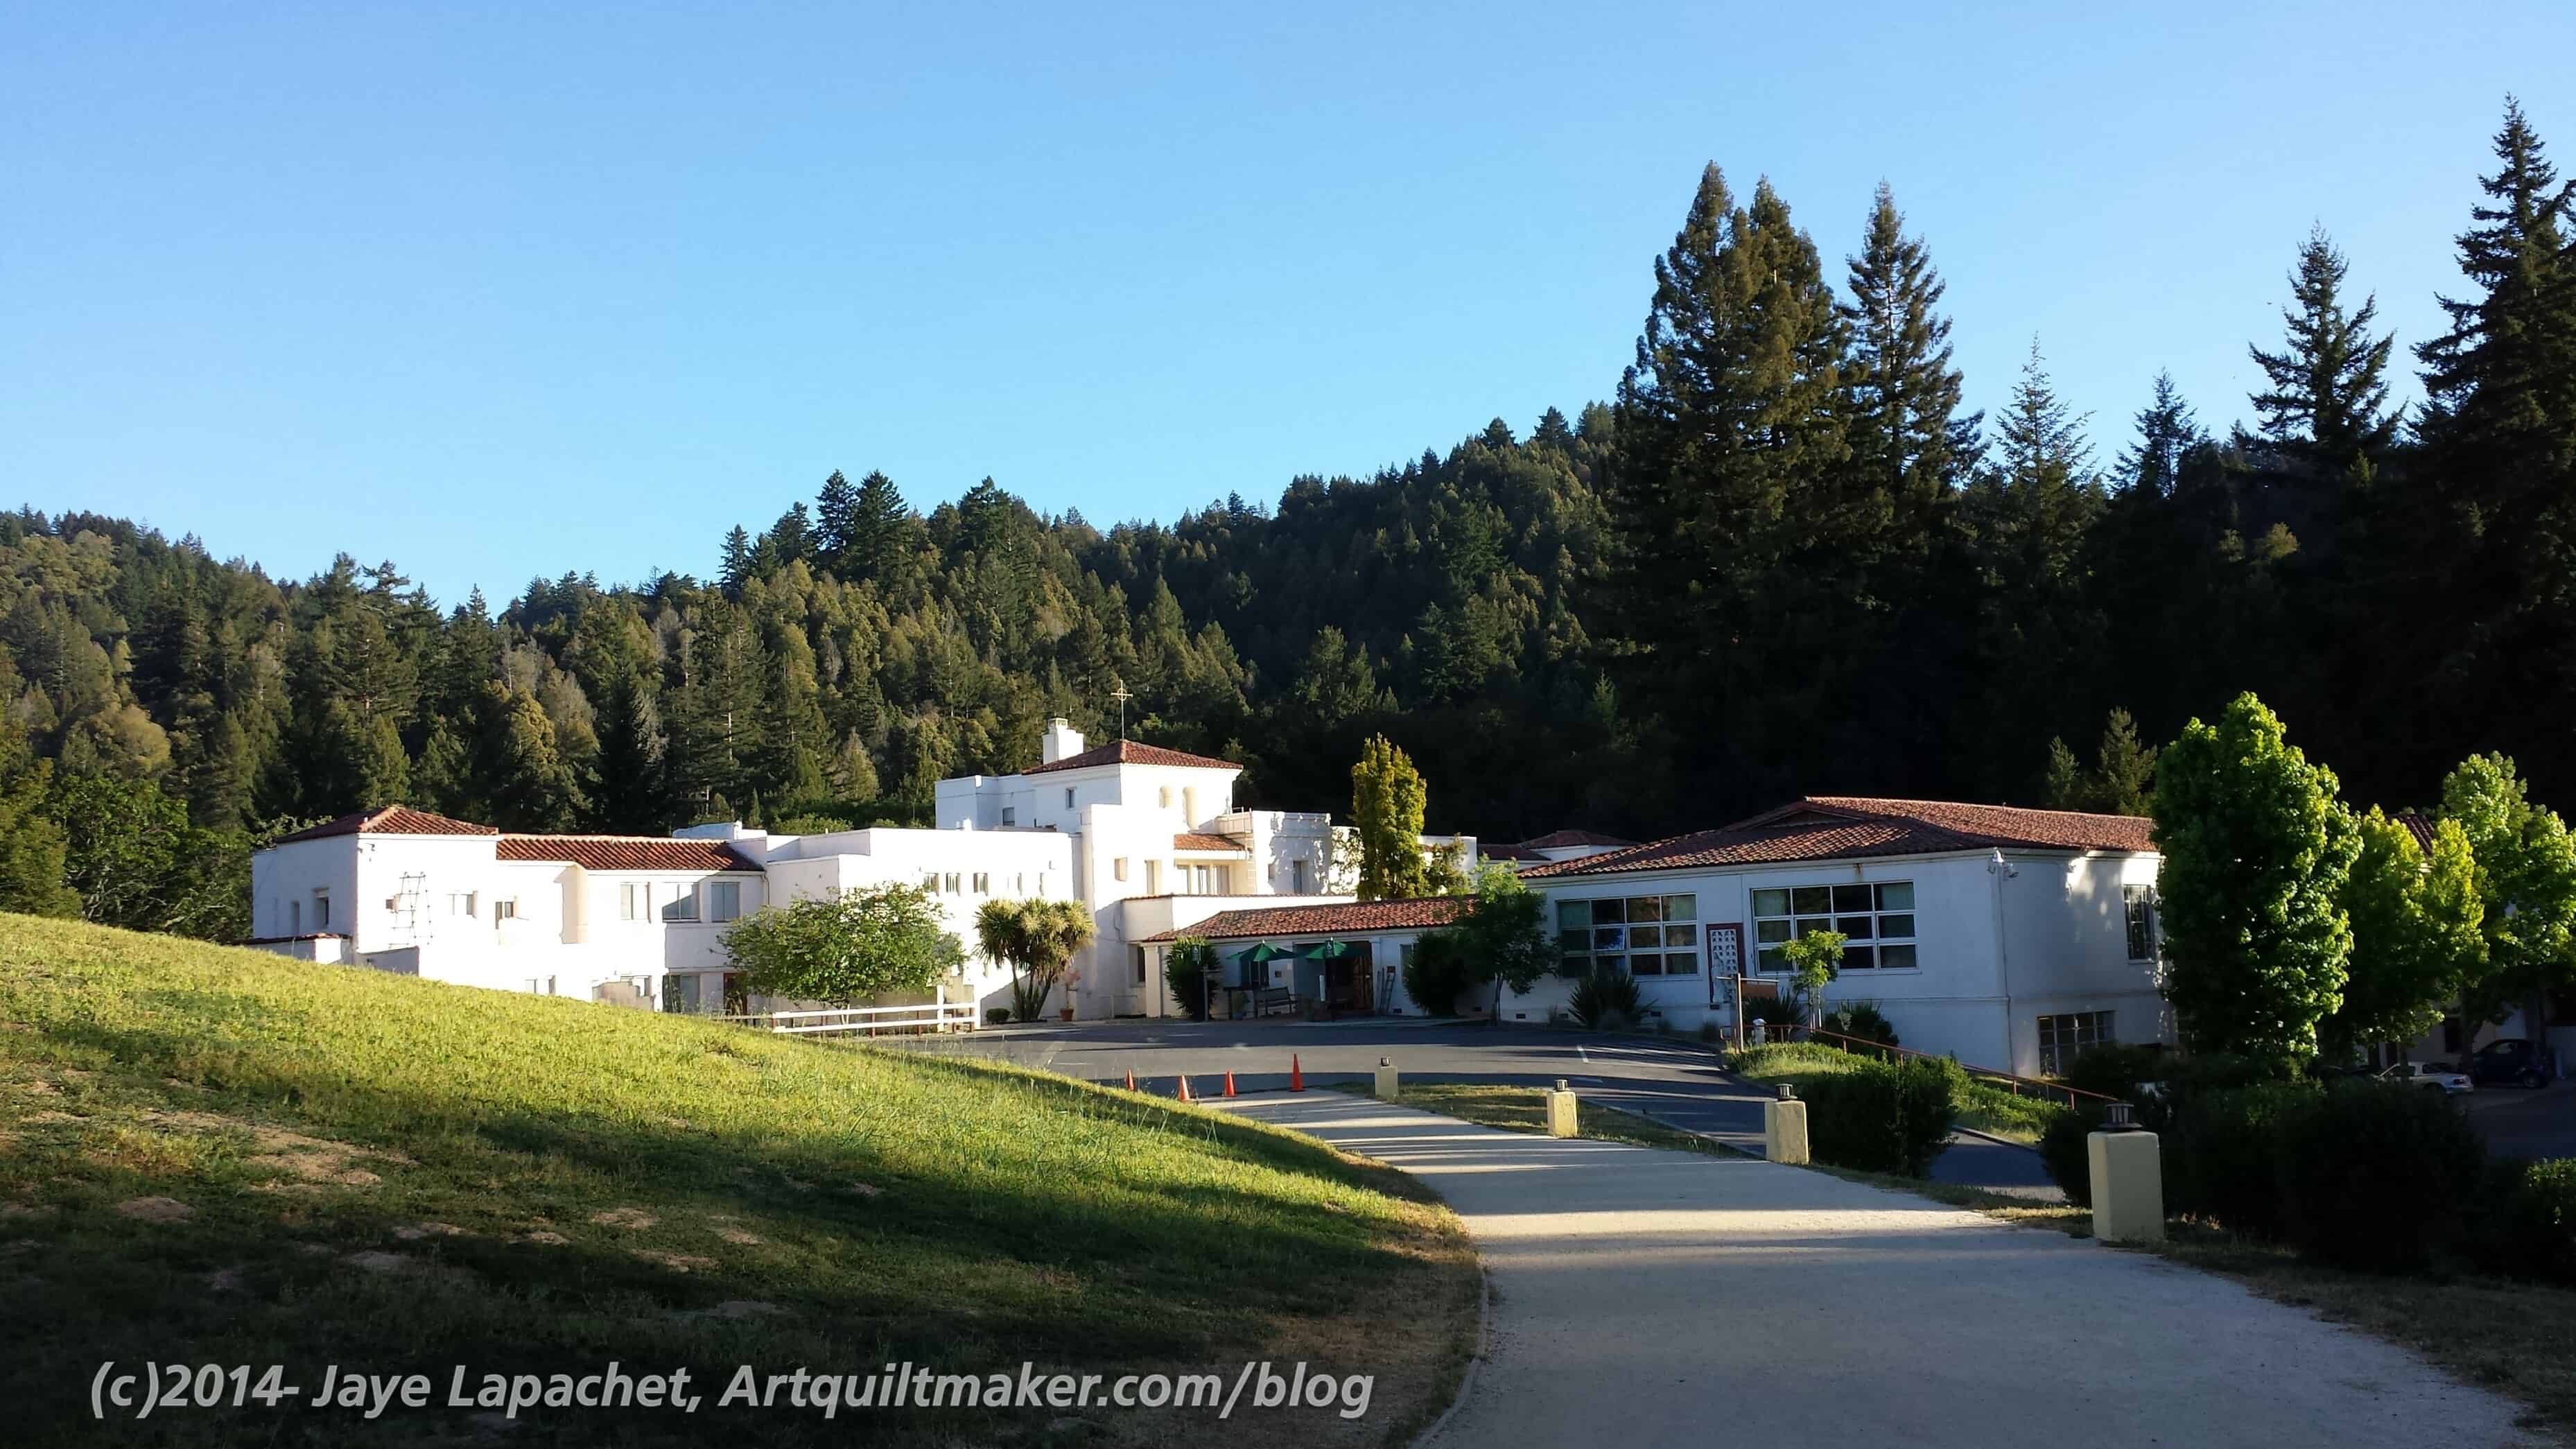
Retreat Location
The retreat started on Friday, but I didn’t get there until mid day on Saturday as we were traveling for the Native Sons back from Grand Parlor. I was a commuter, so I drove back and forth. It is about an hour each way, but after the intense people time of Grand Parlor, some quiet time in the car made me more human at home and at the retreat.
Two things that happened right as I got there, practically before I got set up, was that I got a bag of goodies and I won a prize! The CQFA Retreat does not include goodie bags or prizes (someone has to organize all that). It was fun.
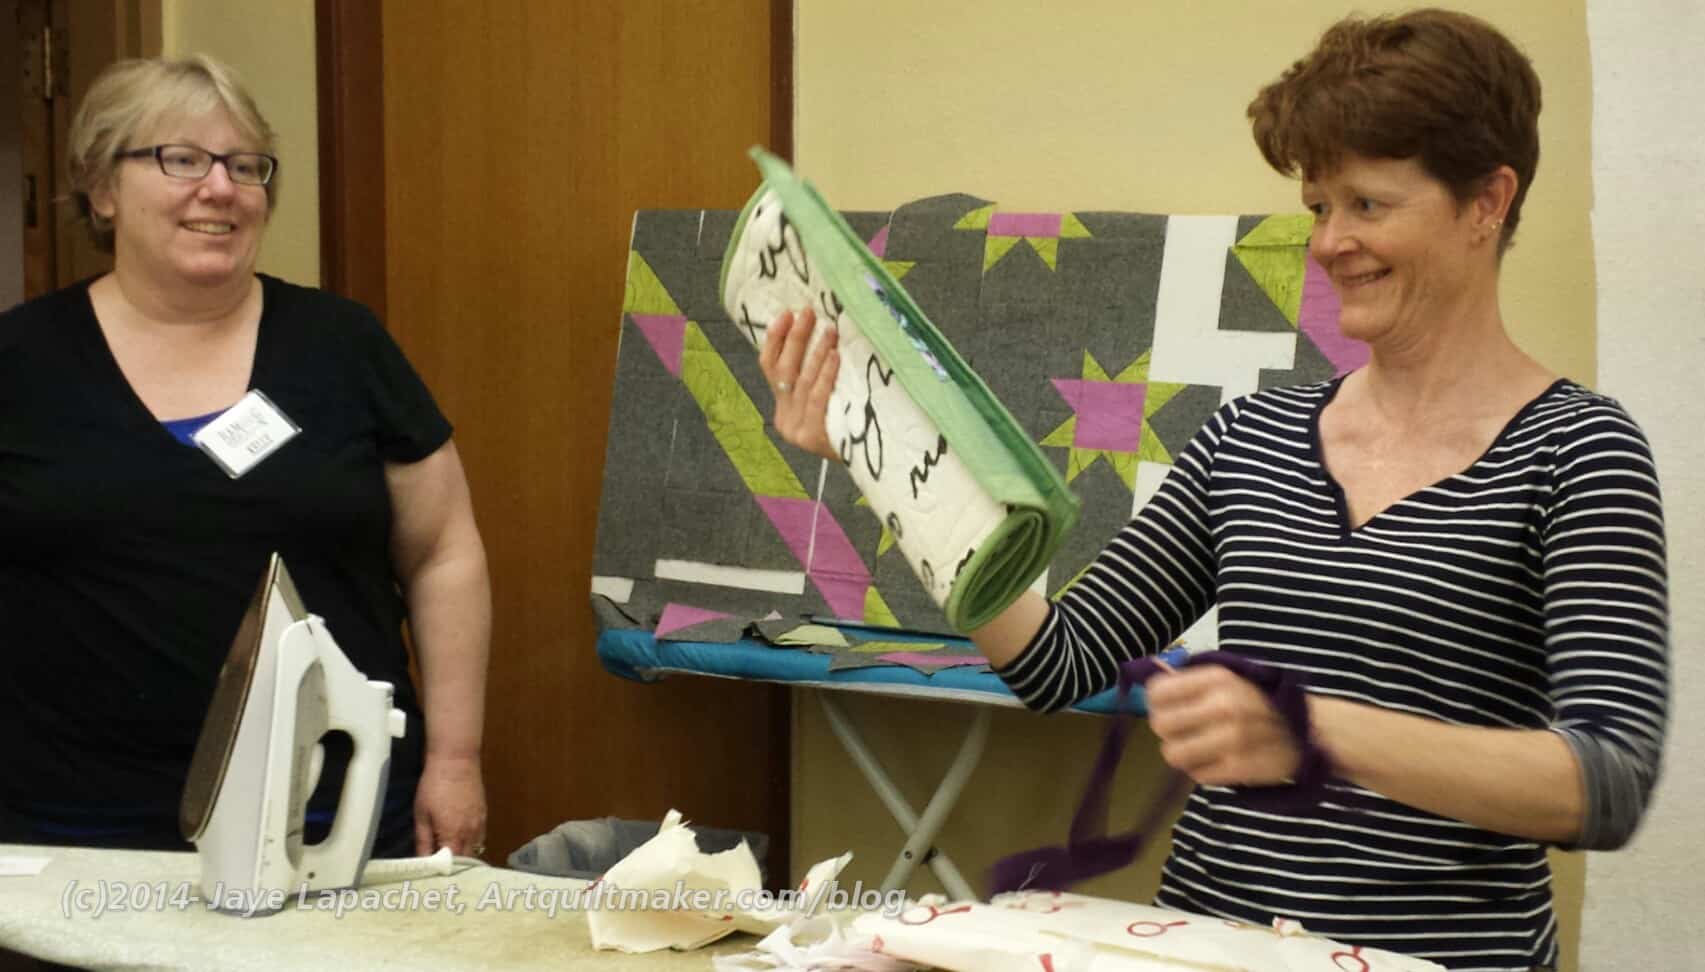
Mystery Quilt in process
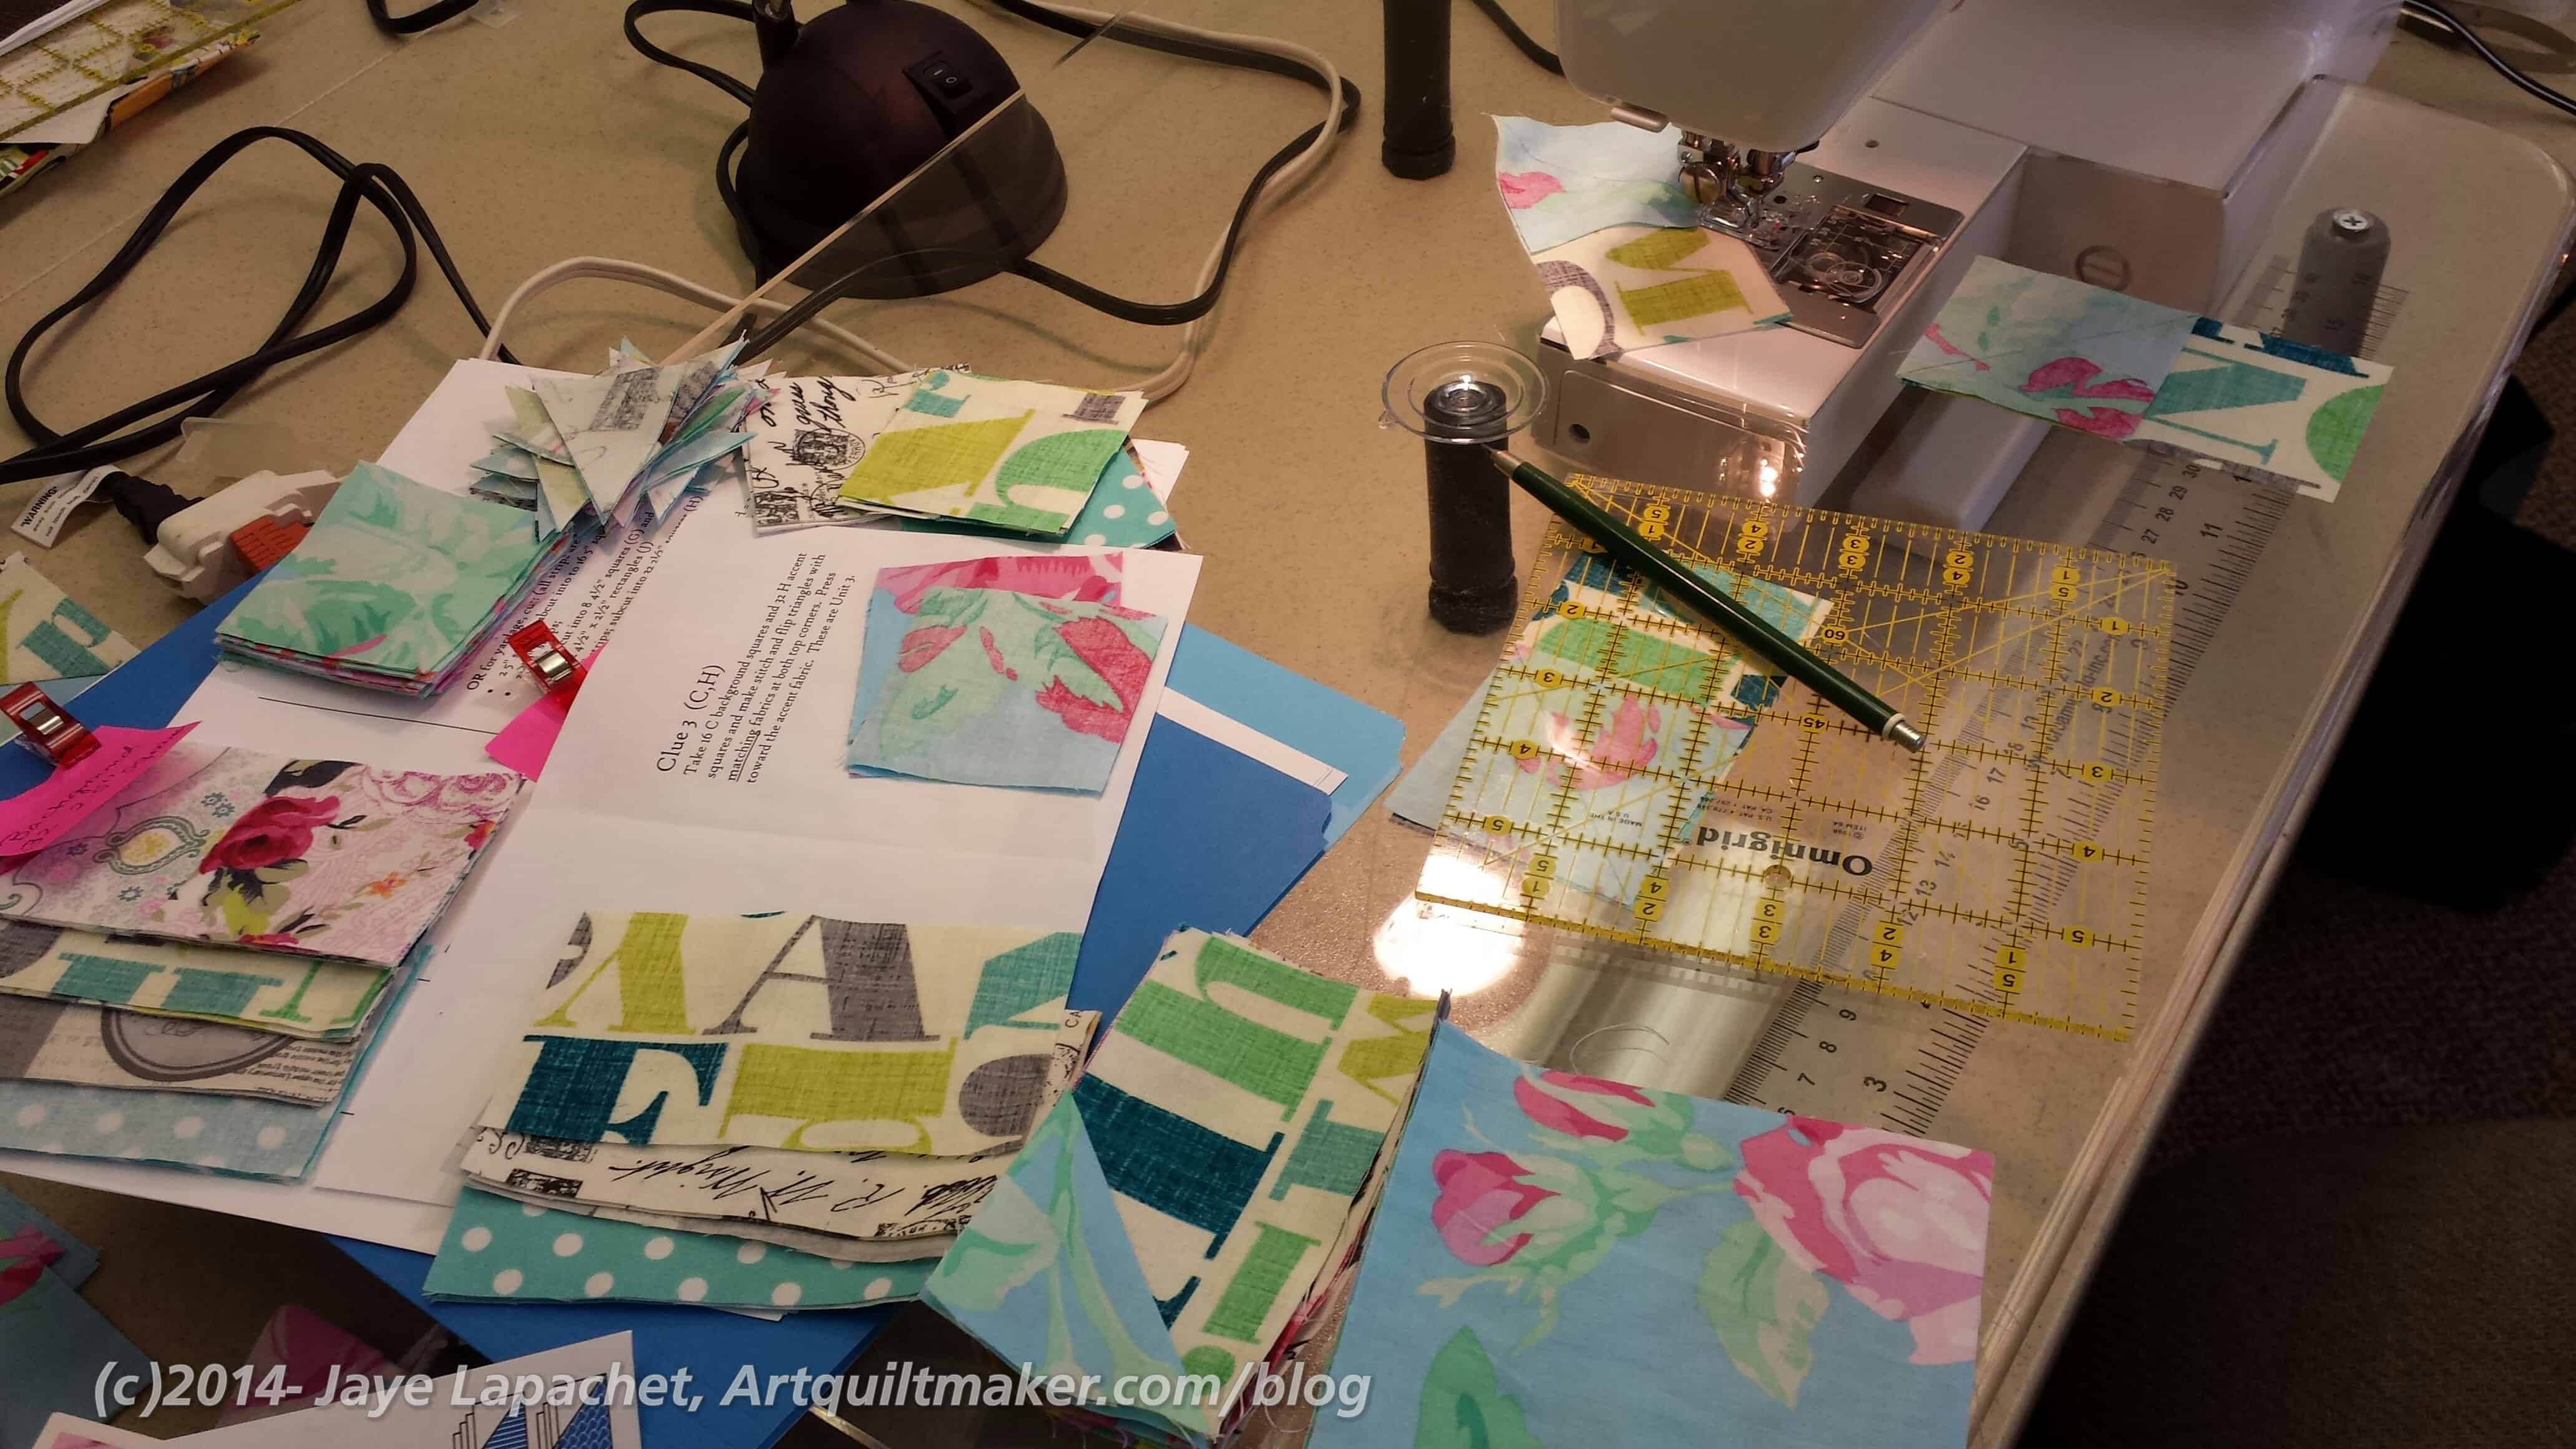
People were working on the mystery quilt and I was 3 clues behind, but they had just gotten Clue 3 when I arrived, so I made those units and used Clue 1 as leaders and enders, so I had most of Clue 1 done as well by the time I got finished with Clue 3. I had my fabric and I had cut out all the pieces, thus I was ready to dive right into sewing, so I got busy on that.
I really liked all of the different fabric choices that people came up with for their mystery quilts. People admired mine, but by the end I wasn’t liking the combination very much. the funnest part of the mystery quilt was working on the same project as everyone else. I enjoyed that with Scrapitude as well.
I have only been on CQFA retreats, which are very basic. This retreat was kind of the deluxe edition!
Cutting Room
There were 3 rooms we could work in. One room was set up as a cutting and ironing room. We also gathered there for Clues and prizes and the donation blocks were as well. People put their finished blocks there and kits for blocks needed were also available there.
It was great to have those high tables for cutting out large pieces. I used them when I was working on my bag.
Hard at Work
There were 6 tables set up on each side of the two rooms (room were linked by a very large opening). Ruth set up a design wall at the end of the room (I believe the Steampunk blocks belong to Cheryl). My spot was the spot from where I am taking the photo. People were pretty diligent, but there was a lot of laughter as well. Some of the laughter was fairly crazy.
Design Floor
I sat across from Corky. I don’t think Corky and I had had a chance to talk at a meeting, but we were chatting and borrowing tools like old pals. It was nice to get to know her a little better.
Quilts and quilt parts were everywhere. Any open space was fair game and people just hopped over them and continued on their way. It was awesome, in a way, that people would just take it in stride that quilts were everywhere.
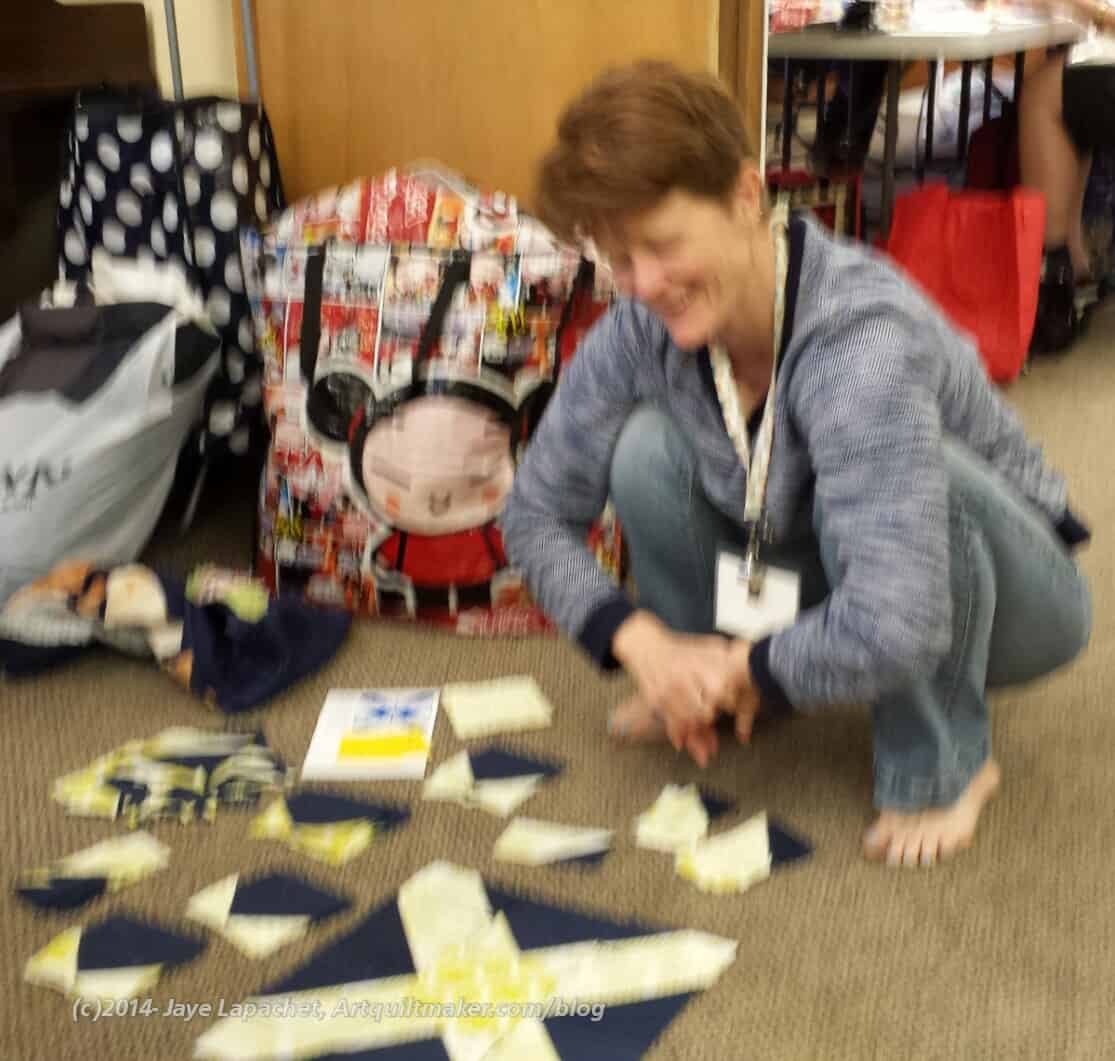
I had my mystery quilt on the floor for awhile while I laid it out.
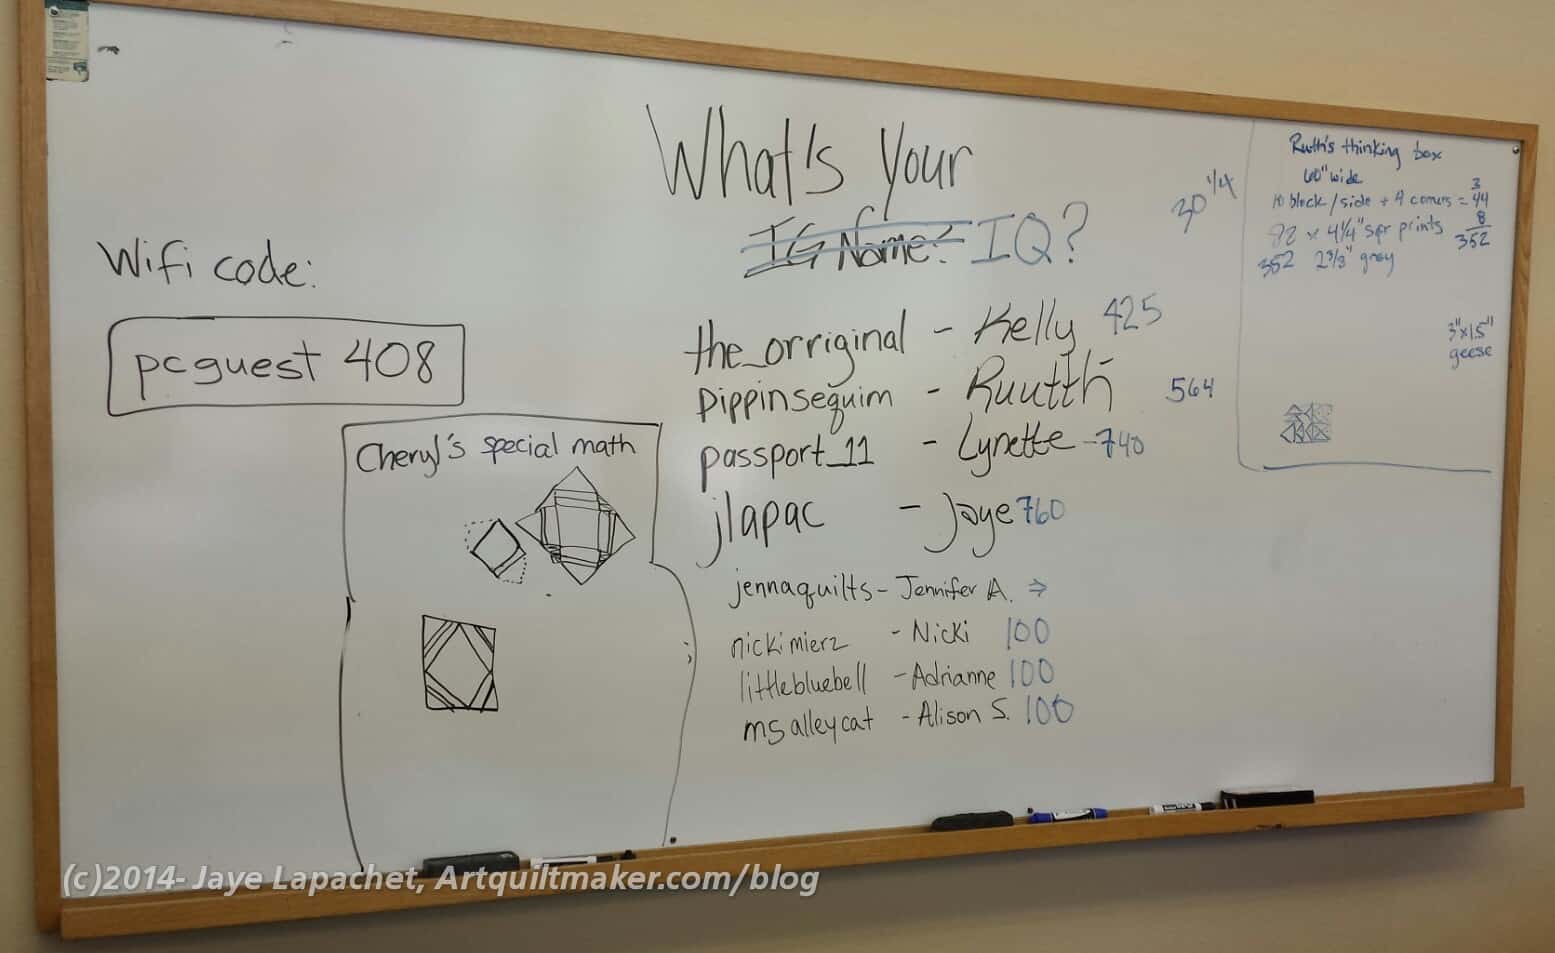
Special Math
The whiteboard was right across from my workstation. Right after I arrived, Kelly added me to her list of Instagram names. Somehow after that, the Instagram names morphed into IQ. I didn’t say anything about my IQ; I just watched the points increase.
Peggy & Amanda
I couldn’t sleep and got up at 5:30. After doing a few of my morning things, I got on the road and was at the retreat by about 8:30. Monday morning found us all a little more punchy than the previous 2-3 days. References to music started coming up and Amanda played songs for us on her phone. One got Peggy and Amanda up and rapping together.
Anyone who thinks that Modern Guilds are for young people only should meet Peggy. Peggy is the most ‘modern’ of anyone in the guild and she has only been quilting for about 5 years. She has a great and inspiring and practical attitude and is also the most prolific charity quilt maker. I would do well to take after Peggy.
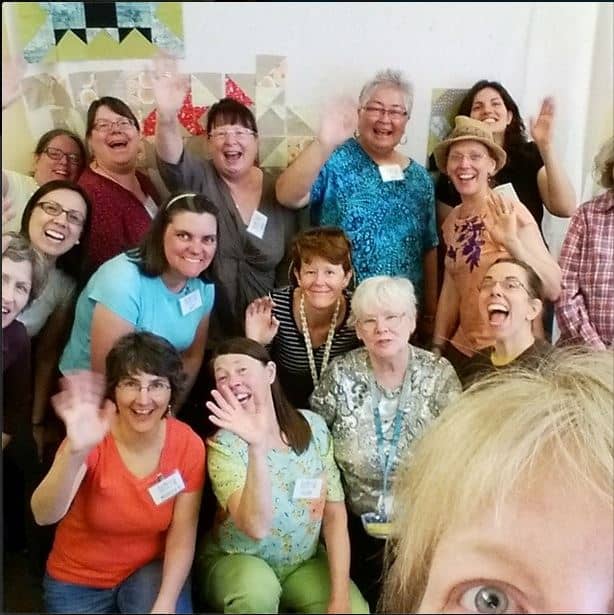
BAMQG 2014 Retreat Group
We took a group shot. I am pretty sure not everyone was in it, as ‘everyone’ was hard to wrangle. It was a fun shot, especially that Kelly got herself, or part of herself in it. I stole this version from Kelly’s Instagram.
I am always on the lookout for inspiration and I have to say that I was overwhelmed by my choices. there are so many creative people in the group that everywhere I looked, there was something I wanted to try or make or know more about.
I’ll write about actual projects in another post. This one is long enough. I would love to hear about retreats you have attended.
I had a great time at the meeting Saturday. People showed some really great work and everyone seems to be looking forward to the Retreat.
The next Sew Day is June 7, 10am -11pm. Once again, I can’t make it as I will be in Vancouver for work. My trip will be fun, but I’ll miss Sew Day.
I will also have to miss the next general guild meeting, which is on June 21, as I just made plans to go to Disneyland. Shhhh! Don’t tell.
Angela’s Quilt
Show and Tell is my absolute favorite part of the meeting and I wish that people would bring more stuff to share. Angela showed a great quilt from a workshop with Joe Cunningham and I just love it! It isn’t gradated, but it really gives the impression of being gradated. She was finishing up the binding so she could give it to her mom for Mother’s Day. She said that her mom loves it.
I showed Fresh Fruit and Fabric of the Year 2012. that was an exciting experience as people wanted me to tell the story of doing a quilt every year again for newcomers. I was a little embarrassed. Allison asked if I would bring all of the FOTY quilts sometime. As I said, I would love to have an exhibit of all of them, but, perhaps, showing them off to an appreciative audience would be the next best thing?
San Mateo County Fair: Lynnette kindly offered to take our quilt entries to the San Mateo County Fair intake day. She left with a pack of quilts. We will arrange pick up at a later time. I had a crazy morning when I realized that the Whole Cloth Quilt, which I entered without looking at it, didn’t have a sleeve!!!! I quickly made the sleeve using Robbi Joy Eklow’s directions in her Free Expression book (a book which you should have if you don’t already!)
I am really slow at putting on sleeves and the two recent quilts, Fresh Fruit and FOTY 2012 took me forever. I didn’t have confidence that I would have the sleeve done by the end of the meeting, but I worked towards that goal. The sleeve was pinned on to the quilt when I left the house and I started sewing as soon as I sat down. I did get it done! I sewed on the entire sleeve, gave the quilt to Lynette and home I will see it at the county Fair.
The group will be participating with other Bay Area Modern guilds in an Amish Exhibit: November 2014 at SJMQT. Joe Cunningham will do jurying. Entries are due October 1, but I don’t think I will apply. I am not inspired. Kelly decided to organize a small group to encourage people to work on their projects and get them ready for the exhibit. I don’t know how she will split herself between the Tula Pink City Sampler group and the Amish Exhibit group.
Jackie Gehring Workshops: July 26, 27 – there are still spaces available, so if you want one for a friend or haven’t signed up yet. I am surprised that these are not full.
Charity Block
Charity: I have been kind of a charity slacker lately. I haven’t worked much on the black and grey donation quilt, though I have also not abandoned it. I don’t know why as I got a lot accomplished last year and was busier.
It could be that all the other projects have been overwhelming me. Michelle, one of the Charity Girls has designed a new block for this quarter – the fish block. There are actually 3 fish blocks (Block A, Block B and BBlock C), which are the same parts in different configurations and sizes. Directions and handouts have been posted to the BAMQG blog. Take a look, because the blocks would make up cute baby quilts as well.
Enough about me and my excuses. Despite my slackness, 60 finished charity quilts will be taken to the NICU at Stanford this week. Peggy finished a number of them since the last meeting, using some time on the last charity sew day.
From the Cat Bed department: Amanda couldn’t make the meeting, which was a shame, because I couldn’t get any cat beds to sew together. Next time.
Small Groups:
Hand quilting and hand piecing – the group has been expanded to include other kinds of handwork. Angela worked on a binding while Rhonda stitched hexagons together using the English Paper Piecing method. She bought a Tula Pink kit to get started. Perhaps I will try to remember my half hexies to bring a long and work on.
Jaye brought blocks for the Tula Pink City Sampler small group, but the rest of the members were curiously absent.
We saw Nicki’s finished Round Robin and Cheryl’s almost finished Round Robin in Show and Tell, but no groups met.
Nobody in the Color groups met.
I did not do the Personal challenge for this month, which was to make a tote bag using Kelly’s directions (or others as desired) out of the piece I free motion quilted last month. Next month we are supposed to bring a hand quilted or hand pieced project to the next meeting. I am thought of bringing the Sampler, but I won’t be there.
BAMQG and the St. Louis Modern Quilt Guild are participating in the Swap Challenge Swap Extravaganza. I decided to do it, even though I didn’t know anything about it until I showed up at the meeting with an orphan block. People who brought orphan blocks could sign up to make something that will be exchanged with someone at the St. Louis Guild. All orphan blocks were turned in. They will be doled out by Angela to anyone who signed up. People will not get their own block back, but will receive and need to make something out of someone else’s orphan block. Then the projects will be turned in and sent to St. Louis and the SLMQG will send us a package back and those items will be doled out. We can make anything and Angela solicited ideas, some of which are:
I received a weird email message early last week and, since I was busy, I ignored it. I didn’t open it, thinking that it was spam I could investigate or delete later.
A little while later, I received an email from the BAMQG Retreat Coordinator saying that I should have received my first ‘clue’. Hhmm. I went back to the ‘spam’ message and it still made no sense, but I figured it was the Mystery quilt project, so I downloaded the instructions.
BAMQG is doing a mystery quilt on the retreat. I decided to play along.
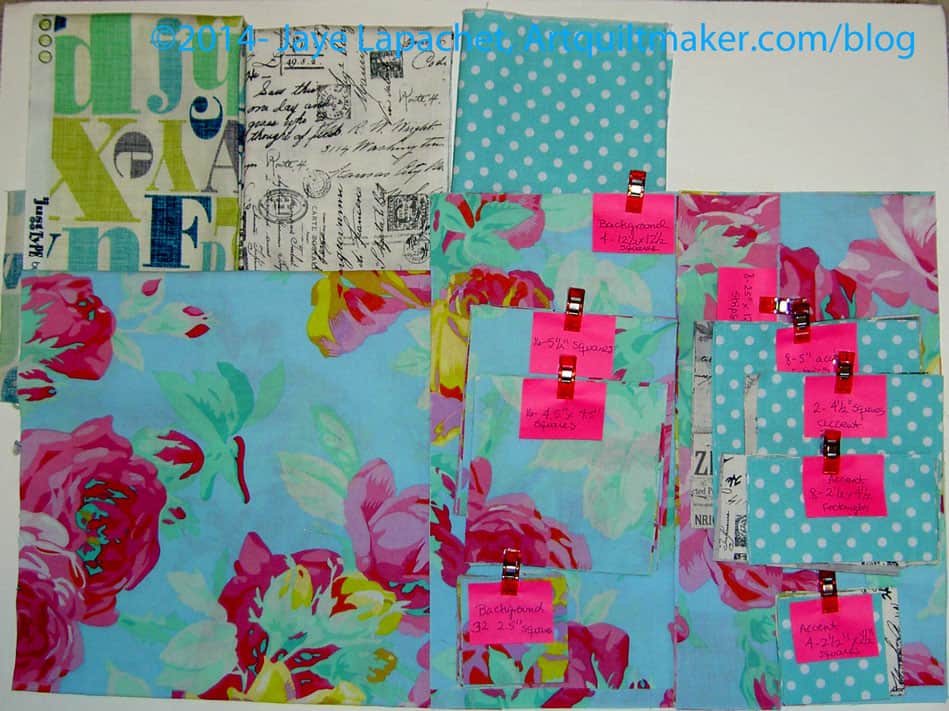
BAMQG Mystery Color Story
I recently read an article about color that included a suggestion about using a large scale print as a background. One reason I decided to do the mystery quilt was because I couldn’t get this idea out of my head. If I was going to do a project that I wasn’t sure about, I didn’t just want to do the same old thing. I picked a wild selection of fabrics. I am not sure they go together and will tend towards ‘pushed neutrals’ or a ‘low volume’ color story.
First, I went rummaging through my Phillip Jacobs and Martha Negley prints. I have been using those mostly for backs so the opportunity to use one on the front made me giddy. I picked English Rose.
I had the dot on my cutting table. It is very close to the green in the English Rose, but it will be fine (famous last words, right?). The text prints are really different. I don’t think I have used many before and they have been on my mind. In they went.
I may add the charcoal circle stitch fabric by Michael Miller as well. We’ll see.
Still, the quilt will be interesting and will be a nice donation quilt, if worse comes to worse.
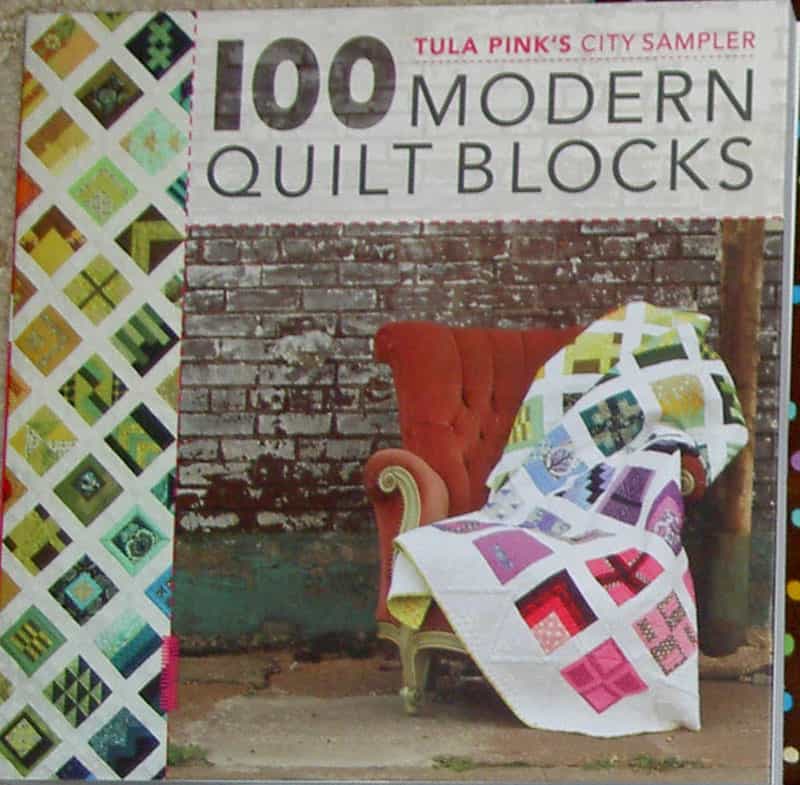
City Sampler by Tula Pink is block book that was written/designed in 2013. The project has been all over Twitter, Instagram, Flickr and other social media outlets as quiltmakers make the blocks, the quilts and share them. BAMQG has just started a project using this book in one of the small groups. So far, I have only seen a few blocks and some members seemed to imply Instagram would be better for sharing than Flickr. I am not a huge user of Instagram and don’t find the way the app crops photos to be appealing, but whatever. My view is probably the old fart quiltmaker view.
Julie got the book for me, as I mentioned, and we agreed to do the project as a way of doing something together while she is in China. One of us thought of the name Tale of Two Cities and I decided to be inspired by the colors of winter here. I haven’t selected all of the fabrics, but there are a lot of blues and greens and they are very clear.
I have been feeling bad that I haven’t done the blocks until now. I finally got busy and I knew that once I started, I wouldn’t be able to stop.
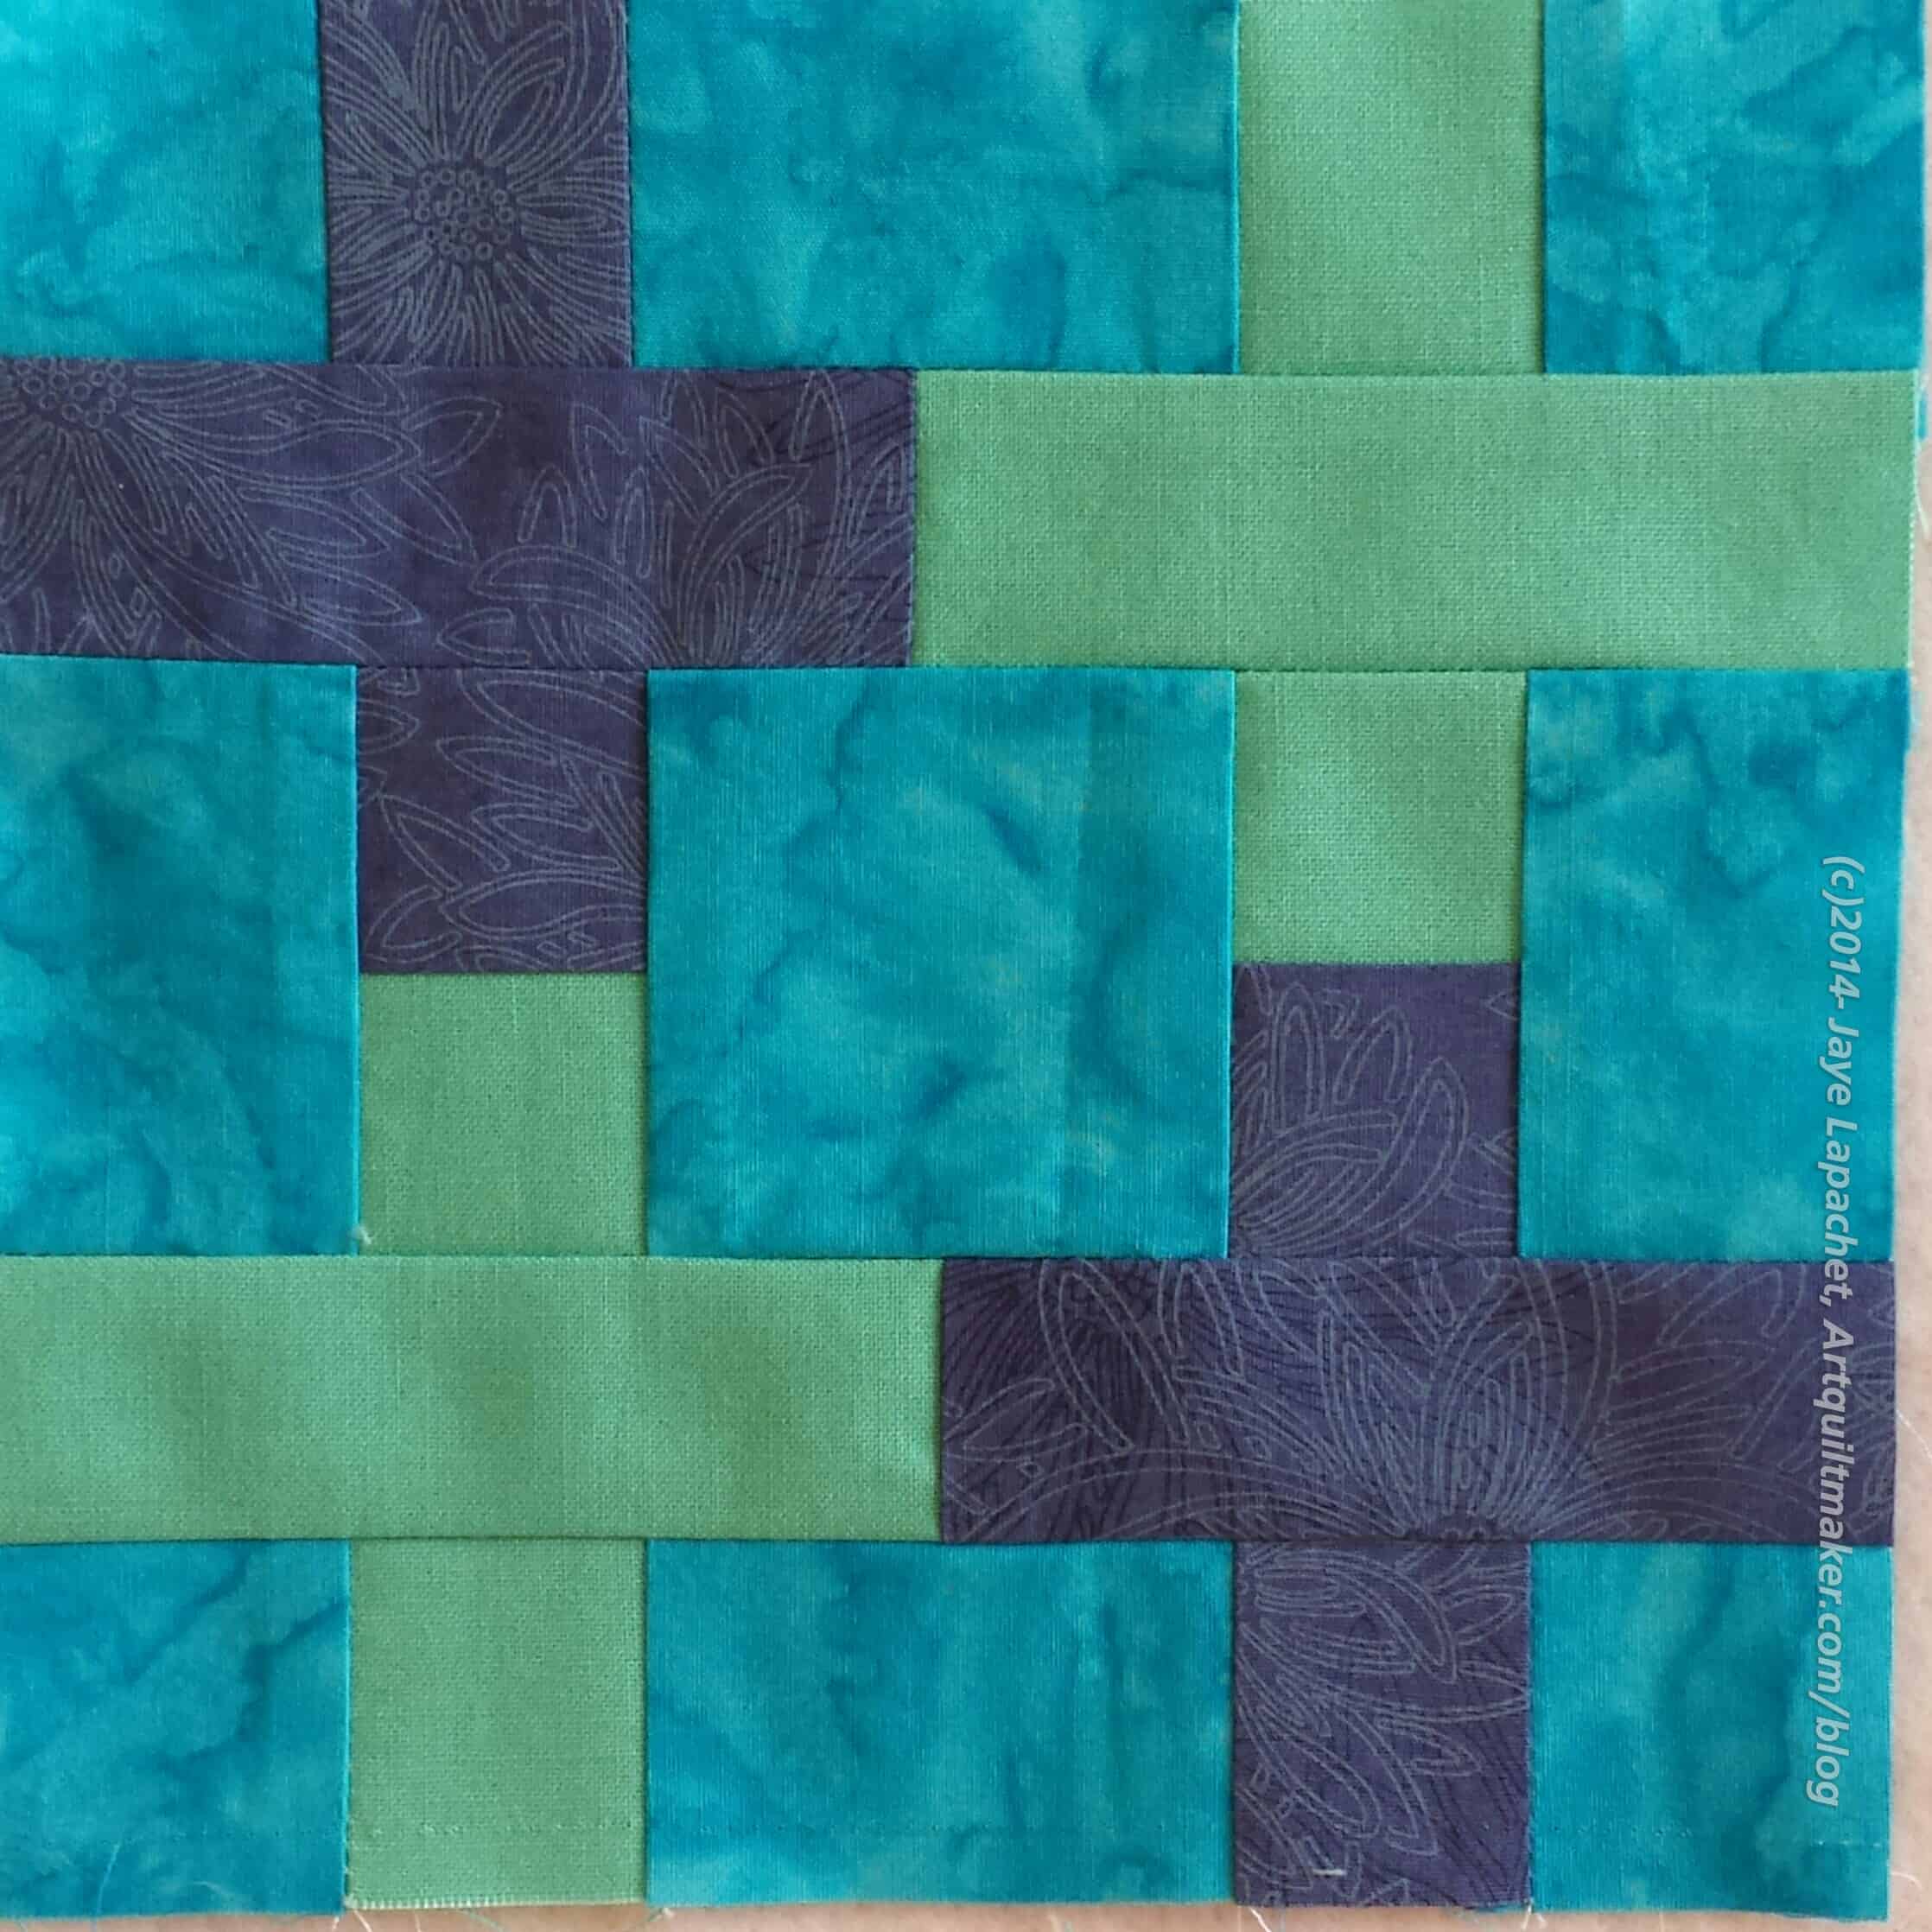
City Sampler block No.1
The first group of blocks shown in the book are crosses. These are, or feel like, log cabin blocks. I admire log cabin quilts and the variety of layouts possible with the log cabin block style. That being said, I don’t like making log cabin blocks. The strips make me crazy. I don’t know why. Strips are fine, but somehow sewing these types of blocks makes me crazy.
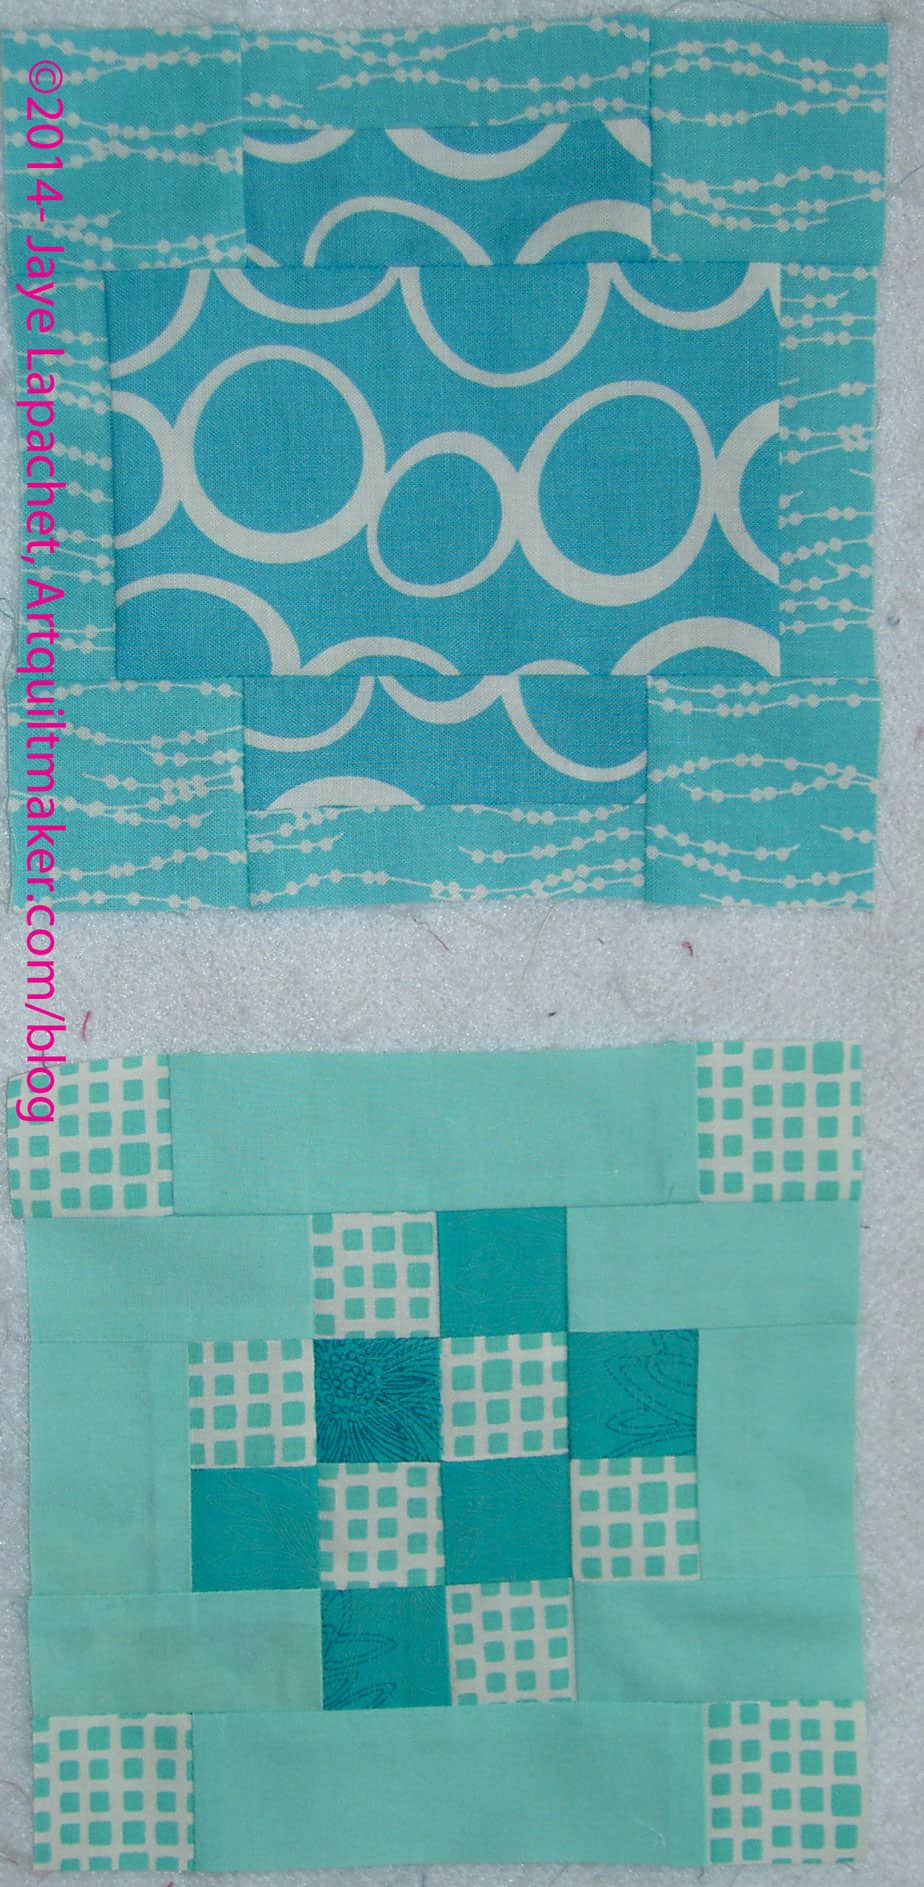
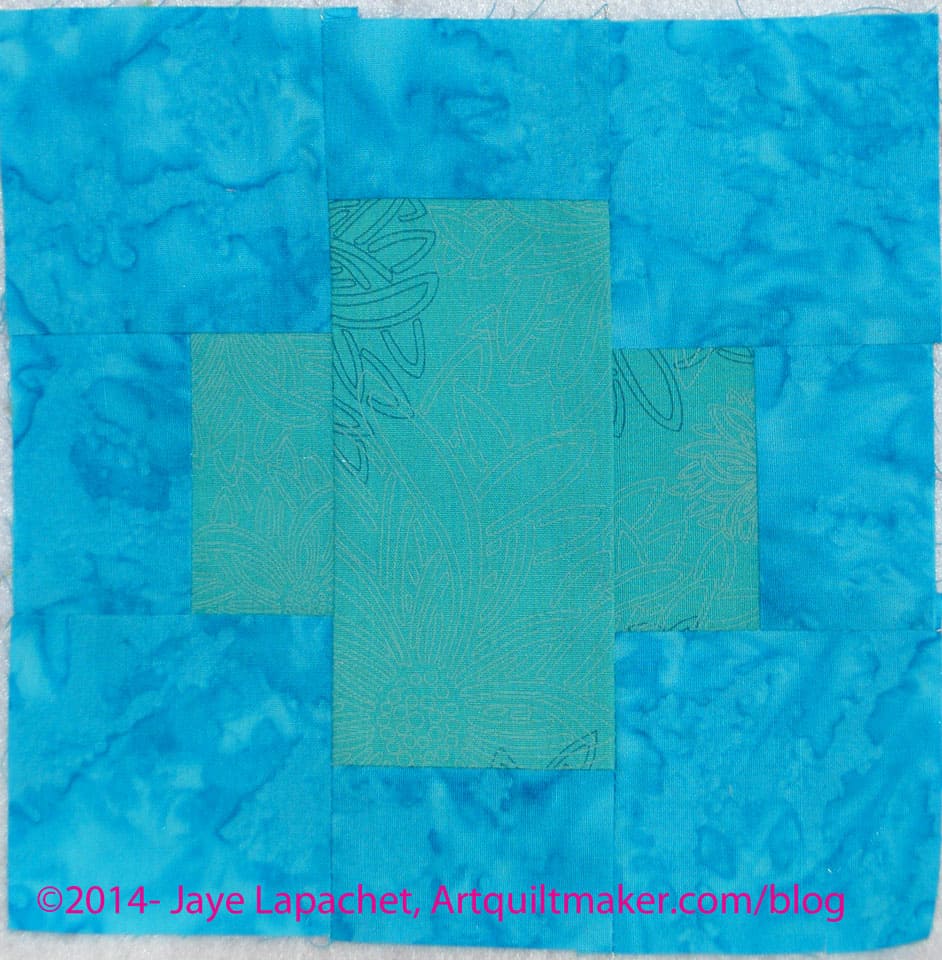
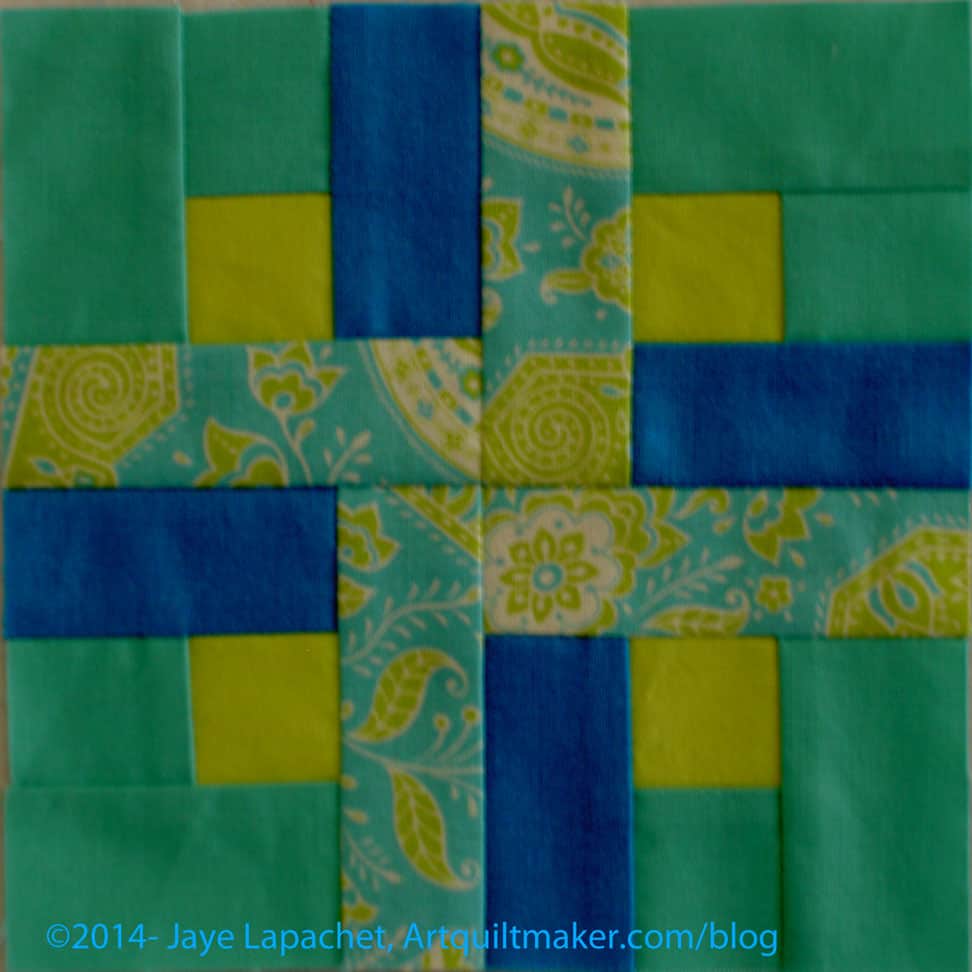
City Sampler block No.2
The group of cross blocks are part of the City Sampler, which is a group of 100 blocks. I said I was going to participate in the project, so I am making the cross blocks. There are 15 of them and not all have a log cabin-y feel when I sew them, so I can suck up the ones I don’t like making. After making 5 of the blocks, I found that they go together quickly.
No.2 (all the blocks are numbered and there is a spot where you can fill in the name) looks the most like a log cabin. I took the opportunity to fussy cut some motifs from one of the prints. This will provide a surprise for those who decide to look closer at the quilt. This is the one that set my nerves on edge, because of the small pieces. The others, so far, have had larger pieces.
All of the blocks are 6″, which contributes to the small size of the pieces. When I say “larger pieces” I mean that the pieces are relatively larger.
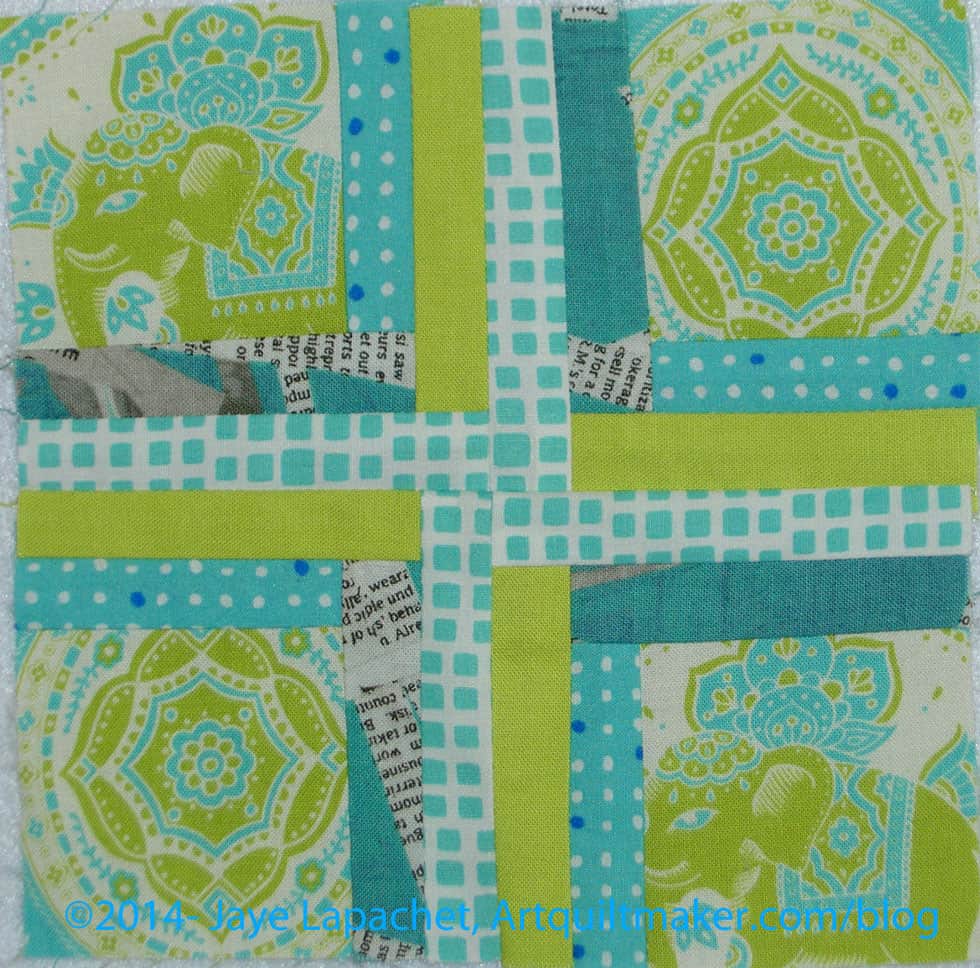
City Sampler block No.5
I don’t know if these are all original blocks. I haven’t taken the time to look through The Quilter’s Album of Patchwork Patterns (have you bought yours yet??) or the Encyclopedia of Pieced Quilt Patterns (or the BlockBase equivalent). I might at some point.
I know I added 3 browns to my original group of fabrics. I used the brown dot in No.5 and the corners might be too much brown. It is hard to tell with only a few blocks, but I can always make this block over if the corners look like big holes in the middle of the quilt. After making this block, I decided I would use the brown in less prominent areas of the quilt and for smaller pieces.
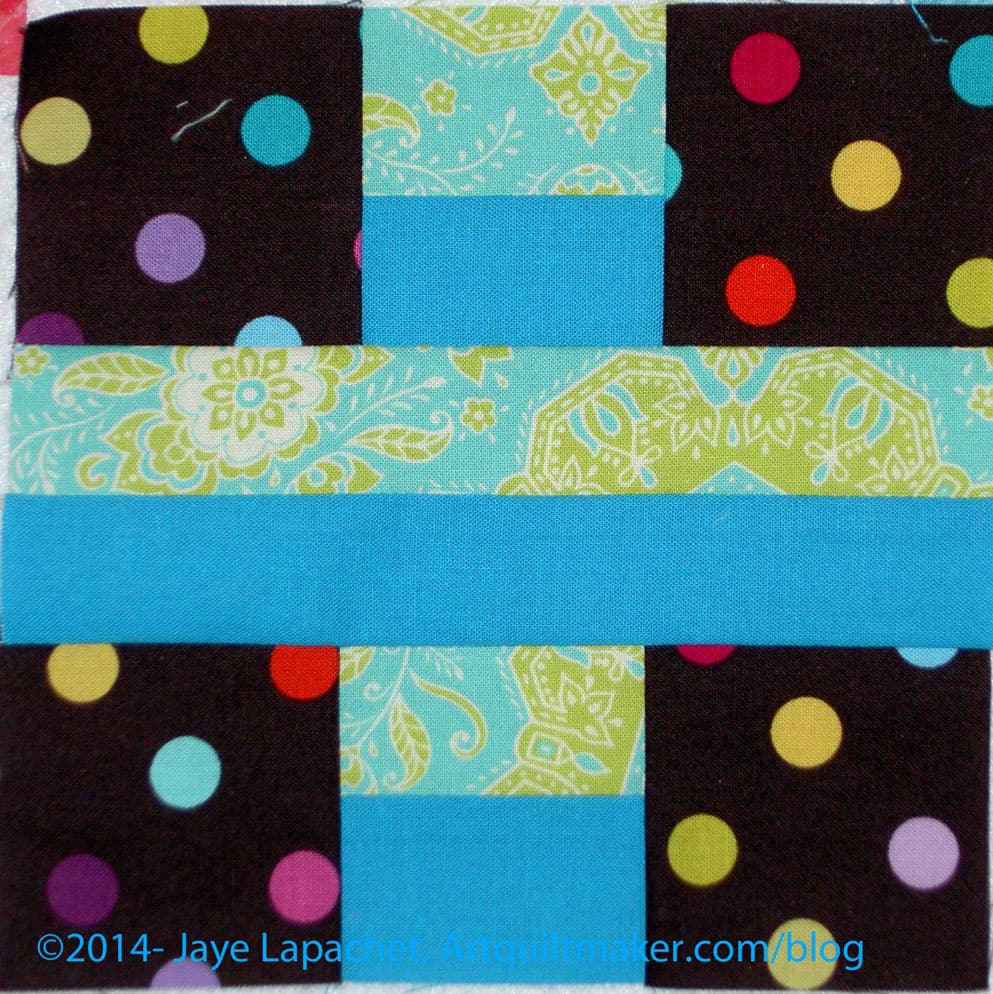
City Sampler block No.4
I used this idea for block No.4.
I cut very small brown pieces to see how the idea would work. This block has all new fabrics except for the brown. I used the brown in small pieces, as I said. I want to use it as an anchor to relate No.4 to the other blocks. The blues are subtle.
A word about the octopus. Tula Pink put out that octopus print as part of the Salt Water line. I thought the print was amusing, so I bought a fat quarter. I am going to sprinkle it into the quilt, but I am not planning on making this a Tula Pink quilt. If I had to assign this quilt a theme it would be either blue or calm.
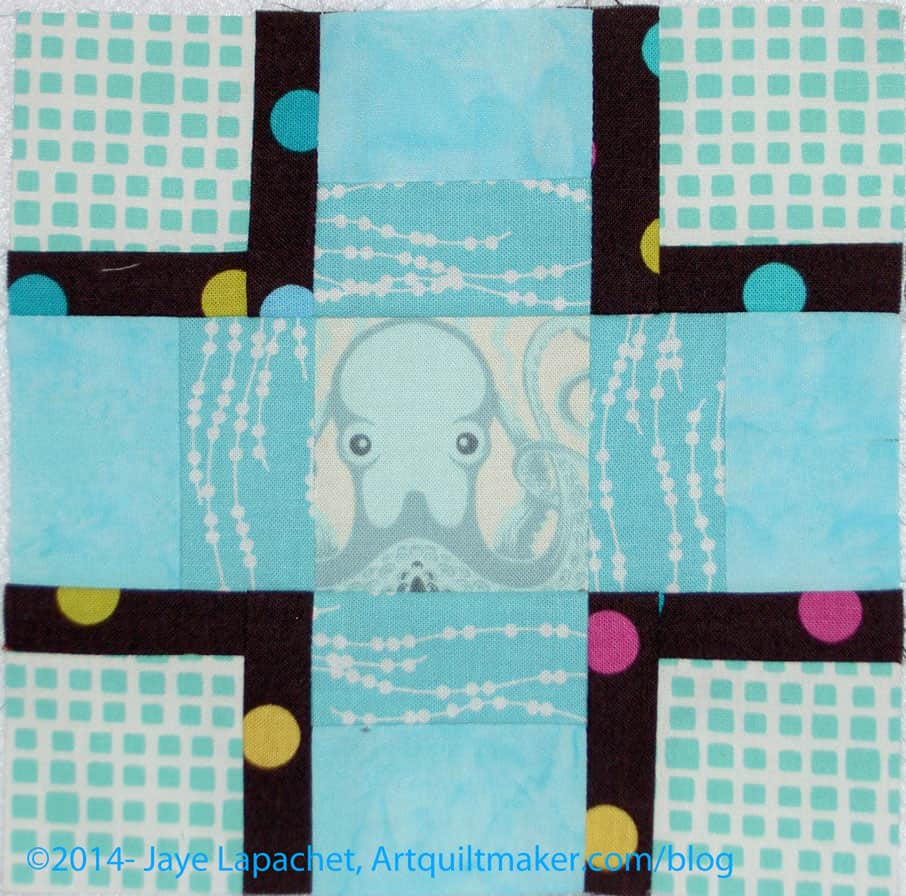
City Sampler block No.3
Block No.3 is another one where I could use fussy cutting. I skipped it initially as I was waiting for the Thomas Knauer Asbury fabrics to arrive and be washed. Instead of going through with that plan, I pulled some fabrics out of my scrap bin and used those.
I am not sure I like this block with the others, but I am reserving judgment until I get more blocks and see if they fit my theme and how they look with the other blocks.
I think I will use a lot of fabrics in this quilt, so I am trying to use as many fabrics as I want, but also trying to use them in multiple blocks so that there is some continuity.
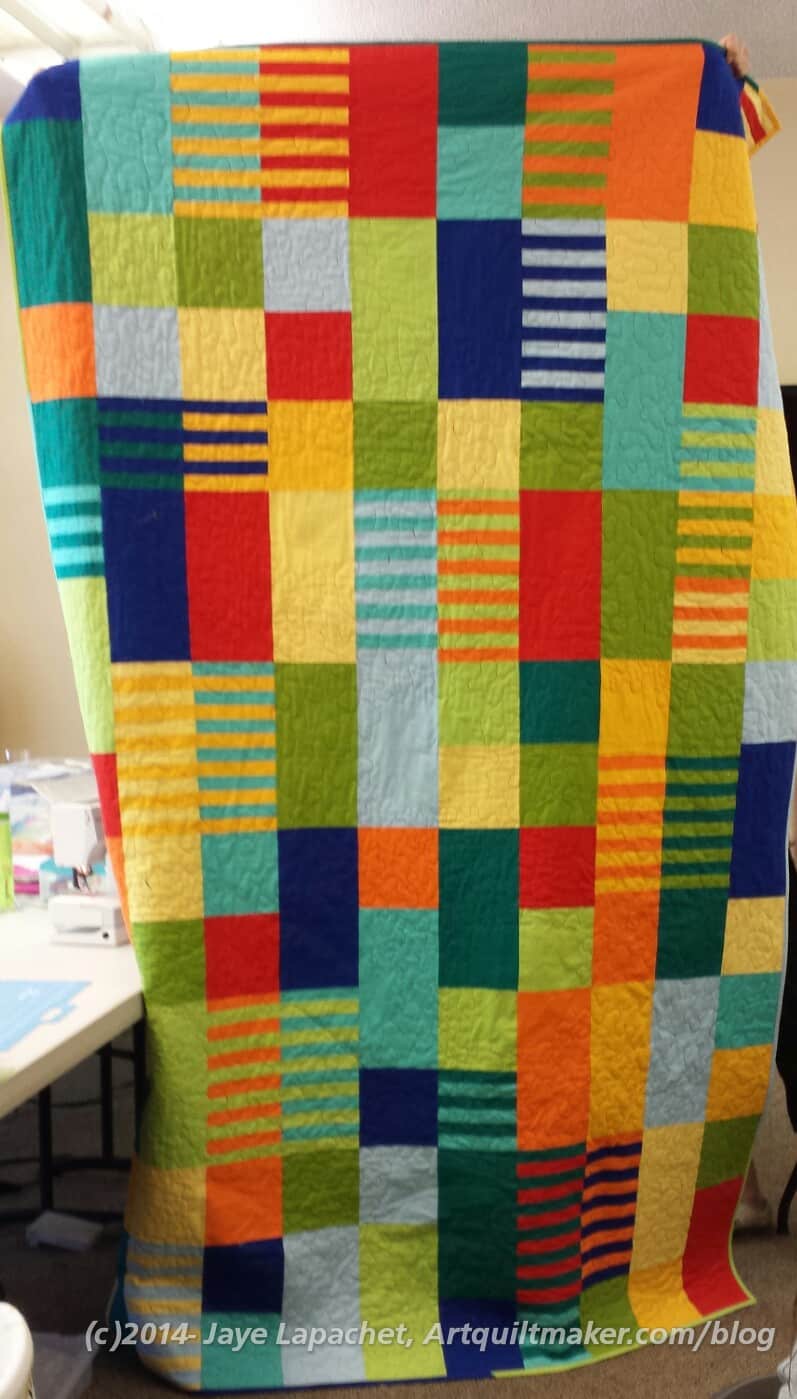
You might remember that I finished the piecing of this quilt last fall. I handed it off to Chris for quilting and then she gave it back to me last month, or, perhaps, in February for the binding.
I finished the binding and gave to the Charity Girls at the last meeting for the charity project.
I have done a lot of art quilts, but this is the first quilt that I think looks like a modern quilt. I am not saying that it is modern; I am just saying that it looks more modern than other quilts I have made. I think it was a good use of the blocks and really made them shine.
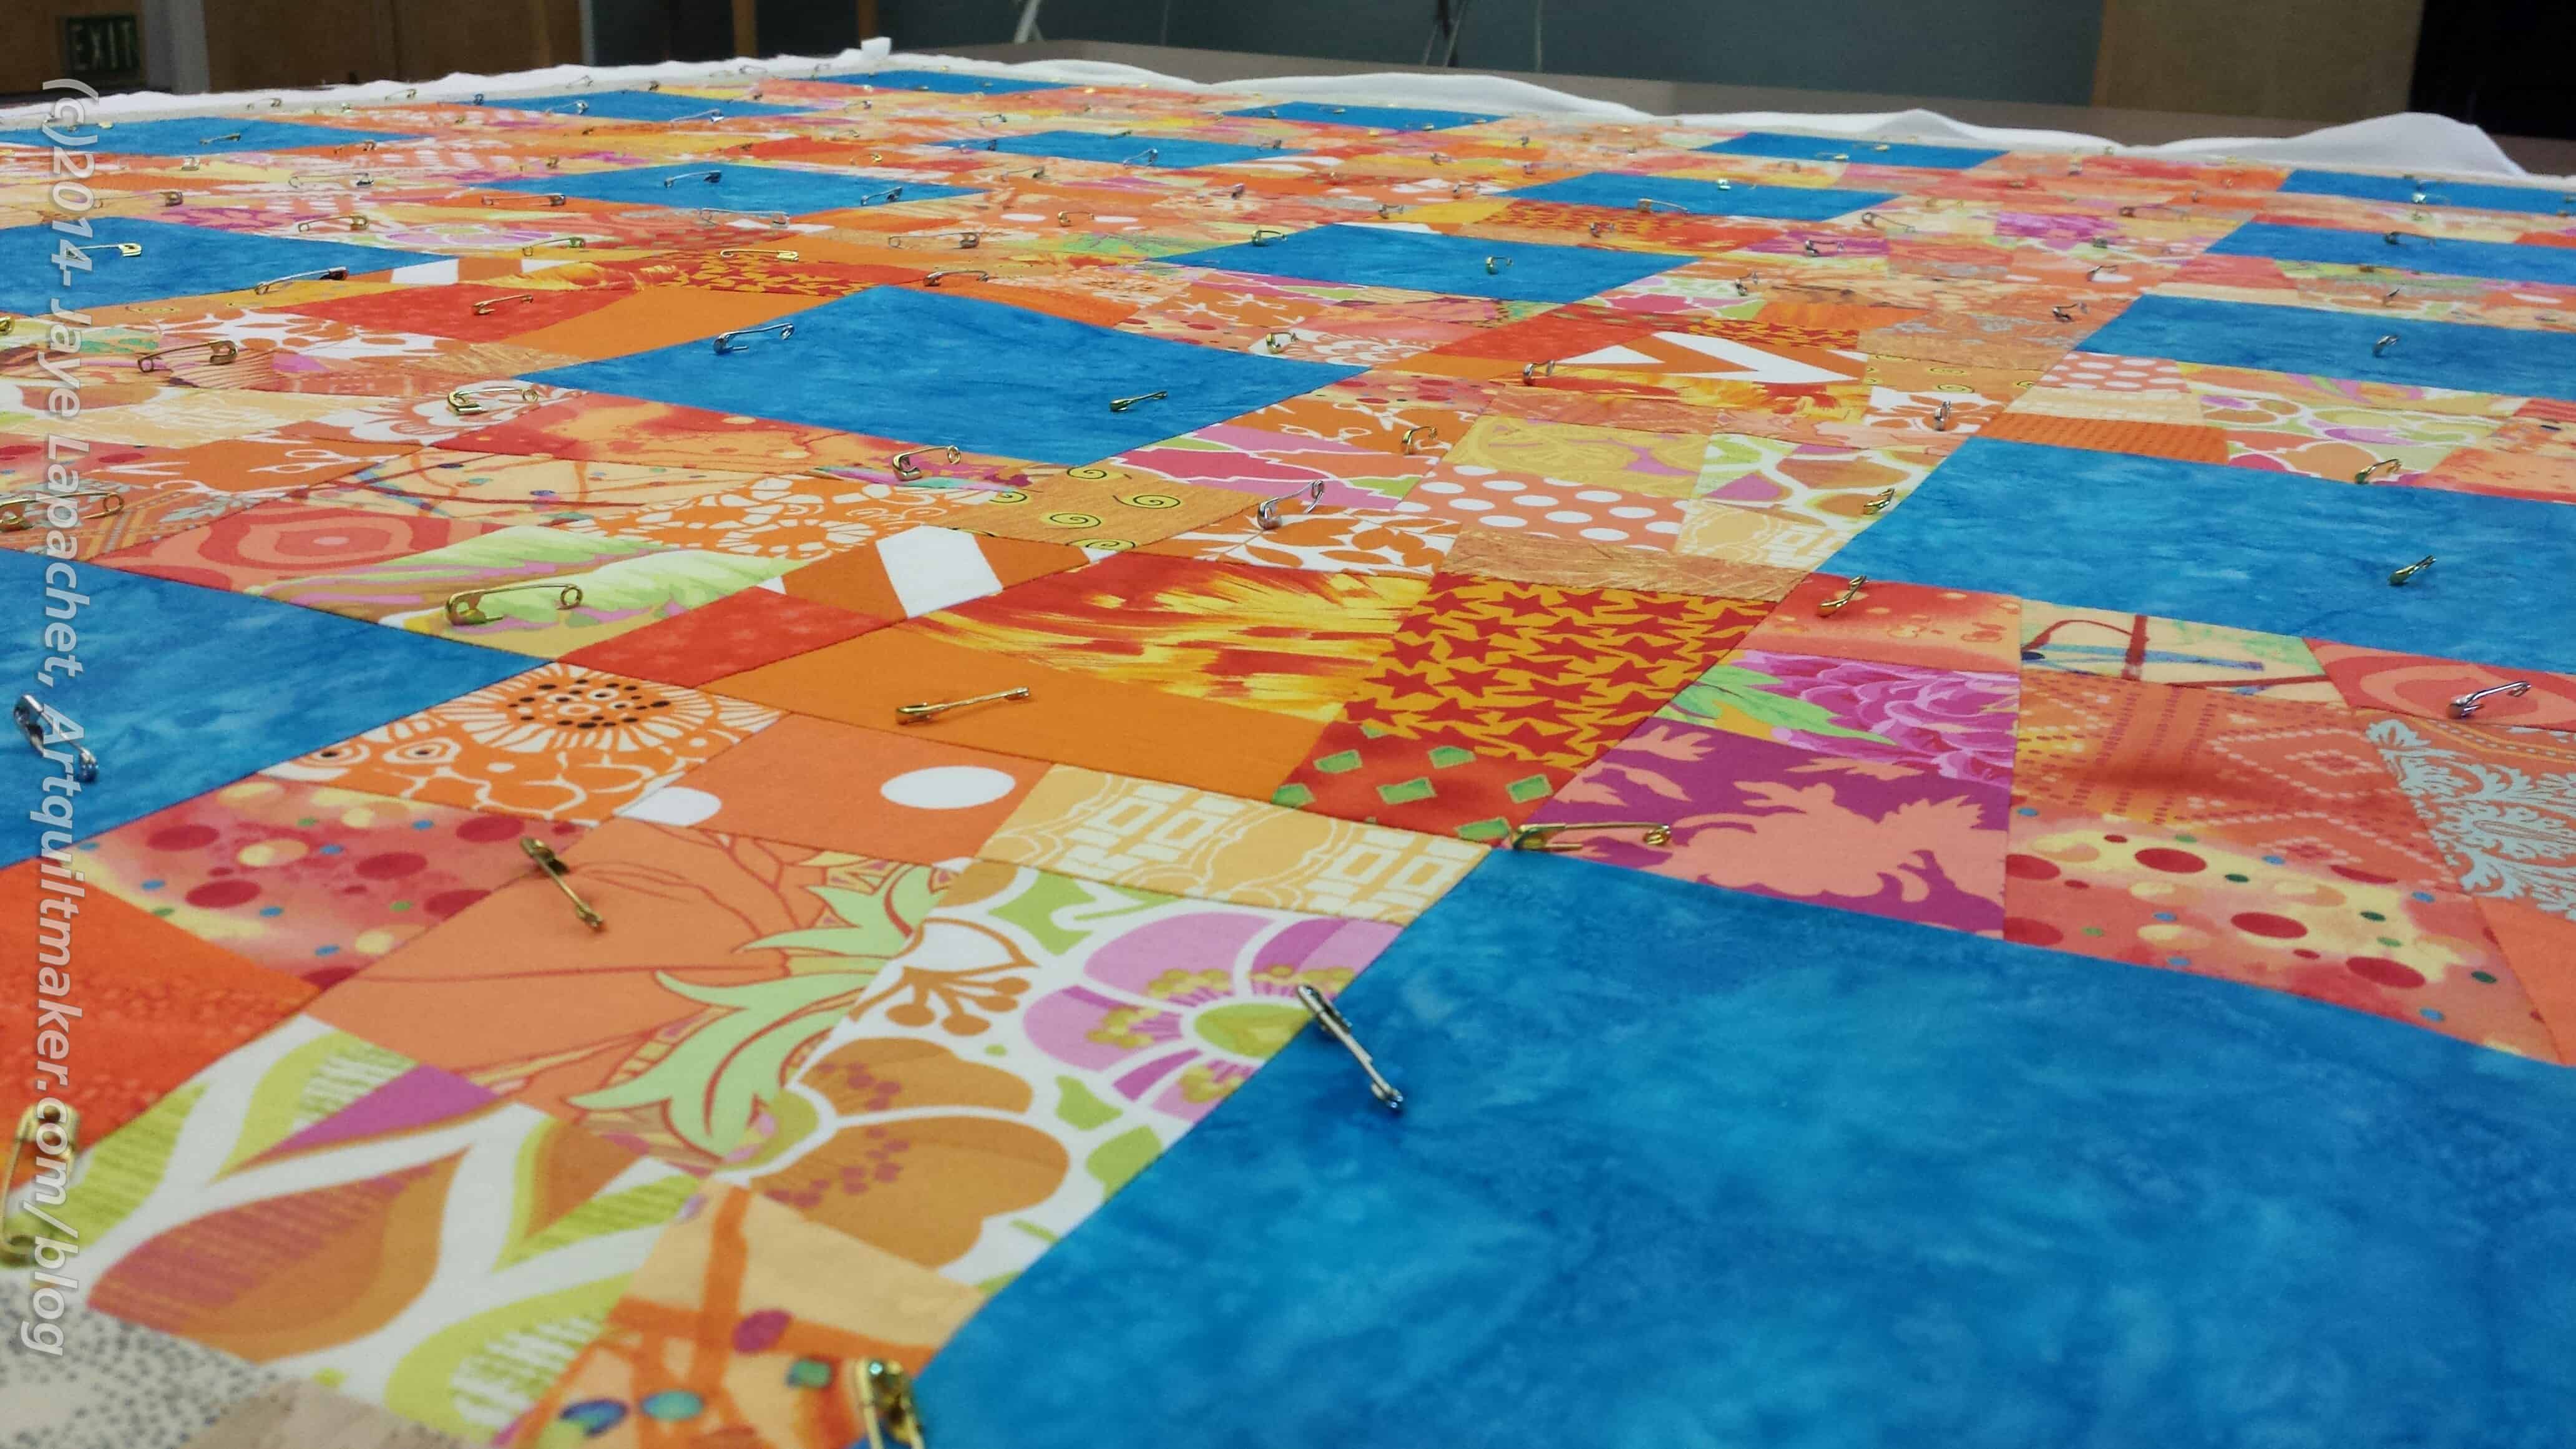
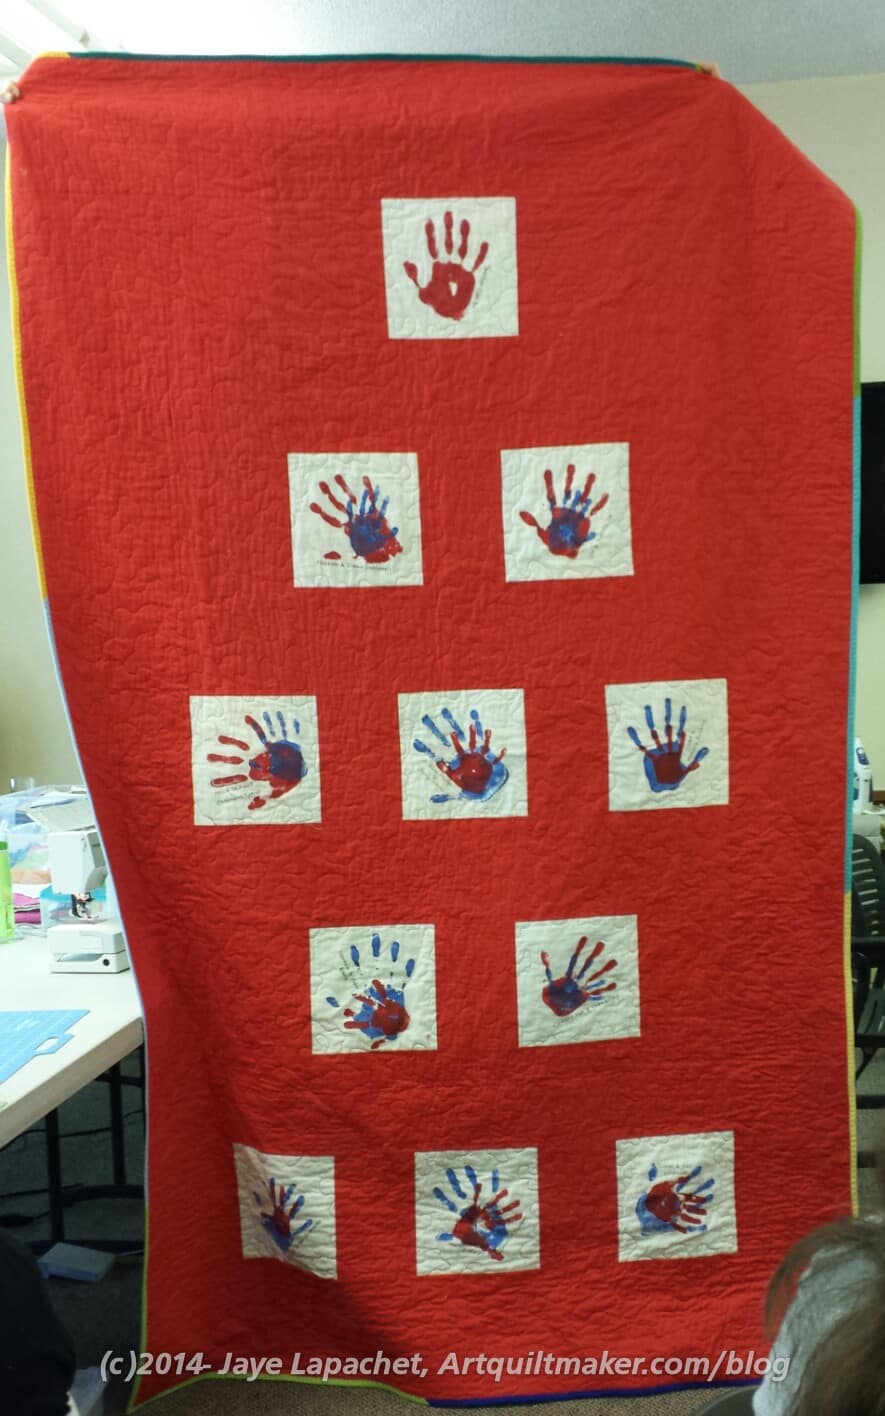
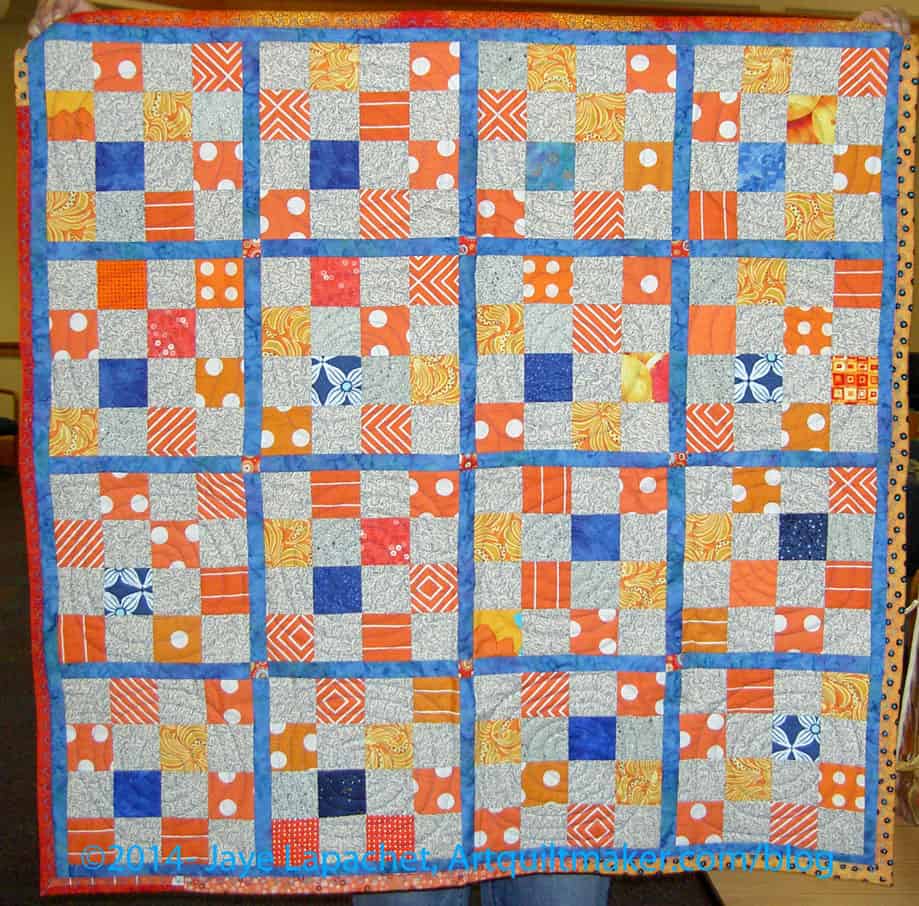
Last summer I finished the piecing for the Orange & Grey donation top. At the BAMQG meeting last week, I saw the finished top.
I was so pleased! the quilting looks great and someone was very clever and pulled excess fabric from the back and did a very nice machine binding with a decorative stitch. It looks great!
It is one of the larger quilts so the Charity Girls will donate it to a shelter, I think.
I feel great when I contribute to this charity project.
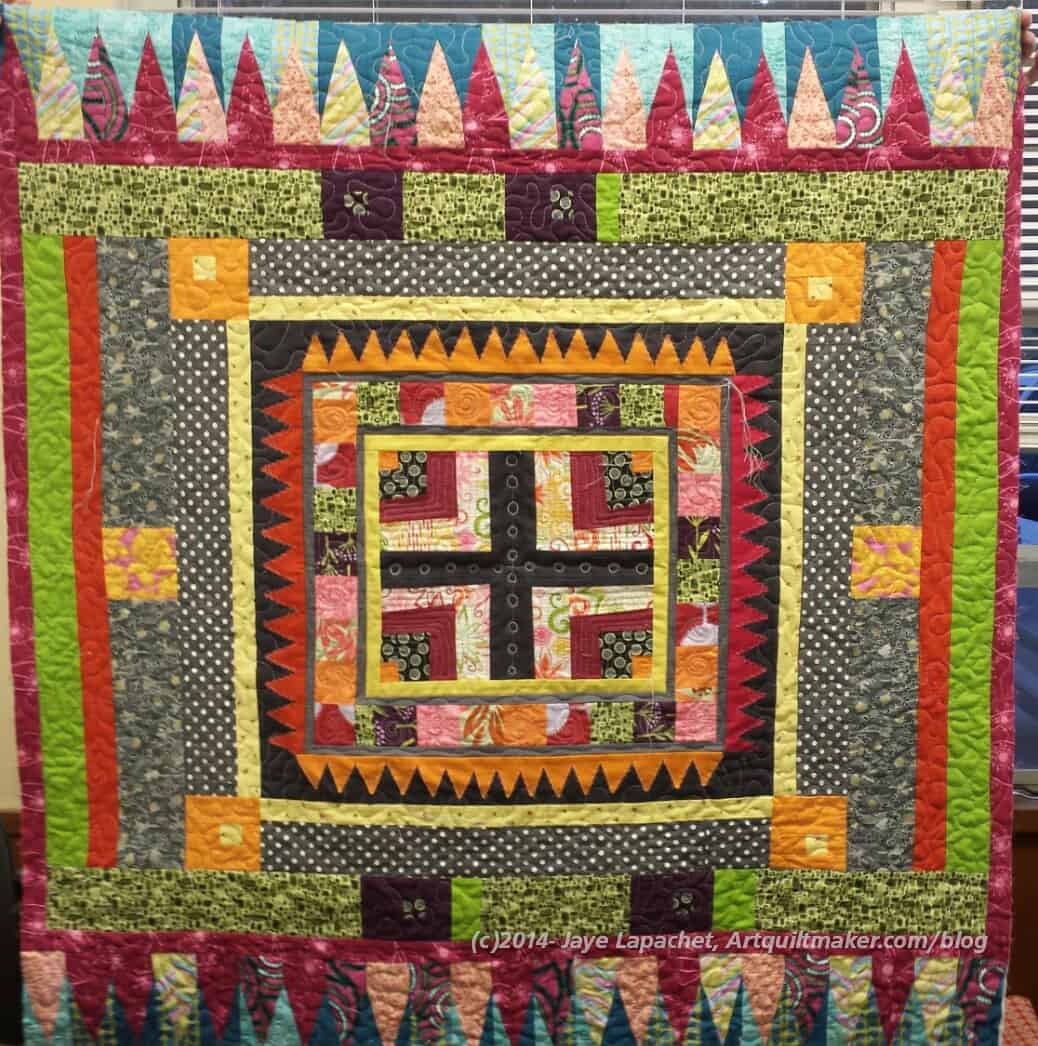
I was able to see my round robin start on Saturday at the BAMQG meeting. It was fun to see it, though not much has been done.
Poor Kelly moved after we started the project. My RR got stuck in a box by accident when she had some problems with the move. My piece has only had one person work on it. While it is cheerful and the work done so far looks really good, when compared to the fabulous work another group did on their projects, my piece looked kind of sad.
HOWEVER!
The other group has done 6 rounds and mine has only gone through one round so the potential is definitely there. Also, we only have 4 people in our group. Looking at the piece in photos really makes me realize how bright and cheerful it is.
Round Robin potential for Round 2
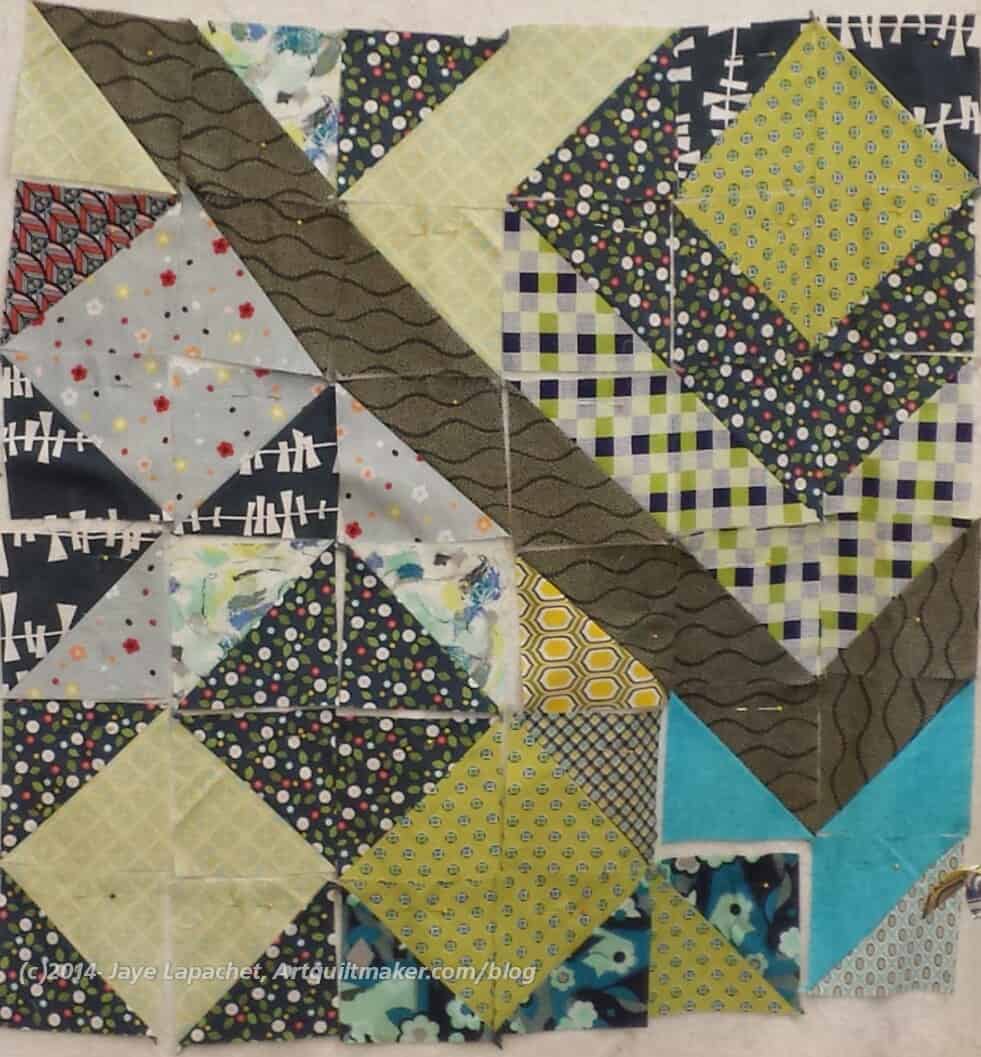
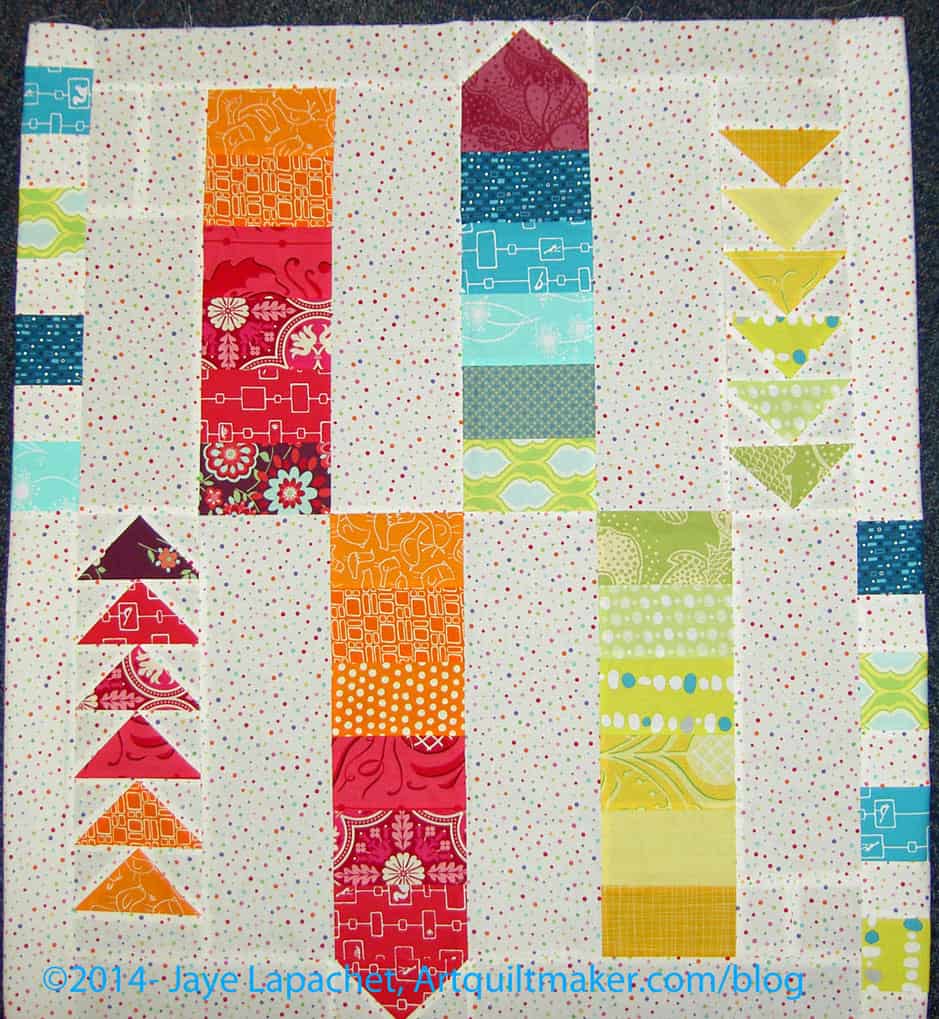
Kathleen is next on the list to work on my piece. She and I pulled out my piece and talked about what to do on it. At the moment the piece is very vertical. We were thinking that it needed some more horizontal, so we explored some ways of making it more horizontal. One thought was to make the edge a little smaller. In the photo you can see that we folded the edges under so that we could see how the piece would look with squares of color on the edges instead of rectangles.
We also talked about connecting the liked colored edge squares (or rectangles) with lines of the same colors, possibly weaving more than one under the other. You can see that some of the various colors on the bottom right are also on the top left. I am a fan of that idea, but I am not working on it, so who knows.
Kathleen said she might draw something to try and work out a design. I was wondering if I could use EQ7 to import the picture and then draw around it to show what I meant. I don’t know if it will work, but can try it and see.
The other thing I was wondering was if I should see if there are other people who want to work on it – perhaps non BAMQG people? We’ll see what fabulosity Kelly and Kathleen conjure up. 😉
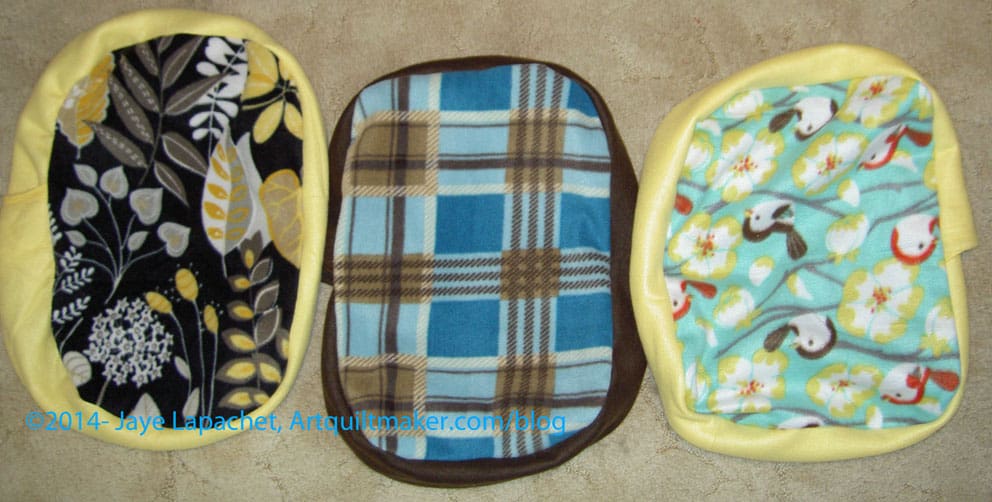
I whipped these up in order to get them done in time for the meeting, which was yesterday. I love the combinations that Amanda comes up with! I am wishing I had some quilting fabric in that yellow and black. Isn’t it great? It reminds me of Jane Sassaman’s work. I can see cutting out the leaves and things an rearranging them, then satin stitching them down. What do you think?
This project has been on my mind since December when Friend Julie suggested it. I am finally making a wobbly start. The start is that I have started to choose the colors.
Julie bought me the book as a gift and after some discussions with her, I decided I would be inspired by the city around me. This, in my mind, fits into the ‘City Sampler” theme that Tula Pink encourages also.
In the winter, the sky is very blue here and, though cold, I enjoy the strong light and clear colors. It should be no surprise that turquoise factors into my choices. I just can’t help myself.
Another appeal of this project is the block element. I miss making blocks on a regular basis like I did for the A-B-C Challenge and the Star Sampler. This project will help me satisfy that craving and, hopefully, will not annoy me.
Finally, shortly after Julie and I talked about the project, Kelly brought it up as a BAMQG small group project. This means I can have fun with Julie and participate more in BAMQG.
I was having trouble getting started. I have been distracted by life and picking a few fabrics (I am sure I will need more) really helps me to get the process out of my head and started.