SueG’s Classmate Tote

Sue's Classmate tote
Sue’s Classmate tote

The other day I mentioned Lee Ann’s Classmate Tote. I wanted to share SueG’s bag with you. It is the other one I made.

As you can see, I made it from the same fabric (Carrie Bloomston) with which I have been making her other gifts. I really hope she likes it as I still have enough to make some other gifts. This does mean that she and Carrie have a couple of bags that are different from each other. I have tried to make them the same bags, but Carrie is not on the board, so she didn’t get one of these. Christmas? We’ll see.

SueG's Classmate Tote - exterior
SueG’s Classmate Tote – exterior

One of the things *I* like about this fabric is the color wheels. I know I have mentioned it before. It is very handy to have a color wheel with you. I didn’t manage to get one of them on the front, but I was able to get one on the back – a whole color wheel. I am thrilled.

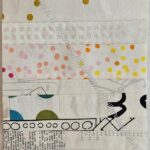
This is a very active print, so I wanted the accent fabric to work with the activity. I chose the black and white stripes. They do add a lot of movement, but I don’t think they compete with the Carrie Bloomston fabric.

It is great to use a whole piece of fabric for the exterior, but I wonder, given the design, if I could add another slip pocket on the outside? Considering how the bag closes, it might not work, or I would have to have a pocket that closes. Something to think about.

SueG's Classmate Tote - interior
SueG’s Classmate Tote – interior

As with Lee Ann’s the inside is very useful. I, again, chose the white version of the Carrie Bloomston fabric and was able to fit most of 3 color wheels inside. It is a bit over the top and I probably should have chosen a less active print. Still, it would be useful for a travel kit.

I showed photos to someone who said it looked like a jewelry organizer.

SueG's Classmate Tote - pen holder
SueG’s Classmate Tote – pen holder

One thing I did differently from the pattern is use some double fold elastic for the pens and pen-like tools holder. The pattern calls for making a pocket (see example) using fabric folded and sewn. I didn’t like the thickness and I thought something like a simple strip would be more useful. The blue strip replaces the pocket. As you can see, I varied the size between the stitch lines so even a small rotary cutter could fit. I triple stitched so it would be tight and wouldn’t pull off with heavy use. Fingers crossed it works.

SueG's Classmate Tote - half open
SueG’s Classmate Tote – half open

The closure is a part of the pattern I am not 100% happy with. I thought about what I could use to replace it, but didn’t think of anything, so I went with the directions in the pattern. I don’t know if I’ll make this again, but I’ll have to think about a different closure if I do.

I did fussy cut a bit to get the color wheel, as mentioned above, but also make sure something interesting was on the bottom so it looked good like I have shown in the photo above.


2024 BAM Officers
2024 BAM Officers

Carrie did a great job wrapping, as usual. She is amazingly gifted at wrapping. I am always so impressed with what she comes up with.

Lee Ann’s Classmate Tote

Lee Ann's Classmate tote
Lee Ann’s Classmate tote

The other day I mentioned giving the Classmate Totes to the officers. I wanted to share the overall look of the bag with you.

The Chrysanthemum print by Philip Jacobs is one that Cyndi gave me after she visited an estate sale where she found fabulous fabric on offer. This is a colorway I don’t often buy. As I said the other day, I wasn’t sure whether Lee Ann would like it, but these colors spoke to me when I thought of her. I’ll have to see about finding some more of this fabric for her next bag so she has a matching set.

Lee Ann's Classmate tote - exterior
Lee Ann’s Classmate tote – exterior

The outside is one continuous piece and I think the fabric is shown very well.

As you know, these colors are a little difficult for me to work with. Not as difficult as brown, but still hard. I am glad this is a Phillip Jacobs fabric as it has rich layers of color. It also makes me think of Fall, autumn colors and Thanksgiving.

Since I don’t have a lot of these autumn colors, or don’t think about combining them, I was also pleased that the yellow I chose for the folds and the binding. The color  fit with the Phillip Jacobs print very well.

Lee Ann's Classmate tote - in/exterior
Lee Ann’s Classmate tote – in/exterior

For the inside, I used a poppy print I bought in Sacramento in 2017, and also some Tula as I didn’t have enough of either.

Normally, I would have used the same yellow for the folds on the inside, but, again, I didn’t have enough fabric. There is a little bit of “making it all work” going on.

Lee Ann's Classmate tote -interior
Lee Ann’s Classmate tote -interior


I have plenty of zippers, but I didn’t have all the same colored zippers, so I chose a couple of different hues in the orange/sunshine yellow range.

There are 5 pockets you can see in the picture. Under two of the pockets, slip pockets provide additional flat storage. I think a 6 inch ruler might fit in the middle area.


2024 BAM Officers
2024 BAM Officers

Carrie did a great job wrapping, as usual. She is amazingly gifted at wrapping. I am always so impressed with what she comes up with.

More White Strips

White Strips #2 in process

I made a little more progress on the White Strip #2 donation top. I have most of the top sashings sewn. I have started to sew the blocks to the sashing, as I show in my chunking tutorial.

I started working on it a little more diligently after I put my aunt’s Superbloom together. That project isn’t finished, but I only had a few minutes and needed a break. I think I’ll be able to take the quilt to Sew Day and hand it in.

More Classmate Totes

Classmate Tote by Terry Atkinson

It’s officer gift time for the guild again. Since I organize the gifts, I get to decide what bag we will make. The Classmate Tote** is the bag of the year for the officers.

This is a small project bag the officers can use for a small flat project, like English Paper Piecing, or that they can use for tools and supplies. I wanted to make this pattern again after making one for Gerre and one for Lindsay. I also thought it wasn’t too big, but had a useful design.

I initially started writing this post back in December after I spent some time one day cutting for both bags. I know several officers read this blog, so I decided not write about the process as I didn’t want their surprise to be spoiled.

We gave them the bags yesterday. We delayed the thank you gifts until all of the officers were at the meeting.

Lee Ann's Classmate tote
Lee Ann’s Classmate tote

Mary C and I made two bags each for the officers. I’ll have to recruit more people next year as I struggled to get mine done.

I wasn’t sure what fabric to use for Lee Ann’s  bag. I wasn’t originally scheduled to make it, but picked it up when another member couldn’t do it. This Philip Jacobs fabric spoke to me and I really hope she liked it.

Sue's Classmate tote
Sue’s Classmate tote

For Sue, I used the fabric I have been using for bags for her and Carrie for the past year or two.

I am pleased with how they both came out.

Mary, as usual, did a great job on her bags.


**N. B. : Obviously, you should shop at local quilt shops and small businesses. However, if you are too busy or can’t find what you need there, I use Amazon affiliate links and may be paid for your purchase of an item when you click on an item’s link in my post. There is no additional cost to you for clicking or purchasing items I recommend. I appreciate your clicks and purchases as it helps support this blog.

White Strip #2 Back Again

White Strip #2 in process

Today is the guild meeting and I thought I *might* have this top done and ready to turn in. No such luck.

I did stop making new blocks and focused on sewing this top together. I could do both new blocks and the top, but leaders and enders is easier for me if I focus on one project as the leaders and enders piece at a time. Also, I have enough blocks for this quilt and don’t need any more.

As I mentioned in the previous post, I am using the back of a fabric as the sashing. I haven’t turned over all the cut sashing yet, so the pieces near the top are still on the right side. I think it looks good.

As per my ‘chunking tutorial,’ I started at the bottom by sewing a block to a piece of sashing. I quickly realized I had forgotten to cut cornerstones. I am backfilling those as it becomes necessary.

Sew Day Saturday

I did a lot on Saturday at Sew Day.

Mom came along, but I didn’t have to do as much for her. She is moving slowly, but moving around a lot more. It is great to see her progress.

Superbloom 3 & 4 pieces

The first thing I did was cut out pieces for my next Superbloom totes. I was able to, mostly, cut out the larger pieces. That is super helpful, because of my small cutting table.

I thought I had everything in a project bag, but I didn’t check before I left. It turned out that I forgot ShapeFlex, Soft & Stable and lining for one of the bags. Oh well! I cut out as much as I could, so that is some progress. Definitely better than nothing.

I also worked on Old Town a bit. I had to line up and mark the pieces for a million Flying Geese, so I did that.

March Sew Day scraps cut

Finally, I worked on my scrap bin some more. Did I make as much progress as I wanted? No, but I never do. I had about 2 zipper bags of scraps. Now I have 1.5, so some progress.

First, I cut all  the shapes I need for various projects. Not tons, but quite a few.

Scrap strips
Scrap strips

Next, I cut strips, which will be used for quilts like the white color strip top I discussed the other day.

For some reason, I have a lot of orange. I also have a lot of grey, which will add to the grey improv top sitting on my design wall. I know they are strips and I should make some color strip blocks with them, but I want to get that grey improv top to the community quilt people. It has been hanging around for an eternity.

Sew Day: real scraps

Finally, I had various real scraps that will end up as an improv quilt in the various colors at some point.

I also found some triangles, which I will make into HSTs for that mythical HST quilt I have on my mind.

Not bad for a Sew Day. I would have liked to have gotten more done, but what can I do?

Mary C's baby quilt
Mary C’s baby quilt

Mary put a baby quilt together. It is Playmat – newborn size and made from two charm packs.

Mom worked on the binding of her first (!!!) quilt while chatting with Friend Julie’s mom who joined us also.  The quilt has been finished except for the binding for years. I am glad she is working on it. I am also glad she has something on which to work.

New White Color Strip Donation Top

White Color Strip donation blocks #2

I finally have enough blocks to get a top on the wall. Well, it isn’t a top yet, but I am getting there.

I am using the fabric I got in the Sew Hungry Hippie box at Christmas as the sashing. It has a lot of gold, which isn’t white, but it might be interesting.

I also planned for the sashing to be 1.5 inches finished. That is a little larger than previous versions of this type of quilt.

February 2025 Donation Blocks

After turning in a batch of 16 patches, I switched back to making my white strip donation blocks. I should have done it ages ago as the strip blocks lead directly to quilts whereas the 16 patches lead to someone having to store them until someone takes them to make into a quilt.

I am honing in on having enough to make another white color strip quilt.

Ends n.22: Improv CR Donation Top

Ends n.22: Improv CR

Since I went and retrieved the quilt for Cyndi and Ruth from Colleen, I ended up with the edges. Thus, Ends n.22.

I decided to work with what I had and not try to add a bunch of fabric. The big blobs of red-violet are a little odd, but I know someone will like it.

Yes, the bottom is a little wonky. I haven’t trimmed it yet. I might leave it to see what someone else does with the bottom.

I meant to take it to the meeting the other day, but I left it on the design wall. It gives me more time to make a back.

Ends n.21 (Ombre) Finished

Ends n.21 finished
Ends n.21 finished

I finally dug in last weekend and finished Ends n.21. Honestly, I needed the design wall space! LOL! Still, it is finished and ready to go to the meeting on Saturday.

This design is super easy, so there wasn’t really a lot to do. I just had to sit down and sew. Saturday was kind of a finishing up day as I didn’t have tons of time to sew, so I finished up projects that were already started and didn’t require a lot of thinking. I think this quilt looks fun. It is about 39 inches x 40 inches. Not huge, but a nice playmat size.

Ends n.21 back finished

I also grabbed a piece of fabric out of my backing fabric supply and made a quick back.

Finished: Orangeade

Orangeade donation top

I finished Orangeade and turned it in at Sew Day. I was glad I had something to to turn in since I didn’t plan on working on the Community quilt project.

This was not a difficult quilt to make. I did play around a lot with the placement of the squares so that the eye roved around a little bit at least.

I am happy with the way it turned out and, as usual, am thinking of making more.

Orangeade back finished

I always want to make the backs as it means more fabric used. The pieces I have available to use are not as big as I have used most of the large pieces that didn’t have a purpose. I ended up piecing this one. I think that will become more the norm. I do have some backing fabrics, but they are a lot of large flower prints and I mostly don’t want to use them for donation quilts. We’ll see. More fabric out means I can buy new fabric.

Ends n.21 Started

Ends n.21 in process

I have started another donation top, this one part of the Ends series. Can you believe this is the 21st?

This is made from a random piece of background fabric and the edges of the Hugs & a Kiss quilt. The sparkles in the dots are fun.

I accidentally started this series in 2017 with the first one, made from what I called ‘dreg ends’. I have a box with the cut off edges of finished quilts. I still have it, though there are many fewer edges. I am trying to keep up with using the edges as they come back from being quilted, but that box still has old edges in it.

Another Sew Day

Scrap cutting result - February
Scrap cutting result – February

Another month, another Sew Day. I spent another Sew Day cutting up scraps, just like last time. I cut a big pile and made a dent, but I didn’t finish cutting up all of my scraps. I spent about 5 hours. My scraps are still not limited to the Desktop Cube I made for the purpose, which is disappointing. They need to be contained since my cutting table is small enough without it being overrun by scraps.

Mom and Jaye
Mom and Jaye

My mom came with me. Yay! She was well enough to spend the whole day out! I kept her supplied with pain medications and food. She said it went well. I kept her quiet and at home the next two days and she is doing ok. I was so relieved that she didn’t have a complete relapse. It sound ridiculous, but I can’t help but worry about her.

Tim's Jittery Wings quilt
Tim’s Jittery Wings quilt

Tim just got back from a retreat with Mitzi of Jittery Wings. He came over the other day to use my design wall and continued that work at Sew Day. His quilt is a whole bunch of HSTs and Flying Geese. Sounds like Old Town, right? LOL!

One thing I love about HSTs is how many different designs quiltmakers can sew using only HSTs. Of course, as I said, Tim’s quilt has whole bunch of HSTs and Flying Geese.

Mary's Crisp Blue quilt
Mary’s Crisp Blue quilt

Mary was working on a quilt for a friend going into the hospital and it looks so crisp.

This is a simple Rail Fence design. She used a couple of jelly rolls she had and it looks so great! I also like how complex it looks. I just love block quilts. 😉

The guild was having a Community Sew Day. People worked on a variety of different designs. I cut up my scraps, as noted above, and didn’t participate there. I couldn’t bring Mom and my machine. I just wasn’t up for it. I did, however, bring Orangeade and several donation blocks. I definitely want to contribute but I don’t need to do it at Sew Day.

One of the quilt tops they worked on was similar to the Infinity Quilt I made for one of my nephews.

Community 9 Patch quilt

Claire is a great one for rescuing usable fabric. She had a group of men’s shirts and people were working on 9 patches out of that beautiful fabric. The fabric was very soft and had a nice weave. I don’t know what the ultimate design will be, but it will work very well for a boy or man once it is finished.

Mom was sitting across from Lynette who was working on these blocks. I wanted her to sit at the other table so she had some new people with whom to talk. I am sure it is boring just talking to me all day.

Community quilt design

The other design was similar to Mary’s Rail Fence. I couldn’t figure out why this was a such a weird shape. I think the rectangles were actually made in two parts, but I really don’t know.

Anyway the Community quilt team did a great job prepping for the event. There were a lot of people at Sew Day, which was nice. Mostly, I was pleased that Mom had a good time and was able to get out and see the world.

January 2025 Donation Blocks

I almost didn’t make any donation blocks this month. As mentioned my mom is sick and it is taking up time (time I am glad to have the opportunity to use). I worked on a donation quilt for most of my leaders and enders time. I finished that and did get to a few blocks. Not the 31 I had hoped for, but some is better than none.

Orangeade Progress

Orangeade donation top in process

I have finished sewing the pairs together and am starting to make four patches.

As usual, I am rearranging squares as I go along. I think the top will be about 40 in x 40 in.

Yes, I added in a few pinks that snuck into the batch of wrongly cut squares.

The last orange top I made was either Orange You Glad or the Orange Improv. I like both of them very much. They are very cheerful. It must be the oranges that I buy – not as much orangey-brown as orangey-sunshine.