I am out of cut white squares for charity blocks, so I used pieces for the City Sampler blocks as leaders and enders while I was sewing the Peacock together this past weekend.
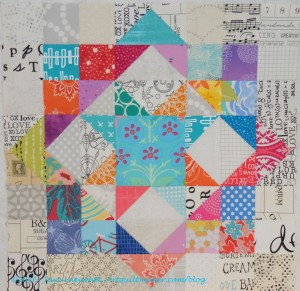
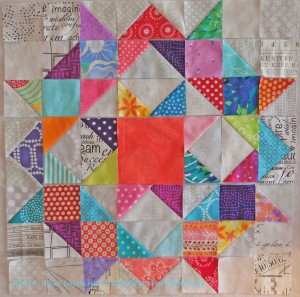
City Sampler blocks n.38-41
I was able to finish a total of 6 blocks, which still makes me under 50 done, but progress is progress. I am still on the triangle blocks and my machine really likes eating the corners when I use the method Tula Pink suggests. I was grumpy making these blocks and ordered more Northcott charm packs to use for the donation blocks.
City Sampler block n.41
I added a few new fabrics from the group I recently washed to spice things up. They are all in the blue-green range, so they will go. I know I said before that I had too many, but clearly now I don’t care.
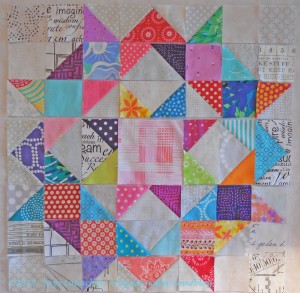
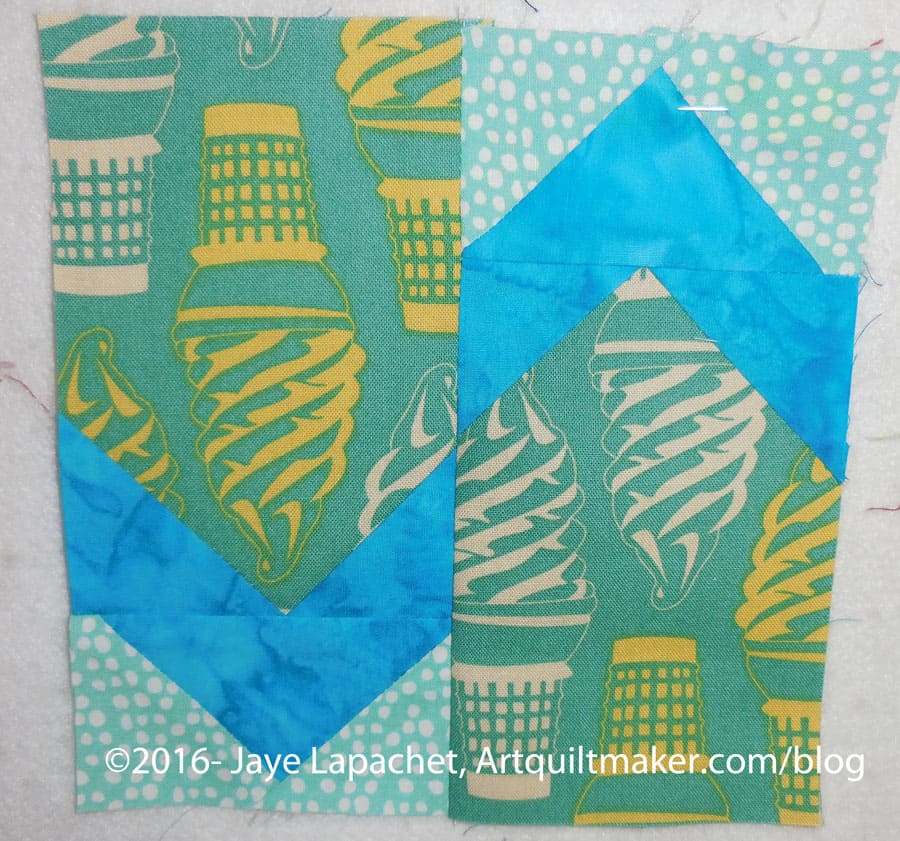
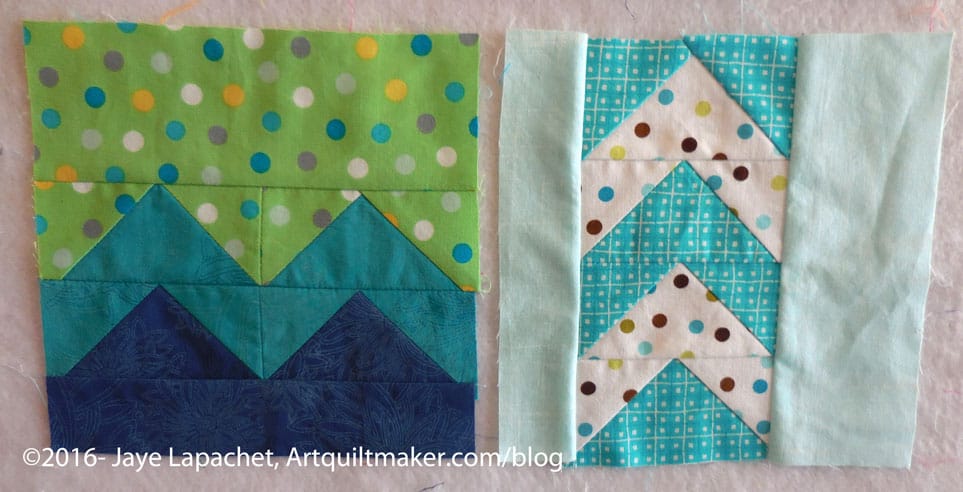
I don’t have a lot of fabrics in my group that are good for fussy cutting, so I did the best I could. I am pleased with the way the ice cream block came out.
Of the above blocks, I really only like the one in the upper right hand corner. I like of the fabrics in all of the blocks, but don’t much like the block designs and not just because my machine ate the corners. I particularly dislike the one in the upper left hand corner. It looks like baby blocks and I don’t think it came out well. The piecing is really wobbly due to the above referenced machine hunger and because of the many small pieces. I may redo as suggested by some on Instagram, but it will probably just blend in by the time I get all of the other blocks made.
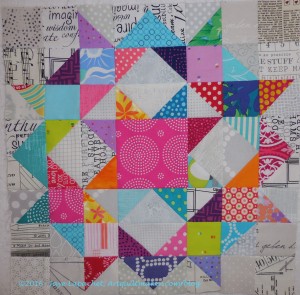
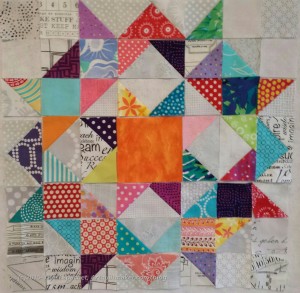
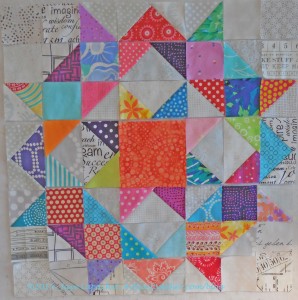
City Sampler blocks n.42-43
I do like the two I made yesterday and think that simple is better for the small size of these blocks. I am really looking at the one on the left and thinking about making it super big – bed sized, in fact for one of the nephews. I have to figure out how big that would actually be. I can see the block as a quilt in, from the top down, Kona Ash, scarlett and black. I would probably do a test block first to check the color choices, then see if American Made Brands or Art Gallery has a similar solid color to Kona Ash.
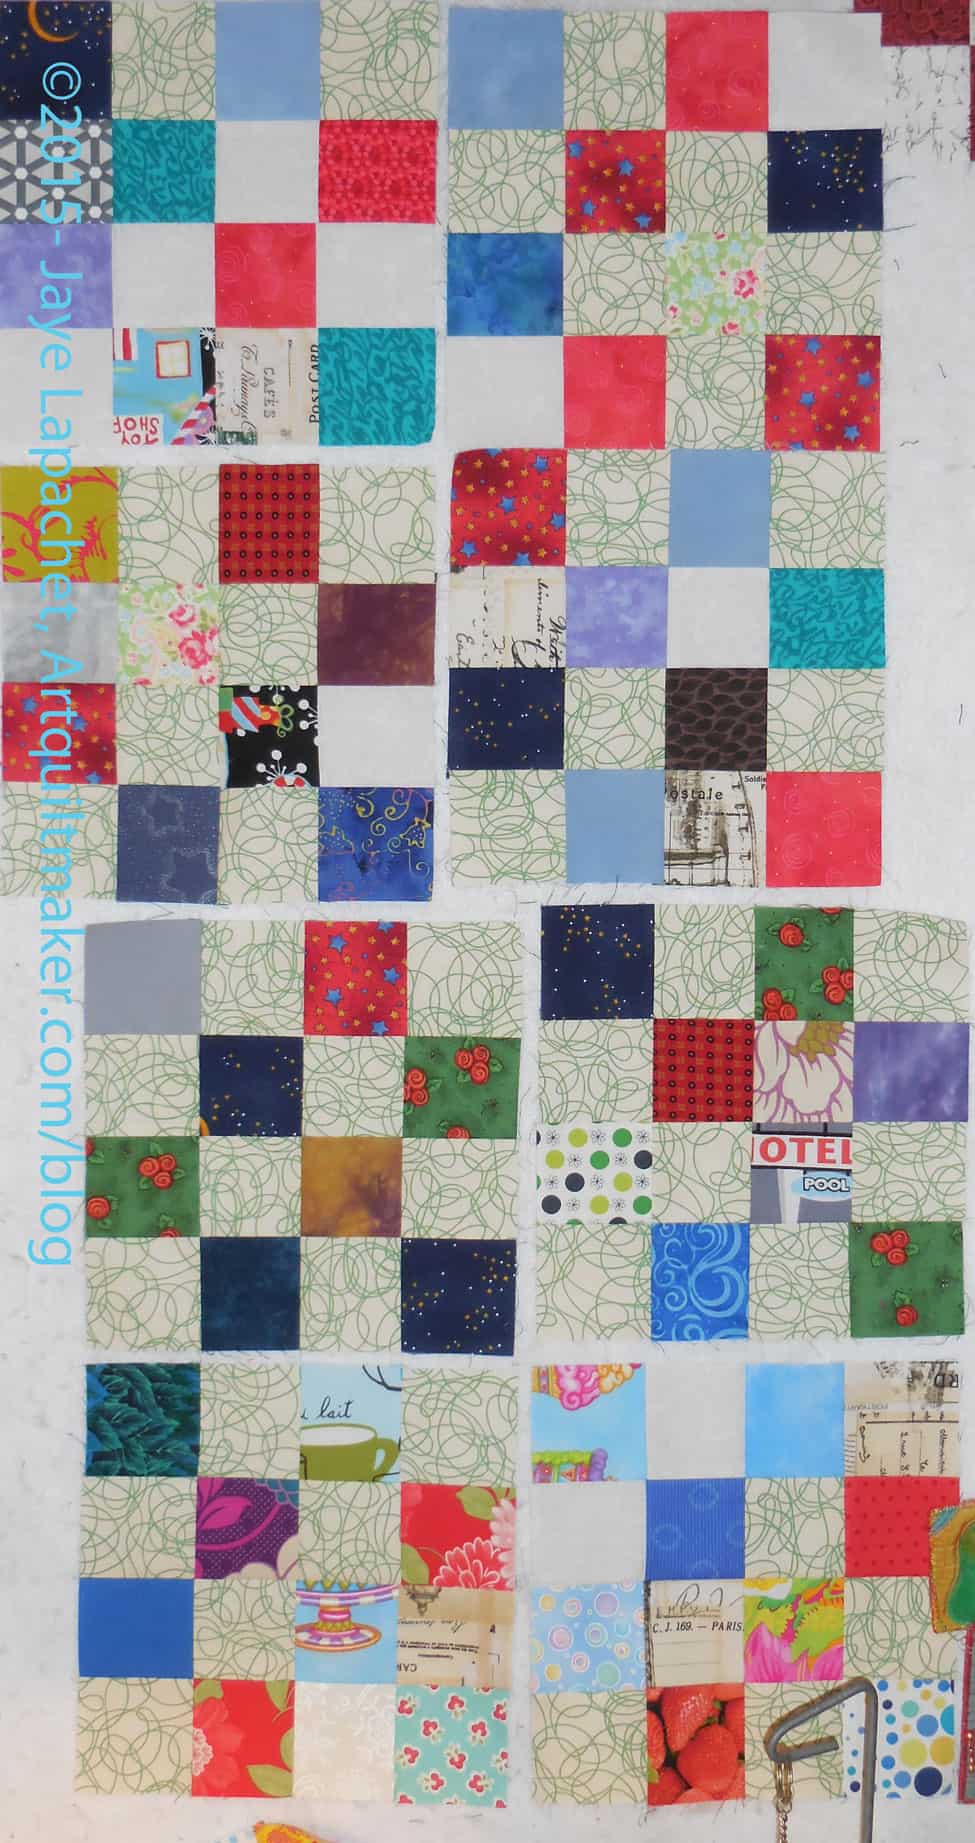
Today we will start the actual sewing part of the class by making a Nine Patch. The 9 Patch is one of the easiest and most basic blocks a quiltmaker can make. It can be made from any sized patches and can be a component of more complex blocks. It is a good block to start with because it is fairly easy, gives practice on matching points and choosing fabrics all without making a new quiltmaker crazy. It also is a 3×3 grid, which means 3 patches across by 3 patches down. This grid is used in other more complicated blocks, so learning it’s structure will help you down the road. Knowing how to identify such a grid will enable you to dissect blocks in the future. It gives you a starting point for many skills.
Finished: Nine Patch
This is usually the first block I teach when I teach beginning quiltmakers in a Sampler Class context. You will need:
Supply list:
fabric
rotary cutter
rotary cutting ruler large enough to cut 4.5″ squares
rotary cutting mat
fabric (2-3 different)
Optional: Mary Ellen’s Best Press (or similar)
Optional: pins
sharp trimmers or scissors
thread for piecing
sewing machine
Iron
ironing surface
I haven’t done a cutting tutorial. I have listed some below and you can find others if you search.
I haven’t reviewed all of the above tutorials in detail, but the brands are reputable and you should get some good information. The best way to learn is to take a class on how to rotary cut and be shown in person. Many quilt shops will give you a private lesson, if you arrange it.
Key Block
I have marked the rows and patch with letters and numbers so I can more easily refer to them for you. You may want to enlarge the picture and make a small drawing to keep near your machine.
First, select your fabric. If you selected a large group of fabrics in the lesson on selecting fabric, you will just need a few from that group. As you can see I have chosen 3 fabrics. You should feel free to use more, if you want. The one in the middle is the only one I have placed in one square. I want this to be my focus fabric.
Nine Patch: Center
Step 1: Cut fabric. You need 9 squares 4.5″x 4.5″ each. I like to use a different fabric in the center of the nine patch block. It adds interest, especially to a 12″ finished size.
Adding RedsAdding Blues
While this particular block is the first block I teach in the sampler series, I suppose I could make it easier by teaching a Four Patch. I think you can handle a 9 Patch. This particular Nine patch will be part of the sampler quilt I am making. I always make a quilt along with my students.
Move Fabrics Around
Step 2 (above): After you cut the squares, move them around to make sure you have the placement of the fabrics in the position that is the most pleasing to your eye.
Start Sewing
Step 3: Prepare to start sewing.
I usually start in the upper left hand corner (row 1 patch A and row 2 patch D), everything else being equal.
In general, if I don’t start in the upper left hand corner for other blocks, I start by sewing smaller units/patches into larger patches. This is a good practice for blocks with sections that will later need to be sewn to other sections. Keep this tucked in your mind, but you don’t need to worry about it now.
Sew patches together in groups of 2
Always use a quarter inch seam allowance.
If you have a needle down option, I always use it
Step 4: Place fabrics right sides together and place into machine with the foot on the fabric, but with the fabric in front of the needle. I have a quarter inch foot on my machine and I sew 2 patches together to make a unit that will fit into the upper left hand corner of the block.
Sew patches together in groups of 2 (front view)
The edges of the patches are lined up so that the bottom fabric is not showing when I sew. Fabrics are right sides together.
Patches SewnChain Piecing
Nota bene: You can certainly take the sewn patches out of the machine, but this is a good time to talk about chain piecing. I have other bits and pieces handy so that I can keep sewing, so I will put them (see red rose fabrics above) through the machine after the patches for the block on which I am working. In the above photo, you can see scrap pieces for a journal cover. I find it is much easier to work on sewing scraps together rather than another block. For my journal covers, I sew pieces together any which way. I don’t have to worry about putting the right patch in the right place or not cutting off triangle corners. This method gives my brain space to concentrate on the block at hand. I like to use chain piecing as it saves thread and keeps the machine from eating the corners of blocks as the machine starts sewing a new patch.
Once you have done some blocks and know how you work, you can certainly put the next group of pieces for your current block through the machine after the first set. Also, if you feel confident, then go ahead and put the next set through the machine.
Cut off Chain Piecing
Step 5: After you have put your second group of patches, or your scraps, through the machine, cut off the sewn patches apart from your second group of sewn pieces. I usually just put one set of chain piecing through my machine after the patches for my current block, especially if I have a lot of fiddly placement. I would rather unsew one set of patchwork if I make a mistake than many.
Trim threads
Step 6: Trim threads.
I dislike a bunch of long threads hanging off the back of my finished blocks. The best way I have found to deal with that is to trim as I go along. Trimming threads is a personal preference. I find it makes my blocks look a bit better and there is less of a chance of anything getting caught in my machine as I sew further along in the project. I put threads and trimmings in a bag and use them for cat bed filling.
Set Seams
Step 7: Bring your 2 sewn squares over to your ironing board and press the threads on the seam allowance from the back with the patchwork closed. This sets the seams. You have not yet opened your piecing to look at it from the front.
I have no idea if this step really sets the seams. Fons & Porter do this and since there doesn’t seem to be any harm in it, I started to do it as well. If you skip this step, your patchwork will not fall apart.
Open Patches
Step 8: Open your patchwork so that the seam allowance is pointing towards the patch that will be in the very upper left hand corner.
Seam Allowance Points Away
Step 9: Point the seam allowance, referenced above, away from you.
You could also point it to the side (either right or left depending on which is comfortable based on the hand with which you press). Above is the way I do it, which probably depends on the size of my ironing board and habit.
Press
Step 10: Swoop your iron carefully from the patch without the seam allowance to the patch which is laying on top of the seam allowance. In my case I am swooping carefully from the red towards the aqua dot.
Place Sewn Patches on Design Wall
Step 11: Place sewn patches on in their spot on the design surface.
Place Sewn Patches on Design Wall (detail)
You will notice that this newly sewn set of patches are quite a bit smaller (1/2″ to be exact) than your other cut pieces. No panicking is necessary. The patches are smaller because you have used 1/2″ of fabric for the seam allowance. You are on track, if your block looks like the two pictures above.
Sew Next Patches
Step 12: Take the center patches (from row 1 patch B and row 2 patch E) and sew them together. Again, you will place your right sides together before you sew.
Use Chain Piecing Techniques
Step 13: Follow steps 3-11 for these patches and the right hand patches (row 1 patch C and row 2 patch F).
Press Opposite
Step 14: Above we pressed towards row 1. After sewing row 1&2, patches B&E, you will press the seam allowance towards row 2. Patch E will be on top of your seam allowance.
Used Another 1/2″
Step 15: Place your pressed patch on the Design Wall. You have used up another 1/2″ of fabric.
After you have sewed all the patches for rows 1&2 together, you will need to sew the patches for row 3.
Step 16: Sew row 3 patch G to patch D. Yes, patch D is already sewn to patch A. Don’t press yet.
Step 17: Follow the directions in Step 16 for patch H and patch I. Wait to press.
Step 18: Press patch G towards patch G.
Step 19: Press H towards patch E
Step 20: Press patch I towards patch I
Nesting Rows
Step 21: Lay the column with patches B, E and H on top of the column with A, D, and G. Make sure that your seams look like the photo above – nested into each other, not resting on top of each other.
The reason to pay attention to pressing is that you can ‘nest’ the seams when you go to start sewing the rows. Nesting seams is when the seam allowances are pressed in opposite directions so that they rest against each other. It helps with accuracy in piecing.
Sew Left Column to Middle Column
Step 22: With the column with patches B, E and H on the bottom, sew the column with A, D, and G to the column with patches B, E and H on the right side.
I did use some pins at the seam allowances.
Step 23: Set seam between the left and middle columns.
Step 24: Press seam allowance between the left and middle columns in whatever direction suits you.
Lay Left Column on Middle Column
Step 25: Lay left column (with patches C, F and I) on top of the middle column.
It looks like the top row, but really is the right column. I just have it turned so the right column is on top.
Step 26: Pin at seam allowances, if desired. I usually use pins.
Step 27: Sew left column (with patches C, F and I) to the middle column.
Step 28: Set seam between right and middle column.
Step 29: Press seam between right and middle column.
Finished: Nine Patch
Step 30: Congratulate yourself! You have successfully completed your Nine Patch!!!
Yes, this is block #7 of the ‘test’ blocks. Apparently, I have a lot of testing in me and can’t stop.
I think that I am making a quilt. I can’t imagine piecing all of these pieces and then giving the blocks away or something. I guess I am making a quilt.
The patches for this particular block were on the wall for a long time. Some of it was that I was away from my machine for various travel and some of it was that I was sewing other things when I did have time. I fiddled with the layout quite a bit until I decided to go with what I had and began sewing.
There are colors, and similar colors that are near each other in this version. I decided to be ok with that. There are no hues that look so much alike as to muck up the design. In the grand scheme, I think it will be great.
I washed a bunch of low volume prints and am ready to lay out the next block.
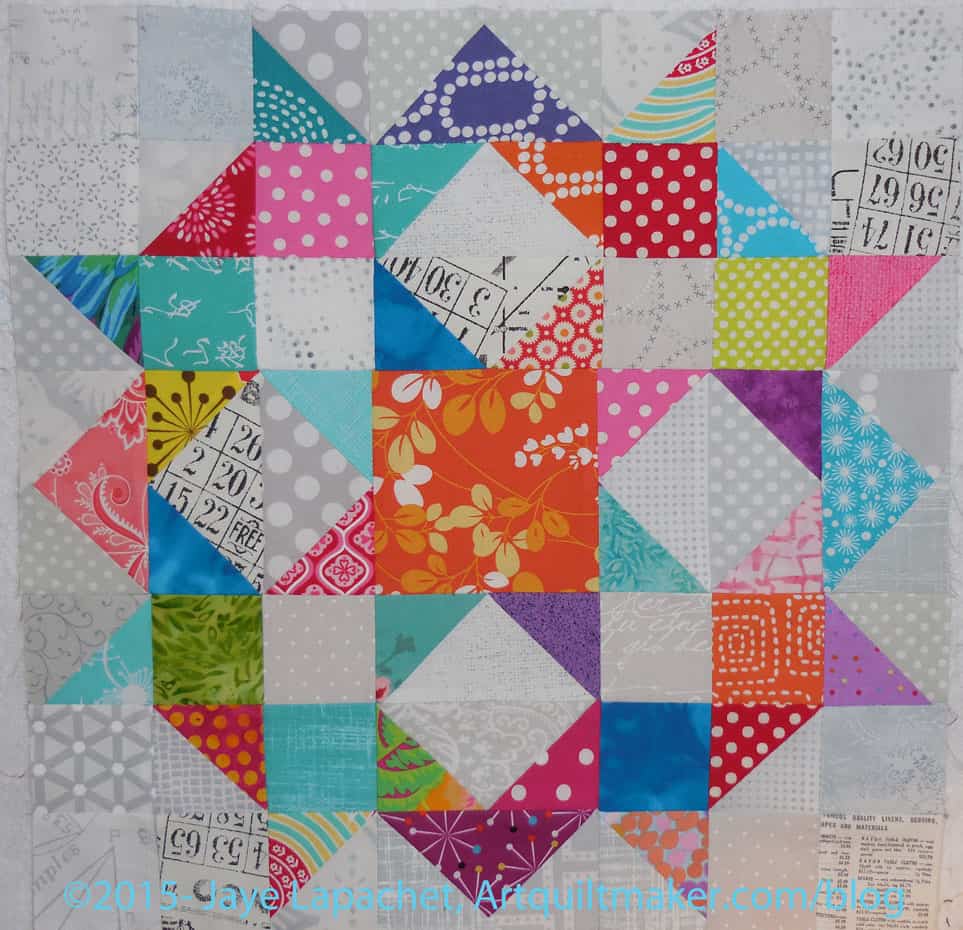
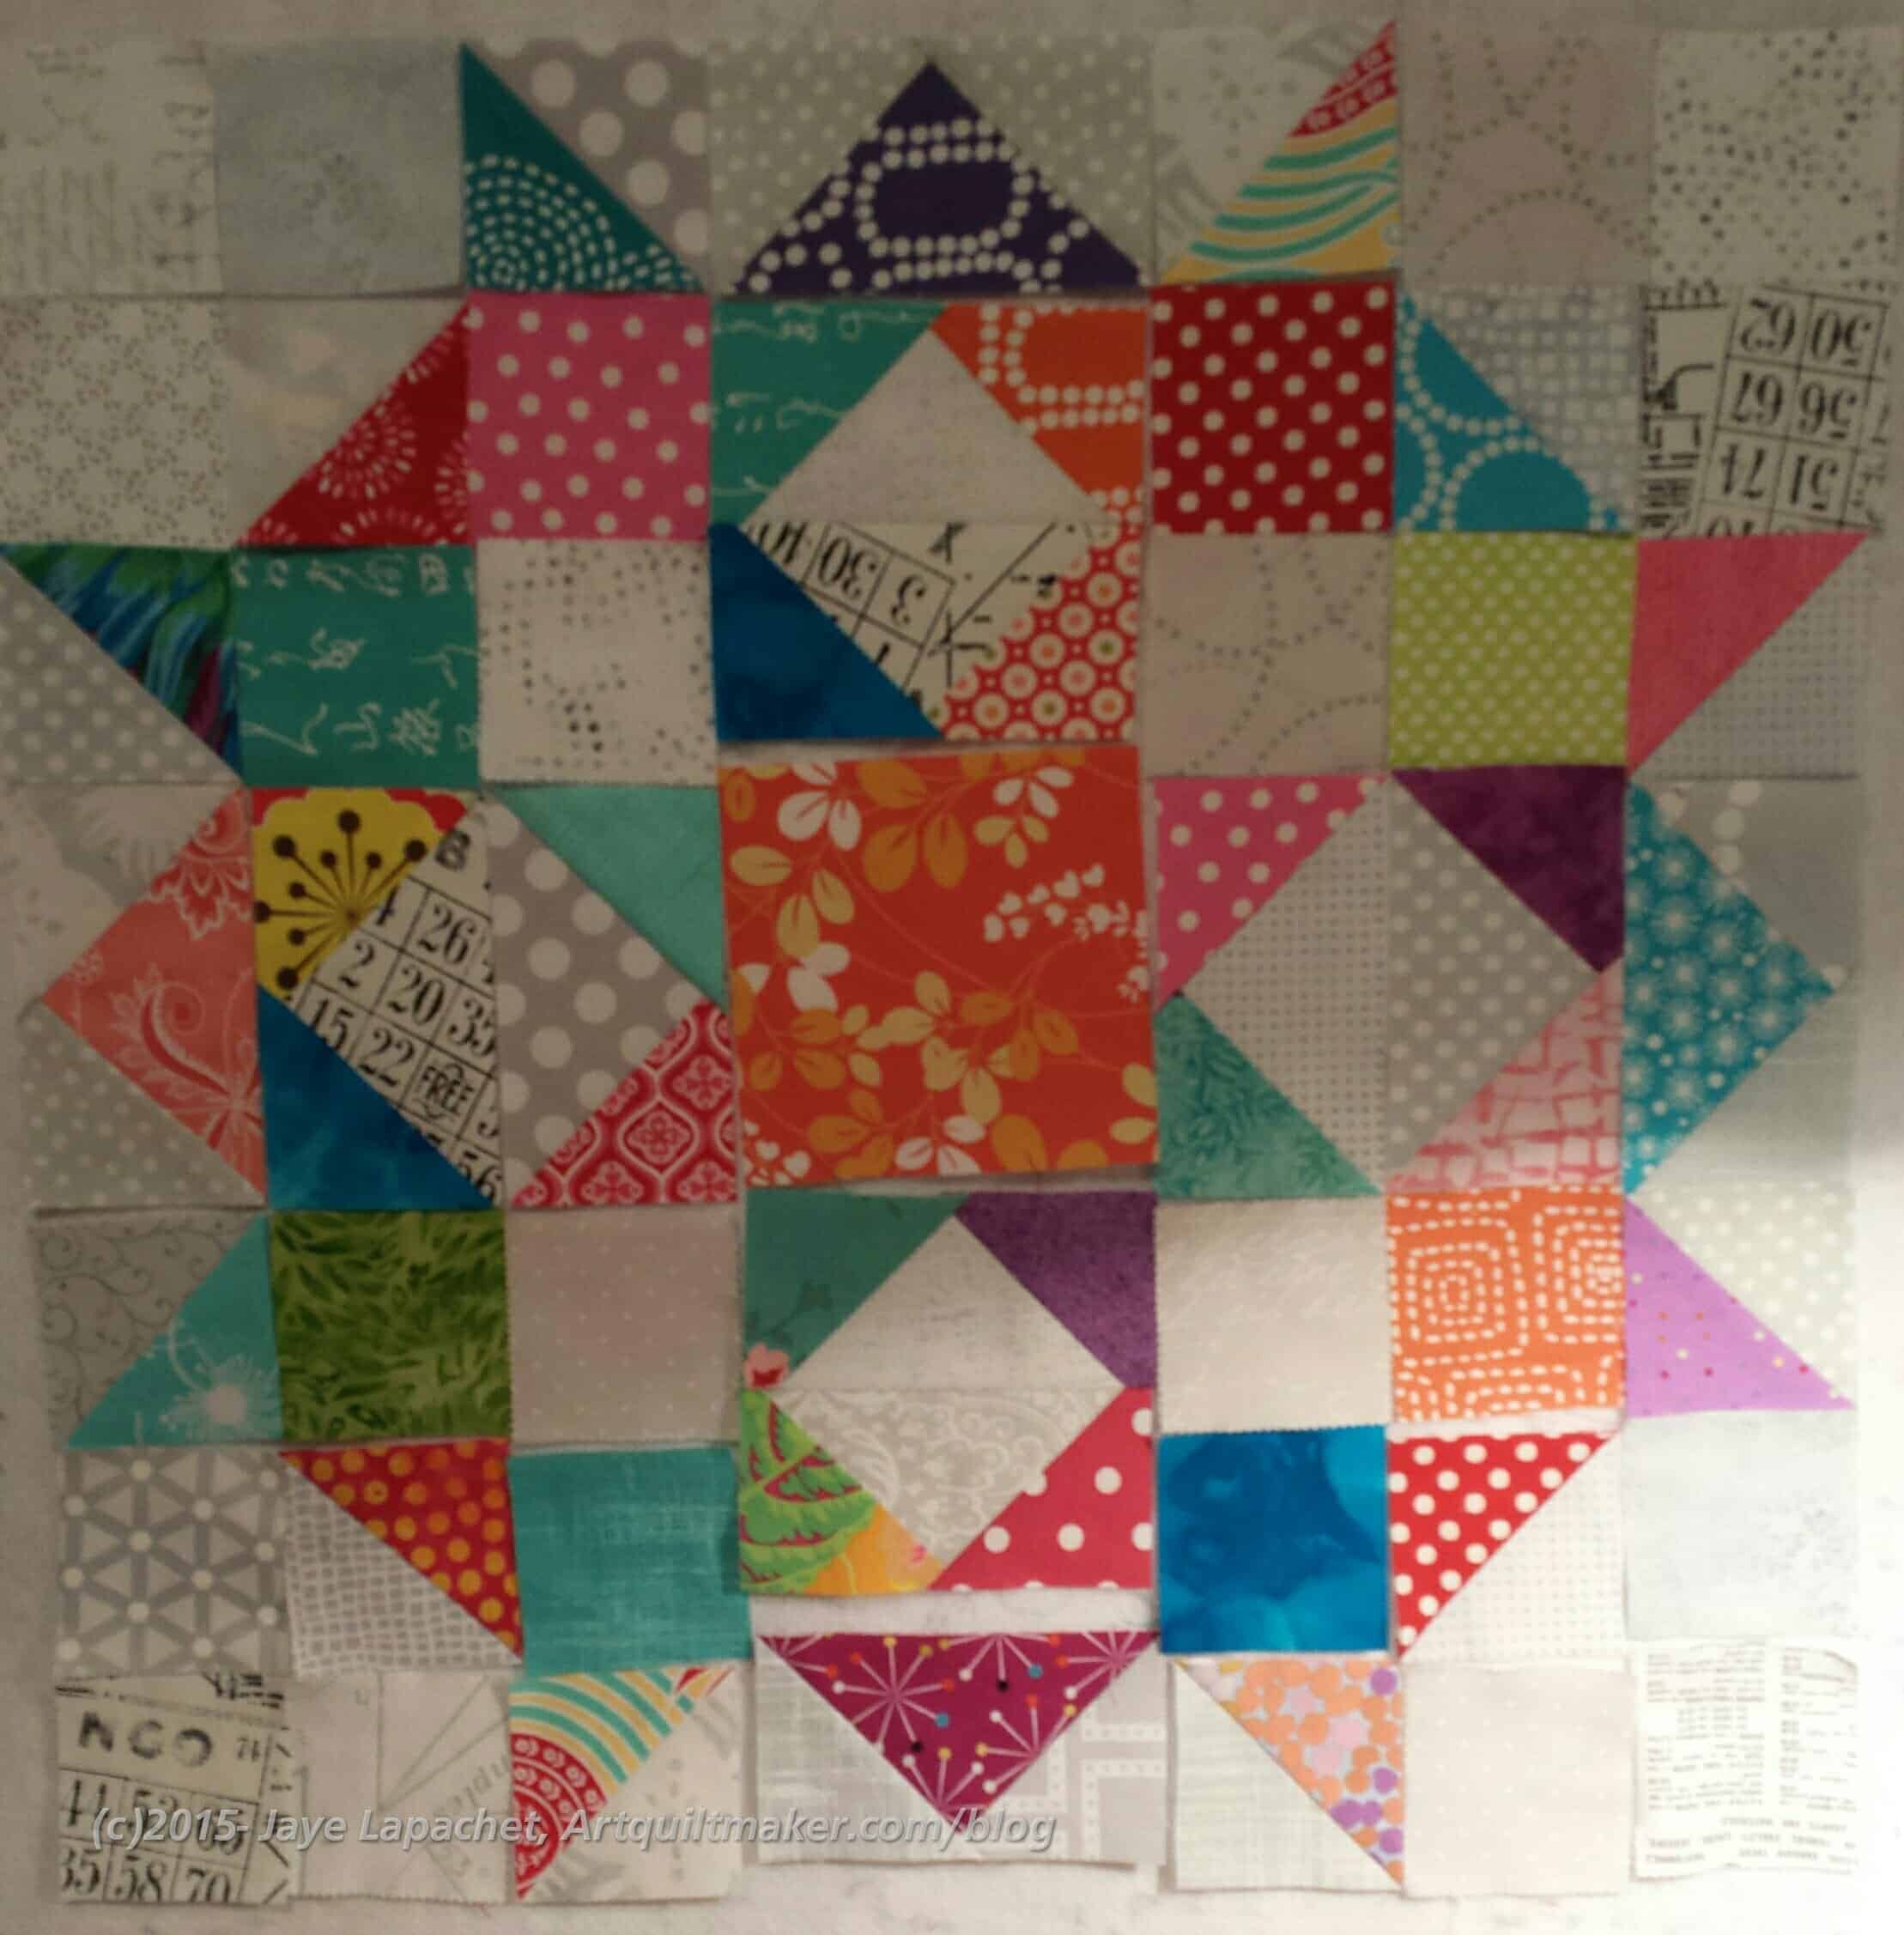
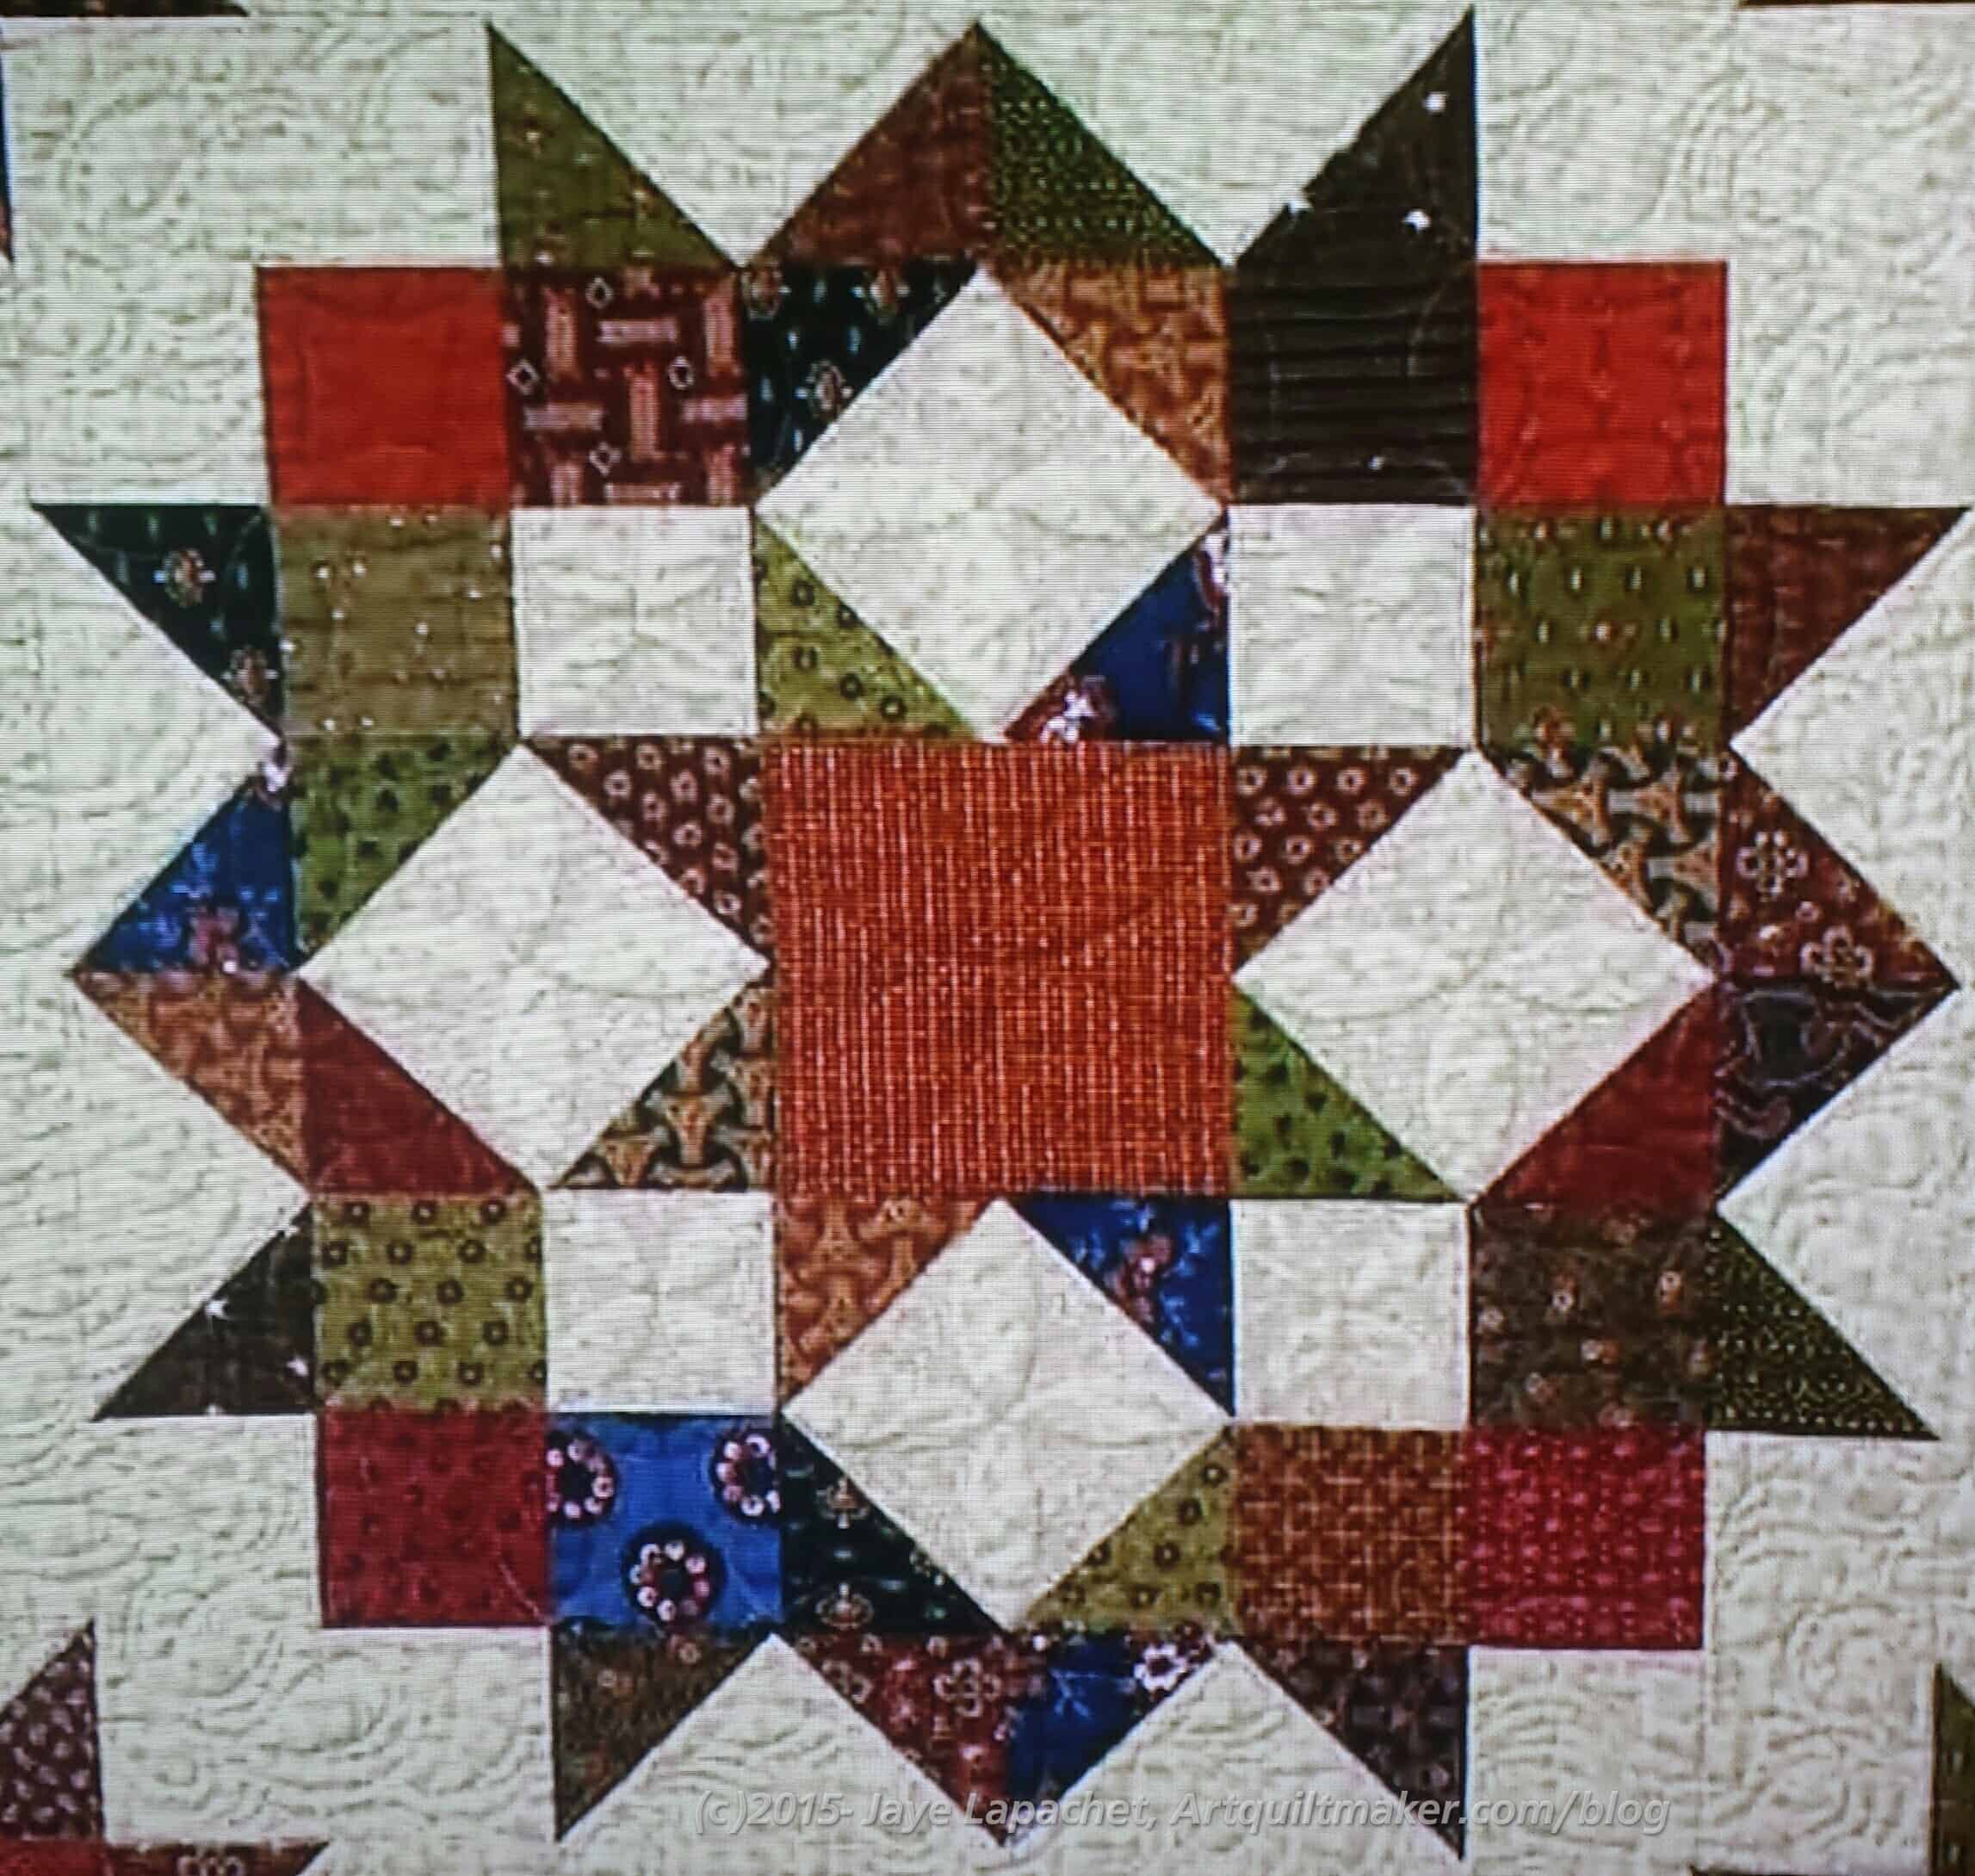
I was finally able to finish this pink (the center is pink so I think of it as the Pink Carpenter’s Wheel) Carpenter’s Wheel block. While I was working on the Sew Together Bags, I didn’t have a quarter inch foot on the machine, so I did barely any quilt work piecing. Very sad as that means very little gets done.
But the Sew Together Bags are done for the moment and I got quite a lot done over the weekend.
This one has more HSTs. I put some in the center, outside the Sawtooth Star, to try and get the look of a ring going. Not sure if I succeeded, thought I do like the look and the opportunity for additional color more HSTs provides.
I am still interested in the low volume background and am adding more of my own fabrics to the mini-charm packs I bought in Corvallis.
I cut and laid out another Carpenter’s Wheel block. I didn’t do it because I wanted an even number. I did it because I had another idea for a variation.
The Carpenter’s Wheel blocks were off visiting Kathleen in Reno when I started laying out the 5th version. Yes, I had another idea for a variation and decided to try it out. I was challenged by the center square. I got it in my head to use orange (forgetting that I had already made one with an orange center), thus had some fun trying out different oranges.
Carpenter’s Wheel with orange
I really thought that the tone-on-tone orange would be the perfect center for the 5th block. Somehow it didn’t work for me. I think the bold patterning of the other fabrics made the tone-on-tone look flat.
Carpenter’s Wheel with batik orange
I didn’t want a fabric that screamed because it is such a large piece compared to the other patches, so I tried this great orange batik. I thought it was probably the best of the lot, but there was something about it that didn’t quite work.
Carpenter’s Wheel with salmon-y orange
I picked out a more salmon-y orange, thinking more pink might work better. The pattern was better, but the pattern wasn’t bold enough to compete with all that was going on in the block and didn’t work.
Carpenter’s Wheel with stripey pink-orange fabric
I did think more pink was good, though, so I looked through my ‘oranges tending towards pink’ fabric to see if I could find anything. This was better. I almost went with it, but though it was a little light. You can see the block evolving as I move some of the other pieces or change them out as well.
Carpenter’s Wheel with pink stitch
I finally decided on a pink stitch design. I think it competes well with the other fabrics, but doesn’t overwhelm them.
I am working on stitching it down. As you might recall, these blocks have a lot of pieces, so it takes time. I also laid out another block and will need to pick out another center. Stay tuned.
I made major progress on this piece during the weekend before Thanksgiving. I have had a lot to talk about, so posts are getting backed up. For someone who hasn’t had much of a chance to sew recently, I seem to have a lot of content!
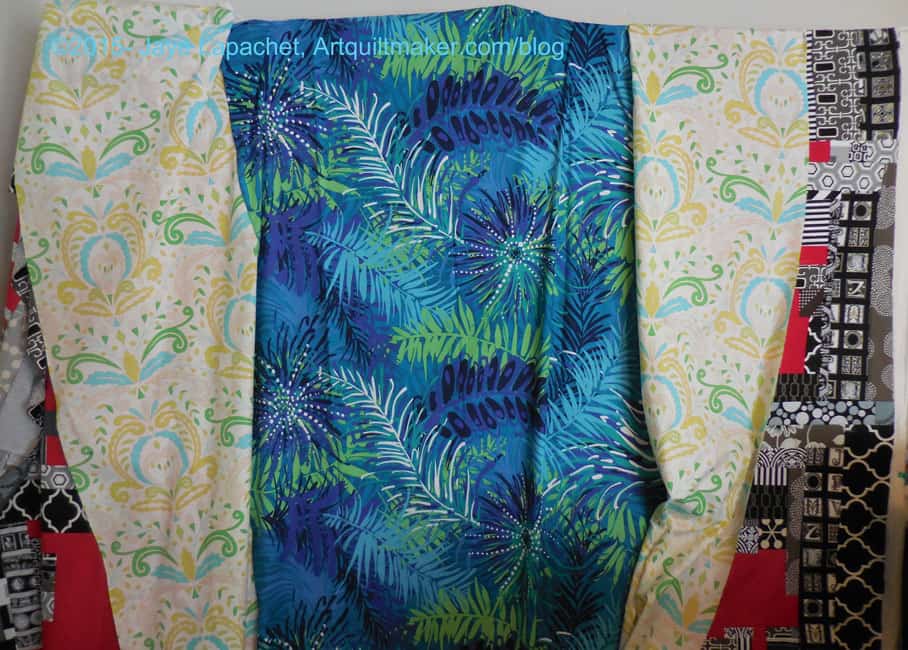
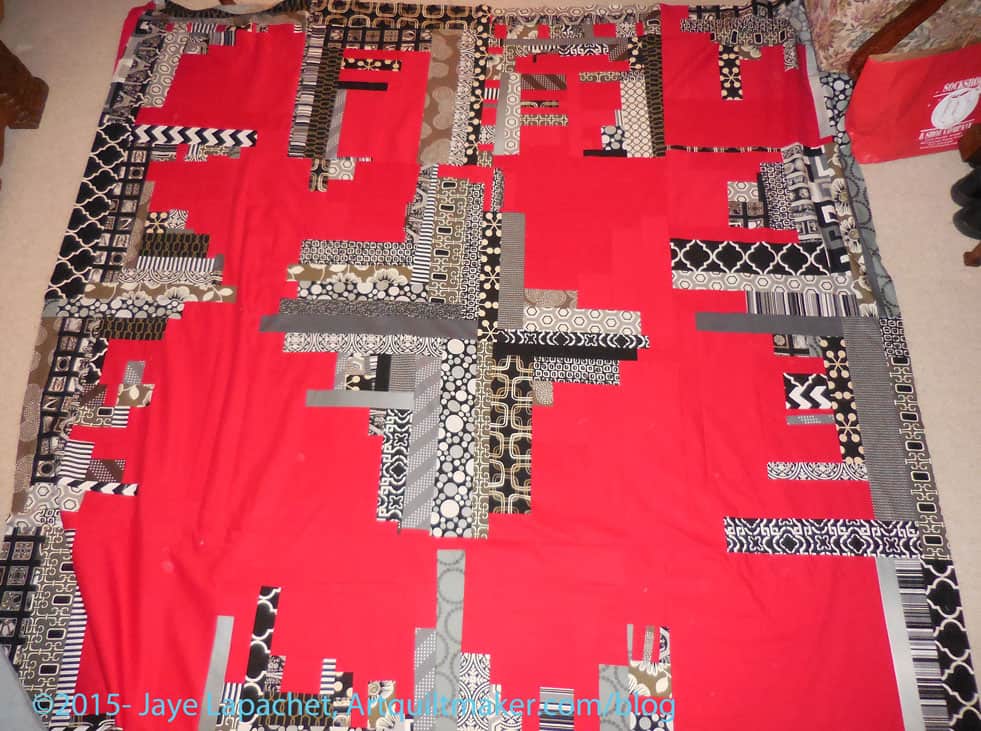
Potential Red & Black Improv Back
I walked around my workroom trying to get comfortable with the blue and green backing. I really tried hard to like it. I tried to convince myself that another color scheme would provide a different look and make a good addition to the piece.
No dice.
I had already cut one piece into two and I still couldn’t like what I saw. The blues just didn’t work with the red and black and I couldn’t do it. I admitted to myself that I wanted to save the large piece of red solid for another project and that cleared the way for progress. I found a piece of American Made Brands red solid on sale and bought it. That kind of freed me up to use the large piece of Kona red for the back, which is what I did.
I spent a whole Sunday piecing the back. I wanted to finish and it took me a long time. I did. I just need to make the binding and then I can take it to Colleen’s to be quilted. I like the way the whole piece came out, but I am glad to get it off my design wall.
The thing is huge and I need to take a photo of both sides outside, but that will have to wait for one of my quilt hangers to return from college.
The 4th Carpenter’s Wheel block sat on my wall for over week. I didn’t really have a lot of time in the past little while to sew, which is hard. I made an effort one evening to get the block done. I had pecked away it, so I didn’t have to sew all the pieces, but there were about 40 pieces to sew, so it was a bit of work.
I tried to add in some different fabrics from the others. I want this piece, whatever it turns out to be, very scrappy.
This block is 16.5″ and has, if I counted right, 77 pieces.
4 Carpenter’s Wheel Blocks
Making the 4th one means that I have reached my original goal. the problem is that I also thought of another variation. Sigh. We’ll see what happens.
I was kind of shocked to realize that the last time I devoted a post to this project was back in September. I did mention it last week and meant to write a full post. I was out of town for most of the week for work and it never happened.
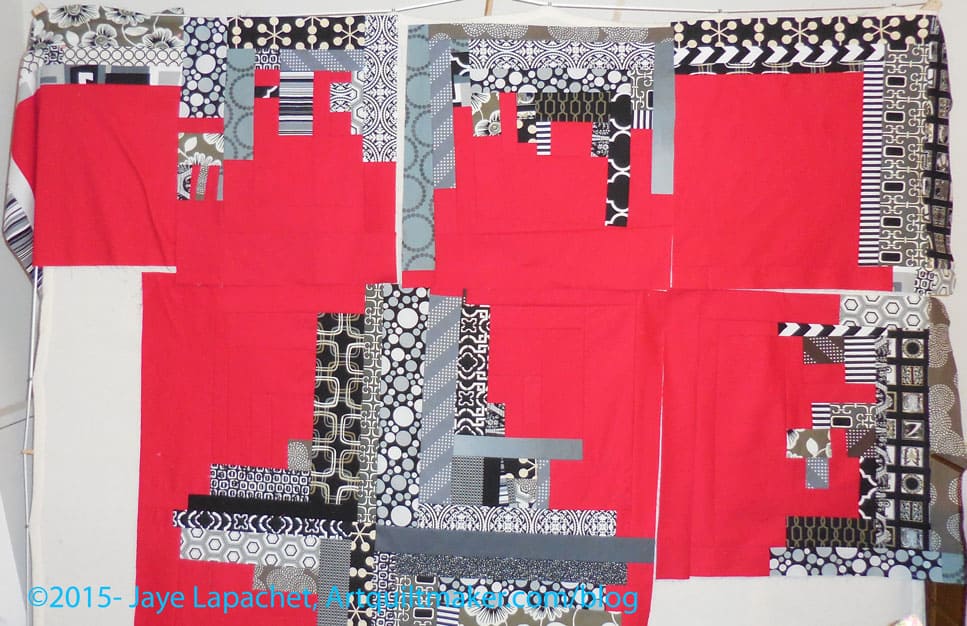
Red & Black Improv Top
On Saturday, I got back to the machine. I worked on this top, in between other projects. For the Improv top, I seem to be able to make progress on this project, but only while working simultaneously with other projects. For some reason this project does not inspire me to buckle down and work on it by itself.
I tried Improv again and it still doesn’t inspire me. I guess I like the technical precision of regular blocks. Does that make me boring? Perhaps.
Three blocks was the sum total of what I needed to finish to put this top together. The end was in sight! (Let’s not talk about back or binding at the moment). I finished one block completely on Saturday and made major progress on two more.
Sunday, I finished the blocks and then put all the blocks together into the top.
I started on the back, for which I am making different color choices just to give it a different feel. I am choosing some blues so that the back will have a different feel.
Yes. More donation blocks. They were part of my sewing work over the past two weekends. I am now out of cut background squares so I will need to cut more. I have some blue dottish on white fabric scraps leftover from the Star Sampler, which I might use. Since they are scraps, they won’t go far and will be a stopgap.
These are on the dull side. I cut up a bunch of foreground fabrics some time ago. I didn’t feel like I wanted to use those fabrics in a quilt and am working my way through them for donation blocks. Someone will like them, right?
I am not doing that again. I decided that if I have fabric I don’t want to use, I’ll just donate it rather than using it like this. It isn’t enjoyable and I want to infuse these donation blocks good energy so that is my plan.
I really tried to recapture the sewing mojo I talked about last week. I didn’t quite feel that adrenaline rush of excitement this past weekend, but I did get a lot done.
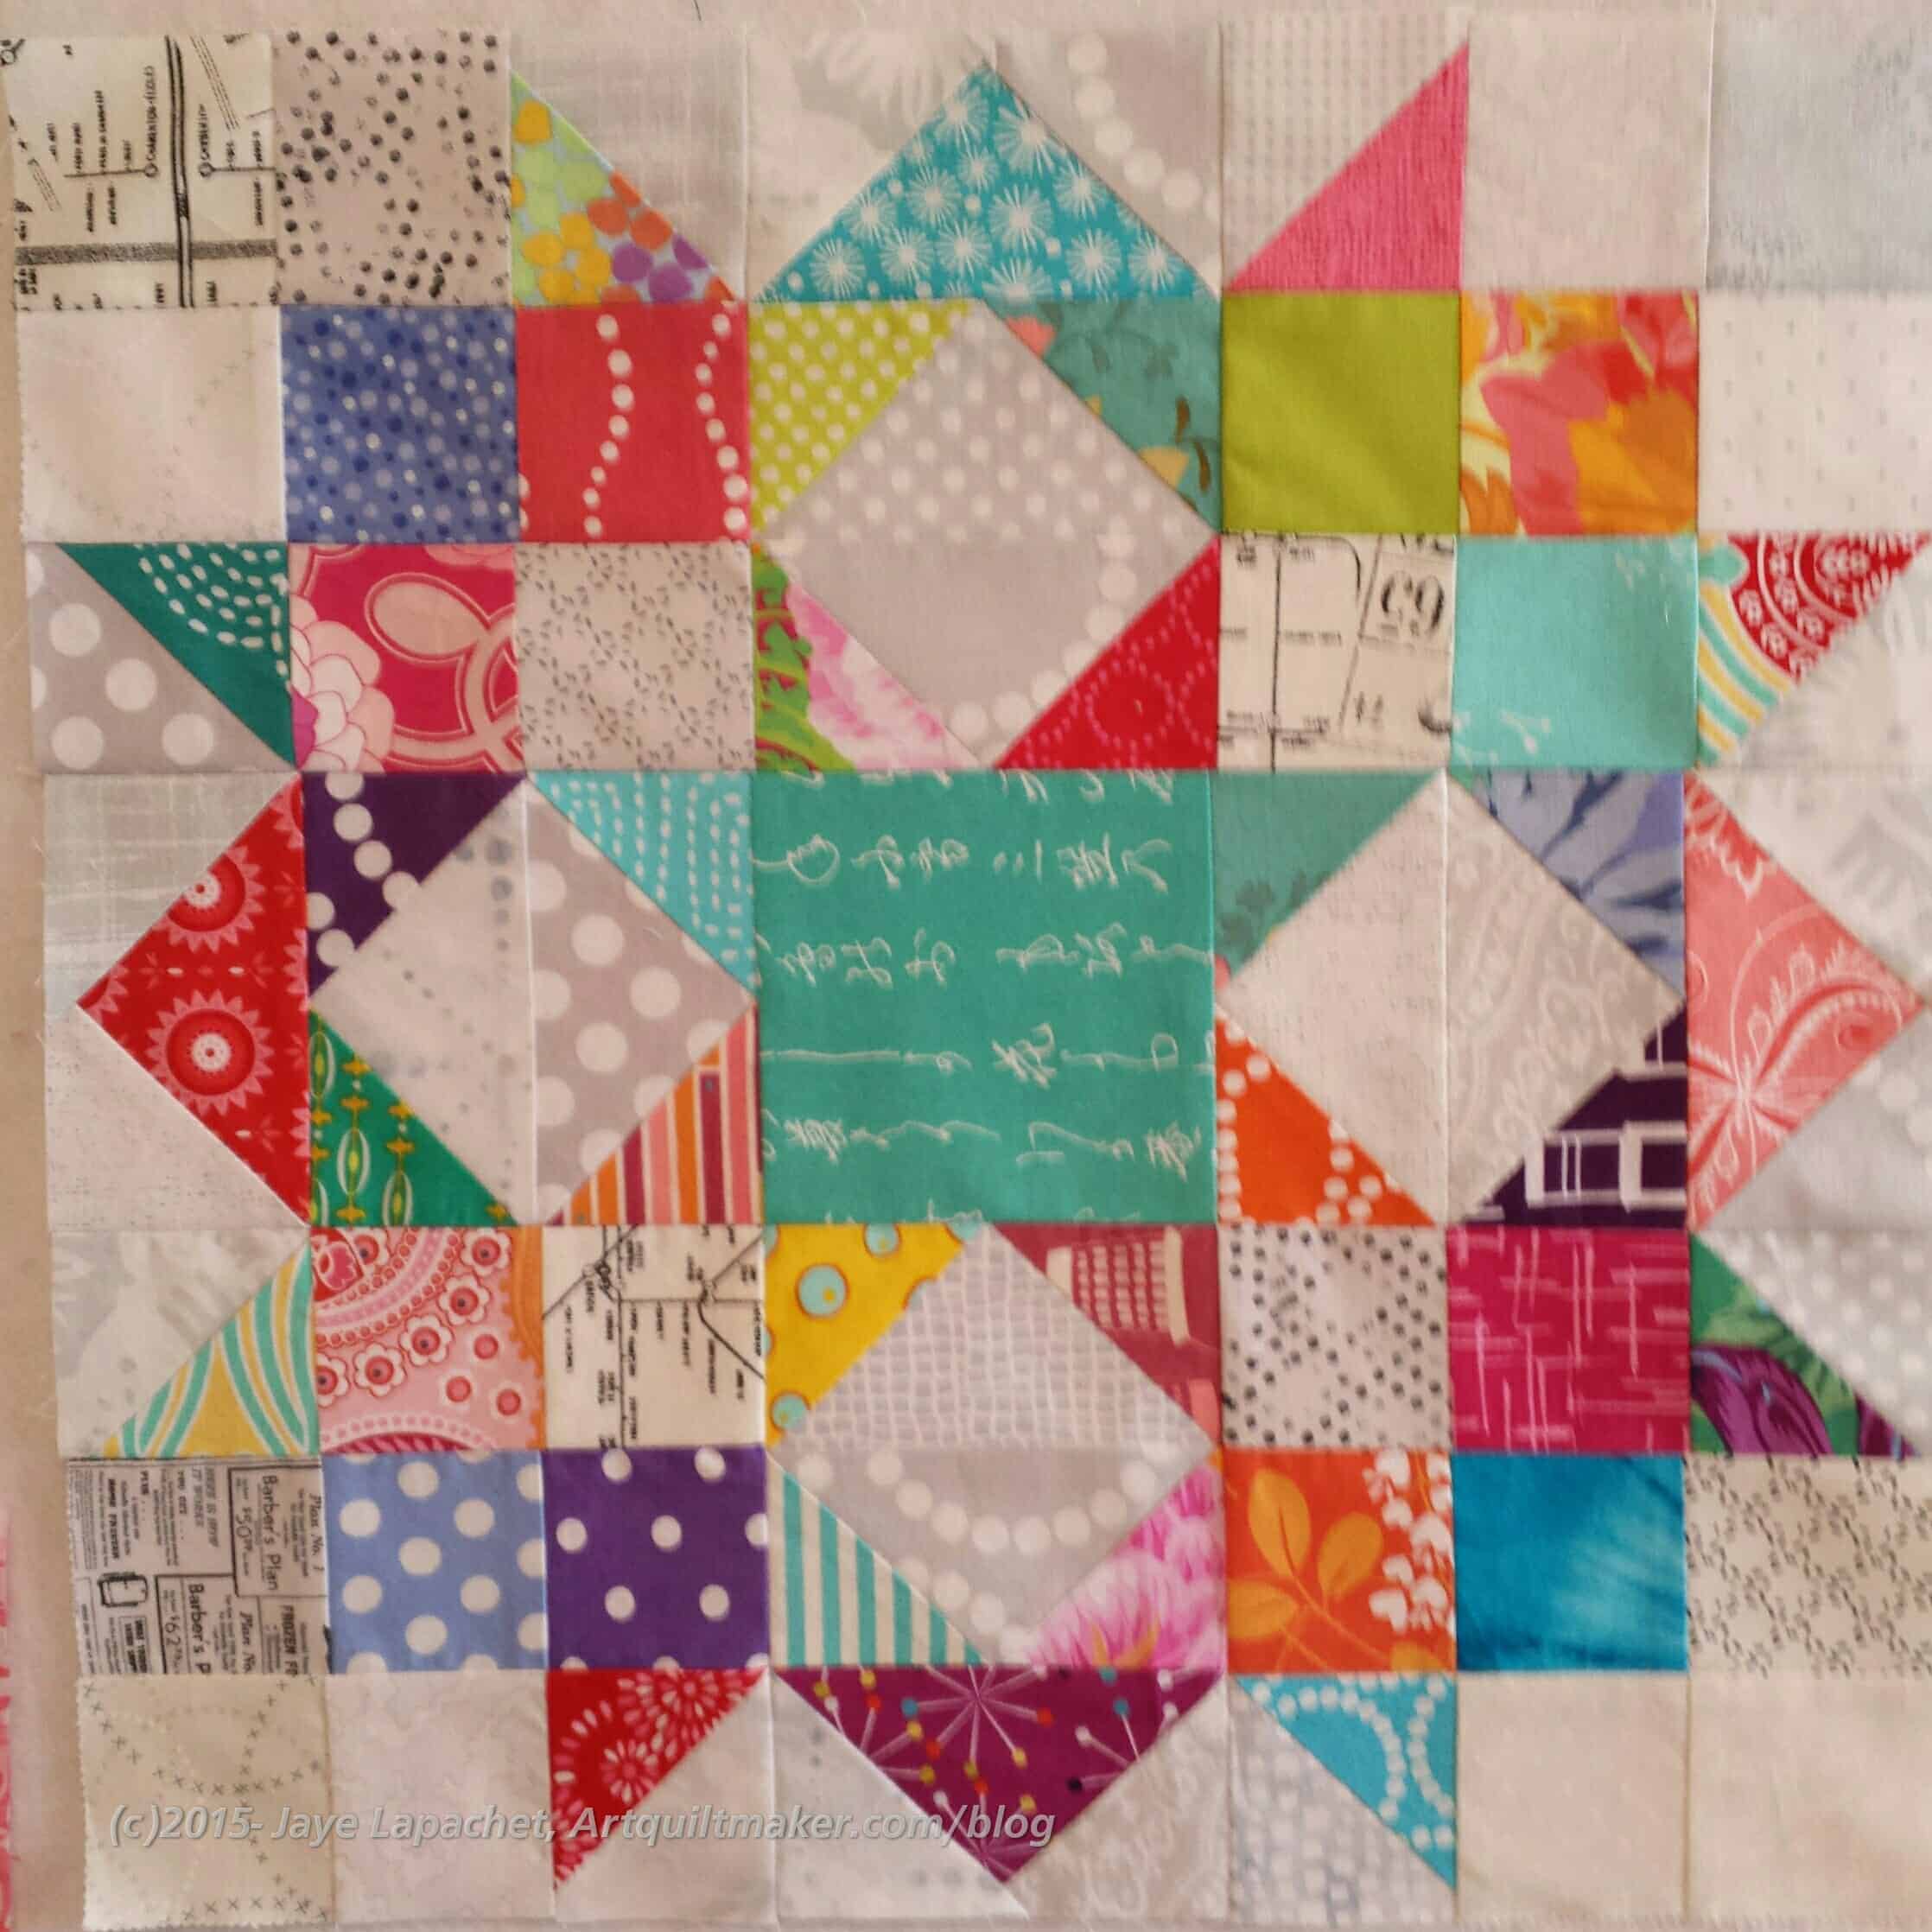
Carpenter’s Wheel #3
I finished the Carpenter’s Wheel block that was named #2.5, but is really #3. I called it 2.5 last week to denote its unfinished state.
I was really lackadaisical at the beginning of the day about working on it. I think I didn’t want to get confused by leaving pieces and parts in the machine by using this block as leaders and enders. I worked hard at placing the fabrics, so I wanted to make sure I didn’t get get confused about where each patch belonged. Towards the end of the day, I set a goal to finish that block and did.
The cherry on the sundae was that I also laid out the last variation I imagined.
I might make a four block quilt, but I don’t know. I don’t want to commit to a full quilt with these blocks, but I may get inspired. I am loving the low volume background. It really adds interest to the blocks without making the background too busy.
I worked last Saturday on Carpenter’s Wheel blocks and some other stuff, which you heard about over the weekend. I am really having fun playing with the Carpenter’s Wheel blocks. So much fun was making me feel guilty about the other projects. In the course of resolving that problem, I made good progress on my variations on Deb Tucker’s Carpenter’s Wheel blocks as I mentioned a week or so ago.
#2 is made the way Deb Tucker showed on the Fons & Porter episode. Note that this one has the extra half square triangles along the outside of the block next to the Flying Geese. This definitely gives the piece a different look
Carpenter’s Wheel #3 – in process
I was able to finish #2 and cut everything for #3, but not get get much sewing done on it. I thought of the #3 variation as I added some HSTs to #2. This variation has HSTs as part of the ‘wheel on the inner row of patches. I hope that the HSTs in the corners will make the piece look more round.
In do this variation I thought of another variation, which I will also try.
I also opened my second pack of Modern Backgrounds – Paper by Zen Chic, which I bought in Corvallis. I don’t love all the prints in this pack, but most of them will work for me. The ones that don’t work are ending up in donation blocks, which I also worked on in between the Improv quilt and this project.
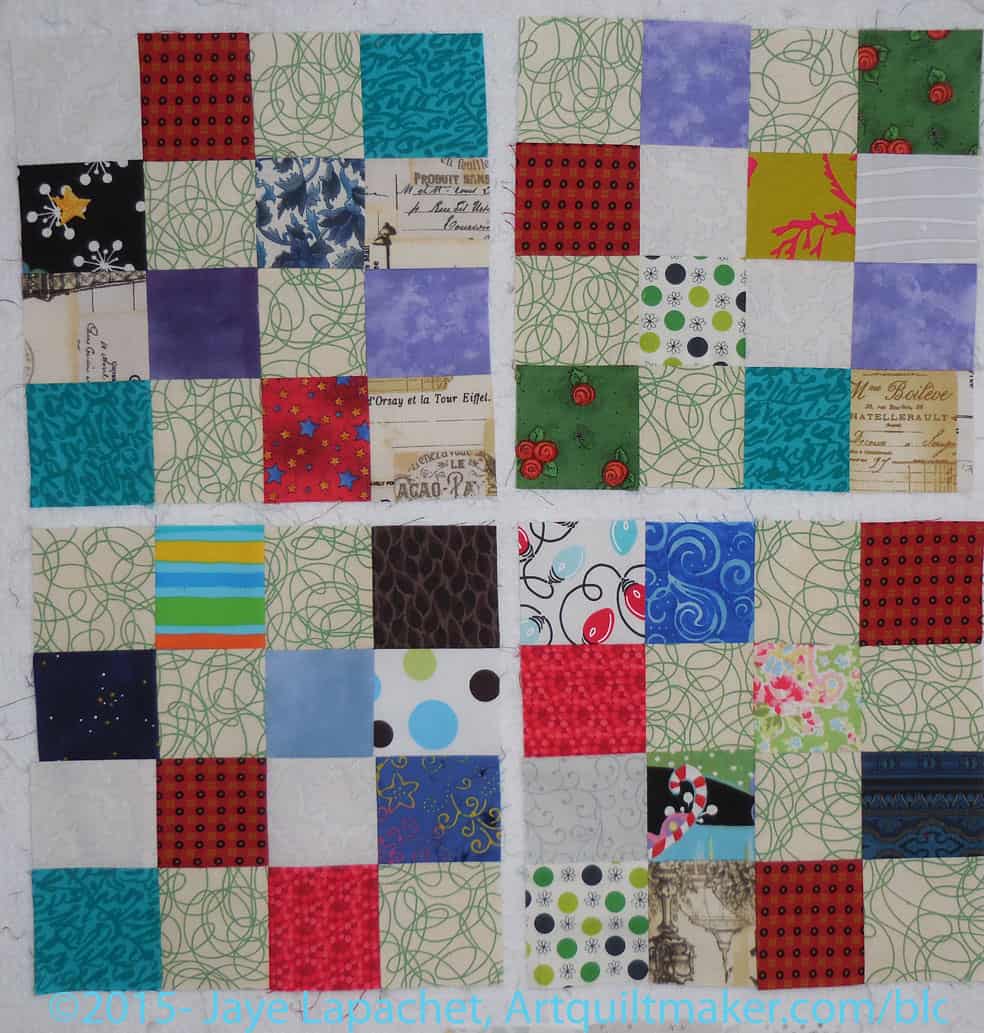
My last batch will make a cohesive quilt. This group less so. I had one leftover from the previous batch. When I returned home from the meeting on Saturday, I decided to cut up some cream and green squares for a background and make more donation blocks.
I pulled out a small bin of 2.5″ squares that I cut up for donation quilts a thousand years ago and began using those to make more squares. There is a lot of blue.
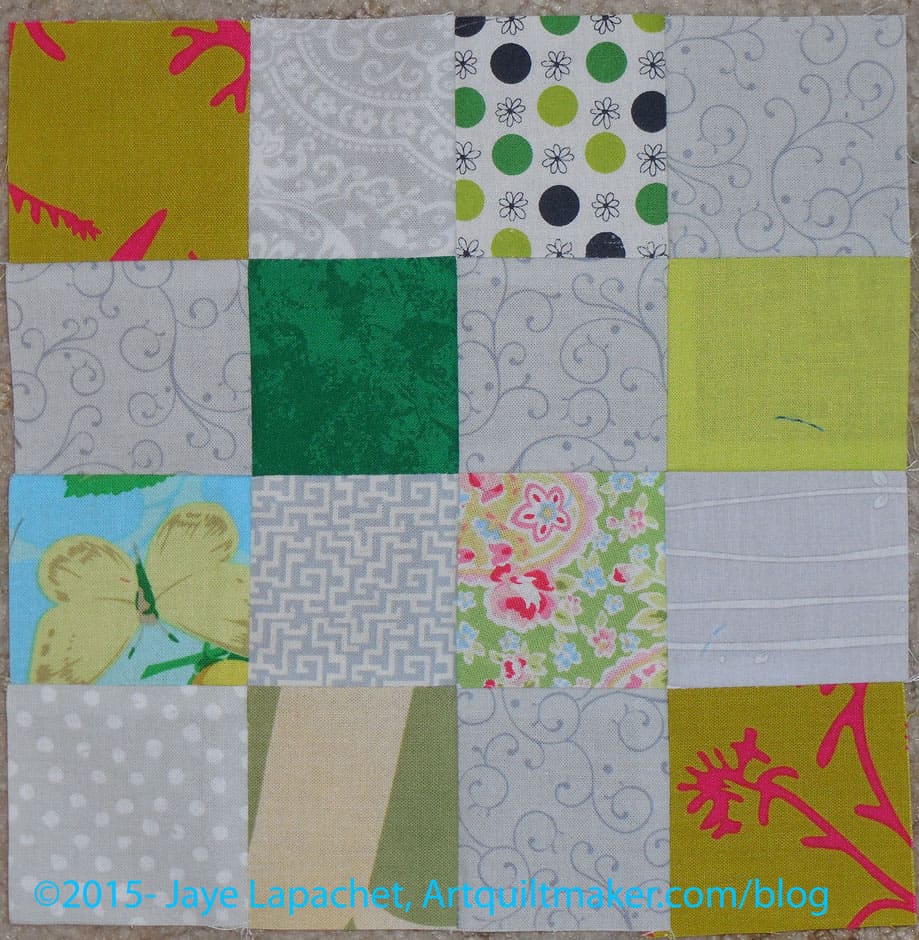
Last Lone Green & Grey Donation Block
The blocks are interesting. They aren’t as cohesive, as I said, but they make an interesting group of blocks. I don’t know that they will all be put together in the same group.
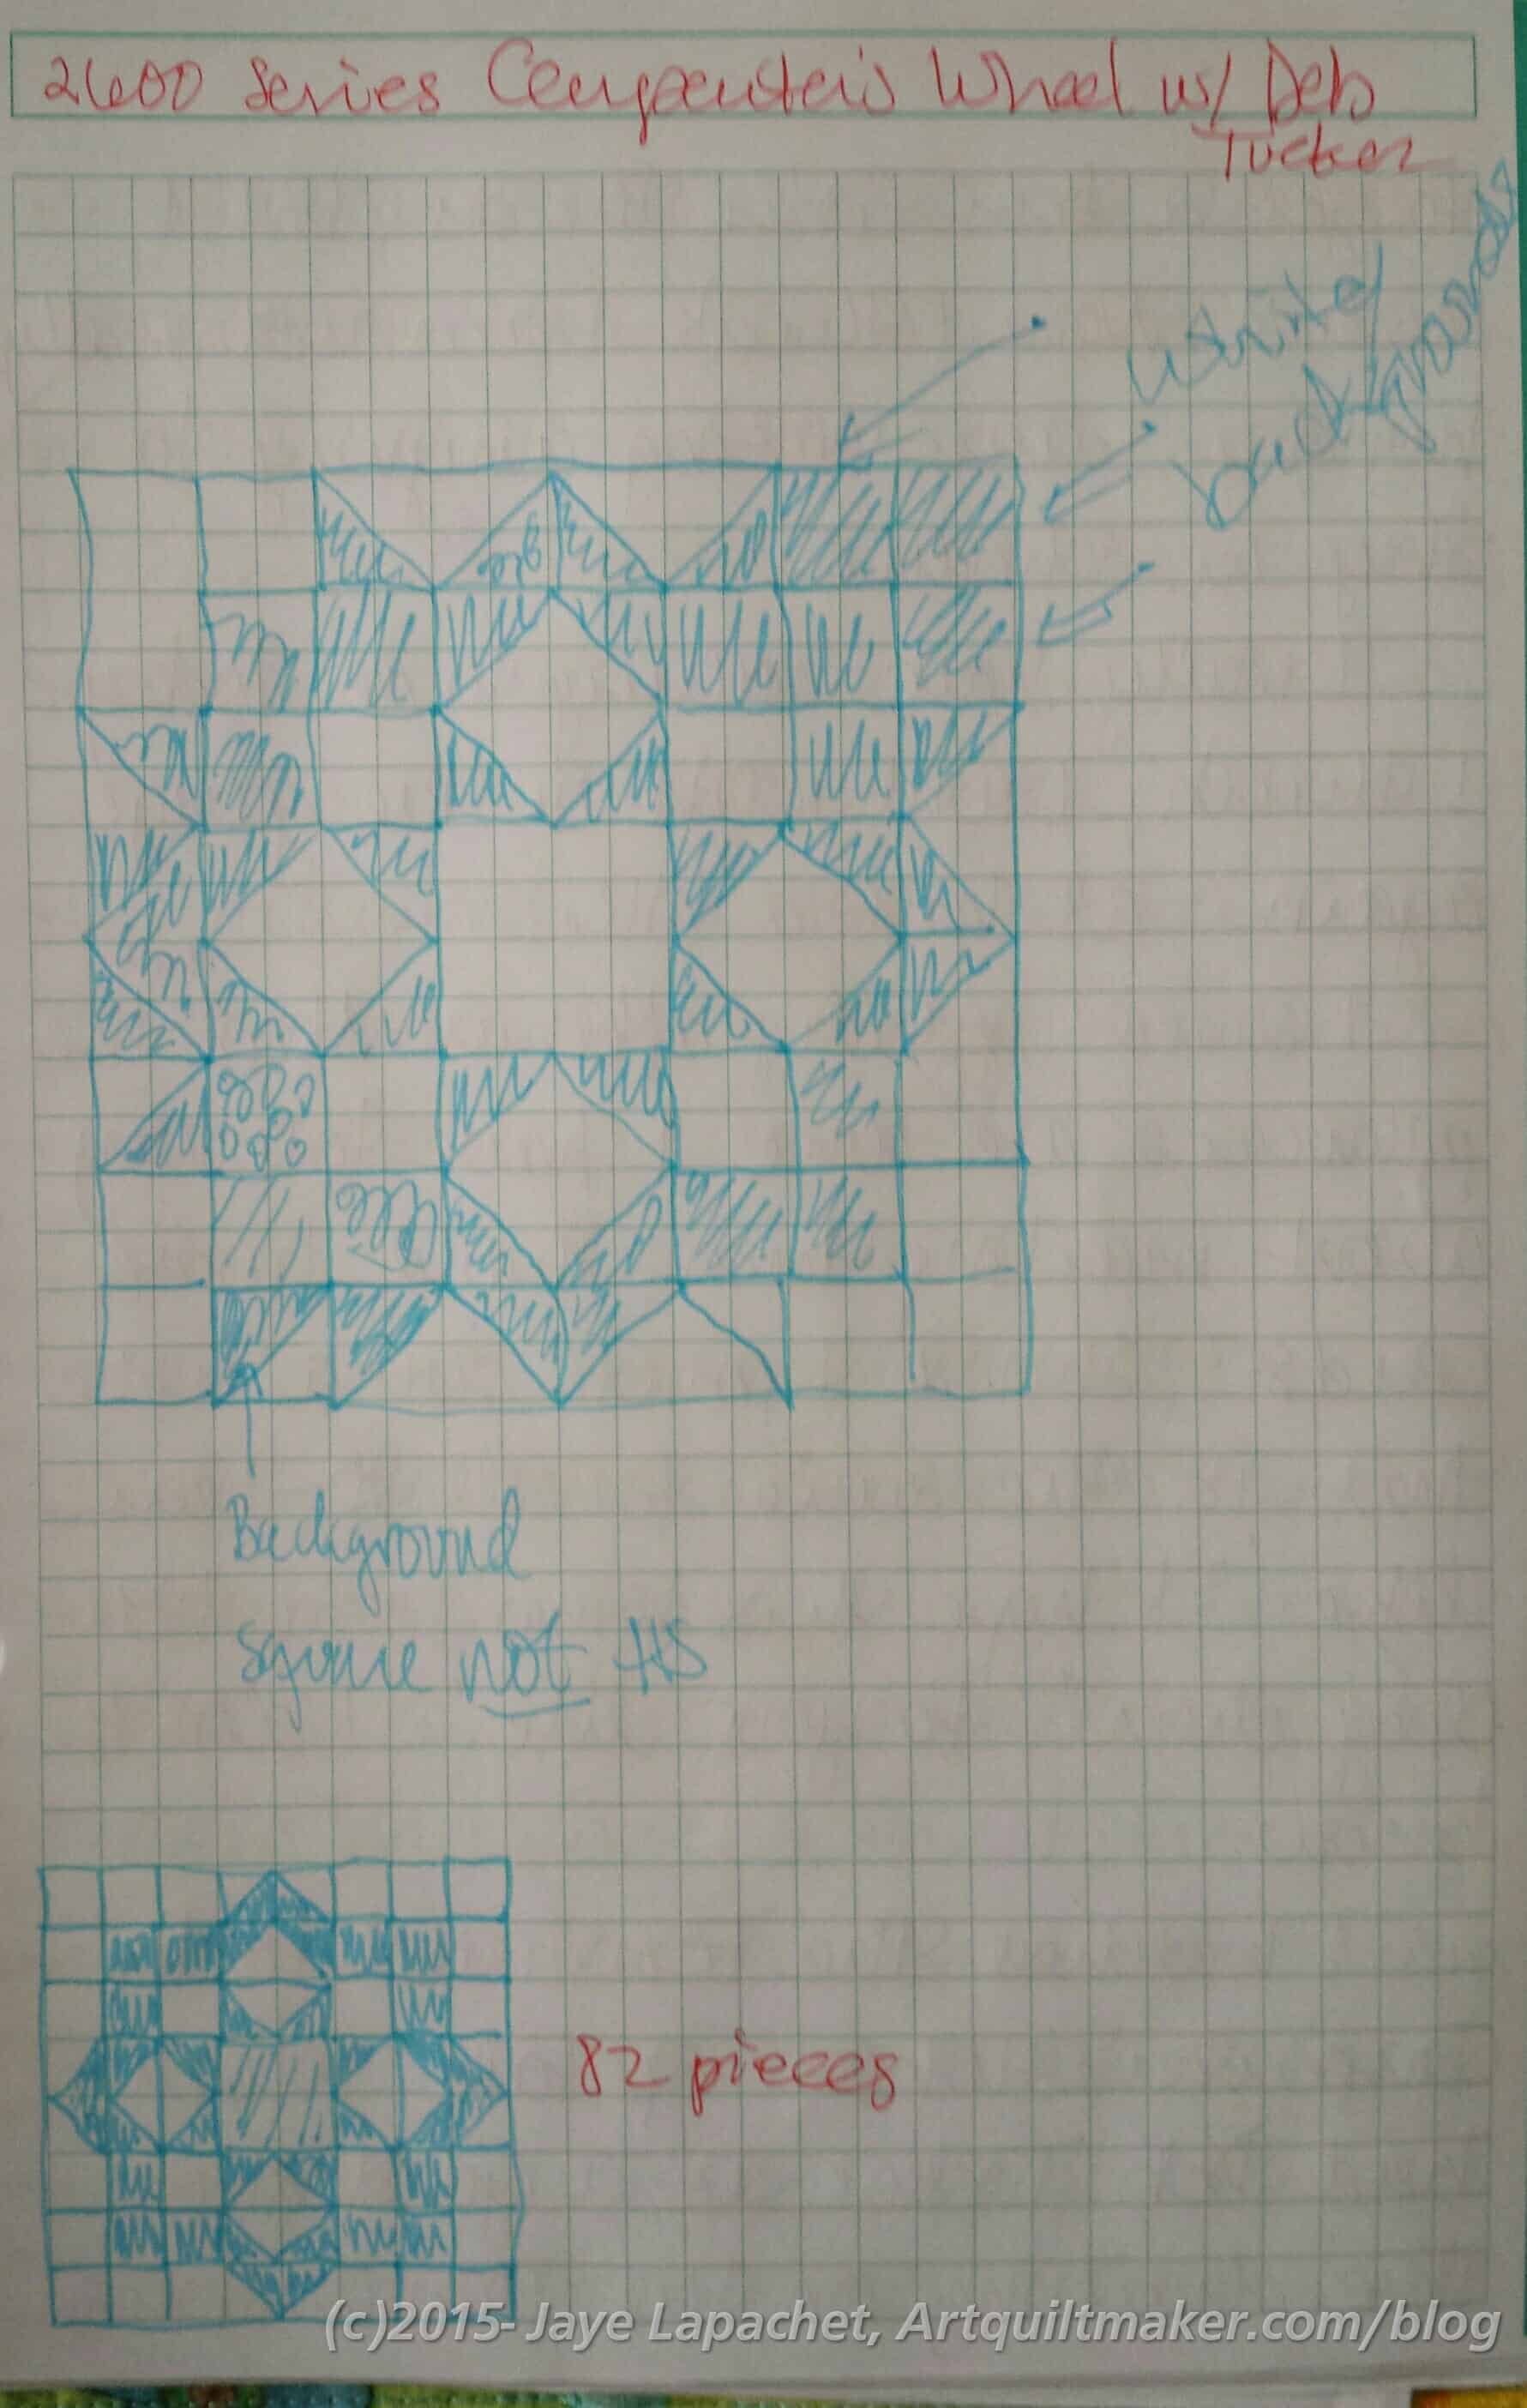
The other day I watched a Fons & Porter episode that had been saved on my Tivo. Deb Tucker was the guest and she was making the Carpenter’s Wheel block (quilt project is called Country Fair). She has updated the pattern to make quicker work of the piecing. I stopped the recording and gathered up pen and paper, drawing out the design as the show went on. I do that sometimes as much for the opportunity to draw as to remember a pattern I might want to make. I think the stars and lots of pieces made this block catch my attention.
The top drawing has a lot of mistakes, so I made the bottom drawing as the final, even though it is much smaller.
I really like Deb Tucker. She is smart, sensible, confident, excited about quiltmaking and doesn’t simper. I have her Flying Geese ruler and like the way it works. I haven’t watched any, but she has a lot of videos on her website. I may have to go watch a few. TQS has a recent episode with her that I’ll have to watch as well.
On the show, they use a ruler called the Square2 ruler, which Deb Tucker designed. They use it to make the Diamond Square units. I didn’t really want to buy the ruler before I could make the block*. I really just wanted to see what the block was about, thus the drawings.
Deb Tucker’s Carpenter’s Wheel on Fons & Porter
I also took a photo of the block off of the TV. I didn’t think it would come out as well as it did. It is a good reference and they don’t have a good photo on the F&P website.
I am not a really big fan of the fabrics used, The look of the piecing offered enough interest for me to soldier on and fabrics are easy to change.
If you look at the block and break it down, it is not that difficult. There are squares, HSTs and Flying Geese. Change that Diamond square unit into two Flying Geese and there is absolutely no scariness.
It occurred to me that I could make one block and have it be part of the low volume challenge at BAMQG. I could make the one block into a cushion cover or something. I decided to try out one block. Not sure what, but something grabbed me and I wanted to make this block. Not a quilt. One block.
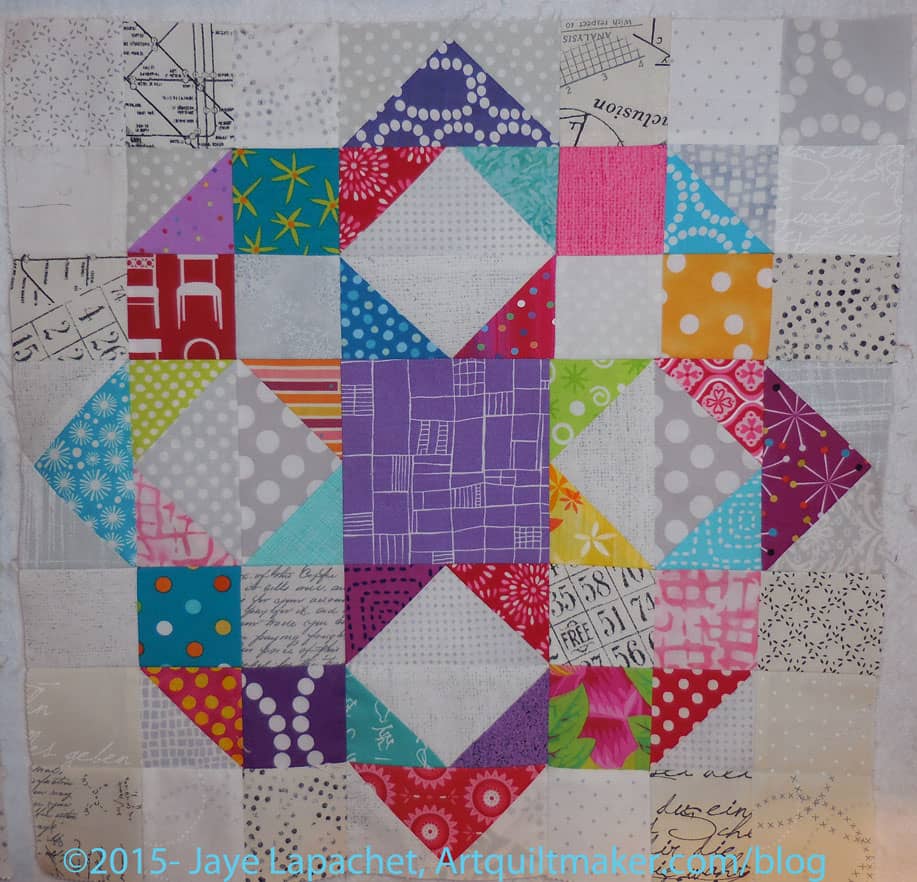
By my estimation it had 82 pieces and, once sewed, turned into about a 16″ block when finished. I decided to use the low volume mini-charm packs I bought at Quiltwork Patches in Corvallis, Oregon. I got a pang of fear and that fearful voice in my head started whispering “what if you need them for something else??” I ignored the voice, opened the packet and began to lay out the block.
There is JOY is using something right away or nearly right away. I am not sure there is joy in saving things for later. I’ll have to think about that and report back later.
My “Carpenter’s Wheel”
On Saturday, I made it. I reveled in the the piecing. I ended up making a version of what I saw and drew. I forgot some HSTs.
As I said, there are a lot of pieces in this block and, thus, there was a lot of cutting I had to do. I used some of the 2.5″ squares I have been cutting for the Goodnight, Irene pattern I plan on making, but haven’t started. There is always more fabric to cut, right? I used the opportunity of using the Flying Geese units instead of Diamond Square units to mix up the fabrics even further.
So, it is a version. I like it, but I forgot those HSTs. I am not bothered by my mistake as I like what came out. I like the cheerfulness and the scrappiness. I just want to see the block as Deb Tucker made it, but in my fabrics with the low volume background. That means I am making another. Just one more block. Perhaps another cushion cover?
A couple of worries: do I have the low volume concept down? Is it ok to have a low volume background and a bright and cheerful foreground?
and
The mini-charms aren’t washed. I didn’t smell anything when I pressed the parts as I made the block, which was good. I don’t have a rash, which was also good.
*It looks like Deb Tucker will have a booth at PIQF, so I’ll have a chance to check out the ruler sometime at the show.
Saturday and Sunday, when I wasn’t working on Michelle’s IRR piece, I was working on the Improv Quilt. I know both are Improv projects.
Improv Progress, September 2015
The last time I made any progress on this piece was over a month ago. That progress felt forced and unsatisfying even though I didn’t know it at the time. I had the piece up on my design, which meant I had to look at it and that frustrated me. Frustrated me, because I wasn’t happy with the work as well as frustrated because it was taking up my design wall. I need to learn to make smaller quilts.
This weekend’s progress felt good. It was fast and intuitive and right. The piece is starting to look like something I won’t hate looking at.
I am not sure the blocks will end up where they are placed now, but there is a good bet some will stay where they are.
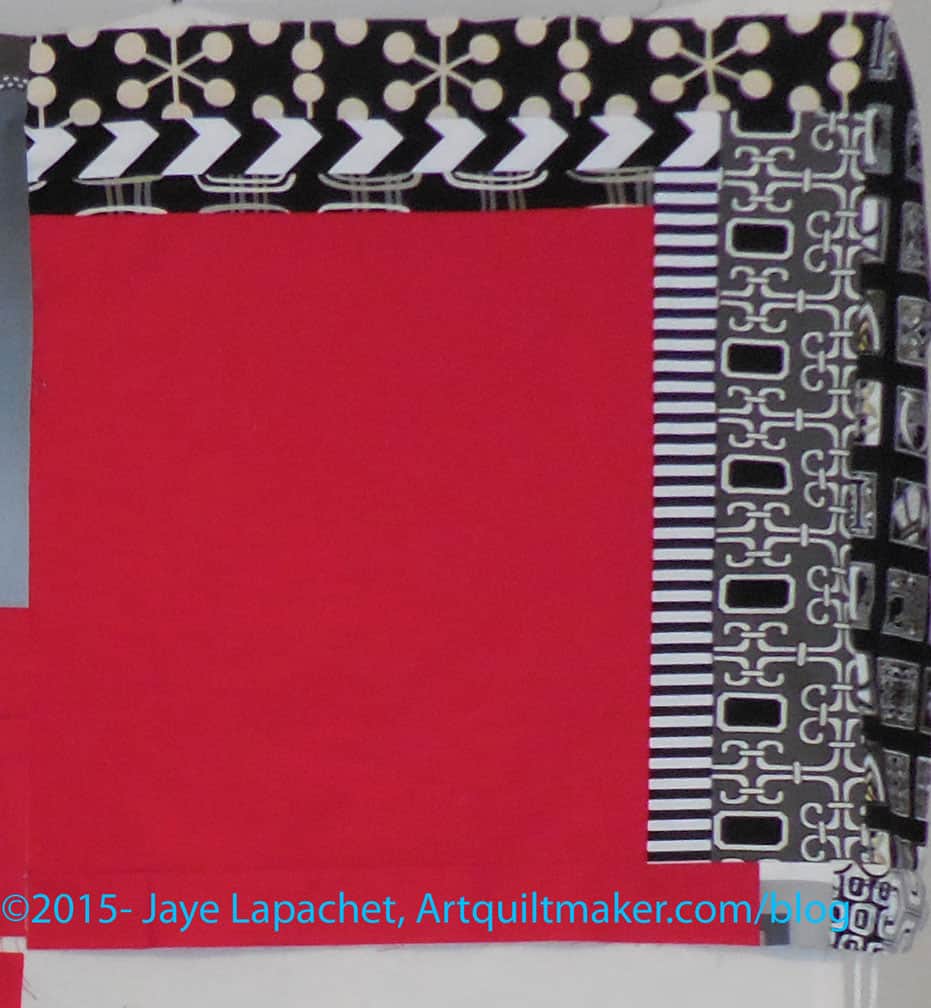
Improv Corner Block
One thing that happened to jolt me ahead in the process was that I laid in bed one night, trying to get to sleep. I spent the time thinking about this piece and made a plan. I decided I would cut a big piece of red to use as a start to make some corner blocks.
I wasn’t completely on board with making ‘B’ blocks for the corners, so I made corner blocks, which are similar to the ‘A’ blocks. I did what I thought would look good. I can always make something different, right?
I like the corner block shown at left, but I wish I had varied the length of the neutral strips more. I did a bit, but not enough. It will be fine once the rest of the quilt is done and I am not going to worry about it right now. I do reserve the right to change it if the design needs it later.
New ‘B’ Blocks
I did sort of learn from this block and the first two ‘B’ blocks. I didn’t want all the ‘B’ blocks to be heavy, so I varied the length of the strips to give them less weight — or less perceived weight. I also made the centers a bit more interesting. I want people to be interested in looking at the piece.
I have about 7 more blocks to make on this monster. I have some slim hope I can finish it by next week and take it to be quilted. I am laughing, but you can stop. 😉 I know it is a pipe dream, but I would like to move this project along.


")


")