All of the pinks in the Pink Donation Quilt have a square in the piece on the left. There are a few from some fabrics I bought in the last little while. I also have some patches from the Art Gallery scraps I received.
I have to admit that I arranged the scraps a bit so they look good in the photos I post for you. Look for these patches in the final piece.
Many of the fabrics in this group are from the back of the Flowering Snowball. I am also diligently pressing and cutting pieces from fabrics that have been washed. The chair on which I hang just washed fabric is no longer falling over. That is a good thing.
There is some Half Moon fabric there, which I need to figure out how to work into a project. No ideas there yet. I have to say that I really came to like that large grey dot and ended up buying a few yards more to use as a background. This, dear readers, is why I do this project. By working with the fabric a little bit, I find out if I like it during a time where I have a chance to get more. I know I am repeating myself, but perhaps one reader will be enlightened. 😉
Fabrics from the most recent A-B-C Challenge blocks are also represented as are fabrics from the NSGW pillows. Kind of like a fabric diary of my recent work, huh?
So cutting for the Fabric of the Year 2012 quilt continues. As I have said, I am really enjoying cutting up patches for this quilt. As you can see, I seem to be doing a lot of cutting.
I am cutting for other things as well, which is what I call the Hunting and Gathering stage. For scrappy quilts, it is better to cut for a long time and save up the patches until you have enough to make the size of quilt you want. I am doing that for a couple of someday projects.
The pieces for this project seem to be multiplying by leaps and bounds. It doesn’t seem like I am working with so many fabrics, but I am sewing relatively fast, so, perhaps, I am.
More Late April Pieces
I am trying a new technique for pressing fabric. In between other pressing tasks, I am pressing the fabric I have washed recently. It means a steady stream of cutting and new fabrics to play with. In the second group (left), I was a little dot heavy. 😉
I was also trying to fussy cut bits from the larger floral patterned fabrics. There are also a group of solids for the QuiltCon challenge. I can’t decide whether or not to include a print in that project, so I have started with the solids and we’ll see how it goes.
This week’s patches are from the batches I have washed recently. I have been trying to press a few yards as a warm up for my quiltmaking sessions. Trying to do that means that I am making progress on the ironing and cutting.
I was afraid that I just wouldn’t get to the washing and cutting and ironing this year. I know people say that they get so much fabric that they can’t wash it all before they use it anymore. I can’t imagine using a lot of fabric I haven’t washed. The unwashed fabric stinks so when I press it.
As I mentioned, the squares and rectangles are a pleasure to work with so far.
A lot of the black on white prints come from working on the Flowering Snowball. I cut two of the purples (above towards the right side of the photo), because the motif is so large that the pieces I cut look very different from each other. I like that print a lot, especially the background color. We’ll see if I remember once I start arranging and laying out the quilt top.
FOTY 2012 Patches, too
There is a lot of white in the prints I have cut so far this year. I wonder if this will be the year of the much lighter quilt? The white doesn’t bother me so much, but we will see once I start arranging.
I also found that I have started to press and cut the larger pieces that have been languishing. In some cases, at TFQ’s suggestion, I am just pressing the edges and leaving the rest of the piece until I use it. Most of them are not very wrinkled, so I think it will work out.
Patches for FOTY 2012
I also have to say that using rectangles and squares makes it much easier to photograph the patches when they are cut.
I have to admit that I am enjoying just cutting squares and rectangles for FOTY 2012 so far this year. I am so glad to be using simple shapes and the squares and rectangles are making me feel much more creative with FOTY 2012. I have been playing with the layout of the little groups I cut as I go along.
I do not regret using the diamonds for FOTY 2010 or the triangles for FOTY 2011. I am pleased with the results. Both were great experiences and I am glad to have worked on them. I do think that it is good to simplify sometimes.
The aspect of FOTY 2011 that I am carrying forward to 2012 is the idea of using smaller pieces of the fabric I have used during the year, but didn’t buy this year, alongside the new fabric. I am being much more diligent about cutting fabric I have used and I have used a fair amount already this year. I love most of the fabric I have bought, regardless of when, so I want to give all the pieces an opportunity to shine. Also, in an ideal world, I would use more fabric than I would buy. Since I like to make decent sized quilts, that means that I would need to include more fabric. Definitely a wallet vs. idea war going on in my head.
I haven’t done anything with Fabric of the Year 2012 yet. I decided that I would go even more simple than last year, but would keep one of the elements of FOTY 2011. I decided that I would go with squares and rectangles. I will cut squares out of fabrics I have used this year (but not bought) and rectangles out of the new fabrics.
A lot of the fabrics in the photo are from the Flowering Snowballs foreground. I only used one piece from each of the fabrics in the Flowering Snowball blocks, but I figured it still counted. They are all great fabrics, aren’t they?
FOTY 2012 Squares - March
I really like the scrappy look, but think it will be even better when I start arranging the fabrics at the retreat in 2013. Seems like a long way off, but here it is already March, so I know it will be here sooner than I think.
From my brief comment, you might have inferred that I am also working on the Flowering Snowball. I am. More on that later.
The Fabric of the Year 2011 top, back and binding are finished and ready to be sent to the quilter.
As you may know from my previous post, I ripped out the first inner border (which meant ripping out all of the outer borders as well) and replaced it with a different fabric. The ‘different’ fabric, is a 2002 star fabric from kp kids. I used it a few years ago on Women’s Work #1. The stars suggest the same form as the triangles and the color is the right amount of black to frame the piece.
I also trimmed a bit of the grey Ta Dot from the top and bottom borders. The top and bottom borders didn’t need that much space.
FOTY 2011 before removing diamond border
You might think I am crazy for doing all that ripping. I really think I need to make visual decisions visually, but sometimes I can’t see the piece as a whole until I get pretty far along the sewing path. I really want to do my best work and in order to do my best work I needed to get rid of that diamond border. I couldn’t get the joins in the strips I was using for the border to match up to my satisfaction. TFQ pointed out that the diamond fabric was printed off grain so the parts of the pattern printed on the fabric was not the same each section of the strip I used. She is right and I didn’t notice it until she articulated it. All I could tell is that I didn’t like the border and I needed to rip it out. So, I ripped it out.
FOTY 2011 back
I used large pieces to make the back, for once. The two fabrics on the left are Basic Grey and I thought using the large pieces would show off the labels and the portions of letters, which are part of the pattern of the fabric. I was also pleased that I was able to use the last bit of the Belle Fleur fabric. I like that fabric and I am glad I have a piece that I can keep for awhile.
Backs are arduous and I am really glad I was able to focus on using large pieces and getting the back finished.
I was going to say “HOORAY!!! I finished the FOTY 2011 top!”, jump up and down and encourage us all to dance together.
But.
No dice. I starting ripping out the border on Monday, because it screamed at me. The diamond black and white didn’t work. Two people that I asked didn’t even notice, but I can’t even look at the top without my eyes going straight to that black and white border. And that means I have to rip.
Still, I spent all day Sunday sewing and that is a bonus. It was such a pleasure to spend time with my sewing machine listening to audiobooks (yes, I finished one book and started another). Still, the pleasure did not create a great border.
If fabric were wider than 42"
If fabric were wider than 42″the quilt top would have looked like the photo right. In this photo, you can’t see the way the fabric was printed off grain or the way my joins did not line up properly when I tried to make the borders longer. The border didn’t work for *me* and the sooner I faced that reality the sooner I could really get to finishing the top.
I got to this place, because I couldn’t find the fabric I originally wanted to use and I was too lazy to shift stacks of fabric around to find it.
New Border OptionNew Border #2New Border Option #3
Laziness is my downfall and I deserve what I get. In fairness, I did move some fabric AND I may have used all of the fabric I was considering, but I did not look all of the blacks to make sure.
I retrieved some other fabrics and found the stars. Right now it is my favorite. I’ll see how I feel and how the joins look later in the week. I am so glad to have some time this week to work on this project in little bits.
I made really good headway on FOTY 2011 over the weekend. If I had not gone to BAMQG, I would have finished the top, but socialization is a good thing. 😉
The photo on the left shows where I left it on Sunday night when my family finally managed to drag me away from the sewing machine. I start the piece by laying out the patches in the bottom left hand corner. I, first, concentrate on arranging the pieces in that area and move towards the upper right hand corner. The patches, before sewing, take up enough space to cover the entire design wall. As I sew, I move the sections (chunks) away from that beginning corner towards the upper right. It helps me know how much I have left to sew.
It turns out that I had a fair amount of unsewing to do. When I started, I just sewed one triangle to another without really thinking of how I was going to put the chunks together. As you can see in the light blue section, I now have all of the chunks angling to the left. To get them to line up, I had to rip some pairs out and sew those patches to other pieces.
I also needed to rip out and recut the smaller triangles. I am not sure what happened, but when I sewed the three prints and one background triangles together, they were at least a 1/2″ too big. I tried to work with them that way, but, in the end, I ripped them out and recut them, then sewed them back together. I have a few more to do in the last couple of rows, but am almost done. I am much happier with them now.
I may finish the top this weekend, but we will see. DH and I have to try and fix our printer and I have an event on Saturday to attend. I hope to have a bit of time to sew.
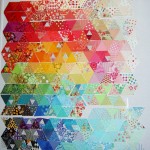
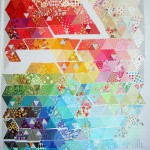
As usual, I started my Fabric of the Year 2011. I made good progress, but I did not finish.
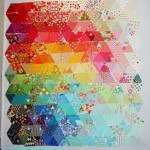
Before I left for the Retreat, I spent time organizing the patches into color families and then from light to dark. Normally, I figure out the size of the finished piece and do more organizational stuff. No time this year and it was fine.
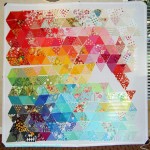
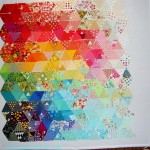
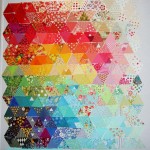
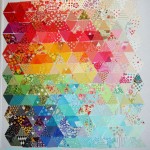
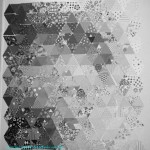
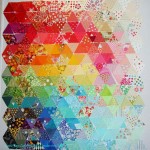
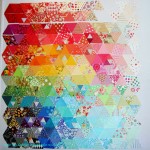
Once at the Retreat, I spent a lot of time – all day Friday – arranging the color gradations. I got opinions from others about the placement of certain patches. I used my camera to look at the patches in a different way and it was a useful tool in my arsenal of work. Above you can see the progression. The top left is pretty soon after I put all the patches on the wall. The last photo, bottom left, is, basically, what I took home.
I had to pin and wrap the pieces in the portable design wall. I set it up in my workroom and am working on it.
I am glad of the progress I made it on it at the Retreat, but I prefer to work in my workroom. As I started work on Monday, I felt an ease come over me and the work began to go very well. I hope to be done sooner rather than later. Stay tuned.
I am trying different arrangements of triangles for show. The previous arrangements have left so much design wall space in the photos. It took me awhile to cut enough triangles for this photo as I concentrated on the Stepping Stones top.
Many of the fabrics are from Camille Roskelley’s Ruby line. I have stacked them up as I search for suitable project for them. I have almost decided I will do another Stepping Stones quilt, though perhaps I will scale it down a bit as how many 100×80 quilts does a person need?
This may be the last batch of triangles as I have to start organizing them in preparation for sewing them at the CQFA retreat.
I am making an effort to cut and press fabric so I am ready for sewing the FOTY 2011 quilt. I have started to arrange the squares by color so they look good in the photo. Vanity, I think. 😉


")