Gifts Bags Spread

It is a little too early in the year for me to be encouraging you to get out your fabric and make fabric bags to wrap your gifts in (though it really is never too early), but Deirdre pointed me to the site below and I thought I would share another option for wrapping gifts in fabric.

clipped from www.env.go.jp

Minister Koike created the “Mottainai Furoshiki” as a symbol of Japanese culture to reduce wastes.

Ms Yuriko Koike, Minister of the Environment, has created the “Mottainai Furoshiki” as a symbol of Japanese culture to reduce waste. Furoshiki is a Japanese traditional wrapping cloth which is used repeatedly in a stylish way. (The utilization of this “Mottainai Furoshiki” will contribute to reducing household waste from plastic bags.) The Minister presented the “Mottainai Furoshiki” at the Senior Officials Meeting on the 3R Initiative held in Tokyo, Japan on March 6-8, 2006

blog it

Bags Return, Part 2


As I mentioned in my previous post, I bought fabric to make a bag for my SIL for a gift.

TFQ and I were emailing back and forth about the EMT bags and she mentioned an easier way to make the straps. The method she found on another pattern has you make them quadruple the size of the finished strap, fold in half, open, fold each raw edge towards the middle and press. I used this method for making straps for my latest bag (above) and after about an hour of work I am ready to apply the large outside pocket and sew the bags together. The straps are on the outside, the pockets are positioned. TFQ’s method, while using more fabric, made the process amazingly fast. I didn’t think that the process explained on the pattern was terrible, but making the straps was terrible and this is much better. I think I will have time to make a couple of other bags for people I will visit this summer. YAY!

This is a good example of why collaboration is so important. As you can see, I have made a lot of progress on the project.

Bags Return


Here are some recent fabrics that I bought from Fabric.com. The bottom fabrics are all home dec fabrics. I am going to use them to make another Eco Market Tote. I have a running list in my mind of bags I’d like to make for friends, so this is crossing the first gift off the mental list. I may have enough to make a dotty bag for myself. I had planned to use the stripe as the outside, but DH said that he thought the blue dot outside would be better, so that is what I will do.

The violet dot at the top was me attempting to replace the fabulous violet dot I got somewhere about a year ago. The color is absolutely right, but the weave (what is it with the weave thing I have going??) is really thin and the violet bleeds into the white dots.

Note to online retailers: don’t buy thin fabric and sell it as first quality quiltmaking fabric. Thanks!

Switchplates….

I have been looking at my switchplates and cringing…well my whole house, actually, but the switchplates are totally doable. I happened on to PCS and found this post. Thanks!

clipped from pinkchalkstudio.com

Switchplates

Switchplates were the March 2008 theme for my Out of the Box creativity challenge. I took some in progress photos but not a full-blown tutorial. I even forgot to take a stylized photo of the one I traded that night, very unlike me! Fortunately making these are extremely addictive so I had plenty more for that purpose. Guess which is Leil’s and which is Caitlin’s?

blog it

A Second Cup of Tea

I was incredibly pleased for The Child when he received a package from famous quilt artist, Pamela Allen last week. In it she had created a quilt-let inspired by a drawing that The Child did while she was doing a teaching-visit last year.
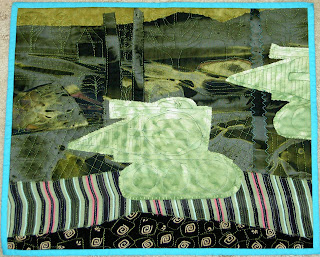
It is so fantastic to see her interpretation of The Child’s drawing in fabric. I especially love her quilting designs. Can you see the trees at the top?

The Child, admittedly, was a bit mystified, but I told him that Pamelala was a famous artist who had interpreted his fabulous design in her medium. I think that his reaction was a good example of how we, as a society, devalue, and as a result squelch, what children can do. I will hang the piece in his room to remind him that he has value and that other adults, besides his adoring family member-fans, think he does good work.

Normally, Saturday mornings, if I am not rushing off somewhere immediately, are filled with Qi Gong, cups of tea and bottles of water, Saturday morning cartoons, and me trailing around the house in my pajamas picking up the debris from the week, loading the dishwasher and generally reveling in being unfocused. This morning is somewhat different. The boys took off at the crack of dawn for a hike, so I have the house to myself for several hours. The peace and quiet are a treat.

I have been struggling for at least a week, probably longer, with an exhausted kind of malaise that has no discernible medical cause. A large part of it stems from my day job, which has turned, somewhat, into a source of anxiety and stomach problems. I am on the BRAT diet almost full-time now, daring to eat salsa and guacamole only on Friday nights, so I have two days to recover before the week starts again. Some of it stems from the creative juices that constantly inhabit my mind, demanding attention, about which I have no time to do satisfy their greed. Some of it stems from the fact that my wireless network is not working properly so my workroom does not get Internet access very well anymore (those of you with no wireless or who have dial-up connections are calling me a spoiled brat right now and you would be correct). This forces me, if I am working up there to constantly run up and down the stairs to look up something on the web or write in my blog. With the malaise, I haven’t been doing it and you, dear readers, have suffered. Some of it stems from the constant drudgery of modern living. Finally, the constant blaring of bad news on the radio and headlines creates a feeling of limited options that produces further anxiety and is not conducive to anything more than going to sleep early or writing book reviews on Goodreads.

On the positive creativity front, I think there was only one evening this week that was so packed that the Child and I did not engage in our creativity time. Oh the Fury and Wrath of the Child for the few activities he deigns to engage in that prevent him from drawing with me at night! The other nights, though, while The Child draws cartoons furiously with his Sharpie in a giant drawing book, I have been cutting purple squares for a new sibling to Feelin’ Blue and Seeing Red, called, for the moment, Passionate Purple. I may change it to the Passion of the Purple, but I don’t want people to think about Lent and the death of religious figures when they look at my quilt, so I may not.


Friend Julie and Friend Adrienne have already cut their squares. The ones I need to work on arrived from Julie yesterday. Thus, I am the only slacker in this project right at the moment. Despite my incredible exhaustion, it was mentally easy to allow The Child to drag me upstairs for our creativity time. I have to cut 40 squares of 10×10″ each. I was able to cut about 25 last night, so I am well on my way. I can finish today and send them off on Monday.

One fun thing about this project (and all of the bullseye projects) is that I get to look at fabrics that I haven’t looked at in a while. I cut into some fabulous purple batiks and looked at some pieces that had strange shapes cut out of them, trying to remember what I made!

In the last little while, I made two more of the Eco Market totes in 15 minute increments over the period of several weeks (damn straps!). I did spend all day last Sunday sewing the bags together, breaking the cycle of 15 minute creativity.


This is my bag. As I mentioned in a previous post, the idea of these bags is wonderful to me. These bags make a relatively easy series (except, of course, for the damn straps!) and they use fabric in a different way than quilts. They are also useful.

In this version, I made the straps with a piece of fabric filled with batting. I like them even if they were a bit fussy to make. The straps are a bit fluffy, but don’t look fluffy. Since I usually drag around two books, a journal, and a bottle of water MINIMUM, I am glad to have straps that aren’t digging into my shoulder.

The fabric was a gift from a friend, who lives in France part of the year. She brought me back some big pieces when she first bought her French house. Awhile ago, I used some bits of the fabric for a small decorative bathroom curtain before we remodeled, but had large pieces of it left. I decided that those big pieces would be great for a bag, so I made two!

Above is the bag for my friend. It came out well (above), as well, but the thing I learned is that it is too confusing to make two bags at once. I had a problem with the fabric (not enough!), so I had to dig around around to find some fabrics that would go with the real French fabrics. If I had made one bag first, I would have known I wouldn’t have enough fabric to make the second and could have arranged the fabric differently when making the second bag.

Nevertheless, it should come as no big surprise that it was no problem to find a couple of extra fabrics that were suitable. One was an old fabric (see the blue kind of swirly fabric next to the fabric with leaves in the picture below? or the straps in the full picture of my bag a couple of photos above). That blue was one of the first quiltmaking fabrics that I bought. I found that I could never cut into it, because I really liked it. I wanted to use it in a project that I could admire frequently. The color blue is not really a color that I use or wear a lot, so it has been languishing. Now I know why. 😉

The gold with the blue jaggedy, swirls motif is another I found as well as the one from which I cut the vase motifs.


At the last minute I decided to add the large pocket to the outside of my bag. A large pocket is very useful and I don’t know why I considered NOT adding it. As you can see from the photo above, I had to piece together some leftover pieces of fabric to get a piece large enough to make the pocket. You need double what you see there, because the pocket is lined. This task, though frustrating, because it felt like I could never finish these bags, was great because it allowed me to fussy cut that little vase and use it on the outside. Also, instead of finishing the pocket with a button, I sewed down one side of the vase to create two pockets out of the big pocket. There is a smaller pocket on the inside and by sewing over it, it was divided and I created a perfect spot for a pen or pencil.

The smaller pocket looks like the above, but the one pictured is inside of the bag pocket not the inside of the big pocket pocket — if that makes any sense. I turned one of the bags inside out in order to get a picture of the pocket. Shooting into the bag didn’t work very well for various reason, especially because I don’t have four hands.

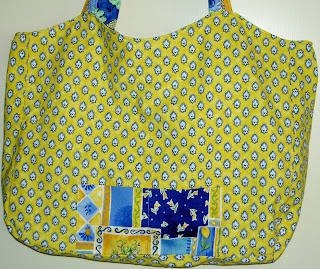
This is the entire bag turned inside out so you can see the placement of the pocket. This pocket is not in the pattern and I realized, as I was about to sew the bag together, that since the inside pocket was not part of the pattern it didn’t remind me to sew the raw edges. DUH. I turned under the edges and sewed them neatly so that pocket wouldn’t fray apart with use. This pocket is good for a transit pass and, perhaps, a bit of emergency cash.

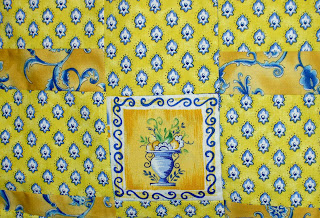
This is the same vase as is on my bag. I did the same fussy cutting for my friend’s bag as well.

So, dear readers, I am on my third cup of tea and if you have made it this far, I hope you haven’t given up on my musings. I am still musing away. I’ll try to figure out the new work processes that I require so I don’t leave you hanging again.

Follow-up: Series of Bags

In case you didn’t have a chance to read some of the recent comments, Laume wondered about the sturdiness of the Eco Market Tote that I discussed in a previous post, by asking “I’ve been wanting to make some bags for awhile now and have been resistant to actually buying a pattern – a bag – how hard can that be I think. But I know I really do need a pattern and so instead I just talk about making a bag some day. Are these sturdy? Are the shoulder straps comfortable when they’re weighted down? They all look wonderful, especially the first one with the big art deco print.”

TFQ saw that comments and answered:

“I’ve been using the red/white/black one for a couple of days and the straps are pretty comfortable — not cutting into my shoulder despite my walking a mile and a half to work with about 10 pounds of stuff in it.

I think the straps would be less comfortable if we had not made them wider, and interfacing the handles for the lighter-weight fabric definitely helps. The bags are completely lined — in fact, they are reversible — which helps with the sturdiness factor, but for a bag you’re going to use to haul around a lot, I agree with Jaye, choose a fabric with a little body to it, like heavier linen or a lightweight home dec fabric. ”

The Eco Market tote comes from Favorite Things. Watch out for the errors described in the previous post. The company said that they have fixed them, but the patterns with errors are still in quilt shops.

Series of Bags

TFQ and I went to Quiltworks Northwest in Bellevue on Friday. At the shop, TFQ saw this bag made up and bought the pattern. The pattern is called Eco Market Tote and is from Favorite Things. I don’t normally buy or even think about non-quilt things, so I didn’t pay much attention. I was interested, but not from the making point of view. I am not sure what lit the spark, but after we visited the Quilting Loft and saw the Alexander Henry Home Dec fabrics, I knew I wanted to make one. TFQ suggested that we make them and it was a great idea. I would have never finished mine if TFQ and I had made the first ones together/at the same time. While we were working with our own fabrics, we puzzled out the directions together. We, unfortunately, got the first printing of the pattern and there are a few mistakes, which have, since, been corrected (TFQ contacted the company). We also made some adjustments, like making the handles wider than the pattern calls for.

The fabulous thing that I found is that this is a great opportunity to work in series. No, it is not a quilt, but it is a great canvas for showcasing fabric combinations. There is also a lot of room for creativity – different types of pockets, different fabric combinations, different fabric ratios and even embellishment. I know that TFQ has picked out fabrics for two more and I would like to make more as well. I have several large conversational fabrics in the quilt backs stack that would really be great as bags. I also have some great French fabrics that a friend brought me from France that would make excellent totes.

This is my bag. As mentioned, the fabrics are from the Alexander Henry Home Collection. They feel like canvas, but may be a kind of cotton duck. I am actually kind of stunned that I picked them out as the accent fabric has a lot of brown and all of the fabrics are very 1960s looking.
This was a great project to branch out in the fabric department and try something new. I wouldn’t buy these for a quilt, but for this bag, they are great!

Back of the bag in construction phase.Front of bag with pocket pinned on. The back and front are the same until you put the pocket on. The above picture is how that back looks and the picture below, as you can see from the picture of the finished product, is how the front looks.

This is the third bag. TFQ made it today.

She added two more pockets on this side to break up all the black. The new pockets do a good job of bringing the red fabric back into the limelight.


The lovely piece below has the distinction of being the first bag we completed. It is TFQ’s bag, but I think it was a real collaborative effort – at least int he brain power department. This was also the bag we learned on. The fabrics are fabulous and it turned out really well.
Detail of the the reinforcing X stitching to keep the handle secure.

One Night Stand

I don’t know what got into me last night, but I had a one night stand. Not the kind you are thinking of, but an art encounter where I finished a small book. I am calling it the Be Brave book.

What happened was that I had a few spare minutes while Darling Boy took a shower and my Artgirlz order was still on the floor where I had left it after I photographed it last week for you to see. I picked it up, opened up the Artgirlz creativity packet and looked at all the stuff. I was surprised to find a little bound book. I thought it was a bunch of paper. All the pages are different colors, which is fun and cheerful.

I sewed the felt to the front and did a bit of handwork on the flowers. Then I got out my rubber stamping ink and tried out many of the stamps in the Artgirlz rubber stamping pack. Then I just kept stamping and sewing and suddenly I was done.

I don’t know how long it took, but not very long, perhaps a half an hour. I could do more, but it is not a project that is sitting half done on my worktable. I can still do more later if I want. Close up.

Finished product. I also used some of the Stampin’ Up letters on the little marker/tag.

Pink Chalk Pencils Rolls

I followed a link to Pink Chalk Studio’s blog and found these lovely pencil rolls. I would love to say I will run up and make one right away, but it probably isn’t going to happen. I love the way the stripes of color interact and will really have to think about that for inspiration. That lady is NOT me. See my profile for a pic of me.

You can still buy this pattern at Pink Chalk Studio.

Make Lounge Cushion Cover

I was randomly surfing blogs and websites today (studiously avoiding the laundry, the Christmas cards and the Pineapple!) when I came across Make Lounge via Juju Love Polka dots blog. I saw this cushion cover and thought it was very fun. Sadly, Make Lounge is in London and I am not. Still, perhaps I will take out Pamela’s project and be inspired.

Appliqué cushion cover

appliqué cushion cover
  blog it

Halloween Revisited + Some General Notes

I was browsing Deirdre’s Sloppy Studio when I came across the Sassy Art Goddess blog. I think of this as the best pumpkin I saw.

Other notes and tidbits:

Yarnstorm has some new and interesting links to other blogs. Pea Soup is quite good and I love the creativity of the names of people’s blogs. How about Lobster Squad? Kind of makes me wonder if Artquiltmaker is a misleading name since nothing that I am working on currently could remotely be called ‘arty.’ Her drawings remind me of what I would like my visual journal to look like. Oh, yes, visual journal. Got to get back to that….

I was asked when is the best time for me to write my blog and my other writing and I really can’t figure it out….yet. I often write in my journal in the morning and my blog at night – bookending the day with writing. But I also write more blog posts on the weekends and more journal entries during the week. Today I am writing in my blog in the morning and I definitely feel much more energetic about it. Of course, since I am not at home, I don’t have all of my tools, so the posts are more texty that full of pictures,perhaps skewing the impression? Let me know if you see a difference in the posts I write in the morning vs. the ones I write at night. I know you are rolling your eyes at my unreasonable demands, but just let me know if you notice! Otherwise just read on!

Artquiltmaker blog has not shown up in Technorati yet, per my Entering the Internet Age post. I will have to investigate. The blog is showing up on Google results, however, which, I guess, is good. I haven’t seen any additional traffic, but also don’t have a counter. More investigation required, I believe.

Have a great day!

Using Liquid Paper to Satisfy a Child’s Halloween Dreams

How to Make a Halloween Costume

Supplies and Tools

  • Picture of child’s dream costume
  • Felt (of appropriate color(s)
  • Sewing machine
  • Scissors
  • Shoelaces
  • Timtex
  • Liquid Paper (correction fluid)
  • Aleen’s Craft Glue

The Halloween costume, except for some decoration, which are drying, is finished. The Darling Child is happy and I didn’t have to buy anything except 2 yards of black felt. I like using felt for Halloween costumes, because the raw edges don’t ravel. You can also just cut it off, glue things to it and cut strange shapes out of it with no problem. The costumes are a bit fragile and don’t usually last long. You can see the cloak that I made by looking at this picture from Wikipedia.

I didn’t have any white paint, so I used Liquid Paper to create the whorls on the red emblem the Darling Child needed.


I only had enough red to make five of the emblems, so we had to place them carefully for maximum effect.

It is kind of fun to make the Halloween costumes – to make a child’s Halloween dream come true. It is also fun to kind of figure out how to make something work with what you have on hand. I always buy enough felt to get through the main part of the project, but inevitably, I don’t think farther than that. One costume I made needed a fat tail that stood up. I used a paint stirrer to keep it stiff enough. That was before I knew about Timtex.

Hiatus Progress

I decided that this brief interlude while the 9K is in the shop can be considered a Pineapple hiatus. I don’t want to take the blocks off the wall and put them away, because then it will be a year before I get back to it, so having a small break where I can work on different projects will be rejuvenating for my work on the Pineapple.

Although I spent most of the day working yesterday, I did have time to make the baby blankets. I get a yard of flannel and hem the edges. On the 9K, I have a variety of decorative stitches and letters that I can use to make words. Between flannel baby blankets and gift bags I have tried nearly all of the stitches on my machine and found which ones I like for which type of project. Usually on baby blankets, I use the star pattern. I also use the letters to make words which say “For Baby Last Name” and “Made by My Name.”

However, with the 9K at the doctor, all of that is out the window. In using the Jem, I don’t have very many options in the decorative stitch department and I have no options for words. I made due and used the zigzag and whizzed through all 6 blankets. I still need to wrap, get cards and send. I don’t know if I will make bags for them, but we will see. It is a good way to spread the word about gift bags.

Above are the fabrics that I used. The two left hand fabrics will go to the baby due in October (person I want to impress), the two purple fabrics will go to the baby due in December (colleague/fellow librarian/friend), The two right hand fabrics will go to the second baby due in October (colleague/fellow librarian/friend).

So, #1 on the list is complete.

  • 6 baby blankets: two colleagues and one person I want to impress are having babies: 2 each
  • Binding for Sharon’s quilt.
  • Binding for Serendipity Puzzle.
  • Gift bags: I have lots of fabric for bags, and Christmas is coming.
  • Cut out fabric for test blocks. I am going to start looking at new machines soon and I want to have some piecing in my own fabrics, which I can use to test the machines.
  • Wash and press new fabric.
  • Replenish Pineapple strips.

I was also able to work on pressing some fabrics that have already been washed and cuttings strips for the Pineapple, but I am in no way near done with that and I doubt I will even be able to make a dent.