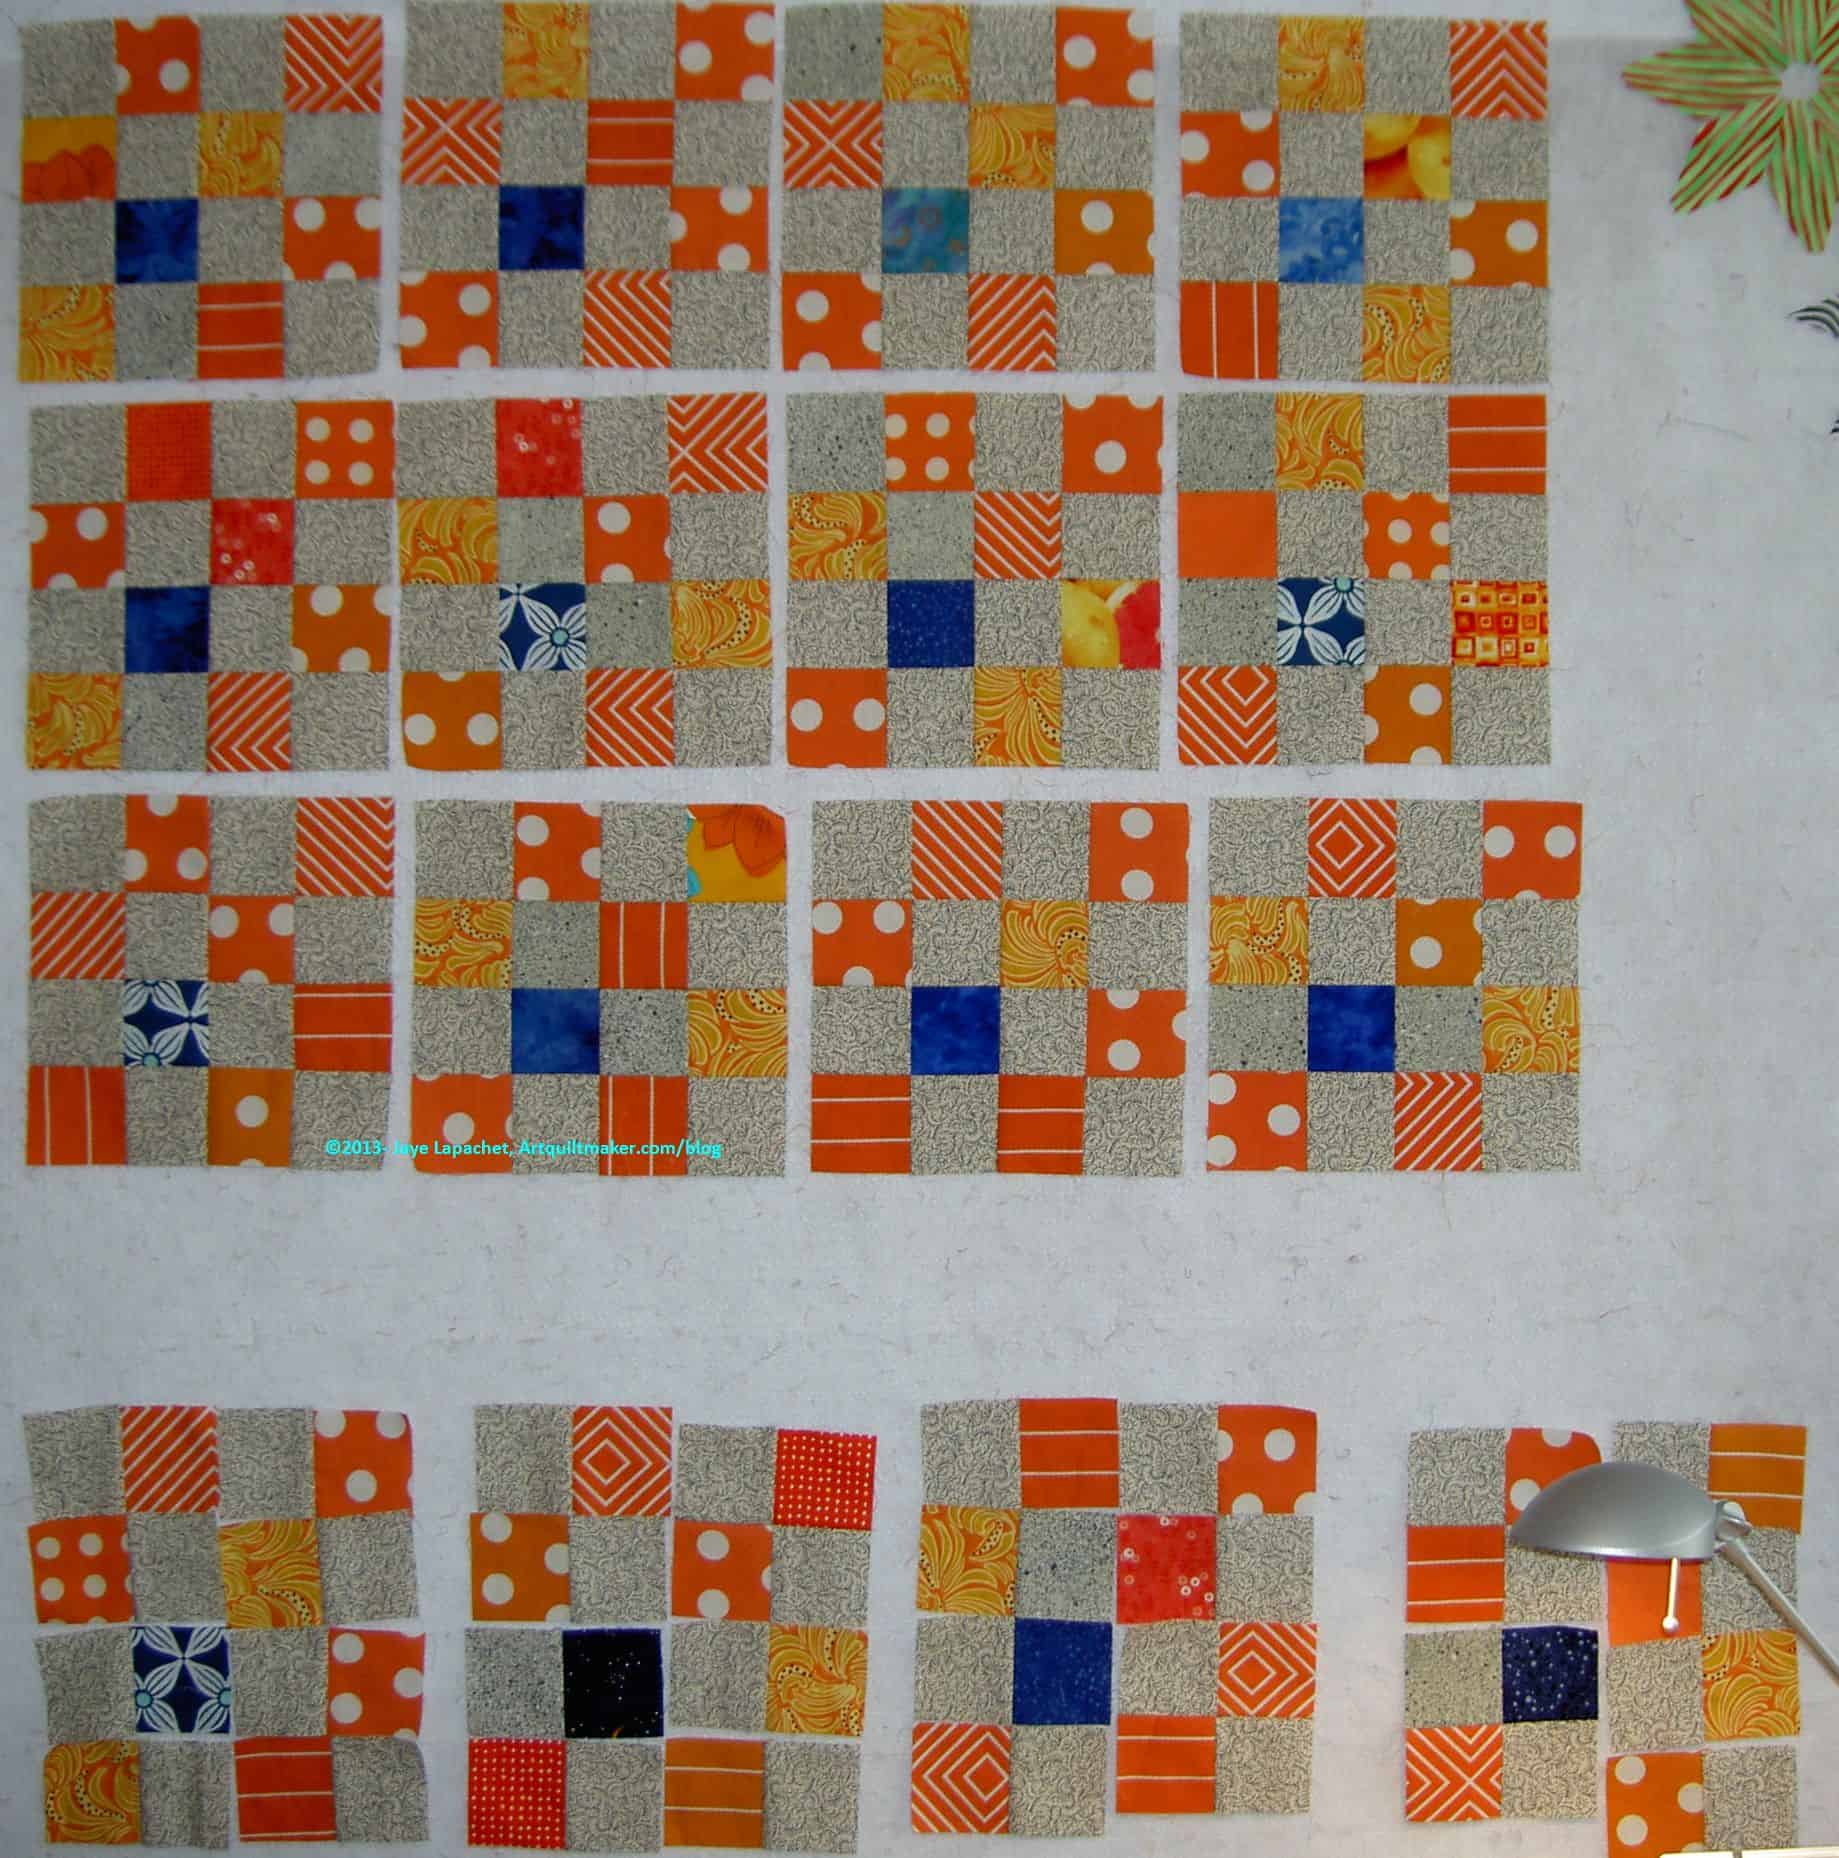
I have been working on these blocks as leaders and enders for the past month or so. I finally finished sewing enough of the two-squares-sewn-together basic unit for a large lap quilt. I pressed all the pieces and put them up on the small design wall, which had been, mostly, empty since the end of the Star Sampler.
Most of the orange fabrics are leftovers from Fresh Fruit. The grey background is an old half yard (or so) I had laying around. I am trying to use up my bin of neutrals for donation quilts since I don’t use them that much.
In using up pieces, I am trying to use greys that are too beige and other beige fabrics. I worked at making sure this piece did not look too depressing.
While doing my Qi Gong exercises yesterday, I stared at the piece and moved patches here and there and exchanged placement of certain bits as well.
Pam gave me the idea of adding a blue square when she posted her Rainbow Baby quilt with the white square. I like the illusion of looking through the block to the wall (or whatever) behind. In mine, I went for adding some punch. I love that blue and orange combination, though, I think it would have had a greater effect if I had used no background fabric. Next time I might try making monochromatic blocks and punch it up with a dash of a complimentary color.
Clearly, I am not done with this pattern yet.
Nota bene: My computer is still giving me fits so some of the next posts and photos will be via cell phone. Bear with me while I get used to the new platform.
For those of you who do not follow me on Twitter (@artquiltmaker, if you are so inclined) will not know about my commuting woes. Our local interurban train system is on strike, which makes for longer and more tiring commutes. As a result, I have not had much inclination to sew after work or even write much. I don’t often sew much in the evenings anyway, but occasionally I will cut or press fabric, sew a seam or two or do something.
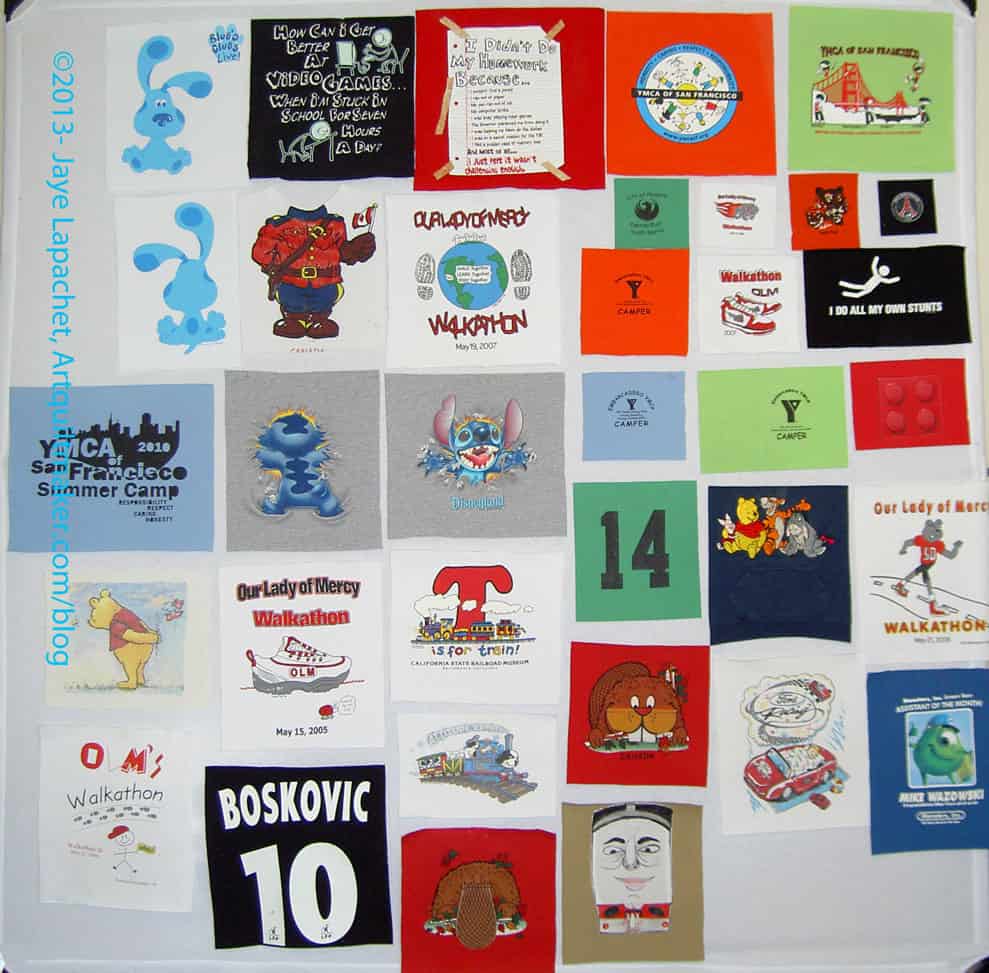
Still, over the last week, I was able to get the center of the T-shirt quilt mostly together. I need to put on a couple of borders to anchor all of the stretch, but, essentially, the main part is done.
I am also considering a pieced border. I am thinking about 4″ squares surrounded by the grey speckle, but we will see.
The biggest problem with this quilt is keeping the &^%$#@ thing square. I have, actually given up, because each time I trim, I have to trim somewhere else. I can see the sense in sashing all the blocks first.
I started this quilt a long time ago, so when I pulled all of the t-shirts out last week, I wasn’t sure where I was or what to do next. The top photo shows the pieces to use as a start.
I had already trimmed off the colors, cuffs and backs, so I trimmed the other t-shirts in prepartion for interfacing them. That was a trip down memory lane. The small sizes of the shirts are hard to reconcile with the giant boy-Young Man who lives with me now.
I spent most of the day on Saturday trimming the t-shirts and pressing interfacing onto the back of each t-shirt panel. I chose a grey pebbly print that I bought before the Young Man was born to make the shirts a uniform size. After sewing sashing to a couple of the panels, I found that that technique was not working for me. I decided to just fill in between the panels. I had thought about sashing each panel and making little stars as the cornerstones. I am not sure it is going to work, though. I think I just need to fill in between the t-shirts and have stars quilted into it.
T-shirt panels
When I cut the t-shirts, I was forced to cut them all to a different size based on the design on the front, which is the main part of the quilt’s design. Looking at the all the designs and brands, while working through this process, made me think of the Young Man’s interests and how they have changed. I do think I will offer to make him another t-shirt quilt to encompass his current t-shirts, which reflect his current interests. However, his size won’t change as much during the 4 years of high school as it did during the K-8 period.
In a way, this quilt is about the fabric. The stretchy t-shirt fabric. It is not terrible to sew once the interfacing has been applied, but the cutting is tricky. I also find that sometimes the design sticks to my sewing table as I sew.
I really thought I had more t-shirts, but I guess I was brutal about the ones I chose. the Young Man also wore a lot of plain colored t-shirts as he got older, which are not interesting in a t-shirt quilt.
I almost didn’t cut up the Winnie-the-Pooh sweatshirt (dark blue, lower right) as it was so adorable and I remember chasing after the Boy trying to put it on him when he was super tiny. There are bits of schmutz on some of them, but I guess that just means they were used and well loved.
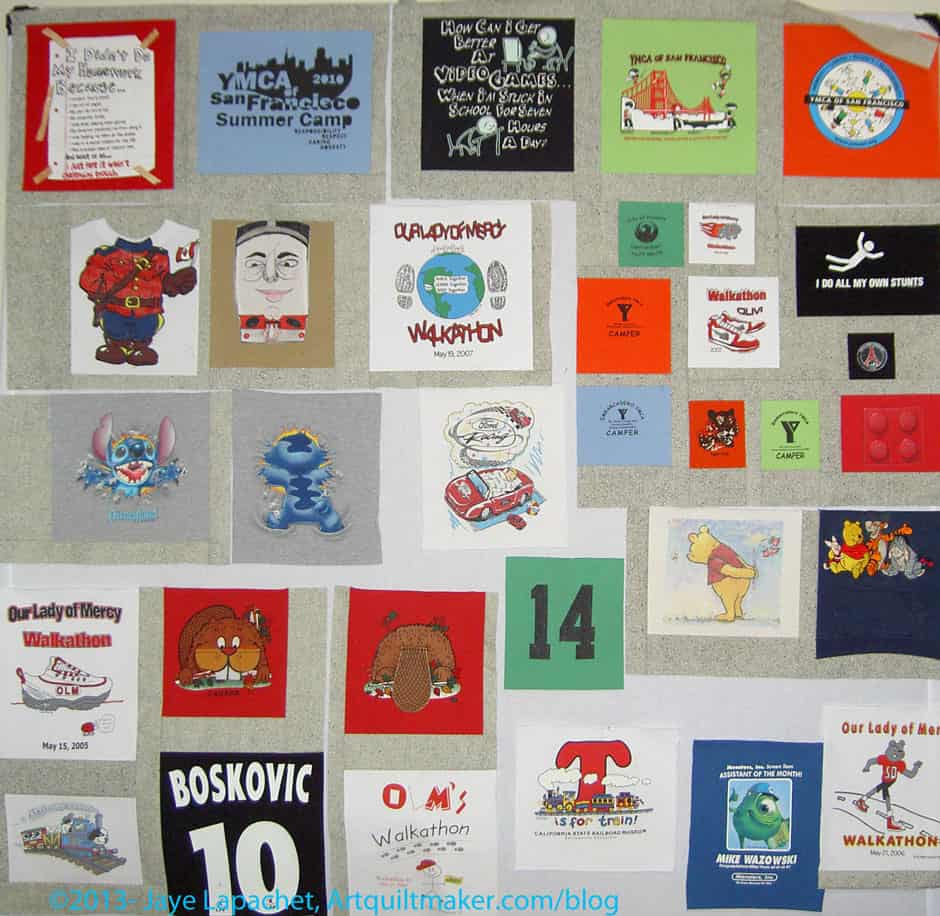
T-shirt quilt, after the weekend
The boy came in and looked at the layout Sunday afternoon, as I was working on it. He liked what I had done so far. He did, however, ask me to remove the Blue’s Clues t-shirt, so I will put that one on the back. It is probably a good thing as my design wall is full and I would like to keep the size of the piece to the size of the design wall.
The bottom photo is what I ended up with after working most of the day Sunday on putting the piece together. I am particularly proud of the section with the smaller pieces (middle right).
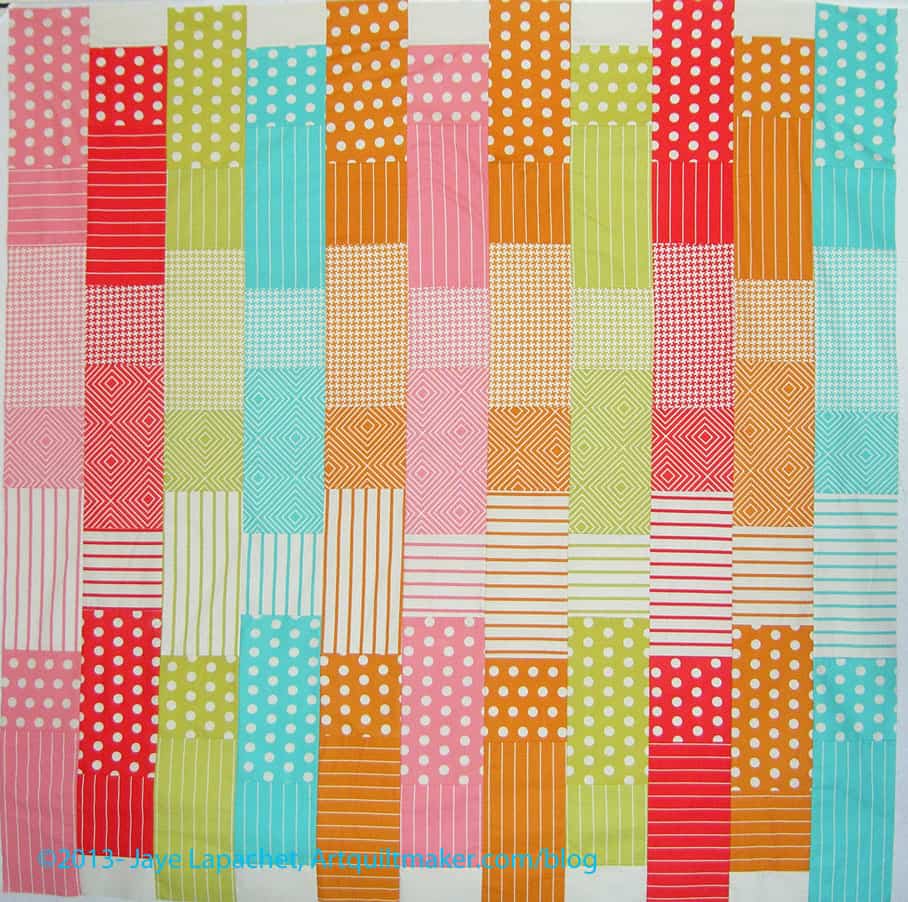
I subscribe to Easy Quilts, because I am a member of the Quilters Club of America. I never make patterns from Easy Quilts, because often the patterns are too easy and too boring. I can’t say that anymore, now that I have made this quilt.
This one pattern appealed to me because of the fabric. The fabric used is Textured Basics by Patti Young, which I found I liked better in the magazine than in person. The neutral that goes with the colors is too beige for my tastes. The teal and the red, however, are especially vibrant and fun. The oranges, pink and chartreuse would have looked better against a white contrast. As a whole, the line works very well for this quilt.
I cut the pieces while working on my general cutting, which, it turns out, made me not think about the patches very much. I sewed almost the entire quilt together using the leaders and enders technique while working on the Star Sampler. As a result, I finished the top before I really realized I was working on another quilt project.
There is really no way to change this pattern. The pieces are so large and not in block form. That, coupled with the fact that I barely realized I was making the quilt, meant that I didn’t make any changes to the pattern, which I normally would do in order to make it my own. This pattern could be used effectively for other large scale prints (I am thinking Philip Jacobs fabrics) assuming the additional fabrics were selected carefully to retain the strong, but subtle horizontal motifs.
I have the binding done and am working on the back. I am using the orange, chartreuse and pink leftover yardage as I don’t think I will use those. Also, I am using the herringbone print from all the colors since I don’t think I will be using that print any time soon.
Pattern from Easy Quilts magazine, Summer 2013, pg.31-34
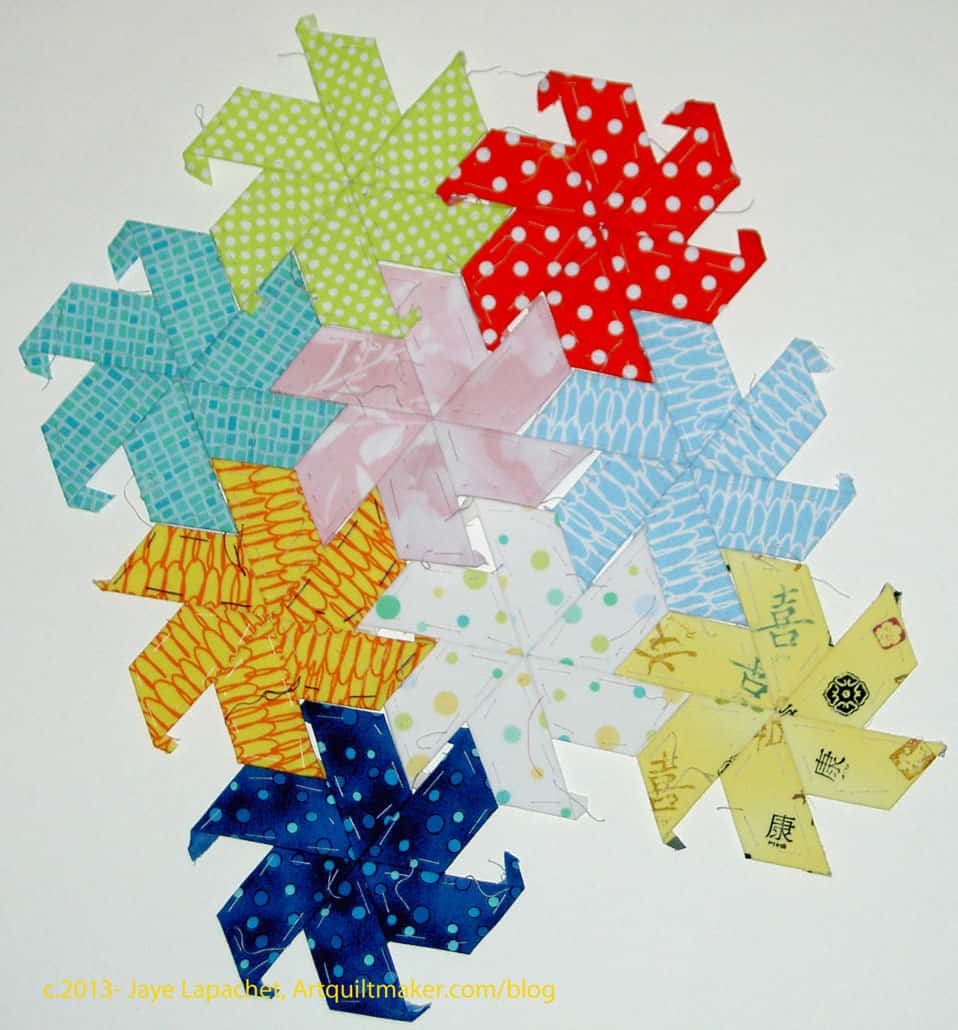
I spent the weekend up on the North Coast with my handsome DH. In the car, I like to work on something. The English Paper Piecing project I started in August is perfect and I was able to finish 4 stars. A few of the stars were done during TV watching sessions.
I forgot how much I liked this project.
I organized the half hexagons in the hotel room on Saturday, so they were ready to put together in the car. It worked out great.
I have 3 blocks to make (due this past week) and four more to make next week. I made one! The easiest one, too.
It plays a bit with negative space. some of the pieces that should be background are colored as foreground and visa-versa. Interesting.
I said the other day that I didn’t think that fabrics with a lot of white would work, but this dot, even though it has white seems to be working fine.
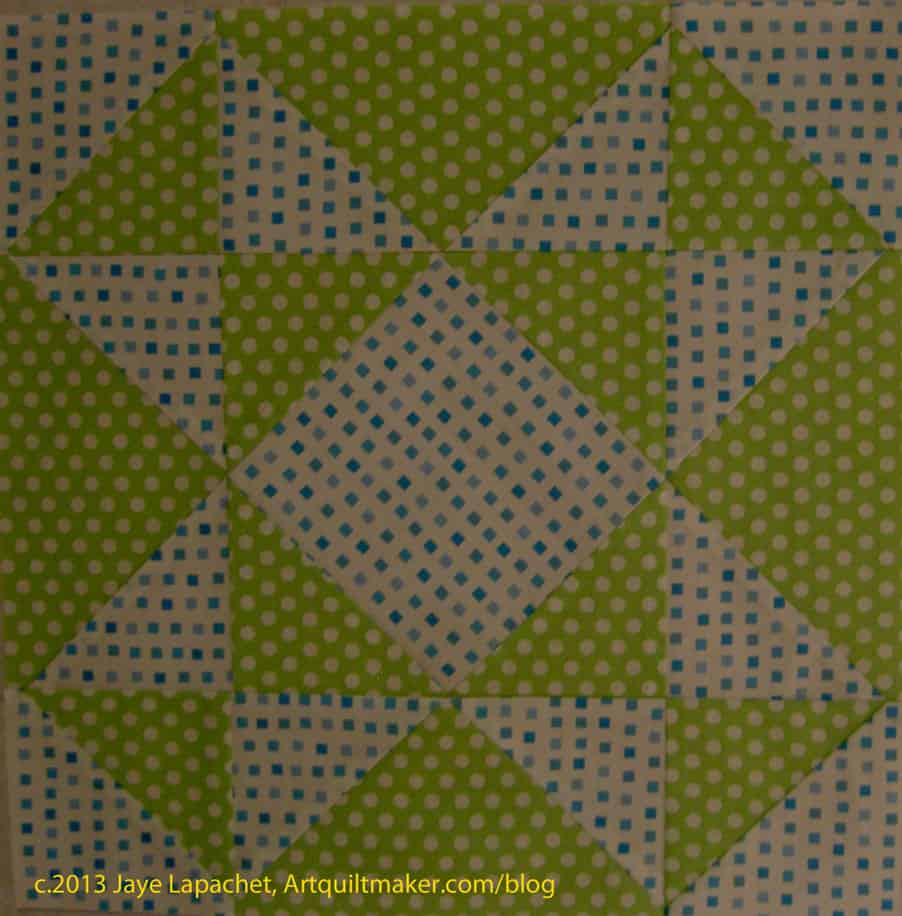
Interesting Shape
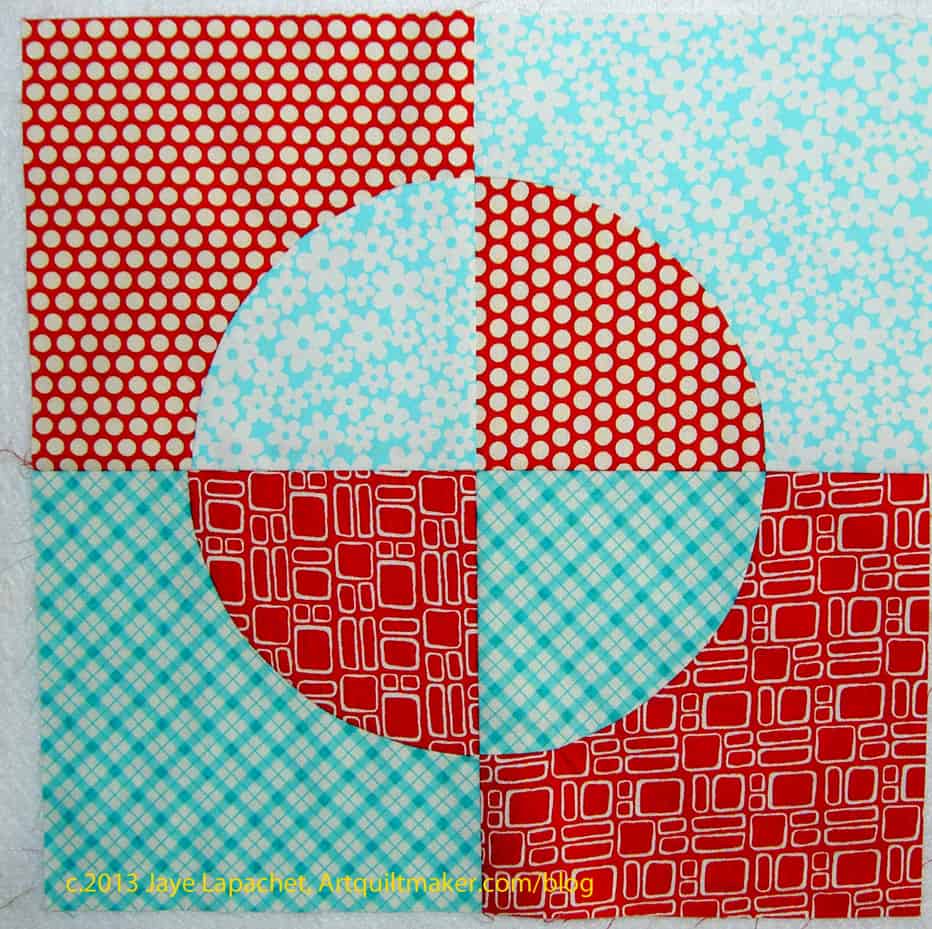
Before I sewed the last two seams together, I noticed this shape.It is the middle of the block, but I thought it was really interesting. It makes me wonder what a quilt using this shape (and perhaps the size, too) would look like.
I have been a bit unwell and not up to a lot of contemplation about the meaning of this quilt. I thought that a slideshow of the progress might be just the thing to satisfy you. Enjoy!
I started a series of tutorials on sewing curves during my last Sampler Class, but I never finished the last two parts. The first part is about fabric and arrangement of pieces.
Curves-The Dove
Supplies:
The Dove pattern
paper scissors
template plastic
glue stick
fabric (at least 2 different)
pen ( I like the Pigma Micron & the Pilot Ultra Fine Point)
Fabric scissors
pins
Sewing machine
quarter inch foot or other marking system
thread
Iron and ironing board
We will be using a quarter inch seam allowance. You will need to adjust the pattern if you are using a different seam allowance.
The Dove pattern is a baby version of the Drunkard’s Path. If you make this piece, the next logical curved piece would be a Drunkard’s path block.
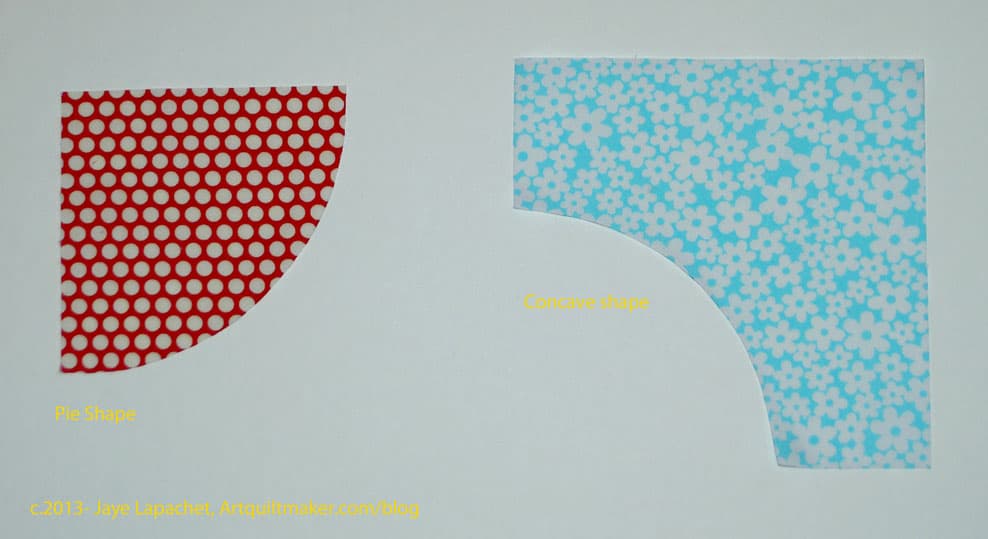
Key to Pieces
This block, as well as the Drunkard’s Path block is made from two types of pieces: a concave ‘L’ and a pie shape. The pie shape forms the circle in the center and the concave ‘L’ can be considered the background. In this block, the pieces are somewhat larger than in the 12″ Drunkard’s Path I used in my previous class. This design also has a very strong focal point.
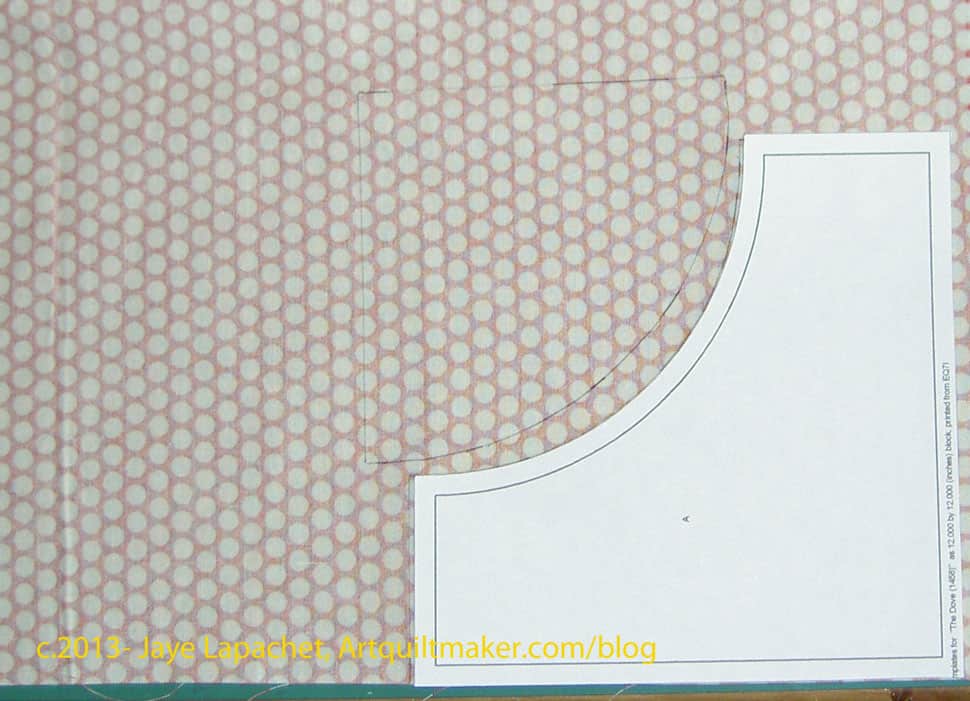
Take the The Dove pattern and rough cut the templates.
Use the glue stick to stick the paper templates to the template plastic. You won’t need heat resistant template plastic as we won’t be ironing over the templates. It is fine to use, though, if that is the only kind you have.
Rough cut out the templates you have glued to the plastic.
Carefully cut out the template on the seam allowance line, cutting off the rough cut paper and plastic.
Place your fabric wrong side up on a hard surface.
Draw Around Templates
Place the templates wrong side up on your chosen fabric. Nota bene: If you are using symmetrical templates, then it doesn’t matter whether they are right side or wrong side up, but it is good to get in the habit of doing it the right way in case you use non-symmetrical templates in a future project.
Draw around the template with your marking implement of choice. You will need to hold your template firmly so it doesn’t shift. You can also rough cut out the fabric pieces if trying to cut precisely or carefully with a long length of fabric draped over the cutting table is too difficult.
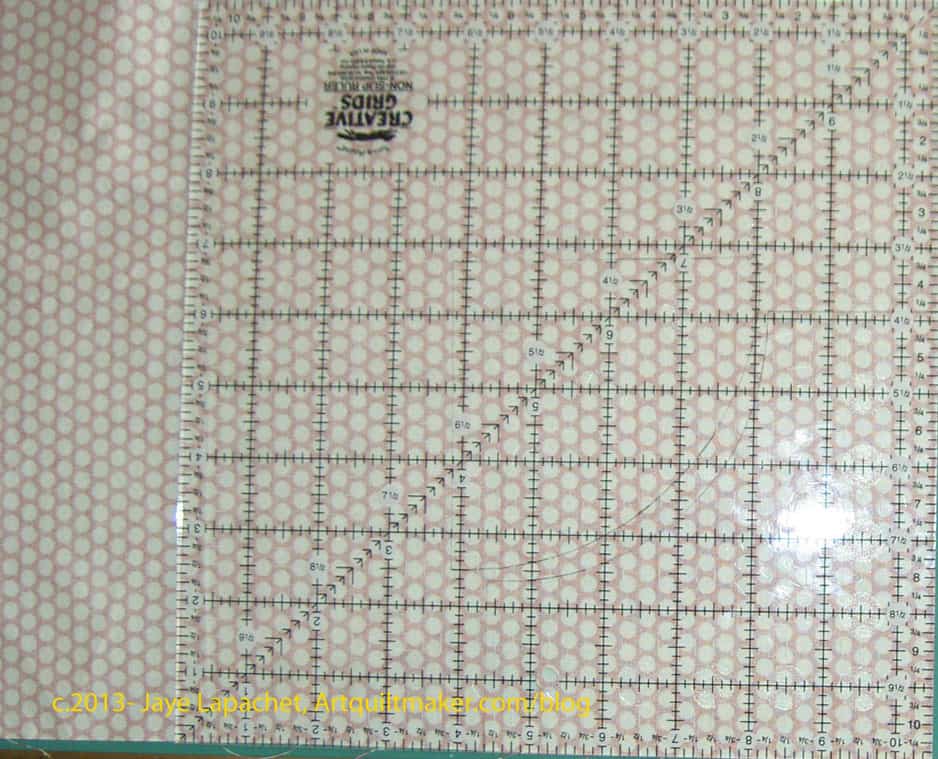
Rotary Cut 90 degree angles
Cut the fabric out carefully using your fabric scissors, especially the curves. Cut the drawn line off the fabric. I used a rotary cutter for the 90 degree angles.
Check to make sure that the fabric you just cut out is the same size and shape as your templates. You can lay the template over your fabric to check.
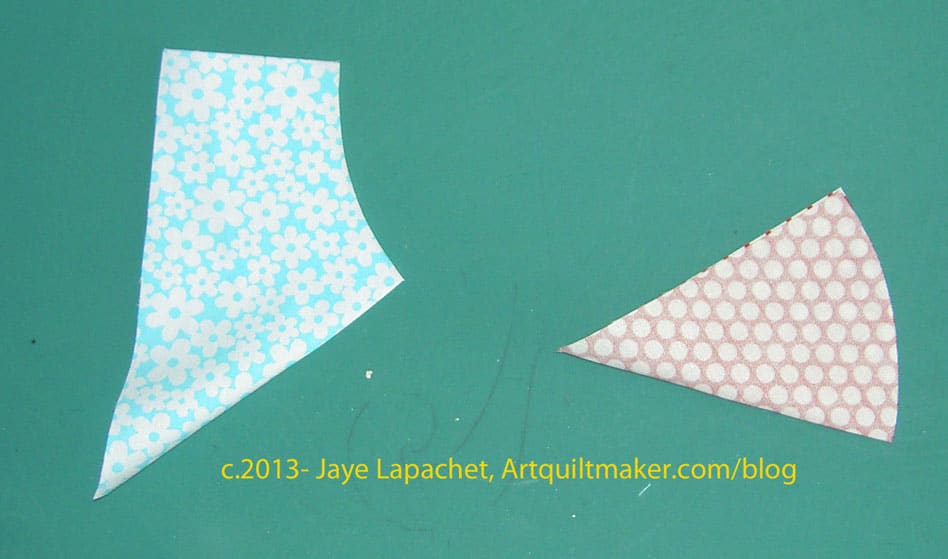
Fold Pieces in Half
Take a pie shape and a concave shape and fold them in half. Line up the edges carefully. The halfway point that you create will be used to make sure the pieces are sewn together evenly. You will want to make the marks so the patches nest. That means you fold the concave piece in half with right sides together and the pie shaped piece in half with the wrong sides together. Mark the halfway point with a pin or through finger pressing.
Nestle the pieces right sides together.
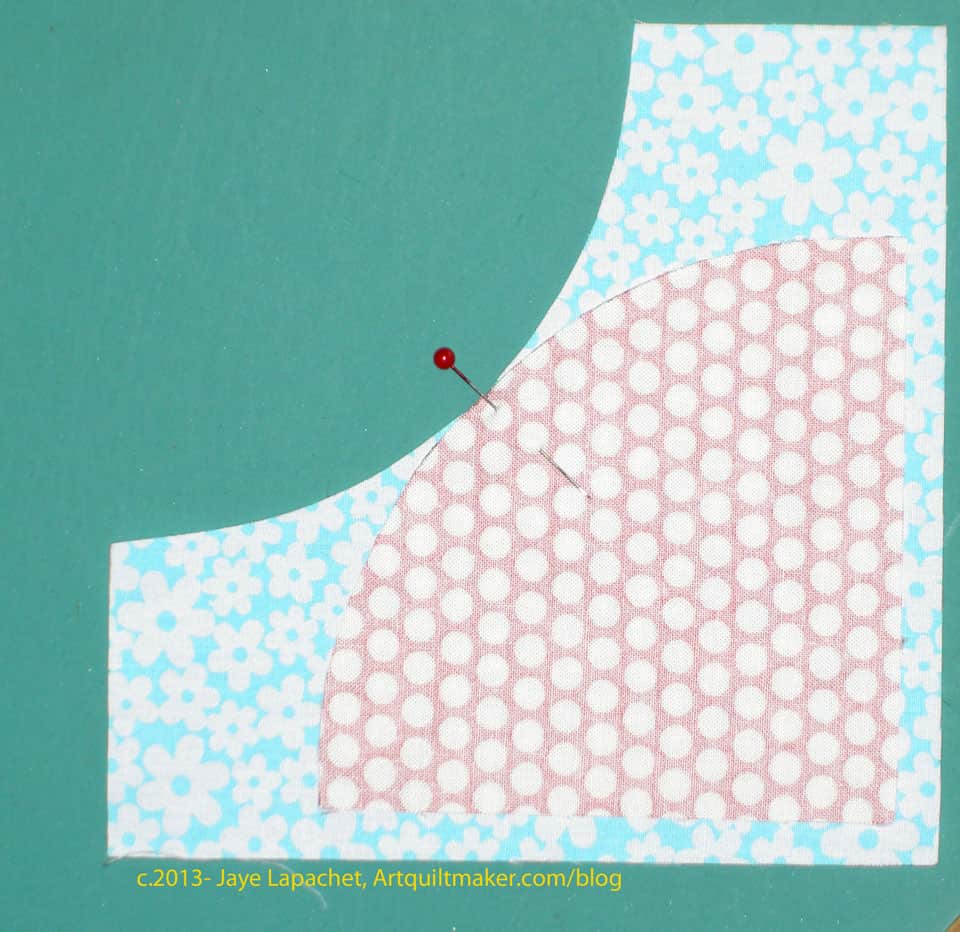
Pin in Middle
To do this, line up the middle mark where you have finger pressed to align the blocks accurately.
Pinned 3 times
Line up the outside edges and place a pin close to the two outside edges.
Fill in the area between the middle pin and each outside pin with pins. Ease the area between the outside and middle pins into smoothness with your fingers, lining up the edges of the fabric as you do so. Place as many pins as you need between the middle pin and the outside pin. Make sure the fabric is flat and there are no pooches. You may have to ease a bit, but do it very gently so as not to stretch the pieces. If you have to stretch and tug and pull, there is something wrong and you should check to see if your templates match your fabric pieces.
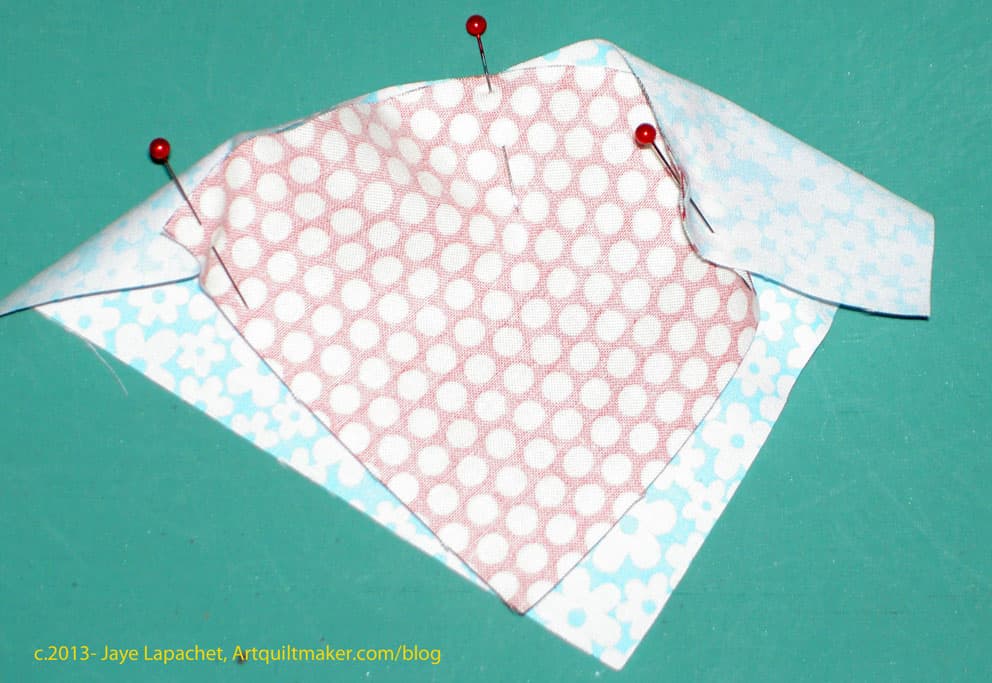
Completed Pinning
Do the same with the second section between the middle and the other outside edge until you have used a lot of pins.
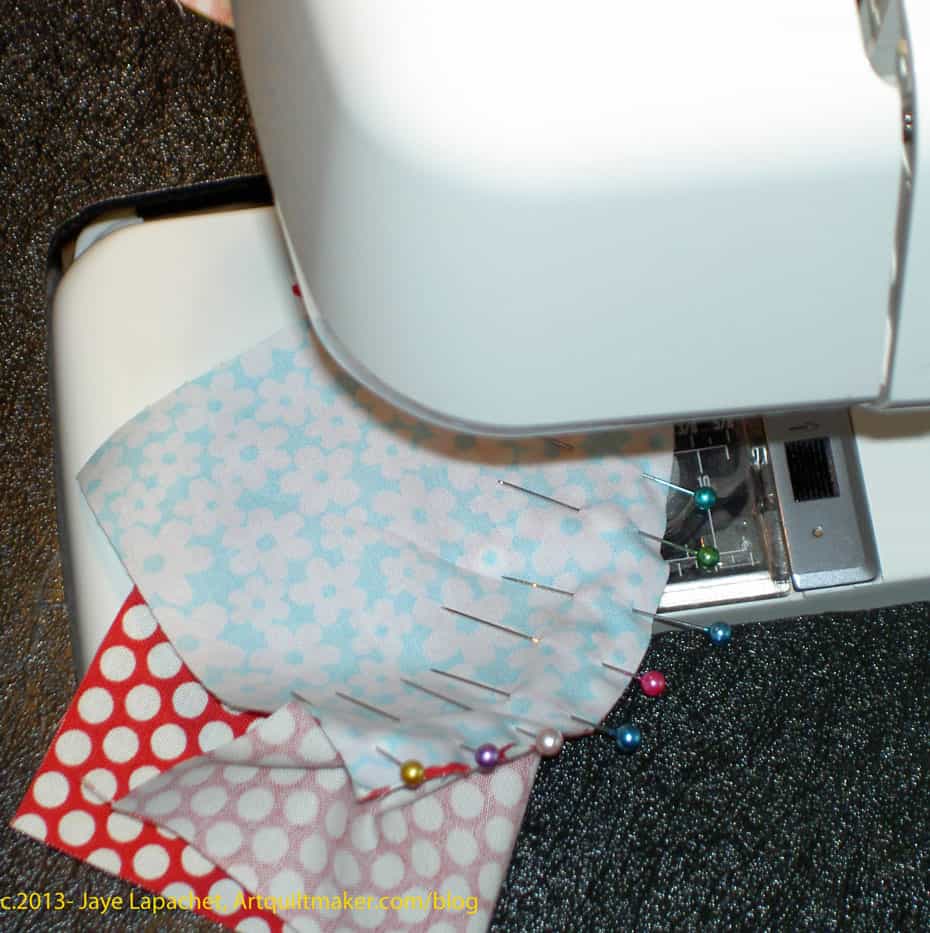
Sew Pie to Concave Piece
Sew Pie to Concave piece, removing pins before you sew over them. You may want to use the point of a pin to keep the edges of the fabric lined up until you sew over the area where the pin was. I also use a seam ripper as a stiletto to keep the two pieces in place after I remove the pins.
Dove Block in Process
Press carefully.
Repeat for all of the quarter blocks.
Dove Block in Process
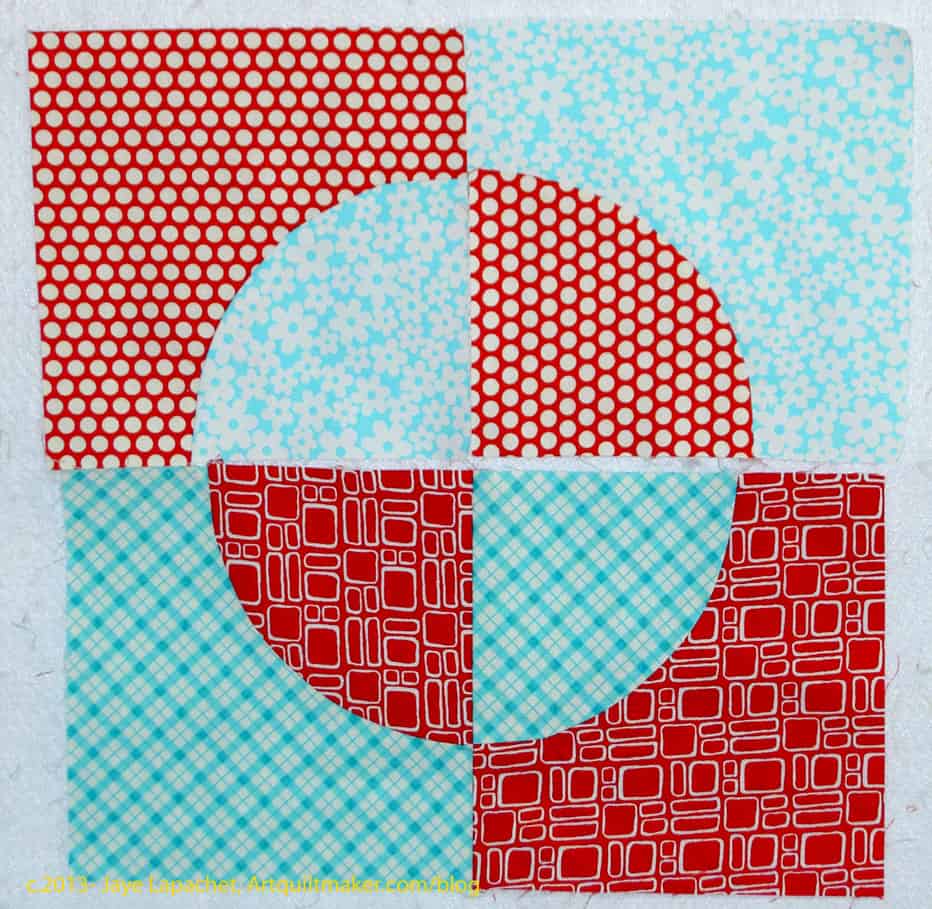
Sew 2 quarter blocks together to make a half, then sew the other 2 quarter blocks together so you have two halves.
Press so that the center seams nest
Pin the two halves together, paying careful attention to the center.
I was still not quite ready to start this project, but I did need to decide on the background.
These two Sawtooth Stars are 4.5″ each. I used the Philip Jacobs print for the center and a couple of different background possibilities.
I really wanted the leaf print (right) from Simply Color by V&Co to work. I really like that print and wouldn’t mind having yards of it around. It would work with some of the solids I have chosen for the project, but, as you can see, with prints it would be a problem. I want the stars to be crisp and this print, sadly, makes the stars mushy.
I’ll put it on the back.
This conclusion meant that I needed to use the square dot print. I like it very much. It wasn’t what I expected to use, but I think I will like it. I wanted to do some more tests with some of the different fabrics, but the way manufacturers go through fabric lines, I had to get it quick before it was gone. The place I wanted to buy it was out, sadly ($4.20/yd!), but I found the amount I needed and am waiting for it to arrive.
Sunday, I worked on the A-B-C Challenge back. I finished the top on Saturday and got busy with the back on Sunday. It took forever. Well, it seemed like it took forever.
I think I was just tired. I took last week, mostly, off, but with one thing and another, I did a lot.
Another thought is that I have really high expectations of what I can accomplish in a given number of hours. I don’t usually count requests for my chauffeur service, laundry duties, lunch, etc.
For once, I was very careful about pressing the seams open, though Colleen never says anything about that. I am proud of myself.
I am also pleased that I could use another giant piece of Martha Negley fabric. I love her prints, just like I love Philip Jacobs prints. Putting the large flower on the back of the Flowering Snowball was such a great experience that I wanted to repeat it. This particular print has some odd colors, but they go well with the Empire gold that Pat Bravo loves and includes with her collections. Also the green goes well with that border fabric.
I am trying to use larger pieces and make simpler backs. They take less time. Can you tell how simple this back is compared to the Stepping Stones back? I wonder what I was thinking!
Yesterday I detailed all the BFSI comments you wrote (keep ’em coming!) and the prizes I gave away. I actually did get sewing done, which was great. I don’t feel like I got as much sewing done as I would have liked, but I got enough done. I guess.
As an aside: Is it ever really possible to get enough sewing done? I don’t know what enough sewing is, so I can’t say. I would like to try to figure it out, though.
Enough of that.
I know that there were a number of people who had to work, Kati had problems with her laptop, so could only follow along and others had family obligations, so I feel lucky to have gotten done what I did get done.
I started out the day by getting up a bit on the late side…for me. I got up around 7am and since we had 24 people over to eat the night before, I got the first load of non-china dishes going in the dishwasher while my tea steeped. There were also some things that needed to be soaked, so I put them in hot water as well. I could hear the call of Twitter, though, throughout the chores, so I didn’t stay away for much longer.. My phone has been acting up, so I gave it a good talking to, which encouraged it to work. I was able to use it during the day as well.
I kind of think that I did some #BFSI warm-ups earlier in the week with the cat beds and the donation blocks. Who doesn’t need a good warm up?
I promised to make two pincushions for the BAMQG raffle basket, so I decided to get busy on those. The meeting is next week, after all, so I didn’t have much time.
I used a charm pack from Sandy Gervaise called Objects of Desire and the Petit Gateau pattern from Fig Tree quilts. This is the pattern I used before and I liked it.
In general, I like Sandy Gervaise’s fabric designs. They are fun, generally cheerful or have a bit of humor. She also usually includes dots, which I love. I have found, thoughn that her color choices are usually a bit too beige for me. She often has a really good and fun print on the front of the charm pack, but as I pick through the fabrics (which is one reason charm packs are great!), I find many of the fabrics to be ‘Meh.’ I don’t hate them by any stretch, but they aren’t my favorites.
Pincushions in progress
Why choose ‘meh’ fabrics for pincushions, you ask? In small doses they are a relatively cheerful and a nice combination of fabrics for a pincushion. It took me some time to get them together, but once I made the half square triangles, they went pretty quickly. I sewed a couple of charms together to make the gusset piece. I thought about digging around in my fabric closet, but have plenty of charms, so that worked for me.
I have a lot of charms from the pack left so might make a couple more pincushions as gifts. They are fun and cute.
I have some hand stitching to finish, buttons to attach, but I am pleased with the way they look. They are cheerful and I like the different scales of fabric.
I also worked on the A-B-C Challenge. I know I talked about it before, but in order to get to the stage of FINISHED top, I worked on the border on Saturday as well. I spent most of the time that I worked on this piece on the grey inner border.
Patchwork Wheel #7 & 8
I also always need leaders and enders. That is mostly how I am getting the Patchwork Wheel blocks done. I doubt I will get a quilt top from them finished by the meeting next Saturday, but I can finish it by January.
Sandy talked about her BFSI experience on her blog. Sarah detailed her progress and she had to go to work! Pam did a lot of sewing work, but admitted to finishing the Star Wars quilt during the Black Friday Sew-in. Katie made major progress on her Orca Bay quilt. She was being good and trying to finish it before Easy Street started.
I am really pleased to say that the Spiderweb top is finished. There are still a lot of things to do to get this finished into a quilt, but I am pleased, really pleased, that the top is finished.
The paper is still in most of the blocks. I had to pull out some of the paper as I sewed, but there is still a lot to pull out.
As usual, the piece looks a lot better sewn together. The sewing together brings the whole thing together. I am pleased with the overall look, though I still think the background is a bit dark. I can tell that my tastes have changed, because the new blocks are filled with much clearer fabrics, more pink, aqua, and chartreuse. I do wonder what this piece would look like with a lighter background, but am NOT making another.
Spiderweb Top
I have enough fabric, I think to make a binding. I have been thinking about the binding and wonder if I should make a straight of grain binding rather than my usual bias binding. There are bits of the border on the bias, because of the kite shaped pieces.
Because I couldn’t match up all the bottoms of the webs, there are some that don’t match up. I am going to be ok with the differences.
I really hope you can understand this when you read it. I stayed up too late watching the election Tuesday night and, as I write this, the exhaustion is taking over.
The last time I wrote about the Spiderweb was last December. Nearly a year later, something is finally happening. But the worst part of the story is that I started this project in 1998. I looked at the blocks many times and my tastes had changed and I didn’t really want to work with dark backgrounds. The project languished, but the 26 Projects list has forced me to get to it. Forced is a strong word. I could have donated all of the blocks to the Charity Girls and been done with it, but something prevented me from doing that.
I started small by buying some Carol Doak foundation paper. Then I continued by printing the main foundations for the border blocks. Then I started sewing and found I printed the foundations the wrong size, so I started over. Finally, I was able to sew enough to get some blocks put together.
In the process, I found something really remarkable. I feel really good making these blocks. I don’t know why. They don’t seem especially gorgeous, though they are pretty. I get a warm glowy feeling inside each time I work on them. It is so odd.
Spiderweb Border Block detail
I have all of the center blocks done, but, like the Flowering Snowball, I needed to make special border blocks so the border plates weren’t cut up. I wanted them to be finished.
In the photo, right, I have put numbers on the border blocks. You can see the differences, if you compare them with the center blocks.
The border blocks are definitely brighter and more cheerful, because of the newer fabrics I am using. I hope there isn’t a big disparity when the quilt is finished.
My biggest problem, however, is that I have nowhere to lay this quilt out. My design walls are full and the quilt, since there is foundation piecing paper on the back of the blocks, wouldn’t stay on the design wall without pins anyway. For the moment it is on the floor in front of a design wall and blocking the closet. This isn’t going to last long, but I don’t have a solution right now.
At the moment, I have 7 border blocks complete and one needing some trimming and pressing. The quilt will be 8 blocks wide and 10 blocks tall. I have about 32 more blocks to make and I hope I don’t run out of the border fabric. If I do, I will have to make the quilt smaller and donate a few of the leftover blocks to the Charity Girls.
You will be pleased to know that the sashing drama is over. The quilt top is double sashed.
“Double sashed” means that I have sashed each block and then added sashing between the blocks.
A-B-C Sashing Complete
I did not chunk this quilt and I am partially sorry I didn’t.
One of the benefits of chunking is that all of your sashing lines line up. When you put a quilt together in rows, it is possible that your sashing lines will be off from row to row.
I did not sash, because I didn’t want to have the checkerboard problem I had earlier this year with the inside border for FOTY 2011, which was that the white looked weird because it didn’t line up problem. I wanted to have really long pieces of sashing so that there would be as unbroken a line as possible.
At this point I am not sure it would have mattered. I am pleased with the red and white dot fabric I used. I think it is inspiring me to have a Year of the Dot in 2013. We’ll have to see if I can figure out what that means.
A-B-C Sashing in process
Next step is to figure out what else I need to do for the borders. I worked on different things last weekend, but didn’t come up with anything that excited me. If I had more of the Sevenberry red dot, I would put a thin line of the grey around the edge and then a fatter strip for the border. I don’t want to go hunting for more fabric. I’ll find something I have to make it work.
As you might remember there were good comments on the next to the last post I wrote about the border of this quilt. Rhonda was right, not that I doubted her, of course. This quilt looks a lot better with a red border on it.
I did a trial run of the border in another post and, then, sewed it on last weekend. Do you ever have times in your quilt work where you have a lot of little things to do – make a binding, sew on a border, fix a hole, print foundation templates – that all seem to stack up before you can move on with projects? I had a weekend like that last weekend. I never feel like I get a lot done when I have those lists of things to do, but the weeks that follow are full of amazing productivity.
I really am so much happier with this quilt now that it has a red border. One thing I completely forgot about was the binding. I had made a white binding, which was no longer appropriate for this quilt, so I also made a red binding for the quilt.
As I have mentioned, I may quilt this myself. My quilter has so many of my quilts and they are languishing a bit. My machine is so much easier to use and no longer frustrating since it was serviced and I have a spool of thread that would work. I think I could quilt this quilt – simply and get it out of the house.
Quilting a quilt does take up space on my machine and does hamper my piecing productivity. I guess I have to become OK with the entire quiltmaking process. I have been avoiding quilting for the last couple of years. Perhaps it is time to get back in the saddle.