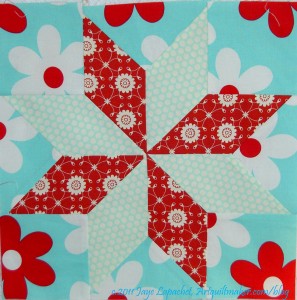
This is a tutorial on making a LeMoyne Star. This block is also called an Eight Pointed Star. This is one of the ways that I make it. There are many methods and I encourage you to try different techniques.
Alex Anderson has a great tutorial on one of the Quilt Show episodes on making a Split LeMoyne Star.
Before you do anything else, print the rotary cutting instructions below (first item under supplies). All the sizes, etc are there.
Supplies:
- 8 Pointed Star Rotary Cutting Directions
- 4.5″x 12.5″ Creative Grids ruler
- 4.5 x8.5″ Creative Grids ruler
- Optional: Jinny Beyer Perfect Piecer ruler
- Optional: Mary Ellen’s Best Press or similar
- Optional: stiletto
- fabric marking implement (pencil, Sewline, Pilot SCUF, Pigma Micron, mechanical pencil, etc)
- rotary cutter
- mat
- sewing machine
- thread
- iron
- ironing board
- 3 fabrics (I will name them A, B, C)
- 3″x23″ strip of fabric A for 4 diamonds
- 3″x23″ strip of fabric B for 4 diamonds
- 1 fat quarter for the background (fabric C)
Important information:
- Block is 12.5″ unfinished, 12″ finished
- These directions use a quarter inch seam allowance.
- You will be creating Y seams.
- Chain piecing is not part of this tutorial.
- Respect the bias.
- Do not sew into the seam allowance.
Cutting
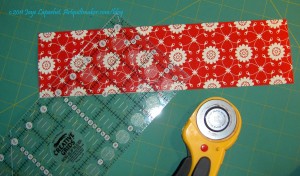
Cut a 3″x23″ strips. That should be long enough for 4 diamonds (parallelograms). Cutting a 3″ strip across the width of a half yard of fabric will generate a strip that is long enough. You will need two and using 2 different fabrics looks good.
As shown (left), line your ruler up so the 45 degree angle on your ruler is along the bottom of the strip.The side of the ruler should be lined up right in the corner of your strip.
The idea is to cut off the end of the strip, so you have the correct angle of one pointy end of the diamond. I did try my diamond ruler, but none of the lines were quite the right size, so I couldn’t use it for this particular block.
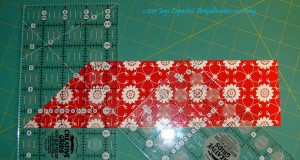
I used the two rulers to make sure that the diamond were accurate. The first ruler, on the left, should be even with the far left [soon to be] diamond point so that it would measure 4.25″ along the bottom edge. I used that measurement to line up the 45 degree angle of the second ruler so I could cut the angle in the right place. I butted the second ruler up against the first ruler (carefully) so everything was in alignment. The second ruler (on the right) must have a 45 degree angle that intersects with a corner or this trick won’t work.
I removed the left ruler before I started cutting, as it was easier to cut with just one ruler on the mat. I was careful not to jostle the ruler in the 45 degree angle position. Line your ruler up exactly as shown in the photo. You don’t have to have exactly the rulers I have. You can use any rulers with the correct lines.
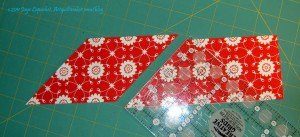
I found that the method really does work. You will need to repeat the step above 8 times to get 8 diamonds. After the first diamond, it will be easier, since you can use the 2d cut for each diamond as the first cut for the next diamond.
Aside from having to watch out for ruler jostling, I was really pleased with how easy this was and well these diamonds came out. Don’t get me wrong, I wouldn’t have wanted to cut the 300+ diamonds for FOTY 2010 using this method, but for a LeMoyne Star, it works very well.
I cut all the diamonds at once from two strips of two different fabrics. My fabrics are:
- background: Lil Plain Jane
- red diamonds: Moda Bliss #55021
- aqua dot diamonds: Moda Bliss #55023
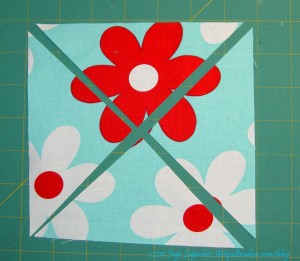
Cut the squares and triangles according to the cutting directions on the PDF in the supply list. The triangles are quarter square triangles, which means that you cut the triangles so the straight of the grain will be along the hypotenuse (the long side of the traingle).
If you have some reason for not being able to cut the side triangles as shown, be careful sewing the block together and then stay stitch the outside of the block once you are finished.
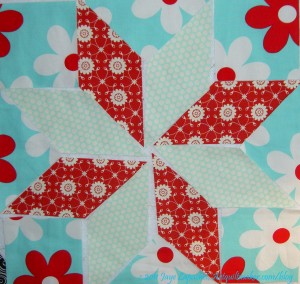
Once your pieces are cut, lay them out or adhere them to your design wall, so you know what you have.
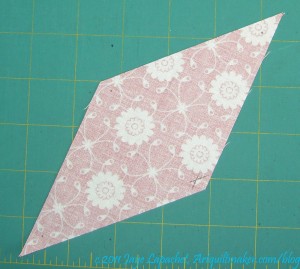
I like to keep them where I can see them because it helps me know where I am. As I sew, I put the sewn elements of the block back up on the design wall.
Once you have cut all the diamonds, you will need to mark them. You need to mark 1/4″ away from the seam line, because if you want this block to come out right, you cannot sew into the seam allowance. The biggest rule I have for making the LeMoyne/8 pointed star block is NOT to sew into the seam allowance. There are exceptions, but I am not going into those now.
Put your diamonds face down on a writing surface and prepare to mark. As you can see from the photo, I used my cutting mat as the hard surface. You can use a table or whatever else works for your work area. I used the Sewline pencil to make the marks. Pilot SCUF pens, a mechanical pencil, etc also work.
Get ready to mark the seam allowance on all of your pieces (squares, triangles, diamonds).
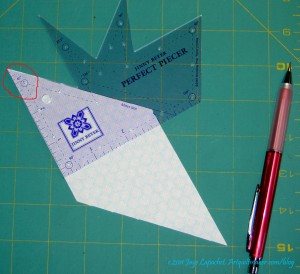
I like using the Perfect Piecer ruler by Jinny Beyer for marking weird angles, because I only have to move the ruler once to mark the ‘corner.’
With the Perfect Piecer (they aren’t giving me free stuff, BTW!), you put the ruler in the ‘corner’ as shown in the photo. Where I have placed the circle is a hole. Note it is a small hole, so a regular No.2 pencil usually won’t work. Stick your Sewline (or other fabric marking implement with a very thin point) in there and make a dot. Voilà!
You will need to use two different parts of
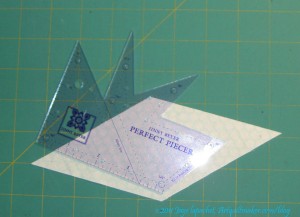
the Perfect Piecer ruler to make the marks on all four ‘corners’. There is no angle for the sides of the diamonds, so just use the straight edge (as I describe below). You don’t need to know the angles, if angles make you crazy. Just match up the shape of the ruler with your cut piece.
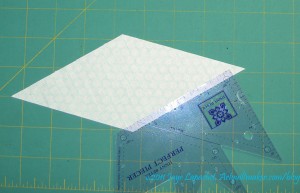
You can certainly use any kind of ruler. Take your regular ruler and line up the 1/4″ line with the cut edge. Make a line around where you think the quarter inch would be. Make it longer, so you don’t have to go back and do it over. Move the ruler to the opposite cut edge of the diamond and cross your first line with a new line. It makes an X. I have done this numerous time and there is no problem using an X instead of the Perfect Piecer dot.
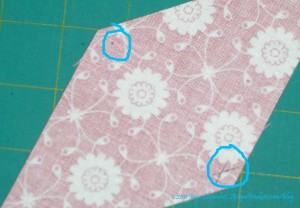
In case you were wondering what the marks look like, the photo (red diamond with blue circles, left) shows examples.
The upper left hand mark inside the blue circle is the mark made with a Perfect Piecer and the Sewline pencil.
The lower right hand mark is made using a regular rotary cutting ruler and the Sewline pencil. Either mark works, as I said. You will use these marks to stop and start your seam lines. NO sewing into the seam allowance!
You will need to mark the squares and the triangles, too. You can use the Perfect Piecer to mark those pieces as well.
At this point, you might want to use some Mary Ellen’s Best Press to stiffen your pieces since you will be sewing along a lot of bias edges. You can either spray it on all of your pieces all at once, or as you are getting ready to sew. If you don’t want to use Mary Ellen’s Best Press or spray starch, no problem. Just keep in mind that you are working with bias edges, so work with them carefully. You don’t need to be afraid of bias edges. Just work slowly and carefully. Respect the Bias! 😉
Sew Segments Together
Now you are ready to sew!
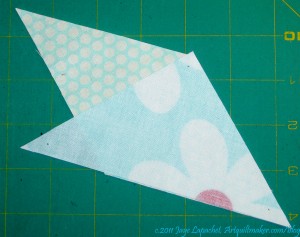
First, position one of your side triangles over the diamond as shown, right sides together. You are lining up the diamond with the left non-hypotenuse side of the side triangle.
Line up the marks you have made on the diamond with the marks you made on the triangles.
I used pins, but only stuck them through vertically one time to keep them in place until I got to the sewing machine.
You can give the pieces a little press to stick them together, too, if you want.
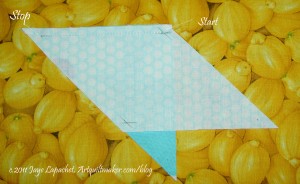
Next you sew from mark to mark. Stay out of the seam allowance! You can back stitch, if you want, but stay out of the seam allowance. Start sewing at one mark and stop at the second mark. Easy!
An Aside: You are probably wondering about the lemon fabric. I press fabric on my ironing board and if I am pressing a lot of pieces, then I will put a larger piece of fabric so that I can get more bang for my buck. As I press the smaller pieces the larger piece gets pressed as well.
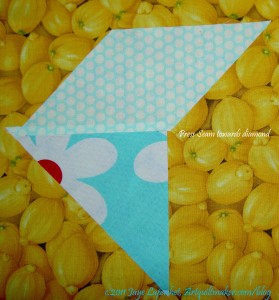
You can press now. If you do, press carefully (remember the bias, respect the bias) towards the diamond. If you don’t want to press until later, that is ok, too. I usually create the entire segment (2 diamonds, one triangle) before I press.
Now you have your first piece. YAY!
Not hard or scary, right?
Repeat this step for all of the diamonds that will be in the same position as my aqua with white dot diamonds.
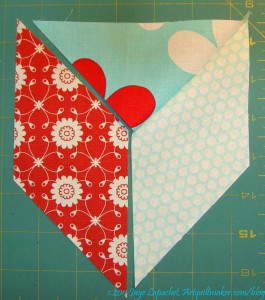
The next step is to sew the second diamond on to the segment (above: aqua with white dot & Lil Plain Jane fabrics) you have just made. You will be doing an inset seam. An inset seam is also called a Y seam. A lot of people hear this and panic. It isn’t difficult, but you can’t chain piece them and you have to pay attention. This method is similar to sewing hexagons together. Y seams really expand your quilt block piecing repertoire.
As you can see I have lined the red diamond up with the segment I sewed and am ready to line up the pieces, pin and sew.
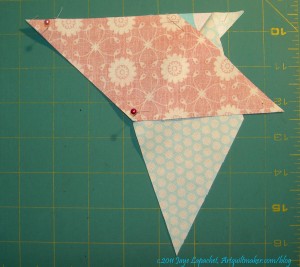
First, line up the marks on the triangle and the diamond.
I just used vertical pins to make sure that everything was lined up before I sewed. I put a pin in the middle of seam line right before I sewed just to hold everything together.
You will be sewing in two stages. I like to sew the triangle to the second diamond before I sew the two diamonds together.
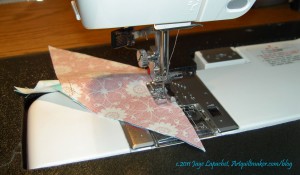
Next, place the group of 3 patches (2 diamonds and a triangle) under the needle, lining up the marks so that the needle misses the seam allowance and goes straight into the first mark.
Sew from mark to mark. The triangle and the second diamond will now be sewed together.
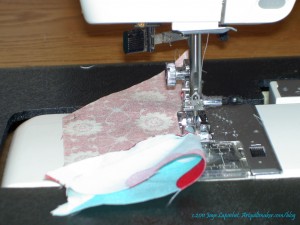
Second, line up the new diamond with the diamond you have already sewed to the triangle.

Match up the marks on the top and sides of the diamond. Right sides should be together.
Put the top of the 2 diamonds into the machine. You will start sewing at the mark, which is 1/4″ in from the top of the diamond. Sew between the two marks, avoiding the seam allowance.
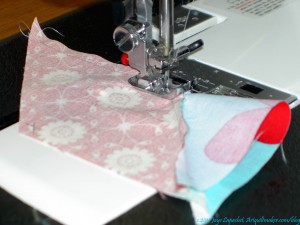
Sew down to the mark at the bottom of the diamond. If the pressed seam allowance looks like it will go under the needle, move it out of the way with your finger, the tip of some sharp scissors or a stiletto.
Stop at the second mark.
Remove the piece from the machine.
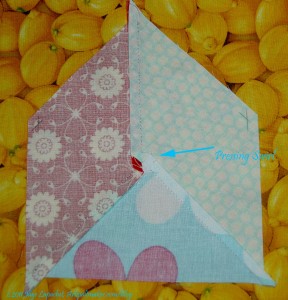
Once you have sewed the the three patches together, you will have one full segment completed.
Next, press the 3 seam allowances into a swirl. This is similar to what you do with hexagons. As a guide, use the first seam that you pressed after sewing the first diamond to your triangle.
The reason I suggest the ‘Swirl’ is that it reduces bulk later. This particular pressing point isn’t as important in terms of bulk as the center, which has a crazy number of layers, once finished. Consistency is good, though.
Repeat to make four of the above segments.
Sew Quarters into Halves
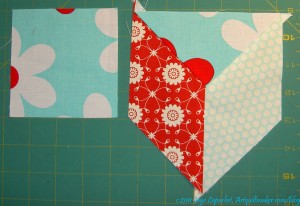
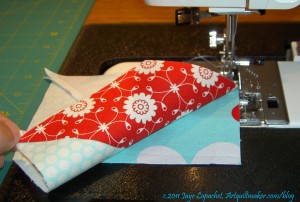
Line up the square to the [red] diamond, matching the marks.
Arrange your pieces like I have done.
Line up the marks in the square with the marks on the outside side of the bottom (in the picture it is red) diamond.
Press, if you like. Pin, if you like. Go back to the sewing machine and sew from mark to mark.
Repeat this step for all four segments.
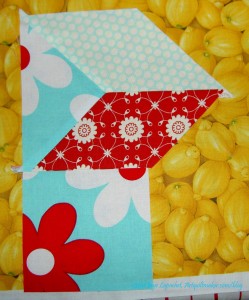
If you just look at the next photo, you might have a heart attack. Please don’t. Add the square is not hard. The key is to NOT sew into the seam allowance.
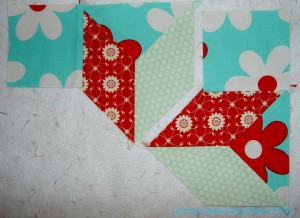
Once you have two segments sewn to two squares, prepare to sew the two quarters together.
An Aside: You can actually sew into the seam allowance on any seam that will end up on the outside of the block. If this thought is going to make your head explode, then just remember my mantra: don’t sew into the seam allowance and you will be fine.
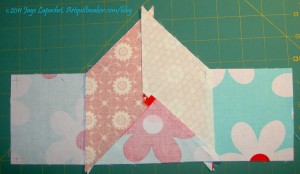
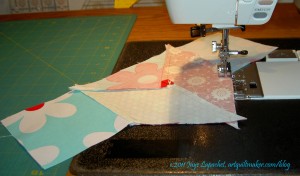
Sew the [red] diamond to the aqua diamond on the bottom. Stay out of the seam allowance and sew mark to mark.
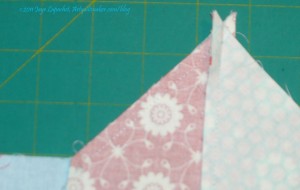
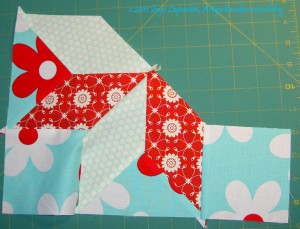
It looks weird once you have sewn the diamonds together, but it will work out.
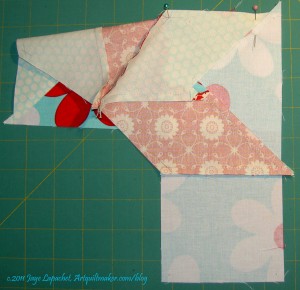
Line up the square with the [aqua] diamond and sew from mark to mark.
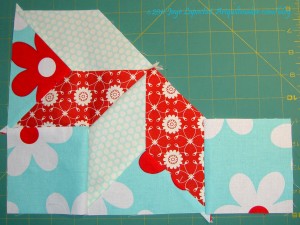
Two Halves of Block
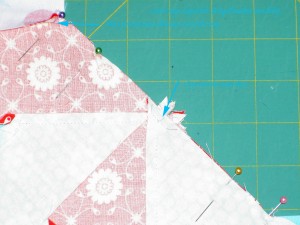
Finally, we are ready to sew the two halves together. You should have pressed in such a way that you can nestle the diamonds together using your pressed opposing seams.
Match up the marks with pins. I used really thin ones this time. I normally use the kind shown in the center detail photo, but switched to thinner ones as I worked on this step, because my normal pins weren’t giving me the results I needed for this tricky piecing. Note that I don’t pin right in the center. I pin well where I am not going to sew and may put another vertical pin in the center temporarily. There are so many layers in the center that it doesn’t always make sense to pin there. Do what works for you.
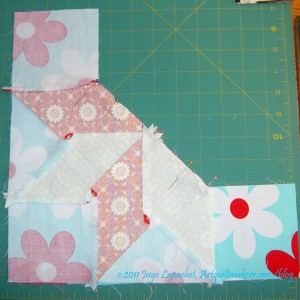
Line up your piece carefully.
Hold on to your pinned halves tightly.
Sew over the center only. Start about an inch from one side of the center and stop about an inch after the center.
Sewing only a couple of inches makes it much easier to rip out, which I had to do. You might think that this will be a piece of cake, which it might be for you. It can be tricky also, because of the many layers of fabric that you are sewing through. My sewing machine did not want to go straight over that center section, which is why I had to rip out the first time.
Take the piece out of your machine, open it and see if you were able to match the center.
Once you have the center matched to your satisfaction, sew from the edge of one diamond across the entire center to the edge of the opposite diamond. Remember the mantra? Refrain from sewing into the seam allowance.
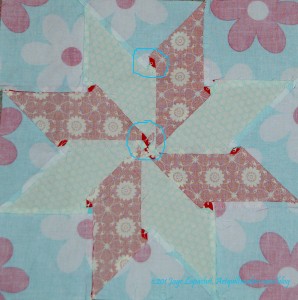
Once you have sewn the squares to the last sides of the last diamonds, pressing becomes very important. I have indicated with the circles how your pressing should look. If you need to re-press, spray the piece with water and that will make it easier.
By creating a swirl during the pressing of the center, you will reduce bulk for your quilting step. You will thank yourself if you quilt your own quilts. Your quilter will thank you, if you have someone quilt your quilts.
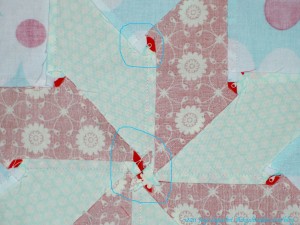
Once you have sewn the squares to the last sides of the last diamonds and pressed the piece, you should have a gorgeous block and feel very proud of yourself.


I am using your instructions for the Lemoyne Star. The square seems too small. Am I doing something wrong? Thanks for any help you can provide.
Hi Kay,
I am not sure why you think the square is too small, but I am attaching the original pattern for your information and for your own use (not for sale or sharing). I made my block from the same pattern, so you should be fine, if you are using a 1/4″ seam and are piecing accurately.
The squares are 3.5″ finished, because the ends of the two diamonds and the triangle are larger than a square in a regular 9 patch would be, if you were making a 9 patch.
Jaye
What size is the unfinished square?
Thank you
Block is 12.5″ unfinished, 12″ finished
What size is the unfinished star block.
Thank you
Block is 12.5″ unfinished, 12″ finished
Thank you so much for your tutorial. It was very easy to follow. Very grateful. My only problem I have is when I pressed the star, the fabric puckered slightly. Any thoughts on this?
Where did it pucker? It could have been that your pieces were slightly too big, but without seeing a picture, I can’t really tell. If you can upload a photo to flickr or your blog, I will take a look.
Hi thank you for the easy instructions. I am getting ready to start my first block and wanted to be sure of the size of my corner squares. Should they be 4 inches unfinished? And what size is the the triangle? Is it 4 1/2 unfinished? Thanks for your help.
Please print out the cutting instructions. All the sizes should be there.
I have created a pattern using the LeMoyne Star and am wondering if you would be willing to allow me to link to this tutorial. It was very helpful to me!
I wrote a couple of weeks ago to ask if I might link to your tutorial here in a quilt pattern I’ve developed that uses a LeMoyne Star. Would you grant me permission for that?
Thank you,
Debbie
Hi Debbie,
Please check your email. I forwarded the email I sent earlier.
Jaye
Thank you ver much for your tutorial, I’m a beginer and didn’t know how to make my star (it’s for a japanese bag and it’s very small). I’m doing well, I think, and that is thanks to you!
I am so glad the tutorial is helpful. Take a look at my other tutorials. They may help as well! Thanks for reading.
Thank you so much for this great tutorial! I never could have sewn this star together without this. I have no spatial awareness. Lol
I am so glad this tutorial was helpful! Check out my other tutorials at https://www.artquiltmaker.com/blog/aq-projects-tutorials/aq-tutorials/quilt-class/
Do you have measurements for the 9 inch finished block or 9 1/2 inch unfinished
Thank you so much
Grateful
Linda
Thank you for this Tutorial. Most useful.
Piecing the star and when I start adding the squares and half squares it wants to bulge in the center. This is my first hand piecing project.
I assume that your pieces are cut accurately. If so, don’t piece too tightly. Ease the square into the corner a tiny bit loosely.