I had a tough time deciding what to make for Carrie and Sue for Christmas. I don’t want to just make them anything. I want what I make to be useful. Eventually, after considering several Minikins patterns I hadn’t tried, I decided on I Spy pouches.
Is this a cop out?
No.
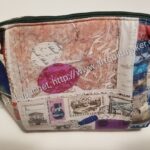
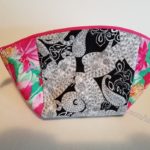
Sue’s I Spy – back
As I have said before, these pouches are like eating potato chips for me. I can make one quickly. I also really enjoy making them. Because they are fast? Maybe. Mostly because they are useful.
Sue gets a color wheel on the back to help her pick out fabric. I also remembered to put a label on the pouch.
Some time ago I made Carrie and Sue Kit Supply Totes. The Hackney pouches I made for them fit nicely into the Kit Supply Totes. I thought the I Spy would fit nicely in it as well.
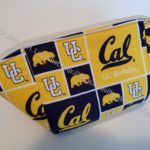
I know it’s been a week or so since I posted about gifts, but we are back to it.
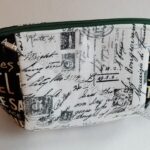
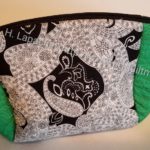
I posted last week about Sue’s I Spy pouch. One of the differences I made is that Carrie got a whole color wheel in the front while Sue’s was on the back. One of the reasons I like this fabric is because it means they always have a color wheel with them.
Carrie’s I Spy – back
I found some nice zipper pulls in my hardware bag that I added. They are apples, which have nothing to do with color wheels, Carrie or Sue, but here we are. Zipper pulls, aside from being cute really help to pull zippers open.
I finished the Atlas Zipper Case right before Thanksgiving. Of course, I couldn’t talk about it before now because I wanted to be a surprise. Even this is a little early!
I am super pleased with the way it came out. I hope my Lil Sissy likes it, too. She shared the original IG video about the pouch (portfolio) with me.
I didn’t find the project to be very difficult even though I struggled to get started. Cutting is always a hassle. I always want to get straight to sewing.
For this piece, I used a piece of the Paris fabric I have been using to make gifts for my sister. The fussy cutting, after I quilted it, came out really well. I used my 20.5 inch x 20.5 inch Creative Grids ruler**. That ruler is really big and a bit unwieldy on my small cutting table, but I wanted to be able to see the whole piece and trim exactly. It worked really well except for pushing my entire scrap bin onto the floor in the process! LOL! The Eiffel Tower is perfectly placed on the front.
Paris Atlas Zipper Case – back
The bicycle on the back looks good, too. I haven’t ever asked my sister if she likes this fabric. I hope so as I just bought more of that yardage. I feel like I was lucky to find some as is isn’t new.
I forgot to sew the label on before I added the inside pockets, so I hand stitched it later.
The portfolio has a zipper that goes all the way around, so the bag is completely closed when it is zipped.
Atlas Zipper Case Open
It has smallish, but useful pockets to keep some of your tools, or, possibly, project pieces organized.
There is also space for flat items, like a 6.5 x 6.5 ruler** under the pockets.
Atlas Zipper Case -open, right
I am on the fence about the fabric pocket on the lower right. All of the other pockets are vinyl. I like seeing what I have available, but I guess you could use that pocket for things you didn’t want everyone to see. Credit cards or your driver’s license? I don’t know. I keep those things in one place so I always know where they are. If I make this again, I might make it into another vinyl pocket.
Atlas Zipper Case -open, left
The left side has a larger pocket completely made from vinyl. This is a really useful pocket.
I really like this project and am looking for ways to make more.
**N. B. : Obviously, you should shop at local quilt shops and support small businesses. However, if you are too busy or can’t find what you need there, I use Amazon affiliate links and may be paid for your purchase of an item when you click on an item’s link in my post. There is no additional cost to you for clicking or purchasing items I recommend. I appreciate your clicks and purchases as it helps support this blog.
Yesterday was the guild’s Holiday Extravaganza. SIL#2 organized a pouch swap. I didn’t participate in the last swap, which featured potholders. I am not a fan of potholders, so I didn’t want to bother. There were plenty without me. However, I want to encourage people to make bags, and I like making pouches, so I planned from the beginning to participate in this latest swap.
Swap Stella pouch
After seeing the Center Street Quilts video on IG showing the making of a half vinyl pouch, I decided to try and make one for the swap. I thought I could probably make the pouch after watching the video, but decided to buy the pattern, the Stella Pouch from Center Street Quilts just to make the process a bit easier.
I looked for more specific directions on the Flying Geese and the vinyl, but didn’t find any. Even with the pattern, I still had plenty of figuring out to do. It wasn’t a problem. I knew I could figure it all out. That is one reason I enjoy making bags. There is always something to figure out.
I think I forgot to trim the height, so the pouch is bigger than the pattern states. Still, I think it will be useful. Small project bag?
Swap Stella pouch – back/vinyl
I am pretty happy with the way the pouch came out. I am getting more practice with binding the inside edges and I was thrilled to get more practice on the zipper tab technique I talked about a week or so ago. I have big plans to make a bunch of these, but we will see.
I finished the Holland Pouch while I was in Portland in October. It was a pretty quick sew – ~6 hours from start to finish. I wasn’t feeling my best, so I knew I could make it faster.
Center Street Quilts directional fabric chart
I bought this pattern at Stitch during the July trip home from Portland. The fabric was also purchased during that trip at Sewlarium. It was a great choice for this bag.
The directions show how to position fabric if it is directional, which is the first time I have seen such a feature in a pattern, that I can remember. I’d love to see this type of chart in all bag patterns. I know most say something like “all cutting directions are width x height”, but having the visual makes a huge difference for me. Even before I saw this chart, I drew little pictures of how directional fabric should be cut in my various patterns.
Black Cat Holland Pouch – interior
I used some hippo fabric and hope he remembers visiting the hippo at the zoo when he was young.
This is the first bag I have made for the YM. I hope it is one he likes and will use it. I sent it off to him for his birthday, which was on the 30th.
We are thanking Laura, a longarmer in Half Moon Bay who has been longarming donation quilts for us for a year or more. Carrie is gathering gifts to make a nice basket for her.
Stella Pouch for Laura
After seeing the Center Street Quilts video on IG showing the making of a half vinyl pouch, I decided to try and make one. I actually made two. One will be for a guild swap. I thought I could probably make the pouch after watching the video, but decided to buy the pattern, the Stella Pouch from Center Street Quilts just to make the process a bit easier.
Stella Pouch for Laura – vinyl side
I looked for more specific directions on the Flying Geese and the vinyl, but didn’t find any. Even with the pattern, I still had plenty of figuring out to do. I knew I could do it. That is one reason I enjoy making bags. There is always something to figure out.
I think I forgot to trim the height, so the pouch is taller than the pattern states. Still, I think it will be useful. Small project bag?
One of the good things about using vinyl for this bag is I was able to use a very pretty lining fabric. Having a good fabric show through the vinyl is an added bonus.
I think I might have a few more of these pouches in my future.
**N. B. : Obviously, you should shop at local quilt shops and support small businesses. However, if you are too busy or can’t find what you need there, I use Amazon affiliate links and may be paid for your purchase of an item when you click on an item’s link in my post. There is no additional cost to you for clicking or purchasing items I recommend. I appreciate your clicks and purchases as it helps support this blog.
Despite my objections to the zipper installation, I decided to make another Holland Pouch. While I was in Portland, I went to Modern Domestic and bought some fabric, then went back to my AirBnB and made the pouch. The second time it only took me about 4 hours from cutting to completion. I couldn’t make these for a living, but I was pleased with how fast I did it.
Bird Holland Pouch Interior
I have been buying a few Charlie Harper bird prints lately. I don’t know why as I don’t usually make projects out of novelty prints. I bought this particular print because Amanda loves animals. The print is sophisticated as well. Most of Charlie Harper prints have a bit of humor as well as some sophistication.
The inside of the bag is made from a Ruby Star scattered star print. The color doesn’t exactly go with the outside, but choices were limited at Modern Domestic. I think the variation looks nice.
I also couldn’t wash the fabric (AirBnB and all), but for a bag, just this once I was ok with it. I was concerned about the smell from ironing the fabric, but I didn’t smell anything and didn’t have any breakouts, so it was all ok. The Charley Harper fabric is organic, so maybe that makes a difference?
Quilting Bird Holland
This pattern requires quilting the exterior, foam and lining fabrics together. Instead of quilting on each side of blue tape only, I put down a piece of blue tape, measured 3 inches to the right and put down another piece. I did that on both sides of the center piece of blue tape until I ran out of space. This means that my quilting isn’t as close together as in the Oxbow tote. It also took less time and I didn’t get as irritated.
Holland Pouch side
The quilting went faster, but it means there is a 3 inch gap between some of the quilting lines. You can see that there is a dearth of quilting lines on the side towards the top, because of the 3 inch gap. I probably should have turned the fabric around, so there was more quilting on the top.
I also had a bit of trouble keeping the fabric taut, so the 3 inch spacing may not have been the best interval. Oh well. Live and learn.
Bird Holland pouch top
This bag has a bit of an accent around the zipper, which I think looks nice in this bag.
This is a very quick bag to make and I am pleased with the outcome. I was more pleased that Amanda loved it. She really helped me during the visit and this was a small token of my gratitude.
The one objection I have to Center Street Quilts patterns are that she doesn’t cover the zipper with the lining. I know this is super petty and have been told so by people to whom I have mentioned this quirk. After all, zipper tape doesn’t fray and if you use a matching thread, the thread doesn’t even show.
Binding the Holland Pouch
I didn’t have a lot of thread colors with me, but I had one that matched the zipper I chose.
The picture (right) shows how the pouch is finished when the lining and exterior fabrics are quilted. You have to bind the edges from boxing the corners. I have done this by hand before. This time I did it by machine. Again, with matching thread, it would look better. I need to practice this.
I am almost finished. This will be a Christmas gift for the YM.
I went to Portland again last week. My original plan was to help the YM settle into his new apartment. He hasn’t found one yet, so I helped him job search instead. Mom didn’t go this time, which was weird. I tried to embrace the weirdness and I did ok. It was nice to be on my own.
Black Cat Holland Pouch cut out
In my off hours I sewed. I brought my sewing machine and a few projects. The first thing I started was the Holland Pouch. This is a basic boxy bag, which I bought at Stitch in Ferndale in July. I bought the pattern as I thought it would be a good gift and I was too lazy to try and find a similar free pattern.
Center Street Quilts directional fabric chart
One of the things I don’t like about Center Street Quilts patterns is that she doesn’t cover her zippers on the inside of the bag. I gave myself a talking to after a discussion with Amanda about this point. First, the zippers won’t fray. If I use a coordinating thread color, it looks fine. So, I am mostly over that. I have to say that CSQ had a GREAT chart showing how to deal with directional fabric. I am in love with this chart. It was so helpful and I am convinced that my cat fabric will not be upside down.
I finished one of the Cotton Candy pouches and was reinvigorated after I did a better job than I did with the Slimline version.
I didn’t have the right length zipper in pink, but I thought the orange went with the fabric. I also thought I should have fussy cut the side panels, but didn’t think of it until later. Still, I am happy with the way it turned out.
I used similar fabrics to the fabrics I used in the Pink Project v.1. I wondered if I should make a whole set using the same fabric. I might have enough of that Denyse Schmidt Flea Market Fancy fabric to make a few more bags and pouches. It might bore me, though, to use the same fabric. I already have a different print chosen for the Chickadee. I don’t want to change that choice at the moment.
Pink Project Cotton Candy interior
Pink Project Cotton Candy interior
The inside is also a Flea Market Fancy print. I filled it with some self-care items and it was used to raise money for Phi Mu Foundation, which provides scholarships and disaster assistance to women. We made $80, which isn’t a lot, but the event was only attended by 9 people. I need to get some more self care items to fill up the next ones.
No, this is not pink, but I am still making it part of the Pink Project, at least for the time being. I don’t want to make a new tag for every project I decide to start.
I was so excited by the triangles that I wanted to use this fabric. I think it is a Carrie Bloomston fabric, but I can’t remember where I bought. I am pretty sure it was a recent purchase.
As mentioned, I am doing a blue version as well as a pink version for two different groups to auction off.
Blue Triangle Cotton Candy – side
I wanted to cement my technique for the Cotton Candy pouch after the mistakes I made with the Slimline Cotton Candy. This is one of the pouches that I made. I decided to make one each for the two projects.
Blue Triangles Cotton Candy pouch inside
While I did better this time on lining up the pieces, I didn’t do as well on the zipper. I am not sure why. It looks really wobbly. Most people won’t notice, but it bugs me.
I wasn’t able to anchor the the sides to seam allowance like I did with the Hildegarde. That might be a challenge for another day.
Blue Triangles Cotton Candy zipper end
I did veer the zipper on one side of this bag, but not on the ‘top’.
I decided to fold over the zipper ends and place them where I wanted them rather than hoping for the best when I was veering the zipper. I think the ends look pretty good.
As mentioned, I started sewing some Cotton Candy pouches at Sew Day. I had cut them out as a reminder after I sewed the Slimline version of the Cotton Candy pouch wrong. I was a little angry at myself, because I want to work on new pouches – patterns I haven’t tried before. Even though I love the Cotton Candy pouch, I have made it many times. I felt, however, that I needed to remind myself how to get this pattern right.
I was pleased with the progress I made at our Special Sew Day. I would have liked to have made more progress, but forgot the zippers. When I got this far, it was time to clean up and go home anyway.
I thought I would try the triangle fabric fabric I bought at Bay Quilts recently and see how I liked it in bags.
Both of these will be for the Pink Project. I know one is blue, but I am doing a second batch for the local Alumnae Panhellenic group and want to use some different fabrics.
I made this Cotton Candy pouch for a friend’s birthday.
It ended up being a ‘slimline’ version as I sewed the side panels to the wrong end of the main panel and had to trim extensively. It worked out and she liked it so no harm.
However, I need to get this right. I have made so many of these pouches that I am shocked and amazed that I made such a big mistake. I am going to make some others to cement the process in my head.
As I was organizing all the fabric to wash, I made notes and took pictures of projects I had in mind for the fabric. I need to do that because I am excited about sewing. I am excited about making gifts and some donation projects. I have a lot going on and I don’t want to forget what I was thinking.
Holland Pouch + fabric idea
First up is the Holland Pouch. I saw this pattern at Stitch in Ferndale and decided to get it. I love the Hemingway pattern by the same company and it was convenient to purchase the print version while I was there. I found the fabric above and I know the perfect person for it.
I bought the black cat fabric in the second photo for the same person. I bought it first and if I had seen the cat fabric above, I wouldn’t have bought the second fabric. Still, I might make this person two bags. I’ll use the same lining for both.