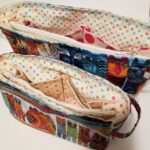
As mentioned, I started sewing some Cotton Candy pouches at Sew Day. I had cut them out as a reminder after I sewed the Slimline version of the Cotton Candy pouch wrong. I was a little angry at myself, because I want to work on new pouches – patterns I haven’t tried before. Even though I love the Cotton Candy pouch, I have made it many times. I felt, however, that I needed to remind myself how to get this pattern right.
I was pleased with the progress I made at our Special Sew Day. I would have liked to have made more progress, but forgot the zippers. When I got this far, it was time to clean up and go home anyway.
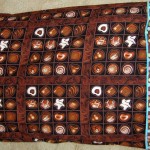
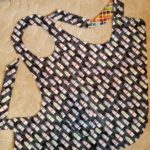
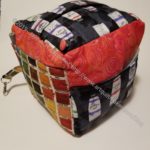
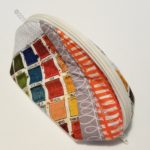
I thought I would try the triangle fabric fabric I bought at Bay Quilts recently and see how I liked it in bags.
Both of these will be for the Pink Project. I know one is blue, but I am doing a second batch for the local Alumnae Panhellenic group and want to use some different fabrics.
I received a little brush at one of the Quilt Retreats I attended in the past. I used it for cleaning out the bobbin area of my sewing machine. Recently, it disappeared and I really missed it.
Sewing Machine Cleaning Tools
Each time I change bobbins, I clean the lint, etc out of the bobbin case. The brush I lost made the job quick and easy.
As soon as I got them I tried using the various tools to clean out the lint from my bobbin case. I like the different shapes of the tools, but I really don’t need all of them.
Regardless of the shape, the brushes are not quite right. They are more flexible than my previous brush. I may not have a choice in that my original brush is gone. Thus, I think that this set will have to work for me.
**N. B. : Obviously, you should shop at local quilt shops and small businesses. However, if you are too busy or can’t find what you need there, I use Amazon affiliate links and may be paid for your purchase of an item when you click on an item’s link in my post. There is no additional cost to you for clicking or purchasing items I recommend. I appreciate your clicks and purchases as it helps support this blog.
The Half Hexie Star is finally finished and off to its new home.
Someone said that I must really like the people to whom I gave the quilt. I do like them, but as I often say: there is always more fabric. I like the people and the quilt was a lot of work, but there is always more fabric. The point of the quilt was to have something to work on in the evenings when I was watching TV and visiting with my DH.
Half Hexie EPP back
Now I am on to another EPP project and the Half Hexie Star quilt will be loved in a new place. As an added bonus, I have spread the joy of quilting to a new couple.
I made another lined Drawstring bag from the Jeni Baker In Color Order pattern as a gift bag for a friend. I was pleased to use the Anna Maria poppy fabric. Can you tell she loves pink?
This one is the Artist size, which is slightly larger than most of the drawstring bags I have made. The size I normally make is called the Project size. I just wanted to try something different this time.
The Artist size is one of the sizes that comes in the paid pattern. As a side note, Jeni Baker has an annual Lined Drawstring Bag Sew Along. It’s coming up in November 2024. It’s hard to find another great way to get familiar with the pattern.
I am still struggling with the ties and really need to figure that out. These look fine, but I always struggle.
I filled the bag with some self care supplies. She said she really liked everything. My friend’s mother died right before her birthday and this was a great way to let her know I was thinking about her.
In honor of my Mom’s birthday, which was yesterday, I am revisiting the gifts I have made for her. She is downsizing so I have slowed my production for her and she didn’t get a bag yesterday. Still, there are a couple of new items on the list. I still have fabric for her, so I am not done making things with it yet.
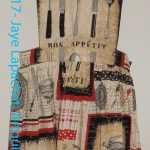
I made this Cotton Candy pouch for a friend’s birthday.
It ended up being a ‘slimline’ version as I sewed the side panels to the wrong end of the main panel and had to trim extensively. It worked out and she liked it so no harm.
However, I need to get this right. I have made so many of these pouches that I am shocked and amazed that I made such a big mistake. I am going to make some others to cement the process in my head.
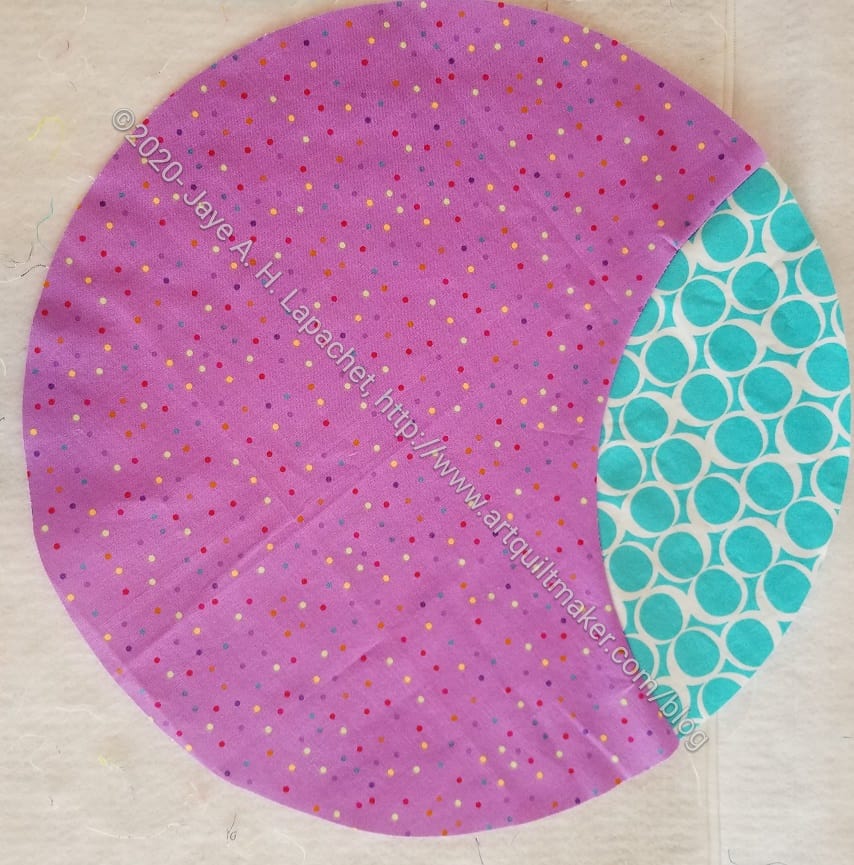
I don’t know how this shape came into my mind, but I was driven to learn to make this combination of shapes when I took the Latifah Saafir class in 2021. I have a sort of idea for a quilt using this shape, but it hasn’t come to fruition yet. The closest I have come to drawing it out or designing it is the Bubble (circle) donation quilt I made with Gerre a few years ago.
Ever since I learned to make these Orange Peel Circles, I have wanted to write a tutorial. I wanted to remember how to make them whenever I wanted. I also wanted to share the knowledge with you so YOU would have another use for your Clammy rulers.
Supply List:
Clammy ruler – the 12 inch** or the 8 inch** or the 6 inch** (any size works)
fabric (at least 2 different) – I used large-ish scraps for this tutorial
pins
Sewing machine
quarter inch foot
thread
Iron and ironing board
Notes:
You need the directions for using the Clammy for this tutorial. They are included on the packaging. If you have tossed your packaging, download the information from Latifah’s site. I downloaded one and the information is laid out very well.
For this tutorial, I am using the 8 inch** Clammy. Adjust if you use other sizes.
Steps:
8″ Clammy ruler and packaging
The directions for cutting an Orange Peel are on the front of the Clammy ruler.
Orange Peel Circle tutorial: cut a square
Start with a square. If necessary, give yourself some wiggle room by cutting the square a bit larger than called for in the directions.
My Orange Peel Circle came out perfectly using the sizes on the ruler packaging. Try out some test circles to gauge whether you need to start larger or not.
Orange Peel Circle tutorial: line up Clammy
Cut your Orange Peel from this square. Line up your ruler as shown. You can see the lines of the Orange Peel shape clearly on the ruler. You want the straight dividing lines to be on the edge of the fabric and the Orange Peel shape to be completely in the square. Review the directions on the front of the Clammy packaging* to line everything up.
If you have cut a larger square, you will trim more.
Orange Peel Circle tutorial: cut 1st 1/2 of Orange Peel
Cut the first part of the Orange Peel. This will yield a shape like you would use for Drunkard’s Path.
This is where your rotating cutting mat** comes in handy.
Orange Peel Circle tutorial: realign the ruler
Turn your fabric and re-align the ruler. You can see how your Orange Peel piece will look through the ruler.
Orange Peel Circle tutorial: cut the 2d part
Cut the second side of your Orange Peel. Set this part aside. Toss the leftover background fabric into your scrap bin.
Now you are ready to cut your full circle
Orange Peel Circle tutorial: cut square
Based on the 8 inch Clammy, cut a 8.5 inch square of fabric. Adjust if you are using a different Clammy.
This will be the main part of the circle.
Orange Peel Circle tutorial: fold squareOrange Peel Circle tutorial: fold square
Fold your square in half and place the fold closest to you.
Orange Peel Circle tutorial: align your ruler
Place your ruler on the fabric. This is a good time to review the instructions or one of Latifah’s videos.
Orange Peel Circle tutorial: cut the circle
Cut the full circle.
Orange Peel Circle tutorial: open the circle
Open the full circle and admire your work! I always feel excited when I see that circle opened up.
Troubleshooting: If your circle is not whole (cut in half) when you open it, then you need to realign your fabric and make sure the fold of your folded square is close to your body before you cut.
Orange Peel Circle tutorial: align your ruler
Line up your ruler to prepare to cut the Orange Peel out of the full circle.
Note: For most of the cutting in this tutorial, I used my regular 45 mm rotary cutter**. For this step, however, I switched to a 28mm rotary cutter**. It is easier to cut the inside circle with a smaller rotary cutter.
Orange Peel Circle tutorial: cut the Orange Peel
The photo above shows the Clammy lined up and the Orange Peel cut out.
Orange Peel Circle tutorial: cut the Orange Peel
Cut an Orange Peel out of the full circle. Turn the circle if you want to avoid cutting into certain fabric motifs. In this case, I wanted to leave the full crescent moon on the fabric, so I avoided cutting the Orange Peel out of that part of the circle.
Throw the Orange Peel from the full circle into your scrap bin
Orange Peel Circle tutorial: create registration marks
Fold the circle and the Orange Peel in half to create registration marks. I do this to allow me to line up the two pieces more precisely.
Tip: If you fold one piece RST and one piece WST, you will be able to nest them in the next step.
Orange Peel Circle tutorial: Line up the pieces
Line up the two pieces using the registration marks. The fabrics should be right sides together.
Orange Peel Circle tutorial: pin at the registration marks
Pin at the registration marks to keep the pieces in place.
Orange Peel Circle tutorial: pin at the ends
I anchor the ends of the Orange Peel with pins as well.
Orange Peel Circle tutorial: pin the rest
Pin the rest of the Orange Peel to the circle using 2-3 pins between each end and the center.
Orange Peel Circle tutorial: sew
Sew the Orange Peel to the circle. I sew with the Orange Peel on top. Take out pins before your needle gets to them.
I keep the two pieces of fabric as flat as possible while sewing the curve. If necessary, make little clips in the curve.
Orange Peel Circle tutorial: sewn
Your Orange Peel is now sewn to your circle.
Press the seam allowance towards the Orange Peel.
Orange Peel Circle tutorial: sewn & pressed
You now have an Orange Peel circle!!
Your finished circle is ready to be pieced into a background. Stay tuned for that tutorial or check Latifah’s site.
If you make one of these circles, send me a photo and I will post your work here! I’d love to see your efforts.
Notes: I prefer the smaller versions. The Orange Peel circle I made with the 12 inch** (above photo) just looks too big to me. If I made a bunch of them, it might be fine.
*If you have tossed the packaging or can’t find it, download the information from Latifah’s site. I downloaded one and the information is laid out very well. You can also check Latifah’s videos on YouTube. One video shows how to cut different shapes, though it focuses on the half circle. You can get some good tips even if you don’t get the full instructions. Take a look at all of her videos.
**I use affiliate links and may be paid for your purchase of an item when you click on an item link in my post. There is no additional cost to you for clicking or purchasing items I recommend. I appreciate your clicks and purchases as it helps support this blog.
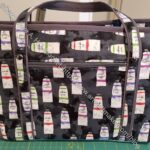
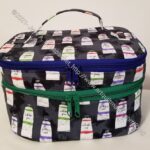
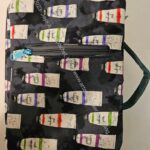
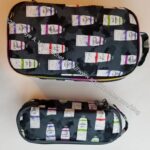
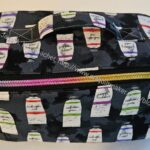
As mentioned, the Hildegarde Notions Trunk is finished.
I have to confess that the end of making the Hildegarde wasn’t as smooth as I would have liked. The Velcro was the challenge.
The photo left shows the dividers in the interior. They velcro to the side strips of Velcro, which I sewed to the lining. The problem is that the I sewed the wrong side of the Velcro to the sides. It was the same side of the Velcro that I used on the dividers, so the dividers didn’t stick very well. Yes, I should have checked I had the right part of the Velcro, but I assumed. Always a problem.
Resewing the Velcro
The Hildegarde looked really good, so I thought about not changing out the Velcro. I decided, in the end, that I would never be really happy with it-and I really like this bag, for once-, so I ripped the lining apart and sewed the correct Velcro sides to the lining sides.
The Velcro strips are originally sewn before the lining is sewn together, so it is very easy to sew them to the sides of the lining. I used the sewing holes to place the new strips of Velcro and took my time. I didn’t want to take the whole lining apart, so I unpicked as little as possible. I used some washaway tape to hold the strips in place and resewing worked pretty well. Later, I realized I could have changed the Velcro pieces on the dividers, which probably would have been a lot easier.
In my defense, I rarely use Velcro, so I forgot to check that I had the right Velcro side. I won’t make that mistake again. At least I hope I won’t!!
I am glad I did, because now I am super happy with it and the dividers actually work!
Hildegarde Finished – front (closed/exterior)
It turns out I had to unpick the turning opening a second time, because I forgot to put the Peltex in between the lining and exterior. Again, I thought about whether I really needed to do it, but the bag was saggier than I wanted, so I did it. I had to insert the Peltex around the stitching of the lining to the exterior. It wasn’t easy, but it was doable and the bag doesn’t look as saggy. The reason this happened is that I didn’t notice the last page of the pattern! In my defense, half of the second to the last page was blank so I thought that was the end, though I did think it ended a little abruptly. I have made a note on my pattern in case I make this bag again.
I went out of town with DH and it wasn’t a great weekend. I was just in a bad mood all weekend, it was hot and the events were not interesting. Or I just couldn’t appreciate them. 🙁
I found a couple of quilt shops, but when I had time, I decided I wasn’t up for the half hour drive each way on my own. A friend with whom I usually spend time wasn’t available.
In an effort not to be a sourpuss and to try and see the good in the trip, I wanted to share a couple of photos with you.
One of the good things during the trip was Fosselman’s. Fosselman’s is a full-service, old-fashioned soda fountain that offers both sit-down and to-go items. They make all our ice cream on the premises in small batch freezers.
I went there while DH was at a members only event and ate WAY too much ice cream. I sat and wrote postcards and wrote in my journal while I ate a hot fudge sundae, etc. It was a good way to spend a couple of hours.
1824 West Main Street, Alhambra, CA 91801
(626) 282-6533
Monday – Saturday 10:00 am to 10:00 pm
Sunday 11:00 am to 10:00 pm
Mission San Gabriel church
The activities were centered in San Gabriel, California right near the Mission San Gabriel Arcangel. The organization dedicated a girls’ high school, Mission San Gabriel High School*. I was impressed with the principal’s dedication and the students that I met. We had dinner in the courtyard of the mission after a tour of the recently restored church.
The tour guide was a parishioner and she was very good.
Mission San Gabriel Altar detail
The church had an arson fire in 2020, which required $8 million in restoration. The entire back of the church was significantly damaged, though the walls did not fall. The altar was not touched, though had smoke and water damage. They still need another few million.
I have seen a lot of amazing altars all over the world. I was really impressed with this one. I have never seen one with statues like this. It was really different and interesting.
The painting on the altar is tempera on wood. The statues on the altar are:
Virgin Mary (bottom middle)
St. Joachim (bottom left)
St. Francis of Asissi ( top left)
Archangel Gabriel (center top)
St. Anthony of Padua (top right)
St. Dominic (bottom right)
Mission San Gabriel bells
We had dinner in the courtyard. The location was beautiful and I am sure the food was delicious. I wouldn’t know since they had nothing gluten free and weren’t prepared for me.????
We went to take a look at the garden and saw a beautiful view of the bells.
The garden has a wonderful fountain where Native Americans hold ceremonies now.
I thought Mission San Gabriel was worth a visit, though I would have rather been at home in the cool sewing.
Doctors, nurses and Charitable Foundation Board
The big check presentation was worth the less than stellar weekend. The hospital does such great work with the kids AND their families. The treatment lasts from birth through 18-20, because of the changes happening as kids grow. The treatment is holistic as well. The program includes surgeries, speech therapy, orthodontics and dentistry, psychological counseling for the whole family and many other aspects that help develop a happy, healthy, mentally stable person. I am so proud of the Native Sons for this effort. The spaghetti dinners, BBQs and raffle baskets contribute to the donation every year. There is no corporate angel giving the money and the Board of the Charitable Foundation does not get paid or reimbursed for their work. All the money that comes from $5, $10 and $20 fundraising gifts goes straight to funding treatment. You can donate at the NSGW website.
Roxanne’s in Carpenteria
I did make it to Roxanne’s in Carpenteria. That shop makes me super happy. You can see a review of my previous visit or wait for my new review.
*If you live in SoCal and your daughter needs an amazing high school, this on has an amazing curriculum and the tuition is unbelievably reasonable.
I don’t consider FQ size pieces of fabric to be scraps. My scraps are small. I have had some larger pieces of fabric that get lost in my fabric bins, so I have cut them up into as many of my normal sized pieces as I could. With additional large-ish pieces, I have also, now, cut some rectangles.
Rectangle pieces for donation top
These rectangle pieces have been hanging around for awhile. I finally had enough to make a donation quilt.
So far, they are just on the design wall. I need to cut white or background pieces, hopefully from scraps also, to put the top together.
This bag has taken a long time to finish. I am not sure why, because it came out really well and I really like it.
It is quite a large bag, for one with a handle. The finished size is 12.75 inches in length x 6 inch tall by 5.75 inches deep.
Hildegarde Finished – front (closed/exterior)
I am pretty pleased with my fussy cutting. The fabric I chose, a Heather Bailey print called Aflutter in pink. I find it very cheerful. It is from an old line, so I don’t know if you can find it again.
I worked really hard on lining up the birds on the top and in the front panel. I can’t remember doing that kind of fussy cutting before. Sara models fussy cutting on her sample in the pattern.
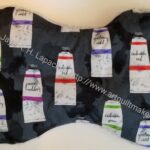
Hildegarde Finished – back (closed/exterior)
I think the little bit of top stitching on the back looks really good as well. I used pink for most of the topstitching, but there is also a bit of white as well.
I like the plethora of birds on the back.
Hildegarde: Interior with dividers
Remember I said that I thought the dividers were unnecessarily complicated? They weren’t. They now seem super useful. I am glad I took the time to follow the directions and make them. I wonder if I could (should?) put another mesh pocket on the other side of the divider?
I don’t often use Velcro and this application went better than expected. I seem to remember sewing Velcro in the past and having it stick to the bed of the machine or the foot or something. I had no trouble sewing it this time, which was a relief. I think the design using the movable dividers, works very well.
Hildegarde Finished (open/interior)
I found a good place for my label, as well. It is not really hidden at all. I like the placement.
I also like how open this bag is. It is like an ‘open-wide/wide mouth bag. I am able to see everything inside.
Side note: when I went to get a label for this bag, I realized I only had two Wunderlabels left. Another thing for my To Do list.
Hildegarde Finished – front pocket – open
I was pleased with the way the front pocket came out. I think the elastic technique worked out very well. I haven’t tried using it for thin tools, but I will. One thing I was thinking about the design is that the tools stored in this pocket would be available without opening the main zipper. I think that would be a good thing.
I plan to use this bag for notions to take to Sew Day and Retreats. I plan to place it inside the Crafty Carrier . I am not sure how I will use this large open space with the movable dividers. I need a lot more space for long thin tools like pencils, tweezers, etc. Rotary cutters will go well in the mesh pockets, I think.
I ending up giving away one of the EPP balls I made to a surprise baby of a friend. I had some leeway with the great niece/nephew due in October, so I made another one very quickly.
This one doesn’t have any novelty fabrics, but is still fun.
Slowly, but surely I am making progress on this green improv donation quilt. I am exclusively using it as leaders and enders so I can finish it for the guild Community Quilts project.
It is about 40 inches wide and I want to make it that long as well. That is about the minimum useful size for a baby quilt, I think.
It is fun to remember quilts and bags I have made with the various fabrics in this piece. I am pleased to be cleaning out the random bits of green, but it is hard going. Piecing ‘made’ fabric takes time.
I know it seems like this bag is taking forever. It is sort of, but I have been diligently working on it a little at a time in between working and managing the house. This is turning out to be quite the complicated bag. In addition to all the pieces I had to cut there is a lot of other prep before I am able to start sewing the actual bag itself together. Oddly, I am not in rush to finish. Usually, I am, but for some reason I am ok with how long this project is taking.
I am sure it will be worth it.
Hildegarde interior detail
After all the cutting and interfacing, I had to make the dividers. These dividers were a little complicated and I wonder if they were unnecessarily complicated? I guess I’ll see once the whole bag is together.
I am pleased with the front section elastic. I thought the way Sara told makers to put this together was really clever. I am a bit confused about the top part – the ‘slots’ are larger – but I am sure it will work out. I have to wait and see.
This is a Sew Sweetness pattern. It is part of Minikins Season 4 bundle. You can see the various projects I have made from the Minikins patterns on the Minikins page.
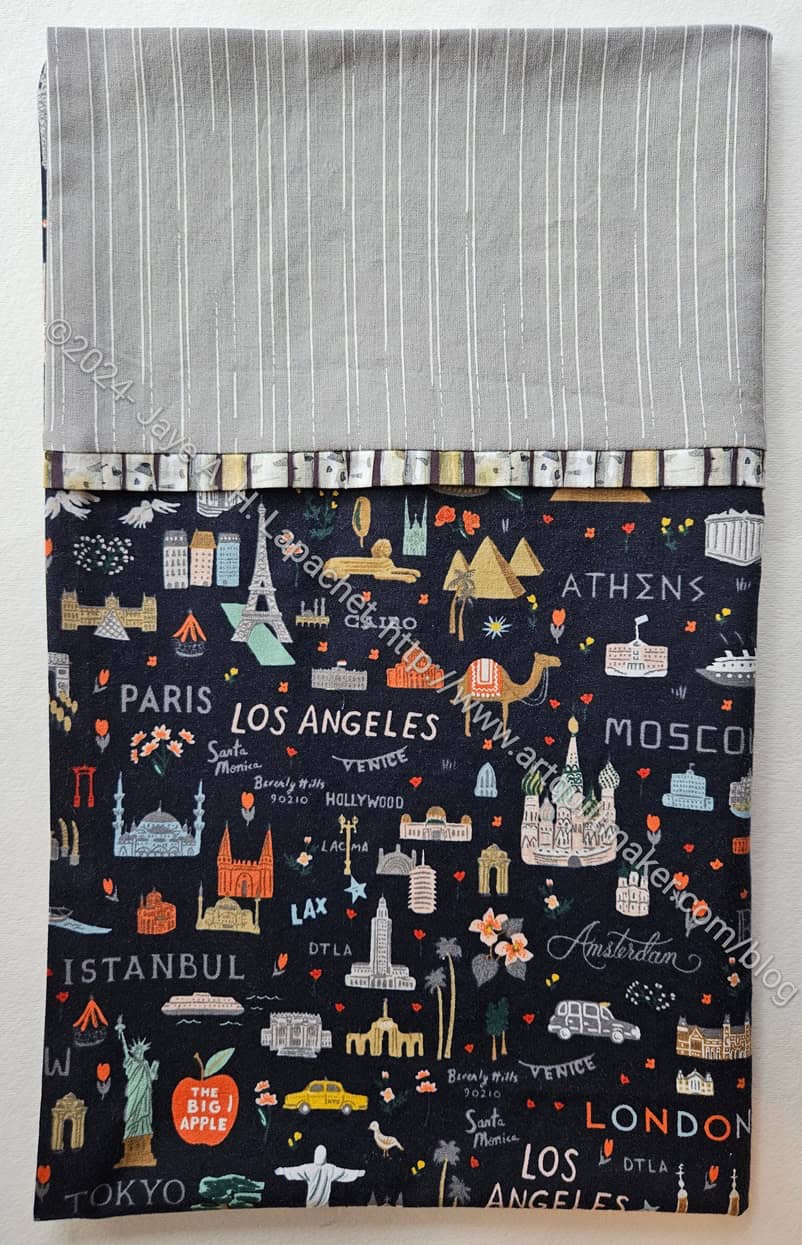
This month I sent off one of the actual travel pillowcases. Last month was the camping pillowcase. I suppose you have to travel somewhere to camp, but it didn’t feel like ‘real’ travel to me, whatever that is.
This was also a birthday gift since the nephew turned 18 yesterday. I stuck a card in the package for him. I actually got a thank you text! Unnecessary, but much appreciated.
I had some extra fabric, so I added the trim pieces to some of the pillowcases for this project