Political Wifery is gearing up. Last weekend we went to Monterey to do site visits for DH’s Grand Parlor*. We had to review the various facilities including hotel rooms required for the event. We also talked to hotel event coordinators to give them details about the events.
It was sort of fun even though I didn’t get to visit any quilt shops and my Saturday sewing time was usurped by this task.
I have to say that it was a beautiful day in Monterey and I did enjoy being outside and walking around.
One of the things we did was look at a location for the BBQ. The proposed location is a historical site, which includes the tiled fountain shown here.
The fountain, sadly wasn’t working. Conscientiousness about the drought in California, I imagine. It was still quite beautiful and would be a great inspiration for a border on a quilt.
*For those of you just joining us, Grand Parlor is the Native Sons** annual conference
**Native Sons of the Golden West is a statewide fraternal organization which brings men together to support the preservation, teaching and education around California history. They also have a strong social aspect and support a charitable foundation that gives money to hospitals to support Cranio-facial Anomalies Teams at UCSF and St. John’s hospitals.
Post the direct URL (link) where your drawing, doodle, artwork is posted (e.g. your blog, Flickr) in the comments area of this post. I would really like to keep all the artwork together and provide a way for others to see your work and get familiar with your blog or website.
The Creative Prompt Project, also, has a Flickr group, which you can join to post your responses. I created this spot so those of you without blogs and websites would have a place to post your responses.
We are also talking about this on Twitter. Use the hashtag #CPP
A webcomic based almost entirely on chaos and tea.
BunnyRuby – Built to be easy to use. Bunny focuses on ease of use. Features, throughput, concurrency are important but ease of use comes first.
Big Buck Bunny is now even more a world standard for video standards.
beach bunny
The Explosive Bunny serves as ammunition for the Bunny Cannon. (Terraria)
Blue Bunny ice cream
Energizer Bunny
The Bunny Museum: Private museum features over 11000 toy bunny collectibles of every size, shape, and matter. Also features four Rose Parade float bunnies.
The Busy Bunny has been providing edible toy treats for pet rabbits and fun stuff for people since 1987.
Pat The Bunny Acoustic punk songs from the desert of Tucson, AZ about addiction, getting sober, and anarchism.
Bugs Bunny
These Honey flavored Bunny Grahams are hard to stop eating once you start! Bunny Grahams are the perfect size for toddler hands and grown-up handfuls.
The Bunny Collection featuring all synthetic brushes was specially designed to deliver a perfect makeup application. (Sigma Beauty)
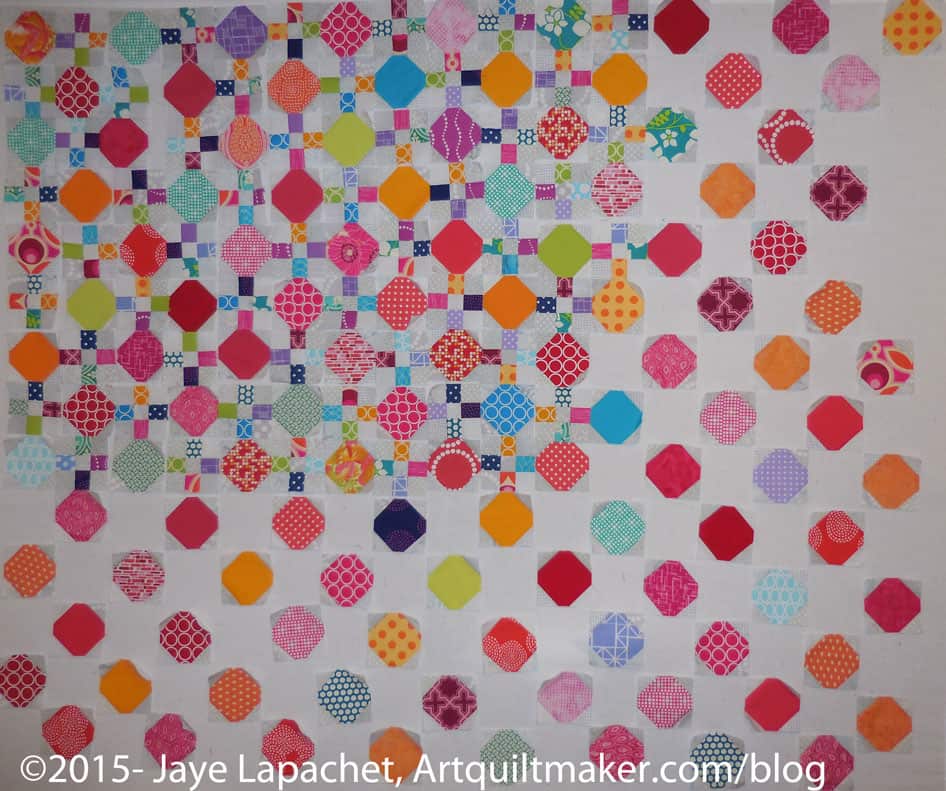
More progress on the Octagon 9 Patch. It seems slow, but I see the progress. Compare from last time and let me know what you think.
The 9 patches are not in their final locations. I started to arrange them as I made them, but it was hard to judge progress so now I just put each nine patch in the next open space. I’ll arrange them later.
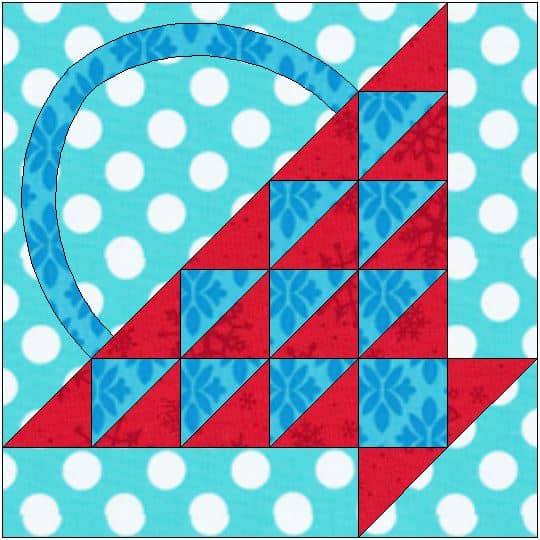
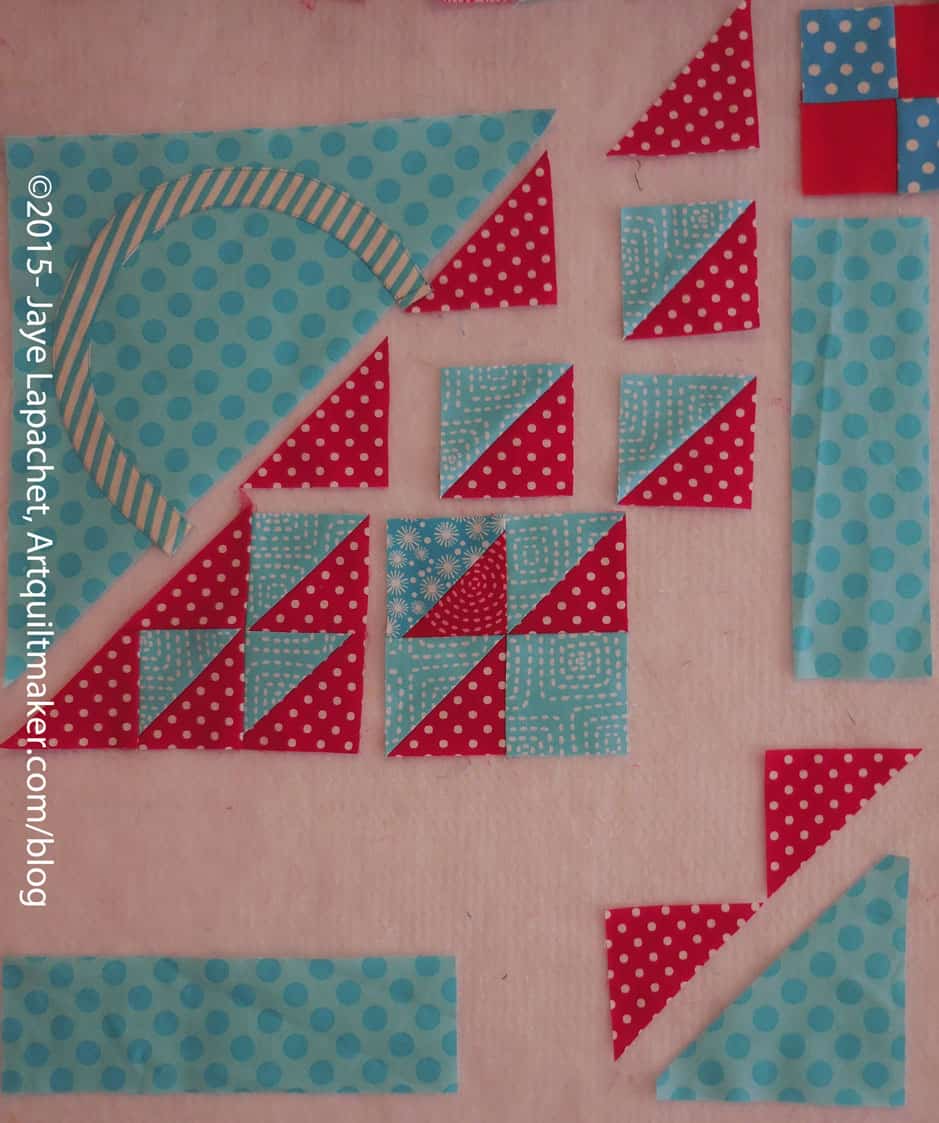
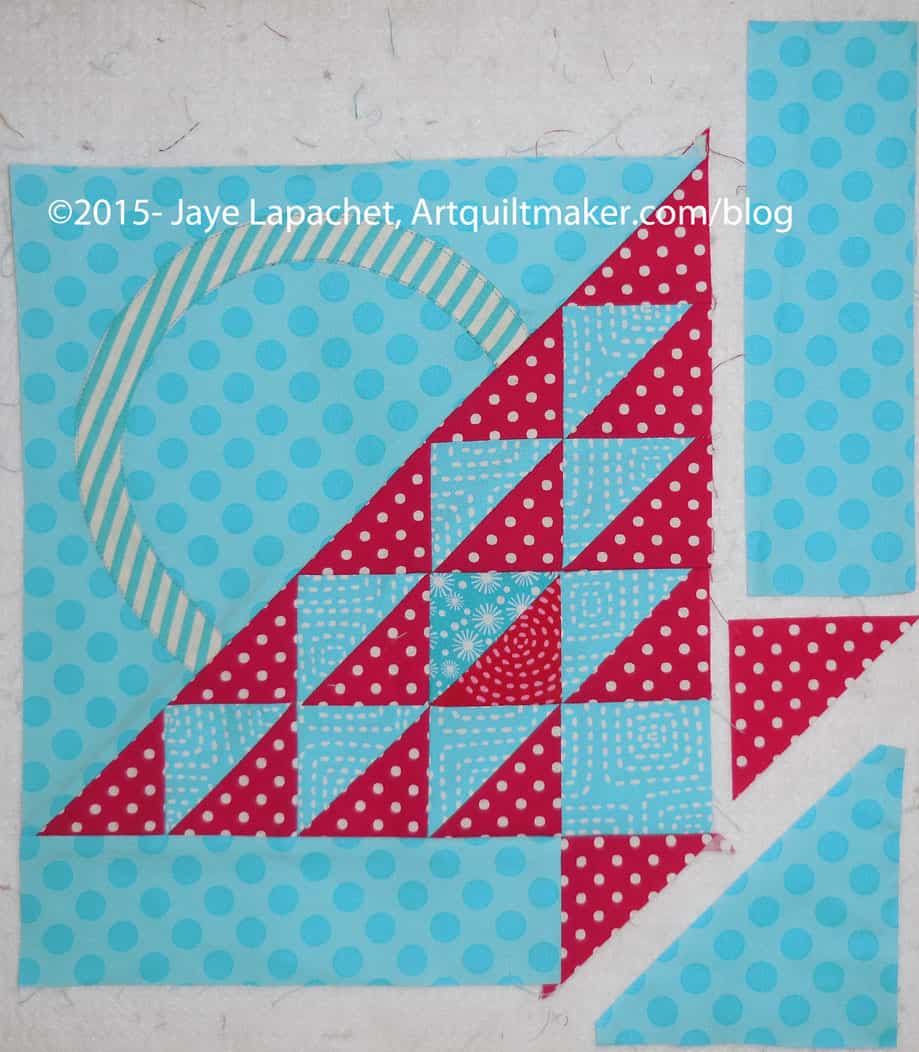
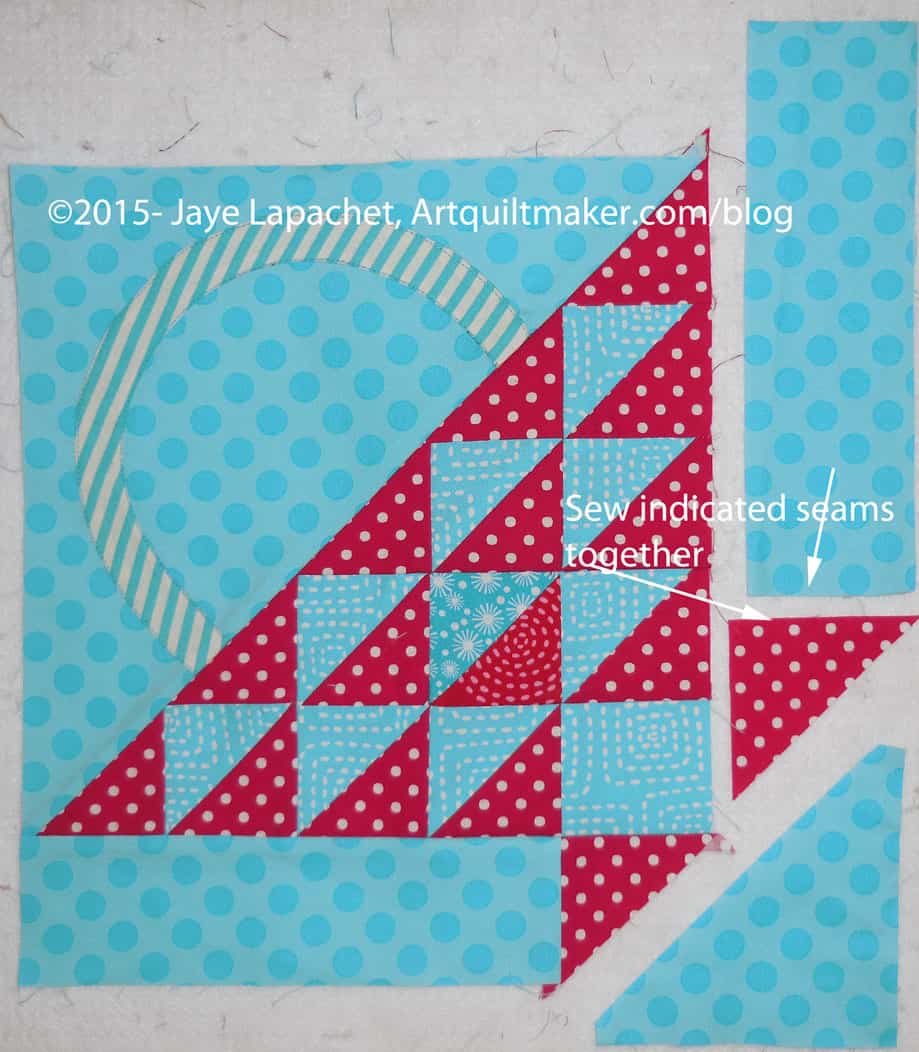
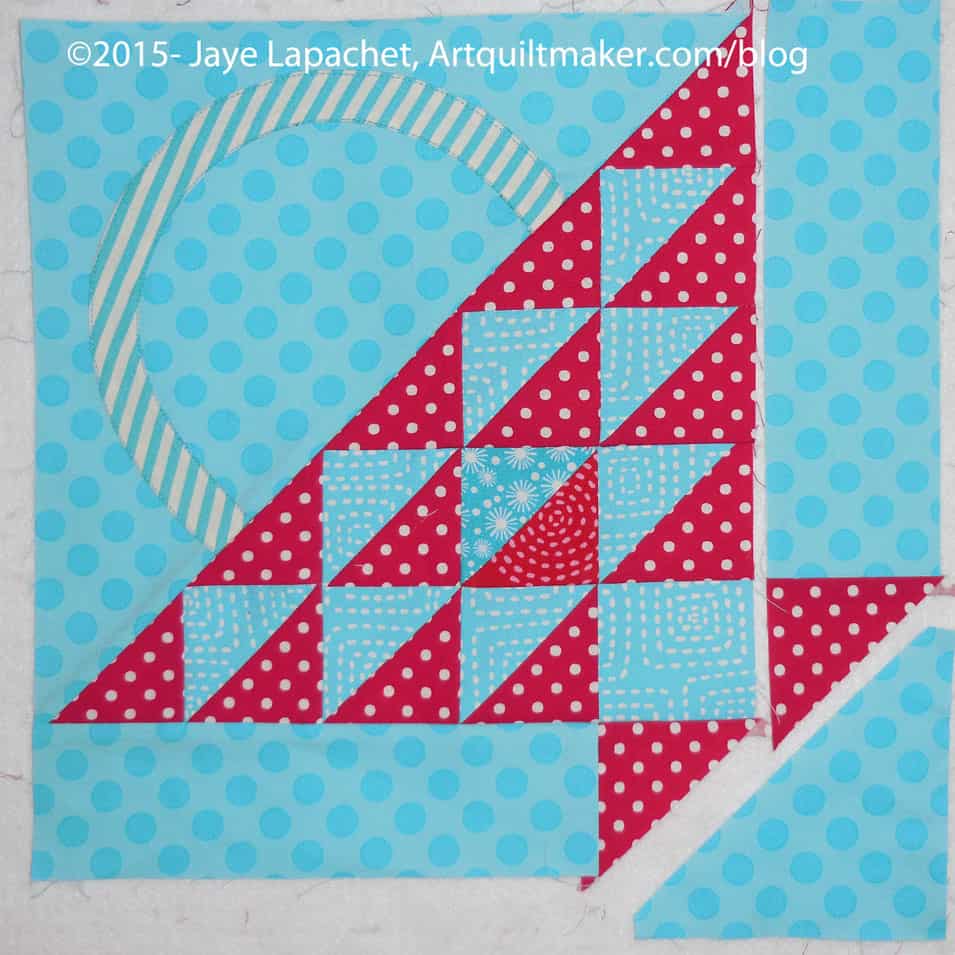
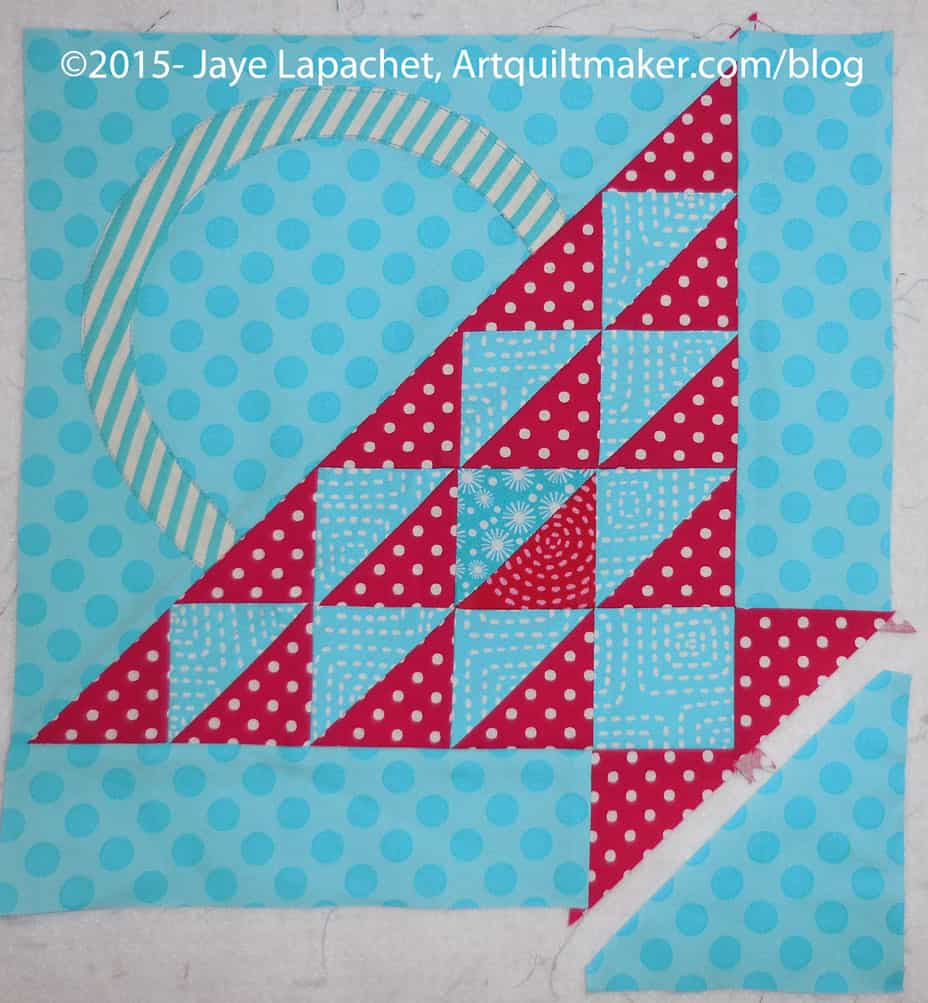
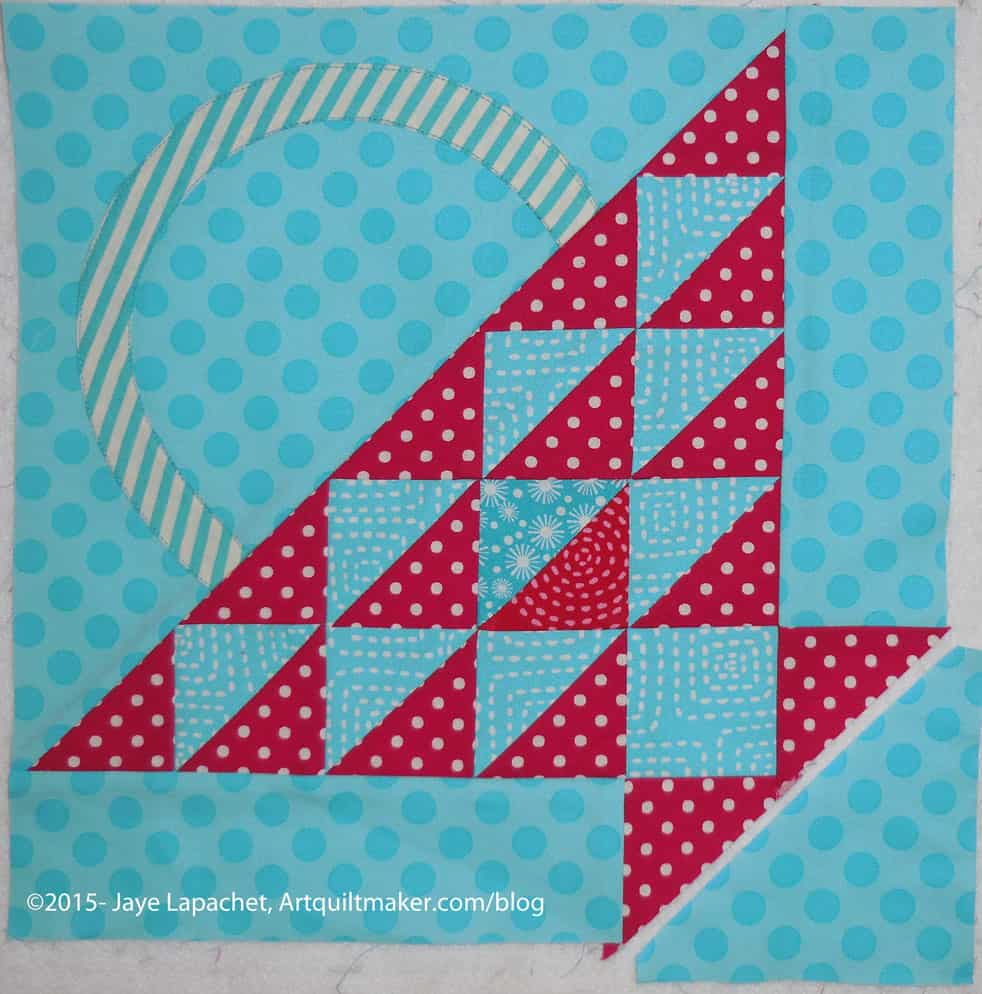
As mentioned in part 1, above is the current block in our Sampler Quilt Class. These directions are for machine sewing your Flower Basket and include a little applique’. The applique’ can be done by machine or hand.
Are you playing along? If you are just starting, below is the complete supply list. You won’t need everything for this step, but you will need to start with part 1 and that part requires more supplies. Also, note, there are a LOT of photos in this tutorial.
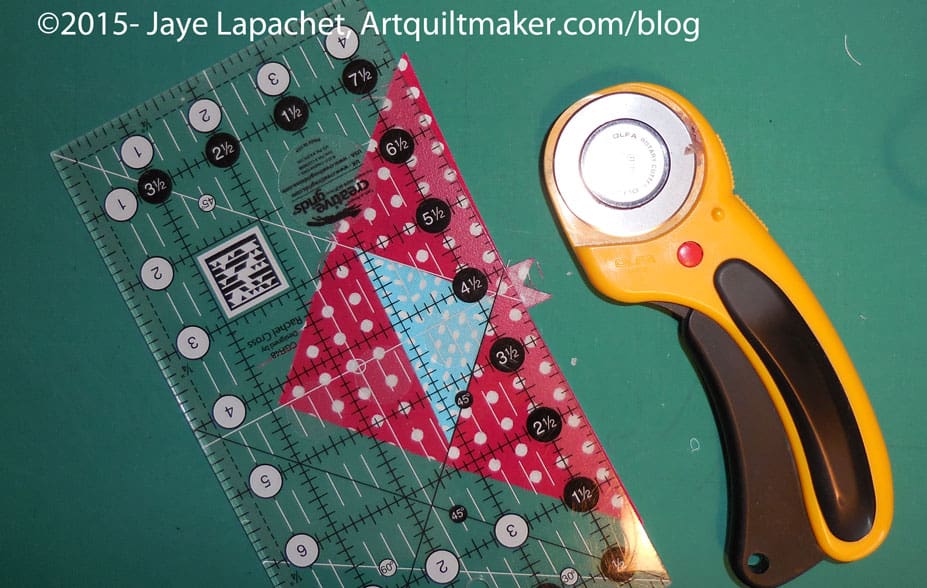
These directions use a quarter inch seam allowance. Check your seam allowance before you begin. If you don’t know how to do that, there are resources available, including one from Connecting Threads and Craftsy. You can search the web for others if you don’t like these tutorials.
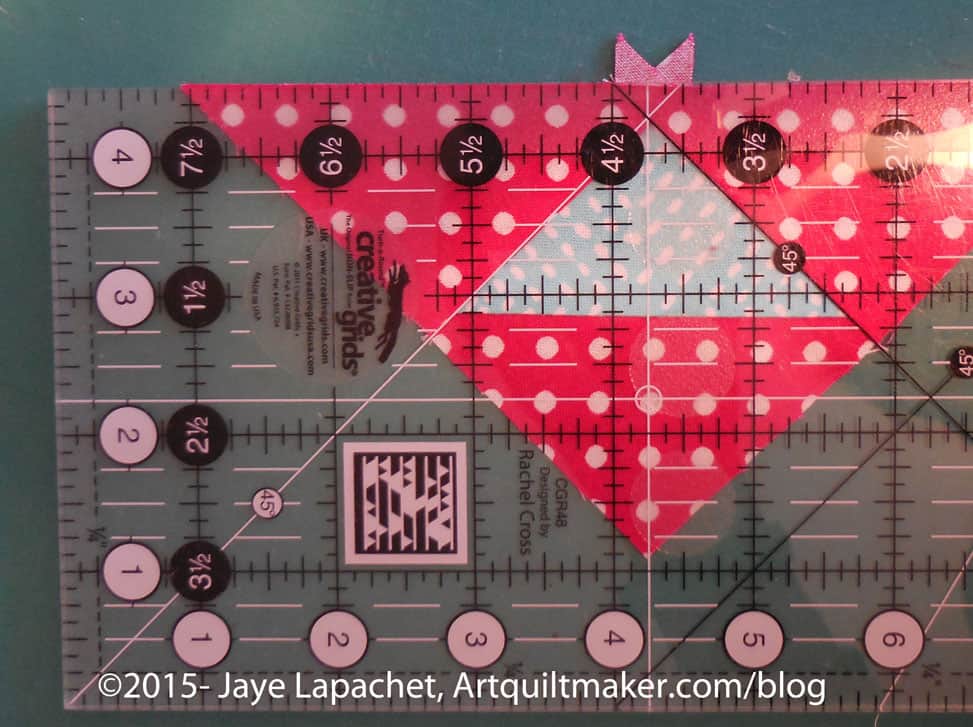
You will be directed to use the Triangle Technique. Make sure you have the chart as well as the instructions handy.
Respect the bias.
After working through part 1, you have already chosen your fabrics, made your templates and cut your pieces. You are ready to sew.
Sewing
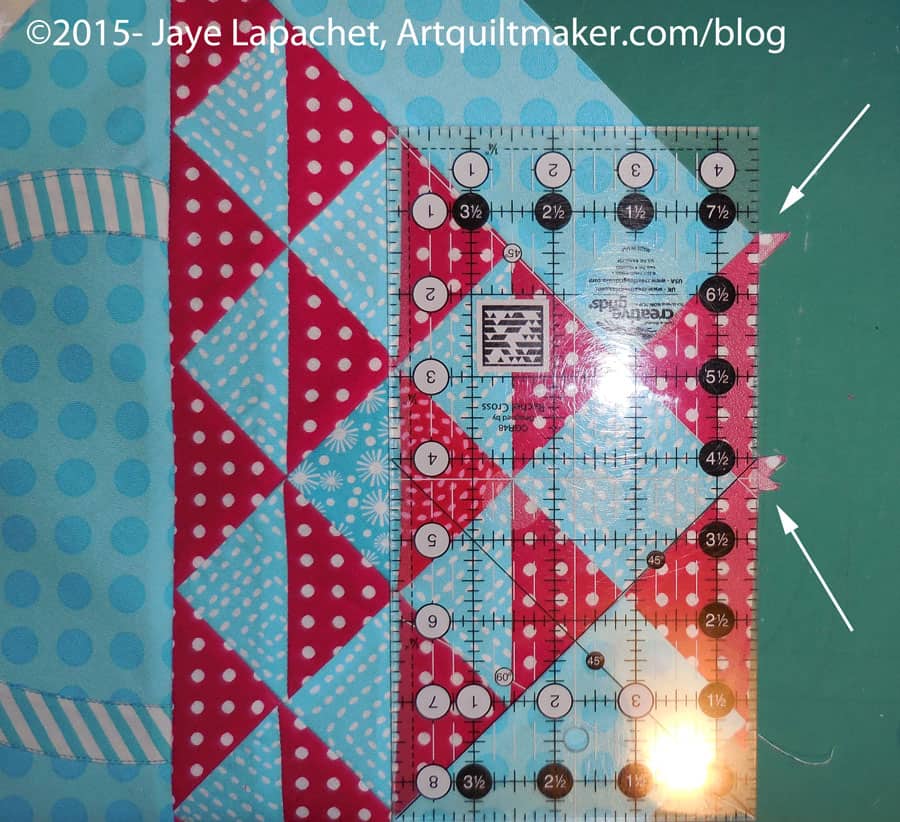
Carefully stitch along the hypotenuse of the large background triangle, about 1/8″ from the edge, to stabilize it. This stitching will be covered up when you stitch the handle part of the block to the basket part of the block.
Triangle Technique
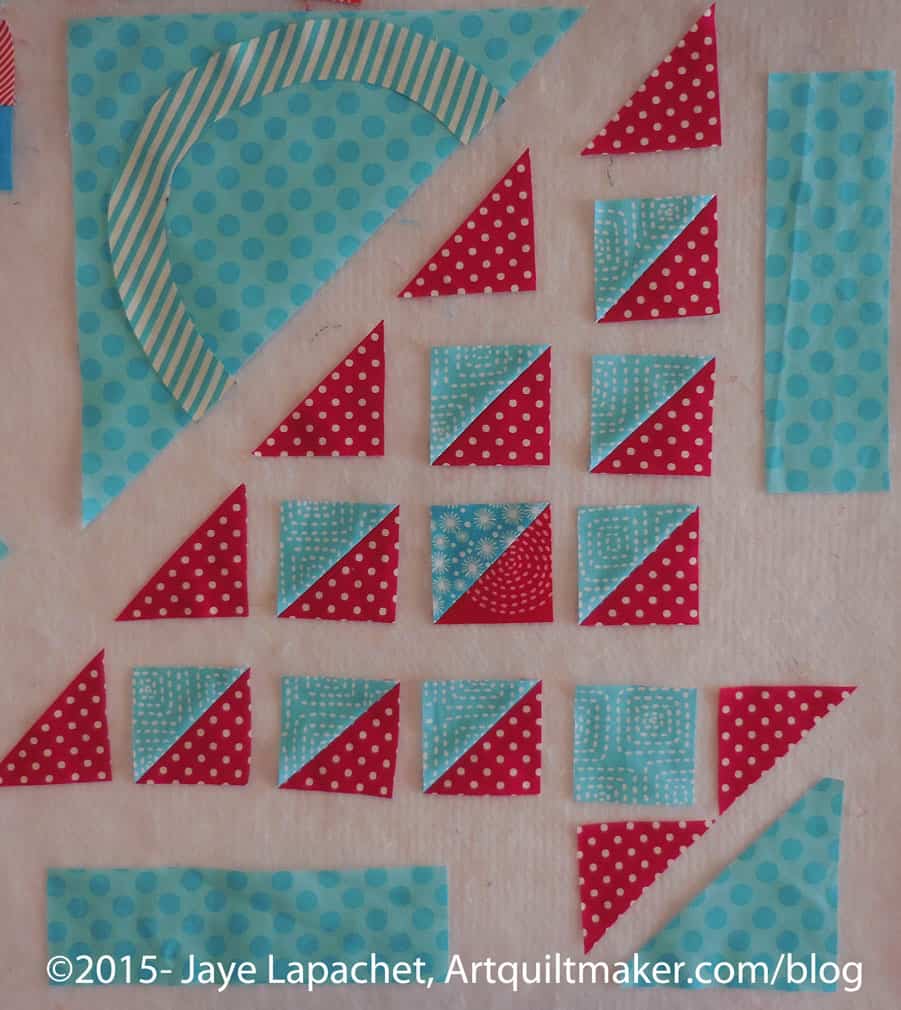
Use the Triangle Technique to make your half square triangles. Make sure you have the chart available to confirm sizes. A brief overview is:
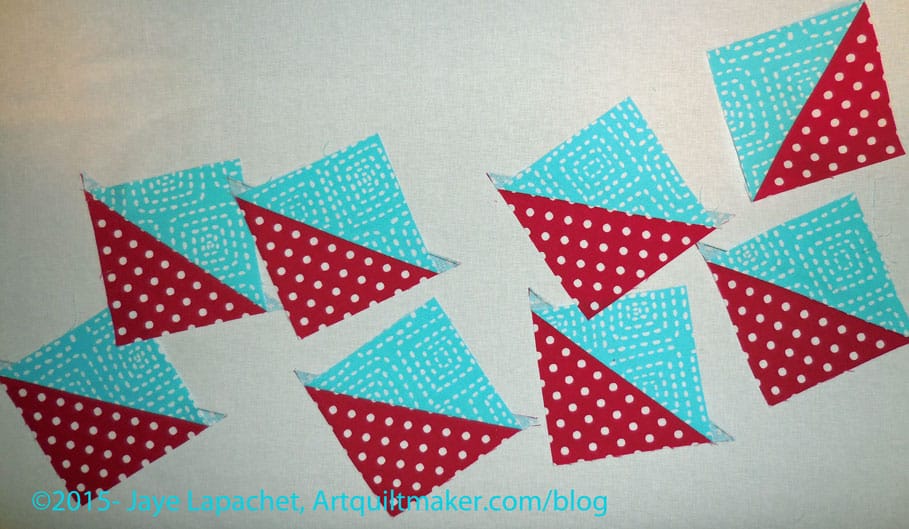
Draw an X from corner to corner diagonally on the wrong side of each of your 6.25″ x 6.25″ squares.
Place them right sides together and sew 1/4″ on each side of the diagonal lines.
Nota bene: If I had wanted to pin I would have pinned far away from any of the diagonal lines.
Now you have a piece with four seams forming an X.
Next cut the ‘Plus’ of your sewn piece. This means that you are cutting horizontally down the middle and vertically down the middle.
Line up your ruler with the edge of the fabric and the point in the middle where the two lines forming the X come together.
Cut vertically.
Do NOT move your fabric.
Reposition your ruler and then cut the piece horizontally.
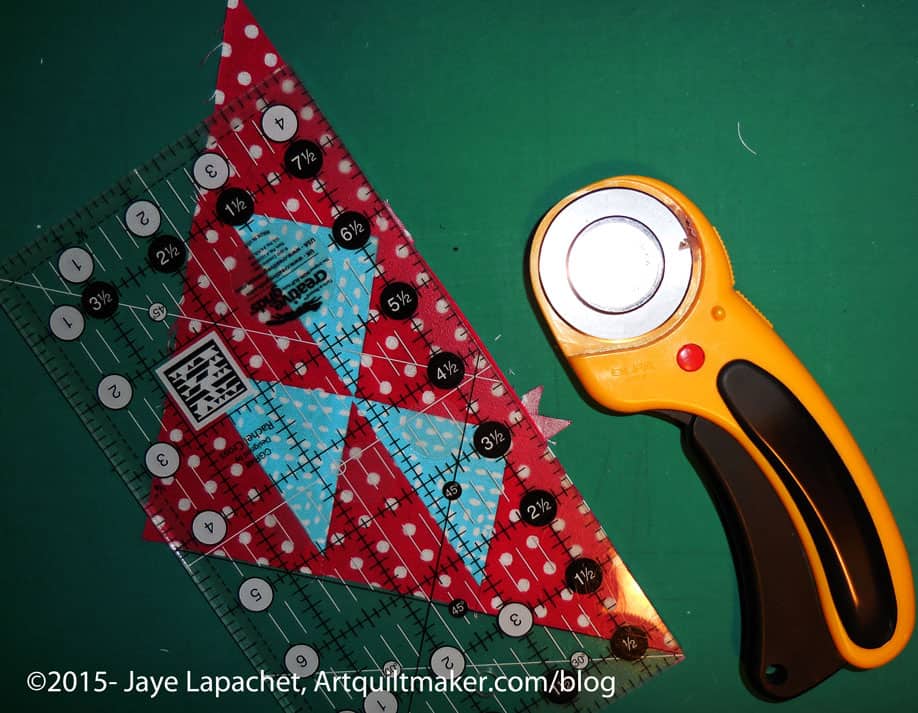
The result is 8-2.5″ half square triangles. The above are actually a thread or two larger than 2.5″, which leaves the perfect opportunity for trimming to make them an absolutely perfect 2.5″.
Trim your HSTs to an absolutely perfect 2.5″.
Now you have 8 beautiful HSTs.
Of course, you can use whatever technique you like to make the half square triangles.
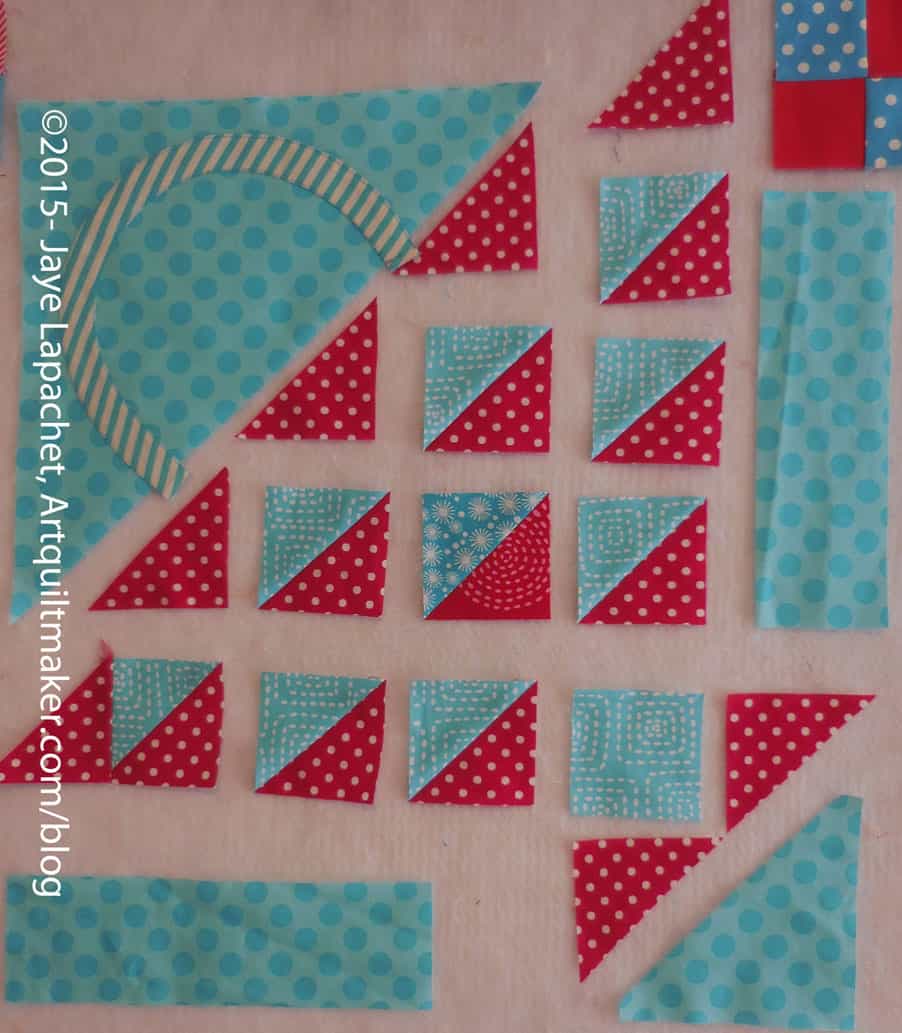
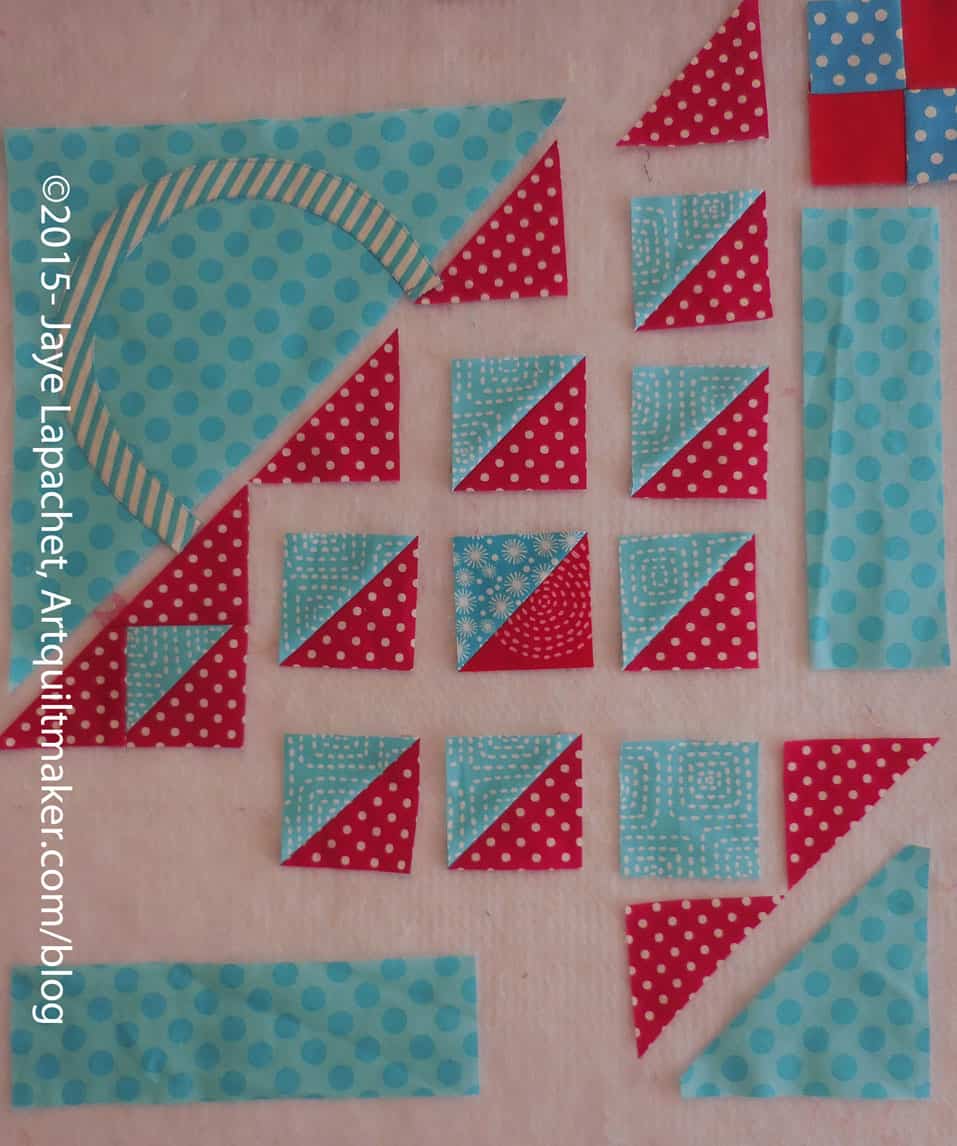
Layout and Assembly
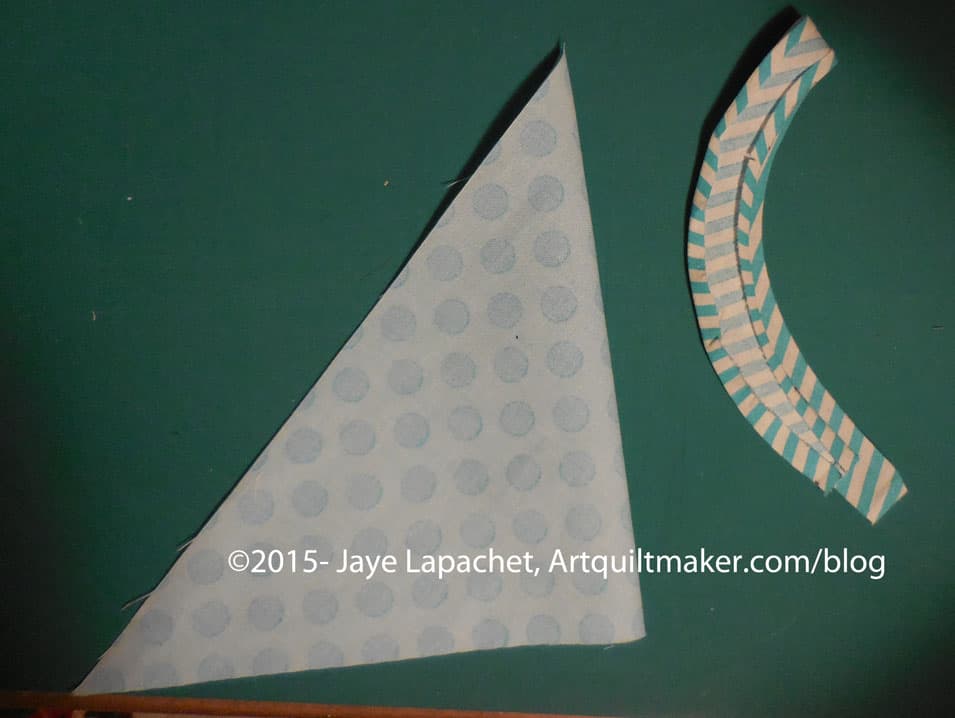
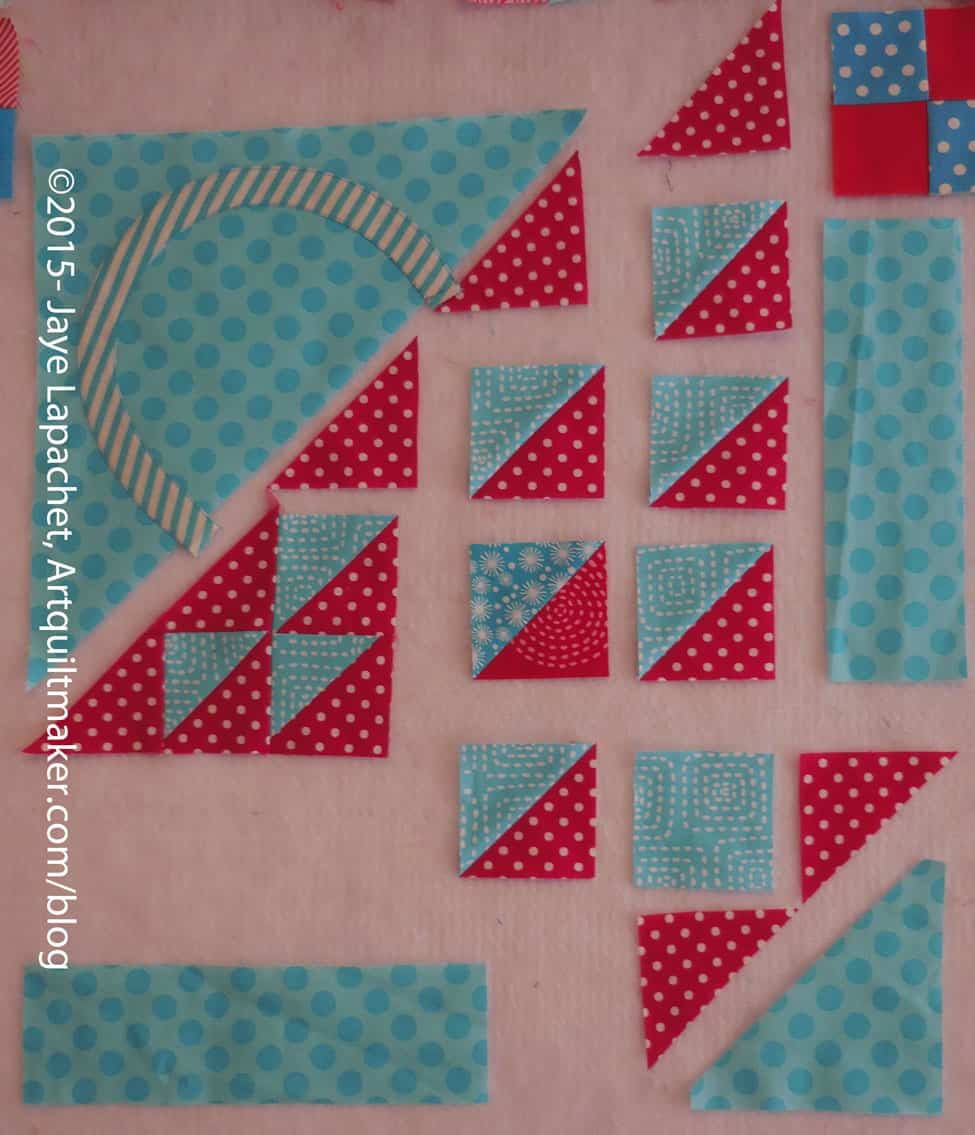
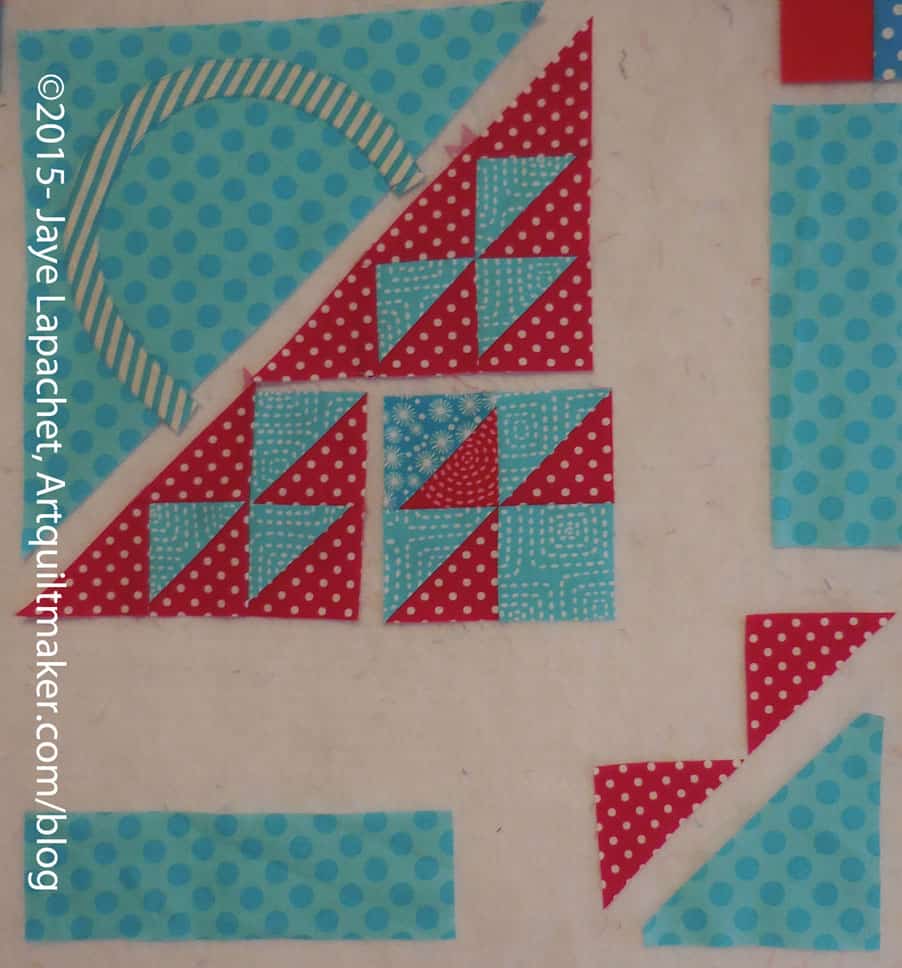
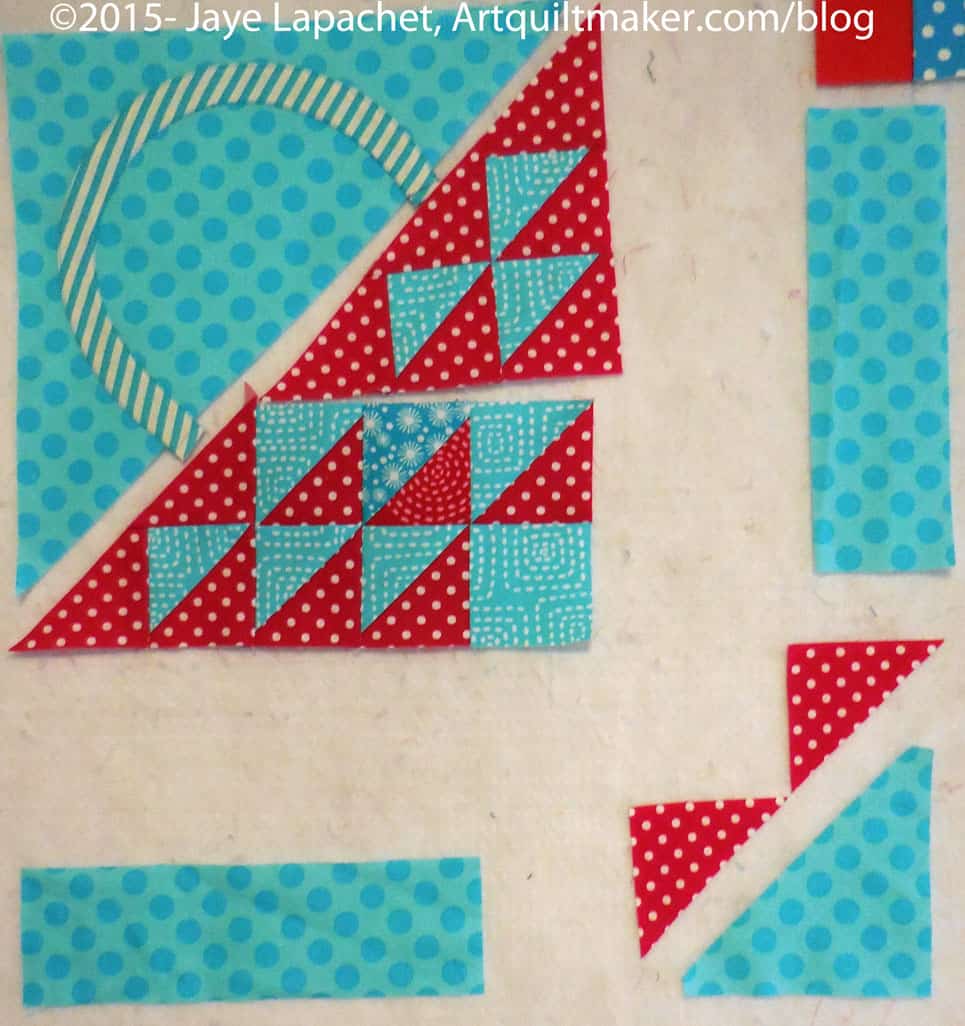
Pieces cut and ready to sew
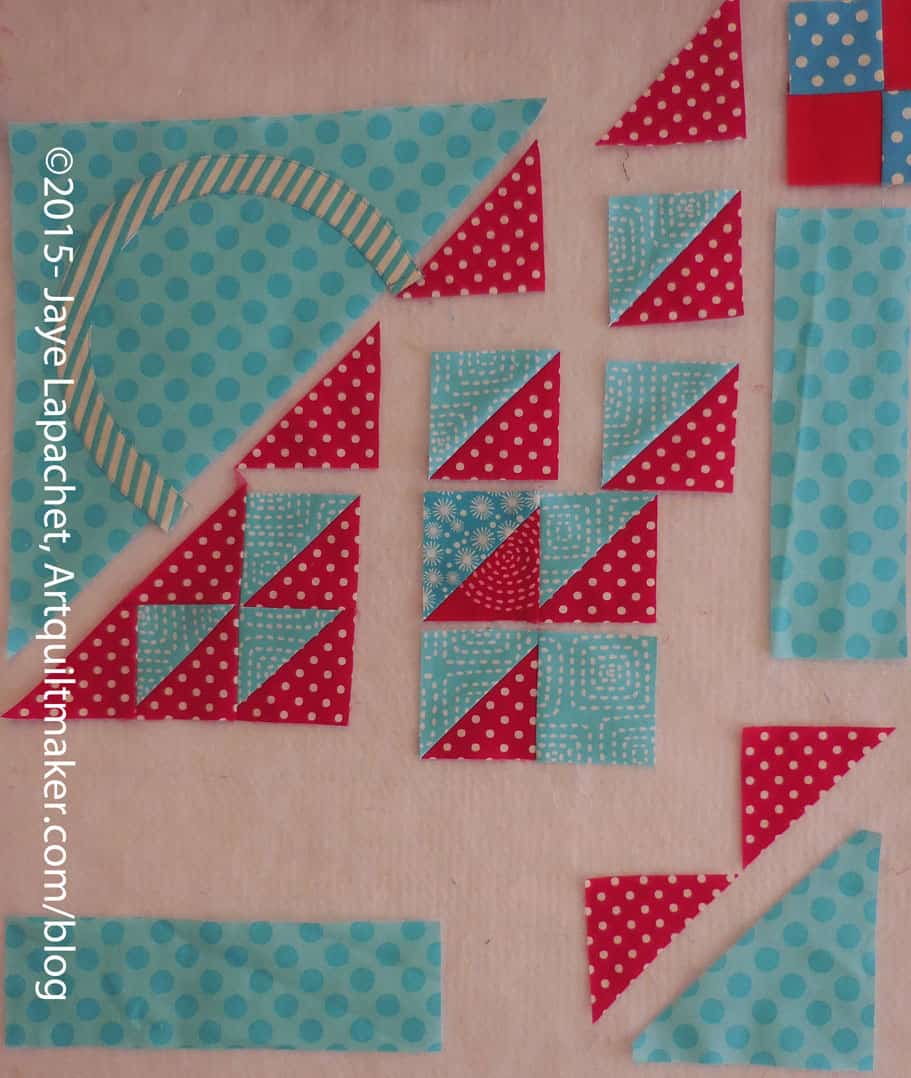
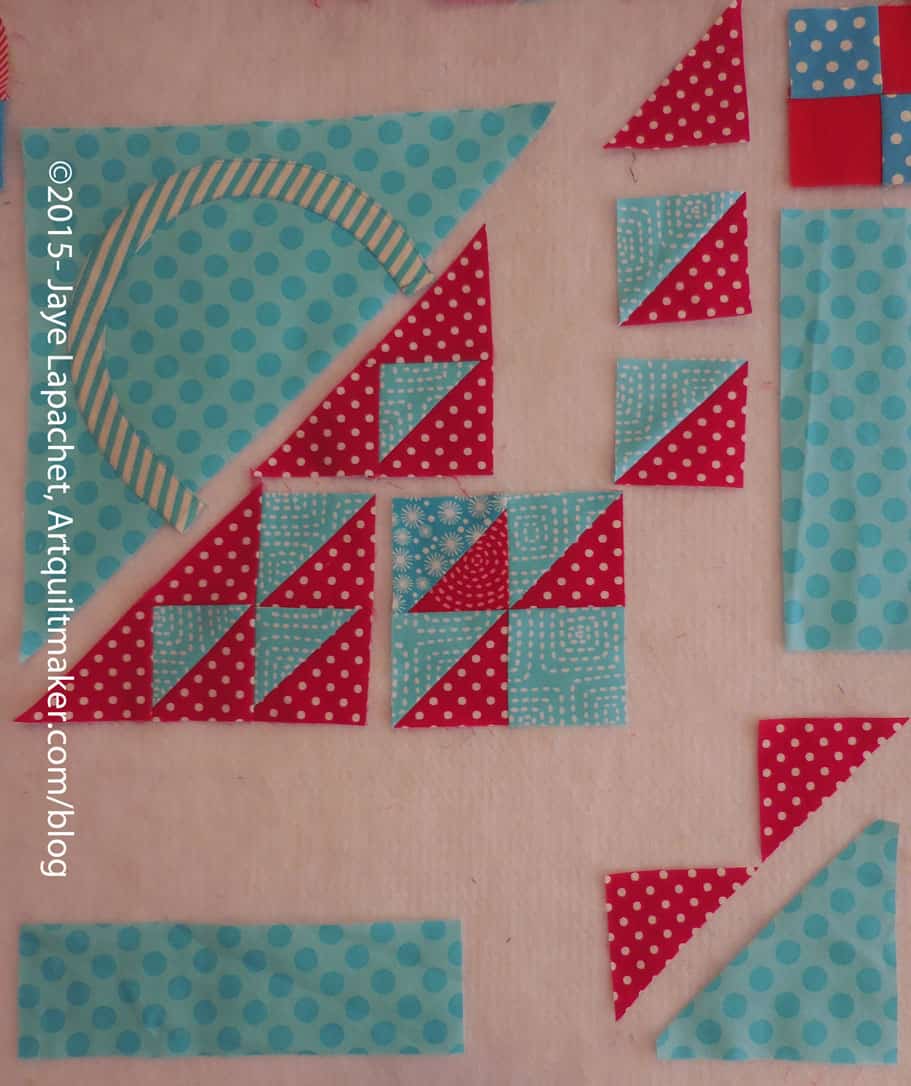
Now that you have cut all of your pieces, lay them out on your sandpaper board, or put them up on your design wall. It is great to be able to see where all the pieces belong and adjust any pieces that need adjusting before you sew.
Sew Handle to Background
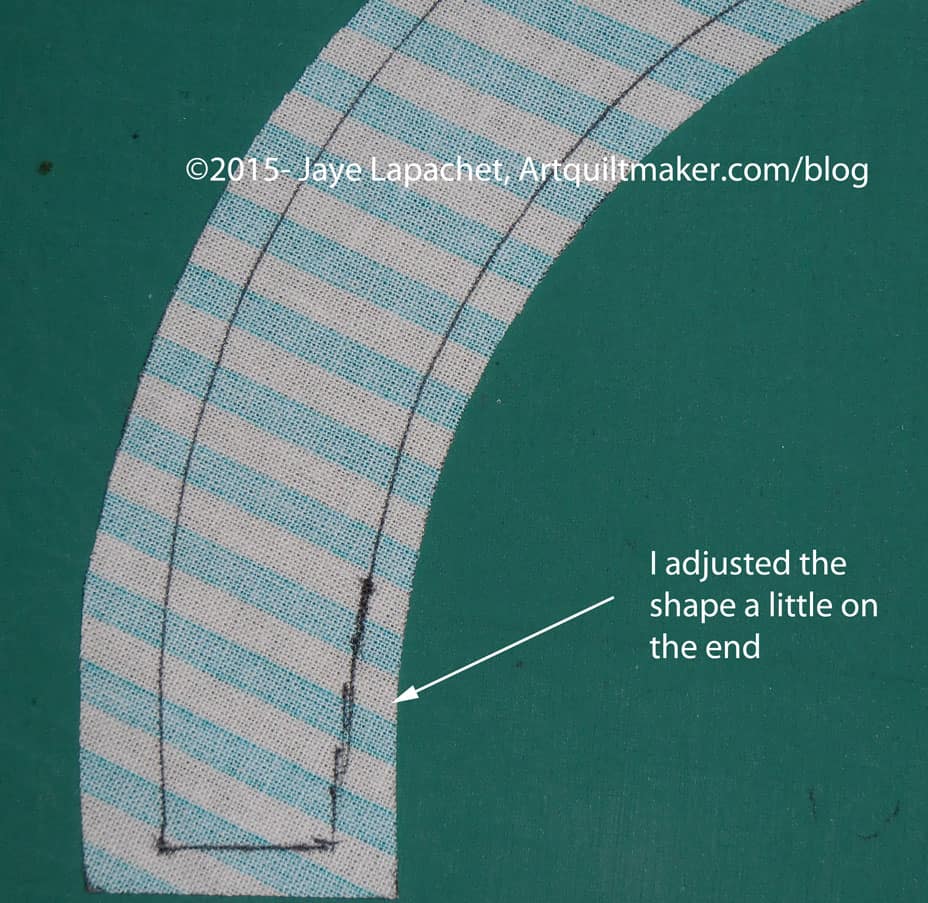
Template on Handle, ready to traceTraced & Adjusted
Because I decided to use the method described below, I made another handle template with NO seam allowance. I placed it on the handle I had cut from the striped fabric carefully so there was an even seam allowance on all sides. Then I traced around it with my thin black pen. I thought the template was a little wide at the end so I adjusted the line a bit to make the seam allowance larger.
Handle & Background Triangle Cut, Laid OutPieces Laid Out
My pieces looked a little weird-not the right size, etc when I laid them out. Have no fear! They will improve.
Press seam allowance underPress with hot iron
I was using my stiletto to adjust the seam allowance, but it was impossible to hold the stiletto, the camera and the iron all at once. Press carefully, so as not to distort your pieces.
Watch out for corners
Pay attention to the corners. The layers of fabric will want to pooch in weird directions. This is where one of those mini irons might come in handy. I used my regular iron and a stiletto, so I know those tools work.
Press seam allowance on handle under
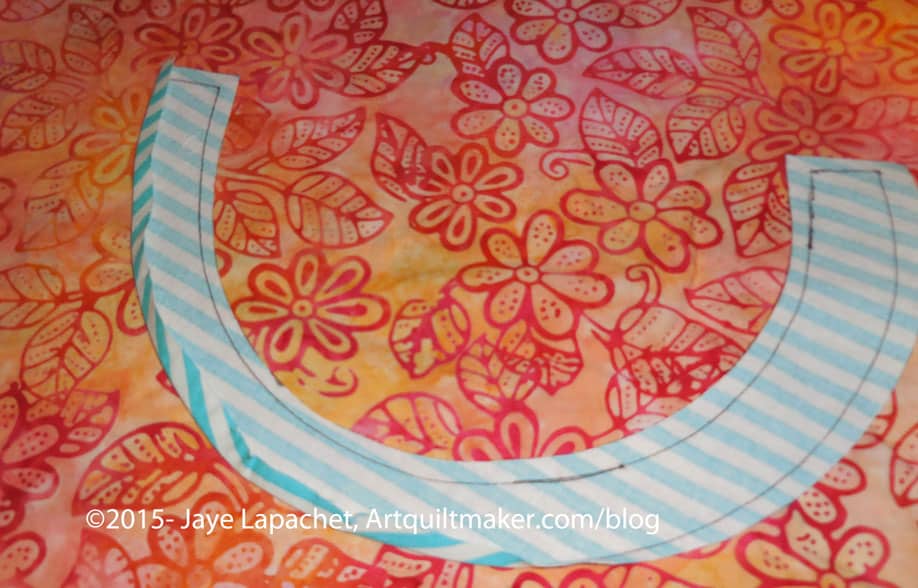
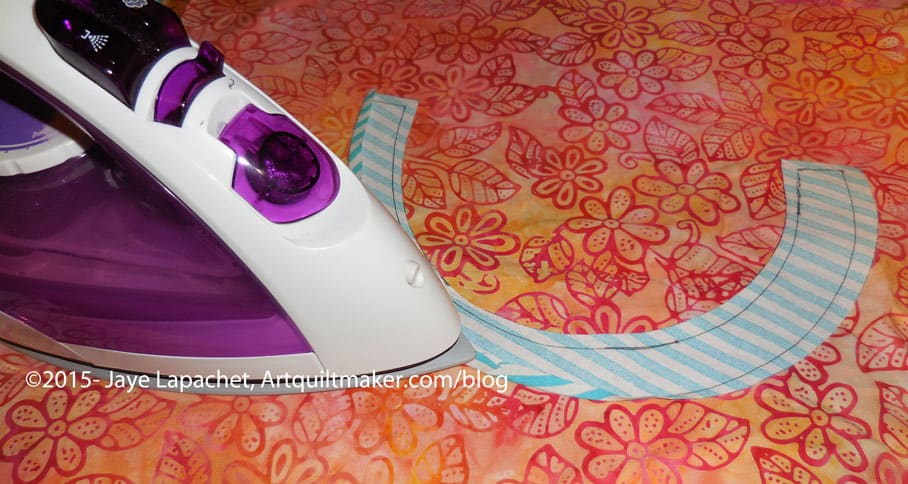
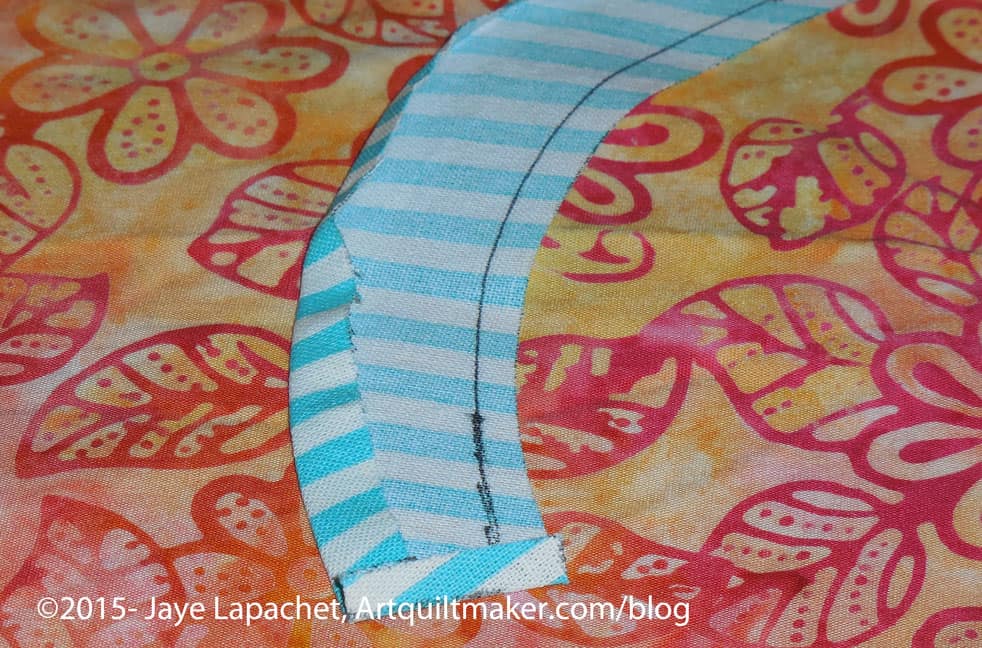
Take your handle and press the the seam allowance under on both sides of the piece. Press so that the drawn line is on the inside of the handle and is covered by the piece once the handle is sewn.
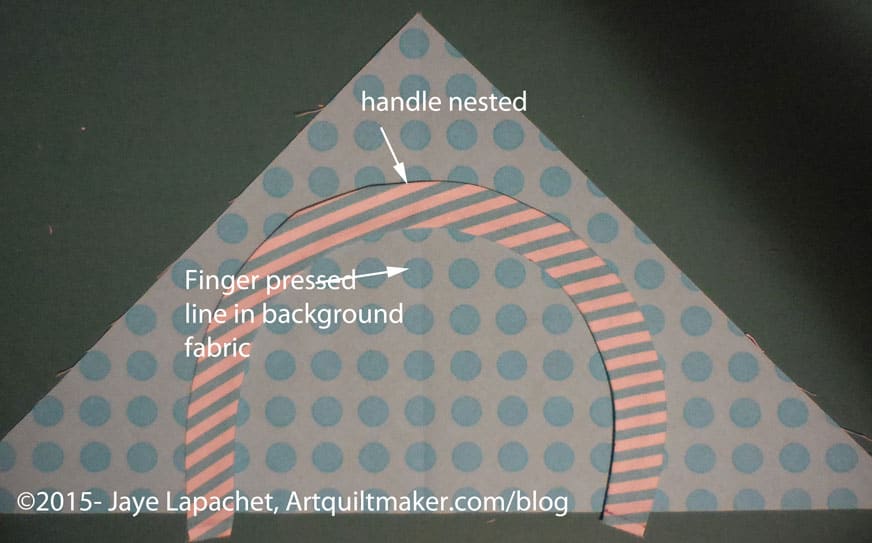
<Nota bene: the orange fabric was selected for good contrast so that the steps would show up well>
Finger press patches in half
Fold the handle in half with wrong sides together and finger press on the midpoint. Unfold.
Fold your large triangle in half with right sides together and finger press. Unfold and layout.
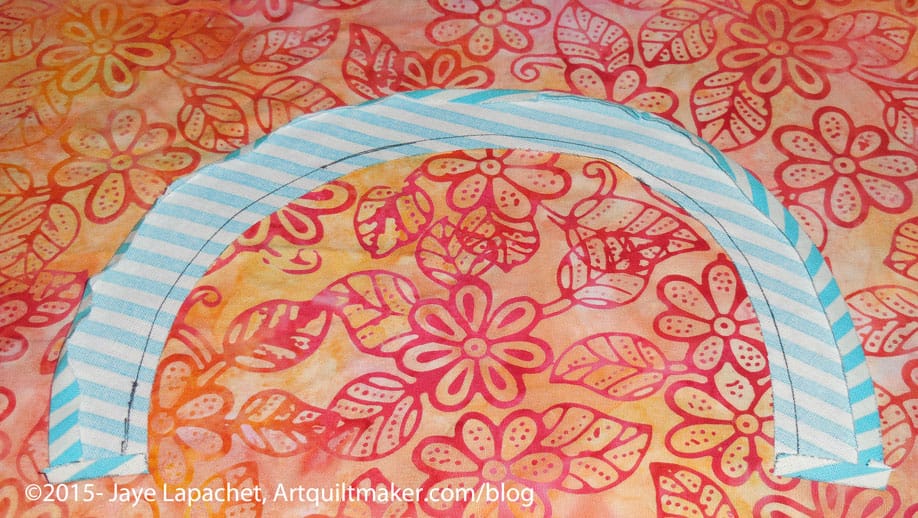
Nesting handle & background
Nest the handle into the triangle with the right sides up.
Line up the bottom edges of the handle with the hypotenuse of the background triangle. If the handle ends are a little over, it will be fine. You can trim them later.
Eyeball your piece to make sure everything looks good and even.
Pin the handle to the background down the center of the handle. Remove the pins as you sew. Try not to sew over them.
Using a lot of pins will help keep the handle in place as you sew
Sew carefully
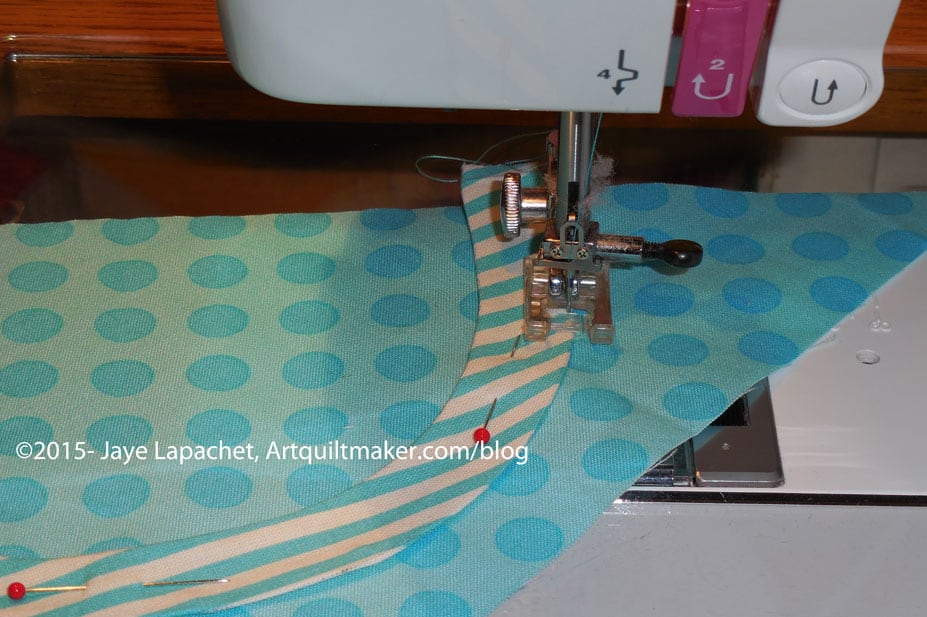
Sew slowly and carefully along the drawn line around the curve. I chose a matching thread, an applique’ foot and a topstitch/sharp needle.
You will either need to hand applique’ the other side down or using a machine stitch that suits you.
You could sew both sides down with a straight stitch, like I did. There are many options.
Optional: You can satin stitch (see the Machine Applique’ tutorial) or blanket stitch or use some other decorative stitch to machine sew the handle to the background triangle piece. If you use one of these stitches, you may need some tearaway stabilizer
Optional 2: you can hand applique’ the handle to the background triangle.
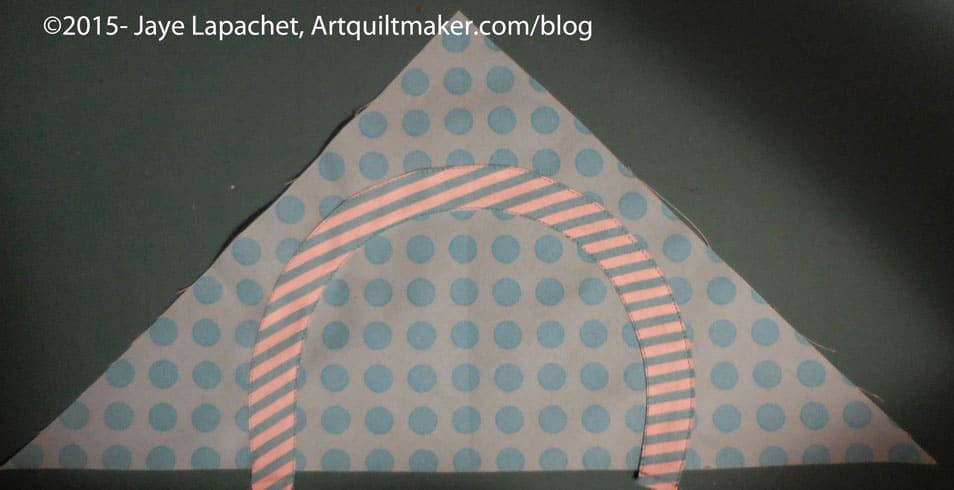
Handle sewn to background with straight seam
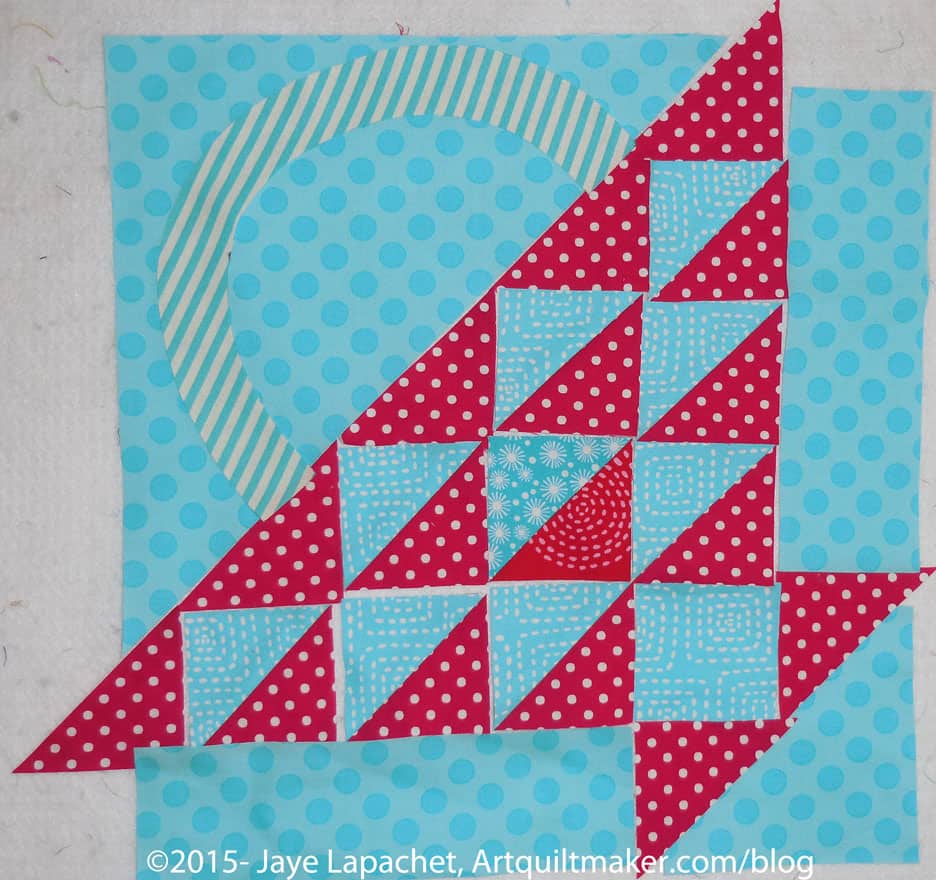
Once the handle is sewn you are ready to move to the woven part of the basket.
Basket Sewing Layout
Sew Basket Together
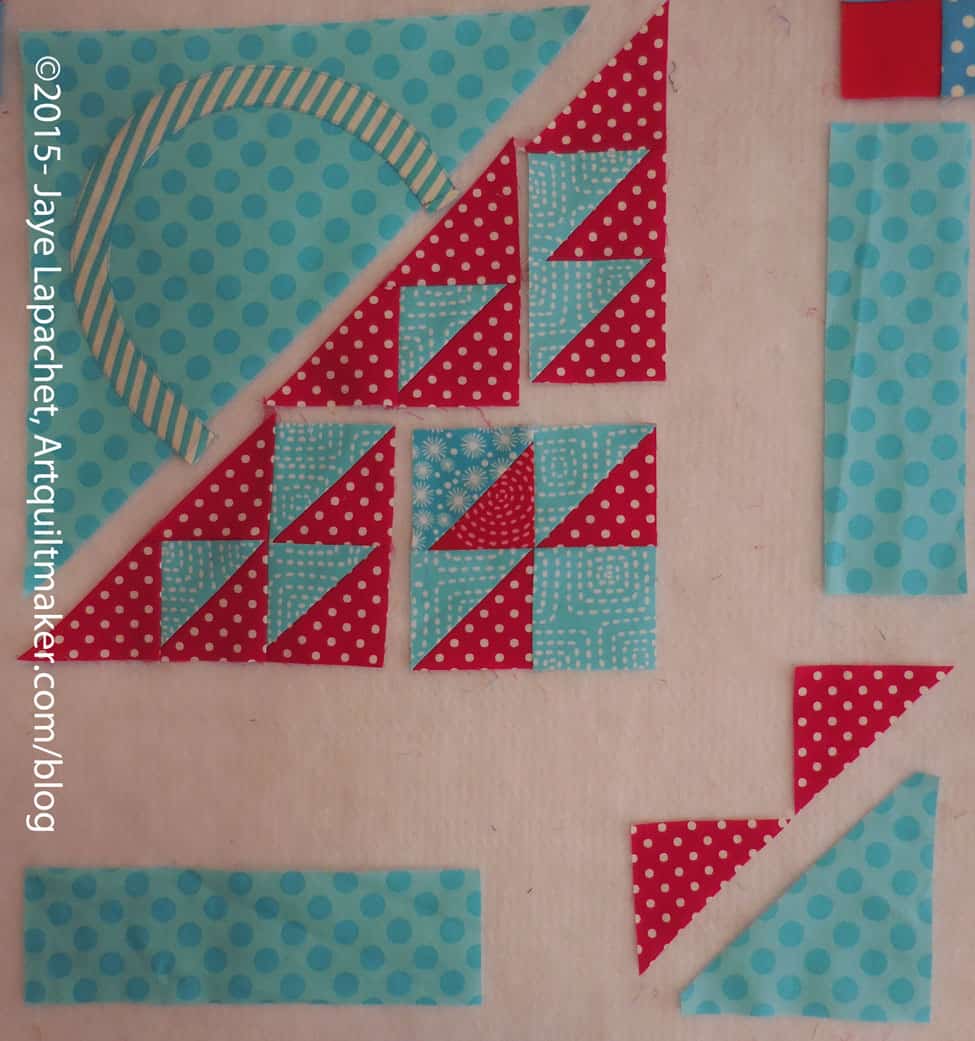
The block can be broken down into two pieces: the top half with the handle and the bottom half with the basket.
The two colored HSTs are supposed to give the illusion of a woven basket.
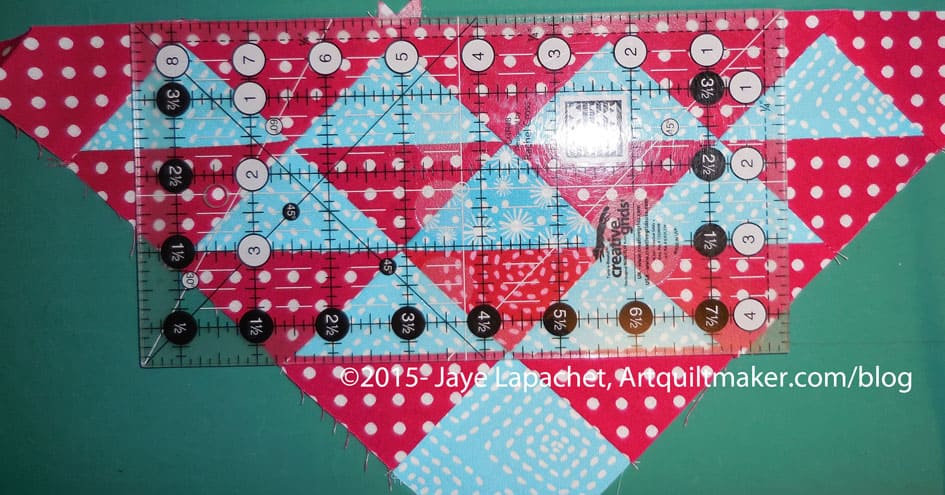
Trim off dog ears
Trim off dog ears from the A,B-HST/1 combo.
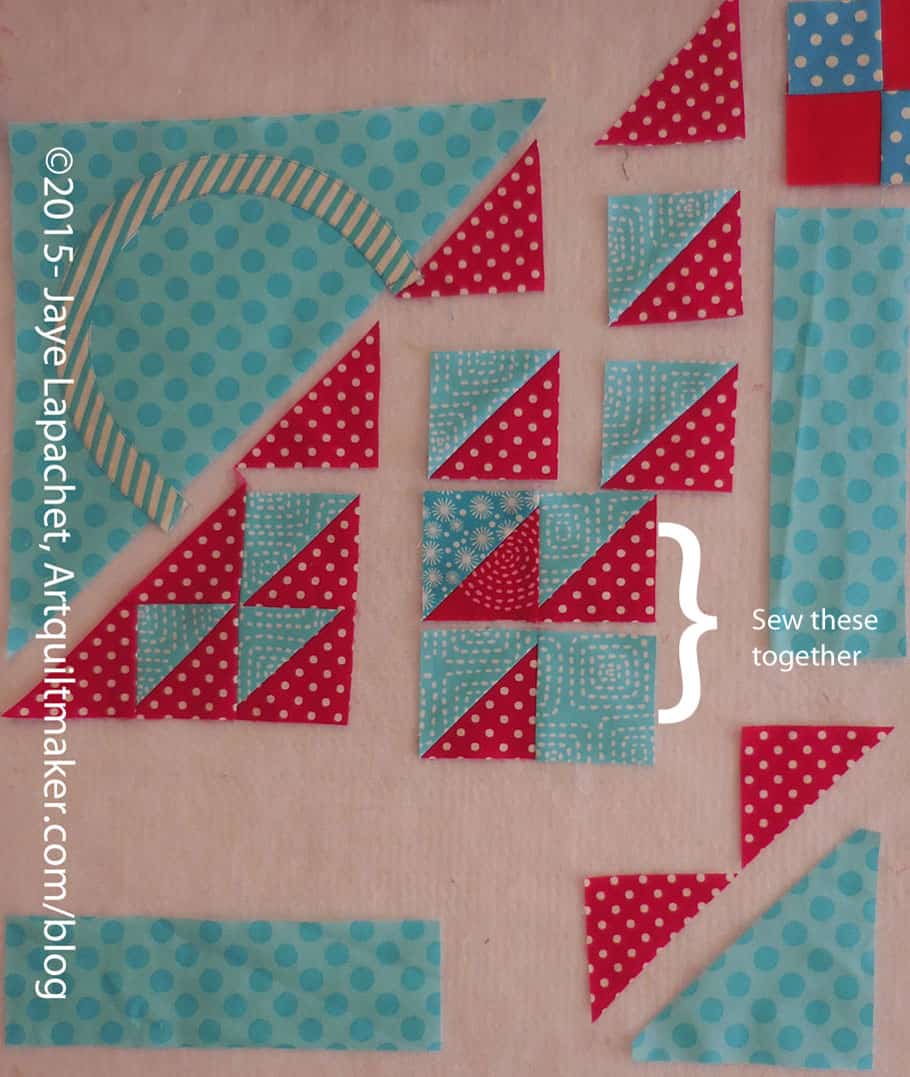
Sew Basket parts together
Sew HST/2 to HST/5. Press towards HST/5.
Using the diagram above to confirm placement, sew your A,B-HST/1 combo to your HST/2-HST/5 combo. Press towards the red.
Sew basket parts together
Sew HST/8 to Square 10. Press towards the Square 10.
Sew HST/6 to HST/9. Press towards the red part of the HST.
Sew 2 sets of woven basket parts togetherSew basket parts together
Using the diagram above to confirm placement, sew your HST/6-HST/9 combo to your HST/8-Square/10 combo. Press towards the HST/6-HST/9 combo.
Sew Triangle to HSTs
Using the diagram above to confirm placement, sew C to HST/3. Press towards the red.
Sew triangle D to C-HST/3 combo
Using the diagram above to confirm placement, sew D to your C-HST/3 combo. Press towards D.
Trim your dog ears
Trim your dog ears.
Sew HST/4 to HST/7. Press towards HST/7, making sure your seams will nest with the seams you have already pressed.
Sew parts of the basket together
Sew HST/4-HST/7 together and then sew the HST/4-HST/7 combo to E. Press towards E.
Four sections of the Basket
Using the diagram above for placement, sew your HST/4-HST/7-E combo to your C-D-HST/3 combo. Press.
Trim dog ears.
Sew 2 Sections together
Sew your A,B-HST/1-HST/2 segment to the HST/6-HST/9 segment.
Trim Your Dog Ears
Trim your dog ears!
Sew last two segments
Sew the last two segments of the basket part together. You may have to re-press some seams.
I didn’t move the borders the whole time I worked on the quilt See how much the basket part shrank? That is seam allowances for you!
Trim the dog ears
Trim the dog ears, if you haven’t already.
Sew 2 halves together
Now you have two halves of the basket. Sew the woven part to the handle part by placing the woven part on top of the handle part, lining them up and then sewing carefully. You can fold the two sections in half, bisecting the handle, to match them up if you think that you need to trim the handle portion later.
Ready to sew last borders
Now you are ready to sew on the borders.
Sew triangle to borderSew triangle to border with words
Sew the B2-G background section by placing the red triangle (G) face down on top of background piece B2 and sew the short end of the background to the triangle, as shown in the picture.
Sew on background B2/Triangle-G
Take the basket piece that you sewed together above and place the B2-G background section on top of the basket section. Line up the red triangle’s seam from the B2-G background section with the HST/8-Square 10 section. You want the seams to match, so pin. Press towards background piece B2.
Only one more border to go.
Take the basket piece that you sewed together above and place the B1-F background section on top of the basket section. Line up the red triangle’s seam from the B1-F background section with the HST/9-Square 10 section. You want the seams to match, so pin. Press towards background piece B1.
Sew on Final Triangle
Now you are ready to sew the last piece.
Trim dog ears
Trim dog ears.
Basket almost complete
Your basket is almost complete.
Line up triangle with borders
Complete your basket half by sewing background piece B3 to the basket. You have already snipped off the corners so you just have to line up the triangle piece with the borders already sewn to the block. Press towards the background piece B3.
Your half is complete.
Take the top half of the basket, the piece with the handle, and carefully sew it to the basket half.
I love the way that this fabric is organized! I would need a much larger closet, though.
I was dying to buy fabric last week, so I washed some of the Great Unwashed and that helped to make me feel like I had some new pretties to pet.
Ruler Recall: Marsha McCloskey sells rulers on her site that make cutting and sewing her Feathered Star blocks easier. She wrote about the ruler recall in her most recent newsletter: “Recently, I learned, much to my dismay, that my last shipment of Precision Trimmer 3 rulers contained defective rulers. Truly, I didn’t know. Rulersmith has produced perfect rulers for me for 15 years. When these rulers were delivered in February 2014, I didn’t check them. My Mom had just passed away and my mind was not on quality control. The ruler problem is in the placement of the locator hole at the ¼” seam allowance at the corner of the ruler. This hole is used to locate the start and stop point for set-in seams. On the defective rulers, the hole is placed slightly to the right. Not acceptable. I have no idea if all the rulers sold in the last year were made this way or only a portion. Rulersmith has replaced the entire print run with accurate rulers and I will replace your ruler if it is defective. I will be contacting people who bought the PT3 ruler through my website, but I have no way to identify who might have bought a PT3 from a shop or from me in a class. You will need to identify yourself, so I can replace the defective ruler with a good one. Please, go to the special PT3 RECALL page on my website and follow the directions if you want your ruler replaced. There is a special page for this issue. You can now use PayPal on her site and a lot of her fabrics are on sale for $6/yard.
These notebooks are clever and creative. I love them except for the part about kids using them in school!
Are you a Frixon pens fan? I found a new product that provides another use for those pens. “Rocketbook, designed by startup Rocket Innovations, looks and feels like a traditional paper notebook and pen combination, but it uses heat-sensitive ink and is paired with a smart app. (The pens, FriXion ballpoints by Pilot, are cheap and easy to find at places like Staples.) When you stick the 8.5-inch-by-11-inch notebook in the microwave for 30 seconds, all 100 of its pages are cleared, so it’s infinitely reusable. Its paper features a dot grid pattern that makes it a good sketchbook for designers, typographers, and architects.
Before you erase your most brilliant doodles, Rocketbook will convert them into digital documents. Lots of artists and designers find sketching by hand, not just on the computer, a crucial part of the creative process, but scanning can be a pain. When you want to save your writing or sketches, the Rocketbook app will upload them to the cloud. The app takes photos of the notebook, two pages at a time, and automatically sends these digitized documents to folders in your Google Drive, Dropbox, Evernote, or email account. Seven icon buttons are on the bottom of each page, and you can assign them to various locations to determine where the document will be sent. For example, pressing the airplane button might automatically send your pages to Evernote.” Interesting idea for your quilt sketches and notes to self.
Websites, Articles and Information
This is a very short article about the Missouri Star Quilt Company without a lot of details. It leaves me wanting more. Where did they live in California? When did MSQC start? Perhaps, it will spur others (DO YOU HEAR PODCASTERS???) on to find out more.
Jackie is starting a series on sewing with children on her blog. She has posted random bits about sewing with children so I am looking forward to this organized series.
Modern Quilts Illustrated issue #10 is available. Weeks Ringle and Bill Kerr at the Modern Quilt Studio have gone to a 2x/year publication schedule. There are no more subscriptions, but you can order it on their website.
The International Quilt Study Center quilt of the month is Oil Rigg by Jo Budd.
We all receive poorly written, flame sounding emails. Sometimes I can’t believe the email I receive because the writer sounds so angry just because s/he signed up to receive a notice of my blog posts. Ms. Lottie, who has the fabulous NZ based podcast and blog, posted a reminder from another artist, Dena Crain, about some tricks on how to avoid and respond to less than clam emails. One thing that spoke to me was the paragraph “Truly, our success at accomplishing all of our life goals has to do with how we approach other people. Give everyone the benefit of the doubt, and trust that most people really do want to do the right thing, even you!” Dena also has a tutorial on making a mosquito netting. I think that is the first tutorial of that kind I have seen.
The Home Machine Quilting Show will be in Salt Lake City May 7-9, 2015.
Charlotte of the Slightly Mad Quilt Lady Blog and Podcast has a tutorial on tying a knot for hand sewing. The thing I like about this tutorial is that it is short, gets down to business right away, tells you what you need to know and doesn’t have a lot of distractions.
Projects, Magazines, Books and Patterns
Philippa, AKA OzzyPip has been posting a series of animal blocks to Twitter. I love this little bird.
I know you NEED a cactus pin cushion. 😉 I saw a pattern posted on the Sewing Lab blog and thought you would like it. I know you could make some creative changes to put your own mark on it. If you make one, post a picture to the AQ Facebook page. I’d love to see your work.
A new issue of Through Our Hands magazine from Laura Kemshall is out: http://issuu.com/laurakemshall/docs/throughourhandsmagazinefeb2015/7?e=3297033/11588949
I was excited to see the Bag of the Month club bag over at Sew Sweetness. It is almost the perfect bag. The Hyacinth Bag is great for a purse and place to store a few things you might need at a quilt show. It is almost the perfect work bag for me, but just a tad bit too small. Still, she is getting closer.
I love the use of text fabrics in the quilt by Magnolia by the Bay.
Other Artists
I know that the New Year is long in the past, but I came across this 2014 Year in Review by Sara over at Sew Sweetness. The visuals add interest. I really like the gallery of photos and will see about doing some similar at the end of this year. I love the apron her friend is wearing towards the end of the post and I do kind of like that Rockstar Bag. I didn’t see it when it came out and I’ll have go and check it out. It has possibilities for a “take my stuff and lunch to work on the train” bag. You might see one that I made pretty soon. We’ll see.
There will be a workshop on Saturday at the CQFA meeting based around this photo, Spring Comes to Humboldt. The name of the workshop is the “Same Design, Make it Mine” challenge.
The guidelines of this workshop are:
1. Look at the photo and recreate the sense of it in your medium of choice.
2. Use your own style
3. Use your own favorite techniques
4. No whining
CQFA Members: bring materials and supplies to the meeting as we will work on our own projects during the meeting.
While this workshop is primarily set up for CQFA and will be held at the meeting, everyone who reads is welcome to play. You can post your efforts to the AQ Flickr Group, or the CQFA Flickr Group, if you are a member. <Nota bene: you can easily be a member for a small payment of dues!> CQFA members should bring their finished or in process works to an upcoming meeting.
There are a number of things about this book that do not fit into my definition of a perfect book, but I like it anyway.
I like the colors on the cover. They are cheerful and drew me in. The colors of the projects pictured in the book are fresh and also cheerful. I also like the fact that Kim Brackett admits that “not all fabrics work well together in a scrap quilt.” Hallelujah. Some authors insist a maker can put anything into a project and end up with a beautiful quilt. I simply do not agree. I find that seeing the words in print make me feel validated.
This book talks about using 2.5″ strips and pre-cuts. I don’t, usually, buy pre-cuts, but I have a ruler and a rotary cutter and have the ability to cut as many 2.5″ strips and squares as I want to make these quilts.
After a short introduction, the author provides into a lot of information about 2.5″ strips. The bottom line is that the reader does not have to buy pre-cuts; s/he has to have fabric and scraps. From those s/he can make the quilts in this book.
The section also includes information on strip swaps and ‘strip clubs.’
Hard on the heels of the 2.5″ strip section is the ubiquitous ‘Basic Quiltmaking Instructions (pg. 11).’ The information found in this section is basic and, mostly, a review. Still, it is always useful to be reminded how to avoid cutting a V in a fabric strip. Aside from the normal “how to sew a quilt together’, this section also includes a little about chain piecing and Folded-Corner Units (like Flying Geese). There are charts to fill in on creating Side-Border Strips and Top- and Bottom-Border Strips.
Quilt patterns start on pg. 20 with a peach confection called Sanctuary. This is primarily made with four patches within four patches. The patterns could do with alternate color ways on the last page of the pattern to spread the wealth of the information. Scrap-Basket Trail is one of those quilts that would appeal to many more people if the brown and reproduction backgrounds were removed and the quilt was shown in, say, pinks.
Cross My Heart (pg.30) looks really great in various Bonnie & Camille fabrics. Hourglass (pg.36) is bright and cheerful and pretty interesting in the piecing department. Almost all of the patterns have something intriguing about them.
One of my favorite patterns is Beachside Bungalow. I love the rings and the colors. I also like the grey used in the background. My absolute favorite pattern, which I intend to make…sometime, is the Triple Star. some of its charm comes from the scrappiness, but it is also an interesting block with a lot of pieces. I also really like the blue background.
Yes. And I felt stupid posting that prompt, but thinking about milkshakes and what the word meant to me was awesome. This response was inspired by, not only milkshakes, but also prompt #208. Sadly, that is one of the lost boys and you can’t go back to see the response. Yet. Again, librarian drama.
I like this response. I was finally getting my drawing groove on. It is more complicated than the other prompts drawn in the same session.
How about you? Want to join in the fun? Don’t copy! Draw, color, paint, dance or sing your own response. Take a look at the original prompt to be inspired.
Then, post the direct URL (link) where your drawing, doodle, artwork is posted (e.g. your blog, Flickr) in the comments area of this post. I would really like to keep all the artwork together and provide a way for others to see your work and/or your blog.
We are also talking about this on Twitter. Use the hashtag #CPP
The Creative Prompt Project, also, has a Flickr group, which you can join to post your responses. I created this spot so those of you without blogs and websites would have a place to post your responses.
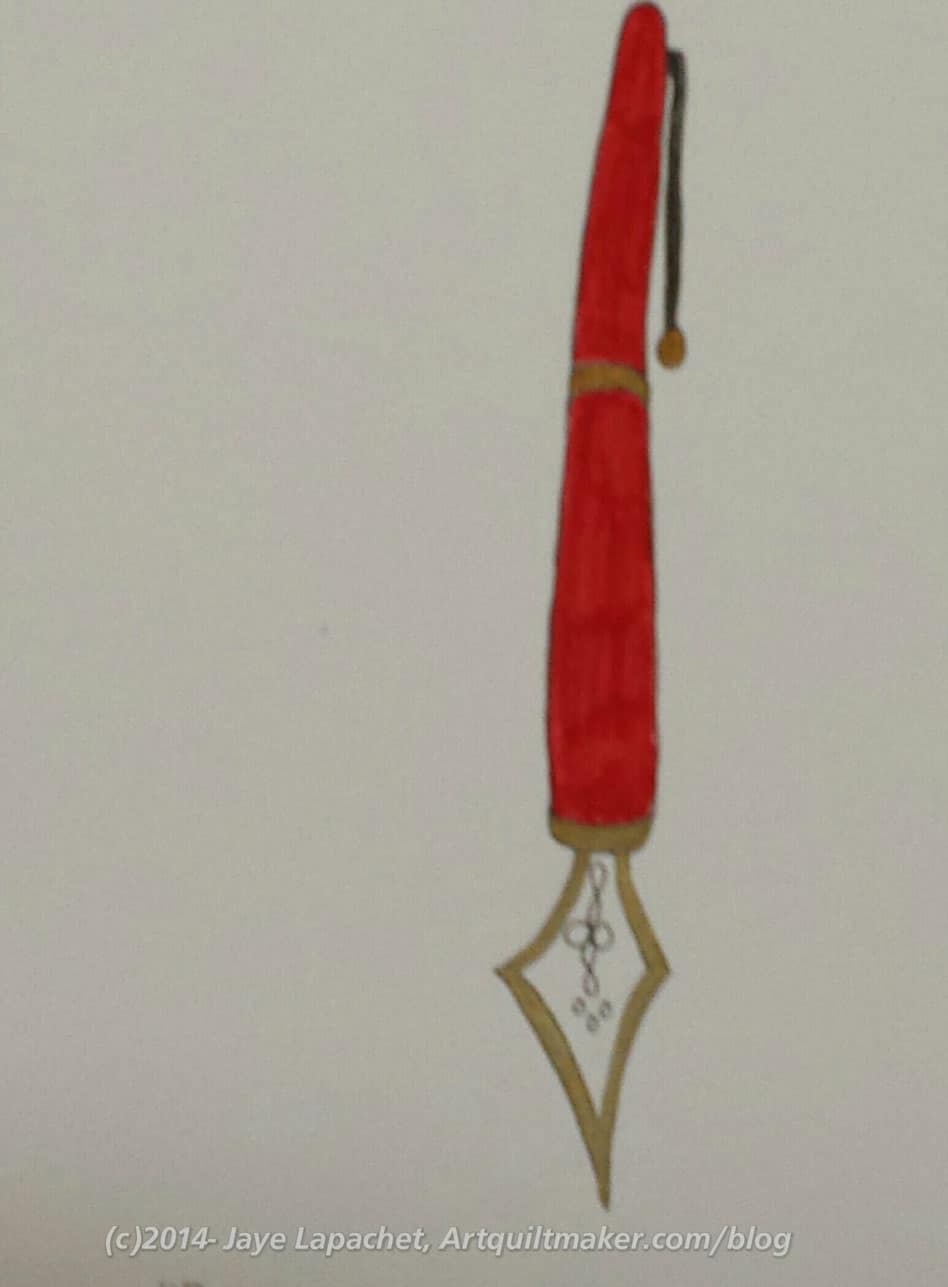
What else could it be but a fountain pen? Have you used a fountain pen? I have. They are an experience. They create individual words – well, the act of using a fountain pen is a creative experience that makes the words look individual. It is a terrible or wonderful experience. Terrible if you run out of ink or your cartridge malfunctions and you get ink all over your hands, paper, desk….you get the idea. Wonderful if your pen flows beautifully.
I have a couple of fountain pens, but none that are scarlet and gold. I do have cartridges with turquoise and emerald ink. I see fountain pens on MassDrop all the time, so they must be coming back into fashion.
I am thinking about picking up a fountain pen again just to see how rosy my memory of using one is.
This drawing is a little bit simple, but I was bold with the color.
Take a look at the original prompt. Then draw, color, paint, dance or sing your own response. Be inspired.
Then, post the direct URL (link) where your drawing, doodle, artwork is posted (e.g. your blog, Flickr) in the comments area of this post. I would really like to keep all the artwork together and provide a way for others to see your work and/or your blog.
We are also talking about this on Twitter. Use the hashtag #CPP
The Creative Prompt Project, also, has a Flickr group, which you can join to post your responses. I created this spot so those of you without blogs and websites would have a place to post your responses.
I did four drawings in one hour. Four responses in one hour. Even in that short amount of time I saw progress and I felt more confidence the more I drew. The first one I drew and the last one posted is very simple, but I found that it got my feet wet.
I also got inspiration, and continued a series of sorts, by looking back at my previous drawings. My confidence was better, but I also penciled in some of the major lines just to get the proportions, mostly, correct.
Draw, color, paint, dance or sing your own response. Take a look at the original prompt to be inspired.
Then, post the direct URL (link) where your drawing, doodle, artwork is posted (e.g. your blog, Flickr) in the comments area of this post. I would really like to keep all the artwork together and provide a way for others to see your work and/or your blog.
We are also talking about this on Twitter. Use the hashtag #CPP
The Creative Prompt Project, also, has a Flickr group, which you can join to post your responses. I created this spot so those of you without blogs and websites would have a place to post your responses.
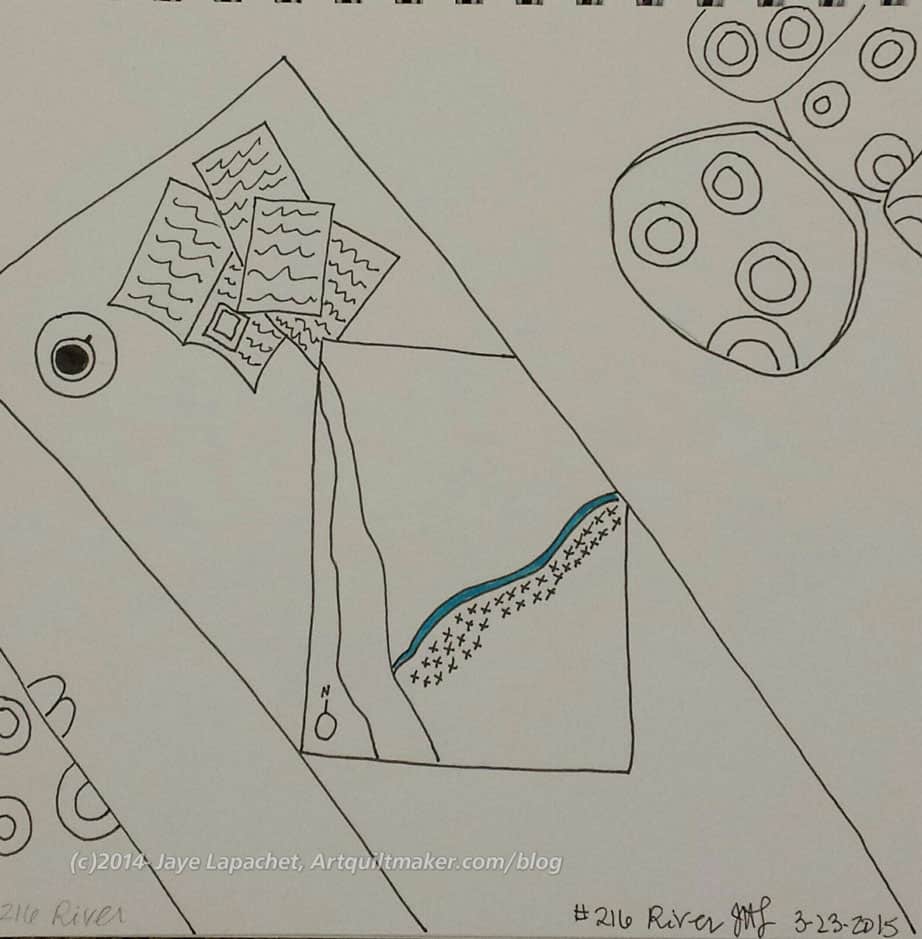
There is good and bad with the posting of, finally, another prompt response.
The Good: I am drawing again. I am responding to prompts again. I am enjoying responding to the prompts. I am enjoying using my pens and paper. I did draw a response (and post it) in 2014!
The Bad: This one isn’t that good and pretty basic. I haven’t posted a response since April of last year.
What is making me a little crazy is that the last one I posted was #204 and this one is #215. There are 11 I didn’t post and now the posts will be out of order. I may add the posts later in order. This is librarian drama.
Still, a person has to start somewhere. I am pleased to say that I am taking my own advice and I only spent about 5 minutes on the drawing.
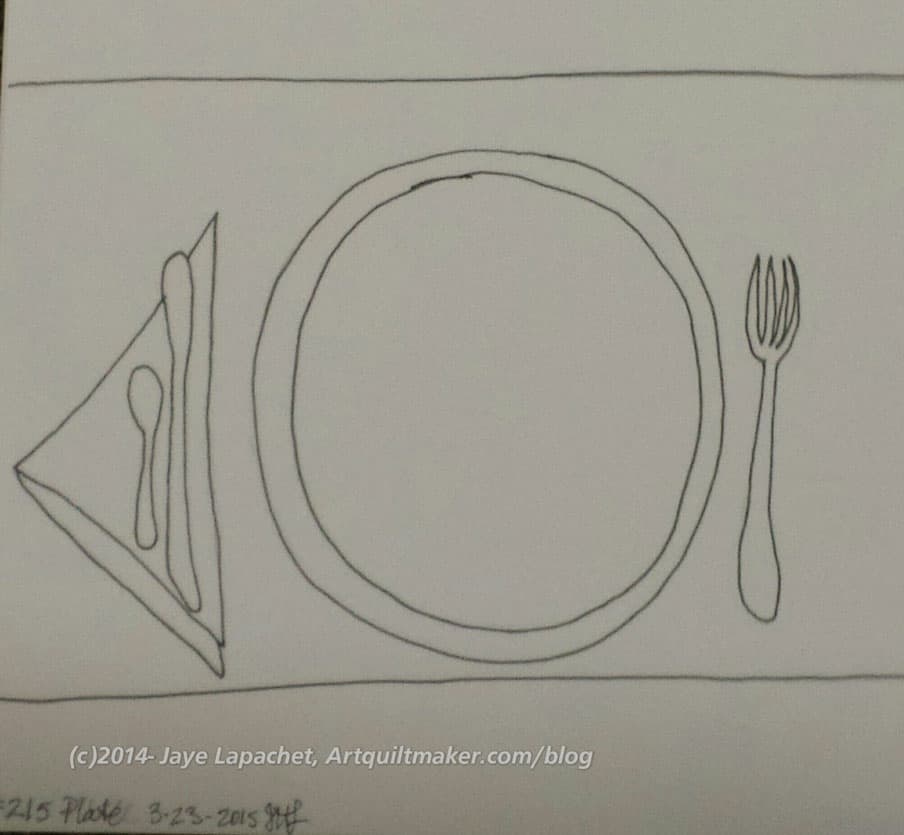
Creative Prompt Response #215: Plate
I don’t hate it, but it does need something. If I add it, I’ll post again.
Have you seen the original prompt? Take a look at it and draw, color, paint, knit, sew, dance or sing your own response.
Then, post the direct URL (link) where your drawing, doodle, artwork is posted (e.g. your blog, Flickr) in the comments area of this post. I would really like to keep all the artwork together and provide a way for others to see your work and/or your blog.
We are also talking about this on Twitter. Use the hashtag #CPP
The Creative Prompt Project, also, has a Flickr group, which you can join to post your responses. I created this spot so those of you without blogs and websites would have a place to post your responses.
Action Hooks allow you to add your own code to WHMCS that runs when specific events or actions occur inside the system.
hook & eye
Hook partners with leading advertising agencies to design and develop spectacular interactive ad content for desktops and mobile devices.
Git Hooks. Like many other Version Control Systems, Git has a way to fire off custom scripts when certain important actions occur.
crochet hook
Hook Mobile SMS API provides cost effective messaging solution for user acquisition.
button hook
Hooks allow custom code to be executed when some defined event (such as saving a page or a user logging in) occurs.
Hook & Ladder truck
Nick Hook (Soundcloud)
grappling hook
Hook Definition
Redmine supports the concept of Hooks. It is an API to allow external code to extend the core Redmine functionality in a clean way.
coat hook
ook & Loop team members have created bestselling apps for iOS, visual effects for Hollywood films, ecommerce sites for fashion powerhouses, comic books, etc
Red Hook Recreation Center
bad left hook (boxing)
Captain Hook
At hook’s cheese company, Tony and Julie Hook have been making Wisconsin cheese for over 35 years.
A hook is a mechanism by which an application can intercept events, such as messages, mouse actions, and keystrokes.
Dragonclaw Hook
Post the direct URL (link) where your drawing, doodle, artwork is posted (e.g. your blog, Flickr) in the comments area of this post. I would really like to keep all the artwork together and provide a way for others to see your work and get familiar with your blog or website.
The Creative Prompt Project, also, has a Flickr group, which you can join to post your responses. I created this spot so those of you without blogs and websites would have a place to post your responses.
We are also talking about this on Twitter. Use the hashtag #CPP
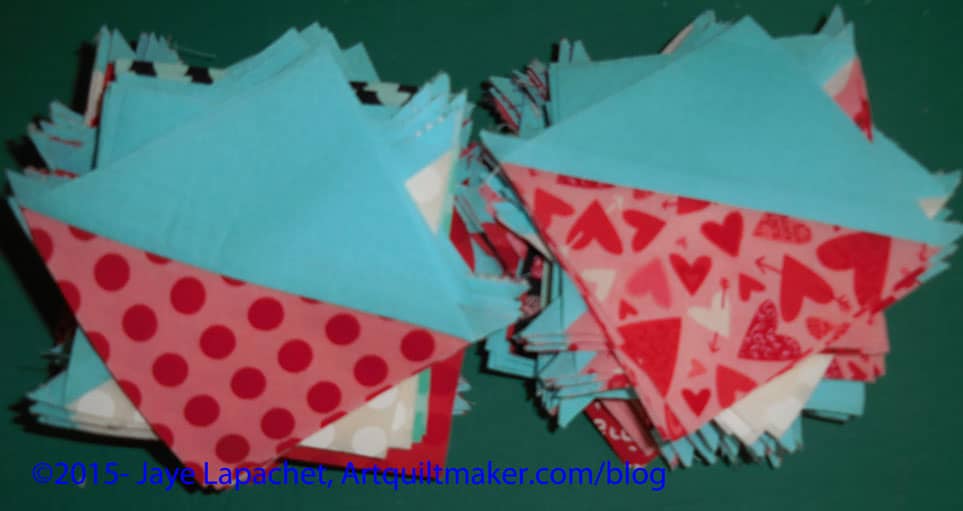
I heard a Wilco song recently called Box Full of Letters and thought that would be a better name for my version of the Missouri Star Quilt Company pattern, Love Notes. Love Notes is a nice name for a cutesy quilt, but I didn’t want to make a cute Valentine’s Day quilt. I just wanted to try out the pattern and see how it worked.
Triangle Squares – preparing for blocks
I have been sewing the squares and cutting them into half square triangles. I have used the Kiss Kiss charm squares that Torie gave me, but am also adding other fabrics that work well with that charm pack. The stacks in the photo will make about 20 blocks. I found a few more that had fallen down on top of the Stepping Stones fabrics.
Potential blocks
There is quite a lot of red in these blocks and I need to add some other colors to the group, but first, I am going to sew these blocks together and see what I have. The blue solid background may make it less sweet. There is a fabric with a black background and pink dots (I think) of which I would like more. The bottom line is that I need to see how the blocks look. I haven’t sewn any blocks yet, but stay tuned for that.
Sadly when quilt shows are put up they cannot stay up forever.
I happened to still be at the Santa Clara Valley Quilt Association quilt show when it closed on the 15th. I stayed around and helped to wrangle the BAMQG quilts that were coming down. I thought we would be able to help with other quilts, but we kind of had to guard the BAMQG quilts. Helpful people kept coming by and trying to take away our quilts and put them with the other quilts to be picked up.
Taking Down the Show
While we were on guard duty, we took down the opportunity quilt, put the stand in its fancy bag, rolled up the BAMQG banner and put away the display quilts.
BAMQG Opportunity Quilt
The opportunity quilt* is beautiful and very unusual. Ruth designed it and Marci quilted it. The photo is just a cell phone photo and doesn’t really do it justice. As mentioned, many of us made blocks and a bunch of us bound it. It was truly a group effort.
I was pleased to be able to help out at the show. I don’t think I had taken down a quilt show before.
*tickets have to be bought at a show. Email me if you want to discuss getting one.
I had to go deposit some checks the other day. Since I was walking I stopped by the library and borrowed the One Block Wonders book. I started reading it before I went to bed the other night and I am less sure about the project.
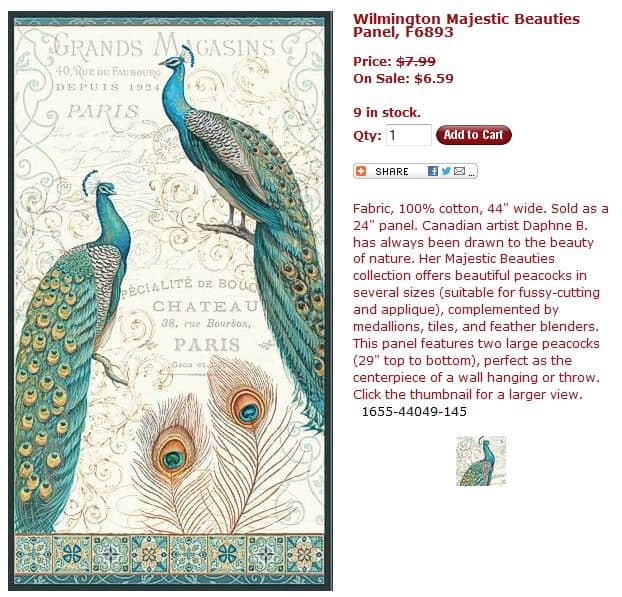
Majestic Beauties Peacocks Panel
First, the original panel I was thinking of using probably won’t work, because it has too much white in the background. I found the fabric on the site called Melinda’s Fabric Shop. I never used that shop before and they have quite a bit of variety as well as a good layout on their pages.
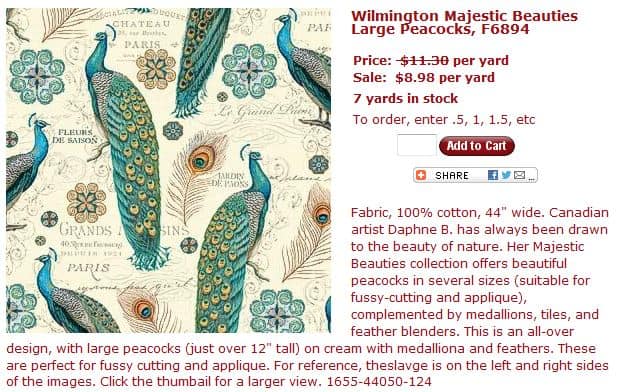
Since the site had related prints right on the screen showing the panels, I looked through the other prints in the line and there are some others that might work for this project. I like the squares print that looks like tile (Wilmington Majestic Beauties Tiles, #F6898), but that print, according to the book might also not work because there is not enough variety in the colors and shapes.
Peacocks fabric
I kept looking and found another print with the peacocks that has more variety in the design and not as much white in the background. It also incorporates some single feathers and the tile. The heads of the birds are a smaller part of the design, which is also kind of a relief, because I really don’t want heads in many, if any, quilts that I make.
The concern I have with this print is the size of the repeat. I can’t tell from the website so I sent them a message. The book says that there will be too many duplicates if the repeat is too small.
I still haven’t looked through my large pieces of Philip Jacobs fabric, but need to do that before I go out and buy more fabric.
I was pretty excited seeing Pam’s version, but as I read the book, I am less excited. I am not thrilled about sewing more hexagons together either. Been there done that. The whole project just seems a lot less interesting after reading the book. Perhaps that is what I felt when the book first came out.
 Political Wifery is gearing up. Last weekend we went to Monterey to do site visits for DH’s Grand Parlor*. We had to review the various facilities including hotel rooms required for the event. We also talked to hotel event coordinators to give them details about the events.
 One of the things we did was look at a location for the BBQ. The proposed location is a historical site, which includes the tiled fountain shown here.