As promised, here is an up to date picture of the Flowering Snowball (Cross Blocks). I found myself short of backgrounds the other day when I had the perfect opportunity to hand stitch.
I laid it out in order to see what background fabrics I should cut. I don’t want to have too many of the same fabrics. I want it to look scrappy.
As you can see I have 3 more blocks for the middle section before I start on the outside. I need to make the pattern pieces for the outside, too. I thought of combining the pieces that will become background, but I may just leave them as individuals, so that I can use a variety of fabrics. The former method means the rest of the project will progress much more quickly. The latter means that I won’t have to figure out a new piecing order.
In grammar school, I would sometimes walk with my sister over to my grandmother’s house after school. Grama worked, so we would be at her house alone, or with one of our aunts. Still, it wasn’t exactly a barrel of laughs. Soon, as children are wont to do, we found a girl on the next block and became fast friends. Her family had emigrated from Korea a short time before and her parents and older siblings were never at home either.
Homemade Paper Dolls
We discovered a shared love of arts and crafts. Paper dolls offered a cheap way of expressing our creativity. She could draw people in a style I now recognize as manga. Our friend was perfectly willing to draw dolls and dresses and other clothes and we would play for hours. I remember a discussion of her being a fashion designer where she told me in no uncertain terms that she was going to be a doctor.
I don’t remember why we lost touch, but we did, as children often do. I still have the paper dolls, however, and, as a result, I think about her on occasion.
Amy, of The Creative Mom Podcast, as she often does, brought paper dolls to my mind again with her episode #67, the Shape of Paper. She sent me on a trip around the web looking at various paper doll websites. I found a cool site, Kiddley, with some good basic paper doll outlines that offer a lot of scope for imagination. Wouldn’t it be cool to make fabric clothes with your quilt fabric? A great use of scraps!
I’d be interested to hear your stories of paper dolls in your life and see pictures of anything you make in the paper doll realm.
The four Teacher Pillows are complete. I have one more pillow form, but the Child is being uncooperative about the last drawing, so I may just save the pillow form for next year. I could take a drawing out of his drawing book and use that…. We’ll see. I think I am done with this project except for the wrapping the pillows in pretty paper.
Tangled Star - EQ6
The above is the outline/color drawing that can be printed from EQ6. It turns out that this was useless to me when I went to make the block, or so I thought.
Resource Teacher Pillow
This is how my version came out. I keep pictures of all of the pillows so I know what the past pillows looked like. That way I can use the same or similar fabrics and the teachers end up with sets of pillows if they teach the Child more than one year. This is the 3rd or 4th pillow I have made for this teacher.
Key for Foundation Piecing
This block is foundation pieced, so I also printed the segments (see below). When I looked at the printed segments, they made no sense to me. The design page ended up as a wonderful key to the colors and placement of the fabrics. I wrote letters on each piece, which correspond to the letters I wrote on the pattern pieces.
Pattern pieces ready to cut out and sew
You can see, if you click on the picture to make it bigger and look carefully a letter, a number and a color. The color notes which fabric I need to use. The letter corresponds to the letter on the design key, which I added to make sure I didn’t assign two segments to the same section of the block. The number is the piecing/sewing order. Doing the prep took some time, but it was worth it once I started to piece. The segment pieces/patterns really don’t look like they will make the Tangled Star block, so these strategies really helped.
Piecing Order detail
Above shows the segment after I have pieced the fabric on to it. The red and gold needed to be pieced first, which they were. I then trimmed them and sewed on the green. In this photo the green still needs to be trimmed.
Resource Teacher Pillow back
Above is the back. The drawing is a sort of label. The Child has a distinctive drawing style that the teachers seem to enjoy. I usually let him draw whatever he wants.
Teacher Pillow Labels
To make the label, I divide up a sheet of copy/printer paper into 4 sections. Then I draw in the seam allowances and have the Child draw inside the lines. Once done, I copy onto fabric backed with freezer paper or something. I get it from Dharma, but The Electric Quilt Company and many other companies sell similar products. Once the drawings have been transferred, I rotary cut the labels apart on the cutting lines and add each label as part of the back of the pillow cover.
Omega Block Pillow, Social Studies Teacher, 6B
I let The Child pick out the blocks. I do have to guide and encourage him a little as this is a boring exercise for him and he, usually, just wants to get it over with as quickly as possible. This year he took more of an interest. Above is the block (Omega) he chose for his social studies teacher. They just finished studying Greece, so I think the Greek alphabet was on his mind. He also informed me that Omega is his favorite Greek letter.
I printed out the rotary cutting directions for the Omega, thinking that I could just make it that way. The pillow forms were 14″ so I had to scale up which resulted in a lot of 16th inch measurements. After cutting about the 10th 16th inch cut, I decided that foundation piecing was the way to go.
Sometimes he gets a little too enthusiastic. He wanted me to make a Mariner’s Compass for his resource teacher and I flat out refused. If I am going to make a Mariner’s Compass I have to start a lot earlier.
Omega Block, back
The Child used a lot more words on his labels his year than he has in the past.
Homeroom Teacher, 6A
This is the first block I made. I wanted simple blocks. They got harder the more The Child was involved. He did the color selection on this one (orange and purple). I was skeptical until I found the flower print with a similar color scheme.
Homeroom Teacher Pillow, back
I hope she can read the back. It is really squished.
Teacher Aide Pillow
I really like the color scheme of this pillow. The Child went with the colors EQ6 had in their example and I think it works. I took the opportunity to use the blue in one of the Infinity blocks as well. The color scheme reminds me of the color scheme for a RUSH day I organized in college. We wore yellow, red and green dresses and looked really bright and cheerful.
Teacher Aide Pillow, back
I was a little concerned about the drawing on the back as the Aide does not look very happy in his drawing. I asked the Child about the drawing and, being a boy of few words, refused to discuss it with me. I asked if she always had a lot of filing to do and he said no. That was really the end of the discussion. Oh well, I have a policy of not censoring his art if it isn’t rude or p*rnographic, so she will have to make of it what she will.
Amy of Creative Mom Podcast posted a picture of one of her ATCs. It was the ATC response to the March ATC project she does. I think the prompt was Lucky, but am not sure. I kept thinking about that ATC and the squares and wasn’t able to get them out of my mind.
CB2 Wall Decor, May 2009
THEN I saw a piece of art that resembled the ATC in the CB2 catalog and knew something was happening. Last hursday night, in the midst of the complete chaos into which my life had devolved, I went upstairs, opened up a sketchbook, which is too big and thus intimidating, and drew some connected squares. Then I went, rummaged around in my scrap basket and got some of those blues of which I am so fond lately. I cut them up into squares and glued them over the drawn squares.
My Squares, May 2009
Then I closed the book, did my exercises and went to bed.
The whole experience was good. A little surreal, but good.
Update 5/30/2009 – After reading a magazine I was reminded of some quilts by Denyse Schmidt that also look like the above works. One is a quilt called What a Bunch of Squares and the other was called Mental Blocks.
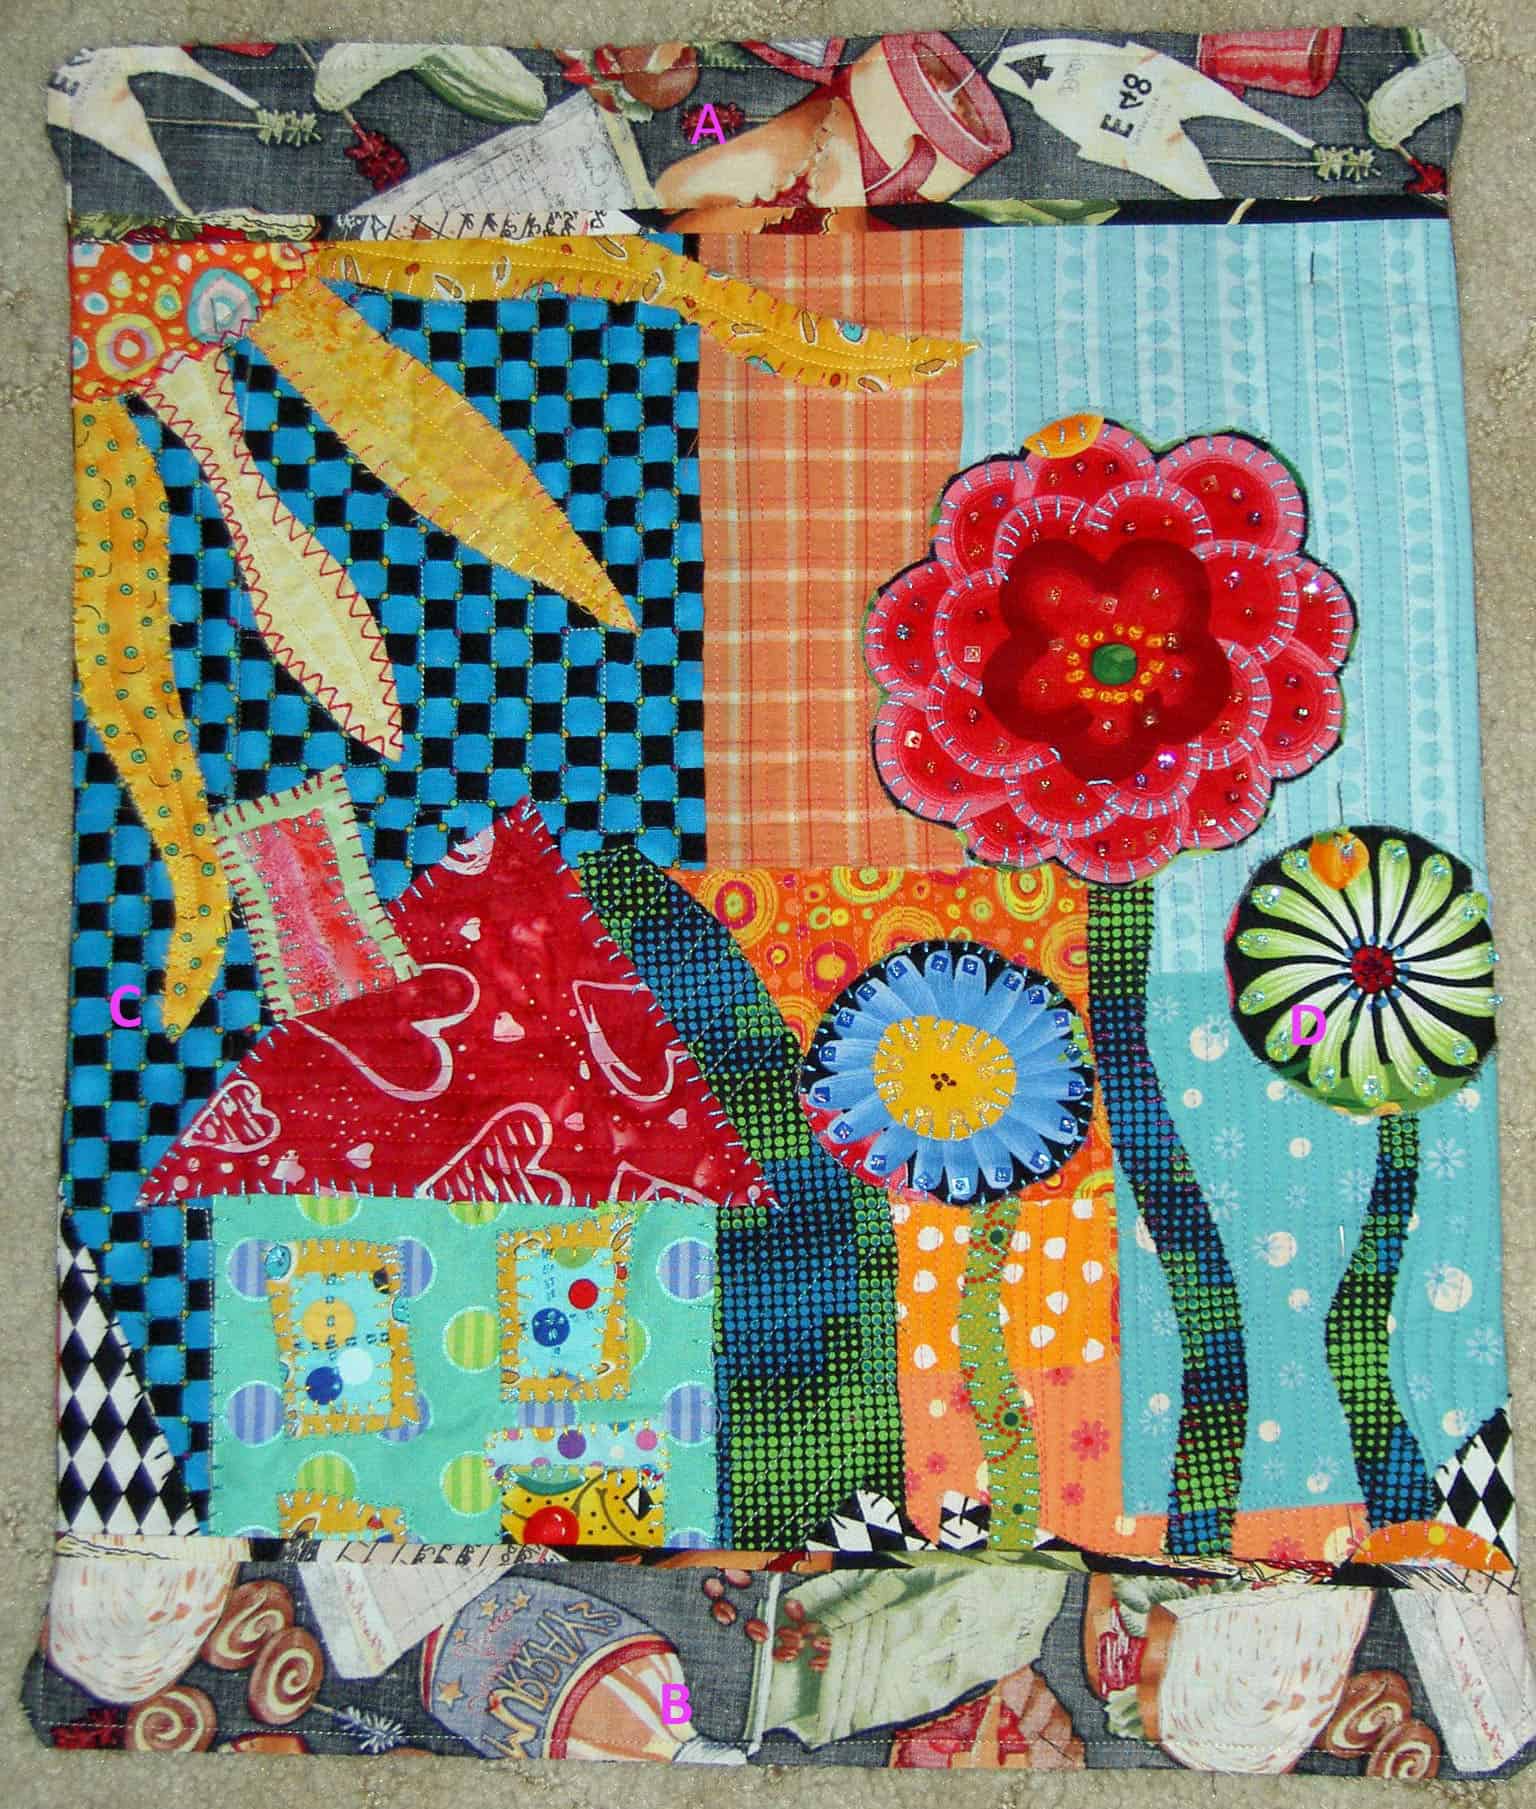
A friend on FB asked me to post Beach Town. As you regular readers know, I get around to posting everything eventually and this past week has been a bit of a challenge. I wondered whether I should post this on Monday to give you more days to look at, but eventually decided just to stack up a couple of posts today and get through the backlog. When I prepare posts and set them to post on a future date, I can’t link to them until they are posted.
I spent Monday afternoon and evening working on the machine quilting of this piece. I still have the purple part of the road and the sky as well as the flowers to quilt, but am mostly done.
I am pleased with how the piece is shaping up. I liked the fluffiness of it before I began the quilting. Now I really like how flat it gets after quilting.
I have to remember to machine quilt it before I start the hand stitching. I know that will be hard in future Pamela Allen classes because of he flow of the class and how excited I get about the pieces I create in her classes.
It took me a long time (well, a month, which seemed like an eternity) to get back to this piece. I learned something from my mistakes, though:
cover the batting somehow
stick or pin everything down really WELL
Ensure the pieces are large enough to overlap to prevent gap-osis
machine quilt before hand stitching
Beach Town, top detail
I do need more quilting on the sky. I just went around each sunbeam in order to tack down the repaired part of the sky. The other part of the sky is just too fluffy, so I will quilt some more in the area on the right of the piece.
I spent a lot of time on the tree, so that the lean, straight shape would be maintained. I think I succeeded?!
Beach Town, bottom detail
Quilting the bottom was a little more of a challenge because I didn’t want the quilting to stand out. That meant a lot of stopping and starting with new colors. That is ok. I spent some time in the evenings during the week working on little bits of the piece. As I mentioned I still need to quilt the purple part of the road and I think some hand stitching will be required.
I don’t know if I will machine quilt the flowers. I am not that into free motion quilting right now. I may just tack them down a little and then do some detailed hand stitching. It may be that I just bead them to try and maintain the look of the color statement. I haven’t done anything there yet, so I will have think about it some more.We’ll have to see.
Are you square? Do you live on a square? Do you walk or gather on the town square?
There is more information and inspiration on the Creative Prompt Page, which I have been updating fairly frequently.
Post the specific URL or deep link where your drawing, doodle, artwork is posted in the comments area of this post. It is an easy and good way to keep all the artwork together.
See the Creative Prompt page if you want to more information how to participate in this project. You can also click ‘Creative Prompt’ in the tag cloud and see more prompts and responses.
I didn’t realize how hard this prompt would be until I posted it. I thought of the series of drawings (are they a series??) that I have going and my heart sank. How would I fit this word into the series?
Then, during my creative binge over the weekend, I had a glimmer of an idea. I let it roll around in my head until finally it jelled. Then, I thought about how I would draw it.
When I sat down to do it the drawing today, it was done except for putting pen to paper. I really had done the whole thing and knew exactly how I would put it on the paper.
I finished and found that it was too boring. It was the perfect time to look through some of my previous efforts. I took the opportunity to add some details from previous drawings and I hope the details will add continuity.
I have mentioned her several times, but as I listened to another Creative Mom Podcast, I have to thank Amy for inspiring me to draw by speaking so eloquently about it. Thanks for taking the time, and expending the energy on your podcast. I appreciate it.
I really cannot believe that it is Wednesday already. I am glad, because that means the weekend is closer. The week is flying by.
Preventing an Avalanche
As you know from a previous post, my fabric closet is prone to avalanches. I needed to rummage towards the bottom of a stack for a plaid. I took all the fabric from that section out and it sat on the floor where I rummaged through it, petted it, looked at it and reorganized by color. Most of it is back in the closet now, but there are a few pieces that still need some attention.
I have a stack of dots that won’t fit in the dot drawers. The need a home. A stack of Jennifer Sampou fabrics destined for a future Interlocking Triangles quilt that I need to integrate with their fellows.
It was fun to look through the fabric. I refreshed my stack of blues for the Infinity blocks. I made 8 of those this weekend in the process – four for me and four for my SIL. They make a good warm up for sewing.
Fabric 2
I also found the piece of plaid I needed. It wasn’t in the giant stack, however. It was in the green bin so I didn’t really need to take all that fabric out! Oh well, as I said, it was fun.
I know that I ignored you all weekend. I spent about 24 hours over the three days sewing and really got a lot done. It is difficult to be at work today, because I am still desperate to be at my sewing machine. Needless to say, I have a ton to discuss.
Updated 2026 – This update uses two different projects to illustrate the process.
I started out with Jeri Riggs’ directions sometime in 2009, which Maureen pointed out to me. You need those directions. I made changes to her process. My additions to Jeri’s post comprises the info below.
You need to know the length of each side of your quilt before you start.
A=Top of quilt
B= bottom of quilt
C/D= sides of quilt
Enlarge the photo below to get a visual of which side is which.
Facing on sides A & B
Cut your facing pieces as follows:
A: 4-5 inches x width of quilt
B: 4-5 inches x width of quilt
Jeri uses 2.5 inches for her width and presses in a hem. I didn’t want to press a hem, so I doubled the width of the facing (the 4-5 inches number) so I could fold it in half and wouldn’t have to press a hem. This also means the raw edges are secured under a machine seam. You can do it either way.
You can also change the 4-5 inches size of the A/B pieces depending on whether you have a large quilt or a small quilt. I used 5 inches on my 1-2-3 Mosaic table runner and it felt really large. If I were doing it again, I’d use 4 inches.
5″ is my starting point and I look at the size of the quilt and adjust from there.
You want to be able to double the fabric so you don’t have to make a hem, as mentioned.
You also do not want the two hems of the facing to meet each other in the center of the quilt, which could happen if the quilt is small.
C: 5″ x width of quilt minus 3-4 inches
D: 5″ x width of quilt minus 3-4 inches
One of the things I really had a hard time understanding in Jeri Riggs’ tutorial was the difference between what I needed do on the top/bottom (designated as A and B) versus the left/right sides (designated as C & D). The whole idea for the different facing sizes is to reduce bulk in the corners.
Make the C/D pieces shorter because you want to reduce the bulk in the corners. The C/D pieces need to be covered by the A/B pieces, but only by enough so there are no raw edges. Before sewing, the C/D facings will be positions on top of the A/B pieces.
Cutting facings: For the A/B (top/bottom) of the quilt cut a facing rectangle that covers the entire top or entire bottom from side to side and is your preferred width. I cut mine, as noted above 4-5 inches for large quilts multiplied by the width of the quilt. Adjust as necessary.
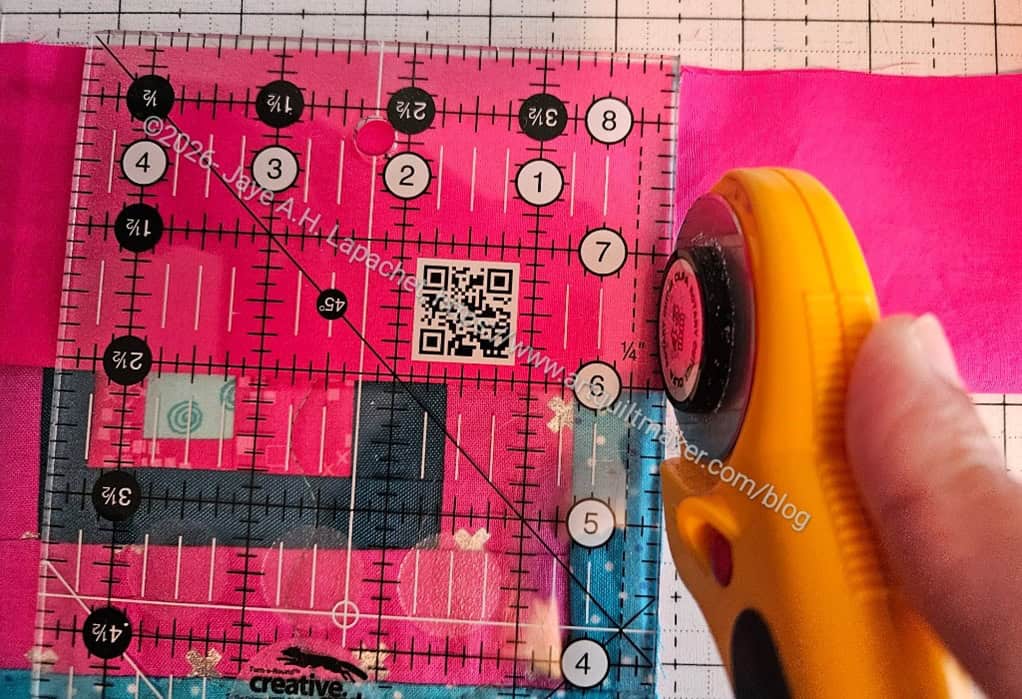
Trim the facing after you have pinned it
I cut the A/B pieces a little longer (mostly because I am too lazy to measure more than approximately unless I MUST). Trim off most of the excess after pinning the facing to the top and bottom. Instead of following Jeri Riggs’ directions by pressing a 1/4″ on the long side of the facing, fold your strip in half and pin the raw edges side to the edge of the quilt.
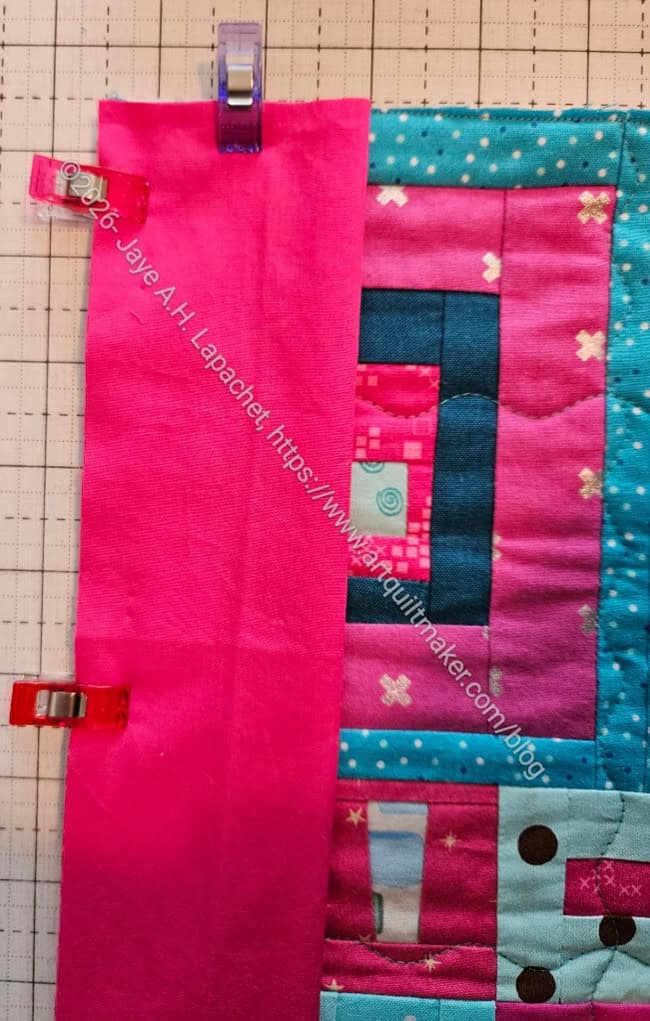
Facing end clipped to quilt
The photo, left, shows the trimmed long (edge to edge) facing clipped to the side of the quilt.
Sewing
Facing laid out
Once the facing pieces are laid out, trimmed and pinned, I machine sewed one facing to the top (A) and the bottom (B).
Note on the sewing: The key is to sew starting on the short side of the A/B facing starting at the edge of the shorter facing. Above you can see the stitching starting about half an inch before the edge of the short side.
Sew around the corner like you are sewing on a binding.
Continue on the long side (very top of the quilt t0 Side A), go around the corner and continue along until you reach your starting point.
Sewing Facing for A & B
Nota bene: The only reason I flipped the bottom of the quilt over (photo right) is because I have a small sewing table. You don’t need to do this. If you have a large sewing table, you only need to flip it if it is creating drag on the quilt as you sew it.
Nota bene: This is a small piece and I would recommend trying the process out on a small piece so you get the feel of the process. If you have an unused machine quilting test piece, it would be a perfect piece to use to try this technique out.
On Sides C & D, only sew along the long side of the facing. The raw edge of the short side of the facing will be covered by facings on Sides A & B once you flip the facings to the back.
Now the machine sewing is complete and you are ready to flip the facings to the back of the quilt.
Optional: trim diagonally across the corners
After you complete the machine sewing you flip all the facings to the back.
Press the edge of the facing (where you machine sewed) so that the facing stays on the back.
Poke out the corners .
If necessary, pin the facings to the back of the quilt. This keeps it in place until the hand sewing is complete.
Hand sew the facings to the back of the quilt.
Keep the facing in place with your hand, as needed.
Watch out for pins as you sew. I seem to scratch myself if I am not careful.
Avoid sewing all the way through the quilt.
Flip over Side C & D
The picture to the right shows the quilt after I flipped Sides C & D. Look at the bottom right hand corner (by the green olive) and you can see the seam with the batting.
Finished and Flipped Piece
The picture below shows how the piece looks after you flip all the facings.
The picture above also shows how the quilt looks when the facing has been completed.
One thing about this process is that the facing becomes a design element on the back depending on what fabric you use. In House & Garden, above, I used the same fabric for the facing that I used for the back, which made it less obtrusive.
Queen of Hearts? of Spades? of Clubs? of Diamonds?
See the Creative Prompt page if you want to know how to participate in this project.
Post the specific URL or deep link where your drawing, doodle, artwork is posted in the comments area of this post. It is an easy and good way to keep all the artwork together.
There is more information and inspiration on the Creative Prompt Page, which has recently been updated.
I know I showed this earlier this week, but I wanted it to have its own celebratory post.
House & Garden Finished!!!
This quilt was started in Pamela Allen’s class at EBHQ in May 2007. Two years, almost to the day later. Hopefully, the ones I started last month at CQFA won’t take that long
This is a photo I took in 1981 or 1982 in the small town that I lived in Austria. I found it recently and thought it would be a great response to the Trees Creative Prompt.
Lisa Call is a fiber artist I am in awe of for writing this post. She is methodically going through the steps of building her fiber art business into a life that she loves. This is a really good post with a good message. I would encourage you to read it.
Color seems to be creeping into my work. I have been seeing these trees that that are completely bare except for lots of puffball pink flowers on them. Not cherries that I have seen before, but they are everywhere. How could I have missed them?