NSGW Pillows

NSGW Pillows
NSGW Pillows

I was back in pillow hell on Monday, except that it wasn’t really hellish. I made four pillows using embroidery panels my SIL and I created on her embroidery machine when I was in Maryland/DC last year. My part in that was saying yes or no to colors of thread and whether the letters should be curved or not. She is the embroidery queen and I was just her humble assistant.

Embroidery panel (1 of 4)

While I was in Maryland, we made a few pillows for the Native Daughters, of which we are both lurker members, but I took the embroidered panels home to make the Native Sons pillows later. As I have mentioned, my DH in on the Board of Trustees of a non-profit. When they are running for off their parlor (e.g. chapter) sponsors a hospitality suite at the Grand Parlor (e.g. annual conference). In the hospitality suite, they play cards, offer liquid refreshments and raise money for their Cleft Palate charity using raffles. For the past year or two, since DH has been running, I have made pillows for him to raffle off. They were wildly popular the first year and he raised a record amount for the charity.

Guess what?

“Later” is this weekend! Can you say last minute? I wasn’t planning on spending my day off making pillows, but this coming Saturday would be even more last minute, so I did the job. I was prepared for drama and there was none. I think I only had to rip out one seam. I measured correctly, counted properly and generally made 4 pillows in record time.

Batting Foundation
Batting Foundation

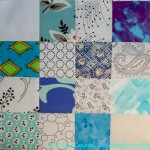
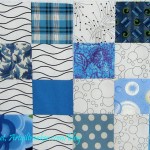
The big difference was that Cathy, my SIL, suggested using batting as a foundation. It makes the block look nice and gives the maker a goal. You cut the batting the size (including seam allowance, so if finished is 14″ you cut the batting 14.5″, etc) you want the pillow and then sew on top of it. I don’t know how this would work if you didn’t have a flip and sew friendly pattern, but I am sure there is a way to figure that out.

Anyway, the pillows are done and packaged ready to head to NSGW Grand Parlor. DH was pleased and I am going to the dentist and then am going to work on something fun that doesn’t feel like “quilt work.”

The Sunday Stash Report (a la Pam at Hip to be a Square podcast) is 2 yards. More on that later.

Nota bene: if you think there are photos missing, there are. I am having trouble uploading some pictures to the blog. Check back later. It will be resolved eventually.

Blue Donation Quilt

Blue Donation Quilt
Blue Donation Quilt

Last weekend I finished the Blue Donation top that evolved from blocks into an actual top.I am pretty pleased with the way it came out. Chunking made this go together really well.

Last night I made a Franken-batting for it and started a back, but I don’t think I will finish the back. We’ll see.

This is for the BAMQG Charity project. Although it is not completely finished, I am putting it in MY finished category, because someone else will take over the quilting and binding.

More Donation Blocks

Blue Zipper Donation Block

The Super Secret project is ready to go to the quilter, so I am back to my 26 Projects list. Before I start the Corner Store, I plan to put together the blue donation blocks into a baby quilt. I am going to put it together with sashing rather than just putting the blocks together. I think it will look nice. Hopefully, it won’t take long.

What do you think of the fish heads?

Scrappy B&W Donation Block
Scrappy B&W Donation Blocks

I hope that the black on white background fabrics will be considered fun and different rather than a poor choice. I don’t have much plain white, and I have plenty of the black on white.

One of the reasons I wanted to put this quilt top (not planning on quilting it, but you never know) together was so that people wouldn’t feel obligated to go out and buy fabric so they make blocks with the black on white designs to match mine.

I did put some of the earlier blocks in the donation basket at the last meeting.

Joel Dewberry Donation Block

I know it is silly to call this (3rd image from the top) block the Joel Dewberry block, but that one square of his print really stands out (2d row, 2d from the left). I like the graphic nature of that patch, so I always think of this block as the Joel Dewberry block.

The blocks I am showing today are all new. I already have enough blocks to make a small baby quilt top, so I guess these blocks will be for the next top!

Dot Donation Block
Dot Donation Block

I know the 4th image from the top is a bit of a repeat, but it is nice to see the blocks together. I was thinking of using black on white for the sashing, but looking at this image makes me wonder if I shouldn’t just sew the blocks together next to each other?

TFQ cut a lot of these squares as we were working on the Super Secret project. I really couldn’t have made all of these blocks without her.

Blue Donation Block
Blue Donation Block

I am also really like the Accuquilt Go!. I cut many of the background fabrics using the 2.5″ square die, which made cutting a breeze.

Look for a donation top from these blocks soon.

Donation Blocks Again

I made a few more donation blocks in between another project I am working on. I know I said this, but I enjoy making these blocks so much. I have only two more blue blocks to make until I have enough blocks to make a large enough Donation quilt.

Donation Blocks

Donation Blocks (March)

This has been a great couple of months for donation blocks. I made a few more the past few days in between sewing for the Renewed Jelly Roll Race. I am unreasonably pleased with these blocks. I find them so fun to make. I am not sure why. The only thing I can think of is that there is an opportunity to play with a bit of color.

Tother thing is that they go together so quickly using Bonnie K. Hunter‘s Leaders and Enders method. My only stumbling block right at the moment is I am out of the kits the Charity Coordinators made, so I am cutting my own patches from scraps and I seem to be constantly short of the right color or background. I used some various black on white prints for the blue block above and hope that will be ok and not ruin the look the Charity Coordinators are going for. I am about to get out my Accuquilt Go! 2.5″ square die and cut a bunch of backgrounds for future use.

Brown Donation block

This block has a weird background, because I took the photo on my bathroom rug. As hideous as the carpet is in my workroom, it does make a fairly inoffensive background for my photos. We had a fairly dramatic shower of sparks which heralded the demise of the overhead light in my workroom. I have some task lighting, but the floor was just too dark for photos. The bathroom floor is small black and white tile, which, I thought, would have been too busy.

Yes, it is a brown block. The boys need quilts, too, and brown works for them. Green and blue, too, I imagine. This fabric is from the scraps of the back of FOTY 2011. I tried to get some of the words for these squares, because I like words on quilts. Letters (as in the snailmail kind) are even better.

Green donation block

These greens are, mostly, more boyish also, if boys can be pigeon-holed into liking certain colors.The Young Man adores red, not the greyed or browned down reds, but scarlet-type reds.

The blue blocks are definitely the ones I will make the most of, but it is nice to make some other blocks in different colors as well.

The one yellow-green (with the x-es) looks quite out of place in this block. I am glad there is another slightly yellow-green square in it (upper left hand corner) so that it is looks a bit like it goes. I am not ripping it out.

Another blue donation block

You will see some of the same fabrics in this second blue block as you saw int he first one. I hope that the Charity Coordinators will receive enough blue blocks with different fabrics to mix my blocks into different quilts.

I did fussy cut a bit on this one, in order to get that cherry and whipped cream into the patch rather than in the seam allowance. I thought it would be fun.

I have a small stack of squares waiting to be sorted into color groups. I try not to duplicate a fabric in the same block unless all or most of the fabrics are the same. I also have lots of scraps to be cut. I am trying to decide if I should cut larger scraps into 2.5″ squares so I have more patches to use or if I should continue to cut one or two squares out of scraps and leave the rest of the scrap for another project?

Second green donation block

I had an incorrectly cut hexagon from the Flower Sugar Hexagon quilt, so I measured and found it would yield one 2.5″ patch. I needed a green patch, so I cut it. Nice to have fabrics from a variety of projects show up in these blocks.

I think I have made 11 donation blocks so far in the past two months. I have one more close to being finished and I have at least another week before the meeting. I think that could be a whole quilt. If I had a wish, it would be that people did not need to be comforted by the quilts I am helping to make.

Donation Blocks

February Donation Blocks

These are the latest blocks I made from the BAMQG kits the Charity Co-Coordinators put together. I wasn’t able to get kits of all the same colors, but I think these look nice.

Donation Blocks - My Scraps

I also cut some 2.5″ squares from scraps of my own as I worked on some other projects. I am trying to cut 2.5″ squares from scraps and fabrics I am working with, so that I can contribute more to the donation effort at BAMQG.

I was able to make 2 blocks from my own scraps. I like the blue.

Doing Good

February Donation Blocks

I am really enjoying making these 16 patch/postage stamp blocks for the BAMQG Charity Quilt project.The beneficiary of our quilts is the Lucille Packard NICU. Apparently, they use the quilts (and other kinds of blankets) to cover the incubators and keep out the light. Each baby who leaves receives a quilt or afghan or other kind of blanket to take home.

I take as many kits, which consist of 16 2.5″ squares, as I want and sew them together into 16 patch blocks. Last time I only took one, but this time I took 4, which was all the red kits available.

They made great leaders and enders and I really was able to put the blocks together very quickly.

Charity Wednesday

Postage stamp-type block

BAMQG has afforded me the opportunity to participate in charity projects without doing the whole thing myself. The group will start 2012 with a whole group of “coordinators” who are organizing different elements of the guild.

Jen and Deborah have started early with their charity duties. They provided kits for making these blocks at the last meeting and I whipped mine together in about 10 minutes. I was so thrilled and wished that I had taken more of the parts! They will assemble the various blocks they receive into quilts. I am not sure they have chosen a charity yet, but they are throwing around ideas for different local organizations.

Stars for San Bruno #3 – Ready to Quilt

I want to make another Anna Maria Horner Multi-tasker tote.

“But, Jaye,” you say “you have so many works in progress, don’t you want to finish them before you start something new?”

I did finish something!!!!

Stars for San Bruno #3 Top

The top for the Stars for San Bruno #3 is pieced, the back is pieced, the binding is made. All the parts are hung up and waiting to go to the quilter.

I feel like I have made a significant step in the Stars for San Bruno Project. it feels SOOOO good to say: All of the piecing for all of the quilts in this project is COMPLETE!! Yes, I finished the piecing for Stars for San Bruno #3 on Sunday. I also made the back and binding.

Stars for San Bruno #3 Back

The back took a lot of time. I have mostly used up the value of blue fabric that I planned to use in all of these quilts, so I spent a lot of time piecing bits of fabric together. It was soothing in a way, but as you can see, some of the fabrics are not blue. They were in the blue bin, so I counted them as available to use.

Also, a note on the photos. My quilt hanger’s wingspan is smaller than the quilt, so the photos aren’t terrific. Hopefully, you get the idea and will come back and continue to read  and not be horrified by my terrible photography skills.

So, everyone, do a happy dance. The end is near.

Stars for San Bruno #3 Progress

Stars for San Bruno #3

I worked all Sunday and a couple of hours on Monday afternoon on the Stars for San Bruno #3. I am too small, so I asked the Young Man to hold it up to me, which, as you can see, didn’t work out very well.

The way I asked him to hold it is actually sideways. The plan was to make a row quilt with vertical rows of stars. If I would actually measure on occasion, I would have known that it would come out weirdly wide. Looking at it like this gives me a chance to see whether it will look ok with horizontal rows.

It definitely needs some kind of spacer on the [current] sides. I want something to separate the pieced stars from the embroidered stars I plan to use for the border.

Progress on one of the 26 Projects? Yes.

Stars for San Bruno #3

Stars for San Bruno #3 Layout?

I finally started the Stars for San Bruno #3 quilt. The picture is lame, I know. It looks like nothing and you can’s see the squares I put on point or squared up. I wanted those of you who participated to know I am not being completely lame.

Stars for San Bruno #2 is almost ready. #2 and #3 go to the same family, so I need to finish #3 before I can get #2 out of the house. I plan to work on it soon so you can see some real progress.

Cat Beds

For a long time I have been wondering why tiny bits of fabric couldn’t be recycled. As I tossed out stockings and holey socks, I wondered if there wasn’t something that could be done with them. Reading Victorian mystery novels didn’t help, because they describe ‘rag pickers’, but who wants that job?

How Much Work?
How Much Work?

I have often judged the amount of work I have done over the course of a week by how full my garbage can was. Still, I wished that I could put those bits of fabric somewhere to use without having to store them myself.

A few months ago, Amanda came to the BAMQG meeting and solved my problem! She told us that she and some friends were making cat beds for a local homeless cat shelter. She asked us to save our tiny bits of fabric including worn out clothing (no underwear!) such as t-shirts and sweatshirts. She would use them to fill the cat beds she was making so the beds would be soft and comfy for the cats.

Despite the fact that I had long thought about saving tiny scraps and doing something with them, I thought saving the tiny bits would be too much trouble. Then I remembered 1) all the times I had been reluctant to toss tiny bits; 2) Pam and what what good care she takes of her cats; and 3) how lame I was acting.

Cat Bed Filling
Cat Bed Filling

I got myself a zipper bag and started tossing scraps in. Thread, schnibbles, bits of batting, and selvedges all go into the cat bed filling bag. I was shocked at how many tiny bits I had and how quickly I filled up a bag. I brought two bags of bits to Amanda the first time she collected them!

Trimmings from quilting, e.g. the edges of the quilt sandwich fill those bags up faster. It is another kind of sorting I have to do daily and I haven’t quite found the right place for the bags. I am really happy to do one small thing to make a cat’s life better and to help Amanda, who is doing the heavy lifting on this project. The other good thing is that my garbage can is a lot emptier, which means less stuff going to the landfill.

I am really good at doing one small thing for various projects that all need time, attention and money. In other projects where this has been my M.O. I have found that I can see the difference – how my contribution changes things-when I do one small thing.


Stars for San Bruno #2 in progress

SfSB #2 Design Process

The ‘paint was barely dry’ on SfSB #1, but I got busy putting the Stars for San Bruno #2 quilt together on Sunday. I had done a few smaller projects on Friday and Saturday afternoon and decided that Sunday morning was the day for SfSB #2.

Putting all of the blocks on the floor and looking at them worked pretty well last time, so I did that again. I found that they logically divided themselves into 2 groups (generally right and left of the photo). Most of the blocks on the left are Sawtooth Stars and I decided to group them into one quilt. I saved the Stars on the right for the last quilt.

Auditioning Fabric
Auditioning Fabric

Once I had selected the blocks, I laid them out on some fabric that Sandy sent just to get an idea of what I was facing.

I could see right away that there would be a lot more open space in this quilt, because I didn’t have as many blocks left. This looks more like a starry night sky, I think.

The quilt didn’t really end up like this at all, but it was a starting point.

Borders and Layout
Borders and Layout

I could see from the layout above that I needed some of the blocks with the light background in lower corner.

More rearranging…

This is a technique that I call improvisational piecing. TFQ and I have used this process when working together on a quilt called She had to have her Latte, which was kind of a precursor to the Tarts Come to Tea. Isn’t it strange how I can relate all of my quilts to each other?

I kept rearranging disparate sized blocks and adding coping strips, corners and strips until the pieces fit together. This process is not for the faint of heart.

Rearranging Process
Rearranging Process
Making Progress
Making Progress

I decide where I am going to start and then march down or across the quilt.In this case, I started from the top and moved towards the bottom. I decided to put almost all of the blocks on point, so I added triangle corners to them. I also filled in the spaces with large pieces of fabric.

SfSB#2 Finished Top
SfSB#2 Finished Top

I was able to finish the top last night. I wanted to get the parts off of my design floor and I didn’t want to have to remember what went where. There was a lot of partial seaming, so it was important to me to get the pieces together correctly.

As you can see, I added a few pinwheel blocks in different sizes. I was inspired by the very center of TFQ’s block (upper right), though I realized that I didn’t make them exactly like hers.

My first thought after sewing on the last line of blocks (right) and looking at the whole piece was that it needed a border. Sigh.

Finished: Stars for San Bruno #1!!

Stars for San Bruno #1

Yes, I really did it! I made the first quilt in this series and it is finished. I have brought it around to CQFA and BAMQG and shown the contributors in those groups. I want as many people as possible who contributed blocks to see it before I give it to DH’s cousin.

Now I have to call the cousins and arrange to bring the quilt. I am nervous, since I don’t know them that well. I’ll let you know how it goes.

Nota bene: the Block-a-long will return next week.

Stars for San Bruno – More Stars Needed

Sandy's Stars
Sandy's Stars

Want to contribute? I could use some more blocks.

Friendship Stars and Sawtooth Stars are both easy and relatively fast to make.

All star blocks are welcome!

Block background: dark blue
Block design: Yellow star (any pattern, technique, eg. embroidery, painting, silkscreen, etc)
Block size: 8? finished (8.5? unfinished) or smaller (we will work with any size)
Remember to sign your block!