I made a few more blocks. I haven’t had tons of time and have been spending my donation making time on the Rectangle quilt and The Swamp Thing.


Commentary about works in progress, design & creativity
I made a few more blocks. I haven’t had tons of time and have been spending my donation making time on the Rectangle quilt and The Swamp Thing.

I made the blocks I promised to make for a group quilt. Most people are making 6 blocks, but I agreed to make more since I suggested making the quilt larger.
I am not a huge fan of the Friendship Star block in general. I like them smaller than 12 inches, which is why I made the Friendship Stars in Flying Around so small. I also like them better when combined in wreath format.
For this quilt, I liked the sentiment of the Friendship star and thought the addition of the ribbon (the green and the blue) was an interesting element. When I put all the blocks next to each other on the design wall, I though they looked great. It looks a little boring with just my blocks, but the group will use different red-violet fabrics for the centers and that will make the whole quilt more interesting.
These blocks are easy to make and would be great for a quilt for friends. I copied the design into EQ8 and created a pattern so you can make blocks for your friends, too. If you need a reminder of how to make Half Square Triangles, you use the Leah Day 2-at-a-time tutorial or my Triangle Technique (8-at-a-time HSTs) tutorial, if you are making a lot of blocks.
Julie is also making some of these blocks. She sewed a practice block, which I think is a good idea, even though I didn’t do it. She also has a great post about her process and the tools she used. I forgot about the Seams Easy marking tool, which I have, but always seem to forget about.
These are the blocks I agreed to make for the project, but I have more fabric, so I thought I would make more blocks so that the quilt can be bigger. We’ll see if I can get them done.

I started this rectangle donation top informally awhile ago. I decided to clear off some of the lingering, half finished projects and this was one of them.
It was a collection of rectangles I had cut from larger scraps. I used the same 4.5 x 8.5 Creative Grids ruler** I use to trim my strip donation blocks. As I cut them I pinned the rectangles randomly to my design wall. Over the weekend, I got myself together to organize them and the few additional cut the few additional pieces I needed.
For once I used the one fabric for the cornerstones. I had enough of one fabric and it had a lot of variety so I thought ‘why not?’
I am in the process of sewing, but it has been slow going. I’ll get there.
*N. B. : Obviously, you should shop at local quilt shops and support small businesses whenever possible. However, if you are too busy or can’t find what you need there, I use Amazon affiliate links and may be paid for your purchase of an item when you click on an item’s link in my post. There is no additional cost to you for clicking or purchasing items I recommend. I appreciate your clicks and purchases as it helps support this blog.

Back in April I started cleaning out my green scrap drawer. While I didn’t work exclusively on this project, it was a constant companion. I made progress through the summer. Finally, I have cleaned out my green scraps as much as I can. The pieces left, which I have sewn together, are not big enough to make anything, but will be the basis for a Journal Cover or the next Color Improv donation quilt.
Of course, this clean and clear state of affairs won’t last for long. As I work through other projects, this drawer will fill up again in a never ending cycle. It’s the nature of the beast, I guess.


The good part is that I made a few quilts, mostly from the scraps in this drawer, for people in the community. These aren’t super large quilts (approximately 40×40 inches), but there are still three of them. These three help me meet my goal of 12 donation tops for the year.
In another part of the never ending cycle, I need to decide which color is next. I might want to work with blue, for example, but really need to choose the drawer that is the fullest.

I finished the Swamp Thing (Green Improv #2), which puts me close to 50 yards used (net). Yes, I have sewed quite a bit in the last 2.5 months. I am pleased.
It is mostly green, but very light. I thought it might be the photo I took, but I took a second one and I think it just looks light. As mentioned before, I seem to have a lot of light greens and yellow greens.
This is finished which means it is time to select another color.
More blocks for more happy people who need quilts. I am eeeking out green strip blocks as I work on the Green Improv piece. I don’t have many strips of the right size left, so every green strip block I get is a bonus.
There are very few blocks this month as I have been focusing on using up scraps in the Swamp Thing. I did hand in three donation quilts, however.


I have made some progress on the Green Improv #2 donation top. This is the second green improv, though the first one was called The Green Thing. Perhaps I should call #2 The Swamp Creature. LOL!
I started using the green scraps I had already pinned together in the green scrap drawer. It was easy to make progress by using them as leaders and enders while I worked on other projects, such as the Ombre Weave quilt. It is amazing how pieces grow larger if I actually work on them!
it is about 36 inches wide now. I’d like the piece to be minimum 40×40 inches. I don’t really want to put a border on it. I’d like it to matches the other quilts in this series, but I may, if I can’t get it large enough. I was thinking of scattering bits of improv in between sashing. I would want to do that with green solids and I don’t know that I have enough green solids to make the idea work. It is a thought I’ll keep in the back of my mind if I need it.

I was able to finish Ends n.18 over the Labor Day Weekend. DH was out and about participating in various activities, so I had time to concentrate on clearing up projects that were hanging around.
I know Labor Day was a long time ago, but things are busy and I am sewing quite a bit.
Didn’t have quite enough of the grey dots for the background, so I added in a solid grey that has been hanging around for a long time. I have quite a bit of various background fabrics, so I just decided to add it in. The quilt top is about 48×48 inches, which is a nice size.
The back is very much off balance. I thought of putting the scrappy bit in the center, but couldn’t be bothered taking more time on it. It looks kind of cool as is.

Many of the donation blocks I made in August went towards the bones of this quilt. I really like these QST quilts and think I want to try one without the striped fabric.
I didn’t have enough of any one stripe, so I used two different kinds.

I am starting to think more about gifts, not just the Pink Project, but upcoming birthday and holiday gifts. The Classmate Tote** by Atkinson Designs has been on my mind for some reason. Perhaps I need to make one for myself!

I like making useful bags. As you know I have made two of them before, one as a swap gift and one for Gerre. I like the idea of this bag and I think it is useful.
There are a couple of things I need to remember, if I decide to make one of these again. The pen holder is too small for *my* pens, so I need to make sure to measure my pens.
The other thing is to make sure the binding goes with the the interior and exterior. I have to admit that I really like getting to the sewing part. That means I sometimes take shortcuts in choosing fabrics. It is so stupid, because I love shopping for fabrics and I enjoy the fabulous motifs of different fabrics. So, the reminder is to make sure all the fabrics go together.
**Obviously, you should shop at local fabric, knitting shops or quilt shops. However, if you can’t, please know that I use affiliate links. I may be paid for your purchase of an item when you click on an item’s link in my post. There is no additional cost to you for clicking or purchasing items I recommend. I do not recommend items I don’t like. I appreciate your clicks and purchases as it helps support this blog.
I worked hard over the weekend to clear out some projects. My workroom and my brain was getting cluttered and I needed some space.

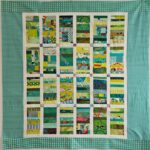
The first one was the Green Strips #3 donation top and back.
The top is finished. It looks a bit weird, but I was trying to accomplish a couple of things. I wanted it to be mostly square, thus the borders only on the sides.
I also didn’t have enough fabric to make the side borders all one fabric. It is more interesting, or it looks weird.

I also made the back.
I was a little sick of this top by the time I got to the back. It has just been hanging around for too long; it isn’t a bad top or anything. I couldn’t find any large pieces of green I wanted to use for the back in my green bins, so I dug into my pile of backing fabrics. I found that stripe, which I know would make great binding, but I wanted to finish it. That piece of fabric has been hanging around for awhile, so it is time to use it for a good cause.
This is ready to go to the Community Quilt ladies.

I started a new Ends donation top with the leftovers from Scrappy Celebration. I also used some from the back of the Diagonal 9 Patch #3.
I did some processing of the various ‘ends’ I had received back from Colleen over the past few months. I decided I had enough to make another donation top.

I have been fiddling with this quilt for awhile, ever since I finished #2. My design walls are full of the grey improv, the black improv and the Pantone Project. I basically had no space in which to put it up and look at it.
Design floor to the rescue.
I finally decided to lay it out and see what needed to be done. I finally laid it out and inventoried the different blocks that I had available.
I am farther along than I thought.
The image above shows my first layout with what blocks I had. As you can see, I have been adding sashing to certain blocks even though I have not seen them up on the design wall.

I had enough blocks to add another row, so I did that to see how it looks. I know it is going to be a weird shape again, but I decided that using up the blocks was more important than my worries about shape. If I were really worried about shape, I would make square blocks.
I have sashing cut, so I prepared sashing and cornerstone strips for the last blocks and see how far I can get in the next little while. I really feel like I need to get this quilt off to the Community Quilt ladies.
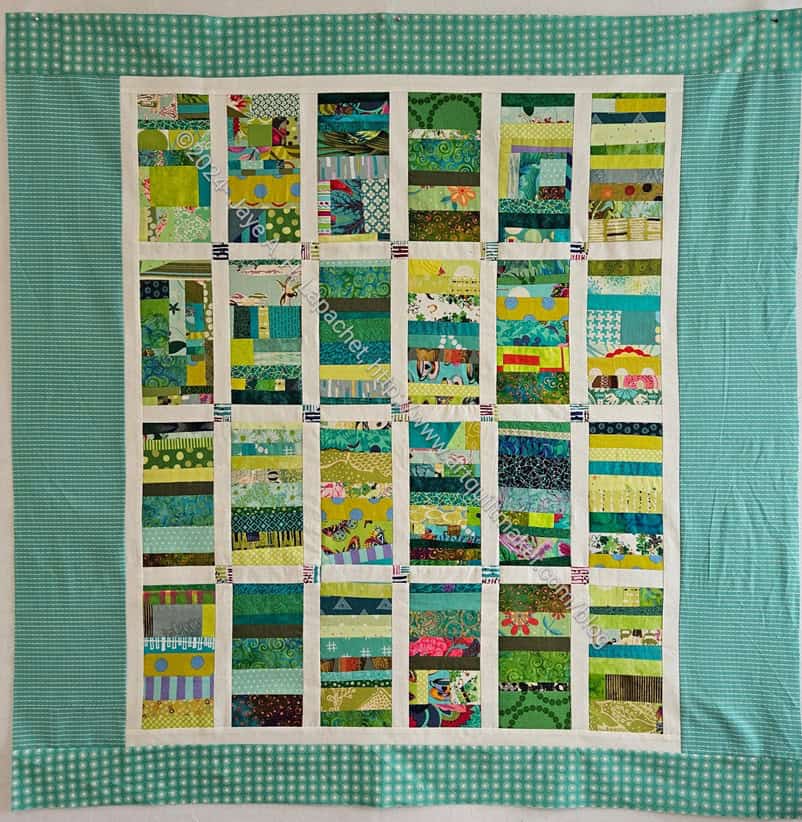
Yes, I am making progress! The top is finished and I am pretty happy with it. I am running out of larger pieces for borders and backings. This does NOT mean I am running out of fabric. It just means the pieces I have left are, mostly, not large enough for the border of a 40 x 40ish quilt. I am not sure what I am going to do about that.
Much of my green, as I may have mentioned, is of the chartreuse and yellow-green variety. I remember buying a lot of chartreuse and icky green as TFQ called it, but I am still surprised I have as much as I do.
The borders I added are some Riley Blake fabrics (I think) that are neither chartreuse or yellow-green or dark green. These are more of a light blue-green…maybe? I don’t know what to call that color. The borders give the quilt a different look overall. Still green, but not as yellow, I think.
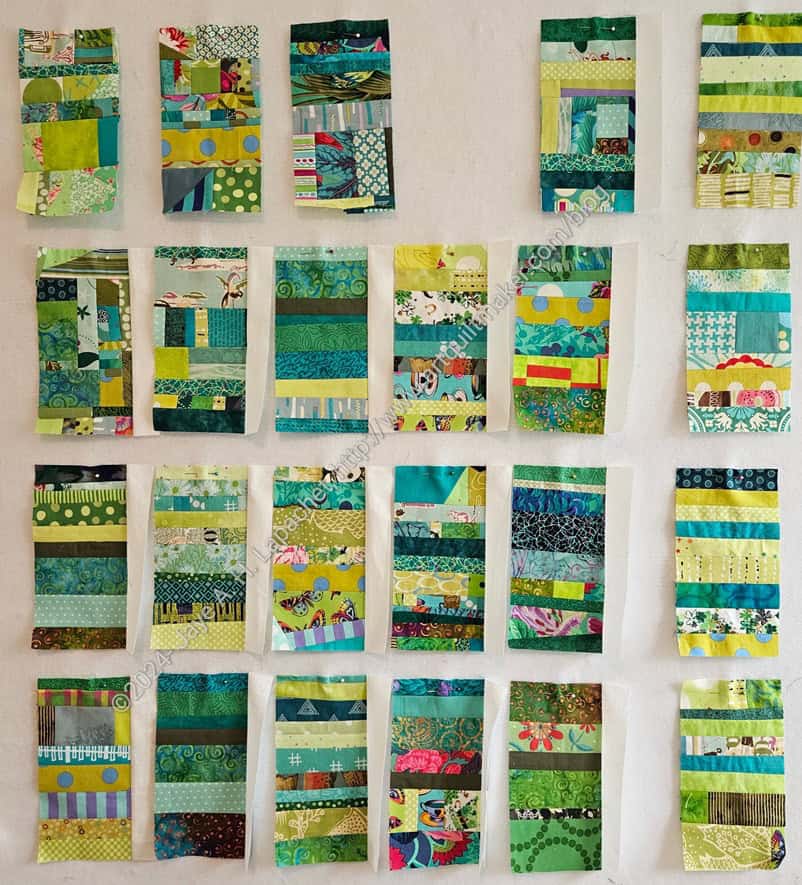
I am making good progress on the Green Strips donation top. It might be a little hard to see, but I am sewing sashing strips to the blocks. I have some of the top sashing cut, but haven’t decided what color to use for the cornerstones. I keep thinking red as that is opposite to green on the color wheel, but I don’t want a Christmas look at all. These blocks remind me of a leafy green tree and I want to keep that feeling. More green, I think. Or a blue tending towards green.