As you may have seen in another post, I have been on a bit of a pillowcase making binge. It is hard not to binge as they are similar to potato chips. In the process of making donation pillowcases, I also made a couple of gifts.
K-man’s Pillowcase
The gift pillowcase for my 14 year old nephew was languishing. It started it a long time ago and never finished it. I don’t know why it was sitting around, but it was. I had seen it a week or so ago, so in the midst of the pillowcase making frenzy, I pulled it out to assess what needed to be done.
What needed to be done was pretty easy to fix. I hadn’t caught part of the seam in the stitch line, so I trimmed the bottom even and stitched it again, then made the French seam on the inside and it was done. Too bad I didn’t finish it for Christmas.
Sweet Dreams Pillowcase #3
I also found more of the chocolate fabric I liked so much when I made the Chocolate/Sweet dreams pillowcase #2 earlier this year. I believe I bought the fabric in Pennsylvania or Maryland last year. I have to say, I could make pillowcases with this chocolate fabric until the cows come home and never get tired of it. This will go to my niece when she is back at college so she has sweet dreams.
As mentioned in a recent post, there is a project to collect pillowcases for the kids at Sandy Hook Elementary in CT. Making pillowcases was on my radar, but I had to get through Christmas first, with lots of baking and cooking, family and friends. I wasn’t putting those in need behind my real life. I really wanted time to work with the pattern and make sure the pillowcases were well made and of good quality. The way Twiddletails shows the cutting doesn’t mesh with my thought processes, so I have to really think about it and focus if I don’t want to waste fabric.
I like that pattern, though, because once you get past the first stitch line, you have only two more stitching lines to complete the pillowcase. I also like it because there are no raw edges due to the French seams.
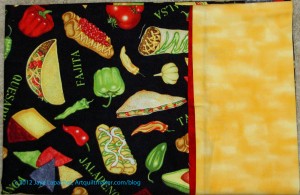
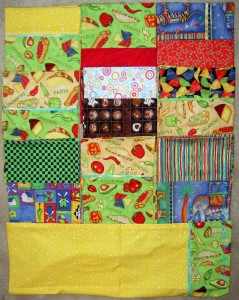
The Mexican food fabric (with beige and green backgrounds) had been languishing for quite awhile and it was time to use them. As you might remember, my intent was to make teenage boy/older boy friendly pillowcases. I know the kids at Sandy Hook are on the younger side, but perhaps there are 5th or 6th graders who are past cheerful trucks and dancing animals who will like them. I find it so easy to find fabric suitable for toddlers, but not so much suitable for teenaged boys.
Dream Fabric
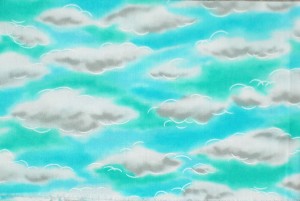
You might have noticed that some of the pillowcases have a green in them that is slightly off. I found this fabric in my green bin when I was looking for something to go with the Mexican food fabric. It yelled out “I am dream fabric and perfect for pillowcases” to me when I saw it. Sadly, I used most of it for something and barely had enough for half a pillowcase much less a whole. I decided to use it for the trim. Yes, the color is a bit off, but I want these pillowcases to induce sweet dreams and be infused with good energy, so I put a little bit in. The viewer can’t see the clouds in the finished pieces, but I know they are there. I really wish I had enough for whole pillowcases.
Circus Pillowcase
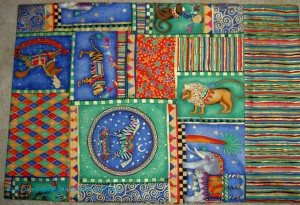
I pulled out a bin I had noticed when I was rearranging and cleaning up after a fabri-lanche recently. It had multi-color fabrics in it. I didn’t remember buying most of the fabrics and they are not fabrics I would buy now, but were very cheerful and GREAT for kids.
I was especially pleased to find this circus print, and enough of it to make a pillowcase and a cuff, as it demands to be left in large pieces rather than cut up. Notice that the cuff is a companion print. At one time I also had the star companion print, but couldn’t find it. I must have used it.
I sent the pillowcases off yesterday and the postage was $12.00+ for parcel post! I forgot how heavy fabric is. That is done and today I am on to something else. Stay tuned!
You might als0 be interested in the following posts:
I made a couple of pincushions for the raffle baskets that will be up for raffle at BAMQG.
I have decided that I enjoy making these pincushions, so there will be more in my future. I have more of the Sandy Gervaise fabric from the charm pack, so I will make at least one more of these. I have more roving and more pellets, so I think I will make even more from other fabric.
I don’t know if tickets will be available of meetings, but if so, I will let you know.
You might also be interested in my last post on pincushions.
I was really on the fence about the BAMQG pincushion swap. I wanted to try it, but was concerned I would have trouble making it. I didn’t quite know how to deal with the button and I didn’t want to make myself crazy trying to get it right.
I decided to participate in the Pincushion Swap with BAMQG after I spoke with Joanna Figueroa at PIQF. Once I had the pattern, Petit Gateau from Fig Tree Quilts, and the know-how I picked out the most modern fabrics I could think of and really had a good time making it.
I liked the way the pattern said to make small blocks and put them together. It was kind of amazing the way, after I cut the circle, the top looks like I sewed it into a circle.
I had a little trouble with the filling. I wanted something with weight, but I wanted to be sensitive to people with nut allergies. I went to the store and as I was being directed around the store for different fillings, I came across the pellets they use for Beanie Babies. I bought a package of those, because I thought they would be good for the weight. I thought about the sharpening qualities that those old tomato pincushions have and landed on some wool roving. I bought a bunch of that and the combination ended up working well. The combination was easy to put in the pincushion.
Vintage Modern Pincushion
It really didn’t take very long to make the pincushion and it was fun. I liked making it and kept thinking about who else needed a pincushion. Perhaps I’ll make one for a Black Friday Sew-In prize?
I am actually ok giving this pincushion in for the swap. I hope I get one back that is as nice.
After the skirt misadventure, TFQ and I decided to make a charger case. I was using a very elegant vegetable bag crammed full of tangled cords and that was the inspiration.
We used a SewCraftyJess tutorial for a jewelry case and modified it slightly.
Charger case – closed
Some of the modifications we made had to do with size.I also noticed that Jess, who did the tutorial, must have had a different type of vinyl (I used the leftovers from my clear bag project), because she did not need a roller foot or tissue paper. I need both of those at various times to force the vinyl through the machine. I don’t think this is problem/issue if you are using some of the flannel back oilcloth and keep the flannel side against the machine bed. For the purposes of this charger case, I couldn’t guarantee that I could have something between the vinyl and the machine bed at all times. This is when I put the tissue under the vinyl. Yes, the bits of tissue paper had to be picked out with tweezers, but that was the lesser of two evils (the first evil being me screaming and berating the vinyl, my machine, etc). I have some tweezers with very sharp points and long handles and they worked very well.
Charger case – half open
Also, as the layers built up (vinyl twice for top stitching, zipper, etc), the thread started to break, so I lengthened the stitch length and that worked better. I might use a larger thread than 50wt if I made another charger case.
I thought not stitching the back to the front would be a problem, but it seems not to be, though you could stitch all the way through the layers if you wanted.
The tie was a bit of a puzzle. I ended up machine sewing it to the center of the binding on one of the short ends. It seems to work fine. I might try velcro or a magnetic snap if I made this again. I used the technique for making the ties that I use for making bag handles (4x desired width, fold in half and press, fold outside edges to press line and press again, fold on original press line, stitch around entire outside edge). The ties would have had more style if I had made a point at the end.
I am pretty happy with how it came out, though I am thinking that aqua dots might have been a better choice for the inside. I wanted something light so I could see what chargers were where. All of these little tweaks are why I made things more than once – to see if my imagined tweaks would work better.
You might remember I had high hopes of making a skirt. This past weekend was the weekend, because TFQ was here to walk me through the process. On Saturday, we pulled out the patterns, the fabric and got busy.
We cut out the pattern pieces, measured my waist (UGH!!) and TFQ read the directions for the Butterick pattern. We chatted, she read and then she told me that we needed 60″ wide fabric not the 45″ wide fabric I had. I flew upstairs to get the other yard I had, but it still wasn’t enough.
She reminded me that I had bought two skirt patterns, so I ran upstairs (our plan was to cut on the dining room table) and got the other pattern. Again, we chatted, she read and then she told me that I had bought the wrong size. Bleah.
Our options were to go get 60″ wide fabric, get a different sized pattern or bail. I had had enough of skirts for one day, so I bailed.
I had hoped to have a new skirt this week, but, alas, that was not to be. Don’t worry, I am not completely demoralized and I am not giving up. I’ll go get some 60″ wide fabric and the other pattern in a different size and we will try again.
Lessons learned:
Measure before buying pattern
Learn where the pattern tells the maker what size fabric to buy.
My favorite image in this book is called Venice 2 by Tom Leighton of the UK. It shows St. Mark’s Square with a carousel in the middle of the plaza and famous buildings such as Notre Dame ringing the plaza. I love the juxtaposition and “wrongness” of the image even though it looks wonderful and perfect and as though it cannot possibly be wrong. Everything fits and it seems normal. There are tons of other images, as well as pieces of images, that I really REALLY like. Losing T.E.M.P.E.R.(detail, pg.34) satisfies that urge for gears that seems to manifest itself periodically in me. Dreamboat(pg.166) has really great waves. The curves are so symmetrical and perfect. I also like America the Beautiful(pg.169), a woodblock print that shows the topography of the United States in a cartoon kind of style. It makes the cities seem unimportant, which is a relief since they seem to dominate everything.
The last book I reviewed in this series was PUSH Jewelry. I still love this series, especially the edginess of the art that is included and the joy that is no patterns!
You’d think that all of the pieces in this book would be digitally manipulated, but there are pieces described as “woodblock, linoleum cut, hand-typeset lead and wood typography,” so something for everyone!
The types of images range from drawings to photographic imagery. Images are sparse and very complicated. There are dense drawings as well as lithographs, monoprints and silkscreens. The 30 (again!) artists in this book really push the boundaries of printmaking.
Yes, there are some images that I don’t like at all. They just aren’t my style, but I can see the line weight and the shading in them and appreciate those aspects.
There are brief bios at the back of the book either of the artists or their studio. The bios provide links to websites and information on whether the artist teaches, sells works or can be hired for other services. Artists come from all over the world and it makes me think of the differences in styles between countries and whether a similar book of artists from all one country would have the variety?
This is a new book I got from Lark Crafts to review Tuesday and I have to say that I love this series. The last one I reviewed was PUSH Stitchery. I like the size, shape and feel of the books. I also like the edgy nature of the pieces they include. I probably wouldn’t make any of these pieces (not that there are patterns, because there aren’t), but I can definitely get inspired from looking at them. They are really different from things that I normally look at and looking at new stuff always fires my brain.
I have to admit that the linear part of my brain was in charge when I started looking at this book. I thought that many of the pieces were quite ridiculous, but then I started look at them in terms of creativity, shape, form and some of the other design elements and principles we have been exploring in the Design Series. I kicked the linear part of my brain to the curb and started thinking about them in terms of originality and WOW factor.
The books in the PUSH series highlight several artists and give a few pages to each artist, so the reader can see more than one work by each contributor. This part of the series includes 30 artists. Each section includes a picture of the artist and a selection of their work as well as an artist statement in Q&A format.
This book has really interesting forms. Many of the pieces are quite sculptural.
Some of the pieces I really like:
Li-Chu Wu, of the UK, has a piece that looks like a sea urchin.
Allyson Bone, of the US, shows some necklaces that look like cat eye glasses or masks.
Joe Wood’s pieces, also of the US, are quite sculptural and would be appropriate 50 times larger and installed at the SFMOMA.
Dr. Tina De Ruysser, UK, has some very interesting folded paper necklaces.
Mirjam Hiller, Germany. She has feathery, layered pieces. Some of my recent CPP responses have had feathers and I see myself gravitating to those shapes and layers.
These pieces really push all sorts of the boundaries and even the display photographs are provocative. Many of the pieces are large. There are a number of the pieces that do not fit my definition of delicate or pretty. The artists use interesting and unusual materials as well: acrylic, dollars and Euros, fur, rubber, and porcelain, to name a few. The processes used to create the works are equally as interesting: folding stainless steel, adding powder coats, a process like origami, if it isn’t origami along with normal jewelry techniques such as stone setting and metalsmithing.
I think that you would get a lot of inspiration from this book and wouldn’t be sorry if you took a look.
I have to admit that I was kind of shocked when I opened the package that held this book. My immediate thought was Shrinky Dinks? Jewelry? Really?
I had some Shrinky Dinks as a kid, but not many. I think they must have been too expensive and, perhaps, messy. We made some shrink plastic Christmas ornaments a few years ago, but I don’t remember the circumstances. Apparently, Shrink plastic is back and you can wear what you make to work!
There are about 30 jewelry projects in this book and they are quite interesting. They range from earrings and necklaces to cameos! Remember those? The book starts off with a history of Shrink plastic filled introduction. My favorite part of the beginning of the book was the very funny “Shrink Plastic Basics” (pg.10). She gives the scientific name, which sounds scary, but has some potential for entertaining wordplay in it. She also reassures us about the safety aspects of the plastic.
Lark books all have comprehensive materials lists and this is no exception. This is a fun list, because you can use a lot of different art supplies to decorate your projects including and inkjet printer, colored pencils and rubber stamps! The same tools you used in your other jewelry making projects can be used here. There is also a lot of talk of sanding the plastic, which scares me a little bit.
The Basics section also covers decorating your project, using scrapbook punches and coloring the designs. Ms. Sheldon covers my anxiety of the pieces curling as well.
The projects start on page 27, so you know that the “how-to” section is quite substantial. The projects come from different artists and crafters as well as Ms. Sheldon. While most of the projects were not my style, I didn’t see any that I hated. I liked the colors and styling of the Mexican Oilcloth Necklace (pg.48-49) by Jalene Hernandez. The simple look of the Simple Circle Neclace (pg.52-53) was very appealing. I really liked the idea of the Not-Your-Grandmother’s Cameo (pg.57-59) project as well. There were a few 3D projects, which shows the flexibility of the materials.
There are templates and patterns in the back as well as short biographies of the project artists and (YAY!) and index.
This whole book – colors, page layouts, style- has a fun feel to it and that made it pleasant to read.
When Amanda had the new kits out at the BAMQG meeting earlier this month, I wanted to take them all. There were about 6, but I restrained myself and just took one. These cat beds are really easy to make and as an added bonus, I get to dump my schnibbles into the center as filling when I am done.
I had to do a bit of unsewing on this cat bed, as I put the wrong tail on the outside when sewing. You have to put the end you want to hide on the outside when sewing the middle strip to the ovals so that when you turn the cat bed right side out, the hemmed end will be on the outside. I started to unsew the entire thing and then realized I only had to unsew the ends. I did the unsewing then re-sewed and have another great cat bed for Amanda and the Homeless Cat Network.
Cat Bed #2 Side-ish View
One of the things I like about this project is that I can put my schnibbles in it.I save, as I have said, the bits that are really too small to save. I used to throw them out, but putting them inside cat beds is better. I had the ends of a quilt (that get cut off after machine quilting) that I also cut up and put inside this one.
The second photo shows more of the frog fabric used for the side. I hope the cat likes it.
I like the cover. I can see the texture even though I can’t feel it.
I like the colors of the pages and variety of illustrations. The styling of the book is wonderful.
I like the interesting tools the author uses such as crochet hooks and clothespins.
The book is well illustrated with lots of little photographs sprinkled throughout. Even the table of contents is illustrated. Using this table of contents means that the reader gets an idea of what they will be looking at when they turn to the project page. I think this is one of the most entertaining tables of contents I have ever seen.
Like many of Lark’s books, the first section talks about materials and tools, types of beads, clasps, headpins and jump rings, as well as different types of chains. Non-metals are covered as well in the stringing materials section under ribbon & silk cording and yarn, hemp & nylon. It is nice to have options.
I really like the definitions of the lengths of chains. This is perfect to include in a book of necklaces and something that I have never seen. I have heard of opera-length, but never knew the exact length. I am now glad to know that an opera-length necklace is 28-34″ long. These are really good definitions. We all wear necklaces at some point and may have heard some of these terms, but the book spells them out for us.
Metal finishes, tools, adhesives and a brief section on abrasives and polishing compounds are also covered. Many of the techniques uses in the projects are covered in the ‘Techniques’ section. Lots of clear illustrations guide the reader through the words.
There are 40 projects in this book, which makes me think we quiltmakers are getting ripped off! 😉 I really like Roccoco Ribbon (pg.30-31), mostly because of the ribbon used, but also because of the color. Chronos (pg.32-34) also looks like a necklace I would wear. The beads in the Marie Antoinette (pg.) project really make that piece. I am not sure if those particular style of beads are prevalent, but the necklace would have to be re-imagined a bit if the beads are hard to find. I love the hot pink of those beads, though. The styles are so diverse among these projects that I think most people could find something they would enjoy making.
Many of the projects show variations, which is a great way to use the patterns/directions as jumping off points for your own creations.
Thanks to Lark Crafts for sending this book along. I appreciate your faith in my writing skills!
Thanks to Lark for sending me this book to review! Since the holidays are coming, and birthdays seem to pile up on me constantly, I thought this would be a good book to review.
As with many of Lark’s books, this is primarily a project book. There are about 23 projects included, which run the gamut from bracelets and earrings to wristlets, brooches and chokers. The book includes the basics, project templates, bios of the designers and (YAY!!!) an index.
In the book’s introduction, the author contends that there is a revolution in jewelry going on in the world and that “personal adornment is getting a makeover…” (pg.6). Part of this revolution has to do with recycling and reuse that is so popular now, but the cost of extracting and transporting precious metals and gems cannot be ignored either (pg.6). The introduction reminds the reader that there are techniques in the book that help veer away from the patterns and the muse speaks. I always like it when books are tools in a journey rather than just a pattern book to be accomplished.
A variety of techniques and skill levels are represented from no-sew to machine stitching, stuffing and quilting. Something for everyone!
The ‘Basics’ section gives some details on the qualities and characteristics of different kinds of fabrics including canvas, corduroy, silk, tulle and organza. There is some helpful information that might inspire quiltmakers to put some of these fabrics into quilts when they are done with their jewelry.
I liked the few paragraphs on needles. They were helpful and I learned a thing or two. Hand and machine stitching are covered. The basic hand stitches have illustrations showing the reader how to create them. As with many “basics” sections, not everything can be covered. Whole books on almost every topic in this section have been written. Still, this ‘Basics’ section has a good overview and will definitely get a person started.
You will need some metal for these projects. Clasps, earring findings, jump rings, etc are all covered: what they are, where to find them and whether you can make your own each have a place. After a few pages about tools, some fundamentals on metal, a list of supplies and two pages on beads, the projects start.
The book is well illustrated with color photos on nearly every page. the photos illustrate the text or give examples of jewelry by the artist-designers. The font is easy to read and the writing is clear.
Each project has instructions with illustrations. At the end of each project are a few photos of similar or related projects by which the reader can be inspired.
Tulle is used in an interesting way in the Floating Tulle Earrings project (pg.46-49). I like the pods in the Chrysalis Neckpiece (pg.54-57), but I imagine a mobile in brighter colors made from the pods. The flower int he Lotus Choker & Earrings project (pg.66-71) could easily be reimagined as a brooch, a hat pin, embellishments on a quilt or bag. change the color of the petals and the center and you have a completely new flower. Sun-Kissed Lemons (pg.112-117) is a lovely machine embroidered and satin stitched piece.
The materials are interesting, too. One project (Jennifer Halvorson’s Laced Up, 2005, pg.87, an example) uses shoelaces. Tweeds and plaid wool, recycled from men’s clothing is also used (pg.88-91)
I think there is an underlying sense of inspiration in this book that encourages, by implication, readers to move on quickly from the projects and only using them as a jumping off point.
There is a Labor Day Sew-in happening on Twitter. If you are on Twitter, you can add the #LDSI hashtag to your sewing tweets and join the fun. If you do not have a Twitter account (or you want to follow ALL the tweets) you can still follow along via Tweetchat at this link: http://tweetchat.com/room/ldsi . I tweet as @Artquiltmaker. Are you surprised? Hope to see you there!
This phenomenon started sometime last year with the quilty podcasters. I think Sandy from Quilting for the Rest of Us was the first, but the others quickly joined in. There was a Black Friday Sew-in (for those who don’t shop, or get their shopping done early), Boxing Day Sew-in, New Year’s Day Sew-in that I can recall. It is a fun way to have some contact with other quiltmakers and still sew in your pajamas.
I stayed home while much of the family went to see Cal play in their new stadium. I want to see the new stadium, but when given a choice between sewing and watching football with 70,000 other people, the choice is clear.
I had the Young Man, of course, and one of the nephews home with me. They are close in age and hang well together. I worked on the laundry and tidying the house. Feeding those boys turned out to be a major undertaking that I didn’t expect, as well. I went through: 2 bowls of potato salad, 5 pieces of cobbler, 2 pot pies, a bowl of goldfish, a bagel, frozen yogurt and smoothies. WHEW!
As mentioned, I am sewing more slowly than usual, but I did make some progress on various projects.
K-man Pillowcase
First, I finished a pillowcase that the nephew (above nephew) started sewing awhile ago when he was home alone with me. I didn’t think he was going to finish it anytime soon and I kind of wanted it out of my workroom and on his bed.I talked to him and he was fine with me finishing it.
What a pain this thing was to finish! It was much too narrow. I don’t know what I was thinking when I cut it. I had to add pieces to make it marginally wide enough. My nephew is an easygoing child/Young Man, so I think it will be fine.
A-B-C Challenge Blocks – LDSI Day 1 Progress
I started to sash the A-B-C Challenge blocks. They are looking good, IMO. I am really liking the grey.
One of the bonuses that I didn’t expect was that after I sashed a number of the blocks, I was able to see how much better the grey sashing looks as opposed to using white. I may not have considered white, but the design wall is white and having the un-sashed blocks next to the sashed blocks shows a big difference. I also think that the grey is really setting off the vibrant colors of the blocks well. Glad I chose that grey.
Pink & Green Donation Block #1
Yes, the new color scheme is Pink and Green! I like the black on white, but needed a bit of a change. I don’t use green much and after trying out the yellow, I thought green might be a good challenge. someone said that it looked like 1980s Papagallo. I have a vague memory of that store (??) or shoes (??). Not sure, but the comment made me smile.
What do you think? Is using a color as a ‘neutral’/background successful? You can reserve judgement until the quilt top is done, if you like. I do think it looks cheerful.
Pink & Green Donation Block #2
All of this means that I finished sewing together all the groups of 2 2.5″ patches I need for the next donation quilt, so I pressed and resorted them into groups of 8 and started making blocks. I made a total of 3 blocks yesterday and may be able to finish the rest of the blocks today. I don’t know. We will see.
Mrs. K can see some of the pink fabrics she sent me in these blocks. There are also a lot of pinks and greens from my fabric closet as well. It was kind of fun to pick greens, though looking at these blocks I wish I had stayed with one slice of the color wheel rather than going more scrappy. This is one reason I like these donation quilts. I can try out different combinations, not only of color, but tones of color to see how they work together. I might have another one of this color scheme in me. We will see. I still have a lot of pink squares cut.
Pink & Green Donation Block #3
As previously mentioned, I make these donation quilts as a leaders and enders project. My main project at the moment is sashing the A-B-C Challenge blocks. This means that I don’t know how long the donation quilt will take. I have a vague goal in my head of finishing the top and bringing it to the BAMQG meeting next week, but I already have the Pink Donation top to bring, so I don’t feel obligated. Still, it would be nice.
EPP Star
My final accomplishment of the evening was to unsew and then re-sew a half hexagon star while I watched football with the family. More info, generally, can be found in the previous post about this project.
The footballers (first game in the new Cal stadium) called on their way home from the game and asked me to bring the boys over to SIL and BIL’s house to watch the Michigan game. We are new fans as a niece attends that school. I agreed to pick up Chinese food on the way. I packed up the boys and my hand work project and headed over at the appointed time. The lighting wasn’t that good, thus the poor photo. I’ll get a better one when I take a photo of a group of stars.
None of these projects are really new or exciting for you, perhaps, but I am fond of them.
I have to refresh my work wardrobe. I am at the point where the collars and cuffs of my clothes are fraying, etc, because they are so old. The problem is I dislike shopping for clothes. I have been doing a bit on my days off, but I need to spend more time than I have. I need to replace everything, so this is an opportunity to revamp my entire wardrobe, get a new look and feel better about the clothes I wear.
One of my ideas is to start wearing more skirts. I haven’t been able to find the kind I have in mind. I do have a Study Hall Skirt from Anna Maria Horner, but haven’t done anything with the pattern….yet. I was at Joann buying an Accuquilt Go! mat and decided to look at skirt patterns. I was inspired by reading a Threads magazine that was in my stack from a few years ago.
I found these two patterns. I know they are similar. I don’t know if this style will look good on me, but we will see.
I brought them home without buying any of the notions, because I want to read the pattern and consider before going back and getting zippers, etc. I have enough of some dot fabric (who is surprised? Raise your hand) to make a knee length skirt, so I may only need a zipper. I may make a test skirt out of muslin or something.
I’d really like to find a pattern I can be friends with and make over and over (kind of like the Multi-tasker tote by Anna Maria Horner). I don’t know if these will be it, but we will see.
This is another gorgeous ‘500’ title from Lark Books. More eye candy and inspiration for all kinds of creative people.
This book starts off with an introduction by author Ray Hemachandra. The introduction is interesting, because Ray mentions that beading is one of the oldest forms of creative expression and then moves on to mention changes to the art form’s professionalism in the last 20 years, among them social media, Etsy, copyright considerations and online connections. While this is not the first time I have read something about online communities and social media in a print publication I notice that the conversation is becoming more prominent.
Mr. Hemachandra gives an excellent description of the book, which I could not write more eloquently. He says “The book includes so many beaders with wonderful personal stories to share and that I’d like to share…but this isn’t that book. That’s another book to come soon, I hope. This book instead tells its stories through its photographs of jewelry….”. This book, as I said, is a feast for the eyes and will provide so much inspiration you will go to bed at night with your head spinning. You will have to make up your own stories about the artists and artworks, however.
The majority of the photos depict necklaces and bracelets. And in this department extreme beading is not an overstatement. I thought Kissy Fish was pretty extreme beading, and, perhaps, it is on a quilt, but I scattered a few beads across the surface in comparison to some of the amazing works in this book.
Neutrals such as bronze, grey, black, gold, pearl and silver dominate the colors, as jewelry tends to be made predominantly with those colors. There are a few glimmers of color on each page. Susan Blessinger’s Impending Bloom necklace looks very neutral in color in the full photo, but the detail shot shows dragonfly-esque pearlescent colors that are not visible in the full photo. Jamie Cloud Eakin’s Bling, pg.76, sparkles with prisms and crytals reflecting magenta and purples, evne on the book page. Of course, the pieces with pure beads and no metallic parts have more color.
There is a pretty, but serious necklace (You & Eye by Rachel Nelson-Smith, pg.116) with very realistic looking eyes. The necklace is more of a collar done in pure white with the eyes embedded in the surface beading. I am not a big fan of fake eyes, because they often look freaky, but the eyes in this piece look very real. I kept looking at the photo and waiting for one to blink.
One piece I noticed that was not a necklace or bracelet was a kind of long sleeved shrug (for those of you who knit), pg.118. It is called Dragon Lady and is a garment. I never thought of using beads to make a wearable accessory.
One of my favorite pieces is Jennifer Cameron’s Carnival (pg.75), because of the lovely combination of blues, greens and purples.
Look at the shapes, materials and colors and be inspired.
Thanks to Lark Books for sending this book to me to review!