Making the Zig Zaggy Quilt

I have had some interest in the Zig Zaggy Quilt. I have had a lot of nice comments. While, it is not a completely original design, being related to the Oh Fransson! New Wave pattern and the Happy Zombie variation, I thought you might be interested in my version of how to make this quilt.

First, the differences: Oh Fransson’s pattern using templates. Happy Zombie uses the EZ Quilt wedge ruler. My variation uses the longer Philips Wedge Ruler.

Supplies

Basic Sewing Kit

Sewing machine

thread

2 Jelly Rolls (one Jelly Roll will get you 4 rows and a bit of fabric for the border)

sashing fabric (not sure how much you need for this project. I bought a 5 yard piece of Kona Snow and have been hacking bits off for various projects)

Mary Ellen Best Press

10 degree wedge ruler (www.phillipsfiberart.com)

stilleto

quarter inch foot to fit your sewing machine.

iron & iron board

Directions

First, I cut strips of the Kona Snow, selvedge to selvedge, 1.5″ wide. I probably would cut them 1.75″ or 2″ wide if I were to make this quilt again.

Press strips
Press strips

One by one, lay out your strips on your ironing board. Spray with Mary Ellen’s Best press and press with a hot iron. Follow the directions on the MEBP.

Place ruler on Jelly Roll Strip to Cut

After pressing the Jelly Roll strips with Mary Ellen’s Best Press, take your strip over to the cutting station and trim off the selvedges. Double the strip. Place the ruler on strip lining up your preferred ruler line with the bottom of the strip. My orange post it was used to remind me where I was cutting each time.

Line up small ruler
Line up small ruler

Use a small ruler and line it up against the short end of the wedge ruler. Remove the wedge ruler and trim the strips (remember your strip is doubled) to the desired length.

Lay out Wedges
Lay out Wedges

It is important to lay out the pieces, before sewing, so you know which way the wedges are sewn to the sashing strips. I also found this layout helpful in order to keep the colors in the correct order.

Sewing Wedges to Sashing

Carefully line up the wedge skinny end or fat end towards you depending on the orientation of the wedge and sew without pushing or pulling the fabric. Remember you are working with bias.

I sew each of the wedges to one sashing piece in assembly line/ chain piecing fashion. After I sew, I press and then lay the wedges in order by color on the floor. You could also use a design wall. Once that is done, all wedges need to be sewn together.

After stitching, press

After stitching, I lay the two pieces on the ironing board. The piece towards which the seam will be press should be on top. In the photo above, I am pressing towards the color/wedge and NOT towards the sashing.  I spray lightly with Mary Ellen’s Best Press and PRESS (not iron) the seam in the correct direction.

Lining up Sashed Pieces

Before trimming, lay the two pieces and eyeball how they would be sewn together.

Trimming Wedges
Trimming Wedges

After eyeballing the sashing, move the pieces aside and trim the sashing so it aligns with the top and bottom of the wedge. This may seem wasteful, but it is a lot easier than trying line up perfectly cut sashing with a diagonal line.

Sewing Wedges Together

After trimming, line up the corner (bottom right in the picture above) on the sashing so that when you put the pieces in the machine there is a little v that is approximately 1/4″ from the edge (bottom in the picture above). You may not be able to see the v as it may be on the bottom.

Trimmed Wedge Group
Trimmed Wedge Group

Above is what the trimmed wedge group will look like.

Line up Wedges after they are Sewn

After trimming the ends off the wedge group, put it back in it’s place in line, so you don’t get confused about where these colors go. You want to ensure that the colors are consistent lengthwise down the quilt.

Keep sewing the groups together until you have a whole row.

Once you have two rows of wedges completed you need to sew the rows together.

Press Consistently
Press Consistently

In the above photo, you can see that I carefully pressed the seams in the same direction on all the pieces in this row (towards the sashing). The row on the bottom has the seams carefully pressed in the opposite direction (towards the wedges). In that way, I was able to nest them together before sewing the row. This helped the pieces to line up when I put the rows together.

Sew Slowly
Sew Slowly

Notice: LOTS of pins!

Lots of Pins, Slow Sewing

When putting the rows together, pinning is very important. Also, using a stilleto and sewing slowly really helped.

Press Row Seams Open

Look! The world didn’t end because I pressed the seam joining the two rows together open. It makes the join of the two rows lay flatter. If you have gotten anything from this post it should be that pressing is really an important aspect of putting this quilt together.

You want success? Press. Carefully.

Finished Top
Finished Top

I left two edges wiggly. I didn’t feel like squaring them up.

Chunking It – For Frances

If you haven’t started listening to the Off Kilter Quilter podcast, I suggest that you go over and start right away!

TFQ taught me this method of putting quilts together. I have adopted it as my own and use it for block quilts. Very occasionally I’ll put a long border on after the center of the quilt is complete, but otherwise I try to avoid the long seams required to put quilts together in rows.

Step 1
Step 1

The basic idea is to put the quilt together as you would a block. Sew smaller pieces together to make larger pieces. I avoid sewing in rows as I think the quilt gets out of square if you sew it together in rows.

Step 2
Step 2

This step makes a larger piece.

Step 2A
Step 2A

This will be for the bottom of Block 1 in the drawing in Step 2.

Step 3
Step 3

This way of sewing a quilt together makes the pieces much easier to manage, because you are mostly handling smaller pieces.

Optional Step 3A
Optional Step 3A

You can also divide the border into blocks (plan it that way as you make your quilt) so you can include border pieces as chunks.

Optional Step 3B
Optional Step 3B

You have to pay attention to what you do with the corners if you choose to add the borders this way. This technique works better if you are making a self bordering design.

Step 4
Step 4

Refer to the drawing of your pieces in Step 1.

Step 5
Step 5
Step 5A
Step 5A
Step 5B
Step 5B

You have to sew the bottom sashing + cornerstone to Block 3 and Block 4.

 Step 6
Step 6
Step 7
Step 7

You really need to do the two steps above before Step 5B2 even though my numbering is off. Sorry about that.

Step 5B2
Step 5B2

I got a little ahead of myself in my drawing. Sew the sashing and the cornerstone to Block 2 and then sew Block 2 (with side and bottom sashing and one cornerstone) to Block 1 with all of it’s sashing.

 Step 7A
Step 7A

The above step will make your next chunk.

Step 8
Step 8

After this first chunk, do the same things for the rest of the blocks in your quilt and keep putting chunks together into larger and larger pieces.

Let me know if you have questions.

Facing Tutorial

I started out with Jeri Riggs’ directions, which Maureen pointed out to me. You need those directions. I needed some clarification and my additions to Jeri’s post comprises the info below.

You need to know the length of each side of your quilt before you start.

A=Top of quilt
B= bottom of quilt
C/D= sides of quilt

Facing on Side A & B

Cut your facing pieces as follows:

A: 5″ x width of quilt
B: 5″ x width of quilt

You can change the 5″ size of the A/B pieces depending on whether you have a large quilt or a small quilt. 5″ is my starting point and I look at the size of the quilt and adjust from there. You want to be able to double the the fabric so you don’t have to make a hem and not have the two sides of the facing meet each other in the center of the quilt.

C: 5″ x width of quilt minus 4″
D: 5″ x width of quilt minus 4″

You make the C/D pieces shorter because you want to reduce the bulk in the corners. The C/D pieces will be positions on top of the A/B pieces.

One of the things I really had a hard time understanding in Jeri Riggs tutorial was the difference between what I needed do on the top/bottom (designated as A and B) versus the left/right sides (designated as C & D). The whole idea for the different facing sizes is to reduce bulk in the corners.

Cutting facings: For the A/B (top/bottom) of the quilt cut a facing rectangle that covers the entire top or entire bottom from side to side and is your preferred width. I cut mine, as noted above 5″ for large quilts x the width of the quilt. Adjust as necessary.

I cut the piece a little longer (mostly because I am too lazy to measure more than approximately unless I MUST). Trim off most of the excess after pinning the facing to the top and bottom. You can see in the photo that I followed Jeri Riggs directions by pressing a 1/4″ on the long side of the facing that would NOT be machine sewed to the quilt. Instead of doing this, fold your strip in half and pin the raw edge side to the edge of the quilt.

Sewing

Once the facing pieces are laid out, trimmed and pinned, I machine sewed one facing to the top (A) and the bottom (B). Note on the sewing: The key is to sew starting on the short side (Side C) of the A/B facing starting at the edge of the pressed over 1/4″ seam, go around the corner, continue on the long side (very top of the quilt t0 Side A), go around the corner and continue along Side D to the edge of of the facing where you have pressed over the 1/4″ seam. You are sewing the A/B facings using a seam that is shaped like a big U. You will have no part of the A & B facings flooping around.

Sewing Facing for A & B

Nota bene: The only reason I flipped the bottom of the quilt over (photo right) is because I have a small sewing table. You don’t need to do this. If you have a large sewing table, you only need to flip it if it is creating drag on the quilt as you sew it.

Nota bene: This is a small piece and I would recommend trying the process out on a small piece so you get the feel of the process. If you have an unused machine quilting test piece, it would be a perfect piece to use to try this technique out. Of course, you can always make a little quilt-let. 😉

Aligning C & D
Aligning C & D

This photo (left) is a little bit blurry and I apologize for that. In the photo you can see Side D laid over Side B (bottom). Note how it does not extend to the bottom of the quilt. You need to cut the facing pieces  for Sides C & D shorter than the facing pieces for Sides A & B. By cutting the facing pieces only 1/4″ – 3/4s” over the A & B facings, you reduce the bulk in the corners.

On Sides C & D, only sew along the long side of the facing. The raw edge of the short side of the facing will be covered by facings on Sides A & B once you flip the facings to the back.

Now the machine sewing is complete and you are ready to flip the facings to the back of the quilt.

Flip over Side C & D

The picture to the right shows the quilt after I flipped Sides C & D. Look at the bottom right hand corner (by the green olive) and you can see the seam with the batting. This means that after you complete the machine sewing you flip sides C & D to the back. I pressed the folded edge (edge of the quilt where you machine sewed) so that the facing would stay to the back. After pressing, I pinned the Sides C & D facings to the back of the quilt to keep it in place until I could hand sew it down.

Finished and Flipped Piece

This picture is serving two purposes. First, it shows how the piece looks after you flip all the sides. Flip Sides A & B after you have successfully flipped, pressed and pinned Sides C & D. After flipping Sides A & B, press and pin those facings as well. Because Sides A & B have been machine sewed in a U shape, pinning is optional.

After you flip all the sides, I finished the piece using hand sewing. I think this technique requires hand sewing as I can’t think of another way to finish it. You machine only people may be able to think of another way to finish the piece. If you do I would like to know. I don’t mind handwork, as you have probably noticed. 😉 I just sat down and did it with some matching thread and a Harry Potter movie. Only got through a small amount of the HP movie as the handsewing went really quickly.

After pressing and pinning, the only problem I had was not poking myself with the pins as I hand sewed. Normally, I use metal hairclips on a regular binding, however they won’t work on this facing technique, because it is too wide.

The picture above also shows how the quilt looks when the facing has been completed.

One thought about this process, which Maureen pointed out to me, but I didn’t understand until I did the process, is that the facing becomes a design element on the back depending on what fabric you use. In House & Garden, above, I used the same fabric I had used for the back, because I don’t really care about this back (may frame this piece; we’ll see ). One thing about testing this process is that you can see what you are facing on the back.

Remember I couldn’t have done this without Jeri Riggs laying the groundwork and Maureen helping me figure out the practical details.

Let me know if you have any questions or need further clarification. I also want to hear your stories of making facings. I may update this page based on new information and things that you tell me.

How to Machine Applique’ – TJW

When I started working on the Tarts Come to Tea again I really could not remember how to machine applique’. It was the strangest feeling. I knew the general principles (trace pattern, iron it on fabric, satin stitch around the shapes), but all the details had left my mind. I felt like I had to start over.

Being a good librarian I looked at some books, but could only find references to needle-turn and raw-edged applique’. I fumbled around for awhile and came up with the following process.

Cake block pattern
Cake block pattern

First, I draw the pattern out life size on a white sheet of sketch paper. (I know this doesn’t look like white paper, but see the Weekend Work post for an explanation). I usually draw in pencil to start.

Machine Applique' Pattern
Machine Applique’ Pattern

Next I draw out the patterns on individual smaller sheets of paper. If there are parts that need to be in different colors or need to be separated for some reason, then I make separate patterns for them. For example, I made a separate pattern each for the cake, plate and whipped cream, above.

Tracing Machine Applique' Pattern
Tracing Machine Applique’ Pattern

I put the  Steam-a-Seam 2, or other fusible of your choice, over the pattern and trace the pattern onto Steam-a-Seam 2.

Traced Pattern on Fabric

After that is done, I trim the fabric to the approximate size, then press the SAS2 (or other appropriate fusible) on to the wrong side of that piece of fabric.

Cake block detail

Finally, I put all the pieces together, press the fusible on to the background and satin stitch around the edges.

See the Fusible Applique’ tutorial for more information. See the Machine Applique’ using Directional Motifs for more information on making sure your designs go the right way.

Making Cross Blocks (Flowering Snowballs) Tutorial

Judith asked about making the Flowering Snowball blocks, so here is a visual tutorial. Please note that this is the “Jaye-Way” and may not get you an prizes at Houston.

I would suggest that you read the book by Jinny Beyer on handpiecing, as she has a lot of good tips, though she doesn’t recommend using a felt tip. You can use a mechanical pencil to mark, if you want.

I am using templates and handpiecing them. I use a black or red Pilot (formerly SCUF) ultrafine point felt tip pen to mark around the templates. I use grey Aurifil thread and a thimble. Sometimes I put wax on the thread to keep it from tangling. Use whatever needles you like. I use betweens for piecing.

Practice with the felt tip on fabric. You want a thin line with no blobs at the end. I usually run over the end of the template a little and start lessening pressure on the tip right at the end of the template. If you leave it in one place too long, you get a blob. Blobs are bad for precise handpiecing and they look ugly, too.

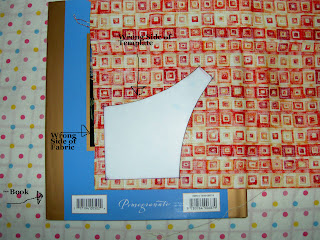
Trace around the templates on a hard surface. In this case, I am using the book as hard surface. Trace on the back/wrong side of the fabric.

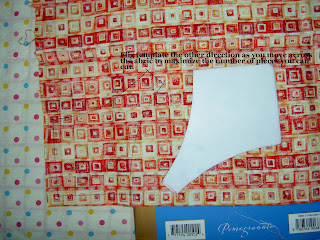
That tiny print says to flip the template 180 in order to get the most pieces out of your fabric. I was cutting 4 pieces from each fabric, but found that to be too many. I will use the ones I have, but am now only cutting one or two. I am trying to keep this quilt to a reasonable size (HA!) and to have as much variety in the fabrics as possible. If I like the fabric, I can always go back and cut more of it, right?

I trim around the templates by eye. I don’t measure the seam allowance. I try to keep it to arounda quarter of an inch and not to get too close.
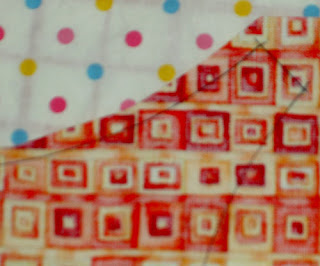
Detail of trimming.

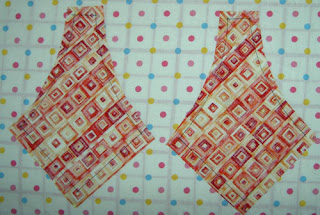
Here are the pieces cut out.

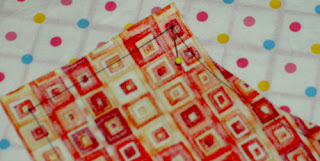
Here is the pinning. First, I pin right in the corner just inside the drawn line. I poke it through the foreground (colored) fabric first.
This is the back of the pinning. Same deal goes here. I come up through the back. Get the pin right in the corner where the drawn lines intersect and just inside. Remember you have drawn around the template, so the drawn line is a little larger than the template. This is why I try to pin AND sew just inside the drawn line.

Here (above), the pinning is done. Note that I put two pins close together at the beginning, but I take the first one out right when I am ready to sew, so I can start. The second one holds the pieces together while I get started. I try to make small, even stitches that are evenly spaced. Remember to look at the back as you sew so that you are poking through the back right inside the drawn line.

It is ok that the piece is wrinkly, because you want to match up two curves that are going in opposite directions. Use the bias to make them match.

How the Pieces Go Together

My whole philosophy, which I am pretty sure is a general quiltmaking philosophy, is to go from smaller to larger. This means to build the blocks by making the smallest patches into larger units and then putting the larger units together to make a whole block.

First, take one corner piece and one background piece and sew them together. Sew/pin with right sides together. Curves require, at least for me, a lot of pinning. For pinning, start at each corner and put pins in by lining up the corners of each piece with each other.

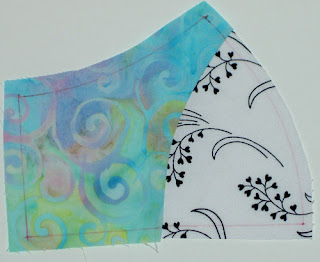
When you sew the corner and background together you will have a unit that looks like the above unit. You can see how the felt tip lines show through, which is another reason to sew just inside the drawn lines. They won’t show on the front of the quilt if you keep them in the seam allowance.

Seeing the felt tips lines here also allows you to see how they line up, if you do the piecing correctly.

Add another background unit. Note: I am trying to use all different fabrics in each position in the block, but you don’t have to do that.

Now you have quite a large unit. You will need two of these units per block.

Sew the center patch to one of the corner (foreground) units.

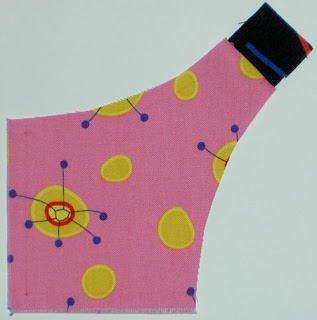
Here is how he unit looks once the middle patch is attached to a corner.

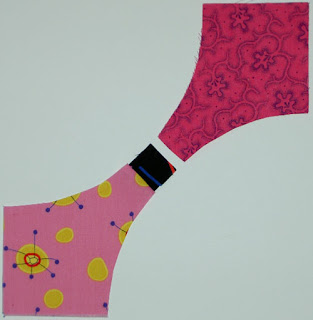
Sew a second corner to the center patch.

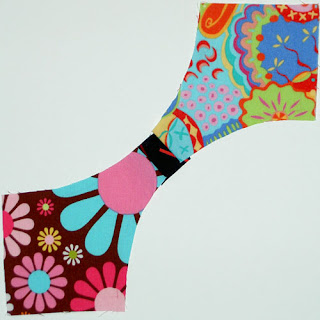
With this unit complete, you are ready to attach the side unit to the center.

So, just do it. Attach a side unit to the center.

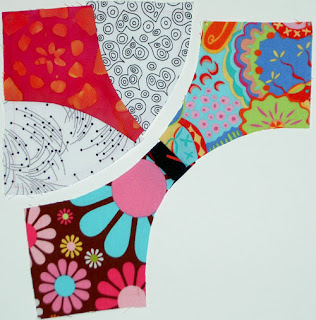
Once you add that unit to the middle piece you are nearly there. The above piecing is the hardest part (but not like you are taking the SATs without a prep course), because the seam is long and the middle section is quite floopy. It also takes a LOT of pins. Make sure you sew through where the seams match several times to keep it strong and make sure the seams line up. I care about that stuff, but you don’t have to match your seams.

I don’t always press the patches after I sew them, because I am sitting on the couch watching TV while I sew (why do you think I have a hand project?) and am too lazy to trudge upstairs to press. It makes the piecing a lot nicer if you press as you go.

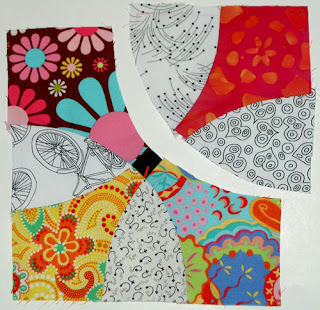
Add the last unit and you are done!

Completed square. I usually trim the block after I am done with the hand piecing. Make sure you don’t cut over any of your seam lines, because your piecing will unravel if you do. This is not machine piecing.