C*R*E*A*T*E

CREATE!!!! Wall
CREATE!!!! Wall

A year ago I created a temporary CREATE wall.

Create Letters
Create Letters

Lil Sissy took upon herself to complete the letters. Recently, she brought over the rest of the letters. I stitched two pictures together so I could see how they looked together, thanks to the Photoshop Elements Class I took a few months ago.

I’d love to paint, get new furniture, but I am just going to put them up. I have some off pretty soon and will see about doing it then.

CREATE

CREATE!!!! Wall
CREATE!!!! Wall

I had an hour on Monday and, still in cleaning mode, I needed to get that ‘C’ off of my desk. It was the bottom of the Leaning Tower of Paper Pisa and the Leaning Tower was not getting any more stable. It needed to go. I wanted it on the wall, so I just put it up. I didn’t look for a stud or make perfect other letters. I just did it.

Create Supplies
Create Supplies

When I arrived home from work, I immediately went down to the computer with the printer and printed letters that I thought might be big enough to see. The font ended up being 700 pt! I did try 800 pt and 900 pt, but they were too big and I didn’t know how to center one letter on the paper.

Create in process
Create in process

After printing one letter on each page, I cut the letters out and traced them on scrapbook paper.

This started a long time ago with a photo I saw via another member of the Creative Mom Podcast Circle and a photo that she posted. Then I saw more possibilities in Anna Maria Horner’s Handmade Baby book. I talked about it back in June or so. AMH’s are more fiber related. I haven’t done either, except take this first step. Immerhin.

Other ideas:

  • I may put some paper behind the letters to make them stand out a bit more at night. During the day I can see them well enough. At night, they kind of blend into the life sucking beige.
  • One could just print out letters on a sheet of paper and put them up on the wall as a stop gap measure.
  • One could print out letters on fabric and embellish.

Cutting Table

Clean Cutting Table
Clean Cutting Table

I have a small cutting table. Part of my cutting mat isn’t even on the table! From this cutting table comes all the tote bags and quilts that I make. It isn’t ideal, but it is what I have and it works for me most of the time.

End of the Week Cutting Table

Above is what happens to my cutting table by the end of the week. I do try and craft every day but a lot of times I end up pressing fabric, or knitting or engaging in other hand work. Sometimes nothing fiber related happens on particular days.

I don’t have much horizontal space in my workroom and the debris of the week just ends up on the one mostly clean horizontal space. I end up tidying that space on Friday or the weekend and that has become part of the ritual of starting to sew on the weekend.

Finished and Hung Board

I am currently dreaming of redoing my workroom (which doubles as a guest room) with paint, new shelving, a Murphy bed, lots of drawers. The Board I made last week is part of it – perhaps the start of it. It is a small start, but a person has to start somewhere.

Evolving Board
Evolving Board

I cleaned some stuff off the big desk and started to fill up the Board. So far there are only photos. Now I can enjoy them. I hope to put some inspiration photos and other things on it. I am allowing it evolve organically.

Expansion of Design Wall Space


With some Christmas money, I decided to buy one of the Cheryl Ann’s Portable Design Walls. Terri had one at the CQFA retreat last year. She let me use it and I found it to be very useful. Despite our financial woes, I decided to buy one. It will come in very useful when I work on the FOTY 2008 quilt, which is my project for the retreat.
I looked around the web a bit to see if I could get a better price than Cheryl Ann was offering and ended up buying it at the Quilted Banty.They were fast!

The boys were gone over the weekend, so I set about trying it out. I wanted to make sure all the parts were there and I would be able to set it up. Above is a picture of the behemoth on the floor of my workroom.

This is the thing set up with some of the FOTY patches placed on it. I have to say that it is a bit wobbly. By that I mean that if you walk by, it waves a bit in the breeze you make. I may buy two extra legs to kind of stabilize it.

Once I put up the most recently cut patches, I had a sinking feeling that the FOTY 2008 quilt will be quite large. A lesson? Perhaps.


I am determined to get the piece sewn together this weekend. That may be more challenging than I originally thought, mostly due to the Blue. I really like all those blues together. You can see, in the photo above, that I have placed them together. In a kind of test, I also placed the greens and white background fabrics together (above). I like the look. This means that I my have to unsew all the patches I have already sewn together. Before I lose my mind, I am going to post them all up on the design wall to see what they all look like. I also have to remember that I cut second blue patches and have been doing so as I dig into other blues, so I don’t need to keep those blues together to get the same look.

I had planned a Rail Fence type setting, but may sew them together up and down as shown above. We’ll have to see. Your opinions are welcome.

Organization

It is very hard for me to accomplish anything if I am not organized. The first thing I do on any project is organize the pieces. I get a lot done, I think, because I am organized. It drives a lot of people close to me insane.

The fabric closet in my workroom had dropped off the organization list sometime in the last century. I have been flinging things into it randomly for some time. There was no space for me to get into to do anything. I knew I had to take everything out [EVERYTHING!!] and start over. There was no possible way I could face such an endeavor alone. TFQ mentioned it last year when she was here for PIQF. It had gotten so bad between times that this trip she convinced me it was time. I also asked her to help me clean it out.

I threw out, recycled, and organized, for Goodwill and Freecycle, a ton of stuff. It felt good. I have been on that binge for awhile in other parts of the house, but this was a major quilt/fabric related effort.

Sadly (or perhaps not), I didn’t take before pictures. I think that is, at least, partially a good thing. I do have the after pictures.
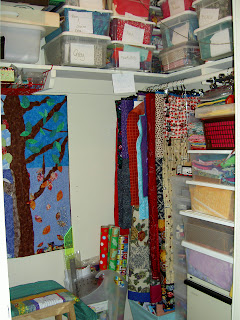
Closet Right Side: Quilts are on pants hangers and hung in the corner. File cabinet was moved closer to the door so I can file paperwork easier. Fabric bins that I use a lot were brought down, so I don’t have to crawl up to get at my fabric quite as much. We didn’t do much with the fabric bins, but have gone through them together in the past. I have also been going through them recently as I work through the bag project. I will go through them again in the future, I am sure.
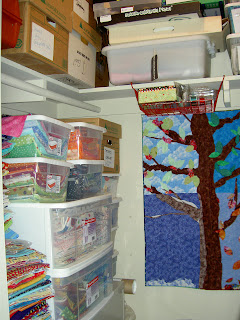
Closet Left Side: The new drawer thingy is full of dots. Closest to the left side of the photo is a continuing part of the project. I have to get some crates to replace the bankers boxes for ‘current’ fabric. In the middle on that upper shelf is a weird bin (the style of the bin is weird) full of projects in process. They are organized, so I can find them, which is a good thing, because I would like to move through some of the projects that have been lingering. I also went through a lot of of my projects that were going nowhere and got rid of them. No point in keeping something that never even made it to my UFO list. A number of them were block exchanges from the early 1990s. Lots of teal went to people I hope will make great quilts for others.
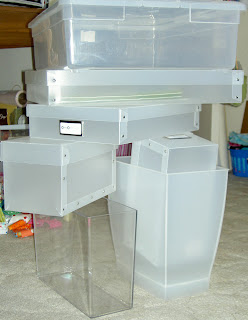
We really needed one more day to get the project completely finished. We didn’t have it, so TFQ sent me to the Container Store with a list of items to buy. Above are the containers I bought to fill with stuff. The clear plastic garbage can is full of rulers now and I want to get another. After I filled it up, and amazingly all of my rulers fit, I decided that I didn’t like the rulers with instructions and packaging in the same container as the regular rulers. The other frosted garbage can was a ruler possibility, but the shape is wrong. I may actually replace one of my garbage cans around he house with it. I am definitely going to get another one of the clear plastic ones.

PS. I surpassed 450 posts yesterday. Thanks for reading!

Happenings in the Workroom

I am a little busy right at the moment. Too much to do over the weekend, so I didn’t get to catch up, so here is a quick post for my faithful readers.

This is what is on the Design Wall:
Here is what is on the floor:
I recently spent some time cataloging my books and the above are the newest.

Here is some progress on the Flowering Snowball (Cross Blocks):