Not too long ago, Frances asked, in one of her podcast episodes, about making pieced backs and whether there was a tutorial.
I didn’t look for one, but I knew I had a back to make soon (for the Stepping Stones), so I thought about taking the opportunity to make a tutorial.
As I have mentioned in the past, once the top is finished, I am done with the project and want to move on. I love piecing. The other parts, such as making the back, making the binding and label, quilting are all dull for me. However, I have found that the Finishing Fairy does not visit my house and I have to do my own finishing or finish by checkbook.
My first step was figuring out how I make the pieced back. The basic premise is easy: sew pieces of fabric together until you have a piece large enough to accommodate the quilt.
What I realized is that it isn’t quite as easy as a step 1, step 2, etc tutorial. I sew bits and pieces together as I am making the quilt that end up larger when I am ready to sew the back together. You aren’t going to have the same size pieces as I have. So, this will be more like a guide rather than a tutorial.
I am a firm believer in not buying new fabric just for the back. Yes, it would be easier, but I have a lot of fabric and I might as well use it. I try to use the largest pieces possible as well as the pieces I have sewn together while making the quilt.
The first thing I do is make a label. I make my labels using a word processing program (Google Docs would work just fine) and then I print the piece out on paper backed fabric. I have also used the stitch letters on my sewing machine to write out a label.
The label will be sewn into the back, so as soon as I peel the fabric off the paper I start sewing. Know your paper backed fabric and ink so that you know whether the ink will wash out immediately, over time, or not at all. I use fabric backed paper from Dharma Trading Company and my regular ink jet printer.
Tip #1: larger pieces make the back go together faster
When I made the back for FOTY 2010, I purposefully used really large pieces. That was the best back experience of my life, because it went together really fast. I suggest you start out this way with pieced backs so you don’t lose your mind. This is your fair warning!
Tip #2: As with blocks, sew from smallest to largest.
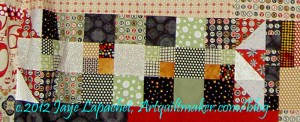
I start with the label and surround it with fabric until I have about 1.5′ from the right hand side of the back and about the same from the bottom.
I sew the label into the back so if a quilt is stolen, the label cannot be ripped off without ripping out the quilting.
Tip #3: Plan to leave extra fabric around the edge if you want to longarm. 4″ on all sides is usually sufficient.
Once I have one corner completed, I sew across the bottom of the quilt back until I have a piece the desired width. I make the width generous as I don’t want to go back when I think I am finished and have to sew on a strip to a long edge.
Tip #4: Coordinate your backing fabric with the fabric pieced into the front.
I use fabric that will coordinate with the front, though it isn’t necessarily the same fabric. If I have a lot of leftovers that I don’t think I will use in another quilt, such as in Stepping Stones, then I will use the leftovers for the back.
Tip #5: Leaders and enders techniques make the process of sewing the back go faster.
Where possible I will sew smaller pieces/shards (not schnibbles! I am not advocating doing something that will send you to an insane asylum) of fabric together using Bonnie Hunter’s leaders and enders technique. Now, I have not taken a class from her, so visit Quiltville, Bonnie’s blog or buy her books to learn her methods. My idea is that I put pieces/shards through the machine after the regular pieces for my top so I can get those to ironing board for pressing faster (discussed previously in this post). Also, this alleviates the need to put a scrap piece of fabric through the machine to keep your feed dogs from eating your triangle corners. Finally, it minimizes scraps added to the scrap pile.

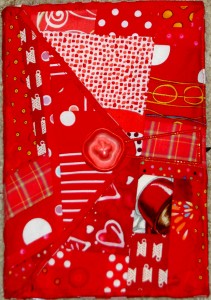
As I have discussed on different occasions, I call the end result of sewing bunches of scraps together randomly mosaic quilting. I use the leaders and enders method to facilitate the mosaic quilting result. I made the entire cover of the red journal by using the leaders and enders method to get a mosaic quilting piece. I enjoy sewing like colors together to make new fabric. If I have nothing else to do or I can’t think or I am stressed out, it is a good activity.
How does this relate to pieced backs?

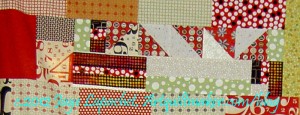
I do the same thing, but on a larger scale. When I am finished piecing the top and am definitely working on the back, I find pieces that fit together and sew them. When I am piecing the top, I sew the smaller pieces into larger pieces and then use the larger pieces for the back.

Tip #6: Skip sewing small pieces together if you have not done so prior to finishing the top.
I just want to finish, so if I have not sewed smaller pieces into larger chunks prior to starting the back, I skip it. It drives me crazy to have to stitch little bits together for no other reason than making a back. Why this doesn’t bother me when I am using them as leaders and enders, I don’t know.
Tip #7: Backstitch
Any seam that will be on the outside of the quilt or not crossed by another seams gets a few back stitches. All of my handling rips out those stitches and then I have to go over them before giving them to my longarmer. To alleviate the process I backstitch. I backstitch more than just the outside seams as sometimes I don’t know what will become an outside seam.
Finally, I sew chunks the same width as the first chunk (with the label) until I have a piece the same size as the top with an additional 4″ on each side. Depending how how small the pieces are, the back can take me 4-6 hours. I am slow, and get cranky when I do this.
Alternatively, you can just buy a big piece of fabric and put it on the back. 😉
Hi. This is interesting to see. I make my labels the same way, but then sew them to a triangle of contrasting fabric. I don’t piece it in, but sew it across the corner when the quilting is mostly done, then catch the edges in the binding. It looks like this: http://www.flickr.com/photos/62072073@N08/6674189697/in/photostream/ . I am trying to use up existing fabric in backs, but I am kind of picky. I like the look of a pieced insert, but I want it to look intentional. I usually piece a long strip, sometimes w/ extra blocks, split the backing fabric in half or thirds (or one third), and insert the strip. Usually, my inserts have been lengthwise, like this one: http://www.flickr.com/photos/62072073@N08/6674189711/in/photostream/ . I like the look of those journals, but want something cleaner on quilt backs.
Do you quilt your own quilts? Or do you take them to a long armer?
What happens when you have a number of seams land in the same place when you quilt? Does it make it bumpy having seams on the top and bottom?
How intricate / heavy FMQ can you do on a pieced back?
I know many long armers are particular about the balance of the seams on the back and the front because it could break their machine trying to sew through those layers.
Nonnie
,