I spent some of Friday and Saturday trimming and sewing napkins. I have seven sewn and ready to press and topstitch. I don’t know why I don’t have eight, but I don’t.
The fronts are made of various food and food related fabrics. The backs are made from Michael Miller’s fabric with the 1950s family and their funny comments like “Thanks honey, mother will never taste the arsenic”. DS thinks the fabric is hilarious.
I did the first round of sewing (FQ right sides together, sew around the edge with a straight stitch leaving an opening slightly larger than your hand, turn inside out press). I am now at the pressing stage.
This pressing stage is always a pain, because no matter what I do the are where the stitching is wants to collapse in towards where the raw edges of sam seam are. Sigh.
I have tried pressing the seams open before I turn the napkin inside out. Didn’t make a difference. This time I will try to press with my mini iron by sticking my hand and the iron on the inside of the napkin. I am not hopeful, but we will see.
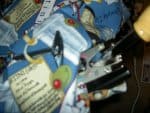
This is the only photo that really came out at all. It was hard to press with the mini iron and take photos at the same time.
Napkins 1
You can see how I stuffed the mini iron into the inside of the napkin after I had turned it inside out and was pressing from the inside.
I have finally sewed these together and they came out moderately well. I still need to work harder at preventing the sleeves from collapsing.
In my last post, I said that one of the things I was thinking about was quilt teachers and/or teaching quiltmaking.
I think it is important, when teaching a class to do the following:
1. Know your subject : study the subject before you go to teach. Are there articles or books you can include in a bibliography? Have other people taught this subject? Can you review their work and incorporate salient points? 2. Be well prepared : people are busy and they are giving up their valuable time and money to take your class. Make you give them the courtesy of having everything (handouts, lecture, slides) organized and ready to go. 3. State your goals at the beginning of the class : Students will be much happier if they know what points you cover, what you plan to accomplish and how the timing will be in the class (when is lunch, when can they run to the restroom without missing a critical point). 4. Have handouts (with pictures, if appropriate) : people learn in different ways, so having a handout that describes (even with only bullet points) what you are saying will help students who learn by reading. It will also help jog the memories of those who learn by hearing or by being shown. Students will also be able to take notes on their handouts. 5. Don’t assume that since you can quilt you can also teach : teaching is a difficult profession and just because you make fabulous quilts doesn’t mean that you can teach others how to make fabulous quilts. Take classes where the teachers are GREAT and watch how they teach. Mary Mashuta and Ruth McDowell are both great teachers. Read up on how people learn. Teach a class or two for free to practice. 6. Manage students : if someone is hogging all of your time or all of the discussion time, cut them off and call on someone else. Don’t let students interrupt others. Students get frustrated if you let the class get out of control. Also, no teacher’s pets! If you like someone’s work, talk to them after class or contact them after you get home. 7. Don’t assume that people are there to hear your opinion : just because people are taking your class doesn’t meant they ONLY want to hear your opinion. Spread the wealth and give all sides of the story. This will also allow you highlight why your ideas/methods are better. 8. Acknowledge that people cannot absorb information for 8 hours: give students breaks (1 in the morning, 1 in the afternoon, lunch), but also give students time to work on their own after you teach them something new. Ideally, teach one or two new things, then let students do a short exercise to cement the information into your students’ brains. 9. Be professional : dress up if you need to feel professional to like a professional, but don’t become “one of the guys”. You are the teacher not a student, you are in charge, so act like it. 10. Make sure your handouts are well organized or track your lecture : nothing is more frustrating than a teacher whose lecture I cannot follow, but if the handouts are well organized, it makes it better. Try to synch your handouts and your lecture. Don’t write your handouts the night before. Start months in advance and keep revising and updating. Think of your lecture and the associated notes as a work in progress. 11. Consider whether you need a helper : this could be someone who passes papers out, gets your slides in the carousel, etc. 12. Walk around : look at what your students are doing. Look at their supplies. Make comments on everyone’s work. Some people won’t ask questions and you won’t know they are struggling unless you look at their work and their face.
People rate teachers and tell each other what they thought of teacher. Make sure you are thought well of by using the tips above.
There is a great saying that someone told me: OBE – overcome by events. That is what happened, but I am still committed to the blog, so please come back.
The things I am thinking about now are:
-what makes a good [quilt] teacher -how much slack should you cut a teacher to whom you pay money? -just by virtue of walking into a room of quiltmakers, should you consider them your friends? Should you expect them to consider you their friend? -napkins. I am trying to get another long term pending project off the back of my chair. I just need to sew. -clearing out stashes. I did it and brought 3 bags of first quality fabric to the Children’s Quilt Project. I had help and my friend also reorganized my fabric so I can find stuff. I now have a section of quilt back fabric, which is great. -exchanges. A friend and I are doing a block exchange. We haven’t started yet, but it seems doable. I can’t wait.
I discovered a cool photo site that provides great inspiration on Louanne Sassone’s blog today. It is nice to see some photos as essay. Take a look and get inspired!
No, I didn’t abandon the blog. Life got in the way. School started, which means PTO meetings, Cub Scouts, etc. I also had to go deal with a family pseudo-emergency (nobody died) in SoCal one weekend which kept me away from home two weekends in a row. Anyway, I am back, though no sewing under my belt.
City Arts and Lectures is one of my favorite radio shows. I listened to Wayne Thiebaud last week on my way back from the Qi Gong retreat. Thiebaud is one of my favorite artists. I love the simple complexity of his work. One of his assistants worked as an adjunct professor at Berkeley and I was fortunate enough to have him as a teacher in an art class. I still have the works that I did in the class. I never get tired of looking at them. Colored pencil is still one of my favorite media (after fabric, of course!).
Anyway, one of the great things that Thiebaud said is that he isn’t an artist, he is a painter and that history will have to decide whether he is an artist. I love that and plan to adopt it as my mantra. I have been thinking about it a lot and what it means. I think it means that I can just do my work.
Being an artist is so much responsibility. I don’t know if I am artist or if I am making art and I don’t want to decide. I just want to do what I do and let someone else deal with the labels.
I really wish that City Arts and Lectures would put their lectures on Audible.com, so I could listen to Thiebaud’s comments again.
The link to the Red is for Passion post is very interesting. Not at all related to quilts except that the writer is able to make a quilt. Still I like the idea of thinking about what you can and cannot do related to quiltmaking.
I spent time this week catching up to my students on my blocks. I had the pieces to the Drunkard’s Path blocks cut for weeks, but couldn’t seem to get them together. I pinned and pinned and pinned and pinned and pinned and something didn’t seem right. I couldn’t figure out what it was and I couldn’t sew the things with so many pins. Per chance, I picked up Ruth McDowell’s Piecing book. If you don’t have this book, get it. It is the best.
Anyway, I read the bits about sewing curves and found the problem. Clipping! I had forgotten to clip the concave part of the curve. I think I was so caught up in having problems with the block when I was a beginner and trying to make the Drunkard’s Path that I couldn’t think straight.
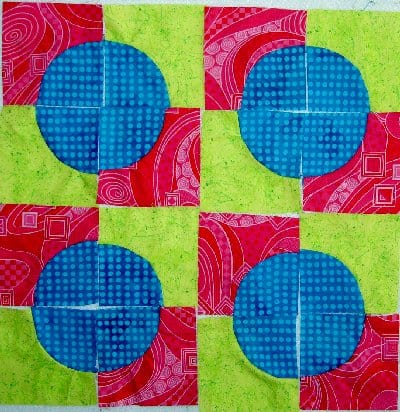
I sewed all the little blocks together then played with the layout for a few days and came up with the following layouts:
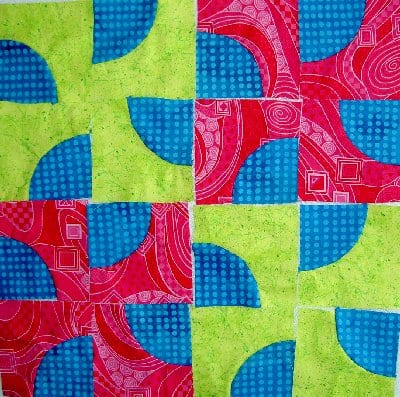
Drunkard’s Path
Good graphic look on this one.
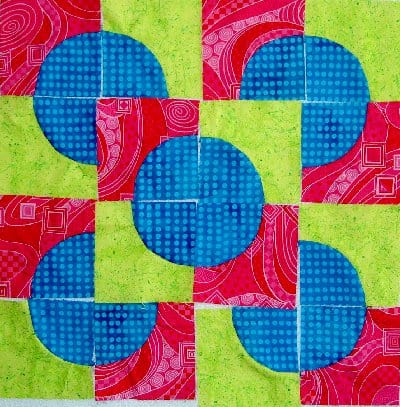
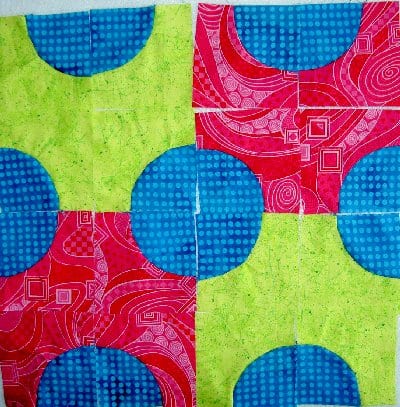
Drunkard’s Path #2
I really like the way the middle circle comes forward in this design.
Drunkard’s Path #4
Not sure what the heck this is supposed to be, but it obviously doesn’t work.
Drunkard’s Path #5
I like the way the pinwheel type design shows up. This is my second favorite.
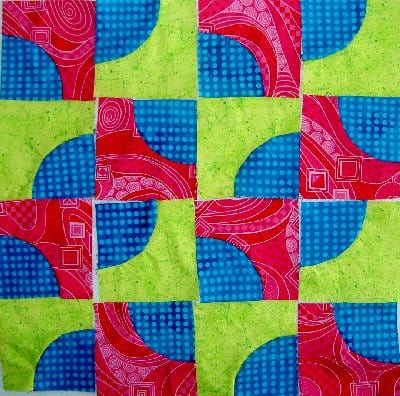
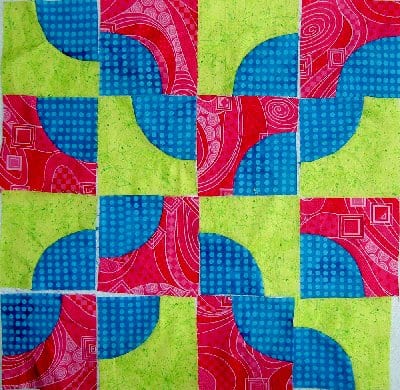
Drunkard’s Path #6
Again good graphic look, but the way the circles go off the side don’t appeal to me as much as the other layouts.
Drunkard’s Path #7
This is supposed to be an X, but the X doesn’t show up, because I used three colors (2 for the background) instead of just two total.
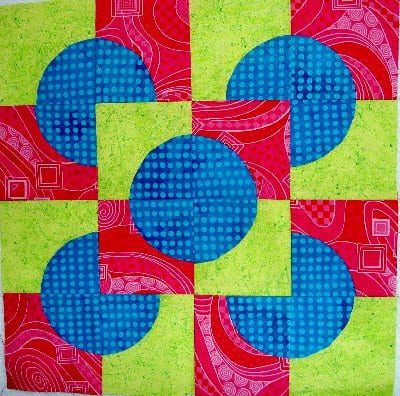
Until I finally decided on the design below. I did have a hard time deciding between this and the pinwheels:
Drunkard’s Path Final
This exercise, again, shows how great blocks are. I could make a whole quilt with this block and do each one with a different layout. I think that there is so much that can be done with block designs.
Feelin’ Blue, Too and The Eye of God are both at the quilt show. I delivered them on Monday. This means that I finished them both! YAY. The quilt show starts tonight with the preview party, so I will get to see all the winning quilts. Aja did not finish hers. She was very upset when I talked to her, but I told her it was no big deal and that we will show all the bullseyes together at some point. I hope the show goes well.
We had sun in DC today for the first in 2.5 months. It was a thrill to get off the train and see sun. I know some of you are sick of the sun, but I have worn a jacket and long sleeves all summer. School starts tomorrow for the kid, so I have been working on that rather than sewing. Still, I did finish sewing the binding on to Feelin’ Blue, Too yesterday and immediately started working on the sleeve. The sleeve is just a tad too big, but I will sew it to the binding rather than redo it. This means that both bindings are done. Hopefully, I am on the home stretch.
I love county fairs and wish that more people would enter their work. It is not a “highbrow” art organization, but everyone’s art and every entry is welcome. I also wish people would attend more county fairs.
It is great to see the wonderful and unusual items that people make and enter. It is great to see what people are doing in their homes: what they are collecting, the types of Lego and K’Nex constructions they build, the photos they take, the cakes they bake, the jams they cook and table settings they concoct, etc. I think county fairs are such a community event. You can really see stuff by your neighbors…. if more people would enter and attend.
That said, I have to admit that I didn’t enter something this year. I have done every year for the past several years and I just didn’t have (make??) the time this year. I will for sure next year. It is expensive to attend the fair ($32 for admission and parking), so getting the free tickets and parking passes from entering an exhibit is really worth it.
The boys were really interested in the Junior exhibits. They all reviewed all the Lego and K’Nex constructs very carefully and swore to build something for next year’s fair. We’ll see.
I, of course, went to the see the quilts. There were quite a number of them. I was, however, shocked at the California Living Building and the displays. There were no banners hanging outside. The building has been redone. It is not as light inside as it used to be. In previous years, quilts had been hung high up on the walls -near the ceiling, which made them hard to photograph, but made the building seem very cheerful. This year most of the quilts, even the prize winning quilts, were hung low and draped over something else or hung on racks very close together. At first I thought there weren’t very many quilts, but in the back of the hall I found quite a few, once I looked at the racks. There were some very nice quilts, especially a couple of star quilts that were amazingly intricate.
The Eye of God is bound and I am working diligently on Feelin’ Blue, Too. I have been working on one of the other of them every day. I expected to make more progress today, but worked on other things. Mostly “housecleaning” and kid wrangling. I haven’t gotten the sleeves on but am happy to be making progress.
Mom and I went to the Great Petaluma Quilt Show last weekend (8/13). We had a good time spending time with each other (a rarity these days) and looking at the quilts. We had a nice time – lunch at McNear’s and iced coffees at a smoothie place that was brand new. It wasn’t hot, but I was comfortable in my skort and t-shirt. I had my jacket along and kept putting it on and taking it off as the clouds passed overhead. I was hoping for kind of hot weather as we have seen nothing but fog at home since mid June.
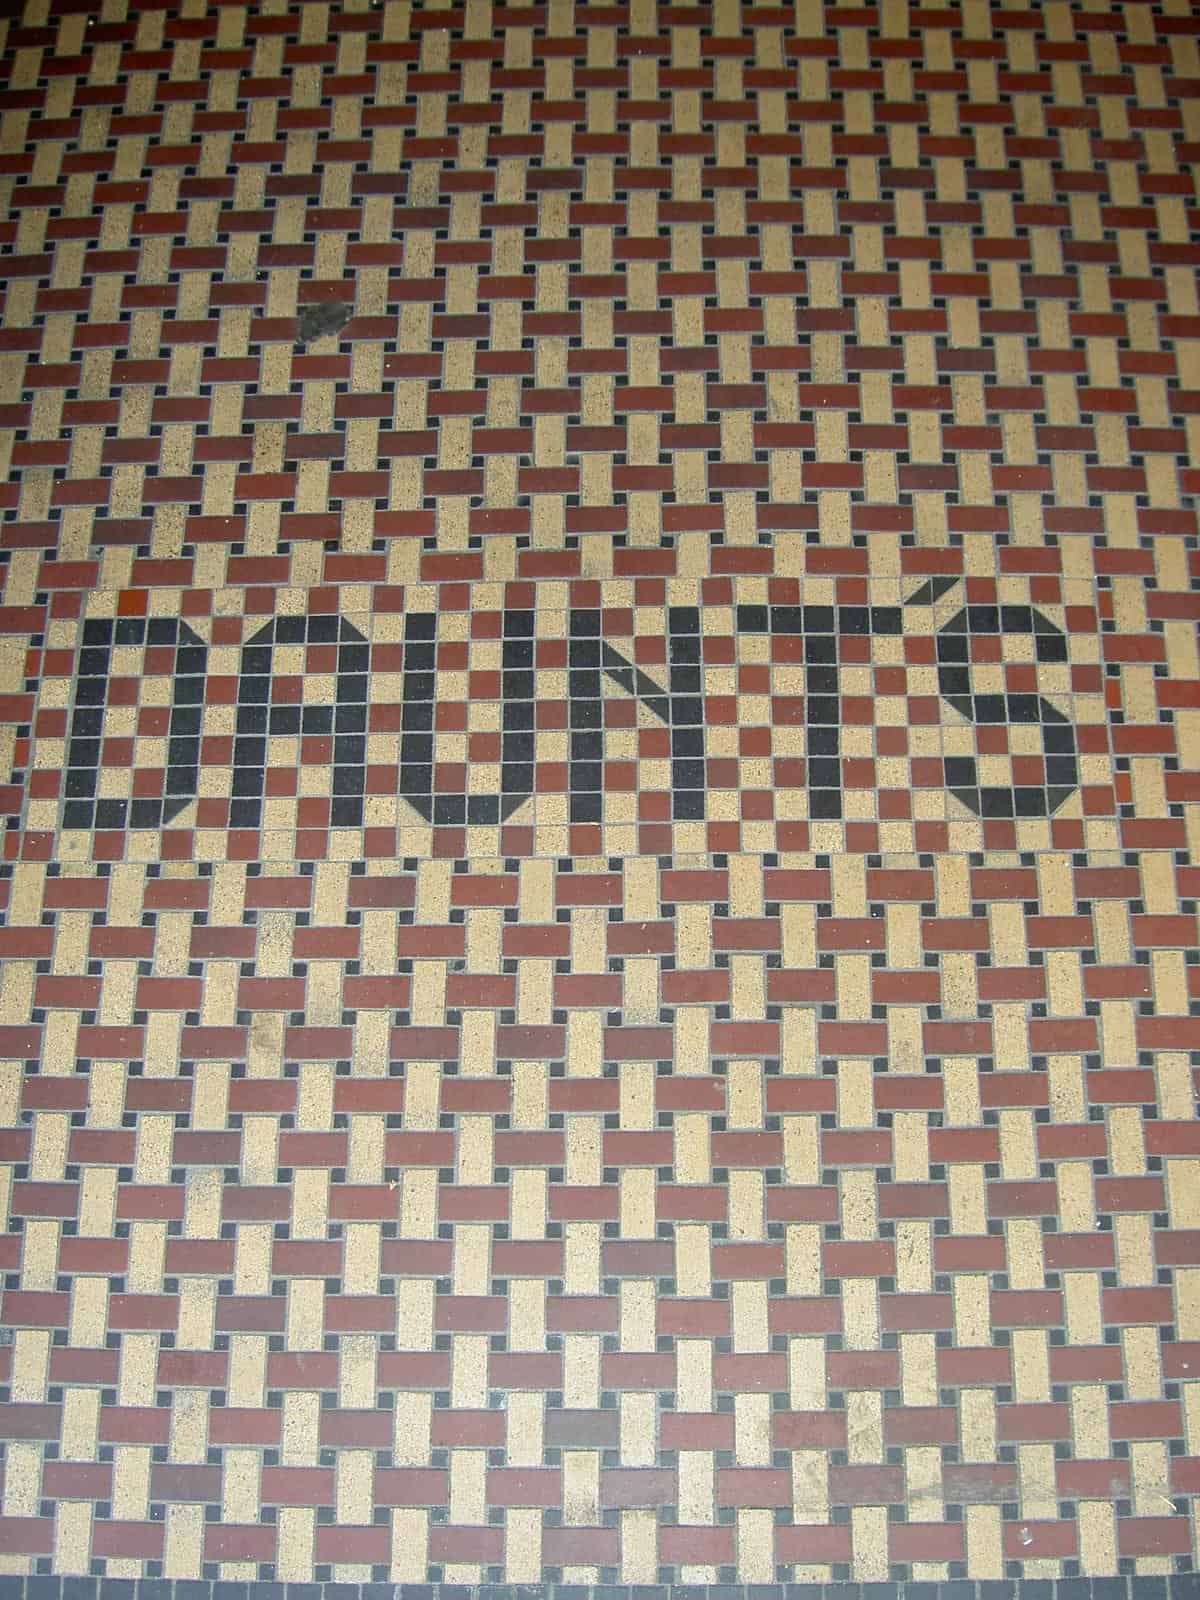
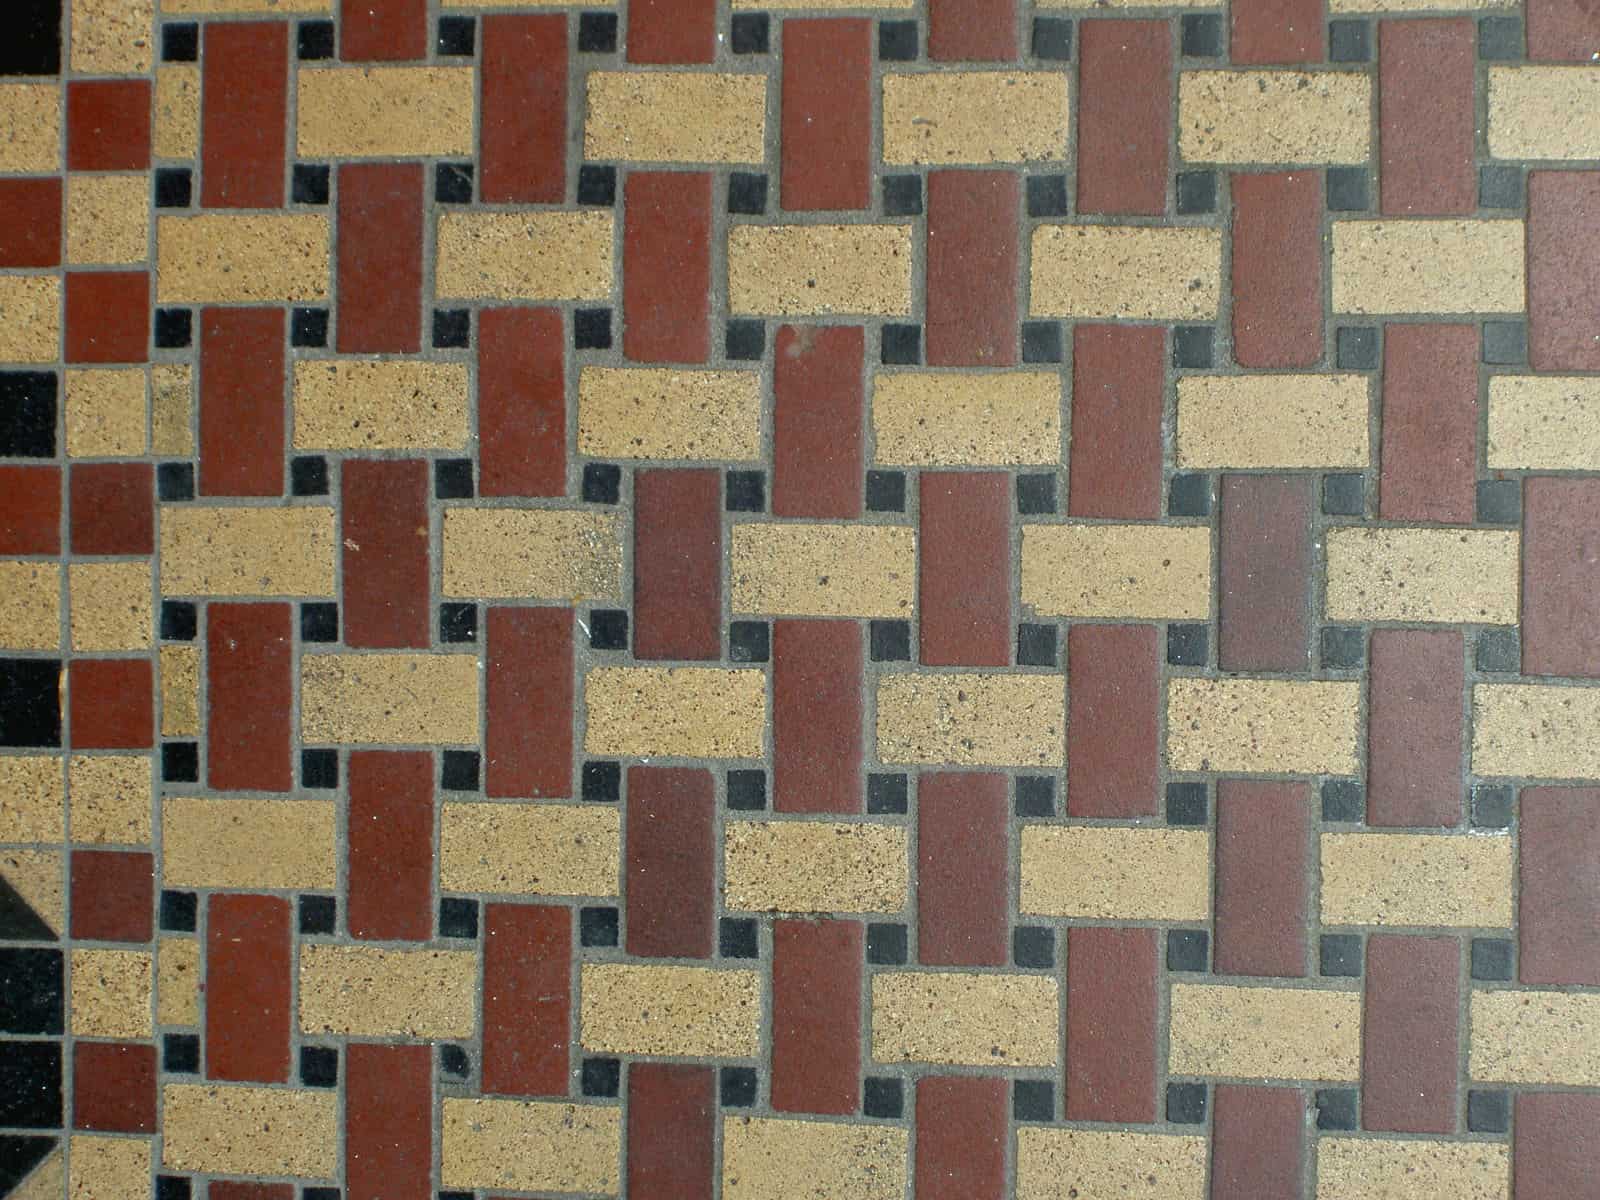
Petaluma is a nice little town, once the egg capital of the world. Kentucky Street has great, period storefronts, both architecture-wise and retail-wise. I bought a couple of Christmas gifts (yes already!) at an interesting shop that I was sure I would remember the name of, but have since forgotten. I also admired the tiles in the entryways of the various establishments. As I am such a fan of tile and mosaics, I took some photos of the more interesting (and clean) ones for future inspiration.
Tile Entry
The thing I like about tile and mosaics, in general, is that the designs relate to quilt designs, thus providing inspiration. I also marvel at the workmanship of the designs.
Tile Entry detail
The quilts were hung outdoors along Kentucky Street, which seems to be one of the main downtown streets in Petaluma. I hadn’t been to the show in a long time. Mom claims that we went together last time and it was over 10 years ago. I am not sure about the date, but I am sure I could dig up photos if I looked hard enough.
The quilts were nice, but there didn’t seem to be very many of them. They were getting a bit beaten up, because of the wind. I saw one red and white quilt I liked that had redwork on it. It wasn’t classic redwork, but motifs of a paperdoll and her clothes. The border was of little Mary Engelbreit-esque flowers. I really liked it. It was a good design and I am a sucker for red and white quilts.
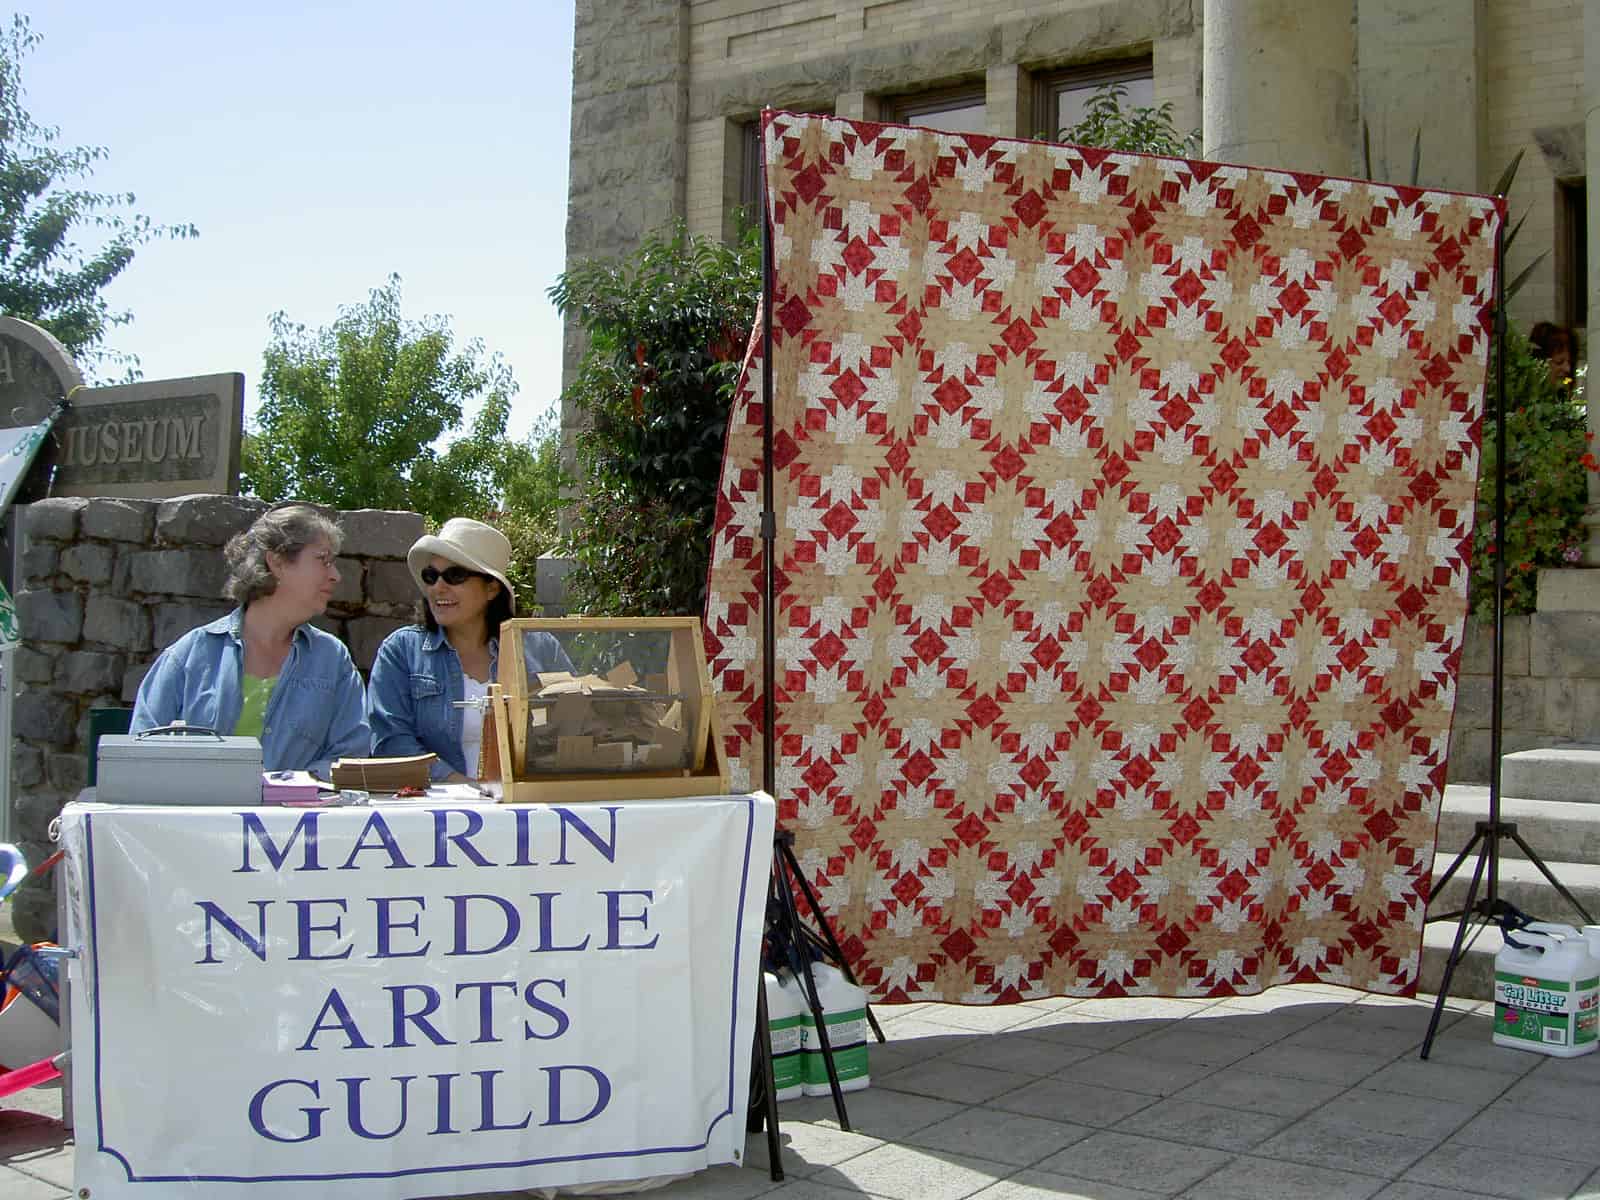
Opportunity quilts were displayed as well. We walked by at least 5 guilds with their quilts out selling tickets. I bought a few tickets, but not all. The Marin Needle Arts ladies had a prime spot in front of the town museum.
Marin Needle Arts Guild
The town museum used to be a library. It is a gorgeous stone building with two stories, the second of which is in a balcony/mezzanine type configuration, with a huge leaded and colored glass dome in the ceiling. The entry to the building has tile, which says Free to All. My camera was acting up (long story) so I didn’t get a photo of it, but I will sometime. Inside the museum, aside from the local history exhibits, were the Hoffman Challenge quilts. My favorite was a peacock. It was a small quilt, but the tail was heavily machine embroidered. It was fabulous.
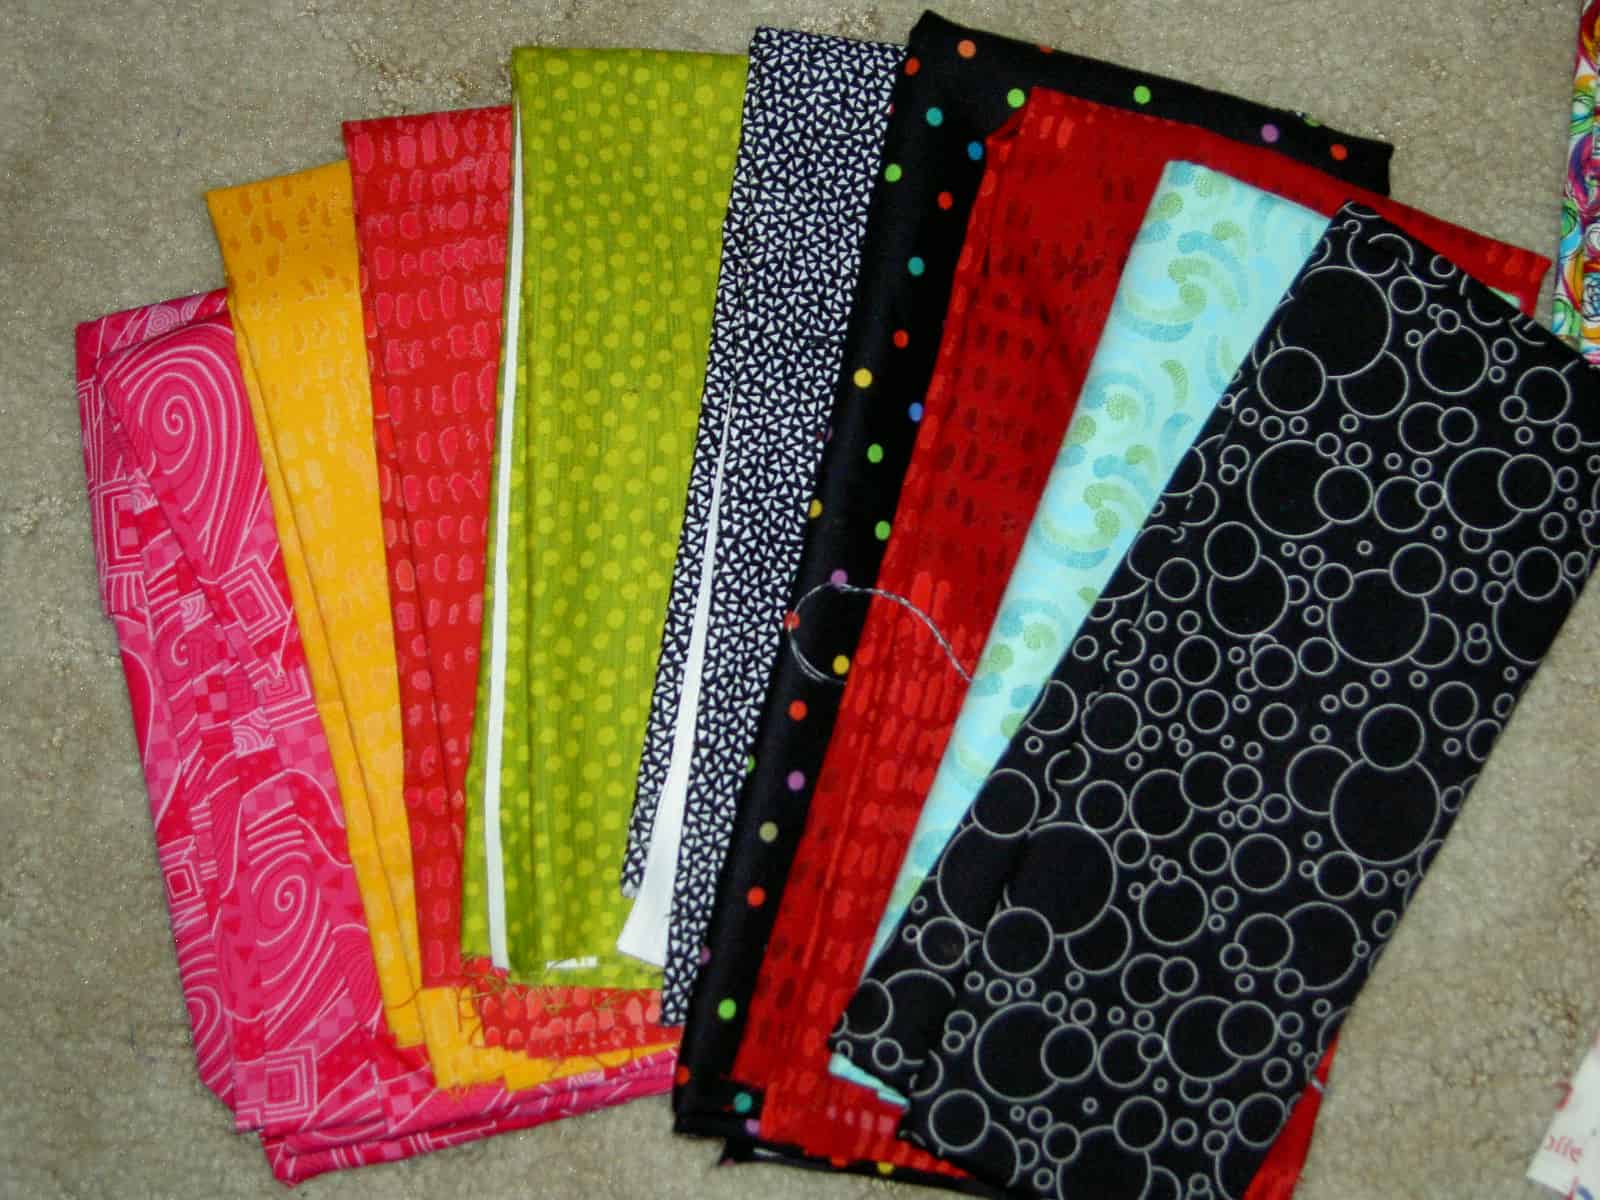
The park at the end of the street (closer to the freeway) was filled with vendors.From the vendors, it seemed that they had combined a normal Farmer’s Market Day with the quilt show. As with most Farmer’s Markets, there were fruit and flower vendors. Along with the vegetable and lavender tables were quilt vendors as well. CG was there in her capacity as fabric sales woman and I couldn’t leave without buying some of the fabric I had seen when I picked up my quilts. I bought what CG and her cohorts call “niblets.”
Fabrics
The “niblets” are the red and yellow fabrics. They are from a collection of subtle food fabrics. The icky green is close, but not the same group. I like this grouping of fabrics and may try to keep them together in order to make a quilt sometime. The group is a little on the dark, Autumn side, but not too dark. I am sure the yellow would spark it up enough. Not sure what kind of design I would use, but I have enough projects to keep me busy, so will let it percolate for awhile.
There were a number of vintage quilt vendors. One vendor had bought an old quilt from another vendor and she let me take a photo of one of the blocks. It was a block that was completely on the bias, but I liked it. I’ll have to revise this post and post it later, as those pictures are in a disposal camera that I bought after the battery on my digital failed once and for all.
After the show we stopped at the Quilted Angel. I hadn’t been there in a long time, but it was just as I remembered. They had a room in the back with LOTS of books. I didn’t remember that room from before, so perhaps that room was added since I went there last. I couldn’t resist buying more fabric.
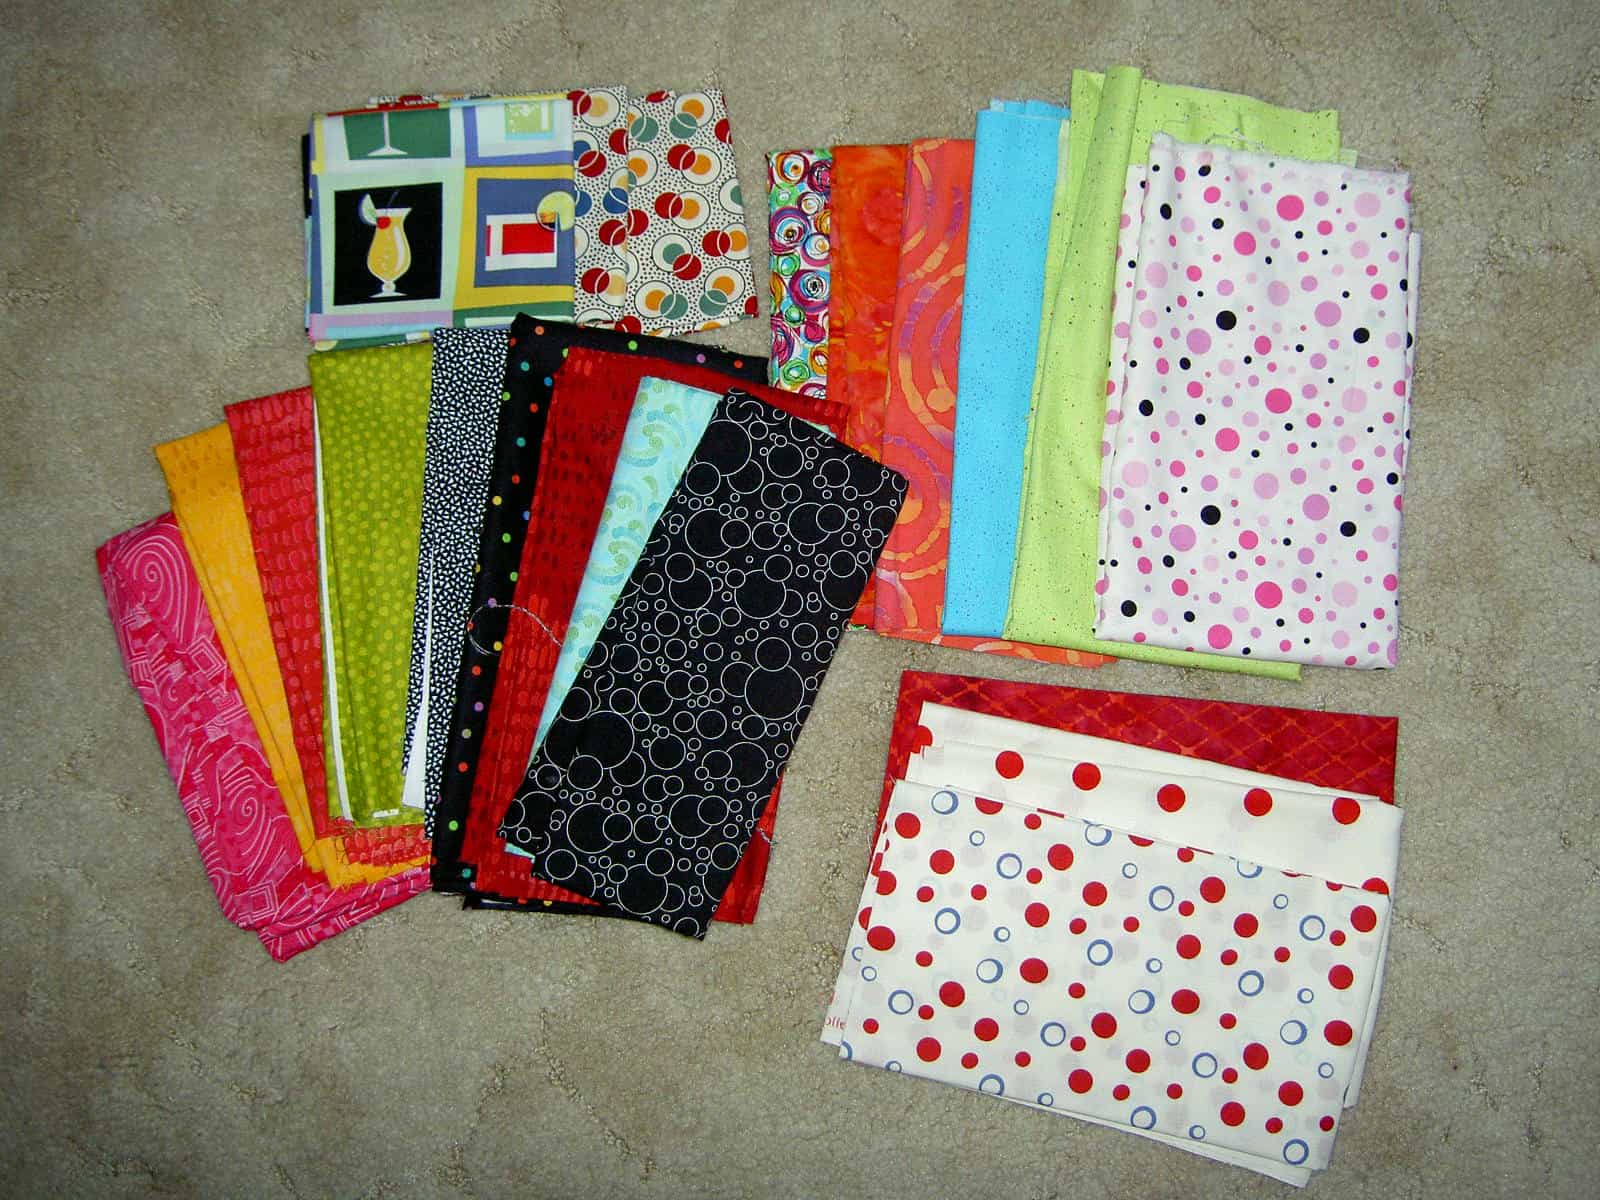
Petaluma Quilt Show Purchases
The above picture shows all that I bought. I also love the grouping of fabrics with the dots.
I would love to have a day or two to whip out an easy, but graphic block quilt with these fabrics. I don’t see it happening in the near future.
The small garbage pail next to my sewing machine table is full. I found this to be an excellent indicator of my fiberart output in a week.
Trashcan 2005
There have been too many weeks recently where my garbage pail has been completely empty. The quilts are back, however, so I cut off the excess fabric and batting in anticipation of sewing on the binding. This exercise quickly fills up the pail.
CG did a great job quilting them. She did the work quickly and it was reasonably priced. I am very pleased. The only thing that threw me for a loop was the way the edges were not straight. This can’t be unusual, so I don’t know why this seems so odd. I had to be very careful cutting Feelin’ Blue, Too, because there is no border, so if I cut too much, the blocks will look odd. I tried to err on the side of caution. This must be from the shrinkage from quilting the quilt.
Both bindings and sleeves are ready to go. Tomorrow: onto the binding. I know I have plenty of time and will get them done.
I made the sleeve and the binding for The Eye of God this weekend. YAY! I am thrilled that I made progress. I feel like I am on a roll and will go to make the sleeve and binding for Feelin’ Blue, Too.
Both sleeve and binding are ready to be sewed on to the quilt when The Eye of God returns. I used Robbi Joy’s directions for making the sleeve and I am pleased with the result. I do like the way the sleeve went together. It also feels substantial, like it would protect my quilt from errant rods. Of course, we will have to see when I put the sleeve on the quilt.