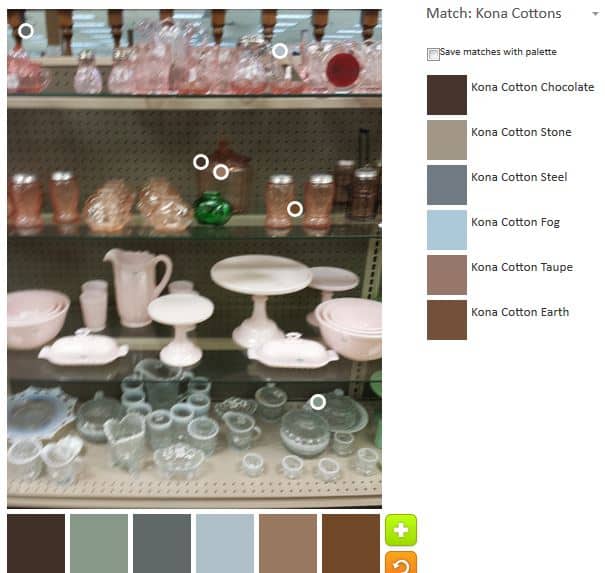
The latest ColorPlay photo is another of the pressed glass photos from May. I thought it would be fun to play with some pinks and whites to see what I came up with. I really do like the actual items, especially those white cake stands. I might have bought one if I hadn’t been flying home from Indiana, and I had space in my cupboard at home. I also like the variety of items they had. You can see bowls, pitchers, salt & pepper shakers, candy dishes and more in addition to the cake stands.
While manipulating the first one, I realized that my dreams of creamy whites and blush pinks were going to come to nothing with this photo. Again with the preponderance of neutrals. Sigh.
I know. I know. The lens doesn’t see the world as our eyes do. I just have to find a photo that creates beautiful palettes.
ColorPlay: Pressed Glass #3 – default
So the default palette was dark. I think the palette would be good for an on-the-market/for sale house interior, but not for a quilt. At least not for one of my quilts.
Cynthia W made a comment on another post about a pop of color, which made me think. While looking at the default photo, I looked for the pop of color. I think, in this case (right, default palette) it is the light blue – Kona Fog. I don’t really consider that a *pop*, but in this context it is.
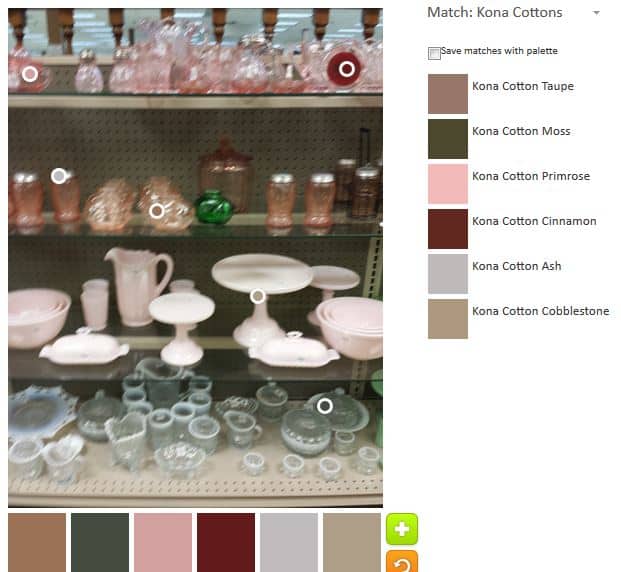
ColorPlay: Pressed Glass #3 – n.2
Of course, I tried again. I really tried to get some bright colors in the palette.
I sort of succeeded.
The Primrose and Cinnamon are fairly bright and the Primrose is definitely the *pop* color in this palette with Cinnamon doing some propping up. I have to say that the Moss does nothing for me. I think of the Ash as a background color. I really don’t know what to think about the Cobblestone or Taupe. They are too beige for me and not my colors.
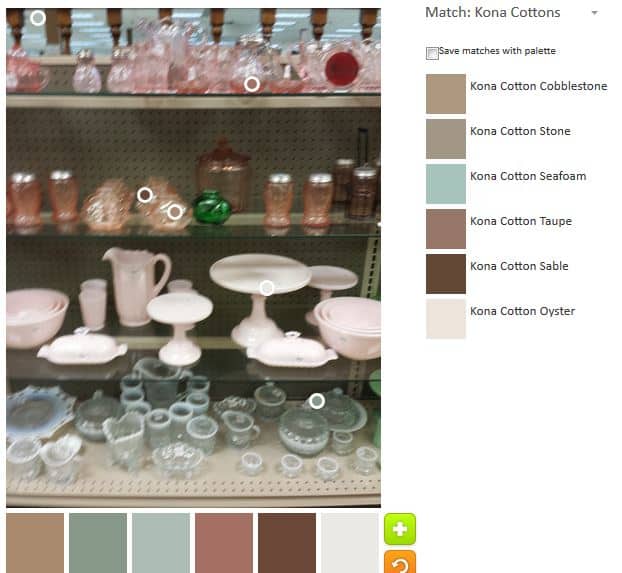
ColorPlay: Pressed Glass #3 – n.3
Yep. You guessed it. Around a I went again for another try.
This palette is even worse in terms of dead. If I had to pick a *pop* color, I would be hard pressed to do so.
Perhaps the Seafoam? It is such a wimpy color, how can it pop? The Oyster is the background in my mind with the Cobblestone, Stone, Taupe and Sable boring me to death.
ColorPlay: Pressed Glass #3 – n.4
I decided on one last try.
I didn’t make much of an effort. I was tired of this photo, so I just went for an easy palette.
Funnily enough, this one is much better than any of the others. There are a couple of reddish/pink tones plus the Steel works very well with them. It isn’t great, but I do think that working with the photo made me get to this palette.
The Palette Builder is a great and fun tool. Try it out! Let me know if you make anything with any of these palettes.
Pink Castle Fabrics has a June Roundup of free patterns.
Sara at Sew Sweetness is now posting about pattern hacks of her patterns. As you know, I love the Petrillo Bag and have made several including hacking the pattern. She has never made mention of my pattern hacks, though I did let her know. I was trying to stay true to her pattern. I guess I am not famous enough or I should have been bolder.
The Covered in Love block drive ends today, but you can probably sew really fast and send a block OR make a whole quilt and send it in. Keep this in mind when you are looking for a charity project. She does these block drives every other month or so.
Want a new Block of the Month? Sign up for Jacquelynne Steves I Love Home BOM.
Threaded Bandit is hosting a Feathered Star QAL. It started on June 25, but you can still catch up if you get busy right away. Get the patterns at her site.
This HST tutorial looks very similar to mine. She has a better name and more easily understood chart.
Tutorial prices range between $14.95 and $49.95 with some content being free. Pre-packaged kits from the Fat Quarter Shop and Missouri Star Quilts Co. are available to students at an additional charge. (Learning to make fabric slippers and booties may have just solved all out gift-giving dilemmas).
The channel, which launched with 10 tutorials, will introduce new tutorials and free content every month. (thanks to Stashed for the tip)
Inspiration
Google has a new series of sites about arts and culture. The sites allow users to explore cultural treasures in extraordinary detail. This is a great idea and I immediately started clicking around. I found a Schiaparelli exhibit, which was interesting (have you seen her shoe hat inspired by Salvador Dali?), but I was really looking for some exhibits that I have been interested in and haven’t been able to see. I think the interface is too fancy for me and needs some work. I would like to be able to search for certain things and put them in my own collections. I shouldn’t whine. I am very pleased to be able to see what they have in such great detail. I might not be able to see such detail even visiting in the museum.
I really do love fashion – beyond practical fashion, but wearable. One of the things I liked about the Native Sons is the opportunity to put on a nice dress and some stilettos and go out. One of my life’s regrets is that I am not a better garment maker. I do keep trying, though. Schmetz linked to a video of Balenciaga dresses from the V&A in London being x-rayed. This appeals to me from the making perspective as well as the fashion perspective. I also like the sheer ingeniousness of some of the things Balenciaga designers did that you can’t see. One thing was that they used dress weights in strategic places to make the dresses hang a certain way. I NEVER thought of that. Amazing.
Jackie posted a customer’s Illusion quilt. The pattern has been around for a little while, but this is a really nice version.
Books, Magazines, Media & Events
Michael Miller has a recap of Quilt Market. Included is a really adorable paper doll quilt (pattern forthcoming).
Aurifil also has a couple of recaps of Market. Here is the second.
Sara from Sew Sweetness has a new video channel on YouTube to help you work through her patterns.
Modern Quilts: Designs of the New Century is now available for preorder. The book will ship in December 2017.
Quilters Take Manhattan (QTM) is a three-day event Sept. 15-17 that includes garment district tours, museum and gallery exhibitions, a night on Broadway, a vendor hall, silent auction and raffle prizes. The QTM 2017 keynote speaker is Sherri Lynn Wood, author of The Improv Handbook for Modern Quilters: A Guide to Creating, Quilting, and Living Courageously. QTM sponsor Quilt Alliance recently posted an interview with Sherri on its blog.
And this year at QTM, attendees are invited to participate in the Fashion Challenge, By making garments and accessories featuring fabric from the Quilters Take Manhattan collection available at Spoonflower, they have a chance to win prizes.
QTM is an annual fundraising event for the non-profit Quilt Alliance which works to document, preserve and share the stories of quilts and quilters. (thanks to Stashed for the tip)
The non-profit Quilt Alliance is conducting a membership drive through August. Established in 1993, the Quilt Alliance documents, preserves and shares the American quilt heritage. Individuals as well as guilds and small businesses can join. (thanks to Stashed for the tip)
QuiltCon 2018 Classes
QuiltCon registrations opened for members on Monday. I stayed home from the gym in order to register (I went later) and got all of the classes and lectures I wanted. Yay! Will you attend? Take a look at the 2018 QuiltCon show schedule.
BBC Trending, an Internet radio outlet that covers topics being shared on social media, recently discussed political polarization among quilters and the activities of a closed Facebook group that was outed by some of its member who felt the group was going too far. Listen or download here. (thanks to Stashed for the tip)
Fabric, Products & Tools
Buy your No Quilt Bullies notebook from Generation Q. There is no space for bullying in general, but the recent events on FB have brought quilt bullying to the fore. Spread the message.
Quilts Inc has a products spotlight. Apparently they have it every month. The June spotlight includes an interesting trimming ruler from C&T.
In other DYI news, Michaels and Pinterest are working together to offer limited edition Make It Kits. The co-branded kits will be based on popular pins. According to the companies’ announcement, the limited edition kits will be offered first to Michaels Rewards customers through Promoted Pins and a special email offer before they are offered to the public on michaels.com. (thanks to Stashed for the tip)
Tips & Tricks
Riley Blake linked to a chart of bedding dimensions that includes beds and pillows! For those who make pillowcases, this is especially helpful. Scroll down all the way for the full list of dimensions and associated images. Twin beds and baby sizes are not included on the top chart. It was originally posted on U Create.
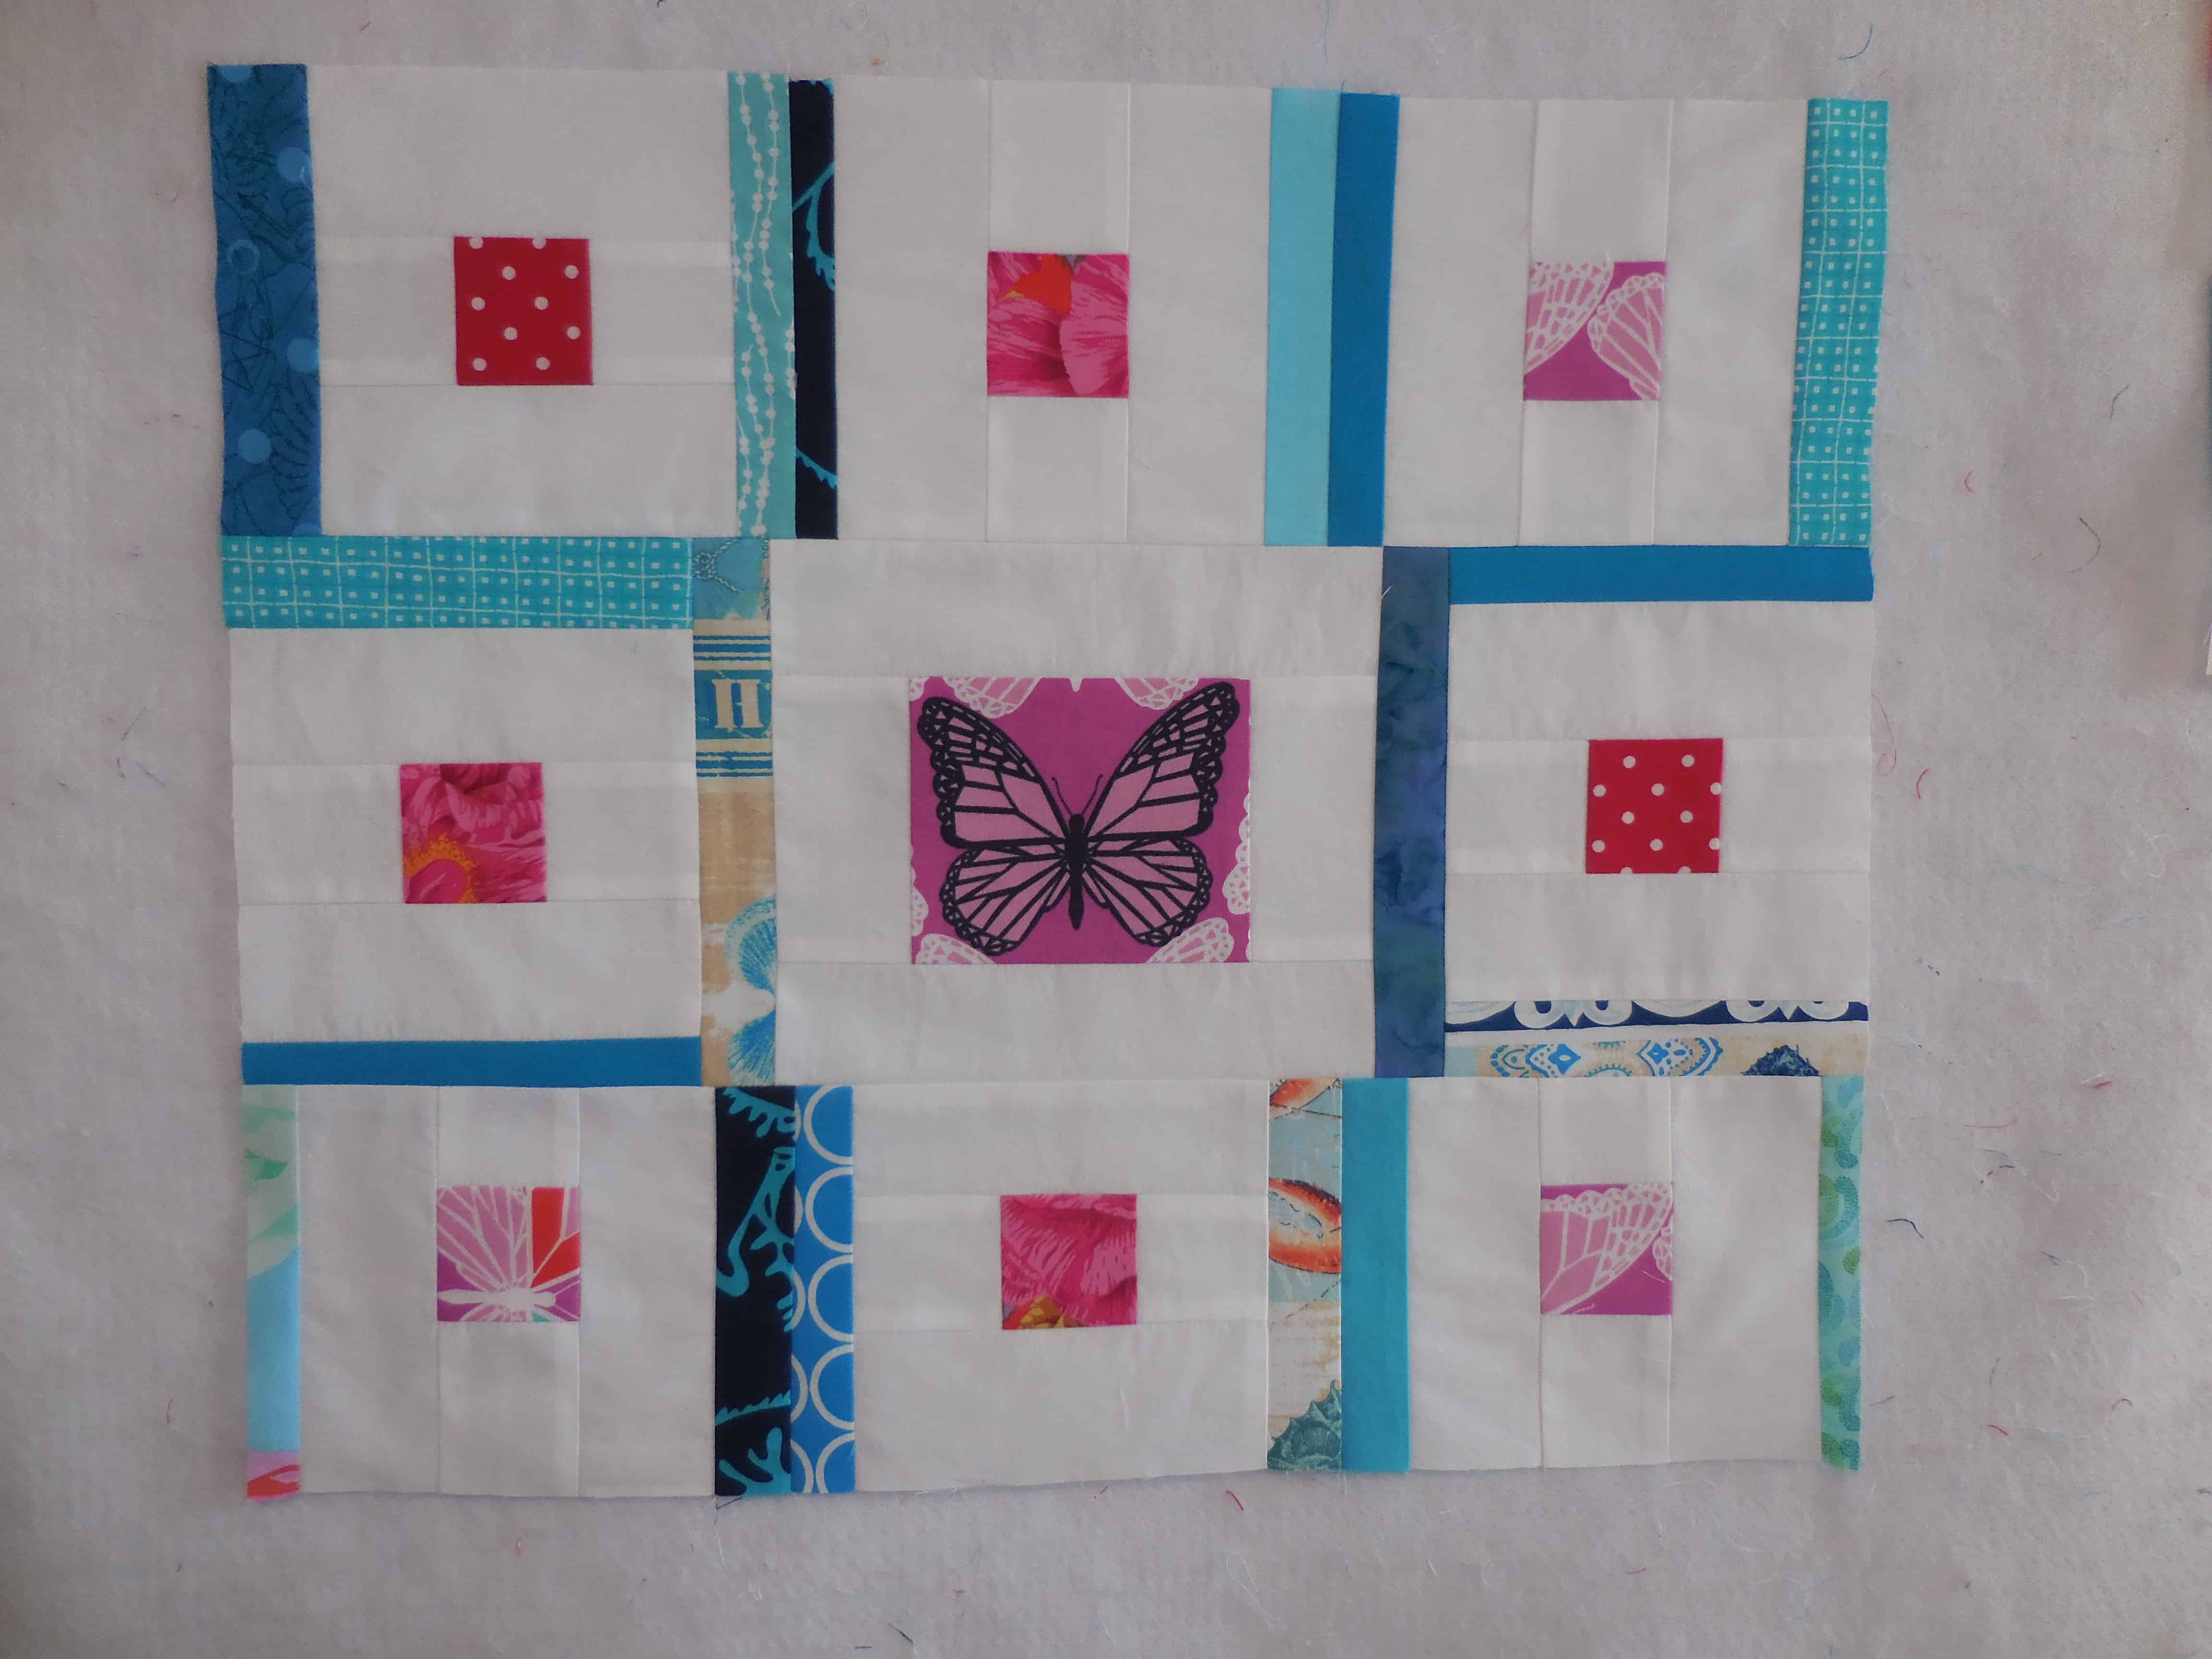
I finished Gerre’s piece on Sunday. I was almost done on Saturday, but had a bit more to do.
This did not come out as I envisioned, but I still like it. I saw that butterfly and it made me think of Gerre.
On both pieces, I had blocks on the mind. I really didn’t feel Improv in my piecing plan this time, so blocks it was. I had some leftover bits that I didn’t use, so I included them with the packet as well.
I know I am crowing about the tiniest of progress, but I have to take finishes, even semi-finishes, where I can get them.
En Provence Four Patches
I finished Clue 3, which was a surprise, because I thought I would have to cut more 2″ squares to finish more four patches. I thought I had about 40 more to make. They were done and I didn’t figure it out until Sunday when I counted all the 4 patches up and came up with 171. That means I have 3 extra.
I am pleased, but I know the joy will be short-lived since I have to make more Peaky and Spikes next similar to the ones I made before.
I spent most of the day with my in laws cleaning my MIL’s house. She is 91 and lives alone, but needs some extra help now and again. I spent my time cleaning her fridge and running errands for her upstairs. Everyone else worked on the garden except YM who scrubbed her outside stairs and the tunnel to her front door.
The first thing I did when I got home was to take a shower, but after that I had several hours to sew. I decided to leave Sunday all free for something new and to try to cross some to dos off my list.
I had an idea for the Color My Quilt pieces I owe Gerre and Annemarie, so I decided to work on those.
Annemarie’s Color My Quilt Shard
They didn’t go completely as planned. However, I ended up with something I think will work with the other pieces. Annemarie received pieces at the June meeting, which I missed, so I really don’t know what Annemarie’s shards looked like. I hope the apricot I added gave her the look of southwest without the coyotes and saguaros feel of kitschy Southwest.
Christina is spearheading the drive to make a quilt for the nurse who coordinates and founded the Blankets for Babies Project at Stanford. Christina is racking up the hours in front of the sewing machine, but is still a relative newbie, thus she called on me to do some applique’ on this quilt.
Make a Splash from Moda Blog
The quilt, Make a Splash, is a free pattern on the Moda Blog (scroll down as once you click on the pattern an Adobe Acrobat window will open in your browser, so there is no direct link).
Anchor detail
It took me awhile to get it done. With my travel and various things happening, I only got to it last Thursday. I snuck in some time after work to do a bit of applique’. I am pleased that my part is finished and I can hand it off to Christina again. Don’t get me wrong; I am always pleased to help the guild. I just have so much going on right and I felt like I was letting Christina down by not getting it finished. Now it is and I can move on to the 2,000 projects I have going.
Nota bene: Clearly, I have to make sure I have two extra days worth of posts ready to publish before I go on a trip. I returned on Wednesday night from Phoenix, but have been so busy the past two days that I didn’t finish either this post or the ColorPlay postI had planned to post Thursday and Friday. The ColorPlay post will show up eventually and you have something to look forward to reading.
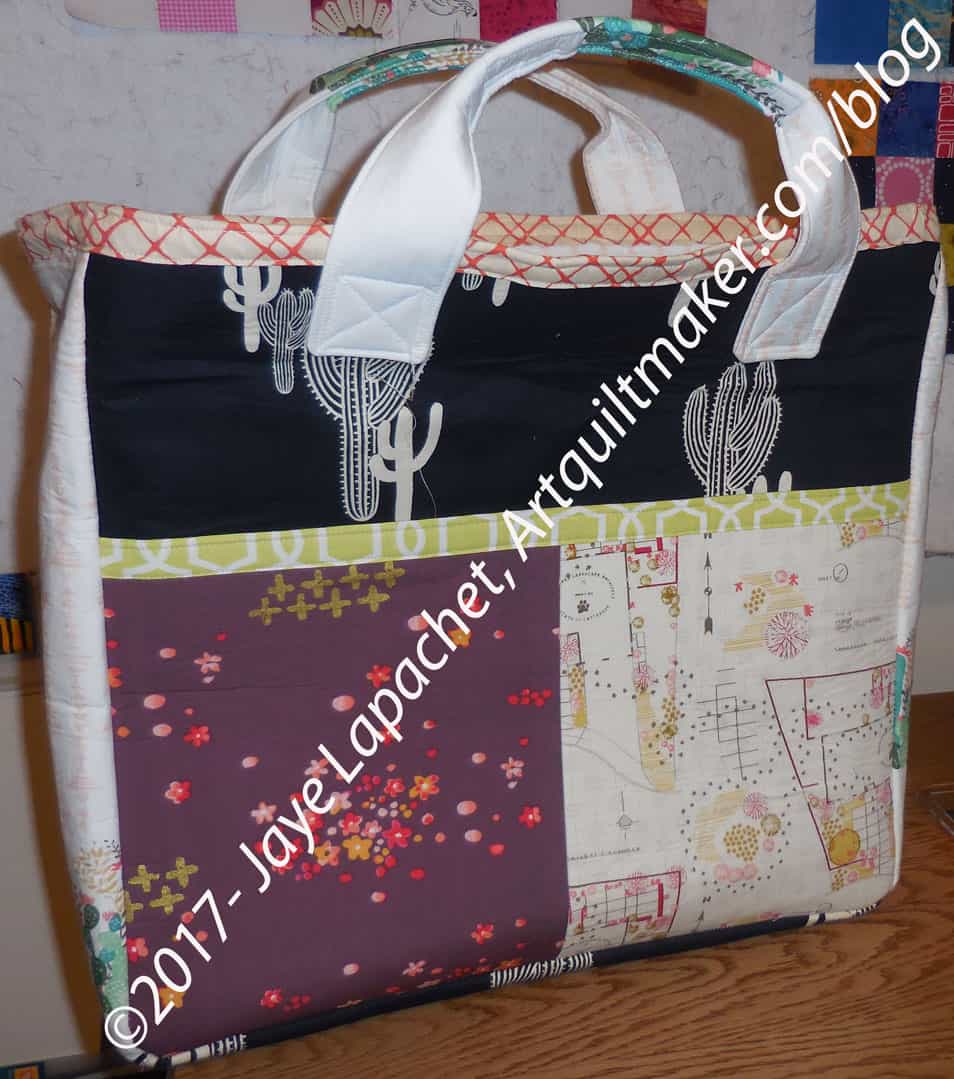
Boxcar Tote Complete
The Boxcar Tote is finished. I bought this pattern from Hawthorne Threads and was pretty excited about the size and shape.
It is a good grocery bag size, though I do think it might be better used as more of a beach bag, carrying swimsuits and towels rather than heavy gallons of milk. It doesn’t have any cell phone pockets or key leashes, so those might be additions to consider later.
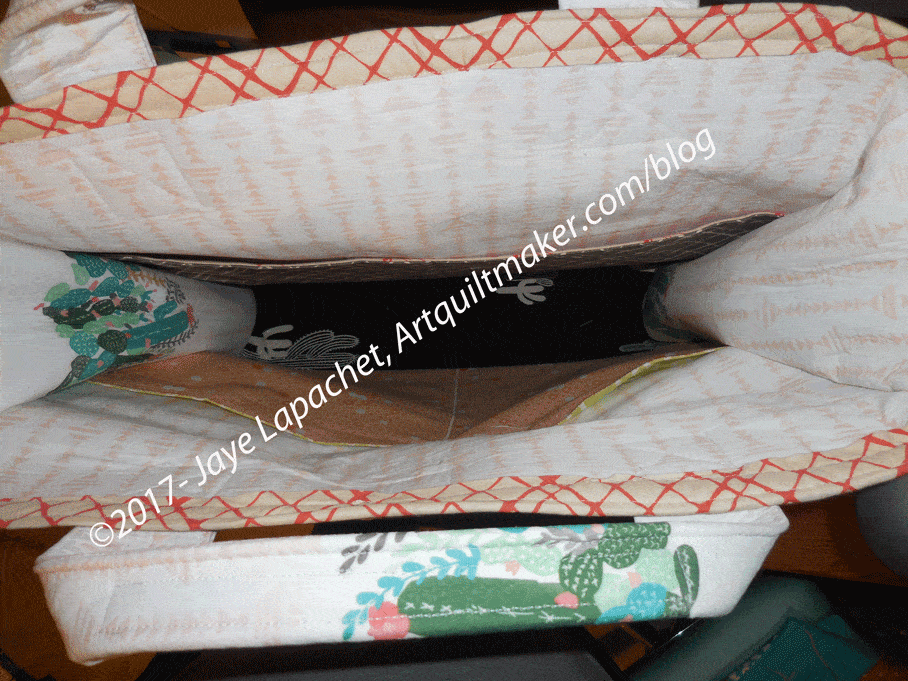
Boxcar Tote inside detail
The finished product has two pockets on the outside, one on each side and four pockets on the inside. The pattern pieces were the same, but I divided the inside pockets into two. They might be a little too slim to be useful, but a tablet or clipboard could fit very well.
The white background cactus fabric is a Hawthorne Threads designed fabric. I chose the various cactus motifs because the friends for which it was made now live in Tucson.
Frankly, I am not happy with the outcome. I found the pattern to be well written enough. It is straightforward and clear. I think my inexperience with Decor Bond as well as using a machine with a small throat were both the main parts of my challenges. I almost never give up on a project, but putting the top trim and handles on almost made me give up the whole enterprise. The only reason I didn’t was because I had bought the cactus fabric especially for my friends.
I really like the shape and size of the Boxcar Tote and thought this was a bag that I might want to make as gifts multiple times. I made a huge effort to follow the directions exactly, so I could really get a feel for the pattern. I did get the feeling that the designer may not have much experience with pattern designing for bags. I am not sure why (except for the construction of the bottom), but that was my impression. I do want to try it again with Soft & Stable.
I had several problems:
Construction of main part of bag
Decor Bond interfacing
Construction of handles
application of handles
application of binding
First, the construction of the main bag was in 5 pieces. This means that the bottom was separate. This is an awkward way to construct a bag IMO, because I never feel like the corners are very secure. When I turned the lining right side out I saw severe strain on the corners so I reinforced the stitching again.
If I make this bag again, I might try to cut the two sides and the bottom piece out as one. I would have to figure out a way to differentiate the bottom from the sides, but that might help with my construction issues.
Reinforcing the stitching was really hard because I was using my small machine. I really like this machine as it is a workhorse and has a great stitch, but the throat is really small. Since the bag parts were already together, I had no choice but to struggle through trying to cram it through the harp. The Decor Bond isn’t very flexible in the scrunching up kind of way, so it was a huge challenge and my stitching, frankly, sucked.
I didn’t think much about the Decor Bond when I started. I was excited to try a new interfacing and even more excited when I realized how stiff it was. I knew that the bag would stand up quite well using this interfacing.
The first problem I had with Decor Bond was that after fusing it to my fabric, it refused to stay in place. It didn’t come away from the fabric, but kind of wrinkled up the fabric fused to it as I continued to put the bag together. As I said above, the Decor Bond isn’t very flexible in the scrunching up kind of way. This means that as I had the whole bag put together, topstitching the top binding was nearly impossible. I had to keep stopping and starting and moving the bag slightly. There is very little give so I realized that the shape of the Decor Bond is the shape you will end up with.
As I progressed on the bag, I also realized that I would be sewing through multiple layers of the Decor Bond. Fortunately, my machine was ok going through it, but getting the layers under the needle was the problem. A really big problem. Even when I got the pieces under the needle, they would shift and move and really make it hard for me to sew. Part of this was also the inflexibility of the interfacing.
I don’t want to imply that this interfacing is hard like a tabletop. It did bend and flex, but not, as I said, in a scrunching up sort of way. This also caused the machine to stop feeding and stitch in place when the pieces hit the wall and got stuck.
Boxcar Tote Handles
Using the Decor Bond for the handles was a bad idea IMO. Again, I am not an expert Decor Bond user, but they took me about an hour and many tools to turn.
Yes, just to turn!
The Decor Bond was so thick and in such a small space that the turning was more difficult than any other time I have turned handles.
In the photo, left, you can see the wrinklyness of the fabric fused to the Decor Bond that I described above. Yes, I followed the directions.
The good part is that the handles are sturdy.
The worst parts were the application of the handles to the bag and the top stitching of the binding to the edge.
Boxcar Tote handle detail
The pattern showed placement and the standard box/ X-cross configuration of stitching. I could not maneuver the bag enough to get a straight stitch straight across the part of the handle to be sewn to the bag. Part of it was that my machine harp is small and the other part was the that Decor Bond was not very foldable. So, the top stitching on of the handles looks really crappy. 🙁
My final shame is the binding. I am not a huge fan of binding the tops of bags. It is a lot of work and doesn’t always look good if you are trying to stitch it on after the bag is assembled. Part of my problem was that the two sections (Outside bag and lining) were equally stiff and the tops didn’t line up. I had to force them to line up and it was not a good outcome for the bag. I meant to use a larger seam allowance for the lining and forgot. I could have trimmed the top of the lining, but was afraid. I should have done it.
To be fair to the designer, Alexis Abegg of Greenbee Patterns, I looked up some websites that talked about the pattern. The Crafty Planner is also a visual and verbal learner, like me. Her version looks fantastic. I do think she used something else besides Decor Bond, perhaps Soft & Stable.
Nisha Williams made the tote from a kit and wrote about it on the Craftsy blog. I was relieved to see that she had the same sort of challenges with the handles that I had.
I searched the Greenbee blog and did not find any information on this tote. There is no word cloud, so I couldn’t click on totes or bags or anything and try and find it from there. 🙁 The On Holiday Bag they share in their most recent post (2-17-2017) has the same general shape and the same sort of handles.
The recipient loved it, which was great. I really hope it doesn’t fall apart.
Yes, I have started another project, a small one, but another project for which I have to find time.
EPP Travel Kit – Bright and Cheerful
I am making another EPP Pouch like the one I made for Mary. I intend for this one to be much brighter and more cheerful. I also intended for it to be at the point where I could do the hand sewing while I was away, but that didn’t happen.
I have liked this quilt for a long time. The photo shows a version that I have admired multiple times at Back Porch Fabrics.
This version uses primarily Kaffe Fassett and Philip Jacobs fabrics with a charcoal (description not actual color name) solid background. I really like it.
I am using the Alison Glass’ Sun Prints layer cake I bought for the Layer Cake Explosion QAL. There aren’t enough bright clear colors so I am throwing in some Kaffe and Philip Jacobs fabrics as well. I also have some Alison Glass Chroma coming soon and may add some of that into the mix.I want it to be as scrappy as possible while using supplies I already purchased. I can always adjust as I begin assembly.
I have the charcoal background I bought for the QAL, but I also have white, so we will see what I end up using. I want this quilt to be appealing and cheerful.
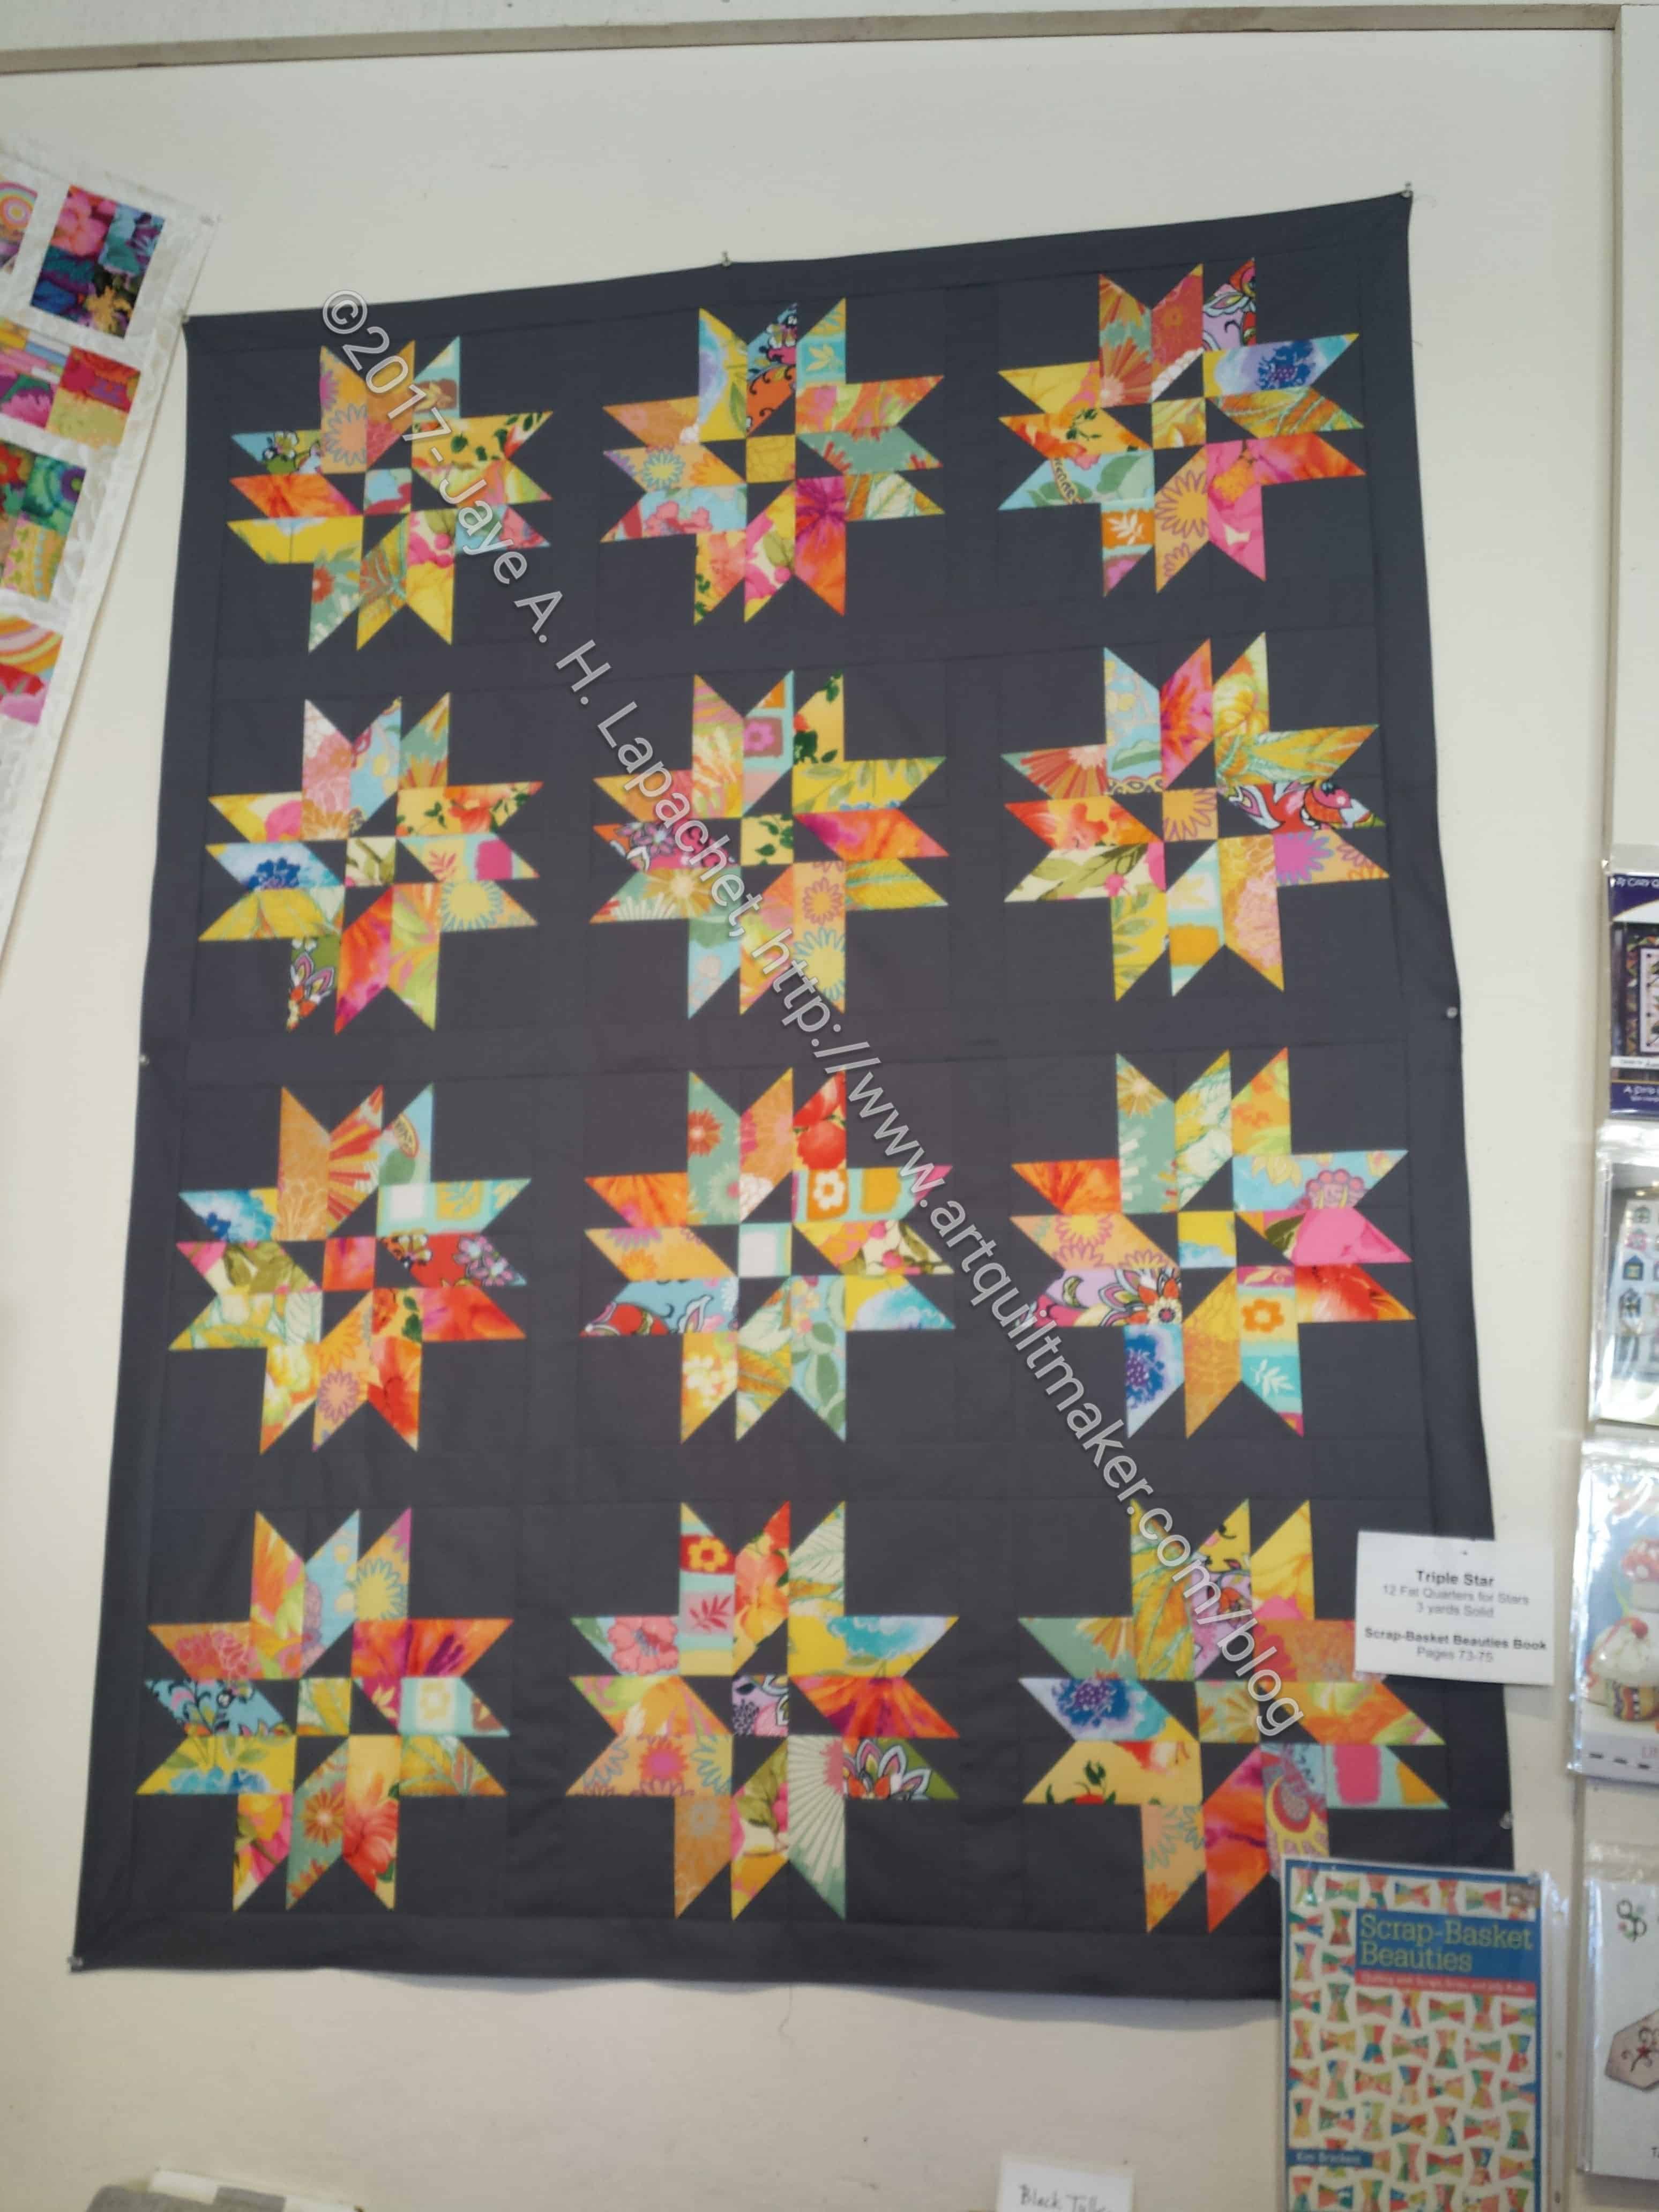
This quilt design is from Kim Brackett’s book, Scrap Basket Beauties. You should buy it. There are a number of quilts I have marked in this book to make. I need to get through this time of “must dos” before I can make any others.
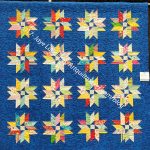
Triple Star by Glenda Freiberg, Half Moon Bay
Star Fancy by Marina Kaiser of San Bruno
*
I visited the county fair last week and was surprised to see a number of quilts in this pattern on display. I don’t remember ever seeing them in quilt shows or at the fair before and wonder if there was a class somewhere locally.
I love seeing individual variations on a pattern. The fair was a great place to see variations on the same pattern and it was so fortuitous that I am planning the same quilt.
*-images ONLY are copyrighted NOT pattern or versions, ideas by above makers.
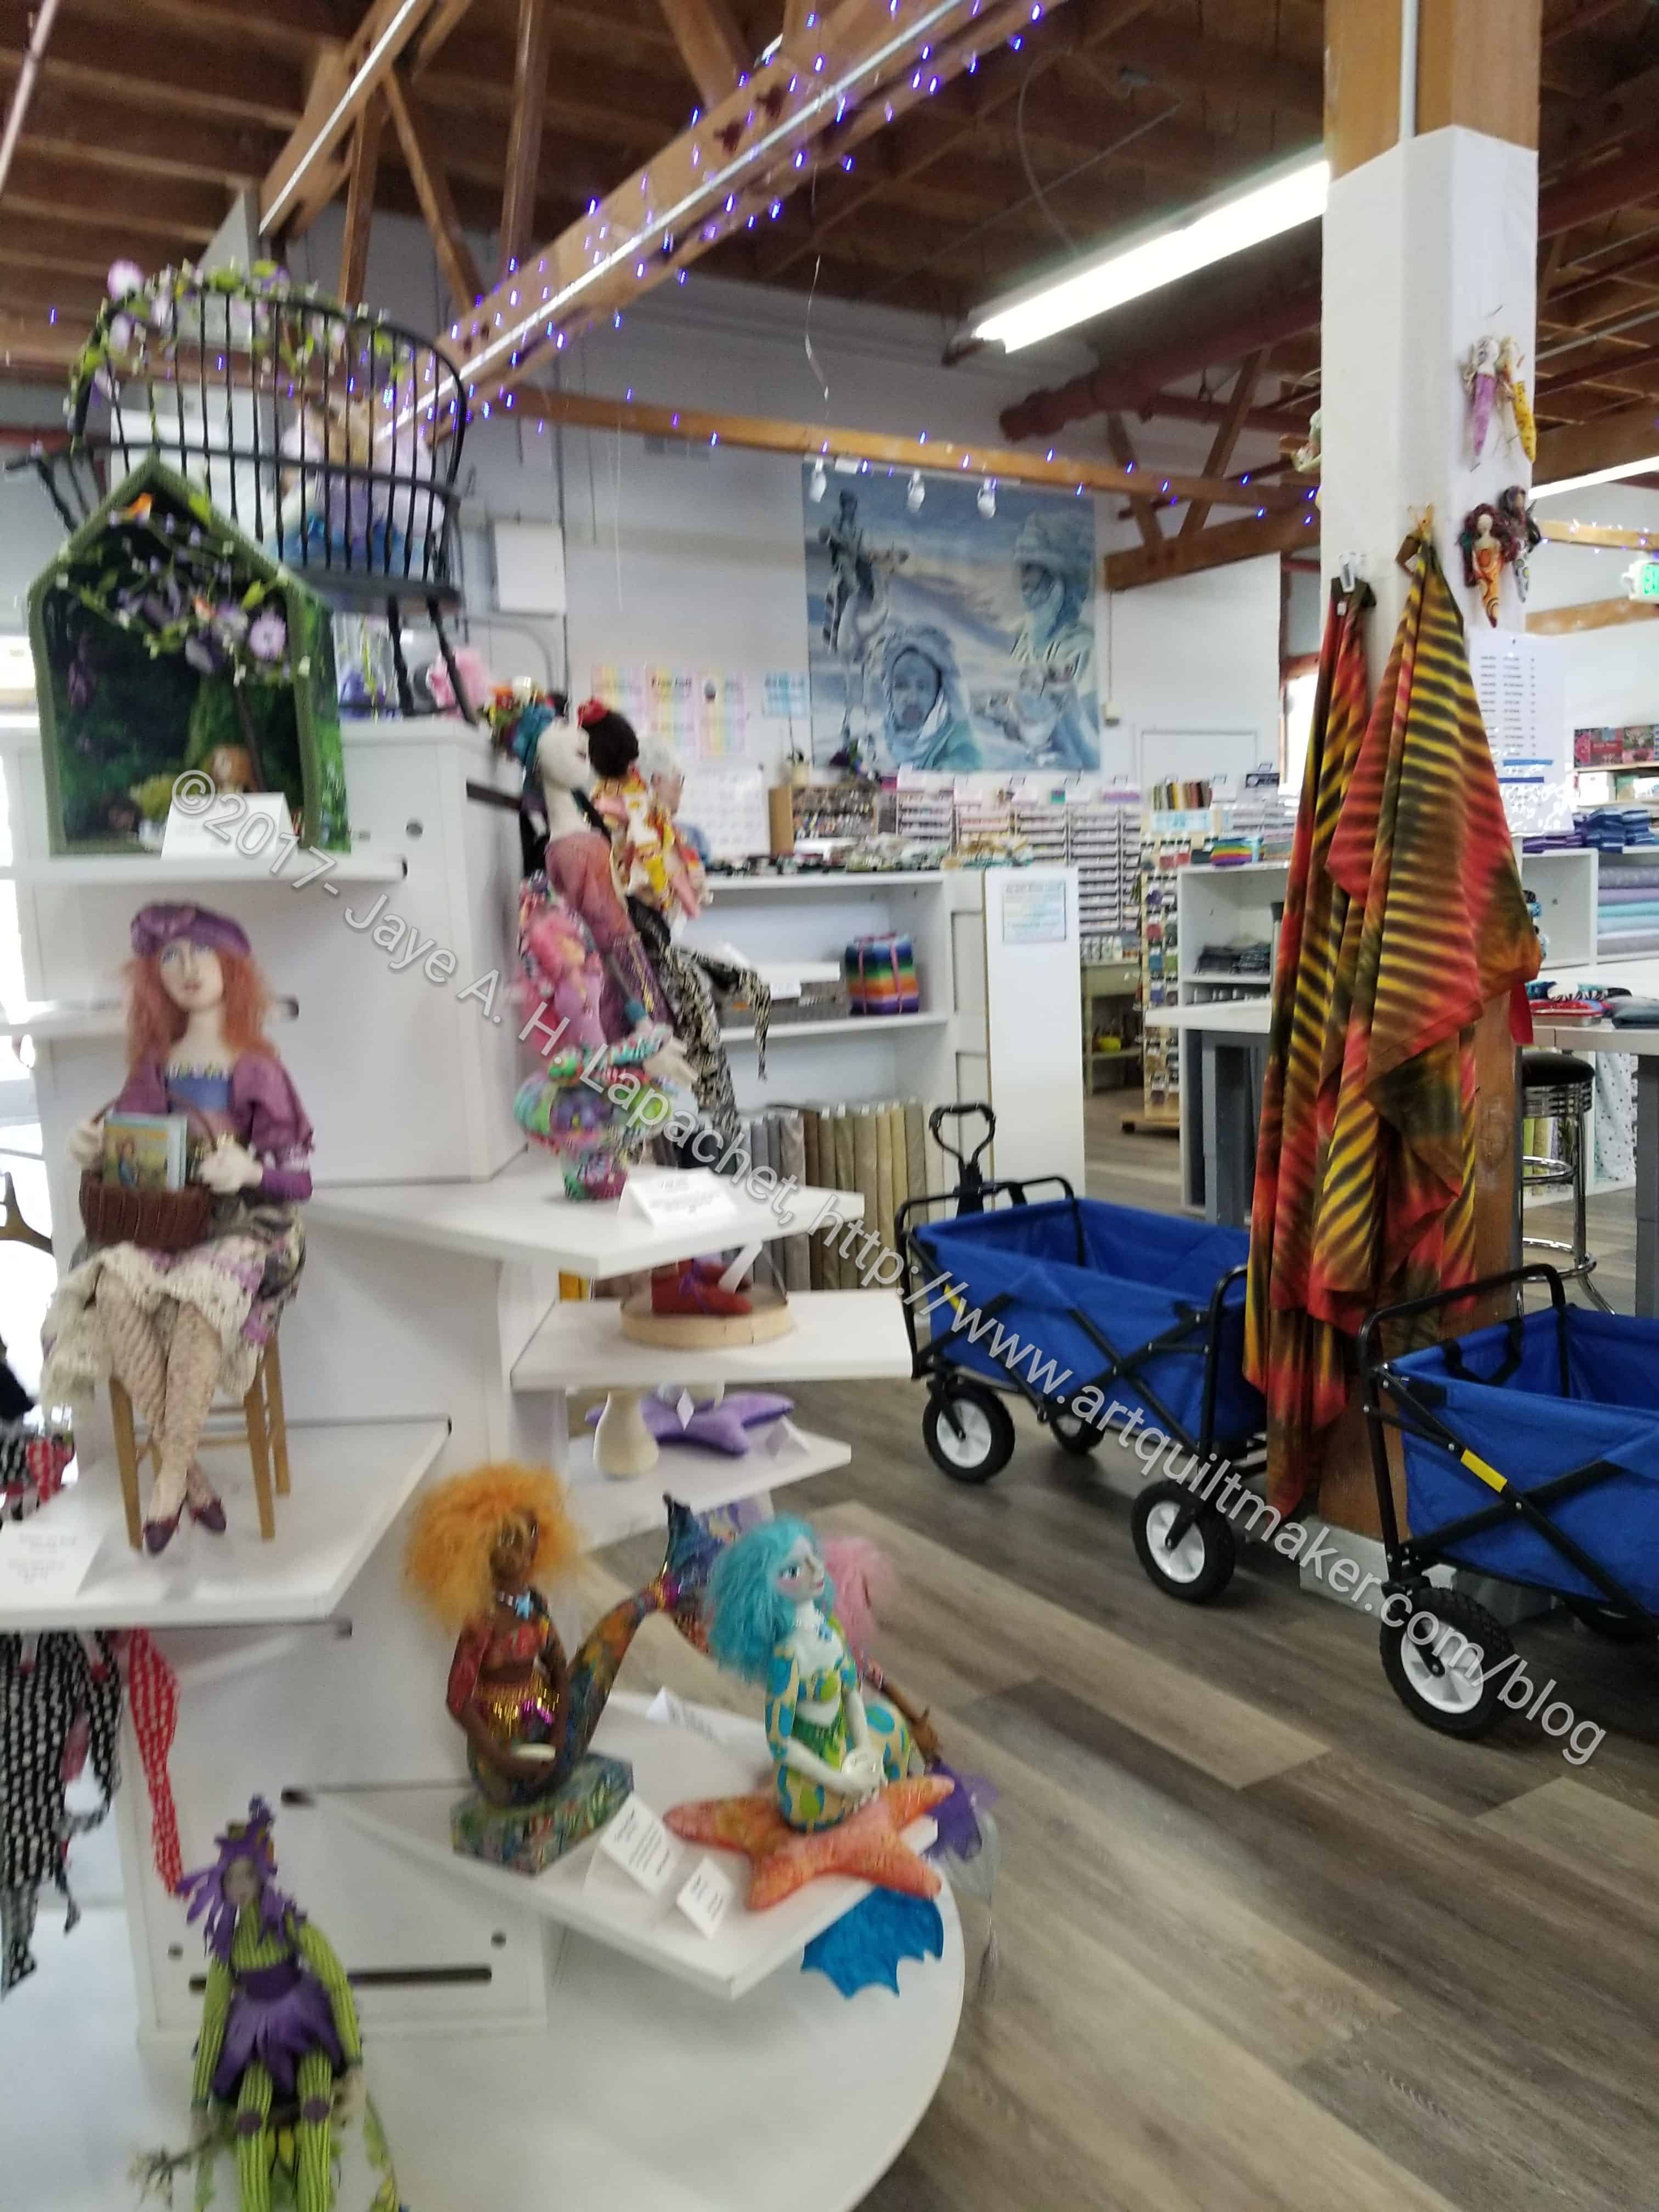
I went with my mom on our monthly lunch date to Bay Quilts the other day. It is a new quilt shop in El Cerrito. I have been wanting to go there for awhile and this visit was the first chance I had gotten. I was really pleased that Mom didn’t mind driving all the way over there. We always have fun together. I love this shop! This is a really great shop.
They have a fabric shop, but also a workshop loft and art gallery. This shop is owned by Sally Davey, the woman who used to own New Pieces. There are similarities in the look, but also distinct differences.
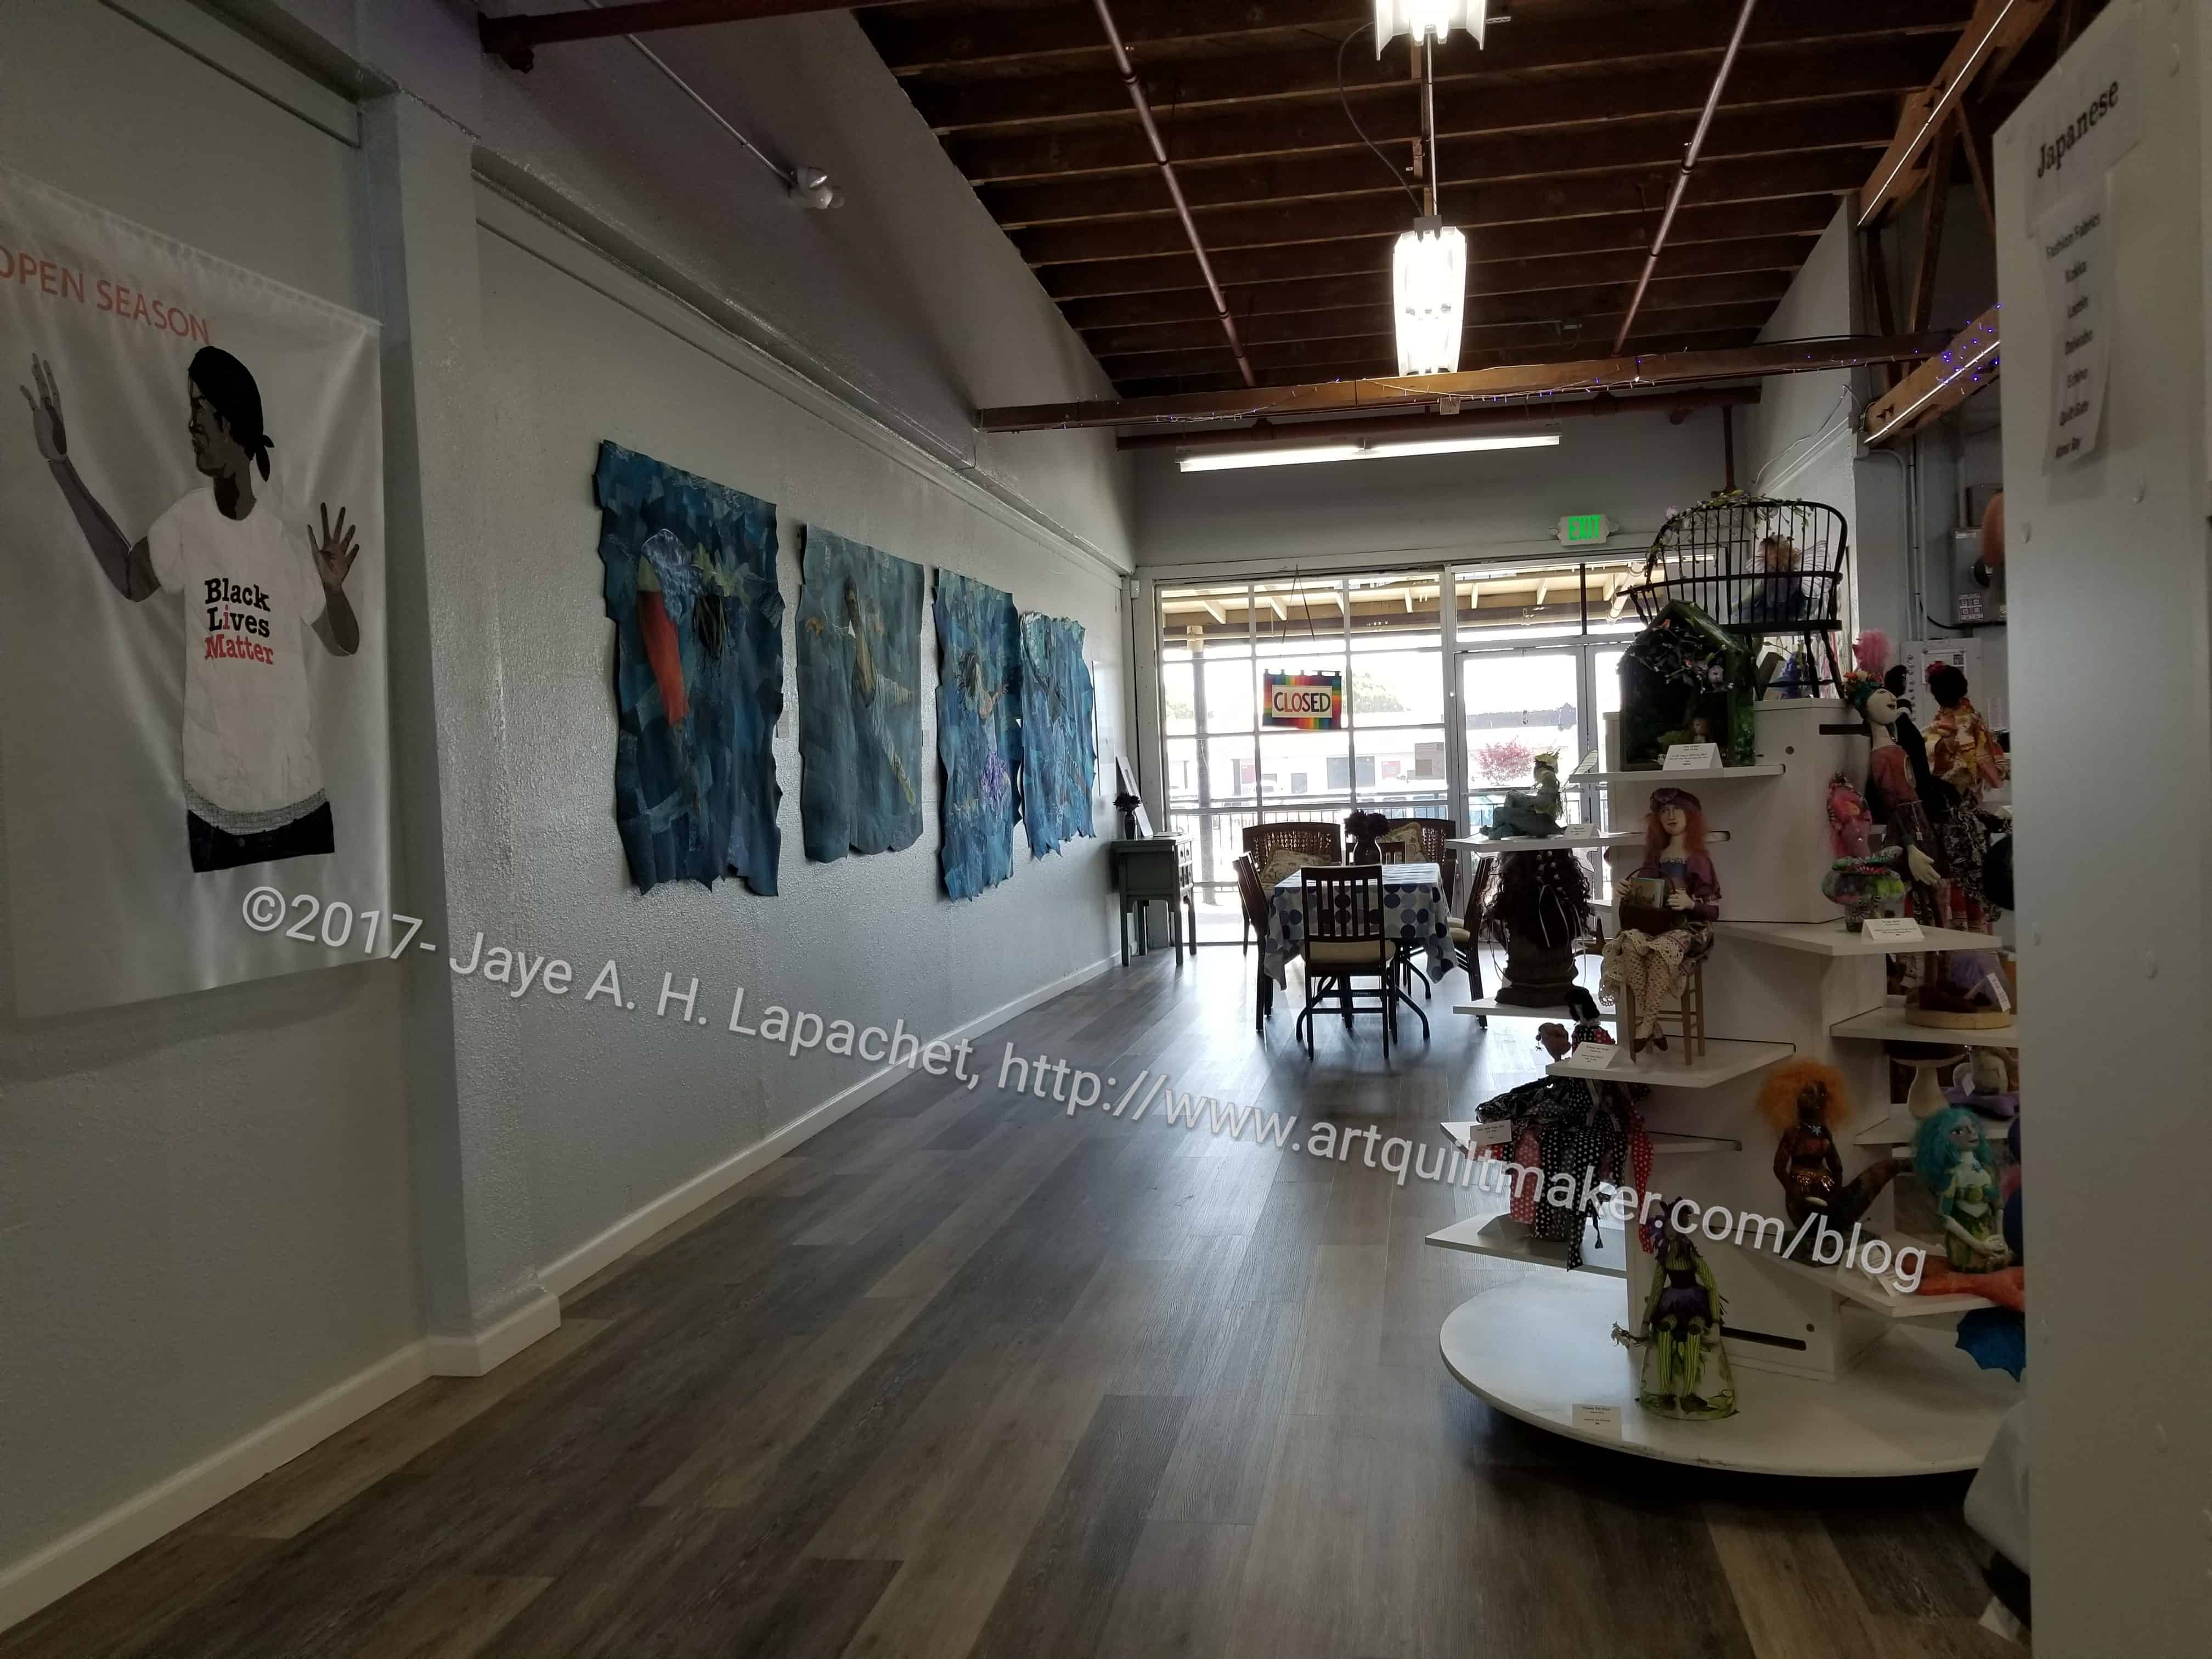
Bay Quilts – large, open space
The space is large and open. The ceiling is high and customers can see into the loft above. The displays are really great – fresh, new and not quilt-like at all. One display was a Wonder Woman dress made from a Simplicity pattern. I wanted to modify it into an apron. It was a great idea.
The thing that made me really laugh was the wagons. They will loan customers wagons to pull around the shop and fill up. I love this. I think it is dangerous to not have to carry 10 bolts around the shop, but I also think it is a great idea.
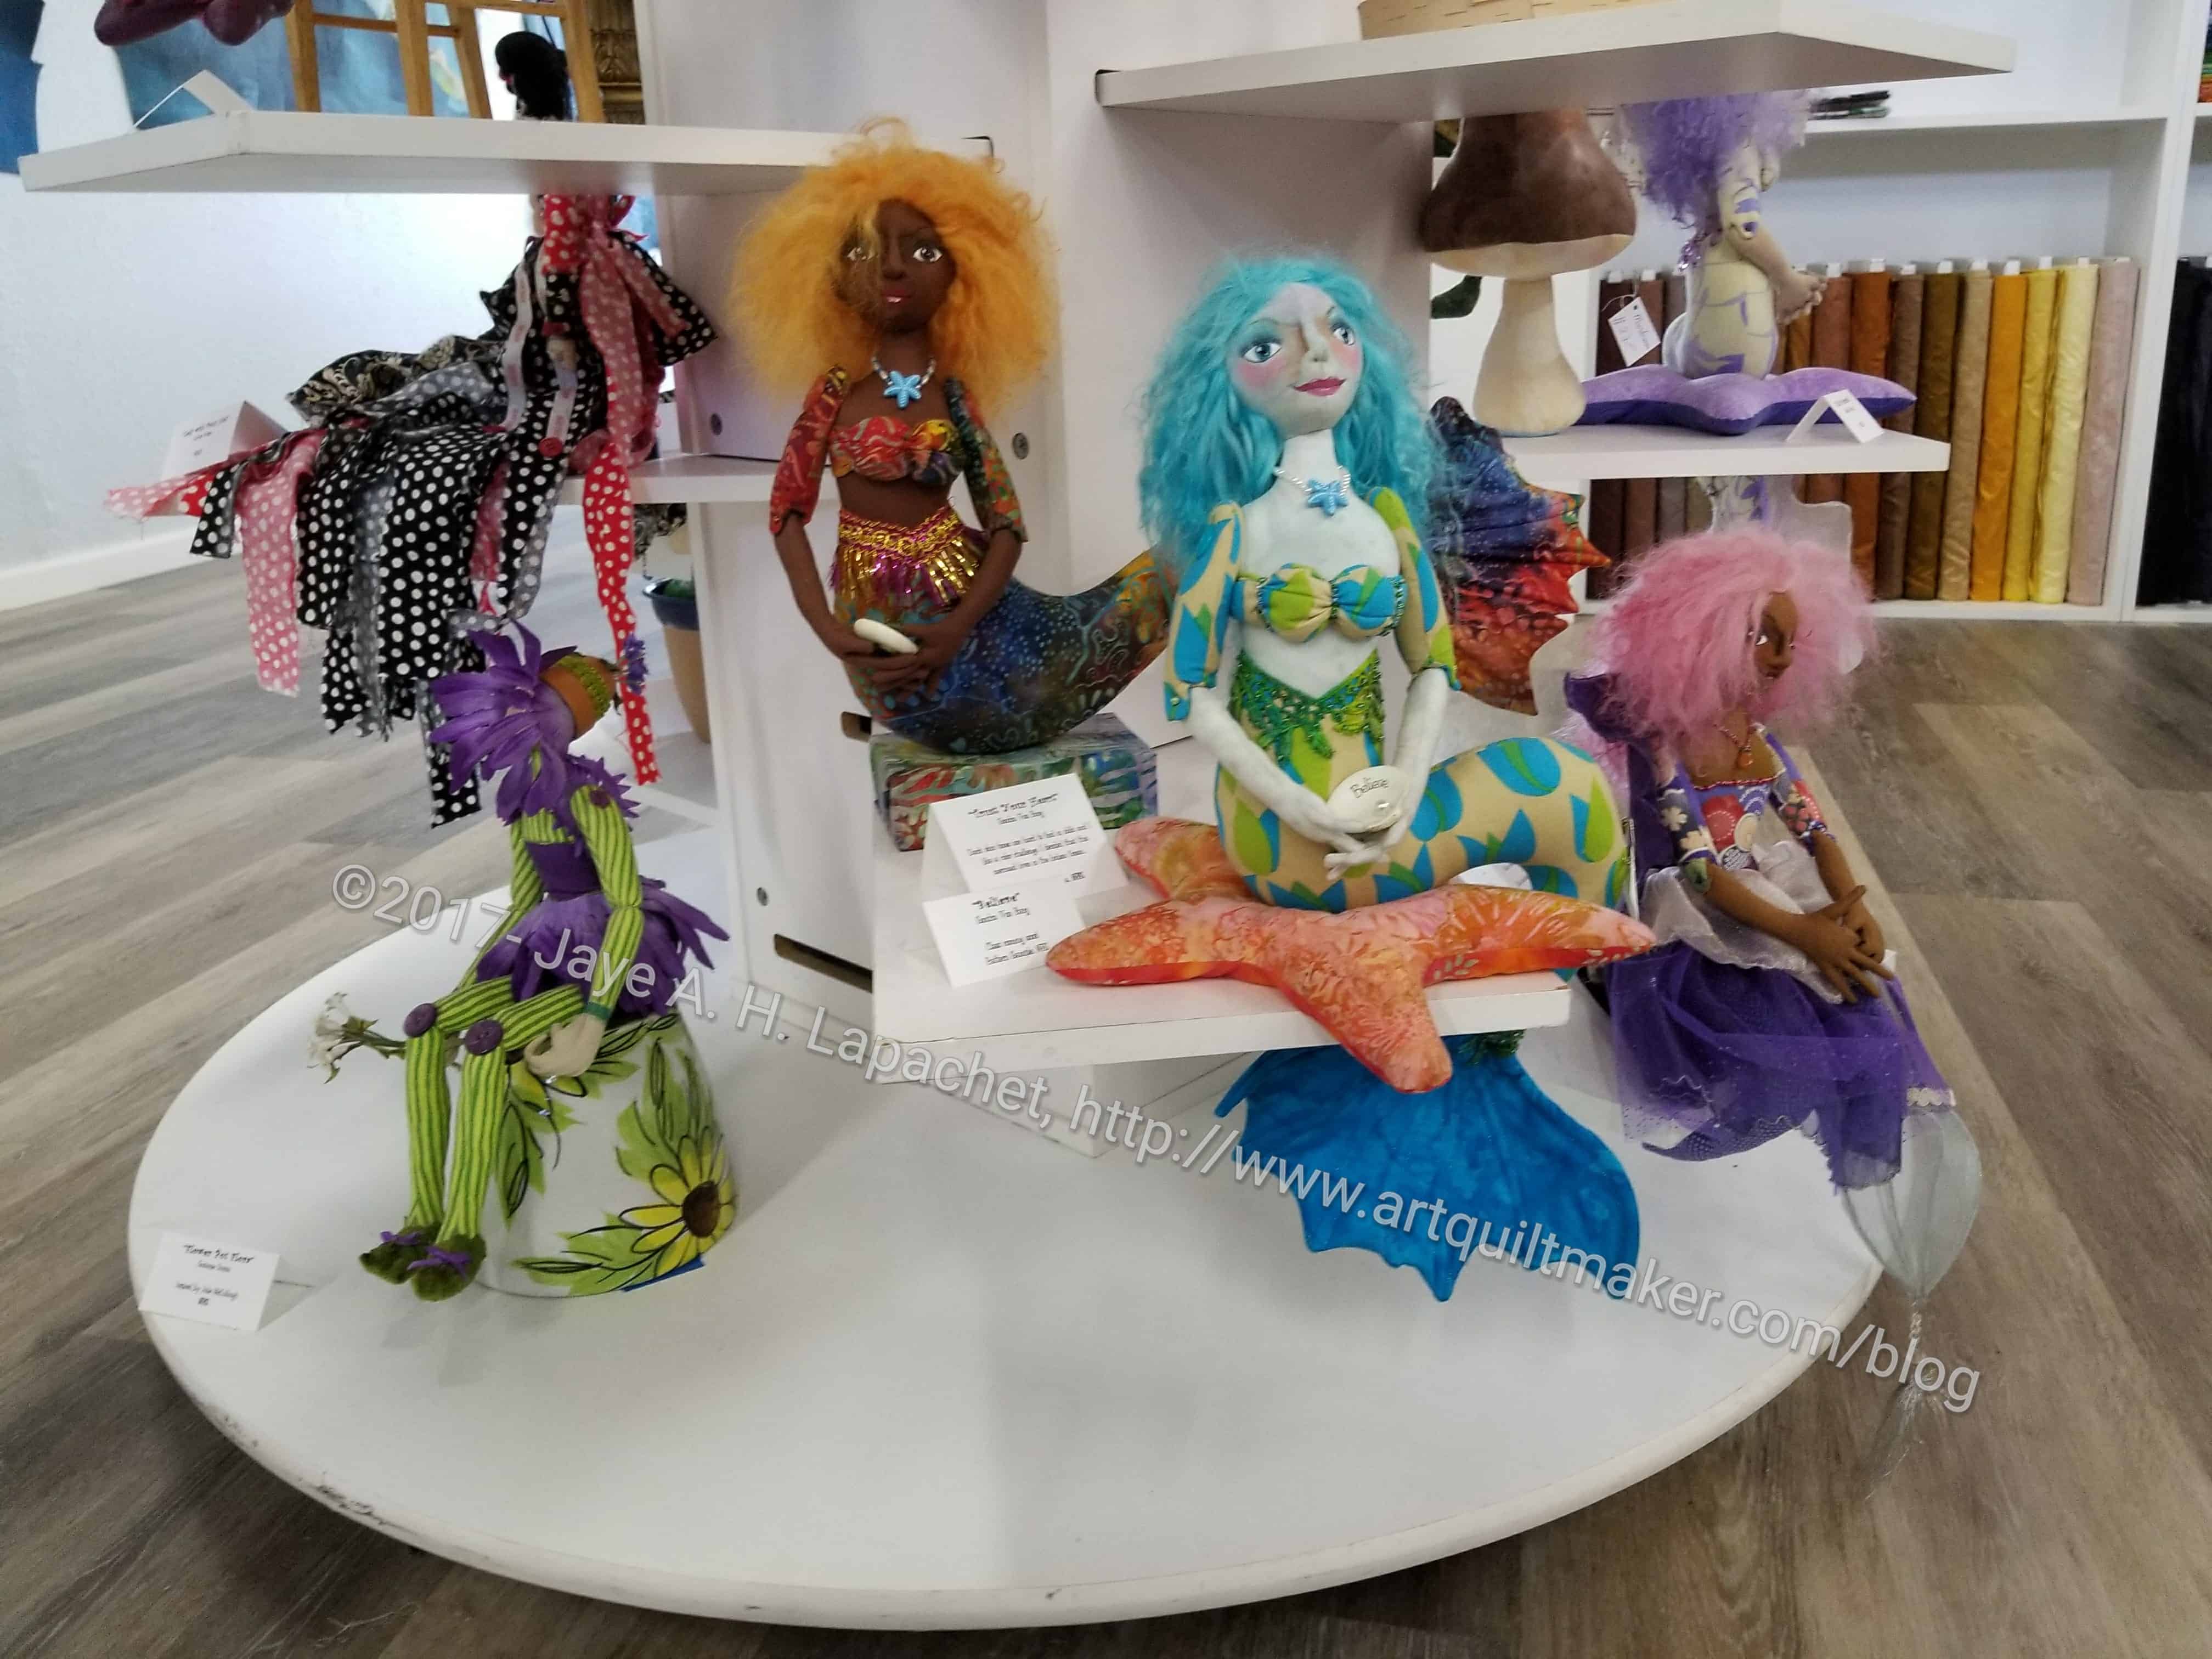
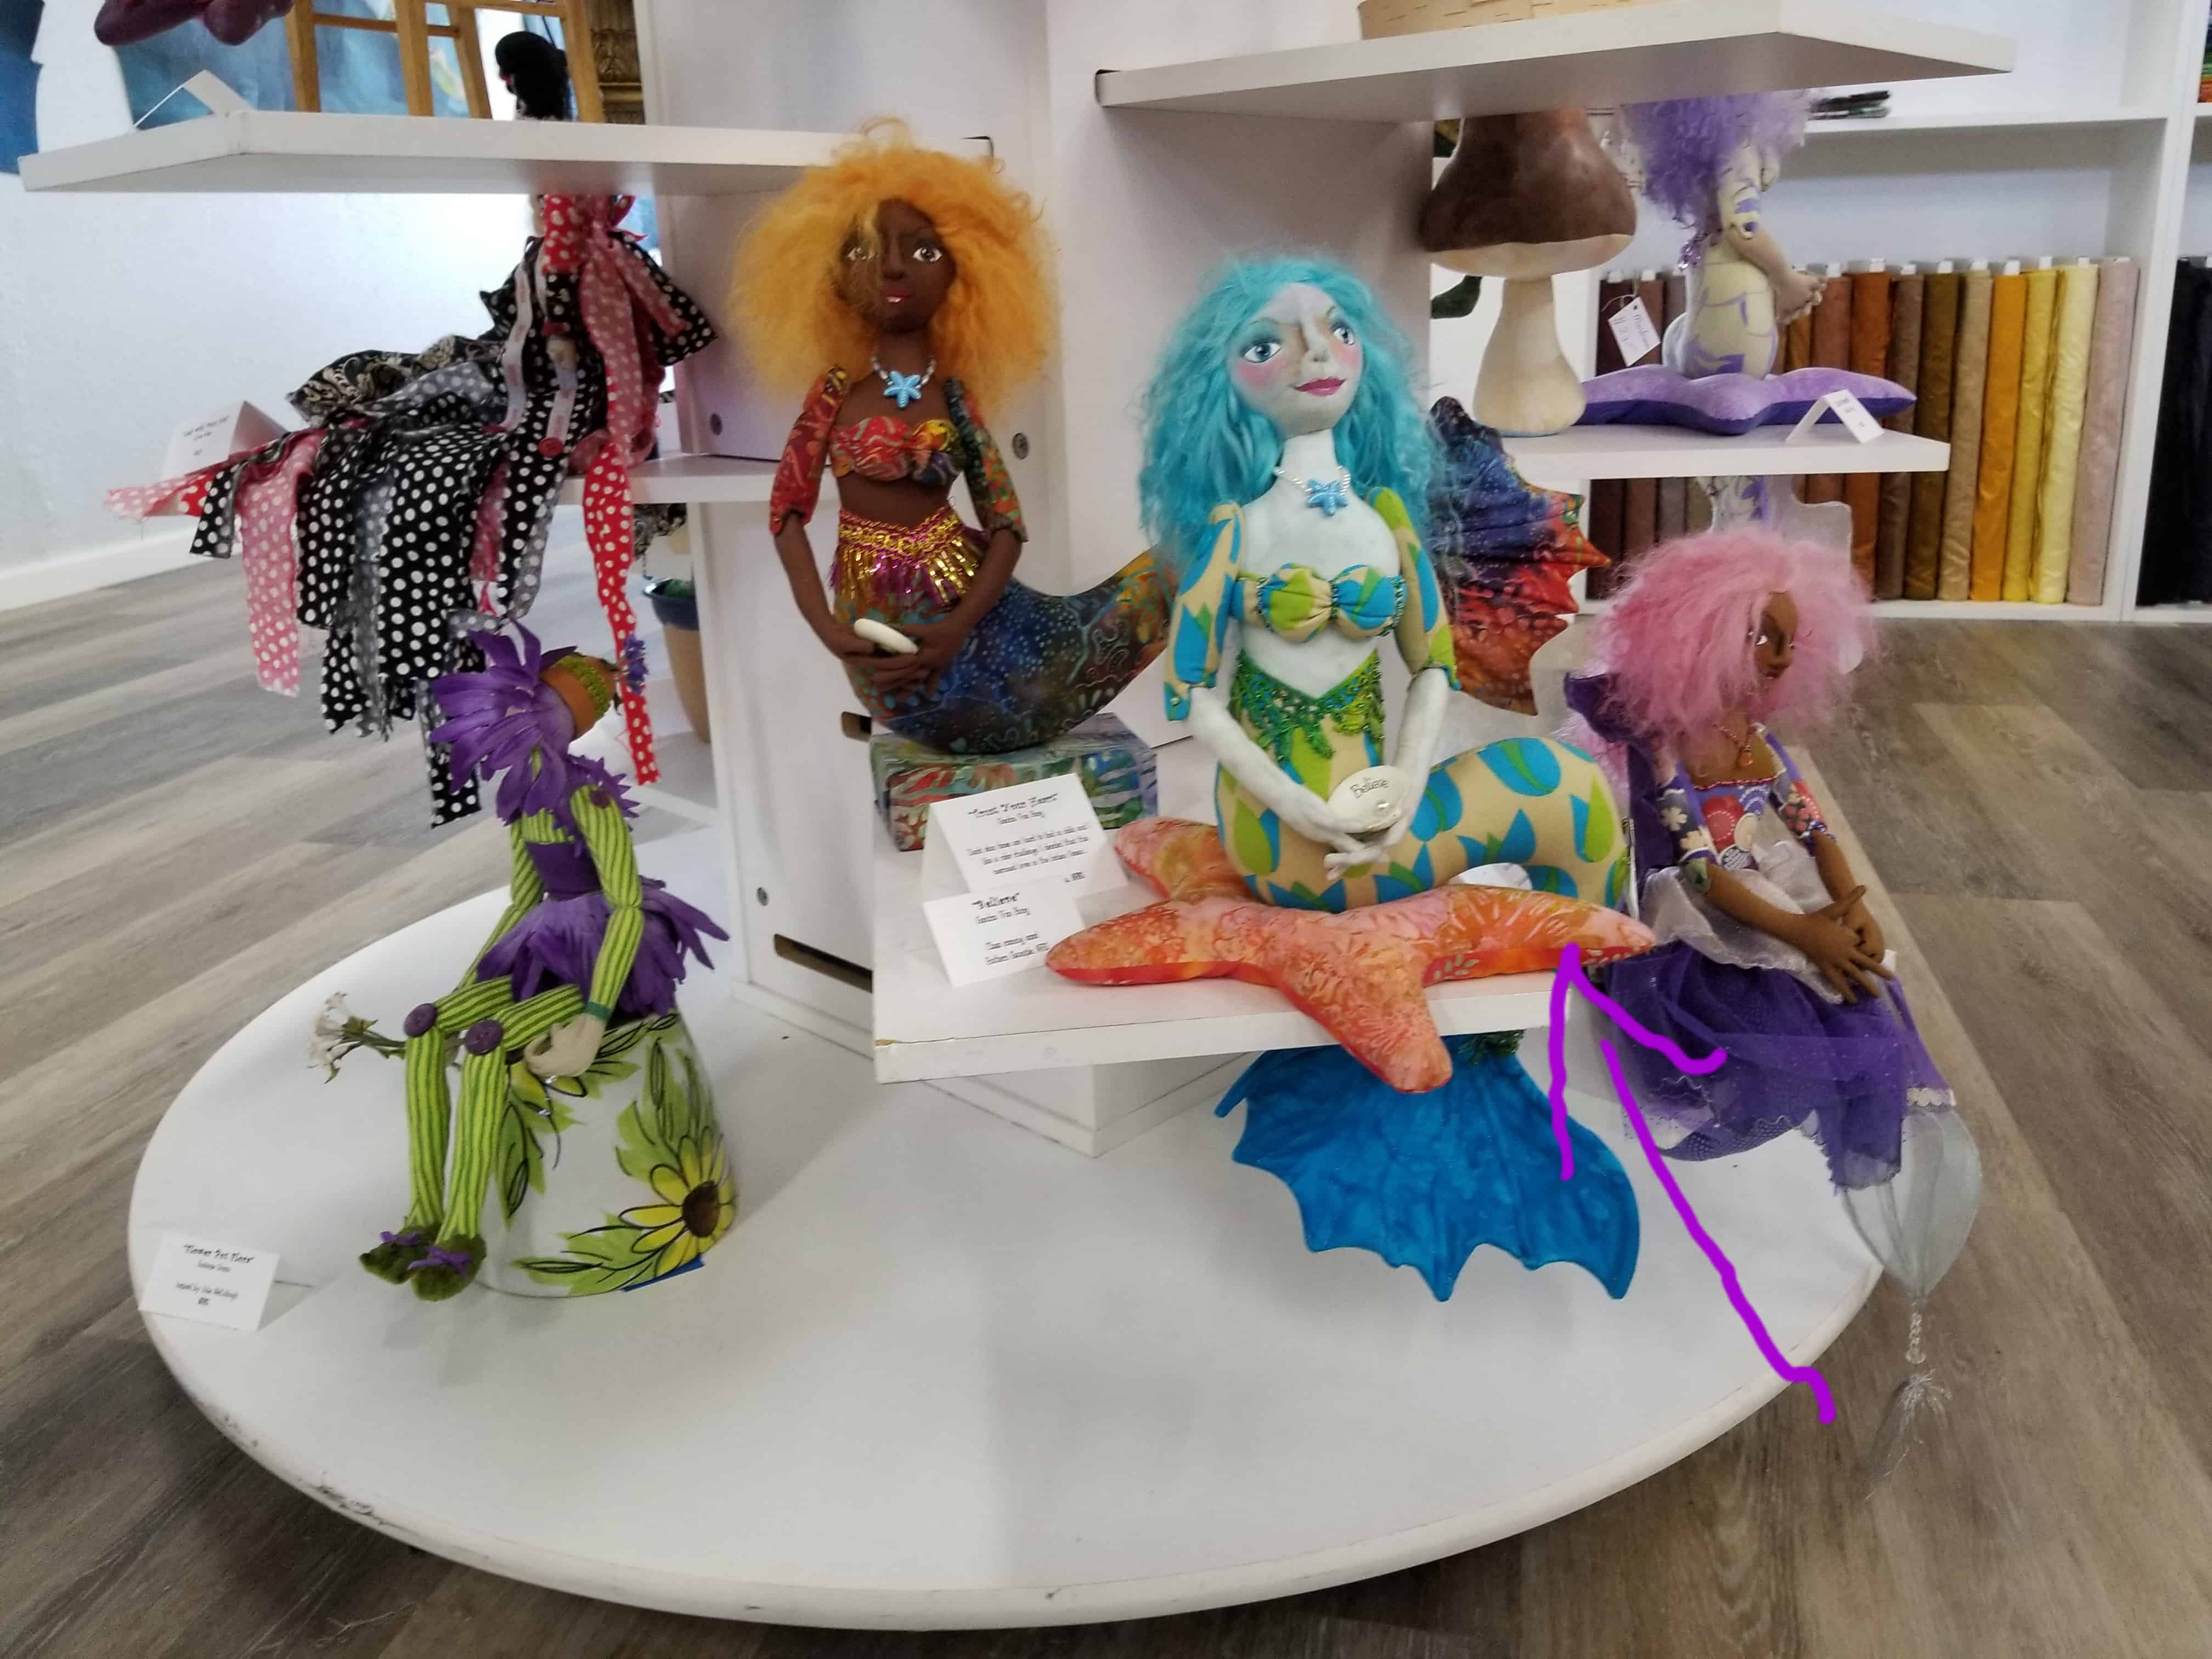
Bay Quilts – art dolls
There were two gallery areas set up. One was a wall area with quilts hanging and the other was a rounder with art dolls displayed. They were whimsical and detailed and gorgeous.
Bay Quilts – mermaid tail
I really liked all of the dolls, but the mermaid was a special favorite. I might just be another girl in on the mermaid craze, but I really like that tail. Look at the curve in that tail!
If you have never made a doll, you will have no idea how hard it is to achieve. When I made Red and Coral for my niece I thought the straight legs and arms were difficult enough. I have a lot of respect for this artist.
Bay Quilts – art quilts
The quilt gallery show was interesting as well. The quilts reflected some of the political news phenomena happening: Black Lives Matter, 45, terrorism and other things we all dislike seeing on the news right now.
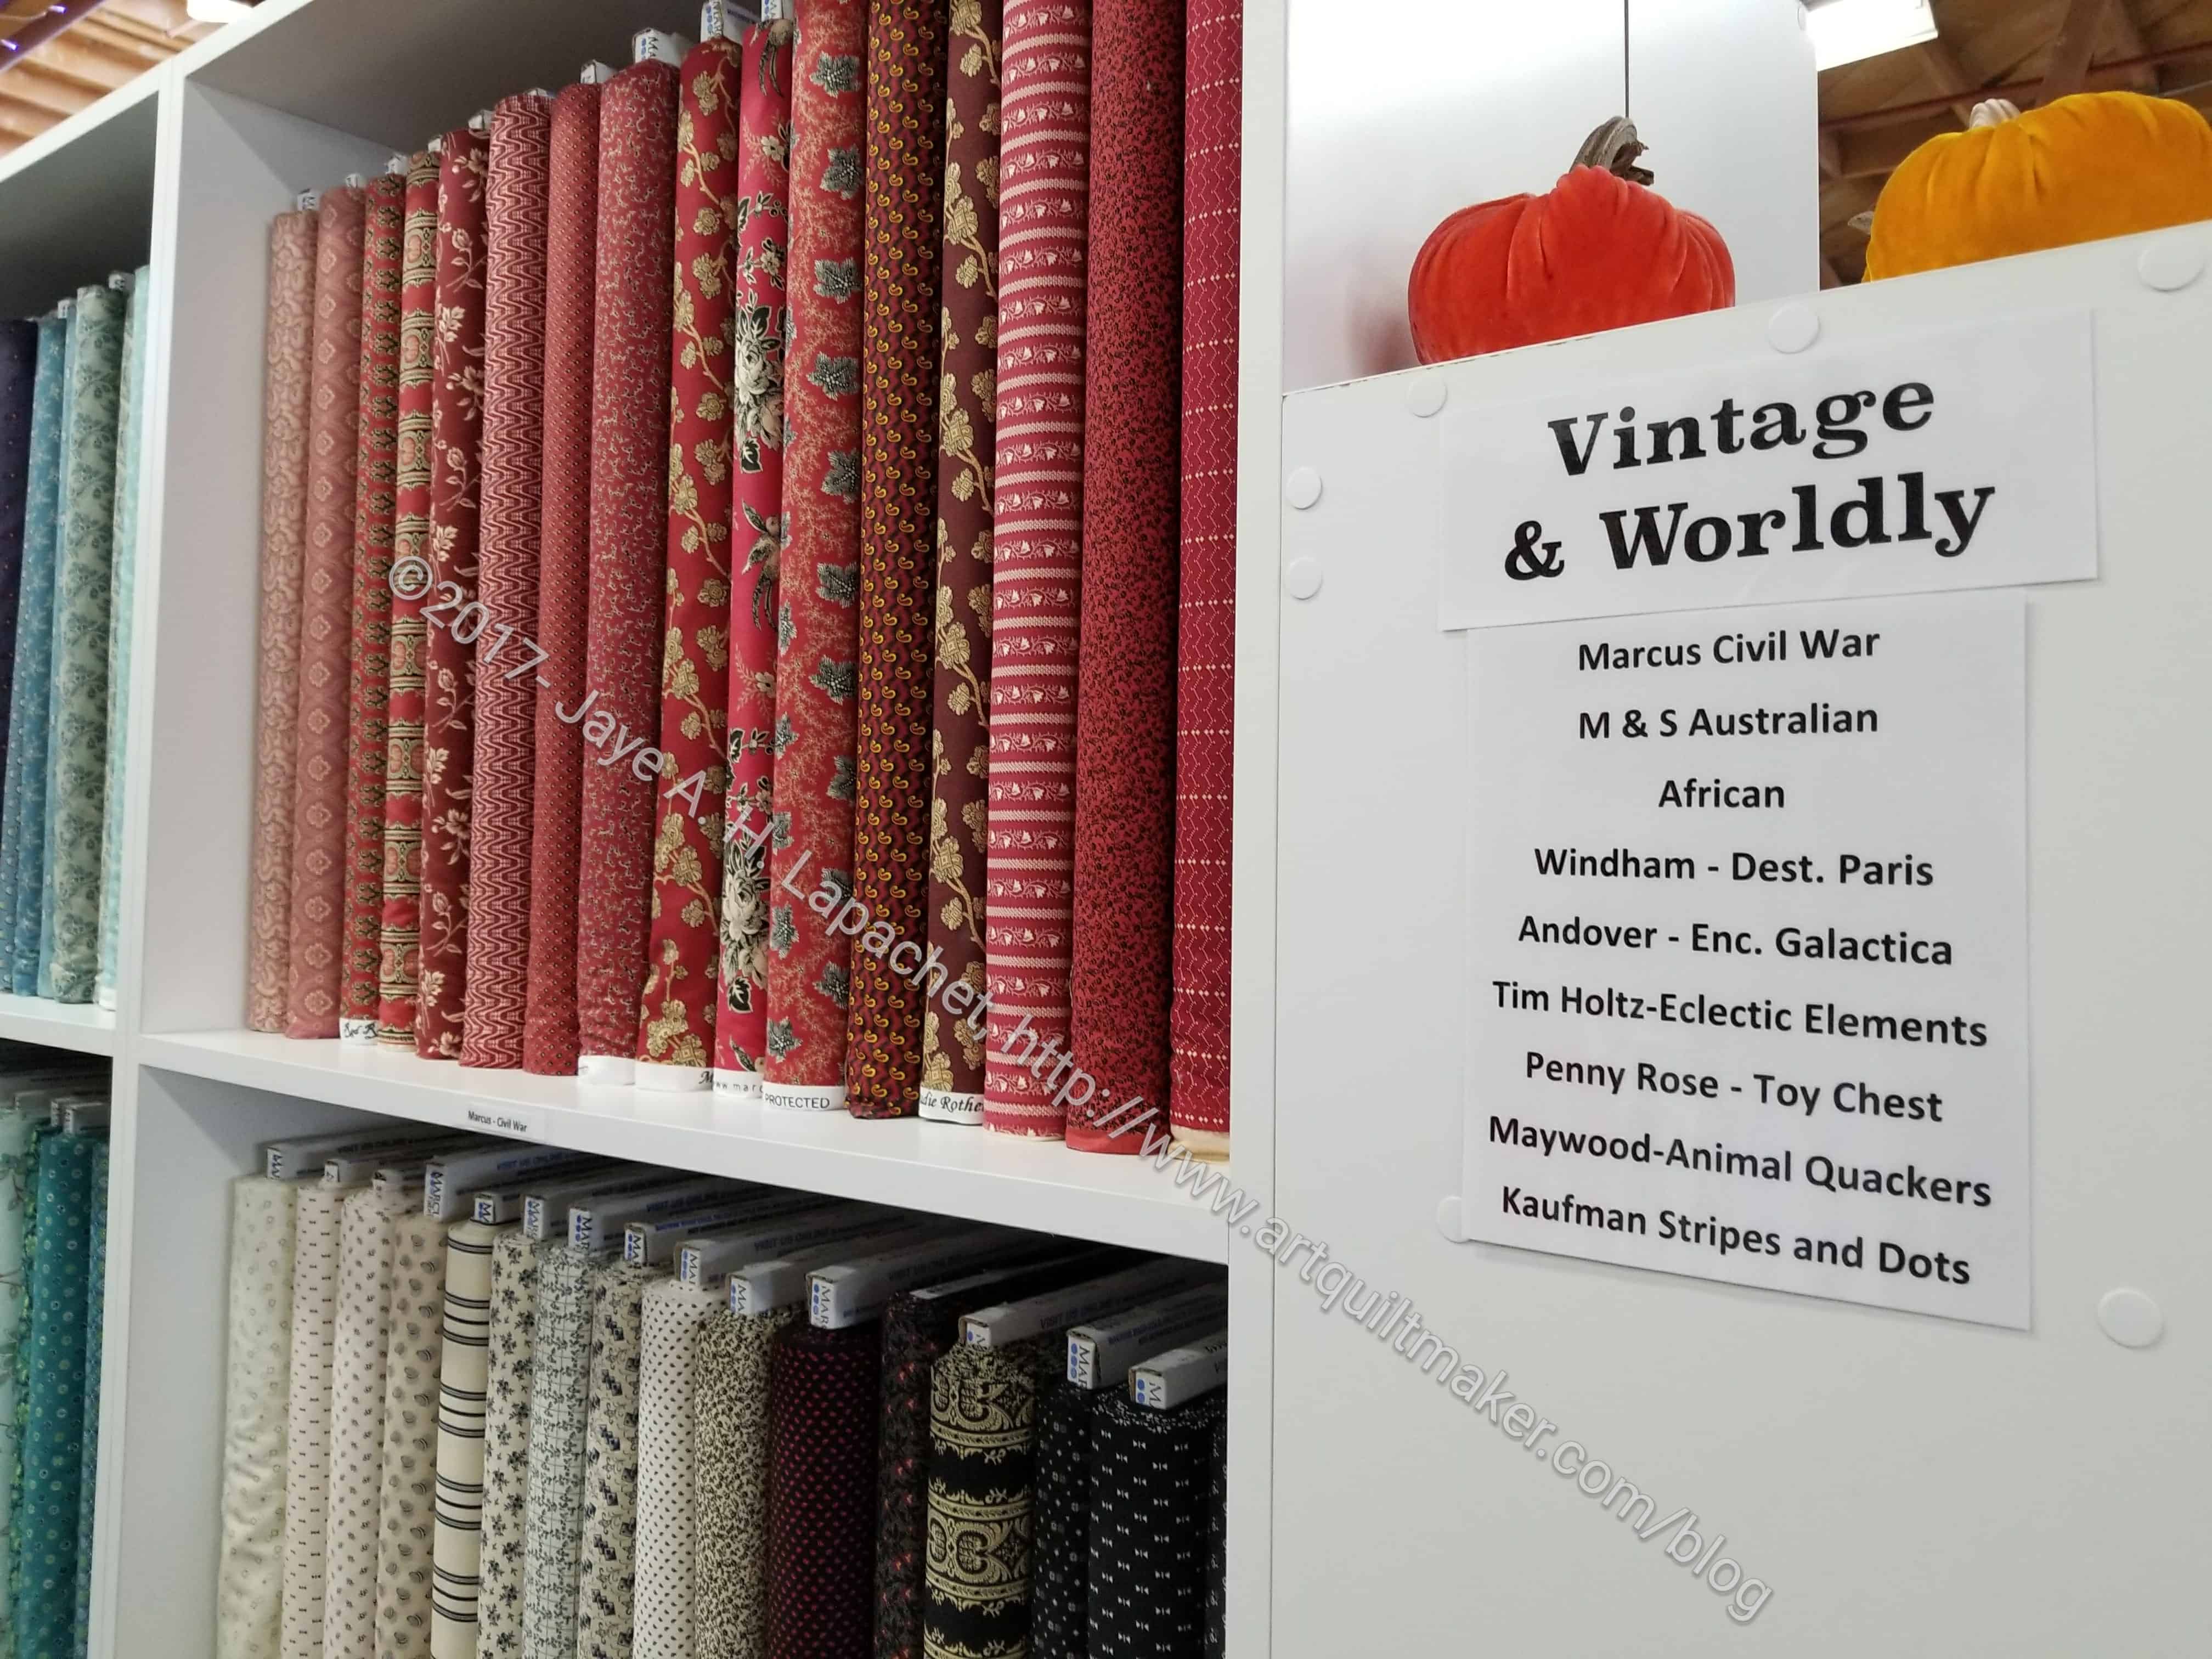
The best part of the whole shop was the fabric. Hands down, no question. I loved the fabric. I saw fabric that I have not seen anywhere else. some of it I had heard about and some not. they had a good selection of super hero, Star Trek and Star Wars. I also saw the new Anna Maria Horner and a huge selection of Japanese fabric. The best of all was the huge, HUGE selection of Philip Jacobs prints. Yes, I bought some for another tunic or two.
Bay Quilts – signage
I did like the way they described what was on each aisle as well. For example, there was a section of reproduction prints. The group looked really out of place IMO with all the other fabrics, but I know the owner is marketing to all segments – something for everyone. I thought ‘Vintage & Worldly’ was a great way to describe this aisle.
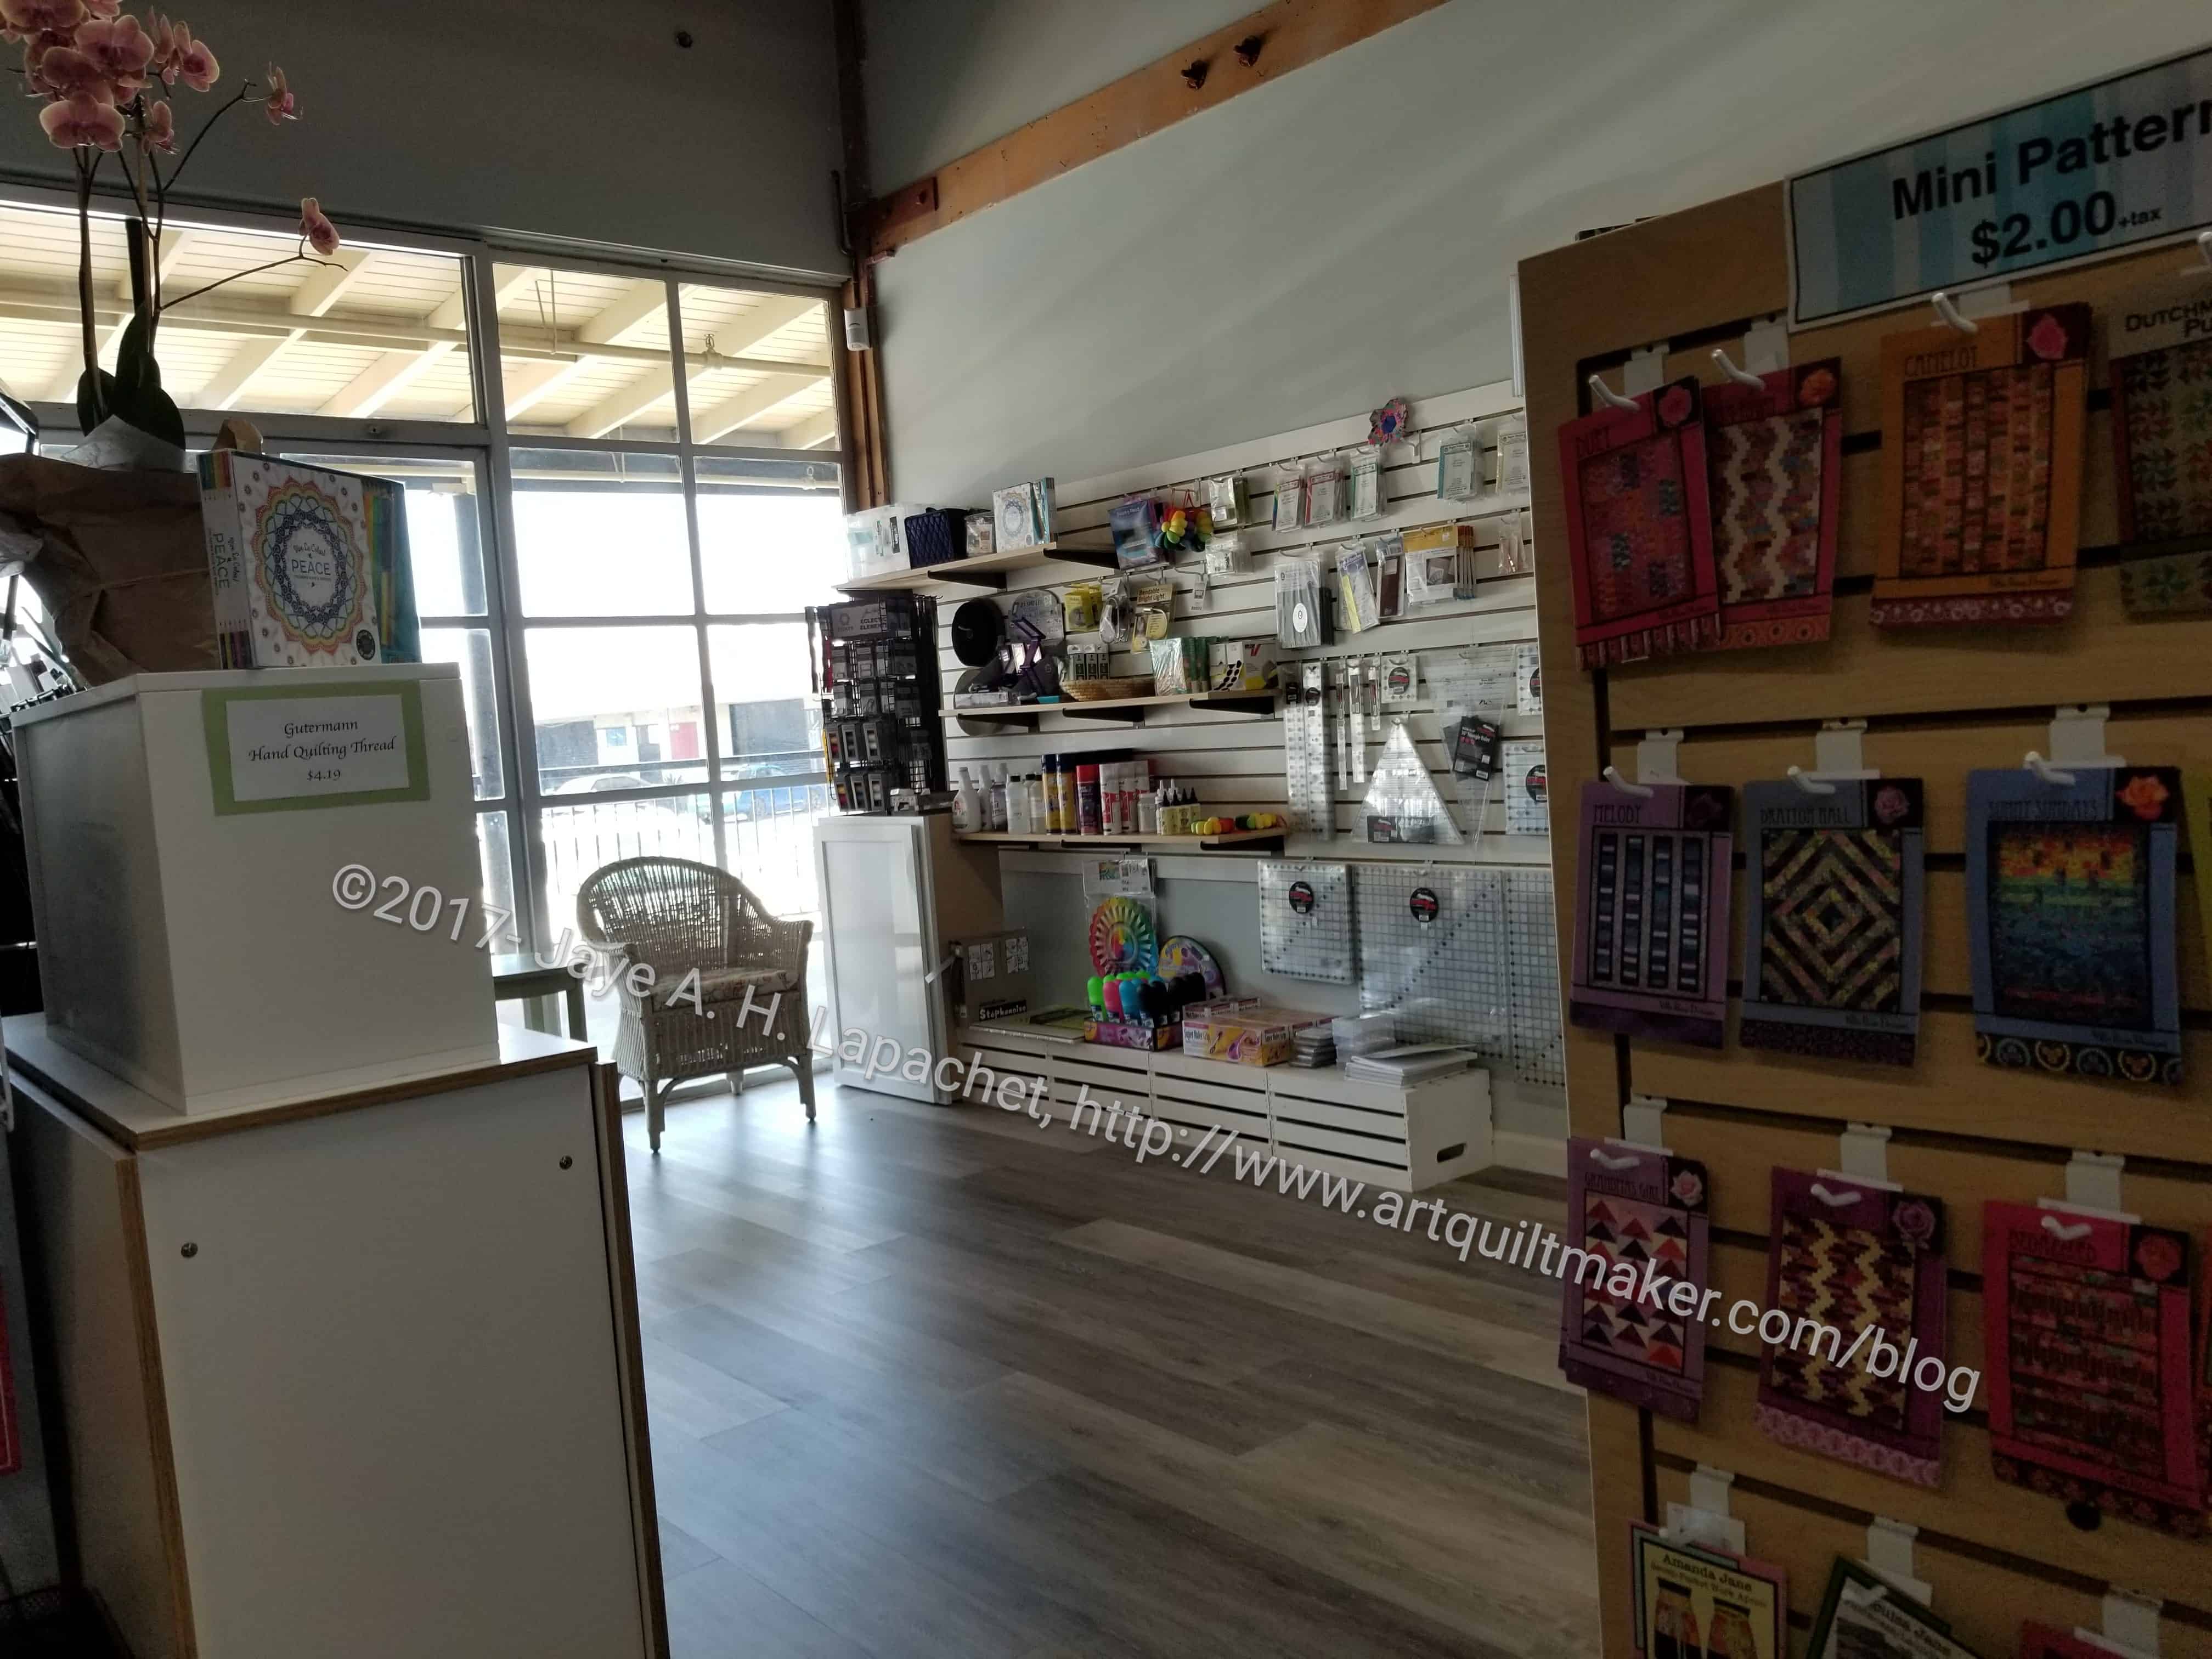
Bay Quilts – notions wall
Clearly, the owner has thought about the business a lot. This is not just your stereotypical quilt store. There were a carefully selected group of notions, not just the same old Dritz items that quilt stores can get from distributors.
She has a lot of books, which I know is a hard path to travel with Amazon being so easy. The shop offers discounts on purchases, which is an incentive since you can have the book right then, even if you could get it in 2 days for cheaper from Amazon. Buy local!
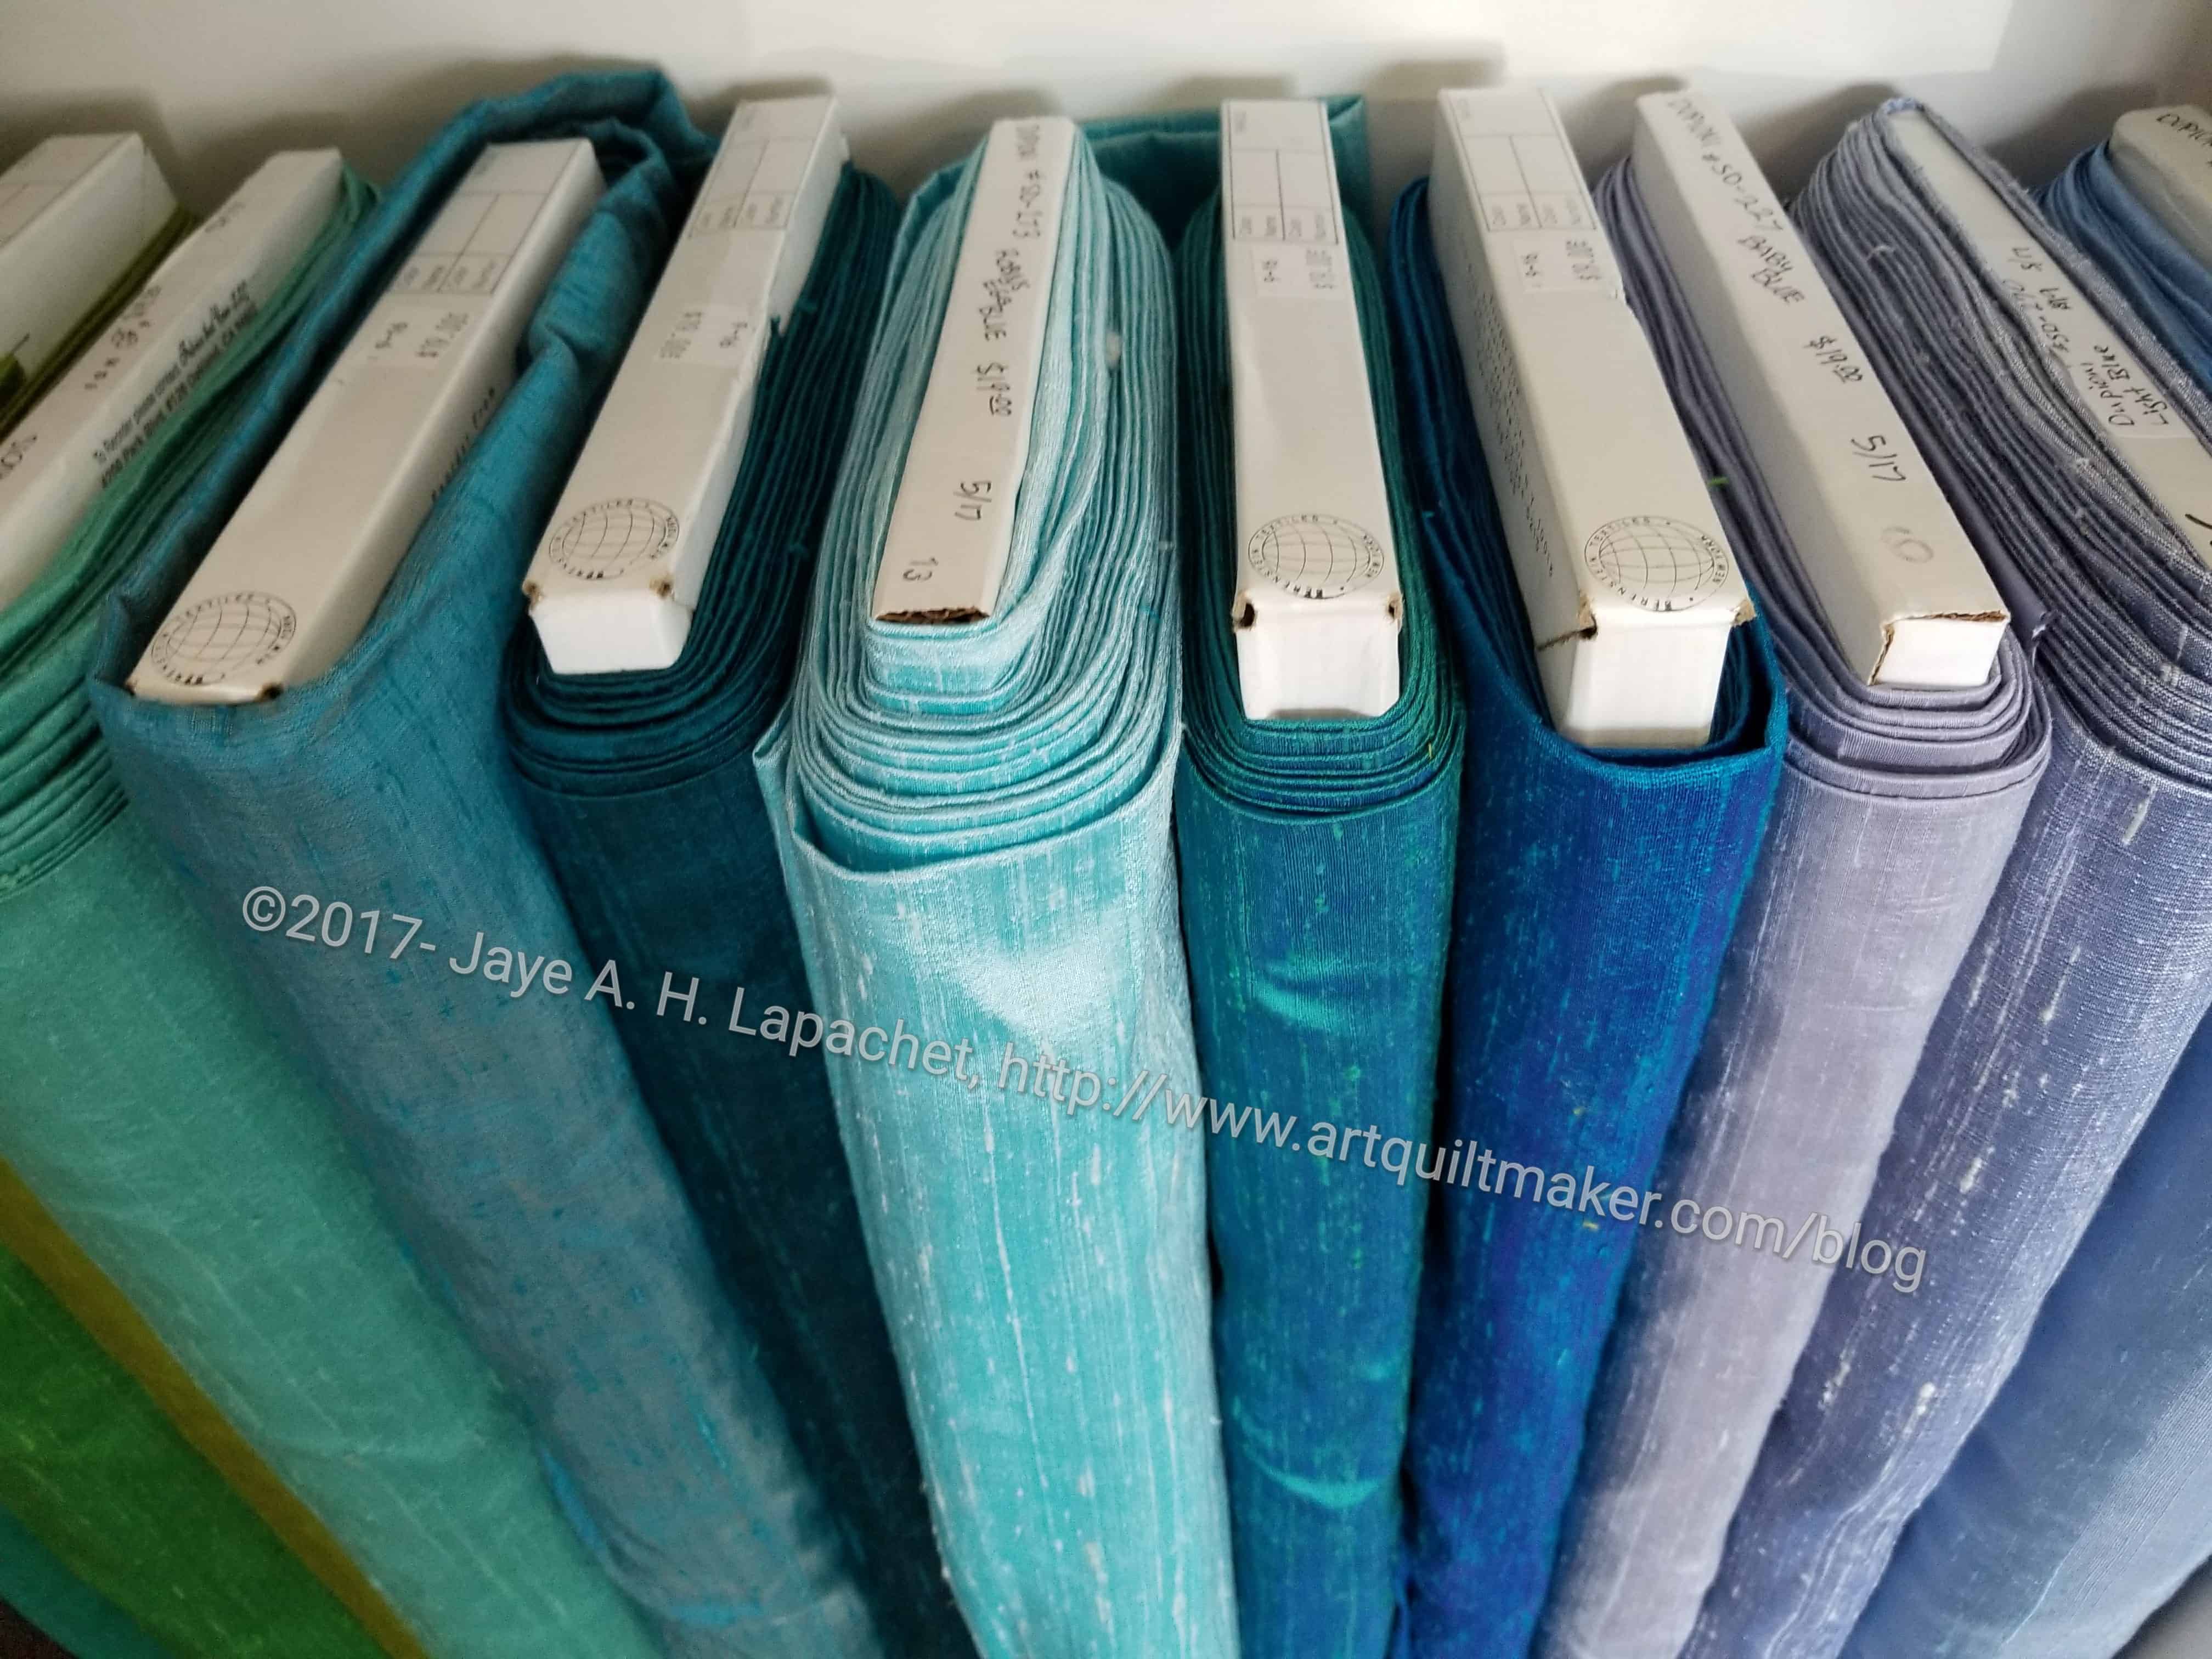
Bay Quilts – silks
There were a wide range of 108″ backs, different substrates and some absolutely luscious silks. If I had seen these a few months ago, I would have had more than my little black dress to choose from for NSGW events.
I bought a small pack of them just to have some of the colors. If I have ever make that silk quilt I planned, I will use them.
Bay Quilts – quilts for sale
The shop also has quilts for sale! That is something I have never seen in the quantities at Bay Quilts. There was a lot of beautiful work at reasonable prices. If you need a gift, this is your savior.
Go visit!
Bay Quilts
5327 Jacuzzi St, Ste 3-C
Richmond, CA 94804
Tel: (510) 558-0218
I bought this book at Back Porch Fabrics in Pacific Grove, California back in November when Friend Julie, Mom and I did our mini-shop hop. The publisher should pay Gail at Back Porch Quilts to sell this book, because I would never have bought it without her enthusiastic sales pitch. After watching her do a brief demo, I was convinced that this book would solve all of my quilting problems. I think I probably need to take a class from Gail with regard to this book, because my efforts did not go as well or as easily as advertised.
The book starts out with a Table of Contents that tells the reader the book has 30+ pages of instructions and 13 projects. The cover advertises an additional 25 bonus ideas.
Jera Brandvig uses the Introduction to give the advantages of QAYG (pg.7), but also to bash “traditional quilting.”(pg.6). She talks about what a hassle it is cut precision pieces. It gives some idea on why the author started using this technique. She calls Quilt-As-You-Go (QAYG) a “…fresh, fun and simpler-than-it sounds technique.” (pg.5). There is nothing about where she heard about it. There is a perfect place between the first and second paragraphs where she could tell us, but that information is obviously missing. Even though I know better, I was left with the impression that Brandvig herself thought up the technique.
The book has a list of supplies, (pg.9-11) which includes some tips such as ‘If you do have to stash your mat when it’s not in use, be sure to keep it flat against the wall – or under your bed – so it doesn’t develop wobbles.” (pg.9). Aside from the word ‘wobbles’, this statement is one that makes this a beginner friendly book. It goes a step further by including such useful charts as “Planning Your Quilt Size” (pg.14) and “Not Sure How Much Batting Yardage to Buy”(pg.15).
The chapter called “Quilt As You Go Technique” (pg.17) starts the how-to section. The first block exercise has the reader making a log cabin style block and quilting each fabric after it is added (pg.18-19). There is no mention of backing and it becomes clear later (pg.20) that backing isn’t used at this stage. The author also give guidelines that include a very obvious ‘don’t’ (pg.21).
Jera Brandvig gives some alternatives for quilting the blocks (pg.24-25) if the reader did not quilt each patch as described in the log cabin example (pg.18-21).
We finally get to the assembly of the blocks, which is the part that gave me fits (pg.28-) when I was doing this technique on my own. Brandvig details the two ways in which the blocks can be assembled (pg.28-31). The first method, sewing the blocks together directly, is the one I thought would be easiest. I don’t like the method using joining strips (pg.29), though it does have it uses.
Ms. Brandvig expands the options by including a section on mixing in “traditional” block patterns with QAYG methods (pg.32-35). She explains an additional four different methods. This is one of the expansions that make this an interesting book. She doesn’t just stick to a couple of methods. She thinks beyond the basics.
I wondered, after reading the how-to section, whether it was really possible to provide a quilt pattern. The author says at the beginning of the project sections that it is difficult to have precise patterns, a statement which I applaud. She tries to alleviate any perceived problems this might cause by giving the finished quilt size, the finished block size and the trimmed block size (example pg.38). The author refers frequently to the how-to section in each of the project directions rather than repeating information. She includes page numbers, which makes it easier to flip back and forth. The patterns are on the long side compared with other books with the same sort of designs. They include a lot of photos and some variations! Yay!
Most of the patterns use variations on strip quiltmaking. I like the colors and style of Rainy Days (pg.44-47). Emerald City makes stars (pg.85) and has lozenge variation (pg.84). Some of the layouts such as Cascade Range (pg.91), are clever and relieve the monotony of the strips. Portage Bay (pg.92-95) is built on one huge piece of batting, which could turn into a quick baby quilt. Once you are done piecing, there are no blocks to put together. With some more quilting, you have a quilt top.
Techniques for finishing the quilts come at the end of the book (pg.102-109). This is where I had the most trouble with my project and felt the most resentful about the technique. Regardless of any advertisement, the quilt still needs a backing and the backing needs to be held on with quilting. Jera says “You work with small and manageable pieces, which means you can quilt more intricately without the physical strain and frustration of feeding a large quilt sandwich through a sewing machine”(pg.7). While most of the projects are on the baby-kid quilt size, the author does provide information about making larger quilts (pg.14). There seems to be a disconnect between the beginning and the end of the book.
In the section on finishing (pg.102-109) it is confirmed that we still have to baste the backing to the top (pg.103). The advantage presented is that the reader will need far fewer pins (pg.103). Brandvig writes that the quilt will only need minimal quilting since the blocks are already quilted. My experience, however, was that I had to add more quilting than I expected because of sagging/bagging fabric. The book shows a picture of the minimal quilting suggested (pg.103) and I don’t think it is enough. YMMV.
The book also includes comprehensive instructions on binding (pg.106-109), which can be used for other projects.
Back Porch Fabrics felt the need to add a sheet of notes to the books they sold. The notes seem to reorganize information already in the book into an easier to access manner. For the method where the blocks are sewn together directly, they also suggest sewing the blocks together with a 1/2″ seam allowance. I did this and found it to be a hassle because I couldn’t use my quarter inch foot.
I was kind of annoyed at the book before I wrote this review because of my experience. I felt that it did not live up to the its promise. I also get annoyed when no mention of the historical / previous efforts in the technique are mentioned. After writing the review, I want to try QAYG again, especially for charity quilts. The Charity Girls have a hard time getting quilts quilted and I really don’t want to add to their burden. This is also a good technique for using scraps. I’ll think about using this technique with the Solstice Parade pattern (pg.38-43) as it uses strips and I have a lot of strips in my scrap drawers. I think this technique has promise and I’d really like to make it work.
I know you probably roll your eyes at the way I go on a bit about donating blocks for someone else to make donation tops. Quilts do actually get made from these blocks, which is great and you do know that I do make tops as well.
I forgot to mention the work of mine that Erin finished last month.
Retreat Donation Top quilted by Erin
You might remember the Retreat Donation top? This is truly a team effort as I took shards Maureen was giving away at the Retreat and made them into a top. Erin did a great job quilting and binding it. Two guilds, three people = truly a team effort.
Donation quilt – Erin’s finish
She also finished a top that I don’t think I made, but was made from some of the single blocks I contributed. I am pretty sure I ddin’t make the top as there is no sashing. I usually put sashing between the 16 patch blocks to give them space.
Anyway, I really appreciate Erin’s work as it is a tangible example that we are working as a team to contribute to those in need.
This chapter is about finding the original flame of your creativity. So many people I meet see one of my quilts and say something like ‘I could never do that’ or ‘I am not creative like you.’
Baloney.
What I do isn’t that special. I may get special results from my choices, but anyone can sew a straight line. Really. ANYONE. The key in this chapter is to read the text and think about it. Remember ‘images of your creative life as a child.” (pg.61).
I was fortunate that there was always plenty of opportunities at my house to be creative. We painted plaster 3D objects, we made stained glass and painted canvasses. The theme was not perfection but to make stuff and keep trying. the items I make are not always perfect, but I don’t get discouraged; I keep trying.
People I meet or know use negative self talk as the basis of their life, it seems to me. The phrase: ‘I did that terribly, which makes me a bad person’ is one of I heard in various iterations a million times, many times from women friends. It is VERY important to “replace those negative messages with some others. Take each of the negative messages” you thought “and write the opposite.” (pg.63). Then practice positive self-talk. Anytime something negative starts to escape your lips, spit it out (quietly) and say the opposite. It doesn’t make you cool to degrade yourself.
This chapter is all about exercises. If you only buy the book for this, buy and do these exercises.
Nota bene: we are working through Carrie Bloomston’s book, The Little Spark. Buy it. Support the artist. There is a lot more to each spark than what I am writing and the original chapters will help you. Go buy Carrie Bloomston’s book, so you get the full benefit of her fabulousness! You can see my book review, which is what started this flight of fancy.
You can find the last spark on the blog last week.
I am using En Provence for leaders and enders so my donation quilt/block progress has slowed somewhat. I did manage to make one block.
I am back to using white and will send this one to the guild rather than use it to make a quilt. I have enough blocks at home to make donation quilts and will focus on those. Someone else can use this one to make a quilt.
I am REALLY, really, Really excited that I finished the Carpenter’s Wheel top on Friday night. DH was preparing for a Native Sons event and I sewed after dinner until 10. As I have said before, after dinner is not my best time, but I have been getting good sleep lately (no coughing), so I was up for the challenge.
Carpenter’s Wheel top finished
I had about half a block to finish sewing. Then I had to sew it together and sew that block to the last row. Once I completed that section, I had to sew that section to the right hand corner section to make one giant bottom row. After that it was just one long seam to join the two halves of the quilt together.
I did it and stay stitched around the whole quilt. As I knew it would be, the quilt is a giantess.
On Saturday, I sent DH off to a Native Sons event and laid out the top in the living room and measured it. Laid out is kind of misnomer, because the thing is too large for my floor.
I also made the label, but had to go and get ink for the printer, so I did that, then came home and started sewing the back. I promised myself I would stick to LARGE pieces and stay away from fiddly sewing. I mostly did that. The back is mostly 3 large pieces of fabrics with a few fill in smaller pieces. Nothing crazy and I didn’t finish it feeling horrible. I felt find and switched to another project right after I finished.