Flying Geese Design Thoughts

I was thinking about the design for the Flying Geese I have been getting and making for the Flying Geese swap with TFQ. We have been sending each other photos of interesting Flying Geese quilt designs.

Possible Flying Geese Design

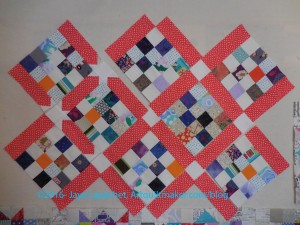
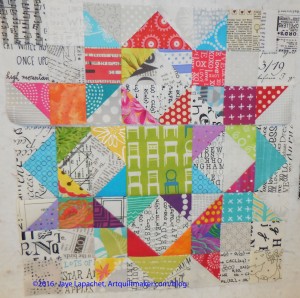
The other day I was at In Between Stitches and I saw a version of Camille Roskelley’s Round and Round pattern. I really like the way she combined a bunch of small Friendship Stars into something fantastic. Seeing this quilt and thinking about the Flying Geese gave me an idea. Driving home from the North Coast, I sketched out an idea.

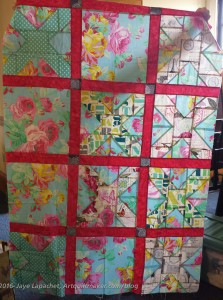
The image left is about the third draft of my design. It isn’t quite the way I want it and there are no sizes involved. Still, the Flying Geese portion is pretty much the way I want it.

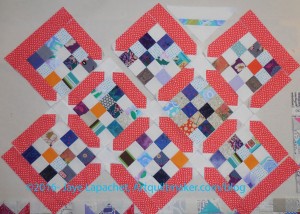
Possible Flying Geese Design #2

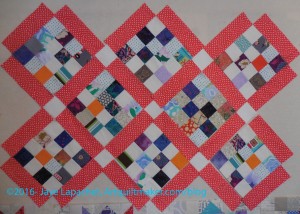
I don’t want the Friendship Star blocks to be lined up the way they are in the picture above. Draft n.2 is much more asymmetrical than the picture above and more the way I would want the whole quilt.

What I don’t know yet is:

  • what sizes I will make the Friendship Star blocks
  • whether I will have half or quarter Friendship Star blocks along the border or only finished ones
  • if I will fill in more Flying Geese around the edges

Even though I have not decided to make the Flying Geese quilt, I like this idea. I get to use the Round and Round block and the Flying Geese are not lined up. For some reason that appeals to me.

EPP Progress

EPP Progress-main
EPP Progress-main

I have made a lot of progress on my English Paper Piecing project. I worked on it a bit during my recent trip to the North Coast.

I am now out of papers and basting thread, though I have more to use. I just didn’t have it with me. The papers are a bigger problem as I need to buy more or unbaste some from that big piece and reuse them. I will work on that.

Invisible Stitches from the front

I also tried a different way of stitching the sections together. I used an, supposedly, invisible stitch and I am pretty pleased with the results. The picture with the green star is one of the first tries at this invisible stitch and I can’t see the stitches. I am using Aurifil 50wt in the #2600 color, so I have thinness and a blendy color on my side. It is a bit of a pain to sew the pieces together, because you line them up side by side as they will look when finished. This makes it hard to hold them together while sewing. I can’t use WonderClips to pinch them together. I have resorted to a few stitches at critical points to hold the pieces in place and that seems to be working. I am pleased with the progress.

Back of invisible stitches

The back doesn’t look quite as nice. Fortunately, very few people will see the back.

In the photo, you can see my needle (towards the center of the picture by the green rabbit ear). That is how the sections, or stars, get sewn together. For the moment, I have been sticking to this method with big sections only.

I have found that using this method means that I trim more of the excess fabric, frayed threads, etc off the back.

So progress. Next on the list is to lay this on the bed and see how much more I have to make.

Donation Block Progress

Donation Blocks for Cutting Corners Ruler + a Lobster

It took me forever to get these donation blocks done and I am only marginally closer to having a finished quilt.

Mrs. K's Cutting Corners Quilt
Mrs. K’s Cutting Corners Quilt

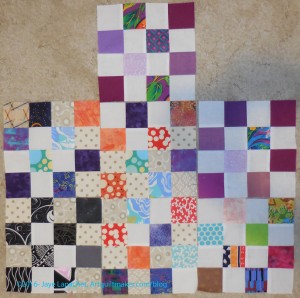
These are the pieces I am going to use to try out the Cutting Corners Ruler a la Mrs. K’s quilt.

Now that I have the blocks, I have to figure out the ruler. I took a quick look and it seems to make sense. I am going to start with the sashing and decide about the checkerboard border later.

I am making a smaller quilt to start with and may use the ruler to make others later.

Cheryl’s IRR

I don’t actually have any IRRs right now and I wasn’t at the BAMQG meeting, so I couldn’t take another. I had three in quick succession, with Cheryl’s being the last before my brief hiatus. Ruth‘s and Claire‘s pieces were the other two in the trio.

Michelle and I met at Trader Joe’s again and exchanged IRRs. I took Claire’s to pass along as she wouldn’t be at the meeting either. I headed up to the North Coast again with DH for NSGW/#politicalwifery events and Michelle was headed to Spain. Rhonda was kind enough to take both bags to the meeting for us and I gave them to her at the CQFA meeting.

All of this meant that I had to get Cheryl’s done in time to get it to Rhonda. I had about a day once I figured out all of the timing, so I got down to business.

Cheryl's IRR - before
Cheryl’s IRR – before

Cheryl’s piece looked great when I got it and I was loathe to wreck it, but Michelle had added half a row, so that missing section was perfect for me to complete.

Cheryl’s piece is turning out really well. I love it, thus the feelings of avoiding wreckage. I really wanted to use the Paris map fabric, but couldn’t really fit it in once all was said and done.

I walked around with it on my design wall for a few days and decided to add some Flying Geese. Yes, I am still in love with Flying Geese.

I also needed to add my signature fabric, but I didn’t want to add a large patch or strip as I have on other pieces, because I wanted to preserve the mainly white and turquoise color story.

There were a few small strips left over from other piecing, so I pieced a few of those together to make another strip large enough to handle my signature fabric. I wanted something that would look like it fit in.

Cheryl's IRR - my part
Cheryl’s IRR – my part

I made some Flying Geese. Since those were the main parts, I started working getting Michelle’s strip completed. I added some white and a strip of the black and white stripe, which came to me after looking at the piece.

After making my piece, I think the white on the edge needs to be corralled, but someone else, or Cheryl, will have to worry about that. I am pleased with how my part came out and I think my signature fabric piece fits in well without overwhelming the whole design.


Cheryl's IRR - finished with my part
Cheryl’s IRR – finished with my part

I also think the piece needs some space at the top. The bottom is getting to be quite breezy while the top is looking a little cramped. Not fatally so, but a little. It will be interesting to see what happens.

Good things about this IRR

  • no rules about how much you have to do
  • don’t have to add much fabric

Checked Out Quilts & Vendors (Quiltcon Day 3)

Another quick post to keep you in the QuiltCon loop.

Skyline Pasadena
Skyline Pasadena

Today was our day to look at the rest of the quilts and vendors. There weren’t a ton of vendors (PIQF has more), but the vendors did have interesting stuff and there was lots of free stuff – fat quarters and charm squares. It was kind of fun, but also somewhat overwhelming.

First, we looked at quilts. As usual there was a lack of understanding of what the judges were thinking.

hoenix by Anne Sullivan of Gaithersburg, Maryland (@playcrafts)

One I liked was Phoenix by Anne Sullivan of Gaithersburg, Maryland (@playcrafts). Anne gave a lecture to BAMQG at some point in the not too distant past about color.

Colorfall by Timna Tarr of South Hadley, MA (@timnatarr) was very interesting. I really liked the quilting on this piece. It did not distract from the overall design and fit in very well.

Drip by Suzy Williams, Chicago, IL, (@suzyquilts)

Drip by Suzy Williams, Chicago, IL, (@suzyquilts) was one of my favorites. I think it was because of the colors. I saw it from across the room and it caught my attention. I am dying to make a quilt that invokes such a sense of calm.

Falling by Kathy York of Austin, TX and the Austin Modern Quilt Guild (@kakiyark) was another favorite. The balance is good. The colors work well together. The design isn’t too fussy or complicated. There is also repetition with variety. That little bit of handwork adds something, but not a lot. I love it and am inspired to make something just as fantastic.

I also really liked Cog by Emily Cier (@cpatchwork). I have always wanted to make a Jack’s Chain quilt. This is the same pattern except in Jack’s Chain the squares are replaced by 9 patches.

Putting on the Glitz by Tami Levin of Sunnyvale, Calif. (@lemontreetami)

I love the addition of the trees in Putting on the Glitz by Tami Levin of Sunnyvale, Calif. (@lemontreetami). The colors used to imply the trees are perfect on top of the Michael Miller challenge quilts.

There were some quilts I wondered about, but there were many, many more quilts that wee really interesting in some way. I did wonder about the size of some of the quilts. I thought modern quilts were supposed to be utilitarian? The small quilts, unless they were large mug rugs, did not seem to be utilitarian to me.

One of the good things about the show is that it wasn’t just about looking at quilts and buying stuff. There were manufacturers there who were not there to sell, but to market their newest lines and concepts. A couple of the manufacturers were also working with attendees to make donation quilts.

Kona’s new Color of the Year, Highlight, was the theme of the booth. In addition to all the Highlight quilts being shown, they had a color activity where you could design your own palette around Kona’s new Color of the Year. Julie created her own palette and we both received FQs for her trouble. 😉 It might be interesting to work with.

Dear Stella Selfie
Dear Stella Selfie

Timeless Treasures was making a donation quilt in their Dear Stella booth. We didn’t have a chance to stop and make a block, but we did take some time to post a selfie so we could possibly win a pack of FQs. I posted the goofy selfie above!

ALS Donation Blocks
ALS Donation Blocks

Victoria Findlay Wolfe told us about the donation quilt that Marcus Fabrics was making to provide additional funds for ALS research. We needed to sit down for a minute, so we stopped there and made some blocks. We met a fellow class member from yesterday and chatted with her about her guild, the Omaha Modern Quilt Guild.

I made two blocks and we have some pieces from the class that we can use to make more. The blocks are hand pieced and I have stuff to make more with me. I hope to find the time to do it. You know how much I support efforts make donation quilts. The fabric is the new Victoria Findlay Wolfe Manor House line. Julie and I bought a layer cake and will share it.

Jaye & Julie with donation blocks

Finally we took some time to look at the vendors. There weren’t as many vendors as I expected, though others have said that there are twice as many vendors as last year. I loved seeing new and interesting fabrics (not the old stuff vendors bring to PIQF) and fun prints. I was also pleased to see Sizzix, Accuquilt, several machine manufacturers and small fabric stores like Crimson Tate.

I was thrilled when Coral messaged me asking to meet up. We met at the Marcus booth, because we were still working on our donation blocks. She was a sport in that she was willing to meet us there so we could finish. Coral is a lovely person who is a Bay Area native, but now lives in Canberra. We chatted for a few minutes, then she needed coffee and we needed to get back to our vendors.

Coral & Jaye
Coral & Jaye

It is fun to meet people I know from Instagram and Twitter.

I decided to look for some fabrics that I could mix in with my Timeless Treasures background for the VFW quilt. I won’t have enough of the original background and I want to make the design more interesting and the quilt larger. I took a piece of my fabric with me and compared it to various solids that were available. The above were some of the good choices. I also want to take a look at Moda Bella Seafoam and Moda Bella Big Chill. They look like they will work. I want the solids to blend, though, and not to stick out too much. It is a difficult problem because the TT fabric I used has a lighter fabric overlaid with a darker fabric.

Visiting QuiltCon
Visiting QuiltCon

All in all we had a fun time, met some nice people, saw some great products and quilts.


Creative Prompt #351: Cushion

This should be easy for you! You can even make a cushion!

pillow

whoopie cushion

foam cushion

Definition: “A cushion is a soft bag of some ornamental material, stuffed with wool, hair, feathers, polyester staple fiber, non-woven material, or even paper torn into fragments. It may be used for sitting or kneeling upon, or to soften the hardness or angularity of a chair or couch.[1]

A cushion is also referred to as a bolster, hassock, headrest and a sham.[2]

Cushions and rugs can be used temporarily outside to soften a hard ground. They can be placed on sunloungers and used to prevent annoyances from moist grass and biting insects. Some dialects of English use this word to refer to throw pillows as well.

The cushion is a very ancient article of furniture; the inventories of the contents of palaces and great houses in the early Middle Ages constantly made mention of them. Cushions were then often of great size, covered with leather, and firm enough to serve as a seat, but the steady tendency of all furniture has been to grow smaller with time. Today, the cushion is considered an upholstery item.

Cushions were, and are, used as seats at all events in Italy and Spain at a very much later period, and in Saint-Simon‘s time it is found that in the Spanish palace they were still regarded as a peculiarly honourable substitute for a chair. In Italy, the right to kneel upon a cushion in church behind the king was love guarded and strictly regulated, as it is learnt again from Saint-Simon. This type of cushion was called a carreau, or bird. When seats were rude and hard, cushions may have been a necessity; they are now one of the minor things of life.

Decorative cushions are likely to have a fancy cover material which are patterned style and generally used on furniture.” (Wikipedia)

cushion grip

seat cushion foam

medical cushions

cushion cover

scatter cushions

cushion cut engagement rings

M Cushion is the first fashion forward shiatsu massage cushion.

Lumi Cushion, a liquid foundation infused in an innovative sponge that delivers the perfect amount of makeup.

As your body position and shape changes, your ROHO cushion adjusts creating a safe and comfortable seating surface.

The Magical Cushion that helps children with attention deficit disorder and sensory procession issues focus better when learning.

Darma is the world’s first smart cushion that monitors your posture, sitting habits, stress level, and coaches you to sit better.

carpet cushioning

Zabuton cushions

The Cue & Cushion is a pool hall, bar, and lounge located in Hooksett, NH.

Carpet Cushion Council

meditation cushions

CPAP mask cushions

sofa cushion covers

Arctic Wire Spring Aircool Cushion

Zafu cushion

Brooks Cushion Me running shoes

wheelchair cushions

The Galaxy Cushion combines multi-cellular air technology with a patented, contouring design, shaped to fit the anatomical form.

Post the direct URL (link) where your drawing, doodle, artwork is posted (e.g. your blog, Flickr) in the comments area of this post. I would really like to keep all the artwork together and provide a way for others to see your work and get familiar with your blog or website.

The Creative Prompt Project, also, has a Flickr group, which you can join to  post your responses. I created this spot so those of you without blogs and websites would have a place to post your responses.

We are also talking about this on Twitter and Instagram. Use the hashtag #CPP

throw pillow

I Took a Class (QuiltCon Day 2)

This will be another quick post about my adventures at QuiltCon.

Quintessential Pasadena

Today I was in class with Julie and Kathleen all day. We were pleased Leona was there as well. We took a class called Pies & Points from Victoria Findlay Wolfe.

Short version: she is a great teacher, I learned a lot want to buy a Sizzix Big Shot Pro. 🙂

Longer version

The class was called Pies & Points and is an updated version of a variation on the Drunkard’s Path. This pattern was popular several years ago and was called Snails Trails or something like that. I’ll look it up when I get home (if I remember). I have always wanted to make a quilt like this, so it was the perfect opportunity.

Victoria Findlay Wolfe is a great teacher and if you have the opportunity take a class from her. She was very clear. She was supportive and didn’t try to have us accomplish too much in one day. She was available, was walking around the room offering assistance and seam ripping services. VFW was also accessible and made the project accessible. She was pleasant and funny and very human. I liked her very much and want to be her BFF. She also wore leather capri pants, which were super cool.

I am not a project class person. This class kind of bordered on that type of class, but was full enough of technique that I could apply to other projects that the class worked for me. I could work within certain boundaries, but still spread my wings.

She gave a little bit of information and the Sizzix people passed out the Pies and Points die to us. We each got our own!!! I didn’t know that was going to happen and it was useful as well as exciting.

About this time, one of the QuiltCon people came in and announced that Victoria’s quilt, Mr. Swirly Bones, won Judge’s choice! We all clapped and she was very excited.

VFW showed us how to cut using the Sizzix and then how to sew the curved seams and then we got busy cutting and sewing. You can cut a lot of pieces at once, but there is still prep time for using the Sizzix. Without my normal setup, it took time to get the pieces cut.

I had a bunch of pieces cut and ready to sew, but wasn’t able to sew much before lunch. Right before lunch, I was able to sew one seam and that made me feel better.

Lunch was two hours. Very civilized IMO. We brought our lunch so wolfed it down and then went to check out the vendors and some of the quilts. There were not as many vendors as I expected, but there were manufacturers at the show giving away prizes and showing off stuff, but not selling.

The whole feeling of the show area is so light and airy. Everyone seems cheerful and there is very good energy. People seem excited to be there. I love that.

We looked at the vendors – more getting the lay of the land than shopping – and started to look at the quilts. After 1.75 hours it was time to head back to class and to sewing.

Sewing Pie Points
Sewing Pie Points

I got right down to business and started sewing. I had a lot of little pieces to sew together, but the first seams to get the middle arc were all straight seams. Once I got a few of the arcs done, I started making quarter blocks.

The class was supplied with Sizzix machines, rotary mats, rulers and cutters, irons and sewing machines. The sewing machine I was using was a Juki electronic machine. I wrote down the model, but am too lazy to go look for it. I’ll post about it later. It is a little disconcerting to use a different machine. This one kept lifting the presser foot every time I stopped the machine. It made it really hard to line up the edges of the curved seams. There was a Juki lady, Chris, who was there to help with machines and she changed a setting so I didn’t have to deal with that. I could probably learn to use that feature, but for one day I didn’t want to deal with it.

Without too much pain and suffering I made a whole block. I planned to put them together in her Snail Trails arrangement.

Whole block
Whole block

After working on the one block and looking at the options I had chosen for myself, I decided to make some of the other parts and mix it up a bit. No photos of that to share yet, but soon.

I want to work some more on this piece. I may add some different backgrounds to add interest (my idea turned out to be more boring than cool looking) and because I only have about a yard left and I’d like to make a larger quilt than a wall hanging. I also have the Sizzix problem. I do not have a Sizzix. There a few reasons I am not buying one, but the most important is that I have no place to put it. It is a desktop model and it stays out on a table (desk, worktop, etc). This is problematic since I have to cut more pieces for the quilt. I hope one of the local shops has one to rent and, perhaps, I will buy one at some point. I can also make templates and cut the pieces that way, though …. bleah.

Julie rested after the class and I walked around the show a little bit more. we went to a Brazilian steakhouse for dinner. They bring all different kinds of meat around and you can take what you want. It was a little bit on the pricey side, but extremely tasty. I was a little protein deficient, so it was just what the doctor ordered.

One of the projects was posted on Instagram. I didn’t take a lot of pictures of other students work 🙁 , but I did take a few.

Stacy's pieces
Stacy’s pieces

You can see some of the options available in the above blocks. My latest block has the pieced center like Stacy’s bottom block.

EBHQ Show Press Release

For Immediate Release:

Media Contact: Edith Beard Brady

Voices in Cloth 2016, Extraordinary Quilts by the Bay

Dates: Saturday, March 19 and Sunday, March 20, 2016
Hours: Saturday: 10:00 A.M. to 5:00 P.M.
Sunday: 10:00 A.M. to 4:00 P.M.

Admission: Two-day advance purchase tickets are $10 until February 29, 2016; tickets purchased at the door are $15 and children 12 and under are FREE.

Location: The Craneway Pavilion, 1414 Harbour Way South, in the Marina District of Richmond, California. With its huge windows, panoramic San Francisco Bay views and natural light, The Craneway Pavilion makes a spectacular venue for the vibrant quilts and fiber art that will be displayed at Voices in Cloth.

Website: http://www.ebhq.org/quilt-shows/vic2016

East Bay Heritage Quilters present Voices in Cloth 2016, Extraordinary Quilts by the Bay. Highlights of the two-day show include an exhibit of more than 200 new quilts and wearable art made by guild members; quilts by kids; a stellar lineup of 37 vendors, offering textile and eclectic wares; a Guild Marketplace of Fine Fiber Art; free demonstrations of quilt-making techniques including new ruler-free cutting techniques by Sherri Lynn Wood; bed turnings by the San Jose Museum of Quilts and Textiles showcasing quilts from the museum’s permanent collection; engaging activities for children and introducing new children’s titles from C&T Publishing; and great door prizes.

Voices in Cloth 2016 will as also feature two special exhibits:

“Off the Wall: Maverick Quilts from the Julie Silber** Collection”

Well- known and highly respected quilt authority, Julie Silber curates this special exhibit of 20 of her favorite quirky antique quilts. The pieces all have in common an unusual twist on the ordinary, a certain verve, and a gritty individuality rarely found in more studied and self-conscious quilts. These playful pieces demonstrate that all over America original works of art may be as close as the blankets under which we sleep. Julie Silber will lead a personal tour through the exhibit each day at 1 p.m.


**Julie Silber is best known locally as curator of the world-renowned Esprit Quilt Collection , which was on display at the Esprit Company headquarters in San Francisco in the 1980s. She is the owner of Julie Silber Quilts where she offers a wide range of antique and vintage quilts made between 1800 and 1950. She wrote Hearts and Hands: The Influence of Women & Quilts on American Society, and Amish: the Art of the Quilt.


“Tell Me a Story” A Cloth Doll Challenge

For the first time, Voices In Cloth presents a special exhibit of 36 cloth doll sculptures and their stories. The Challenge is curated by Sondra Von Burg, a local doll artist, teacher and lecturer on the Art of Cloth Doll Making. She states “Dolls traditionally were made to represent the human form in miniature. Contemporary dolls are moving closer to sculpture, but often continue to represent humans beyond just the form and all dolls have a story to tell.” Sondra will be demonstrating “Cloth Doll Finger Turning” during the show and has a vendor booth exhibiting her work.

East Bay Heritage Quilters is a non-profit, all-volunteer organization based in Albany, California. The guild focuses on preserving and continuing the traditions, culture, and history of quilting and textile arts. A significant contribution EBHQ makes to our community is the Deanna Davis Community Quilt Project, through which our members and outside volunteers make and distribute over a 1,000 quilts a year. Recent recipients include First Place for Youth (a home for aged-out foster teens), and survivors of the Lake County fires. In 2016, EBHQ will make monthly deliveries to a Neonatal Intensive Care facility.

There are two Opportunity Quilts that will be featured at the show. Winning tickets in the raffle will be drawn on Sunday, March 20, 2016. Photos and descriptions of Bay Windows and String Theory can also be found at http://www.ebhq.org/quilt-shows/vic2016/vic2016quilts.

Bay Windows

42 inches by 46 inches

Raffle Quilt designed by Nancy S. Brown

Appliqued by Nancy S. Brown, Meg Cupman, Cynthia Demidovich Winn, Linda Gavin, Sue Gragg, Linda Gruber, Andrea Hong, Jenny Kolbusz, Liisa Lyon, Lily Pang, Laurel Putnam, Melissa Quilter, Valerie Sopher, Katie Spangler, Carolyn Weil.

Quilted by Laura Lee Fritz.

Photography by C&T Publishing


String Theory

80 inches by 84 inches

Raffle Quilt by Barbara Ramsey

Quilted by New Pieces in honor of Deanna Davis

Photography by C&T Publishing
East Bay Heritage Quilters, P.O. Box 6223, Albany, CA 94706

Quick QuiltCon Day 1

This will be a super quick post, because I wasn’t planning on writing anything else today, but I feel inspired.

This is the first really big quilt trip I have made since we went to Houston in 2014.

Julie and I drove down to Pasadena and it was amazing to see the green-green hills. We arrived at about 4 at our hotel. We didn’t have to drive through the whole of LA, which was nice, but the traffic on the 210 was bad enough so we were both done with it by the time we got to the hotel. We checked in and sprawled on the beds for awhile until it was time to go and register. By this time it was raining (yes, raining!) and it was dark, so it was a challenging drive: rain, dark, unfamiliar territory. Julie was a champ and got us to the convention center in one piece.

We ran through the rain (my feet got soaked) to the entrance and there were more than a few people milling around.

Swag
Swag
QuiltCon bag
QuiltCon bag

We registered and I was told to get a bag. I went and got a huge bag filled with stuff: mini charms, batting samples, a Soak sample, a magazine and other stuff. I was surprised and pleased. It turned out that the first 1,000 registrants got a gift bag. Nice!

We also saw Kathleen right by the registration desk!

After chatting with Kathleen and a couple of people she was talking with (one-Jennifer Moore- has a new blog sewingreport.com ), we went to look at the donation quilts. They were great and we did see the BAM quilt!

The top left is my favorite, but they were all awesome.

I was also really excited by this quilt, which has great quilting.

I was able to find the BAM donation quilt and was excited about that.

BAM Donation Quilt
BAM Donation Quilt

The exhibit hall, etc is not yet open and these quilts were just a little teaser.

We went to Trader Joe’s and got some stuff for dinner and lunch tomorrow. It is pouring rain outside and I need to get some sleep. I am looking forward to tomorrow’s class.

Have a great day!!!

Mighty Lucky February Challenge (Fibershots)

Mighty Lucky Member
Mighty Lucky Member

I saw the Mighty Lucky February Challenge and groaned. the basic theme was minimalism and I was not interested.

Then I had an idea. Then I saw the notice for the CQFA meeting and that the activity would be working on quilts for the Fibershots fundraiser at SJMQT. I decided that I could get the challenge done and do some good.

Two quilt birds one stone.

I had the materials I needed at hand and got down to business.

As I wanted the pieces were quickly pieced. I was pretty happy, though I can see where a whole series of these would make the designs better. I felt like there was something, but didn’t know what.

I kept the pieces on my design wall for a day or two and then took them to the CQFA meeting to quilt during the work party. I took my thread with me and quilted the pieces in a simple straight line design. I had a brain flash as I progressed across the piece where I decided to add a few lines of colored thread to the quilting.

When I got home I added some triangles as a hanging mechanism as I zigzagged around the edge of the piece. Maureen suggested using some Perl cotton to stabilize the edge as I quilted so I tried that and the edges don’t seem to curl as much.

Minimalist Fiber 1 & 2

As I mentioned, my Mighty Lucky Challenge will be heading off to be displayed with other Fibershots quilts and sold (hopefully) for $100. You, too, can make one. Talk to the Museum if you want to buy one. Like mine. Buy mine. All the money goes to support the museum.

Various & Sundry 2016 #3

Projects, Patterns & Tutorials

Baker Bag from Sew Sweetness. This is a basic zippered, over-the-shoulder bag with a few pockets inside.

I was reminded of the Noodlehead Trail tote. The look isn’t one of my favorites, but Cheryl uses one constantly and I know she loves it.

The Sawyer Bag directions are listed on the Sew Sweetness website. This bag has a couple of hardware loops, but is another basic bag.

The Reversible Box Tote is good for taking along a small knitting project or some quiltmaking handwork. These bags were made for the last BAMQG Retreat and Angela was making some at the CQFA Retreat. They are cool looking and I want to try to make one.

Basic Bucket Tote has a good shape and reminds me of the One Hour Basket, but with longer handles. Another one in which to carry your lunch and reading material on the way to work. I also want to try to make this one.

The Alice Shopper tote has a really interesting handle.

The Laney Reversible Hobo Bag is smallish, but might be good for a lunch bag or small project. Since it is reversible you can put double your favorite fabrics on it!

I am not a big fan of the name of this tote, but perhaps it will make a comeback because of the name. I do like the look of the Ethel tote and think it looks like a useful size and shape. There were no pictures of the inside, so I can’t say if there were pockets or dividers. It was free on Craftsy when I looked.

Thanks to Kathleen for the bag pattern links!

Want some free paper piecing patterns? Super cool patterns? Wombat Quilts has posted some free paper piecing patterns and she has used awesome fabric combinations for the examples. I am not sure why one would need to paper piece all of these patterns, but to each her own. Again, the examples look really good so go forth and make some blocks.

Daisy has posted her latest Outlander Stitch-a-Long pattern. She posts them at the beginning of each month and you can find them all on Craftsy. Check her blog at the beginning of each month for new blocks.

Quiltmaking definitely runs in the Martin/Bennett family. Will Bennett, Judy Martin’s son has a quilt pattern in Quiltmaker magazine, the March/April 2016 issue. It is listed as challenging, which means that if you don’t want to use paper foundation piecing, you need to check out my tutorial on set in seams. 😉

I kind of like this quilt block. It has that lozenge shape again, which I will have to get out of my system at some point.

Tips & Tricks

As you know I am doing an EPP quilt. I saw this suggestion for sewing the pieces together. I tried it when I was adding a big line of stars to the main piece and the stitching was invisible. Nice!

The above tip was for use with The La Passacaglia Quilt, which the Love of Patchwork & Quilting magazine talks about on their blog. This quilt comes from the book Millefiori Quilts by Willyne Hammerstein. (She has also written Millefiori Quilts 2). This quilt and the style of EPP have become a sensation. Love of Patchwork & Quilting writes “We can’t pinpoint one reason why it’s taken off. At a guess, the blend of precision piecing, geometric shapes and intricate kaleidoscopic fussy cutting, combined with the irregular composition, dizzying rosettes and frankly epic scale of the whole project is a heady cocktail guaranteed to take any English Paper Piecing addict to seventh heaven. Here are just a few of the bloggers who have caught the bug!

• Flossie Teacakes
Mommy By Day, Crafter By Night
Lilabelle Lane
The Little Red Hen
A Life in Lists
Sew What Sherlock (includes the coolest stop motion animation videos!)

Take a look at the quilt and what the other artists have done and tell me what you think. I know a lot of it has to do with the fabric. If I weren’t doing my own EPP project, I might take this on.

Other Artists

If you haven’t seen Pam’s Harry Potter/ Hogwarts quilt, you have to go look at it. It is completely amazing. I enjoyed following along via her podcast during last year as she made it, but the finished object is an incredible feat of quiltmaking.

Libby Lehman is quilting again. Read the February 3, 2016 TQS daily blog to find out about her progress.

Yvonne Porcella died earlier this week after a long battle with cancer. She consistently had a bright and cheerful style that I always admired. TQS has a video about her life and style.

Inspiration

From ResearchBuzz: “18 New York museums had a big Instagram swap day. “Today 18 of New York City’s biggest museums are repping one another’s collections on their Instagram accounts. For 24 hours, each institution will be posting images taken at a partner museum, to draw parallels between the two institutions’ themes and exhibitions.” Cool idea.” Can you do this with your quilt friends?

Fabric, Gifts & Supplies

I didn’t know Tanya had an Etsy Shop. I guess I should pay better attention! She has some cute aprons.

I heard about Barney Pens on The Stitch TV Show. They have sewing implements, such as stilettos and seam rippers, as well. All are gorgeous. Great gifts for your friends, not that any of them have to unsew, of course. 😉

My friend Maureen also has an Etsy shop. Check hers out if you need cards or gifts.

Have you tried the Aurifil online color card?

From the Knitting Department: Isn’t this a beautiful object? I love the spiral. The wood makes me want to touch it.

Events & Exhibits

Make it Modern Events is a new events company owned by my pal, Kathleen! The company is hosting an event in Reno in June and the hotel rooms are unbelievably cheap! Less than $50/night. Of course, there are instructors and will be other quiltmakers there. You should go!

There is now a Reno-Tahoe Modern Quilt Guild. Like the page on Facebook (if the link doesn’t work, search on FB. You know how it is!). If you live in the area, get busy helping to set up meetings.

“Quilts with a Sense of Place” article in the New York Times detailing a citywide exhibit of over 100 quilts in Oakland made by the African American Quilter’s Guild of Oakland. You may need a subscription to read it.

Mighty Lucky January Challenge

I already wrote a little bit about the February challenge, but look for a full fledged post about it soon. I am just catching up with the January challenge. I am happy with my first effort with bias tape. It was interesting and a good learning experience, but I want to try this picture again. I like the image, but my rendition didn’t come out as I had hoped.

Mighty Lucky January Challenge

I really like the thin beak of the original picture. I didn’t get the beak as thin as I would have liked. I used a lot of pins, but it was hard to keep the bias in place as I sewed and I am not sure why. The wobble also resulted in all of the straight lines ending up wobbly. This is because I didn’t have the Wonder tape called for in the directions (I have it now). I didn’t add fusible to my bias tape, which was an option I didn’t think about.

Still, I made something for the challenge. I was also expecting progress not perfection. WooHoo!

I was excited about this challenge, because I had been wanting to learn to make bias tape using bias tape makers. It might useful for embellishing or design purposes in the future. This was the perfect opportunity.

After cutting and sewing the bias, I fed the piece through using a pin and the device started making bias tape! I couldn’t believe it that the process worked. Once I got going, I found it incredibly useful to poke a pin into my pressing surface to hold the bias in place. As I reached the end of my pressing mat with the iron, I had to move the pin.

Bias tape maker seam allowance problem

I was disappointed that the directions did not talk about type of fabric or any challenges that might occur. I found a couple of things that were challenging.

First, I used a Kona Solid for the red bias tape. As I have mentioned in the past there is a lot to like about Kona, but its loose weave is not a bonus. I cut my strips about 1/2″ wide and as I fed them through the bias tape maker to make 1/4″ bias, the seams got hung up on the device. The bias tape maker had a real problem going over them as I pulled the tape through. I ended up helping them with a stiletto, but the seams looked terrible once the tape was made, as you can see in the photo with the blue arrow. The photo is of completed bias tape. You can see that the line is not smooth and there is a marked bump in the tape. Yes, I pressed the seams flat and they are still not attractive. The seams are also already starting to fray.

I am thinking that the problem could have been the fabric, as mentioned, combined with the size of the bias tape I chose to make. I’ll have to experiment some more to see what works. Looser weave fabric might work just fine with a larger sized bias tape maker. I do think I might try this technique with Art Gallery Pure Elements Solids as they are thin and tightly woven. I am not sure if that line has a bright scarlet.

Look How Many Bias Strips!!

Second, there was no way of knowing how much bias tape could be made. There was no chart like a bias binding chart included with the directions. Would a bias binding chart used for binding a quilt work? I tried looking at one, but it don’t go down to a small enough width of tape. I now have about 500 yards of bias tape still to use, which is why I am not concerned about a do over.

Yes, I had to sew all of those tiny strips together, which was another ordeal in itself. I should have used the tube bias method.

Next, I used the 1/4″ bias tape maker. It worked like a charm, but is very small. I would recommend using a 1/2″ or 3/8″ bias tape maker on your first time out.

Fourth, the directions did not talk about using a Point Trimmer. A Point Trimmer helps you line up the edges of the bias tape to sew it together in a long string. You can use it for your binding strips as well if you don’t use the tube binding method. As an aside, if you don’t have Point Trimmer ruler, you really need to get one. I like the Judy Martin version because it helps you trim two types of triangles in one tool BUT there are other manufacturers who make them and almost any are good.

Bias tape makers
Bias tape makers

Fifth, these bias tape makers are not readily available. I went to three stores, checked Amazon, Fabric.com and some other places before I found a full selection at Beverly’s. The quilt stores didn’t have them. Amazon, etc had a few, but not all the sizes and not sold in sets. None of the online places could get them to me in a timely manner. I now have a set of them and won’t need to buy them again, but I was surprised. If I were Lucky Spools, I would have made a deal with some shop to sell kits of the bias tape makers and the Wonder Tape.

Pressing Matters
Pressing Matters

Sixth, there were very few instructions about pressing. The author of this ‘lesson’ did say to keep your fingers away from the hot iron, but not much else. I used a type of stiletto, which prevented me from burned fingers. It is two pronged, which gives me more ‘holding’ surface. I think I bought it at a booth at the county fair or PIQF where they sell every kind of scissor and small metal tool known to mankind.

There is more come on this technique as I will post about my next effort.

Mighty Lucky Member
Mighty Lucky Member

Learning is not a smooth process. I am not complaining about any of the above; I am just telling you my story. One lesson for me is to try different brands of solids. Kona is just so easy to find! I am glad I tried this technique and learned how to make bias tape with these devices.

Peacock Quilt

Peacock Panel
Peacock Panel

I realize that I have not discussed the One Block Wonder/Peacock quilt recently. The last time I talked about it was last June!!! I can’t believe so much time has passed.

Frankly, I was stuck and needed some hand holding. This is the main reason I get stuck on projects. Since Pam is in Atlanta, though very willing to help via email, I set up a date with Maureen to work through my issues at the Retreat.

TA DAH! The peacock project is finally moving forward. During the time  I spent with Maureen at the Retreat she talked me back from the ledge with regard to cutting up my panels.

I had read the One Block Wonder book, but being shown is different than reading. This technique is definitely a challenge to learn from a book. The technique is based on repeats, but since panels are panels, I decided that each of my panels would be one repeat. This worked out pretty well.

Cutting Blocks
Cutting Blocks

I had decided on a width for the strips with Pam’s guidance (3.75″, in case you are curious), so with Maureen’s help, I lined up the panels and eventually began cutting. It was good to do this at the Retreat, because we had big tables. I know now that I would not have been able to do this cutting in my workroom.

My panels were about 24″ x 44″. I had to lay out the complete panel flat and there are 6 layers stacked on top of each other after you have lined them up according to the directions in the book. It was helpful to have the big table. I put new blade in my rotary cutter and that was helpful. I only had a 45mm cutter. A 60mm cutter would have been very useful, but nobody had one to lend.

The key piece of helpful information during the cutting process was that there was a little wiggle room if I didn’t cut the panels quite right. One of my panels was not printed like the others and was causing me problems. Maureen’s comment helped me relax knowing that everything would be ok.

Another very helpful piece of info, which relates to wiggle room, was that the cut edge of the panel could be squared up before the next cut. The maker cuts through 6 layers of fabric, which is difficult in any case, but even more difficult when juggling a ruler, a big table you can’t reach across all with spectators watching. I had enough leftover to square the edges, but not enough to make another set of full sized blocks.

I did take what was leftover and make some smaller triangles that I will perhaps sprinkle around the edge.

Peacock Hexies
Peacock Hexies

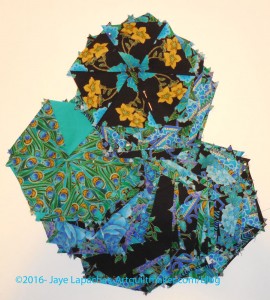
Each set of triangles is pinned together waiting for its turn under the machine. Some of them look like they will make really interesting blocks. Others are mostly black and may not make it into the quilt.

I also have a number of solids that coordinate with the panel and I may sprinkle those throughout the the quilt. I’ll have to see.

I did start to sew blocks together after cutting them up, but I have not yet made very much progress. I had to try each one to see how I wanted to sew it together. Because you are essentially using triangles, there are three layout options for each block.

The above blocks are some samples. They look a little strange, because they are not sewn into hexagons. Three triangles are sewn together, two sets for each hexagon, then they are pinned together until the layout is finalized when all the blocks are sewn together in rows. I could sew the hexagons together and sew them using set in seams, but I am still not over Attack of the Hexies and I don’t want to go there again just yet.

Yes, I did save a panel to use for part of the back.

I am still a bit scattered with my projects. This will be a good leaders and enders project when I don’t have others ahead of it in line.

Oroville Quilt Shops, pt.4

I know you must be exhausted by all of these quilt shops. I know I was by the time I got to the Rabbit Hole. I almost bailed on this shop, but since it was on my way I decided to stop in. Definitely worth the stop!

The Rabbit Hole
The Rabbit Hole

The last shop I visited was called the Rabbit Hole and the name was very apt! As I went into each room in the shop, I found another behind it. As I said, I was tired by the time I got to this shop and couldn’t focus as well as I would have liked, but I could focus enough to see that they had A LOT of fabric.

Rabbit Hole - fabric and panels
Rabbit Hole – fabric and panels

They also had a ton of panels, so if you are looking for panels, give them a call or stop by. Those flower panels might make an excellent One Block Wonder a la Pam’s piece and my Peacock. I couldn’t believe how crammed this place was with different types of fabric – lots of quilting cottons, certainly, but also net mesh, wool, etc. As you can see on the photo, they have a lot of patterns as well.

the Rabbit Hole -Novelty Prints and Stripes

I was impressed with the number of novelty prints and stripes. It made my head swim with the possibilities of pillowcases, but I reined myself in and turned away from them. I still have a few pieces of Christmas fabric I can use to make pillowcases.

I didn’t recognize a lot of the fabric, which tells me that they have a different eye than I am used to seeing. This is probably why this shop is successful with another shop a couple minutes away.

The Rabbit Hole - Novelty prints
The Rabbit Hole – Novelty prints

You can see how large the room is and this is just one of about 4-5 rooms of fabric.

Cutting tables were scattered throughout the shop. The one in the phone (right) was in the very back of the store. I was a little surprised to see as nobody was in the shop except for me. I learned the reason for its placement when a large group of people (yes, there were some men!) came in the shop and filled the place with chatter and laughter. I had been there about 15 minutes and was wondering how much fabric they could move. I had my answer!

I think the newer fabrics were in the front of the shop. These rooms were small and there were several bolts of Asian style fabrics as well as projects made with them. The second room (through the doorway in the above left photo) also had baby style prints – soft colors, Minkee (or similar).

The shop also had a longarm and that room was not free from fabric either. A lot more panels were hanging in this room as well.

Open road with clouds

I headed out after this shop and went back to the hotel and to my Political Wifery duties. It was a somewhat rainy day, but it made for beautiful clouds.

See part 1 of this travelogue.
See part 2 of this travelogue.
See part 3 of this travelogue

Creative Prompt #350: Woman

After this one, I will post only 15 more prompts, then something new or not.

Post the direct URL (link) where your drawing, doodle, artwork is posted (e.g. your blog, Flickr) in the comments area of this post. I would really like to keep all the artwork together and provide a way for others to see your work and get familiar with your blog or website.

The Creative Prompt Project, also, has a Flickr group, which you can join to  post your responses. I created this spot so those of you without blogs and websites would have a place to post your responses.

We are also talking about this on Twitter and Instagram. Use the hashtag #CPP

I am Woman, Hear Me Roar

woman of the year

Definition: “A woman is a female human. The term woman is usually reserved for an adult, with the term girl being the usual term for a female child or adolescent. The term woman is also sometimes used to identify a female human, regardless of age, as in phrases such as “women’s rights“. “Woman” may also refer to a person’s gender identity.[1] Women with typical genetic development are usually capable of giving birth from puberty until menopause. In the context of gender identity, transgender people who are biologically determined to be male and identify as women cannot give birth. Some intersex people who identify as women cannot give birth due to either sterility or inheriting one or more Y chromosomes. In extremely rare cases, people who have Swyer syndrome can give birth with medical assistance. Throughout history women have assumed or been assigned various social roles.” (Wikipedia)

womanhood

International Women’s Day (IWD) is March 8 and the 2016 theme is Pledge For Parity. Celebrate the social, economic, cultural and political achievement of women

women

Women’s rights

UN Women is the United Nations organization dedicated to gender equality and the empowerment of women.

Pioneer Woman

Women Organized to Make Abuse Nonexistent, Inc. (W.O.M.A.N., Inc.) has operated since 1978 as a community-based, multi-service agency

women’s college

Women for Women International: Non-profit humanitarian organization dedicated to financial, educational, and interpersonal support of women survivors of war, poverty and injustice.

Women of the Vine Alliance. The world’s leading membership alliance dedicated to the support and advancement of women in the alcohol beverage industry.

Global Fund for Women is one of the world’s leading foundations for gender equality, standing up for the human rights of women and girls.

Women Who Code (WWCode) is a U.S. based 501(c)(3) non-profit dedicated to inspiring women to excel in technology careers.

The American Association of University Women (AAUW) advances equity for women and girls through advocacy, education, philanthropy, etc.

National Organization for Women

National Women’s History Project: Originator of Women’s History Month.

women’s suffrage

League of Women Voters

Society of Women Engineers

women’s shoes

Woman’s Day

National American Woman Suffrage Association

women’s health

Go Red For Women

The National Women’s History Museum (NWHM) is dedicated to reclaiming the missing half of history – women’s history.

Center for Women Veterans


The position of woman in society has given rise to a discussion which, is known under the name of the ‘woman question’

Woman also can refer to:

  • Womyn, an alternate spelling for woman

Contents

Music

Albums

Songs

Entertainment

Religion

Art