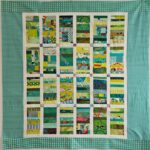
I am trying to use up all the ends from various quilts. This is another group of fabrics from the BAMaQG IRR quilt with a few from Pointillist Palette n.4 thrown in. The pieces seem to be a random assortment of sizes, so I am doing a bit more fiddly piecing than I normally would.
The PP fabrics on the right are a little heavy, so I may move one of the pieces to the left. It will kind of ruin what I have going with the grey strips, but maybe I can create something better.
I hope to get this done before Saturday’s meeting, so I can hand it in. We’ll see.
I finished the latest Ends donation top and handed it in at the last meeting.
This fabric is mostly from Jennifer Paganelli’s Queen Street line. I talked about it briefly when I started the BAM IRR project. I have bits and pieces left, but I think this is the majority of the scraps.
The regular monthly posts are a bit out of order this month due to the American Thanksgiving Holiday. Enjoy more donation blocks! I am back working on a Color Strip quilt, though we all know white is not a color. 😉
I need 40 of the strip blocks to make a nice sized quilt, so I have a few more to sew.
Maria bound Ends n.18 and brought it to the meeting on Saturday. I was so pleased to see it again! I finished it in September so it hasn’t been floating around very long.
Cyndi gave me a few yards of white from an estate sale trove of fabric she got, thus I decided to use white on this quilt.
I know white for a donation top is a bad idea as it will get dirty, but a design wants what a design wants.
I have one more section to sew before I decide if it needs to be larger. Without the left hand section sewn, the top is about 40 in. x 40 in. at the moment. I might not want a white strip on the end. We will see.
As you know from the Sampler Quilt class tutorials, I am very fond of people learning all the quiltmaking techniques. It is a way to be free from the tyranny of always having to use a pattern.
NOTE: I am not against quilt patterns and I feel we should all support quilt designers.
Y Seams demo sample
However, at some point quiltmakers will want to make a quilt design they have thought up themselves. To do this, we need to know all the techniques. Thus, I couldn’t say no when SueS asked me to do a Y Seams demo for the guild. As usual, I had to overachieve. I posted a handout to the guild members only site*. Most of the information is in the Y Seams tutorial.
I made a whole bunch of step outs and notes to tell people. I won’t be actually sewing. That didn’t work out well when I tried to show a demo of leaders and enders, thus the step outs.
*N.B. If you are in the Bay Area and want to join, click the join button on the guild site. We also have a Zoom option, though the demos and Bag Club are not always available via Zoom.
We are thanking Laura, a longarmer in Half Moon Bay who has been longarming donation quilts for us for a year or more. Carrie is gathering gifts to make a nice basket for her.
Stella Pouch for Laura
After seeing the Center Street Quilts video on IG showing the making of a half vinyl pouch, I decided to try and make one. I actually made two. One will be for a guild swap. I thought I could probably make the pouch after watching the video, but decided to buy the pattern, the Stella Pouch from Center Street Quilts just to make the process a bit easier.
Stella Pouch for Laura – vinyl side
I looked for more specific directions on the Flying Geese and the vinyl, but didn’t find any. Even with the pattern, I still had plenty of figuring out to do. I knew I could do it. That is one reason I enjoy making bags. There is always something to figure out.
I think I forgot to trim the height, so the pouch is taller than the pattern states. Still, I think it will be useful. Small project bag?
One of the good things about using vinyl for this bag is I was able to use a very pretty lining fabric. Having a good fabric show through the vinyl is an added bonus.
I think I might have a few more of these pouches in my future.
**N. B. : Obviously, you should shop at local quilt shops and support small businesses. However, if you are too busy or can’t find what you need there, I use Amazon affiliate links and may be paid for your purchase of an item when you click on an item’s link in my post. There is no additional cost to you for clicking or purchasing items I recommend. I appreciate your clicks and purchases as it helps support this blog.
As I work through some sewjo challenges, I decided to make another Ends donation top. I have already handed in two donation tops this month, but an empty design wall doesn’t work for me.
I had various ends laying around the workroom and slapped a few up on the wall to see if I could make anything.
Ends n.18 was finished in September, so it is time for another one. I want to use a background fabric with the pieces shown, but I haven’t decided what color yet.
My brown and beige bin was out so I used a beige dotty sort of fabric that has been hanging around for a long time. The sashing uses various cream fabrics, so I thought it would coordinate. The backing was another plain brownish and white fabric. Nothing special, but a large enough piece so I only had to piece one seam. My stash of large fabrics is getting low, so borders and backs are becoming more work.
I said I would make a few additional Ribbon Friendship Stars to make up where someone bailed out. I was supposed to make another 5, but only had the fabric for another four. I hope that is good enough, though I can whip up one on the special Sew Day next week if we need an extra.
I made good progress on my Rectangle quilt, though it does seem to be taking forever.
I am not sure why I am sewing so slowly, but I am. I plan to put a border on this one. I haven’t decided what kind of border or what color yet.
I like the idea of using larger scraps for this type of quilt. I might start collecting such shapes again as I come across larger scraps. It’s a good way to use them up.
These are the two sunflower blocks I made for the Wrap the World in Quilts project to make quilts for Ukraine. Posting the patternlast time generated a lot of interest in making the block. I hope that means people are contributing to the project.
I am also including some blocks people sent me.
Julie’s sunflower
Some of my friends took my pattern and made some sunflower blocks. Friend Julie took my pattern and worked on this block. I am always so excited to see the fabrics people choose. Julie wrote about her blocks (she picked another to make as well) in her blog while I was away.
I really like the center of Julie’s block. It is different, but gives the impression of a sunflower center.
She finished two, one of which I didn’t see in the original post. The one that doesn’t use my pattern is fantastic as well. I am so glad I put up the pattern. It has inspired people to make blocks for a good cause!
Carrie’s Sunflower blocks
Carrie also took my pattern and tried to make some blocks. She struggled with the ‘flip & sew’ sections of the center as I did. Her blocks will be good for the project anyway.
I hope posting the pattern has enabled people to make a lot of blocks.
I started this rectangle donation top informally awhile ago. I decided to clear off some of the lingering, half finished projects and this was one of them.
It was a collection of rectangles I had cut from larger scraps. I used the same 4.5 x 8.5 Creative Grids ruler** I use to trim my strip donation blocks. As I cut them I pinned the rectangles randomly to my design wall. Over the weekend, I got myself together to organize them and the few additional cut the few additional pieces I needed.
For once I used the one fabric for the cornerstones. I had enough of one fabric and it had a lot of variety so I thought ‘why not?’
I am in the process of sewing, but it has been slow going. I’ll get there.
*N. B. : Obviously, you should shop at local quilt shops and support small businesses whenever possible. However, if you are too busy or can’t find what you need there, I use Amazon affiliate links and may be paid for your purchase of an item when you click on an item’s link in my post. There is no additional cost to you for clicking or purchasing items I recommend. I appreciate your clicks and purchases as it helps support this blog.
Back in April I started cleaning out my green scrap drawer. While I didn’t work exclusively on this project, it was a constant companion. I made progress through the summer. Finally, I have cleaned out my green scraps as much as I can. The pieces left, which I have sewn together, are not big enough to make anything, but will be the basis for a Journal Cover or the next Color Improv donation quilt.
Of course, this clean and clear state of affairs won’t last for long. As I work through other projects, this drawer will fill up again in a never ending cycle. It’s the nature of the beast, I guess.
Green Strips Donation top #2
Green Strips #3 donation top
Green Improv #2 (The Swamp Thing) top
The good part is that I made a few quilts, mostly from the scraps in this drawer, for people in the community. These aren’t super large quilts (approximately 40×40 inches), but there are still three of them. These three help me meet my goal of 12 donation tops for the year.
In another part of the never ending cycle, I need to decide which color is next. I might want to work with blue, for example, but really need to choose the drawer that is the fullest.