The green drawer is still relatively empty, though I have a huge pile of unprocessed scraps on my cutting table, so I am sure that won’t last. I need to find some time to deal with them. Maybe Sew Day?
I finished the Holland Pouch while I was in Portland in October. It was a pretty quick sew – ~6 hours from start to finish. I wasn’t feeling my best, so I knew I could make it faster.
Center Street Quilts directional fabric chart
I bought this pattern at Stitch during the July trip home from Portland. The fabric was also purchased during that trip at Sewlarium. It was a great choice for this bag.
The directions show how to position fabric if it is directional, which is the first time I have seen such a feature in a pattern, that I can remember. I’d love to see this type of chart in all bag patterns. I know most say something like “all cutting directions are width x height”, but having the visual makes a huge difference for me. Even before I saw this chart, I drew little pictures of how directional fabric should be cut in my various patterns.
Black Cat Holland Pouch – interior
I used some hippo fabric and hope he remembers visiting the hippo at the zoo when he was young.
This is the first bag I have made for the YM. I hope it is one he likes and will use it. I sent it off to him for his birthday, which was on the 30th.
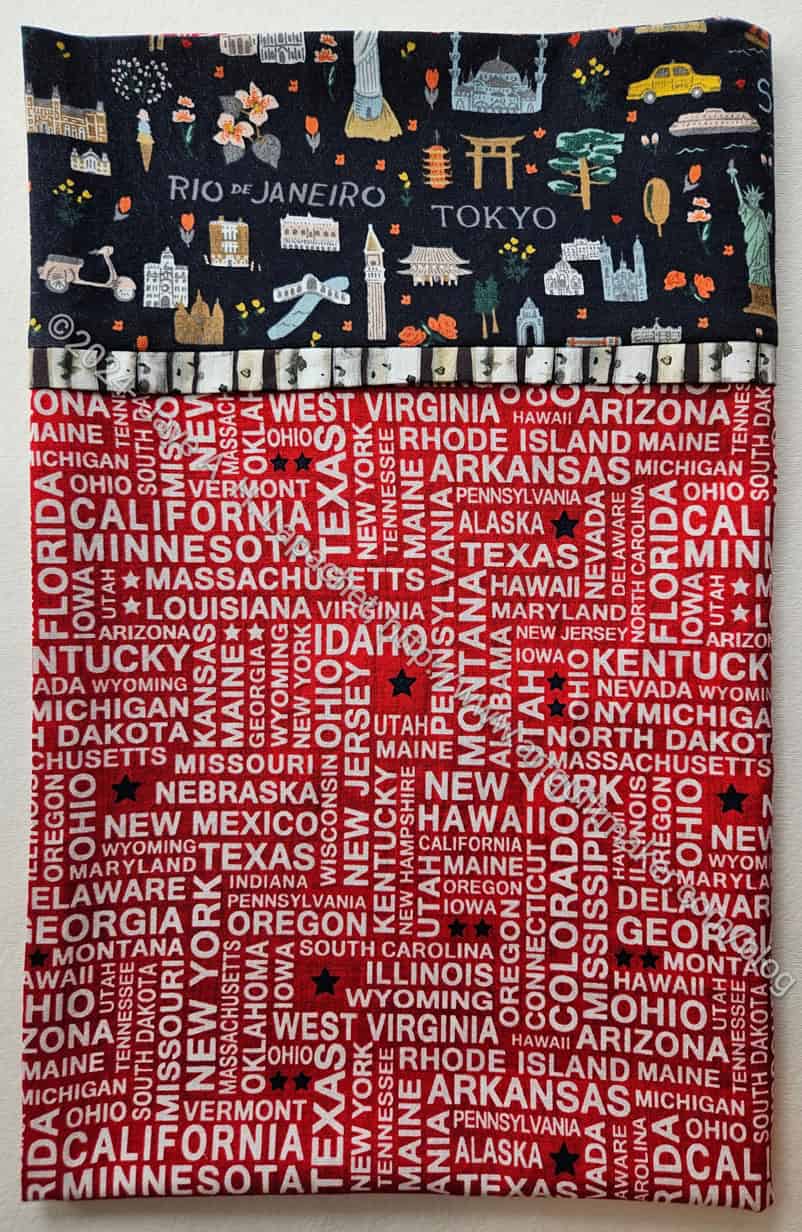
This is not really a Christmas pillowcase, but since it was red, I thought it would be a good one to send off in December.
This one has all the states. I am not sure why some states are in a larger font than others.
Travel doesn’t have to be around the world. There are a lot of interesting things in the states as well as I have found traveling around California with DH. If the youngest nephew can’t quite make it out of the country, perhaps he can do some stateside travel?
I finished the Grab & Go Sleeve very quickly and sent it straight off to my mom so she could use it right away.
Both sides essentially look the same. The only difference is that I put a label on only one side of the exterior.
I also used some ‘webbing’ that Cyndi made me take from one of the Sew Day Free Table offerings. The webbing is made out of cotton rather than plastic, like the Tula Pink webbing I used for a couple of the Take a Stand bags.
Grab & Go Sleeve interior
Since this is for my mom, I dug out the Laurel Burch fabric I used for her Mustang Organizers and used that for the lining.
She received it on Wednesday and said that it fits her portfolio perfectly. She said she really liked it, which makes me happy.
If I can think of things for which to use these bags I’ll make more as they are a quick bag to make, especially if you use pre-made webbing for the handles.
Maria bound Ends n.18 and brought it to the meeting on Saturday. I was so pleased to see it again! I finished it in September so it hasn’t been floating around very long.
I finished the Running with Scissors tote the weekend after I returned from Portland in October.
Running with Scissors tote – front
The time I spent in Portland working on the Running with Scissors tote was well worth the time. I am pleased with how it came out.
I used the foam that Colleen quilted for me and that made the whole project go a lot quicker.
The pattern calls for a border on the front, but I like the large flowers of this Philip Jacobs print so much that I didn’t put it on. Both the front and the back look similar, but I don’t mind.
Running with Scissors tote – inside
The inside looks really great IMO. I forgot to cut all of the zipper and pocket bindings. Fortunately, I had the turquoise stripe with me and it went well with the zippers and the general overall look of the bag.
I customized some of the pockets for my tools. For the mesh pocket, I divided it into a very large section and a small section. The large section will be used for a rotary cutter and the small section will be for Sewline pencil refills.
Running with Scissors tote – outside
I thought the webbing I used for the handle would hurt my hand, but I think the bag won’t get heavy enough to be a problem. I do like the glitter of the webbing. Perhaps having a little sparkle in my life is a good thing.
I was surprised at how small this bag is. I think of it as being much larger. I wonder if I could enlarge the pattern. The pattern is so complicated that I think it would be difficult.
Take a Stand & Running with Scissors
This bag is designed to be used with the Take a Stand bag**. I made a Take a Stand bag for myself awhile ago. As soon as I was finished with this RwS tote, I tried it with the Take a Stand bag and I was so pleased with how it looked.
Now I need to fill this bag up and take it to Sew Day.
**N. B. : Obviously, you should shop at local quilt shops and support small businesses. However, if you are too busy or can’t find what you need there, I use Amazon affiliate links and may be paid for your purchase of an item when you click on an item’s link in my post. There is no additional cost to you for clicking or purchasing items I recommend. I appreciate your clicks and purchases as it helps support this blog.
My brown and beige bin was out so I used a beige dotty sort of fabric that has been hanging around for a long time. The sashing uses various cream fabrics, so I thought it would coordinate. The backing was another plain brownish and white fabric. Nothing special, but a large enough piece so I only had to piece one seam. My stash of large fabrics is getting low, so borders and backs are becoming more work.
In my job there is a concept called ‘MVP’. It means minimum viable product, which is part of an iteration process that promotes getting something out and eschewing perfection. In the quilt world, I like to say ‘there is always more fabric’.
I finished my Sun Hat. It is a MVP.
Sun Hat (Heather Handmade) – side view
I thought I had done everything properly. I was unsure about my progress, so I had Mary C help me at a recent Sew Day. I redid the brim piece after leaving the seams out meant the brim was too big for the crown. Still, there was so much adjusting and redoing that the hat just doesn’t look right. The side parts of the crown fold in too much on the top and I had to ease in the size when I sewed the pieces together.
It didn’t come out as well as I had hoped, but it isn’t terrible and someone will wear it and like it. I want to try again. I bought the Sew Hungry Hippie Bardot hat pattern. I haven’t started it yet, but may try to get it done soon.
Despite my objections to the zipper installation, I decided to make another Holland Pouch. While I was in Portland, I went to Modern Domestic and bought some fabric, then went back to my AirBnB and made the pouch. The second time it only took me about 4 hours from cutting to completion. I couldn’t make these for a living, but I was pleased with how fast I did it.
Bird Holland Pouch Interior
I have been buying a few Charlie Harper bird prints lately. I don’t know why as I don’t usually make projects out of novelty prints. I bought this particular print because Amanda loves animals. The print is sophisticated as well. Most of Charlie Harper prints have a bit of humor as well as some sophistication.
The inside of the bag is made from a Ruby Star scattered star print. The color doesn’t exactly go with the outside, but choices were limited at Modern Domestic. I think the variation looks nice.
I also couldn’t wash the fabric (AirBnB and all), but for a bag, just this once I was ok with it. I was concerned about the smell from ironing the fabric, but I didn’t smell anything and didn’t have any breakouts, so it was all ok. The Charley Harper fabric is organic, so maybe that makes a difference?
Quilting Bird Holland
This pattern requires quilting the exterior, foam and lining fabrics together. Instead of quilting on each side of blue tape only, I put down a piece of blue tape, measured 3 inches to the right and put down another piece. I did that on both sides of the center piece of blue tape until I ran out of space. This means that my quilting isn’t as close together as in the Oxbow tote. It also took less time and I didn’t get as irritated.
Holland Pouch side
The quilting went faster, but it means there is a 3 inch gap between some of the quilting lines. You can see that there is a dearth of quilting lines on the side towards the top, because of the 3 inch gap. I probably should have turned the fabric around, so there was more quilting on the top.
I also had a bit of trouble keeping the fabric taut, so the 3 inch spacing may not have been the best interval. Oh well. Live and learn.
Bird Holland pouch top
This bag has a bit of an accent around the zipper, which I think looks nice in this bag.
This is a very quick bag to make and I am pleased with the outcome. I was more pleased that Amanda loved it. She really helped me during the visit and this was a small token of my gratitude.
I am on the fence about whether this pillowcase encourages travel or not. I thought the fabric was entertaining, so I bought it and now it is off to be encouragement for the youngest nephew. Fingers crossed.
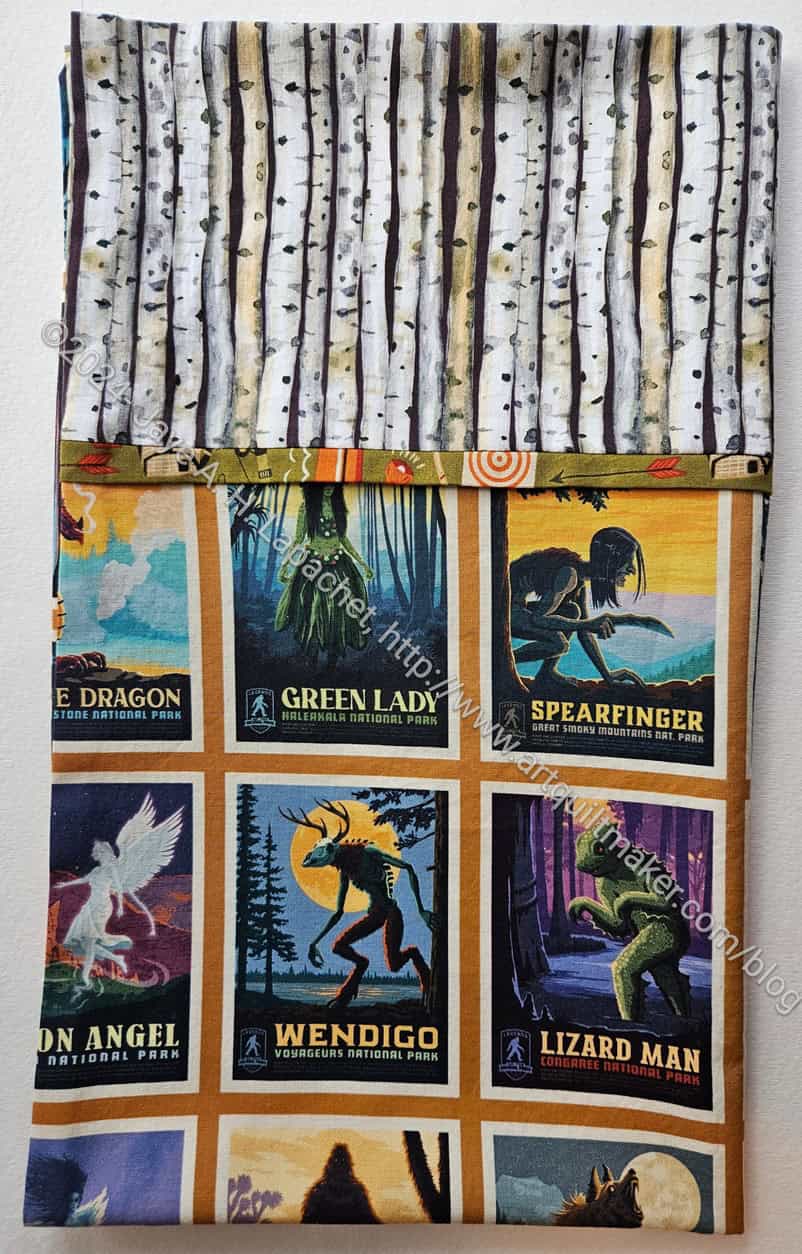
Friend Julie told me that most of these monsters are made up to give each National Park a monster (or legend?).
I found an article on a site I have never heard of called “6 Mythical Beasts and the National Parks They Call Home.” The article tells you what equipment you’ll need to stalk them.
I finished one of the Cotton Candy pouches and was reinvigorated after I did a better job than I did with the Slimline version.
I didn’t have the right length zipper in pink, but I thought the orange went with the fabric. I also thought I should have fussy cut the side panels, but didn’t think of it until later. Still, I am happy with the way it turned out.
I used similar fabrics to the fabrics I used in the Pink Project v.1. I wondered if I should make a whole set using the same fabric. I might have enough of that Denyse Schmidt Flea Market Fancy fabric to make a few more bags and pouches. It might bore me, though, to use the same fabric. I already have a different print chosen for the Chickadee. I don’t want to change that choice at the moment.
Pink Project Cotton Candy interior
Pink Project Cotton Candy interior
The inside is also a Flea Market Fancy print. I filled it with some self-care items and it was used to raise money for Phi Mu Foundation, which provides scholarships and disaster assistance to women. We made $80, which isn’t a lot, but the event was only attended by 9 people. I need to get some more self care items to fill up the next ones.
No, this is not pink, but I am still making it part of the Pink Project, at least for the time being. I don’t want to make a new tag for every project I decide to start.
I was so excited by the triangles that I wanted to use this fabric. I think it is a Carrie Bloomston fabric, but I can’t remember where I bought. I am pretty sure it was a recent purchase.
As mentioned, I am doing a blue version as well as a pink version for two different groups to auction off.
Blue Triangle Cotton Candy – side
I wanted to cement my technique for the Cotton Candy pouch after the mistakes I made with the Slimline Cotton Candy. This is one of the pouches that I made. I decided to make one each for the two projects.
Blue Triangles Cotton Candy pouch inside
While I did better this time on lining up the pieces, I didn’t do as well on the zipper. I am not sure why. It looks really wobbly. Most people won’t notice, but it bugs me.
I wasn’t able to anchor the the sides to seam allowance like I did with the Hildegarde. That might be a challenge for another day.
Blue Triangles Cotton Candy zipper end
I did veer the zipper on one side of this bag, but not on the ‘top’.
I decided to fold over the zipper ends and place them where I wanted them rather than hoping for the best when I was veering the zipper. I think the ends look pretty good.
I finished the Swamp Thing (Green Improv #2), which puts me close to 50 yards used (net). Yes, I have sewed quite a bit in the last 2.5 months. I am pleased.
It is mostly green, but very light. I thought it might be the photo I took, but I took a second one and I think it just looks light. As mentioned before, I seem to have a lot of light greens and yellow greens.
This is finished which means it is time to select another color.
The Half Hexie Star is finally finished and off to its new home.
Someone said that I must really like the people to whom I gave the quilt. I do like them, but as I often say: there is always more fabric. I like the people and the quilt was a lot of work, but there is always more fabric. The point of the quilt was to have something to work on in the evenings when I was watching TV and visiting with my DH.
Half Hexie EPP back
Now I am on to another EPP project and the Half Hexie Star quilt will be loved in a new place. As an added bonus, I have spread the joy of quilting to a new couple.
I made another lined Drawstring bag from the Jeni Baker In Color Order pattern as a gift bag for a friend. I was pleased to use the Anna Maria poppy fabric. Can you tell she loves pink?
This one is the Artist size, which is slightly larger than most of the drawstring bags I have made. The size I normally make is called the Project size. I just wanted to try something different this time.
The Artist size is one of the sizes that comes in the paid pattern. As a side note, Jeni Baker has an annual Lined Drawstring Bag Sew Along. It’s coming up in November 2024. It’s hard to find another great way to get familiar with the pattern.
I am still struggling with the ties and really need to figure that out. These look fine, but I always struggle.
I filled the bag with some self care supplies. She said she really liked everything. My friend’s mother died right before her birthday and this was a great way to let her know I was thinking about her.