FOTY 2009 Progress

FOTY Progress, April 2009

Here are my latest FOTY blocks. I love them! They make me feel so cheerful. Can you tell I have received a lot of blues and pinks?

Some of these fabrics I am going to pull out for a project for which I am collecting fabric. Not sure which ones, but I’ll post a pic when I get a little further along.

Fabric of the Year 2008 Project

I have mentioned dozens of times that I have been working on and off on the FOTY project all year. That is sort of the idea of FOTY (Fabric of the Year). You work on it all year, especially cutting fabric. In my case I also sewed some of the patches together. Now the top is finished and I will soon be moving on to FOTY 2009.

Basics of the project:
2.5″x4.5″ rectangles
Cut one patch from each piece of fabric purchased in 2008.

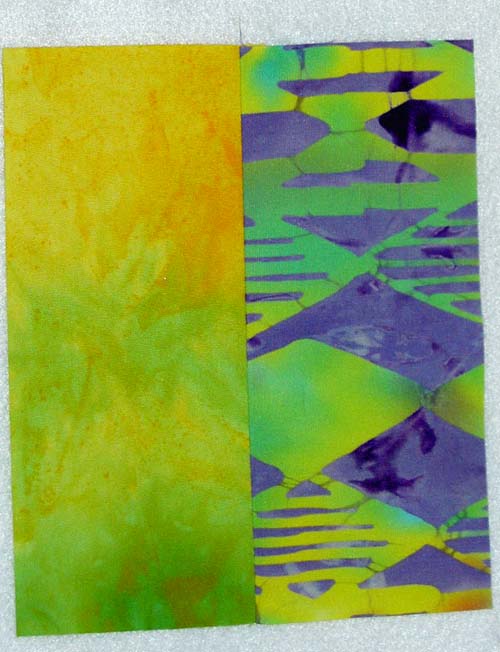
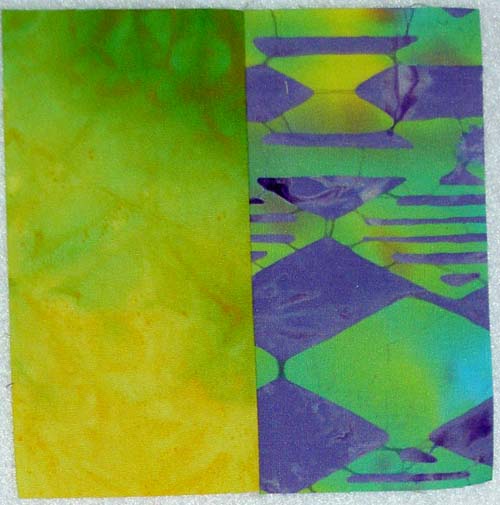
I did find one fabric that was missing and that was the purple vegetable fabric I used to make the eggplant/lemon tote. I have a little piece of the veggie fabric that I will put on the back, but I would like to make another tote with that fabric as the one I made didn’t quite come out the way I wanted. Sadly, I don’t have a large enough piece. Gladly I will be able to admire it on the back of the FOTY 2008 quilt!

This project was a joy to work on during the retreat weekend, as I may have mentioned. I didn’t realize how much fun it would be. Partially, it was one project to work on so I could focus that alone. Partially, people made really wonderful comments on how cheerful it was and what a good job I was doing, which boosted by ego a bit.

One of the huge things I decided not long before leaving for the retreat was to change the direction of the project. I started out with the idea that the patches would be oriented in a rail-fence type setting, like I show in a post from August 18, 2008.


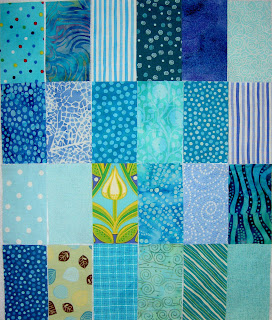
After playing around with that stack of blues over the holidays, I was really inspired by the different blues next to each other. I played around with the unsewn patches I had madly cut in January. Trying the layout of the patches out the new portable design wall sealed the deal. I decided to work on more of a blended / color wheel type look to the quilt. That is what necessitated all that ripping. Three days worth, to be exact, though to be honest, it was all day, every day.

That brought to mind the challenge of the FOTY projects. The fabrics purchased during the year may not necessarily go together and there has to be some way to make a cohesive project. At least for me, as I didn’t want to make a project with no design cohesion. TFQ solves this design challenge by adding in other fabrics for the background.
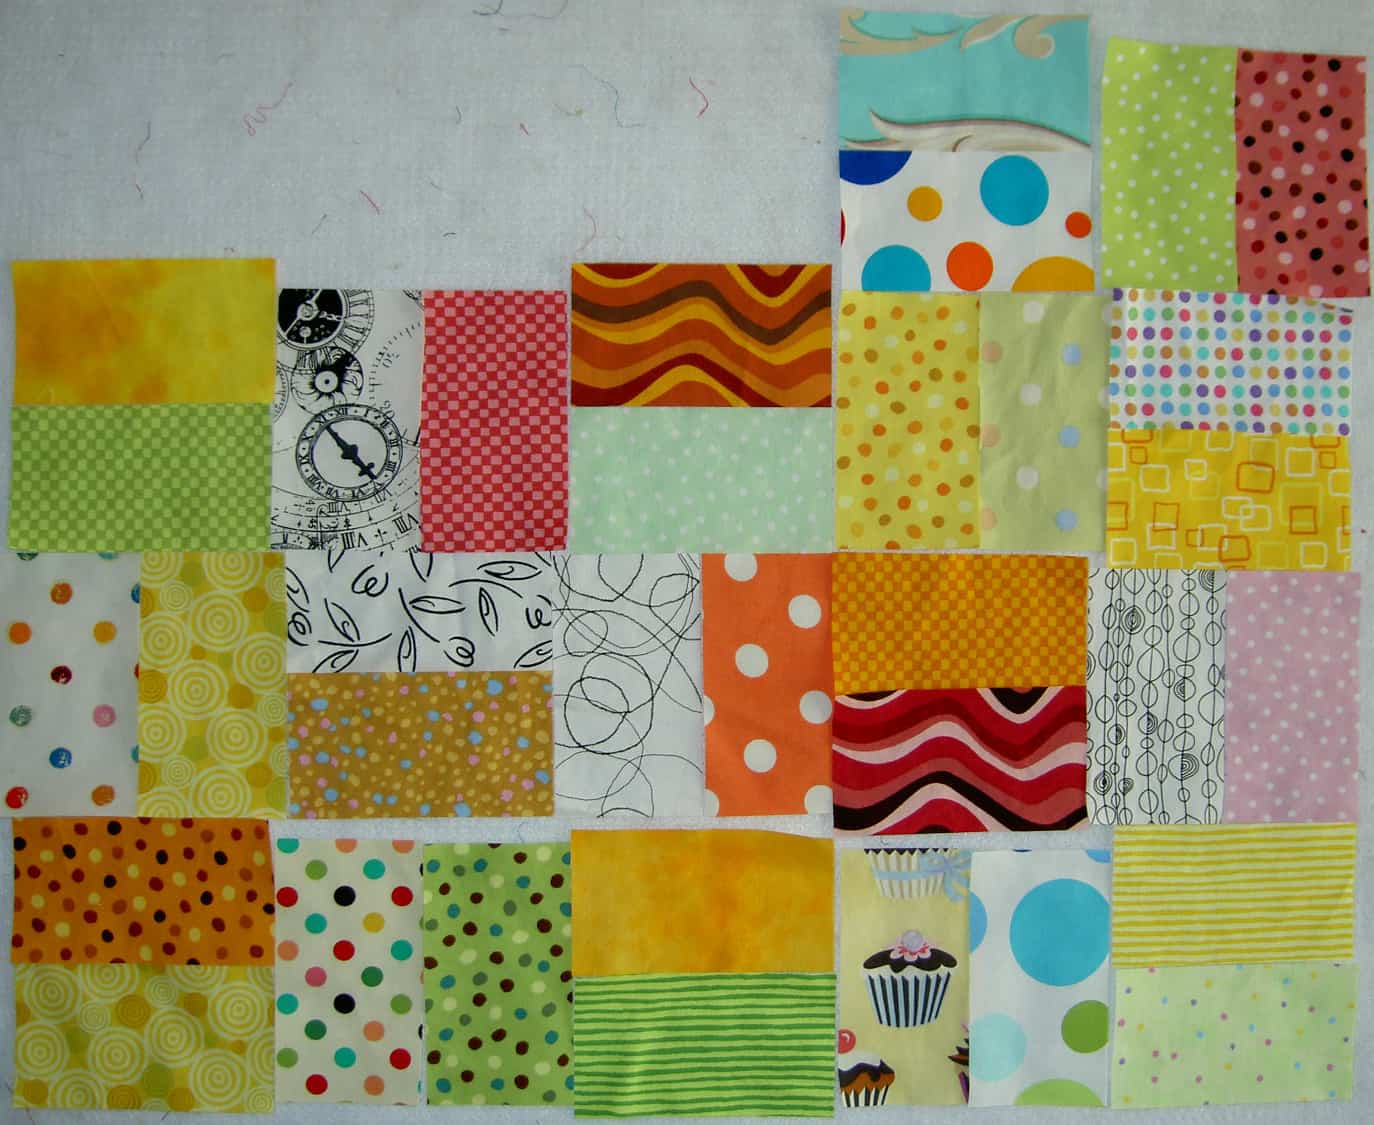
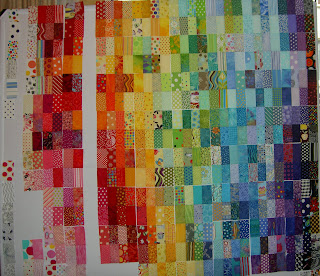
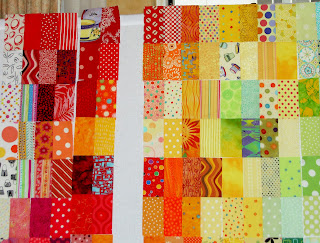
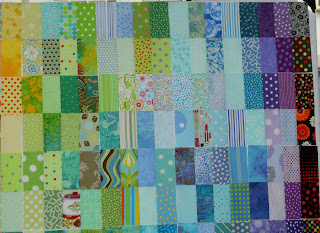
Above are all the pieces that were not sewed together. I put them all up on the portable design wall to look at them. It looks like a jumbled mess here, but that is part of the design process. 😉

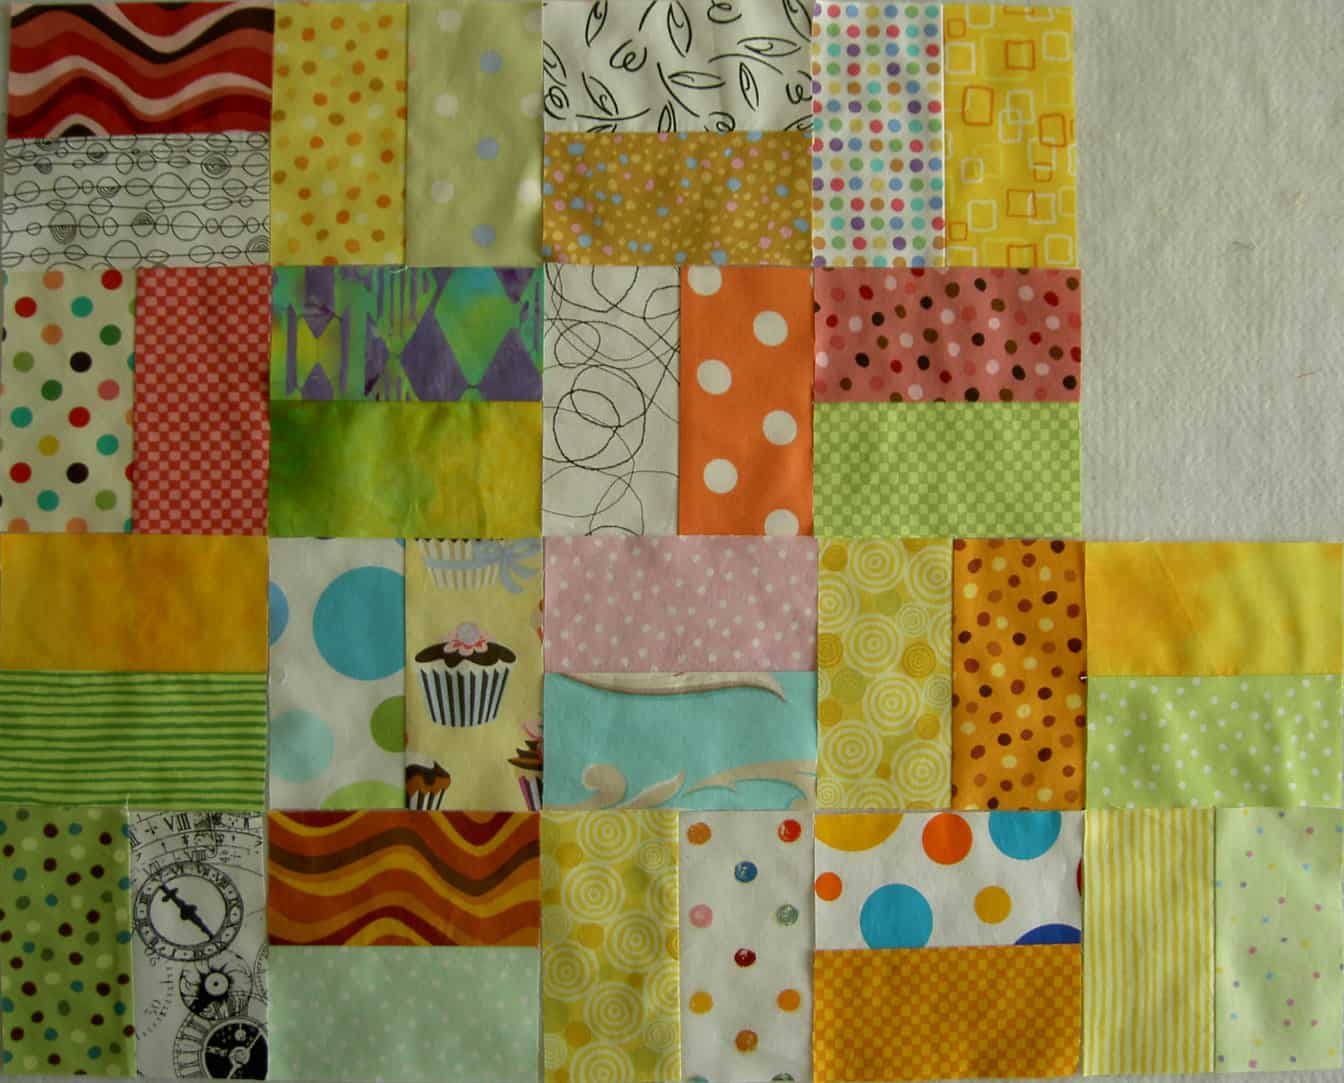
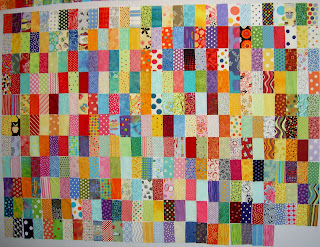
The above is an in process photo. I don’t, wherever possible, like to sew tops together in rows. The seams never seem to line up and that frustrates me. Good technique and well sewed quilts are important to me. It really depends on the piece as to how I end up sewing it together. Generally, I go for chunks, as TFQ calls it. She suggested the technique to me and I have embraced it. On this piece, I started in the upper right hand corner and sewed two rectangles together and did that all the way across the quilt. One thing that always fascinates me is the way the top shrinks as I sew. I know it is the seam allowance, but to see the big space appear as the piece goes together just amazes me for some reason.

Above I was working my way across the quilt sewing 2 sets of 2 rectangles together to make a chunk of 4 rectangles.

In the above photo, you can see that I have made larger chunks. Eight pieces are sewn together by now.The process was:

2 rectangles sewed together

2 sets of 2 rectangles sewn together = 4 rectangles

2 sets of 4 rectangles sewn together = 8 rectangles (like the above photo)

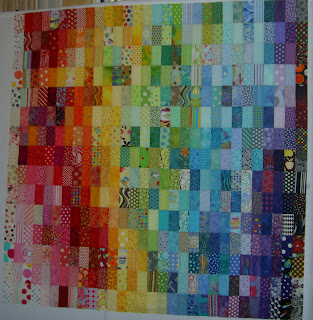
So, the top is complete. I am feeling like I can plow through some backs this weekend, so making labels is on my list. I am thinking that this might be a quilt that I can machine quilt on the longarm. I’ll let you know after Friday’s session.

Finished Top!

I finished this top, the Fabric of the Year 2008 top, at the quilt retreat this past weekend. It was a great project for the retreat, because it was enough work to consume almost all of my sewing time there.

The FOTY concept was created by TFQ, who decided that it would be a good idea to try and use a piece of fabric shortly after buying it for a couple of reasons:

  1. If she liked the fabric, she would find out while the fabric was still available.
  2. It would be a good exercise to confirm what fabrics she commonly used so she could buy similar ones later.
  3. She would still like the fabrics

I really like this top. I think it glows. It is very cheerful.

I will have more about this later, but I had to post this for your viewing enjoyment.

More on the FOTY Front


I am plowing through the massive amounts of fabric that I bought and here are some from which I have already washed and cut a Fabric of the Year patch. They still need to be sewn together.

I have to admit that I am already thinking about the FOTY project for next year. Something with a 4patch, I think.

FOTY Progress

I sat down today and sewed together all of the FOTY pieces I had cut. I had two batches from a number of sources. The one belowwas from my Memorial Day Weekend travels. The rest of the fabric was from a rip or wo to new Pieces, the fabric I bought while TFQ was here for EBHQ in April and miscellaneous online orders.

The above batch is much more cheerful than the group below.
Now I am only behind on the fabric I bought in Seattle over the weekend. At least it is washed.

PS I don’t know what is going on with the size of my photos. Ever since I got the new version of Photoshop Elements, I can’t adjust the size like I used to be able to in Photoshop Elements 3.0. I may have to breakdown and buy the book THEN go through it. I’ll work through. Thanks for your understanding.

Inspiration and Thoughts

I have been to Seattle on trips when the weather has been challenging: pouring down rain and a flat grey sky. This trip, however, displayed really beautiful weather with a lot of opportunity for nice shadows in the photos.

This was a door we walked by. The door grille/safety gate is a really interesting design and it made a great shadow. The circles make me think of bubbles and I like the way they are contained in that oval shape.

TFQ’s block of choice for her 2008 Fabric of the Year project is a Shoo Fly variation. She doesn’t necessarily use only fabric she has bought this year. This makes sense to me, since her blocks are much more complicated. She puts the new fabric in the corners, the triangles and the center and then chooses something else, which could be from her existing fabrics to go with the new fabrics.


The three below are very sherbety looking. I love the way this project illustrates how different blocks can look just by using different fabrics. A person can learn a lot about color from piecing the same block over and over. I have done this (though not to the degree that TFQ has done it) and think it is more exciting than it sounds. TFQ could speak to this point much better than I can. As you can see, there is one Economy block, on the right, from her FOTY project last year. Below are more of the Economy blocks. Again, we put them up on the design wall in groups and took photos of them.

Below are blocks made with mid-century fabrics: 1920s, 1930s and 1940s. TFQ also used fabrics that look like mid-century fabrics.

Fabric of the Year Project etc.

I decided to do the fabric project that I discussed in two previous posts here and here. This project uses fabrics I have recently purchased in some project right away.

FOTY 2008 recent fabrics

This is the fabric I recently washed (a light load). They are arranged in no particular order. I cut the pieces and slapped them up on the wall.


FOTY 2008 blocks in process

Above are the fabrics after I rearranged them a bit and sewed them together. You can see the test block in there as well.

I did run across a few situations I had to decide about as I pressed the fabric, so here are the complete new rules:

  1. 2.5″x4.5″ pieces of each fabric purchased.
  2. Fabrics that have been washed, but not pressed are ok to add to the mix, even if they were purchased last year.
  3. Fabrics purchased twice in the same year should be included twice.
  4. OK to rearrange fabrics as desired.
  5. Press to the dark.

I did find it to be fun, as TFQ said it was. I did find one fabric that I really didn’t like and will put in the Freecycle pile.

Artgirlz supplies
Artgirlz supplies

Needing some retail therapy this week and still having Friend Julie’s post on my mind drove me to the Artgirlz site. I was amazed to find that the creativity pack and the rubber stamps came within a few days, even though it was sen from Rhode Island. Nice service! The thing I have to figure out is how to mount the rubber stamps. I know how to mount them, but don’t have the mounting thingies. Perhaps there is a rubber stamp store somewhere where I can buy some. Artgirlz have some, but they have a variety of sizes in one pack and not enough of the little ones.


Pencils
Neocolors

A few months ago when I was really trying to get inspired to do some visual journaling, I bought a few writing/drawing instruments to inspire me. I finally tried these NeoColors last week. They are like crayons, but more waxy. I wasn’t that impressed as I was looking for something softer. I probably won’t be buying more of them.

Cross Block
Cross Block

Finally, there is good news and bad news on the Cross Blocks (Flowering Snowball). The good news is that I finished another block. I have been working on this one for several weeks, which means that it was mostly languishing in my handwork bag. It is displayed above with some new fun fabrics.

The bad news is that I seem to have lost the templates. In a frenzy of tidying, the stack where the templates lived for months was swept away and no longer exists. The templates are gone now, too, and I can’t think of where I might have put them. Darn! I wanted to cut some more pieces. I can reprint them and start over, but I don’t want to get into a problem with piecing (I have had enough of that!), so I will look for them some more. Cross your fingers that they show up.

Coalescing Ideas

Last year, my good friend, The Fabric Queen, embarked on a project to use a little piece of each fabric she bought all during the year. The goal was to see how the fabric worked in a block, so she could buy more if it worked very well or not worry about acquiring more if it wasn’t optimal for actual quiltmaking. I thought this was a great idea. If I did something similar it would alleviate the problems that I had last year with trying to find old fabrics. It is on my mind, but I haven’t yet done anything similar.

Earlier this week, after reorganizing the reading material next to my bed, I came across a Summer 2005 issue of American Quilter magazine and the cover quilt drew me in and got me to thinking, on various levels about TFQ’s ongoing project with her new fabrics.

Things Change
Things Change
Jane Blair‘s quilt, Things Change, first of all is a really amazing piece of work. The way the layers peel away to reveal another layer is masterful in construction. However, it was one piece of the quilt on the cover that particularly fascinated me. In the upper left hand corner, the artist has placed some simple blocks made up of two rectangular pieces. I am not fond of the colors, but in this quilt, they make perfect sense and Ms. Blair achieves (what I perceive to be) her goal of showing how quiltmaking has evolved.
The thought began to rumble around in my mind that this block might be quick enough to piece for me to actually make blocks using the fabric I buy throughout the year. Then thoughts evolved to the size of the block and the size of the pieces. I haven’t looked it up in EQ6, but it isn’t really such a difficult block that I couldn’t just cut a couple of rectangles and sew them together, however I do think that the ratio of the patches to each and the whole block would be important. It would also be important to determine the right size of the block, so as to showcase the fabric without taking too much fabric or making too much of a commitment to this exercise as a project. I don’t want to make really difficult blocks with 30 pieces. If I do such an exercise, I want it to be simple and effective.

I think that making this rectangle block in a 12×12″ size would be crazy. I wonder if it would work in a 4×4″ size? The patches would be 2.5″ each, so the block would be a finished size of 4″. I suppose I need to fall back on my mantra, made popular in my circle by Lorraine Torrence, “Make Visual decisions visually. I guess this means I need to wash some fabrics!

FOTY 2008 block
FOTY 2008 block
FOTY 2008 #2
FOTY 2008 #2

I sewed a couple of options and it looks like the larger one is better. It is great to be inspired by other quiltmakers. I also like talking about quiltmaking with others and being inspired by our conversations.