I made good progress on the Frosted Star quilt over the weekend. Not as much as I would have liked, but I never make as much progress as I would like!
I finished the border piecing for the Frosted Stars. It required that I piece a whole Jelly Roll of strips together in sets of 10 strips each. It was fun to arrange the strips in different and, hopefully, pleasing ways.
I have an amazing amount of leftovers from the above piecing exercise. The pattern refers to a second pattern to use for the leftovers. I am a little annoyed that I would need to buy a Jelly Roll and spend a bunch of time pressing the strips and piecing them together only to find that I needed less than half of the pieces. Isn’t there a better way? It may be that I did need strips that long in order to make the bias sashing/broder strips work. But it may also be that they wanted me to buy a whole Jelly Roll. I suppose I will have to make a second Christmas quilt. Or I could just waste the fabric pieces.
Frosted Stars with Turquoise
My great feat was that I am now ready to put the whole thing together. Since I need to make visual decisions visually, I laid out all of the pieces on two different backgrounds to see which I liked better. I also got opinions from around the house. One opinion was that the turquoise looks like ice. The stars really stand out in this piece, which I like.
At some show I bought a bunch of a turquoise batik to use as needed. I wouldn’t use it all for the background to this quilt, but I wouldn’t have to piece strips together, because I have a long enough length to just cut one piece. In looking at this layout, I think I would have to add a border strip around the outside if for no other reason than to stabilize all of those bias edges.
Frosted Stars with Snowflake Blue
The other background color we considered is the snowflake blue that is part of the 12 Days of Christmas line of fabrics. In this rendition, we noticed that the blue bias strips that make up the borders and sashing drop out, because the snowflake blue is so close in color. The look of this piece is much more subtle.
I have had some interest in the Zig Zaggy Quilt. I have had a lot of nice comments. While, it is not a completely original design, being related to the Oh Fransson! New Wave pattern and the Happy Zombie variation, I thought you might be interested in my version of how to make this quilt.
First, the differences: Oh Fransson’s pattern using templates. Happy Zombie uses the EZ Quilt wedge ruler. My variation uses the longer Philips Wedge Ruler.
Supplies
Basic Sewing Kit
Sewing machine
thread
2 Jelly Rolls (one Jelly Roll will get you 4 rows and a bit of fabric for the border)
sashing fabric (not sure how much you need for this project. I bought a 5 yard piece of Kona Snow and have been hacking bits off for various projects)
Mary Ellen Best Press
10 degree wedge ruler (www.phillipsfiberart.com)
stilleto
quarter inch foot to fit your sewing machine.
iron & iron board
Directions
First, I cut strips of the Kona Snow, selvedge to selvedge, 1.5″ wide. I probably would cut them 1.75″ or 2″ wide if I were to make this quilt again.
Press strips
One by one, lay out your strips on your ironing board. Spray with Mary Ellen’s Best press and press with a hot iron. Follow the directions on the MEBP.
Place ruler on Jelly Roll Strip to Cut
After pressing the Jelly Roll strips with Mary Ellen’s Best Press, take your strip over to the cutting station and trim off the selvedges. Double the strip. Place the ruler on strip lining up your preferred ruler line with the bottom of the strip. My orange post it was used to remind me where I was cutting each time.
Line up small ruler
Use a small ruler and line it up against the short end of the wedge ruler. Remove the wedge ruler and trim the strips (remember your strip is doubled) to the desired length.
Lay out Wedges
It is important to lay out the pieces, before sewing, so you know which way the wedges are sewn to the sashing strips. I also found this layout helpful in order to keep the colors in the correct order.
Sewing Wedges to Sashing
Carefully line up the wedge skinny end or fat end towards you depending on the orientation of the wedge and sew without pushing or pulling the fabric. Remember you are working with bias.
I sew each of the wedges to one sashing piece in assembly line/ chain piecing fashion. After I sew, I press and then lay the wedges in order by color on the floor. You could also use a design wall. Once that is done, all wedges need to be sewn together.
After stitching, press
After stitching, I lay the two pieces on the ironing board. The piece towards which the seam will be press should be on top. In the photo above, I am pressing towards the color/wedge and NOT towards the sashing. I spray lightly with Mary Ellen’s Best Press and PRESS (not iron) the seam in the correct direction.
Lining up Sashed Pieces
Before trimming, lay the two pieces and eyeball how they would be sewn together.
Trimming Wedges
After eyeballing the sashing, move the pieces aside and trim the sashing so it aligns with the top and bottom of the wedge. This may seem wasteful, but it is a lot easier than trying line up perfectly cut sashing with a diagonal line.
Sewing Wedges Together
After trimming, line up the corner (bottom right in the picture above) on the sashing so that when you put the pieces in the machine there is a little v that is approximately 1/4″ from the edge (bottom in the picture above). You may not be able to see the v as it may be on the bottom.
Trimmed Wedge Group
Above is what the trimmed wedge group will look like.
Line up Wedges after they are Sewn
After trimming the ends off the wedge group, put it back in it’s place in line, so you don’t get confused about where these colors go. You want to ensure that the colors are consistent lengthwise down the quilt.
Keep sewing the groups together until you have a whole row.
Once you have two rows of wedges completed you need to sew the rows together.
Press Consistently
In the above photo, you can see that I carefully pressed the seams in the same direction on all the pieces in this row (towards the sashing). The row on the bottom has the seams carefully pressed in the opposite direction (towards the wedges). In that way, I was able to nest them together before sewing the row. This helped the pieces to line up when I put the rows together.
Sew Slowly
Notice: LOTS of pins!
Lots of Pins, Slow Sewing
When putting the rows together, pinning is very important. Also, using a stilleto and sewing slowly really helped.
Press Row Seams Open
Look! The world didn’t end because I pressed the seam joining the two rows together open. It makes the join of the two rows lay flatter. If you have gotten anything from this post it should be that pressing is really an important aspect of putting this quilt together.
You want success? Press. Carefully.
Finished Top
I left two edges wiggly. I didn’t feel like squaring them up.
Here are the Frosted Star blocks. After all the drama of this project, I have finally completed a major hurdle.
The next task is to sew the border together. The border is made up of Jelly Roll strips. We’ll see how that goes. I probably need to get a Mary Ellen Best Press refill to get through all of those strips.
The thought of all of those strips makes me think that I am done with Jelly Rolls. Time will tell though. As I love to yell at the baseball players on the radio “it’s not over until it is over!”
Here are four of the blocks I have made for my Frosted Stars project. There are a couple of things I found and a couple of things I decided.
I found that the red is not working. It is too intense for this project, so I am not going to include any other red in the blocks I have made six blocks so far, which is slightly less than half of what I need.
I also decided that I would use the turquoise primarily for the background triangles. I decided that I am going to include a couple of blocks with the silver for the background triangles. I am also going to include a couple of blocks with other blues. Perhaps I will include only one, perhaps more. I haven’t decided.
My next step is to cut a bunch of background squares so I can put more blocks together. I haven’t worked on these blocks since last weekend as I have either not been sewing, pressing and cutting diamonds or have been working on the Zig Zaggy back.
This project was, in some respects, all about the fabric and using a whole line of fabric. However, it became more about the piecing as I worked through the rows. It was a pleasant challenge to cut, press, sew, press, trim sew and press. I was able to use the bias to put the rows together so the colors would match. I think it looks nice.
I kept the bias and the softness of the Moda Jelly Roll strips under control with Mary Ellen’s Best Press.
You cannot see the edges because I had to take the picture at an angle. I even stood on my desk and wasn’t tall enough to snap the top straight on.
I want you to see the edges, because I want your opinion on what I should do for the borders.
First, I am only applying a border to two sides. The other two sides have a slightly angular edge and I want to keep that as a design element.
Second, I am not much into chopping off edges, even if that is the piecing pattern. I prefer self bordering my quilts, which finishes out the design from the middle. This is a different kind of quilt, which makes me think self bordering isn’t possible here.
Third, if self bordering is possible, I don’t know that I have the patience.
Fourth, the spiky border, a la Gwen Marston, seems to too spiky for this piece.
Zig Zaggy Edges
In the second photo, you can see the two edges, where the color ends abruptly, that I will border. My first thought is to sew some strips of Kona Snow on them and then add soem color somehow. Fan like elements, perhaps?
This block, Four Columns, is suitable for 2 or 4 fabrics. When you cut the strips for the pieces, you can cut a full strip as you will use it for future blocks.
Note from the Management: Comment and let me know if you are working on this project and whether you would like it to continue.
I had some fun over the weekend piecing the Zig Zaggy quilt. I felt a great deal of joy in my sewing this weekend. I know that sounds weird. It is a weird word to use for sewing, but I can’t think of another word that expresses how I was feeling. I am in love with piecing and color right now and simply, as I said earlier this week, cannot. get. enough.
Zig Zaggy - 4 Rows
I decided early in the weekend to try to piece the entire quilt over the weekend. When TFQ and I are together we can get an entire quilt top done. We do large wall quilts or up to single bed sized in a weekend. I got over the idea of finishing the entire quilt top over the weekend, but I made significant progress. Best of all I had fun.
Zig Zaggy Row 1
The first order of business was to spend some time piecing the first row together. I had to figure out how to do it.This way of putting together the quilt goes completely against what I told Frances not more than a month ago. However, this quilt is not really block based, so it has to go together in rows, I think. I tried a couple of different things, but finally settled on a process for the fourth row.
Piecing the first row together meant that I, first, needed to organize the colors and the fabric designs in such a way that there was variety in the layout. Once I got that task finished, the rest was just rote sewing. Not completely rote sewing, but enough to force me to keep my mind from wandering too much.
Some mind wandering is always in order and I spent some time thinking about the border. I’d like to do a spiky border a la Gwen Marston. The more I think about it and the more I look at the four finished rows, the more I think I won’t do it. We’ll see.
The Zig Zaggy quilt is one on which I made minor progress this weekend. In between other obligations, I worked on two Anna Maria Horner Multi-tasker totes. The whole time I was sewing the bags together I wished that I had some leaders and enders prepared, but I didn’t and I was too lazy, apparently, to stand up, cut some Kona Snow for the leaders and enders.
It seems like such a waste to cut thread after each seam, which is why leaders and enders are great. The sewist can turn a non chain piecing project into a chain piecing opportunity.
Finally, on Sunday, I dragged my carcass to the ironing board, pressed some Kona Snow and cut a bunch of strips for the Zig Zaggy quilt and some squares for the Corner Store quilt. Now I can use the Zig Zaggy quilt pieces as leaders and enders.
I decided that making the small wedges from the 18 degree circle Ruler by Creative Grids and Lynn Edwards that Happy Zombie suggested was not going to work for me. Too much work and not enough bang for my buck. I didn’t know what I was going to do until I saw the 10 degree ruler. One of the things I bought at the Long Beach show was a 10 degree wedge ruler from Philips Fiber Art. The idea clicked in my mind when I saw it. The man at the booth went to the booth next door so he could tell me how wide their Philips Ruler was (I am using a Jelly Roll and didn’t want it to be much wider than 2.5″).
I am using Happy Zombie’s idea, but making the wedges longer. They are approximately 9″. I think this change will make the quilt go faster.
The problem is that I already cut a few patches, which will leave me short of a couple of the fabrics. If I decide quickly, I can get another Jelly Roll in the Me and My Sister Favorites, but I also want to substitute some fabrics for the patches that I cut.
My idea was kind of sparked by some of the antique quilts I saw at Long Beach. Some of them have patches that are completely different colors than related motifs. I don’t want to choose completely different fabrics. I’ll find some similar fabrics in my fabric closet and replace one wedge for each small piece I cut. I found a pink today as I was cutting patches and that will work for one of the pinks I already cut. Th fabrics won’t be from the Me and My Sister Favorites collection, but I hope it will look interesting and not like I am a moron.
If you want to get together with people to make pillowcases, check the AllPeopleQuilt site for info on sewing with Etsy and ancillary meetups around the country. TFQ went home from our trip after hearing me go on and on about pillowcases, to find that she could easily make a few dozen from fabric on hand. Not sure how many she has in the pipeline, but I am looking forward to seeing her finished products. The Child and I are slowly plowing through his pillowcase. It is painful, but he is doing it. Go make some pillowcases!
I hope you know that there are plenty of other opportunities to do good with fabric!
Office Supplies
I am a pen junkie (are there any positive words for junkie/whore when referring to legal things like pens?). My current love is the Pilot G2. Recently, on the Cool Tools Blog, I saw a post about Jet Pens. They also sell journals, notebooks and scrapbooking supplies. Do not blame me if you spent your retirement money on pens and Japanese office supplies.
Sewing
Also on the Cool Tools Blog, I saw a post about a spiral eye needle. Apparently, you can thread this blindfolded! I need this needle. Sadly, they are not sold in regular stores and are expensive, so no losing them. Order from the Spiral Eye Website.
Linda M. Poole, who used to respond to the creative prompt, but got a fabric design contract and has too many things on her plate now is having a contest with said fabric designs! The designs are now fabric and a new line just came out. The deadline is October 4 and all the details are on a recent blog post. Go check out what she is offering as prizes. Did I mention they are FABULOUS prizes? [SherriD: I am looking at YOU!]
Someone pointed out another type of design wall on the Big Tent Quiltcast Supergroup. It is called the Vanishing Design Wall and it looks like it has potential.
Need some quilt-spiration? Bradie Sparrow is doing a summer quilt-a-long. They are on Week 5, but it is easy to find the blocks from the previous weeks. Friend Julie is making the blocks. and has been posting them. I thought about joining in, but really have enough projects going!
Blogging/Social Media
When I used Blogger, I was able to post via email. It was convenient when I went on vacation or saw something inspirational. WordPress has that feature, but I have never been able to get it to work. Amplify, related to Clipmarks, has a way of posting to blogs, Twitter, FB, etc via email. I haven’t tried it yet, but have set it up. We’ll see!
Are you on Goodreads and FB? If so, you can connect them so that the books you read post to your FB wall. I enjoy seeing what quilt books my friends are reading. I also enjoy seeing the fiction and reading reviews friends have written. I kept track of the books I read last year and was amazed to see how many I had read. This year I am a little scared of how many books I am, ostensibly, reading at once. Try it out!
Other
If your child stays at the local library after school, then you might wnat to get him/her one of the seat savers shown in Library God Stephen Abram’s blog. While you are at it, give them a donation. After all, you are saving on childcare, libraries offer a great service and are really hurting right now. Alternatively, perhaps you need one of these for your quilt guild meeting to keep the Quiltzillas away from your preferred chair?
Julie wrote very well about The Sketchbook Project. I have to admit that I got one, too. Since she wrote about it and, basically, wrote everything I was going to say, go look at what she wrote. My theme is In Flight. I haven’t started.
I saw a slide show of a sketchbook by Victor A. Lundy on the Library of Congress site. It reminded me that practice makes perfect and that sketchbooks can be small. The drawings are much better than I can do right now and capture some great images. I studied the people in the drawings especially.
Since I returned from Long Beach, I have been trying to sew a lot. I have a lot of new fabric and I want to play with it. I don’t feel like I am sewing enough, but I am trying.
One of the first things I do is wash and press the fabric. This is a big bottleneck right now. The washing, as I may have mentioned, is done. Since I am not finished pressing so I am, basically, pressing as I need a certain fabric.
The first thing in my sewing adventure I did was cut out and prepare pillowcases for sewing. there is a lot of pinning in the Twiddletails pattern. So far, I have made a total of 3 pillowcases and have two more cut out and ready to sew. I wrote about this a little bit in my post entitled Pillowcase Party. This is ongoing. I have a lot more pillowcases in me, but I am dealing with incremental progress on a number of projects right, so I have very little to show for it.
“Incremental progress on a lot of projects” means that I am working on a lot of different projects and haven’t settled down to one yet. I have been cutting pieces for the Frosted Stars quilt, cutting diamonds, working on tote bags, cutting various patches, trying things for the Zig Zaggy Quilt, etc.
Napkins & Pillowcases (8/2010)
The robot pillowcase (middle), which will be donated, is new. I finished that one quickly yesterday. The two pieces on the right are napkins. I saw the pie fabric and had to get it for napkins. I make pies at Thanksgiving and Christmas and it fits into our family culture. The martini fabric was just fun and not something I would use in a quilt, so napkins again.
I don’t really like making napkins, because the seams don’t press well for me. I LOVE using cloth napkins though. I love seeing different fabrics. I love people’s comments when they sit at my table. I love choosing which one I am going to use for the next few days. I also think it is great way to spread fun fabrics throughout my life.
The napkin fabrics won’t be in FOTY 2010, because I only bought a half yard of each and I use two FQs for each napkin. I like generous napkins and I don’t want to square them up. This time I used two new fabrics (the pies and martinis) and found two fabrics that had been around for awhile with which to pair the new fabrics. When I brought them downstairs the boys were already claiming their favorites.
I finally made the sleeve for the Chocolate Box, so that quilt is nearly done.
Blue Janus Quilted
I also went longarming last week. I am not longarming a monster quilt again. The process didn’t go smoothly and only a small part of it was because of the size. I think it is good to find my limitations. For longarming, I think mine limit is a twin sized quilt.
The shop is having problems with their machine, but it was still functional. We spent two hours working through the machine not working. I quilted about 4 blocks (6″ finished) and we had to rip out all that quilting. Evelyn, my helper, was awesome. We talked about our quilting while we worked on the machine. She told me about her family. Another lady came in to help. No dice. The machine wasn’t working. Finally, one of the owners came in and told us we were using the crappy thread that couldn’t be used with the longarm machine.
My question was why was that thread in the longarm room if it wasn’t to be used for longarming? If it was in the room, I would certainly choose it!
We changed the thread and the machine worked like a charm. Sigh.
The good part is that I got a lot of practice stopping and starting, which I needed.
I was too tired to trim the quilt, so it still needs to be trimmed and it needs the binding of course.
There is more to do and I need about a week to just sew with no other obligations.
If you haven’t started listening to the Off Kilter Quilter podcast, I suggest that you go over and start right away!
TFQ taught me this method of putting quilts together. I have adopted it as my own and use it for block quilts. Very occasionally I’ll put a long border on after the center of the quilt is complete, but otherwise I try to avoid the long seams required to put quilts together in rows.
Step 1
The basic idea is to put the quilt together as you would a block. Sew smaller pieces together to make larger pieces. I avoid sewing in rows as I think the quilt gets out of square if you sew it together in rows.
Step 2
This step makes a larger piece.
Step 2A
This will be for the bottom of Block 1 in the drawing in Step 2.
Step 3
This way of sewing a quilt together makes the pieces much easier to manage, because you are mostly handling smaller pieces.
Optional Step 3A
You can also divide the border into blocks (plan it that way as you make your quilt) so you can include border pieces as chunks.
Optional Step 3B
You have to pay attention to what you do with the corners if you choose to add the borders this way. This technique works better if you are making a self bordering design.
Step 4
Refer to the drawing of your pieces in Step 1.
Step 5Step 5AStep 5B
You have to sew the bottom sashing + cornerstone to Block 3 and Block 4.
Step 6Step 7
You really need to do the two steps above before Step 5B2 even though my numbering is off. Sorry about that.
Step 5B2
I got a little ahead of myself in my drawing. Sew the sashing and the cornerstone to Block 2 and then sew Block 2 (with side and bottom sashing and one cornerstone) to Block 1 with all of it’s sashing.
Step 7A
The above step will make your next chunk.
Step 8
After this first chunk, do the same things for the rest of the blocks in your quilt and keep putting chunks together into larger and larger pieces.
I felt a bit of freedom in my sewing today. I finished the Blue Janus back yesterday (have to write about that, yes) and didn’t have anything pressing to work on. That left me to see how I felt and work on what I felt like.
Frosted Star Blocks
I sewed two more test blocks for the Frosted Star pattern. My pattern is much easier to follow and trimming the segments before sewing the block together works really well. I used a mostly monochromatic color scheme for these latest blocks so I can also donate them to the Rainbow project. I couldn’t resist using a bit of one of my Philip Jacob prints.
I think I need to test the 9″ pattern rather than the 12″, because the 12″ is just too big and the 9″ is what I would use in the quilt. I am thinking that I won’t make this quilt even though I like it a lot.
Merry & Bright Wrap Back
I felt compelled to make a back, so now the back for It’s a Merry & Bright Wrap is finished. This back was less arduous than the one for the Blue Janus quilt. Quite simply, it was much smaller. I also made a big effort to use very large pieces of fabric. Rather than days, it was only a few hours in progress. I am happy that it is done, though I don’t have plans to quilt it yet. I’ll have to see about that.
Making the above back gets me farther along in the various finishing tasks I have to do. I still need to make the sleeves for FOTY 2009 and the Chocolate Box as well as the facing for the Chocolate Box.
Half Moon by ModaKaffe Fassett Dot
I don’t know what is next on the list, but am thinking a tote bag is in order. I have this new black and white fabric that is demanding my attention. Half Moon by Moda will be the bag body with possibly a pink inside.
The Kaffe Fassett dot attracted my attention for handles (I think I may be in a monochromatic phase right now). GAQF only had a fat quarter, but I found a half yard in my fabric closet, which will be enough for the handles. I like the combination of big and small dots.
I am thinking I will use the AMH Multi-tasker tote pattern again even though it isn’t exactly the bag I want. I’ll peruse my other bag patterns first. I do know how to make the AMH MTT and it is a pretty good bag pattern.
This past weekend I mostly worked on the Blue Janus Quilt, which I called the Blue Quilt in a previous post. Those squares required a lot of chain piecing and I needed something to piece in between so that I wouldn’t have to cut threads each time I wanted to press as I moved farther along in the process.
I decided to start the Zig Zaggy quilt and use the pieces to help with my chain piecing.
Measuring
First, I looked at the Happy Zombie site again and confirmed the sizes. then I cut some samples. Happy Zombie used a special ruler and cut 5″ long wedges. Elizabeth Hartman from Oh Fransson! blog originally used templates and cut the wedges longer. I decided to use Happy Zombie’s method and trim later.
Zig Zaggy Sewn
I cut and sewed a few together, think I would do another colorwash look.
Blech!
I am not doing the colorwash. With just the purples it is too boring. the purples are all the same value and just don’t look like the colors are gradating. I am going to mix up the colors. I just didn’t get very far.
I decided to name this quilt the Blue Janus quilt, because Janus is the Greek God of doorways, gateways and transitions. This quilt is going to someone who is embarking on a huge transition. More on that later!
I started out with 6.5″ patches. Each one of those squares is 6.5″, which makes the block about 24′. I needed 16 of the 6.5′ patches across and down to make the desired sized quilt. Yet another monster!
Big Blocks of Big Patches
These are the first of several blocks this size.
Quilt Top Finished
I cannot spread the whole thing out in my workroom, so you get a little piece of the action. It took me about a day plus a couple of hours to sew the whole thing together. Since I want the edges to be straight I added a quilting border that will get cut off later.
Completed Top
You can see a little of the quilting border in this picture.
I am almost finished with the back. It is causing me a few headaches so I wasn’t able to finished before I had to be away from my sewing machine for a week. I plan to quilt this baby at my next longarm appointment at the end of the month so I need to get it done. I am sure I can since I have only a few more seams to get a back that is large enough.
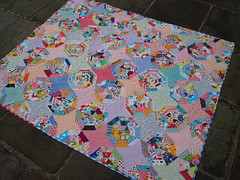
Katy over at I’m a Ginger Monkey has posted her finished Spiderweb. I have been thinking harder about my Spiderweb and, especially, the massive number of random sized strips I have been saving for it.
Katy’s rendition of this pattern is very bright and cheerful. I like the pinks she has used for the background


")