There have been a few bumps in the road to finishing this project. Due to the thick interfacing described in the previous post, this is taking additional time. I thought I would finish over the weekend, but am still working on this.
Sewing Date Traveler lining assembled
The lining is done and ready to be put together with the exterior.
I really should, as a rule, make bag linings smaller than exteriors. This designer didn’t note that in her directions and I didn’t do it. I’ll need to think about a measurement that would be good to use when cutting a smaller lining. For example, should I cut the pieces one half inch smaller or an inch smaller or what?
Sewing Date Traveler Lining with Leash
I added a leash to the inside. This isn’t part of the pattern, but they are easy enough to add. I may make a small Open Wide pouch with a lobster clip for added storage. The leash will also be useful for keys.
Putting everything together is proving to be a challenge. Despite my practice at anchoring linings to exteriors with Lynette, I can’t figure out how to do this one.
If I make this again, I will consult with Lynette about that. Neither of us could make the meeting and I need this done before the 26th.
I found the Sewing Date Traveler pattern a few months ago. It is a free pattern on the Robert Kaufman site. It was designed by Cynthia Frenette. I looked her up on IG, but didn’t see any other bag patterns. I wasn’t sure whether I would make it or not, but saved the pattern anyway.
Recently, I found out that my mom has to have another surgery. After looking at various examples on IG, I decided to make this to corral all the little things (phone, glasses, book, etc) that lay around a hospital room. She had a nice big ICU room before, but we hope she doesn’t get sent there and I don’t know how big the normal rooms are.
RK Sewing Date Traveler
The bag doesn’t have a closure, so it will be used more as an organizer than security. I keep thinking of it as a tray. The picture on the RK site is a little confusing until you read the directions (which I actually did for once). I thought this bag was more like the Sew Together Bag. I thought the green pocket on the inside back was another zipper pocket. In truth, that is a slip pocket on the back lining. The construction is a bit like the Sew Together Bag. If you have made one of those, you should be able to make this without much trouble.
Famous last words. LOL. The construction, for me, hasn’t been the problem. It is very straightforward, if different from the other bag designers whose patterns I normally use. The problem is the interfacing. Since this will be used for who knows how much stuff, I wanted it to stand up to some heavy use. I thought foam might be ok, but wanted something stiffer if I could find it. The pattern calls for Pellon 65. It is described as “… Extra Heavyweight is a sew-in interfacing for extra firm body and stiffening. It is great for printing, visor brims, backpacks, and drapery headers.” I have a chart for interfacing equivalents, but I couldn’t find an equivalent for Pellon 65 on any of them. The description told me a little about how stiff it was and I thought I wanted it stiffer. I used Pellon Peltex 71F, which I knew was thicker than how Pellon 65 was described. It is thick! I don’t use it that often, but once I started, I couldn’t backtrack.
Sewing Date Traveler lining assembled
At the moment, the exterior, which has the Peltex attached, is flat on my ironing board, but the lining is assembled. I thought the bag would be larger, but I think it is a good size. Also, it isn’t exactly small.
I thought I would get the whole thing finished over the weekend, but, as you can see, that didn’t happen.
SIL#2 led at swap at the meeting on Saturday. As mentioned, I made a pencil roll. I decided at the last minute to make another organizer in case a new member or potential member came and wanted to join in.
I found the pattern in a book I reviewed some time ago called Make It, Take It: 16 Cute and Clever Projects to Sew with Friends by Krista Hennebury. I am glad to say that I did notice this project when I reviewed the book.
Make It, Take It needlecase
I am very pleased with the needlecase I made. It is kind of a portfolio and holds quite a bit of stuff. I like it because it is useful and practical, but also has scope for creativity.
I used some of the leftover improv piecing from the latest improv donation top. I think it would work to use Quilt-as-you-go to make the cover as well. I could just as easily use one piece of fabric for a very quick finish.
I was also pleased to see the way the zipper was installed, because I thought it would help me with another project on which I have (mostly not) been working.
Make It, Take It needlecase – open, inside
This was a fairly quick project. I had all of the supplies, which helped. You do need some wool felt and a long zipper.
Each section could be used for a different type of needle, if one were that organized.
One of the reasons I am pleased with the pattern is that it gave me a different way to install a zipper on a circular piece. I can use this technique. I need more practice, but it came out better than my other project.
Make It, Take It needlecase – open, outside
I am also pleased because the exterior looks really good. There is ton of scope for creativity with the outside, as I mentioned. This might be a great project to work on in a group.
Well, the Rose Petrillo sort of returned. I found the project bag in which I put all the pieces.
There are a couple of pieces missing like the strap. I’ll have to find some good fabric for that.
The fabric pieces are all interfaced with SF101, but no foam is cut out. It could be that I didn’t have foam at the time I cut out the pieces. I really don’t remember.
I finished the Vervain belt bag the other day. This is definitely a bag I need to make again to improve my skills.
I did find that the bag went together more smoothly than I anticipated. It made me happy and it made me confident enough to try the Allium bag soon.
This bag is really making me consider buying a rivet press. I got the magnetic snaps in with no problem, but it was a bit of a struggle. What is stopping me from buying a press is space. Where would I keep such a huge piece of equipment? Not sure, so I need to clear some things out to make space.
Vervain: front pocket open
So this bag has a flat front pocket. The snaps are on the front and don’t meet when the bag is as it is shown in the first photo above. The snaps are uneven so the pocket can fit something with more dimension.
I was able to fit my phone in that pocket, but not very well. I wouldn’t store it there on a regular basis. I would use that pocket for lip balm, wet wipes and other flat items.
Vervain: back
The back has no pockets, though I could have included a vertical zipper pocket. I might if I make this again.
I also used a really nice parachute clip for this since it is for my aunt. The clip is a little heavy and that is a concern, but we will see. I hope it doesn’t prevent her from using it.
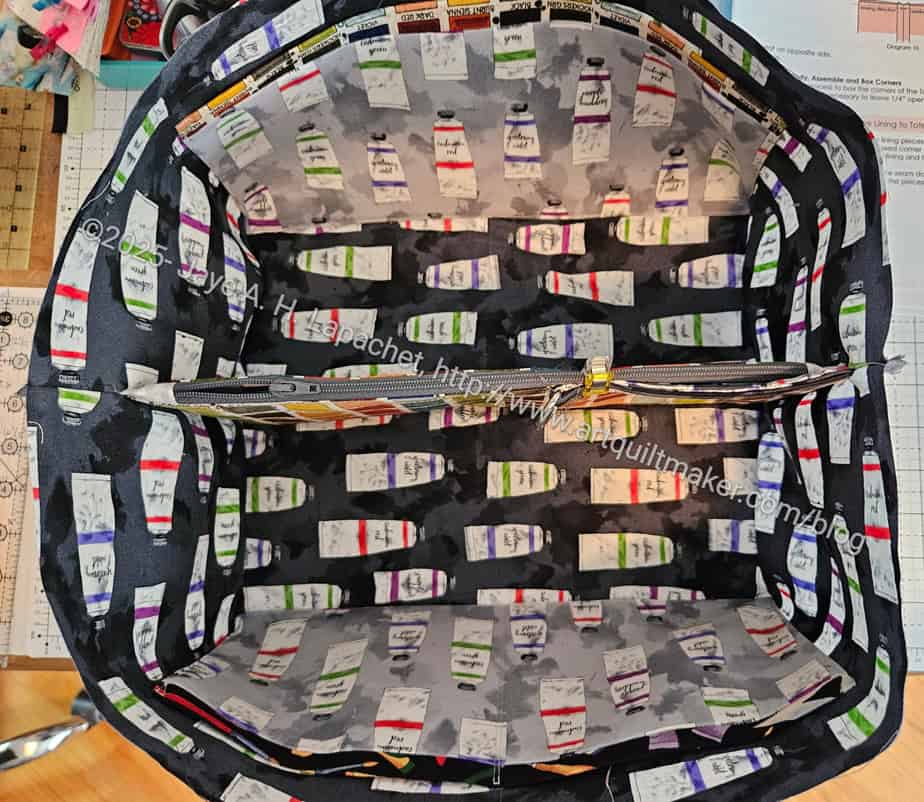
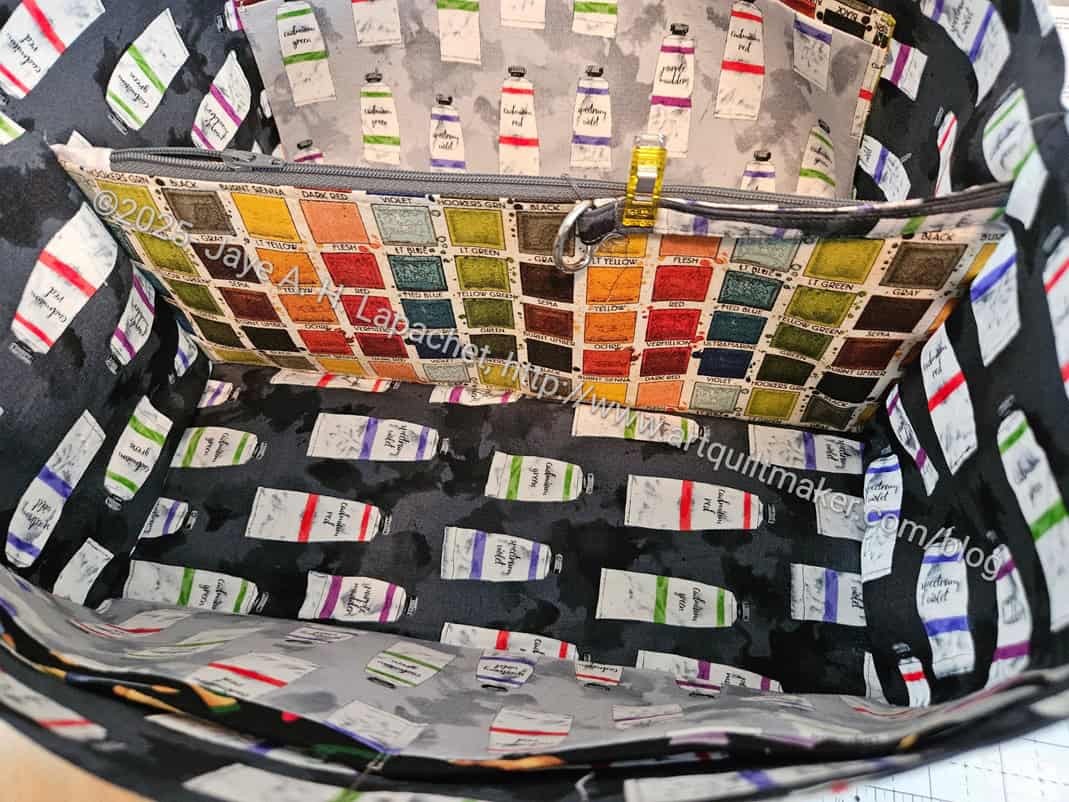
Vervain: interior
Inside is where I would put my phone, if I were using this bag.
It has a zipper that closes the bag completely and also an interior zip pocket for more security.
I think I might have had a little dip in my Sew-jo and didn’t really know what was going on. I had a great sewing session over the weekend and I think I bag to my normal enthusiasm and energy.
Vervain in progress
I really made good progress on the Vervain belt bag for my aunt. You might think this doesn’t look like much, but the sewn bits are the result of about 20 steps!
I was concerned about making a belt bag (fanny pack). I am not sure why, but it seemed harder than normal bags. I think I was just feeling down.
I have a few more steps to go – maybe another 15? I am excited about this project and how it is evolving. I’ll probably be done by next week. We’ll see.
I finally finished the Butterfly Superbloom, but it is bittersweet. The organization to whom I planned to donate it has decided they have something similar and don’t want it, or the Dogwood Pouches, for their auction. 🙁
I have to figure out to whom to gift it or whether I can do my own raffle and send the money to the scholarship fund. Let me know if you want to buy a bag for a good cause!
I am happy with the way this came out. I like the positioning of the butterfly on the side.
Superbloom: Side pockets exterior
Of course, I love the side pockets. They are so fun!
I think I am done with the Superbloom pattern for awhile. I think the white of the zipper tape stands out a bit, however the rainbow teeth go well with the fabric. The side seams stands out a bit in the photo, but it isn’t as noticeable in real life.
Superbloom: Side pockets interior
I accidentally put a treat inside one of the side pockets. I hope whoever ends up using this bag will appreciate the various places where the butterflies are located.
I cut out some more Dogwood pouches the other day. I am using the same sizes (F & J), mostly because I didn’t want to take the time to print more templates. The organization to whom I wanted to donate the set is having their luncheon soon and I wanted to make as many bags as possible. I have only the Superbloom and the Cotton Candy so far.
I finished the two Dogwood pouches at the Retreat. This is a worthwhile pattern as there are multiple sizes, but also a couple of new techniques to use in making your pouches.
Pouch F is the larger one and would be great for chargers and other small electronics. It went together very quickly.
The zipper instructions were a little tricky, but I watched the video (glad I brought my tablet to the Retreat!) and it was clear. I was actually kind of excited about the zipper instructions. They make a very cool finish to the zipper ends.
Finished: Dogwood Pouch-J
Pouch J is the smaller one. It would be good to corral small items in your handbag.
I found that the boxing of the corners was a different technique as well. I had to watch the video (Yay tablet, again!), which made the technique clear.
These are already off to their new home. I haven’t had a clear answer as to whether the Angel Mama likes her set of bags, but I feel good having made an effort to thank her somehow.
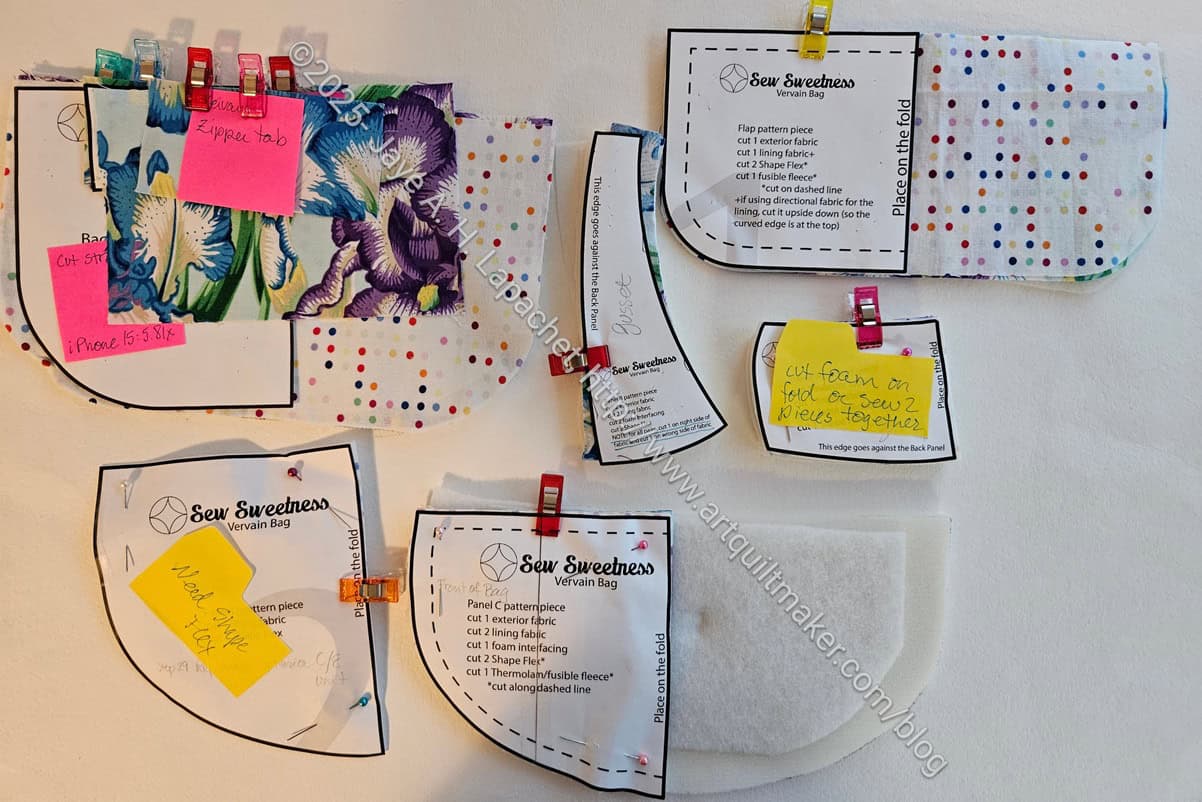
I started the Vervain at Sew Day the other day. The Vervain is a small belt bag (fanny pack). A front pocket on the outside and a lining zipper pocket on the inside lend storage space. The main compartment secures with the top zipper.
I am making this for my aunt, mostly because I have more iris fabric. She wants to use it to hold her cell phone on her daily walks I am happy to do it as she is my favorite aunt and I have wanted to make this bag.
Honestly, I almost cut out two of them. I restrained myself, though. I decided just to make the one and go from there.
Sew Sweetness has no templates for this one, which is a shame as the pieces are weirdly shaped. I used my scissors and that worked fine. I have a couple of pieces of foam I cut separately rather than on the fold. I’ll either stitch them together or cut a new piece on this fold this time.
I finally finished this Superbloom. The Hindsight Superbloom was a high. This one felt like a slog. I don’t know why except that everything that could go wrong did go wrong. This is completely my fault, because I have been somewhat distracted by life. It was still frustrating.
Superbloom #3: interior
The outside looks fine and I am pleased by that.
My aunt loves irises and I found some iris fabric that I knew I had to use for her. The the fabric looks fine , but the lining is too saggy for my tastes, despite my use of a 5/8 inch seam allowance. I know the Muggles won’t know, but you’d think by now I could manage a non-saggy lining. 🙁
Superbloom #3: lining
Normally, I would use a white or very light fabric for the interior, but that iris fabric is so perfect for my aunt. I could have used it for the outside, but I really wanted to use the canvas I bought at Bolt for her for the outside.
Superbloom #3: top closed
I had to buy that ochre fabric after the fact for the zipper panel as I thought the iris fabric would look too chaotic. The ochre fabric is a weird color, but goes with the background of the iris print. Also, it was wonderfully soft.
I think it goes very well with the purple zipper. I don’t think it should, but it does.
Superbloom #3: side interior pocket
Superbloom #3: lining interior pocket
I did use some dots on white for the inside pockets as I thought they would be too dark if I used the iris fabric. I also think I want to make a pouch or a smaller bag with what’s left of the iris fabric.
Superbloom #3: side pocket
Superbloom #3: side pocket lining
I still like the design of this bag. The side pockets are especially cool. I haven’t ever used this bag as I don’t have one of my own, but maybe I need to try it out.
Once I got close to finishing this tote, I stopped working on the SMAP version. I needed to send this one off to my aunt and I wanted to get it done. now that it is finished. I can get back to that bag.
The Chrysanthemum print by Philip Jacobs is one that Cyndi gave me after she visited an estate sale where she found fabulous fabric on offer. This is a colorway I don’t often buy. As I said the other day, I wasn’t sure whether Lee Ann would like it, but these colors spoke to me when I thought of her. I’ll have to see about finding some more of this fabric for her next bag so she has a matching set.
Lee Ann’s Classmate tote – exterior
The outside is one continuous piece and I think the fabric is shown very well.
As you know, these colors are a little difficult for me to work with. Not as difficult as brown, but still hard. I am glad this is a Phillip Jacobs fabric as it has rich layers of color. It also makes me think of Fall, autumn colors and Thanksgiving.
Since I don’t have a lot of these autumn colors, or don’t think about combining them, I was also pleased that the yellow I chose for the folds and the binding. The color fit with the Phillip Jacobs print very well.
Lee Ann’s Classmate tote – in/exterior
For the inside, I used a poppy print I bought in Sacramento in 2017, and also some Tula as I didn’t have enough of either.
Normally, I would have used the same yellow for the folds on the inside, but, again, I didn’t have enough fabric. There is a little bit of “making it all work” going on.
Lee Ann’s Classmate tote -interior
I have plenty of zippers, but I didn’t have all the same colored zippers, so I chose a couple of different hues in the orange/sunshine yellow range.
There are 5 pockets you can see in the picture. Under two of the pockets, slip pockets provide additional flat storage. I think a 6 inch ruler might fit in the middle area.
2024 BAM Officers
Carrie did a great job wrapping, as usual. She is amazingly gifted at wrapping. I am always so impressed with what she comes up with.
I am making good progress on the Superblooms, but not enough. I really want these to be finished today, so I can take my aunt’s to the post office and mail it. I also want to show at least one of them at the meeting on Saturday. I don’t know if either will happen.
As you can see, I have made good progress. The exteriors are finished and the handles on my aunt’s are sewn on.
For my aunt’s Superbloom, I used cotton webbing for the handles that Cyndi made me take from the free table one time. It is wider than called for, but I think looks good with the exterior fabric.
SMAP Superbloom
The SMAP version is less far along. I had to rip the handles out twice. Hopefully, third time is a charm.
I’ll be working on the lining next and that is always the last step. I have a couple of interior zipper pockets for each bag to make and then lining assembly.
I am preparing to start a new contract and the company is really a pain. It has been taking me many hours I could be sewing to set everything up. Finally on Friday, I had a nice chunk of time, so I got to work on the two Superblooms I have been wanting to make.
I was able to get all the pieces interfaced and the side pockets made. I had some trouble with some fusible foam. It turned out to be fusible on both sides. Since it was a scrap and, I hadn’t marked it, I didn’t realize it was fusible on both sides. I don’t normally buy fusible interfacing. I especially don’t buy double sided fusible. The piece was just big enough for me to cut the foam for the bag sides. Perfect, right? Yes, until I figured out that both sides were fusible. On one hand it was good, because I could just press it on the fabric. On the other hand, I had to use a press cloth and I am not sure if my press cloth is gluey. Iron-off** is a wonderful thing for cleaning the iron.
I have a couple more pieces to cut from the new fabric I bought at Needles, but otherwise I think the rest will go quickly.
As I have mentioned the prep is the hard part.
**N. B. : Obviously, you should shop at local quilt shops and small businesses. However, if you are too busy or can’t find what you need there, I use Amazon affiliate links and may be paid for your purchase of an item when you click on an item’s link in my post. There is no additional cost to you for clicking or purchasing items I recommend. I appreciate your clicks and purchases as it helps support this blog.
Today is International Women’s Day and I am celebrating by sending the bag to Gerre for her celebrations.
Sugar Skull Retreat Pouch-small – top view
This is the smaller version than I made for Gerre before. They are a matched set now, which I always like.
Sugar Skull Retreat Pouch-small – zipper end
I like the way all parts of this came out. The zipper ends came out especially well. I left a little space between the end of the zipper and the end of the fabric, which made it easier to sew.
I am still thinking about how to incorporate the technique used for veering the zipper in other patterns like the Cotton Candy pouch.
Sugar Skull Retreat pouch – interior
I chose a text print for the interior. I haven’t been using this particular print for Old Town, because the text is in pink. I love it as a fabric, though, and am really glad I can use it for this pouch.
This one came out really well and I am pleased, but this is a great project. I still want to try enlarging it and using a border print, as discussed a few months ago. I haven’t had the chance as I am caught up in making gifts.