Yes, this is donation quilt week. I promise this is the last one I have for the time being.
Last August, I talked about the Flower Sugar Donation top. I made the top out of leftover fabric from the Flower Sugar Hexagon (Attack of the Hexies) quilt. Gerre offered to quilt it. I got the finished piece back from her at the BAM meeting. She hadn’t completely done the binding, but had sewed most of it by machine. I had given her a piece of binding that was a bit too short, so I added to it. Then I sewed it the rest of the way on to the quilted piece then spent the time hand stitching the binding down.
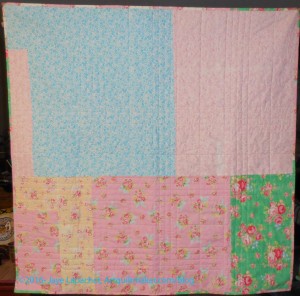
Flower Sugar Donation back
I was feeling like a bit of a slacker, so I was glad to get this piece done. It felt like I had FINALLY finished something.
The fabric I used was, again, called Flower Sugar by Lecien. I still have bunches of it left even though I also used it for the back. I warned Gerre that she might be seeing another one with the same fabric.
I also used some Bonnie and Camille greys/taupes for the background pieces. They are from various lines. Compared to the cool greys I am using for the Flying Geese, these background pieces look really, really brown to me.
So, yay! A finished piece. I am so pleased it is a donation top.
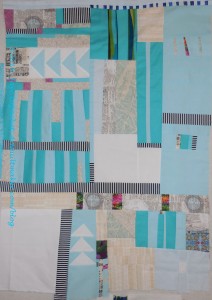
I got a brief glance at my Improv Round Robin piece before Ruth whisked it away to work on.
More of the Philip Jacobs print is showing up and that is creating some interesting results. I do think the piece needs more space, so I will add more solid or, perhaps, someone working on it will add more solid.
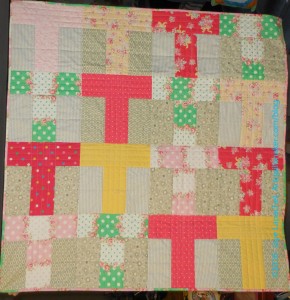
I came across the mystery quilt I made at the BAMQG retreat a few years ago. When I found it it was in pieces. I decided I would put it together and give it to the Charity Girls. I sewed 2 seams max, put it in my bag for the meeting and handed it in. I love the fabrics, but they didn’t work out very well and I was glad not to have another UFO to clutter up my mind.
BAMQG Mystery Quilt
This mystery quilt was not successful for me. That statement has to do with me not with the designer of the mystery quilt or the organizer of the BAMQG mystery quilt project. It has to do with the fabrics that I chose. I wanted bold fabrics. I chose bold fabrics, made bold choices. They didn’t work. I’ll try again
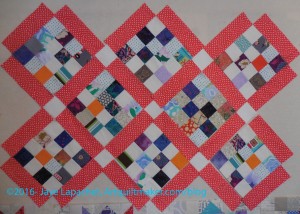
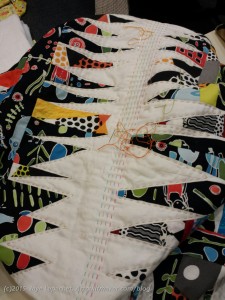
I spent last Sunday finally working on the Cutting Corners donation top. I was fiddling around not knowing what to do. I pulled out a piece of Dear Stella orange dot fabric and was inspired to use it as the sashing. Off I went.
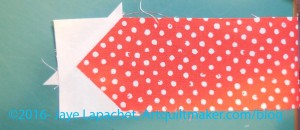
Using Cutting Corners Ruler
The Cutting Corners ruler is not an easy ruler to use, especially for someone like me who is pattern reading challenged. I finally got the critical information and worked on the sashing. The picture above shows the first steps of creating the lozenge shape.
I am not sure this is the easiest method to create this type of sashing.
I am having problems with the corner triangles. The directions for the side triangles are ok. The corner triangle directions are abysmal. There is one line about how to make the corner triangles. I have been emailing back and forth with Mrs. K, but I think I am going to have to call her and get more info.
I probably would have used a different sashing fabric if I had been thinking more. I went with my intuition, though and I kind of like the effect of the orange.
I hope to be able to finish at least the top soon. Perhaps this weekend.
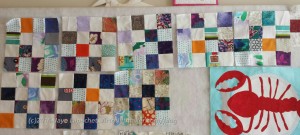
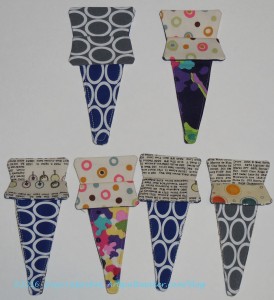
As I said yesterday, I spent Sunday making the Peacock blocks. In between I made donation blocks. I had taken 3 kits from the BAMQG meeting on Saturday so I made those up first. Those blocks are the 2 on the right and the one on the top. After I was done with those, I made up a few more from my own fabric. I sewed them as leaders and enders in between the parts of the Peacock hexagons. I used them to keep track of the various parts of the blocks. They are all the same colors, so it is easy to mix of pieces. And the bonus was all the donations blocks I finished as well.
Donation Blocks for Cutting Corners Ruler + a Lobster
It took me forever to get these donation blocks done and I am only marginally closer to having a finished quilt.
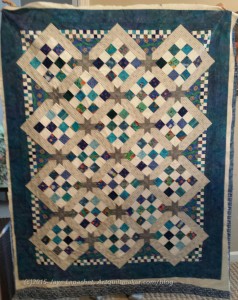
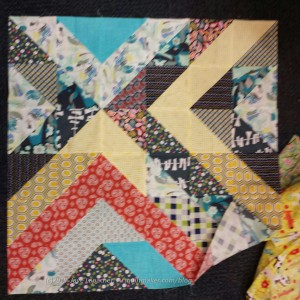
Mrs. K’s Cutting Corners Quilt
These are the pieces I am going to use to try out the Cutting Corners Ruler a la Mrs. K’s quilt.
Now that I have the blocks, I have to figure out the ruler. I took a quick look and it seems to make sense. I am going to start with the sashing and decide about the checkerboard border later.
I am making a smaller quilt to start with and may use the ruler to make others later.
I don’t actually have any IRRs right now and I wasn’t at the BAMQG meeting, so I couldn’t take another. I had three in quick succession, with Cheryl’s being the last before my brief hiatus. Ruth‘s and Claire‘s pieces were the other two in the trio.
Michelle and I met at Trader Joe’s again and exchanged IRRs. I took Claire’s to pass along as she wouldn’t be at the meeting either. I headed up to the North Coast again with DH for NSGW/#politicalwifery events and Michelle was headed to Spain. Rhonda was kind enough to take both bags to the meeting for us and I gave them to her at the CQFA meeting.
All of this meant that I had to get Cheryl’s done in time to get it to Rhonda. I had about a day once I figured out all of the timing, so I got down to business.
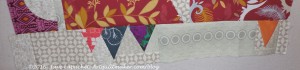
Cheryl’s IRR – before
Cheryl’s piece looked great when I got it and I was loathe to wreck it, but Michelle had added half a row, so that missing section was perfect for me to complete.
Cheryl’s piece is turning out really well. I love it, thus the feelings of avoiding wreckage. I really wanted to use the Paris map fabric, but couldn’t really fit it in once all was said and done.
I walked around with it on my design wall for a few days and decided to add some Flying Geese. Yes, I am still in love with Flying Geese.
I also needed to add my signature fabric, but I didn’t want to add a large patch or strip as I have on other pieces, because I wanted to preserve the mainly white and turquoise color story.
There were a few small strips left over from other piecing, so I pieced a few of those together to make another strip large enough to handle my signature fabric. I wanted something that would look like it fit in.
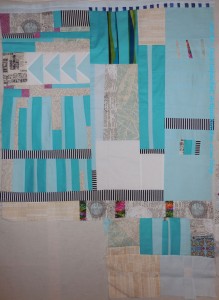
Cheryl’s IRR – my part
I made some Flying Geese. Since those were the main parts, I started working getting Michelle’s strip completed. I added some white and a strip of the black and white stripe, which came to me after looking at the piece.
After making my piece, I think the white on the edge needs to be corralled, but someone else, or Cheryl, will have to worry about that. I am pleased with how my part came out and I think my signature fabric piece fits in well without overwhelming the whole design.
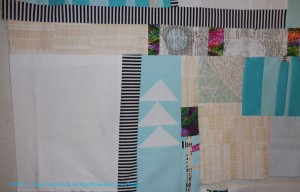
Cheryl’s IRR – finished with my part
I also think the piece needs some space at the top. The bottom is getting to be quite breezy while the top is looking a little cramped. Not fatally so, but a little. It will be interesting to see what happens.
Yes, they are coming fast and furious! I got two at the last BAMQG meeting, as I mentioned. I was able to work on Claire’s piece during my last free sewing weekend, but I didn’t get to Ruth’s. While having little time to sew on the weekend, I have had to cram the work into bits of time during the week. Of course, I forgot to take a before picture. 🙁 C’est la vie. If you imagine removing my part, that is the before. 😉
There is something that makes me think of a castle. The ‘mountains’ could be points of a tower and the curved sections could be arches.
My addition to Ruth’s IRR
Ruth’s piece has a clear color story and large curved center with triangles seem to be a design focus. The piece spoke to me immediately after I put it up on my design wall. I saw the triangles on the top that looked like mountains and decided to add something similar on the bottom.
I had to do some fancy sewing with background around the mountains since I didn’t want to cut off the tips. I think the background looks like Mary Mashuta’s Pushed Neutral concept and I like it.
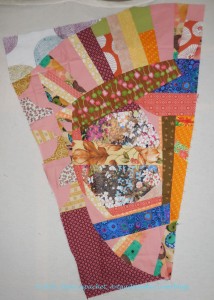
Next on the IRR list was Claire’s piece. Claire was in my original group so I wanted to make sure I worked on all of those quilts. I received her piece at the January BAMQG meeting.
Claire’s IRR was a challenge. The colors are perfect for Claire, but they are not my colors. Also, many of the fabrics had been used up or smaller pieces were left. This is why the project is called a challenge! I did not let these things discourage me.
I put the piece up on my design wall and tried to see the focal point or the place where Claire started. I couldn’t really tell, so I looked at who had worked on the piece and still couldn’t tell what might have been Claire’s start.
Trying out the Grandmother’s Fan idea
I put the focal point aside and looked at the piece. I saw some good curved lines and thought something like the Grandmother’s Fan block might work. I cut some blades and put them up on the design wall.
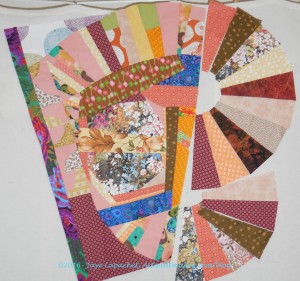
I really did try to keep, mostly, to the 20 minute rule. I find that rule to be hard as the pieces get larger. Of course, cutting is still a challenge. Also, the curves on Claire’s were not an easy design element. And, right on cue, life got in the way and the piece sat on my design wall for a week or more.
Claire’s IRR – continuing the curves
As I walked in and out of my workroom I decided I did like the curves. At one point, I adjusted the fans so the existing curves would be continued — or give the illusion of being continued.
In the photo, I tried to point out to you, in a very obnoxious color, what I thought of as ‘continuing the curve’. No, the blades aren’t all the same size, but the curve seems to be the most important in terms of design. I hope the curves I added work with the existing curves to create a focal point.
The bad part is that I didn’t square off the fans. I know I should have, but I just didn’t feel like it. I know I can offer to do it later, if push comes to shove. I am hoping that someone else will square them off down the road.
Claire’s IRR with my addition
I am happy with what I did. I gave the piece to Michelle on Thursday and will look forward to seeing what she does.
You can read all about the meeting from the minutes, which are already up on the Bay Area Modern blog. I am just going to show you photos and include my comments about them.
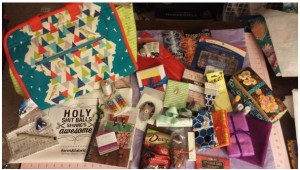
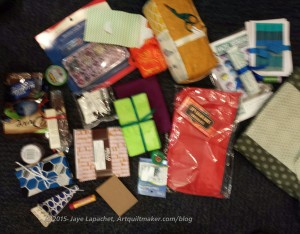
Angela’s Goodies
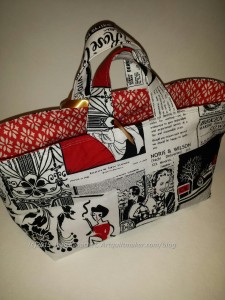
You saw the One Hour Baskets I made for the Charity Girls. I, mostly, forgot to take photos of the fabulous bags made for the other officers. People did such great jobs on them. Kelly got a Chubby Charmer with a sunshine yellow inside from Amanda. Cheryl received a small handbag (we needed and extra bag for all of her goodies) from Rhonda and Angela got a beautifully structured bag from Gerre, which you can see in the photo (left).
Cheryl’s Treasures
The idea is that everyone brings a small gift for each officer and we will fill up the bag with them. This allows people to manage their own budget or make something, if they are inclined. Not everyone participates, but you can see from the stash above that there was no shortage of fabulous gifties.
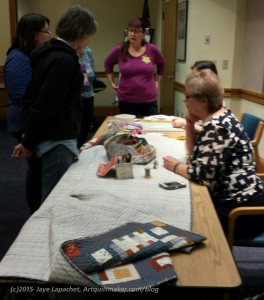
Getting down to business
After the meeting, people brought handwork. As I suspected, I was too busy socializing to get my (yes the one I am I am making for me!) Sew Together Bag cut out. 🙁 Never fear, I am working on it. Others did work on their projects. Ruth is a master at getting down to business.
Lynette cozied up, too and others (Gerre, Molly, Bonnie and Joelle) stood around chatting. I was there for a bit talking to Lynette about her Bionic Bag, which is similar to my Sew Together Bag, but more evolved. Lynette showed the quilt in the front at Show & Tell. It is a great boy quilt. The pattern is Fireside Chat by Blue Nickel Studios. It might be worth checking out for one of the nephews.
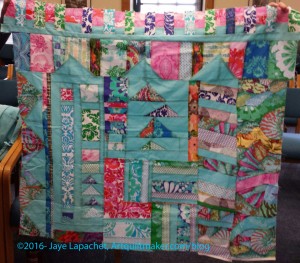
Gerre’s Quilt
Gerre brought the most fantastic quilt. I don’t know the pattern (and am too lazy to look it up) except that she said she made it in a workshop with Freddy Moran. Take a class from Freddy if you can. You won’t regret it!
The fabrics remind me of Jane Sassaman, but the most interesting part is the Big Stitch quilting, which she is doing with 12wt Aurifil. I love that she is using different colors for the quilting. Gerre is not afraid of color and I love her work. Check out a detail.
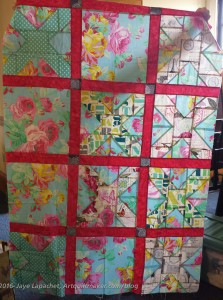
Donation Quilt
Angela worked on basting a donation quilt, which is bright and cheery.
All in all it was a great meeting. I did want to cut out my project, but that got done and it was great to chat with people.
One tradition the guild has is to assemble gifts for the officers and put them in bags made by volunteers. I wrote a good description of the reasoning in 2014. I talked about augmenting this yesterday with some One Hour Baskets.
Scissor Sheaths
Scissor Sheaths are covers for your scissors. Often they are made from leather and come with scissor brands such as Gingher. I made some out of fabric using a pattern/guidelines on this blog.
I cut the pieces and parts out a long time ago. Those pieces had been sitting on my cutting table waiting for a few more pieces for the lining and me to Just Do It, as the Nike ad says.
Since I needed some gifts for the officers, it was time and I did it. I think they were popular. I meant to figure out how to put a ribbon or something on them so they can be carried on a chatelaine or lanyard, but I didn’t get to it. I have one left in case I need a quick gift for someone.
We had the BAMQG meeting yesterday. As is our habit, people made bags and others brought gifts with which to fill them for the officers as a thank you for their hard work. It was a great success.
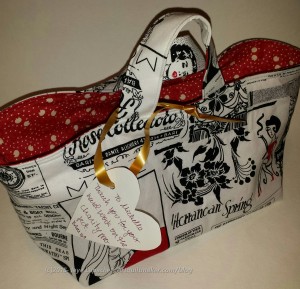
One Hour Basket #1
I, however, could not get the Charity Girls out of my mind. Michelle and Peggy have done such an excellent job of shepherding the Charity project along that I felt some thank you was in order. I tried not to do it, but I ended up making two One Hour Baskets, one for each. They were quick and look nice and I think Peggy liked hers. I still have to give Michelle hers as she couldn’t make it to the meeting, but I may see her next week.
I wrote a lot last year about the awesomeness of the Charity Program. You can also check out the BAMQG blog to see more about the Charity Program.
As before, I put the handles on the sides to make them more useful (IMO). This time I used fusible fleece, (Last time I used Soft & Stable) as the pattern calls for. I think I would put the fusible fleece on both the lining and the exterior, if I used it again. I think Soft & Stable is a better choice for more rigid baskets. Also, I didn’t use ShapeFlex this time and I would go back to using it next time as I like my baskets more stiff.
One Hour Basket #2
The pattern for the One Hour Baskets is on Craftsy. It was designed by Hearts and Bees. She blogs at KelbySews. I noticed that the “advertising” photos show the baskets filled with fat quarters.
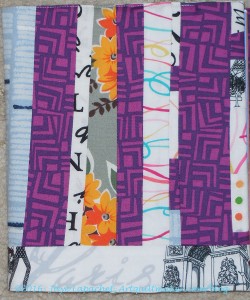
Karen issued a challenge to use a piece of Carol Van Zandt fabric a few months ago. She gave out the FQs at a meeting and there were so many that almost everyone got one, even those of us who had no intention of doing the challenge. Fortunately, I received a color that I liked. As the weeks wore on, I decided that the least I could do was make a journal cover. I needed a new one anyway. I wanted to explore the low volume concept some more so I decided to use low volume fabrics with the CVZ fabric to make a journal cover. I did it as part of the sewing frenzy over New Year’s weekend.
CVZ / Paris Journal Cover
I like the journal cover, but am not as happy with it as I am with the Carpenter’s Wheel effort in low volume. Somehow I got derailed and the journal cover looks like I am trying too hard. Or something. I think I should have stayed with black and white rather than straying into grey and colors.
I used some of the leftover strips from the Paris One Hour Baskets, most markedly to fill in the space at the bottom. What do you think of the addition?
Still, I am resolved to make a lot of work and just have a few good pieces come out. This will function quite well.
CVZ / Paris Journal Cover – front cover
I tried adding in some other purple, but should have stuck to the Carol Van Zandt fabric to highlight it. Fortunately, it is bold enough that it does stand out.
CVZ / Paris Journal Cover – back cover
I tried to add interest here by turning one of the strips sets sideways.
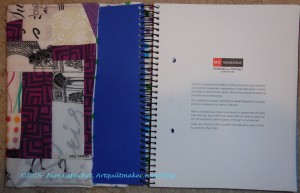
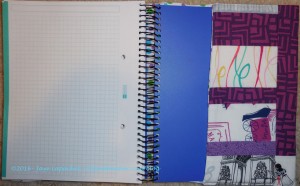
CVZ / Paris Journal Cover – open
You can see the whole cover. The colorful ribbon fabric really doesn’t go and I wish I hadn’t added it. I have some CVZ fabric left and will try again with that.
I had two recent opportunities, the IRR post and the BAMQG Meeting post, to talk about my round robin piece, which is still circulating, and missed both of them.
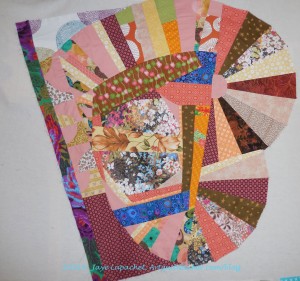
Jaye’s IRR – December 2015
I was able to glimpse the work done on my piece at the meeting last week. I think my piece is looking spectacular. There is a lot of interest because of the improvisational piecing. There is also cohesion because of the limited palette of fabrics.
I am so thrilled that some of that Philip Jacobs (or perhaps Martha Negley??) fabric was added (shells at the top). I love the boldness of it. I would like to take a better look at it as I see some other fabrics tucked into that top section.
As I said before, the pieces are getting quite large and mine is no exception. I think it is probably NICU size right now, or slightly larger. I want it to be larger, but may have to add bits of my own at the end. People from other groups are still working on it, which is great.
We had a Winter Extravaganza-palooza last Saturday. We had a regular meeting (see the notes on the BAMQG blog) and then we had food laden party. Part of the party was that the swappers exchanged gifts. I talked about that in the BBE post. A lot of people made bags as gifts. There was an exceptional amount of good work.
There were a lot of good show and tell as well. I didn’t have anything finished, so I only showed the BBE.
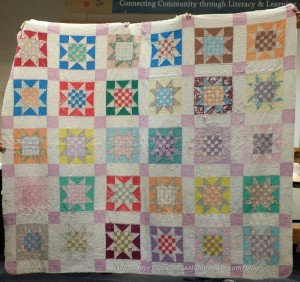
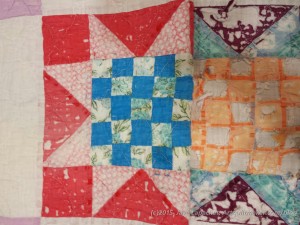
Claire’s Vintage Quilt
Claire showed an amazing vintage quilt. It gave me an opportunity to voice a design thought I have been mulling over.
This pattern in this vintage quilt looks like a Sawtooth Star to me. I have been thinking that taking some of the Postage Stamp donation blocks and adding Flying Geese to each side would make an interesting star.
I mentioned it to the Charity Girls, Peggy and Michelle, and they loved the idea. I am going to see how it would work using my Wing Clipper.
Exciting color choices
I really liked some of the color combinations of this quilt. They were really bold and exciting. I have to remember to think about it when I am choosing fabrics. I just don’t think about it.
The blue and the dark salmon (pinky red??) are a really excellent combination! I want to make something with that color combo!
The quilt is in horrendous condition and I am not sure it can be saved. The design inspiration CAN be saved, though.
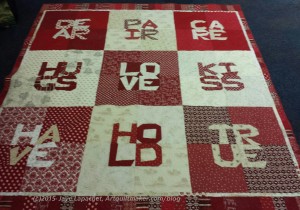
Amanda’s Love Quilt
Amanda finally finished her Love Quilt. At least, I called it a love quilt. She made it for friends who had a wedding anniversary. It is her own design and I have seen her working on it for a few years. I am sure others would love to make this and think she should create a pattern.
CC’s Fireworks
CC made a really interesting quilt that looked like fireworks or something exploding to me. In a good way, of course.
There was too much going on to really relay it all. You should come to a meeting. The first one is free.