Gabrielle Swain Class Day 2

The second day of the Gabrielle Swain class was about the technical steps of putting the blocks together. Swain does all of her applique’ by hand and all of her piecing by machine. She wanted us to follow her through her process, but didn’t care, ultimately, whether we used her process to put the leaves together.

I thought this was an important lesson for me. I often go to class skeptical and with preconceived notions, mostly because I have had teachers who put stupid useless supplies on their list or don’t know how to teach. I am not saying that I am better than them; I am saying that you can’t be a teacher just because you say you are. I have high expectations for teachers. Anyway, when I heard that we were going to do needleturn applique, I groaned inwardly. I was too exhausted to fight and just went with the flow. As the class unfolded, I could see why she makes her quilts the way she does. She has a point and, while I may never make a whole quilt the way she taught us, I am glad I know about it so I have another technique in my arsenal and can choose it among others in the future.

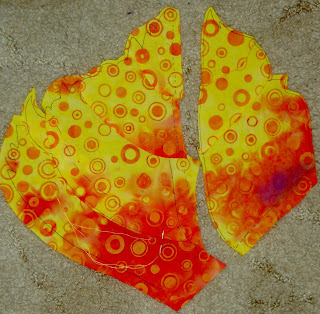
In the first part of the class, GS talked about placing the fabric in such a way take advantage of the shifts in color of the hand dyed fabric. She was basically talking about fussy cutting. You end up with Swiss chees fabric, but she wanted us to understand that by paying attention to the color you could expose light and shadow to make a more interesting quilt. She also wanted us to ensure that we didn’t have big breaks in the colors, that the colors flowed together in a way that looked natural.

Swain also talked about the properties of color. She said:

  • Value: light, medium and dark
  • Temperature: warm (reds and oranges), cool (blues and greens)
  • Intensity: how true or saturated the color is; how much grey is in the mix of the color
  • Hue: more color you get in a quilt the less value

I need to do more research on intensity and hue. I have never really taken a serious color class and cannot vouch for what she said about color and hue.

The other color tip GS provided was not to use equal amounts of opposite colors. I think the ratio she mentioned was 60/40, but it could have been 80/20. Another thing for me to look up. You comments on the color theory aspect are most welcome.

Before we started the applique’, I was thinking that hand applique’ would be too much work. I took an Elly Sienkiewicz class a long time ago and really hand a hard time with the needleturn applique’. I made two blocks in the ES class. One was some kind of flower block and the other was a folded snowflake. I did finish them, but decided that my dream of a full, needleturn applique’ BAQ would never happen in my lifetime. Those two blocks will eventually go into my miscellaneous blocks quilt – a quilt I intend to make from trial, test and class blocks… someday. If I find the ES class blocks, I will post them here.

In order to transfer our pattern to the fabric, we had to ink over the lines of the pattern. I used a Sharpie, which worked very well. I taped the pattern to the lightbox and traced over the pattern straight on to the fabric with a Pilot Scuf pen. GS recommended a Pigma Micron pen, but somehow, I didn’t have the right one with me. The Pilot Scuf worked fine, but you have to make sure that the point is not squished otherwise you will get a very thick line. You have to turn the black line under, so you want it to be as fine as possible.

Before you actually start the applique’, you need to decide which way the seam lines will go once you applique’ them. You start with the piece that will be on the very bottom and build on top of the pieces on the bottom. For the applique’, the supplies recommended are:

  • Mettler 50w thread
  • Thread Heaven thread conditioner (instead of wax)
  • #11 sharp needles (I used a between and it worked fine. I bought some sharps later and will try them outthe next time I work on this quilt)

GS cuts her thread at an angle and threads the cut, angled piece through the eye of the needle. I have never understood this tip and am thrilled that I do now.


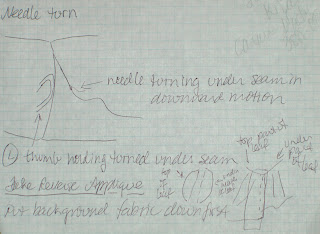
She also showed us a much easier way of doing needleturn applique’. After basting the pieces together with junk thread (who really has junk thread???), you hold the pieces in your left hand and scrape the needle above the raw edge you want to hide, towards the unsewn part of the seam, with your right hand. You hold the piece below where you have already sewn with your left thumb. This allows the appliqued edge to be smoother. It also sends the give towards the unsewn area, which prevents ripples, I think. I found it to be much easier and much faster than the way ES taught. I am not saying that the Queen of Applique’ is wrong. There are many ways of doing things and not every way works for every person. It is important to find the way that works for you and if your results are good, then you should continue to work in the method that suits you.

It was readily apparent how you have much more control when you do this work by hand. However, I can also see how, with care, this work could be done by machine.

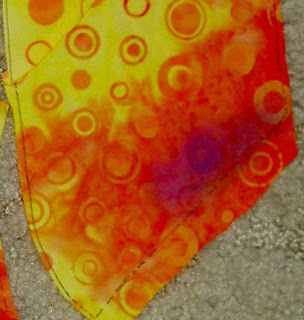
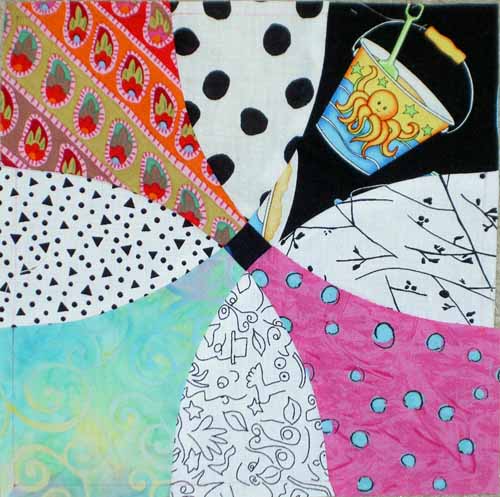
Gabrielle Swain does a lot of colored pencil and ink work on her quilts. She showed us that as well. You can see my colored pencil work in the purple accent above.

Great class. Take her class if you have the opportunity. This post is a good description, but the real thing is well worth the money.
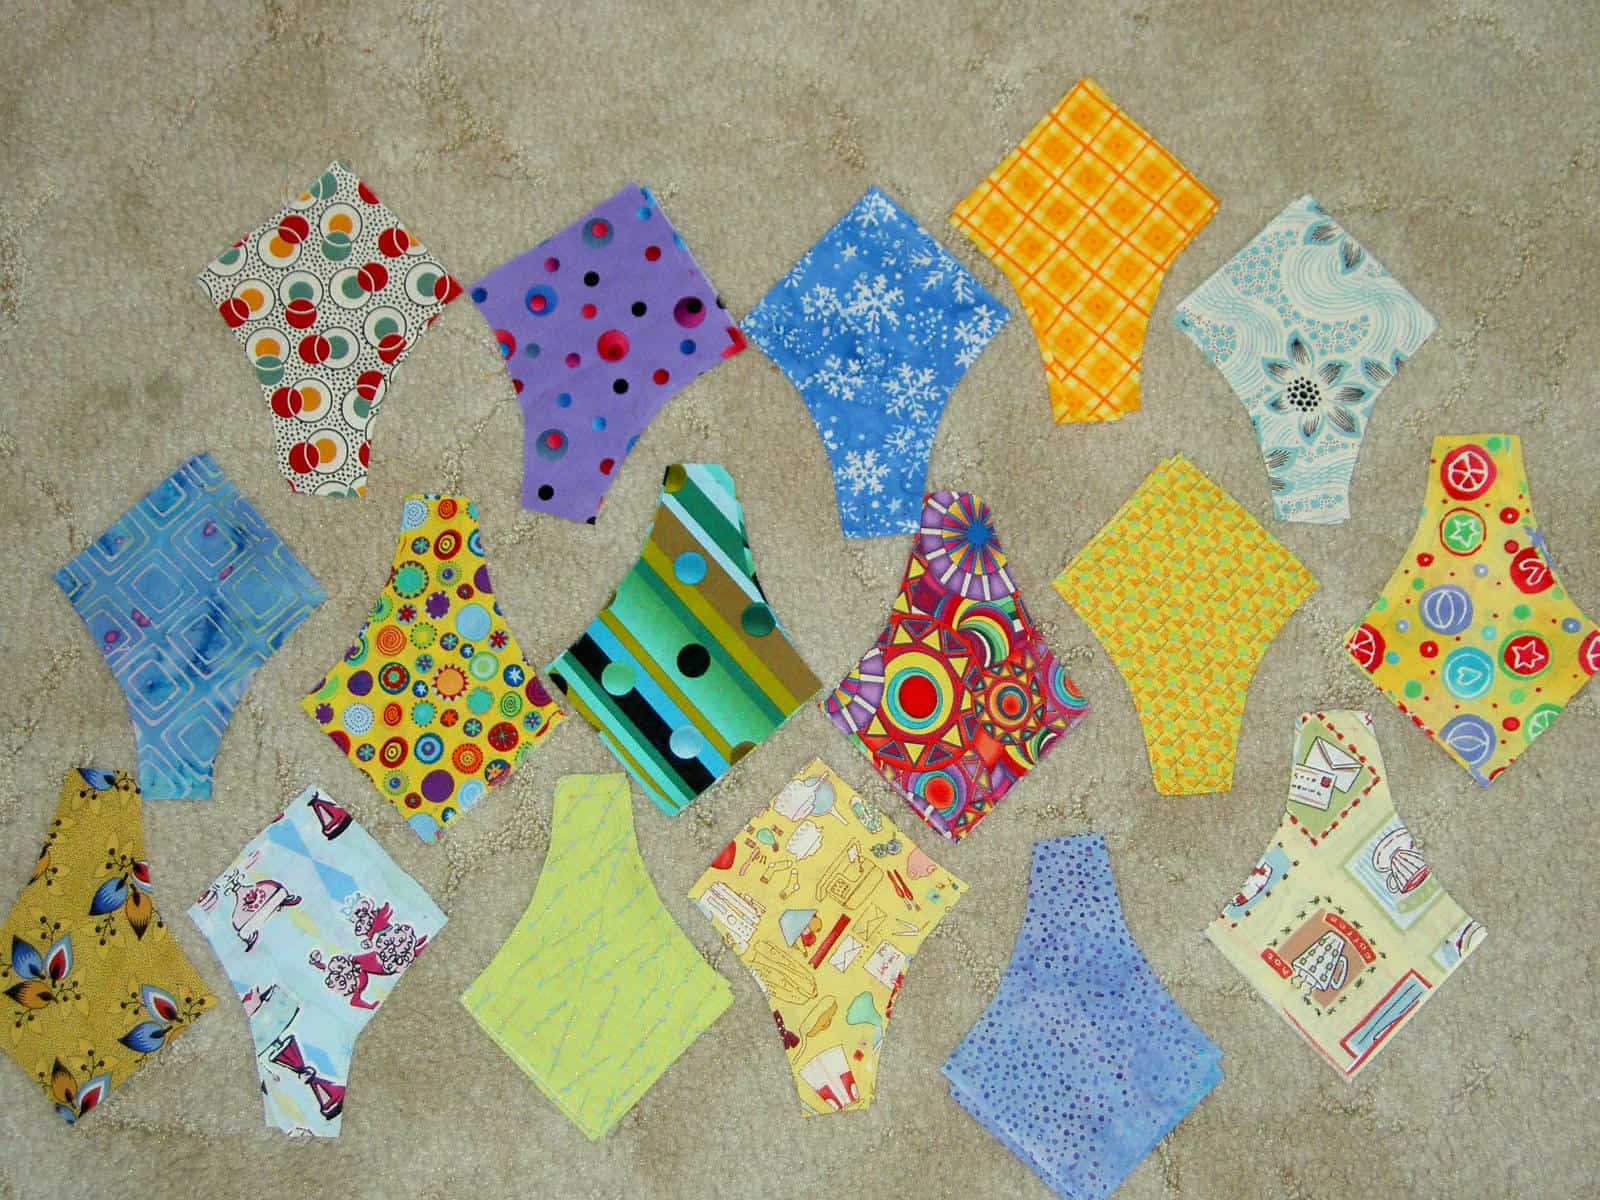
Gabrielle Swain Class Day 1


Another teacher to add to your ‘must take’ list. This woman knows how to teach! She knows her stuff, has confidence in her teaching and has an opinion, which I like. I don’t have to agree with the opinion, but wishy-washy “well, what do you think, dear?” kind of comments from a teacher, make me crazy.

Above are the fabrics that I brought to class. Not being a hand-dyed girl, I chose batiks in a palette that I like. Her suggestion of 3 yards was a wild shot in the dark, IMO. I would improve the supply list by asking for 20-30 FQs evenly divided among all the colors. In this case, I was able to find some fabrics out of my small batch to work with, but other people were having a really hard time. Even people who had brought a lot of fabric with them.

The first part of the class was all about design. No sewing. Some people were completely mortified. I was thrilled. I actually got to spend time on my design and try out a couple of different things. One thing that Swain said, which resonated with me, was that people find their materials first and then try to find a design to fit the fabrics. I Think it is true in a lot of cases, but I don’t think it is true, mostly, for me. It is definitely something to consider and keep in mind.


The theme of the class was leaves. Mom went through my inspiration file and pulled out many of the pictures containing leaves. Talk about a hero! I went through the pictures a few times before I started the design and whittled down the group. I finally settled on a Georgia O’Keeffe postcard of a painting called Yellow Leaves (bottom left). Apparently the real painting is at the Brooklyn Museum of Art. In surfing the web, I found an image of another of her leaf works that has to be in the same series called Pattern of Leaves.

Swain gave us large format patterns, which we could have also used, but I don’t think anyone did.


This was my first attempt and , frankly, it is pretty much a copy of the O’Keeffe work. Swain said to add another leaf (rule of odds) and turn the leaves so they were going in different directions. I had a hard time understanding what she was suggesting. She ended up explaining it by saying to align the leaves so they hit various points on the letter C. Finally, I got it and set to work.

This was my second attempt. After finishing the draft, I was concerned that not enough of the two upper leaves were showing.
I traced my second attempt, but shifted the paper slightly to modify the spacing. It ended up with too much spacing.


Above is my fourth attempt, which I liked. Again, I modified the spacing.

This is the final design for my project. It is the third drawing, which Swain thought was better than the fourth.

I think the above process is a good example of why spending the time on the design is worthwhile.

My first thought was hat I would make each of the leaves out of a variety of different fabrics. Above is my first pass at fabric selection. I was thinking that more fabrics would add interest.

Here are my choices with the background.

This group is good, but Swain was concerned about the strong print on the middle fabric. She thought, when cut up, the petals of the sunflower would draw the viewer’s eye in an unintended direction. She is very much about careful choices in both fabric and seam lines. There were a lot of things she said that reminded me of Ruth McDowell’s work with seam allowances.

Here is my final selection. I guess it is ok. I may work on it a bit more later just to make sure I am happy with it. I like the fabrics, but the combination as leaves is a bit of a stretch. I am, however, willing to work with the colors to see how Swain’s advice works. Here is one example Swain had for a design principle. Think of a tic-tac-toe board. Put an x in the middle, because you don’t want to put anything exactly in the middle. The Os at the intersection of the squares are where she suggested we place our images, if doing this kind of a design.

Julie’s fabric selections and pattern. Julie is Swain’s star student as Julie took her 6 month creativity class earlier this year. Sadly, none of the glow is rubbing off on me. 😉

I Didn’t Realize I Did Do Something!

Normally, I like to give my posts their day in the sun – the one time in their life when you will see them and only them first.

Today isn’t one of those kind of days.

A few days ago, I was lamenting the fact that I hadn’t been doing anything sewing related lately except thinking. When I realized that I had been working on the Cross Blocks (Flowering Snowballs) on and off, but pretty regularly for about three weeks or so, I was thrilled and had to show you. I have some work done! Hooray!

Some time ago, I spent a couple of hours cutting a bunch of patches to have handy when I had time to make blocks. The above five blocks are the result of that exercise as well as the actual sewing that I have done during the past few weeks. It pays to plan ahead, I think.

Some of the fabrics I wouldn’t use again, because they are too dark or too blah, but I think they will mix in well in the end.

Since 5 blocks is an odd shape, I took a close up of these four so you could see the circle (of which I am very proud). I also wanted you to have the opportunity to enjoy some of the fun and fabulous fabrics: the kitchen fabric in the middle (upper right block, yellow) as well as the lamp fabric (upper right block, blue). Normally, I don’t use these in the types of quilts I make, but this project is perfect for some of those conversationals that I like and never use.

I have a total of 33 blocks. I could stop at 36 and make a 6 block by 6 block quilt. I would like to have this piecing see me through my summer travels.

I also want to do the self bordering technique on this project so that the quilt looks finished. I will have to make a round of blocks for the outside. That idea worked so well with the Pineapples, I will have to really think about how I can do it successfully. If I make the center too big, the border will be too daunting.

Flowering Snowball Inspiration

Clevelandgirlie asked me about the Cross Block/Flowering Snowball and I looked through the blog to see if I could point her to the original quilt that inspired this project. The original post was on October 20, 2006. I guess that is the official project start date?


Definitely different coloration than mine. Definitely different. I don’t remember where I saw this quilt, so I don’t remember anything about it (hand pieced vs. machine pieced, hand quilted vs. machine quilted), but I still like it and am thrilled with the inspiration as well as the interest that people are taking in the project.

Cross Blocks Chugging Along

Here is the latest installation of the Flowering Snowballs project. I think that the green (upper left) is a feedsack fabric. I have only a small piece of it and the weave doesn’t seem to be a modern weave. Not that I know anything about feedsacks or the weave of fabric and whether it can be tied to an era!

Snowball and Fabric

I wonder if blogging can get to be like drinking – too much of a good thing? Well, I hope not, though I do feel a bit hungover at all the posts I have contributed lately and am hoping I am not starting to repeat myself. I haven’t even started to post some of the photos I have taken with my phone. Deirdre should be happy about that as she was looking forward to these “on the go” photos and I have not lived up o the possibilities of mobile blogging. Immerhin!

Though I added one measly block, the Flowering Snowball (Cross blocks) piece looks much bigger than it did last time.

I got a FQ pack of the new P&B Pop Parade from Quilting Adventures. Joyce, kindly, allowed me to not buy some of the fabrics from the line that were not cheerful. I want to make something out of just these fabrics, but I am no sure what. I also neglected to decide on the borders and background and buy extra for those. Oh well, I have a bit of time to decide before they discontinue this fabric, forcing me to go on a web/shop hunt for specific fabrics.

Return of the Snowballs


I have not worked on the Flowering Snowballs in a while, because the last time I worked on it I used up the last of my non-red/pink corner pieces. That meant I needed to cut more blues, greens, purples and yellows. I finally did it! Now I can get busy and finish up some of the blocks that I started oh those many months ago. Stay tuned!

I also spent a few minutes of sewing time sewing the binding onto Serendipity Puzzle.

A Little More Progress

I spent a lot of the day playing with Flickr, adding a lot of quilt photos so I could organize them in different ways. As a result, it meant that I didn’t sew much. I did finish another Flowering Snowball while watching some TV and worked a little on the Pineapples.

I am working on four at a time and I really should cut back to two, but I’d like to get them finished.

Fabrics, Blog Fun and Product


I hope the above describes some of my work lately!

I spent the better part of 4 days in Monterey at a conference (for my other life). I have gone to this particular event for a number of years, particularly when it is in Monterey (some years they have had it in Palm Spring, San Diego, etc.). One of the nice things is that I stay with friends rather than staying in a hotel (no late night Law & Order sessions for me!). This year their house was under construction and my friends were sleeping in *my* bedroom! The nerve. They shuffled me off to his sister’s house a bit down the road where I was treated fabulously and helped out as well. Sis’ hubby went in for hip surgery after my first overnight, so I kept her company. I had my own ensuite bedroom and bath. The bath had a heated floor!

Back Porch Fabrics

Back Porch Fabrics is a wonderful quilt store in Pacific Grove, which I have visited and written about before. It is light and airy and the people are friendly. The absolute first thing I did when I got to the Monterey Peninsula was head to Pacific Grove. I didn’t think there could possibly be any dot fabrics I didn’t own, but I was mistaken.
Not only was I able to find more dots (and a few other fabrics), but the lovely Quilts Japan mag as well. There was another issue that I liked, but I really only liked the cover, so I didn’t buy it. The quilt store staff didn’t leave me alone long enough to take a picture of the cover, so I will have to try and find it online.

The quilts they had hanging up were not in my colors, but they went together really well, were graphic and well made and that made me like them. Unfortunately, the staff would not let me take ANY photos in the store. I knew they wouldn’t let me take photos of their class sample quilts, but I wanted to show you some overall pictures of the store so you could get a sense of it. No dice. Sorry, maybe next time.

Sherri e-mailed me and was kind enough to offer the two lovely dots above, which arrived while I was away I’ll need to cut some strips and add them to the piles. I probably won’t be able to use the grey in the Pineapple quilt, but, as I have a few more dot quilts in me, I will find a place for it. Thanks, Sherri!

Finally, I have been neglecting the Flowering Snowballs (Cross Blocks), but sat down in front of bad TV last night and finished this one. I only had the two middle seams to finish, so I can add this to the stack.

I also attended the CQFA meeting today. We spent, probably, 1.5-2 hours on show and tell. It was a lot of tell and that was great. I showed the Nosegay and the sleeve on Sharon’s quilt, which is now finished. Hooray!

I was looking for the Quilts Japan issue when I came across Little Shika blog. It has a Yarnstorm kind of feel with my dogged resolve to show all the steps in a project. (Suppose I should rethink that, e.g. how much information is too much information???) Great photos, too.

Stay tuned for a report on my new iron!

Snowballs Really Flowering

I spent the weekend in LA. No machine. I brought my handwork with me and was able to sew four Cross blocks (Flowering Snowballs)! I have said that each one takes me an hour and a half, but these, except perhaps the first, did not take me an hour and half each. I really blew through them.

One has two pinks, but I tried hard on the others to make all the corner pieces different colors. I started to run out of greens and really need to add some violet or purple to the mix. I’ll work on cutting some different colors this weekend.

Now that I have a good amount of blocks, I decided to lay them out. They are really looking good! I just love the design that is made when the blocks are set together.

Project Progress


I now have 15 Cross Blocks (Flowering Snowball). I could have laid them out in a 3×5 grid, but it didn’t look that good.
MavMomMary and I took the Pineapple Quilt Class together back in January. She is already putting her quilt together. I haven’t seen it since she had only done a few blocks and was thrilled to see it today. I think it looks fantastic. And very different from mine.

And a detail.


More Various and Sundry


These are the two hand pieced blocks that I made last week. Different sort of look. Not so cheerful, but not depressing, either. I am not sure what I was thinking when I put the two dot fabrics in the same block? I thought I wasn’t using dots in this piece. Oh well. It is a scrap quilt, so who cares?


More dots.

I went to Britex today to get some fabric for pants. I was on the second floor and remembered that they have quiltmaking fabric. While the girl was cutting my pants fabric, I took a quick peek at the quilt fabrics. Lo and behold! They had dots! Hooray! I picked up the two above. They also had the Robert Kaufman Tropical Pimatex dots in both sizes. I have enough so I didn’t buy any, but it was good to be reminded that they are downtown and do have fabric. DUH!
I also stopped at the Container Store and found these project cases. I have been thinking about something like this since I read Be*mused‘s piece on the scrapbook project cases she found (I looked for the article, but couldn’t find it and can’t find her search button either-DUH!). They are 12 1/2 wide and 17 and something long. I bought two of them just to see how they would work. I filled up one with the Cross Blocks (Flowering Snowballs) + the fabric for the center pieces, which I don’t want to “put away” and never be able to find it again.

I was told today to look at other kinds of art besides quilts to see what I am inspired by. I have some books. I guess I will look at those and see what I see.

I am still thinking about black and white line drawings in a new visual journal. I haven’t done anything about it yet.

The photos of some of the quilts to which I linked (to Artquiltmaker.com) in the past week looked really crappy and I was embarrassed after I posted them. I took 4 quilts including Ocean Ave, Get the Red Out, the Punk Rock Quilt and the Mary Whitehead quilt to be photographed. I want to put better pictures on my website.

The latest baby quilt, which my mom made and I paid to have quilted, is done. It has to be picked up from the quilter soon. She is quilting the Nosegay next.

Creative Journals

I have been feeling, for a long time, how I would like to work on a visual journal – painting, sketching, colored pencils…something. I am an inveterate journal keeper. I have been keeping a journal since about 1980. Perhaps earlier. I have scads of them everywhere. I used to put snippets of things in them and they would get quite fat and I would have to keep it in a big ziploc bag in order to ensure that the bits and pieces wouldn’t fall out. An old boyfriend spent the day reading my journals once and that was the end of him. Jerk. My journals are for my mental health and NOT for sharing. They are not nice, not always pretty, but they are a fantastic exercise.

Anyway, enough boring background.

Lately I have been writing bits and notes in my journal about Thr3fold journal in order to remind myself what I want to write in the review. Putting the notes in my journal keeps all the parts together. Today, I was reading an article in Cloth Paper Scissors. Jane Lafazio, Keeping Creative Sketchbooks, pg.24-27, March/April 2007 issue, writes a little lesson on drawing and the whole article is illustrated with pages from her notebooks. The images are fresh, alive, colorful drawings. They make me want to get closer, to know more. She also writes “The journaling makes my sketchbook more than a series of paintings; it becomes my illustrated personal story.” What a lovely thought. I love the thought of something being my personal story.

Darling Boy made a deal with me to draw every day. This is his picture. Of course it is about war, but I love the little alien in the upper right hand corner. I am tempted to enlarge it and paint it. Something about it appeals to me, perhaps the googly eyes.

Tonya showed a picture of one of her visual sketchbooks, so I have been reinspired all day to figure out how to do this.

And finally, I finished another Cross Block (Flowering Snowball). Two in one week! I am thrilled!

How do you like the fabric with the faces?