This was another pattern from All People Quilt called Grab Bag. We were invited to a party on Sunday night. I whipped one up to bring to the guest of honor. I have wanted to test this pattern, so it seemed like a good opportunity.
I struggled a bit with some of the directions, especially the last few dealing with the handle finishing. Eventually I figured out what they were trying to tell me, but not without a fair amount of ripping. It was a good exercise in patience for me. I am sure companies like All People Quilt struggle with making the directions short AND easy to understand. For my part, I am glad for some of these free patterns.
I used an old large flower print for the outside and a Marimekko for the lining.
There are two major changes, and one minor change, that I would make on future Grab Bags:
I used regular batting like I use for quilts. I wouldn’t do that again. It makes it puffy, which is sort of cool, but I don’t like the fact that it doesn’t drape very well. I would like to try an interfacing to see how that drapes. I see experimentation with interfacing in my future. My other idea is to only put the batting on the bag part.
I would also make the inside just a bit smaller than the outside. The directions say to use the same pattern piece. It is fine (and much easier to write a pattern, I am guessing), but the bottom of the lining bunches up inside the bag. Not much, but enough to not look very professional.
The pockets are an odd size as well. I would make them a tiny bit larger, heightwise.
Grab bag detail
Above is a view of the inside. You can see a bit of the pockets and the Marimekko print.
I am pleased to have tried two new bag patterns. I think it has allowed me to feel sufficiently successful and warmed up to try the Anna Maria Horner Multi-tasker tote, I discussed in yesterday’s post.
K. S. Perino is one of the participants in the CPP, so I peruse her blog periodically to check out her prompt responses. As I was doing that this morning, I saw that she had made a pencil roll. I have seen the pattern for pencil rolls on the Pink Chalk Studio website and Julie over at High Fiber Content even made me one for my birthday last year. I really like the pencil rolls and have been contemplating expanding/adjusting the pattern a little to accommodate knitting needles.
This pencil roll is one of the best that I have seen. First, it is gorgeous. Next it is even more useful because of the little zippered pouch that the artist added (note to self: learn to put in zippers!). Finally, the little details such as the fabulous machine quilting and the little charms on the ends of the ties really make the piece.
I am thinking that one of these would be great to replace the ziploc bag in which I carry my PITT pens around.
As you know, I have been thinking of branching out from the Eco Market Tote bag pattern that I have a been using for the past 1.5 years. I saw the Over the Top bag in a recent issue of Quilts & More magazine. That mag is on Facebook, so I get more notifications about what they have going. I saw their promotion for Quarterly Challenges, which reminded me of this bag. A couple of things came together, including watching their little tips video, so I downloaded the pattern last Friday and made the bag, mostly, on Saturday.
Batik Handbag
I am pleased with the way it came out. It is the perfect size for a small handwork project tote. As with all things I sew from a pattern, I found that the first piece is really a test piece. I rely heavily on TFQ and her garment sewing experience when it comes to 3D projects, so deciphering this one alone was a challenge.
There were a few things I didn’t really understand in the pattern and, thus, skipped. I don’t see that it made much difference in the long run. There were some things that the pattern said to do that I would do differently a second time. I would add more stiffness to the bottom, perhaps something like Timtex. The pattern says to sew only to the dots, which are about 1/4″ away from the edge. This makes sense for the bottom seams. It is necessary in order to put the Y seams together. It isn’t necessary on the top of the bag and actually turned out to be a pain. since the top seams weren’t crossed by another machine stitched seam, they started to come apart after I had the bag mostly together. I ended up hand stitching the tops of the seams.
I think that this pattern has a lot of opportunities for embellishment, which could be fun. I keep thinking of a picture I saw in either thr3fold journal or Quilting Arts, where Laura Kemshall did a beaded edging on one of her bags.
In anticipation of loving this pattern, I bought enough magnetic clasps to make 4 bags total. After making it, however, I am not sure whether or not I will make any more. In some ways I want to make the bag again, so I can perfectmy construction techniques. On the other hand, I don’t think they style and size would be that useful for me, so I am not sure I want to have a bunch of them hanging around the house. They may, however, make nice gifts.
I have bags on the mind again. I really am thinking about new bags to sew.I would like to have several in my repertoire. They make great quick projects. As such, I was reading Vicki Welsh’s most recent Field Trips in Fiber episode and found a really great laptop bag by Candy Glendening of Candied Fibers. I got the impression that this was her own design. I was really impressed with the attention to detail and the thoughtfulness of the design. I like the water bottle pocket and the cell phone pocket. The machine embroidery or quilting which Candy used to embellish the bag is very nice, too.
The Creative Prompt Project is spreading slowly to other artists. I am thrilled about this, because part of my goal for this project is to inspire other people to be creative.
My tiny, little sister uses paper and scrapbook pages as her artistic medium. She works in other media as well such as pottery and jewelry. Here is the response that she did for “Remember.” One of the things that excites me about her response is that her piece uses a different media than most of the rest of us use. It shows that you don’t have to draw to respond.
This page is about the Fisher Price barn that sissy had when she was a kidlet. She also had the castle, the house, the village and a number of other pieces of the Fisher Price little people toys. *I* remember how much fun we had creating scenarios with all of those pieces.
Well, my brain seems to be really full these past few weeks. Once again, I am writing another catch up post for you. I know that catch up isn’t exactly the right term, but Full Brain post sounds a little odd to me.
1. Tote bags: Always on my mind. I haven’t made any new ones, but I did listen to a new podcast called the Quilted Cupcake Podcast. Jean, the producer has a very friendly and professional not ditzy style. She is methodical, but not talking head boring about presenting the information she wants to communicate in the podcast, which was easy to follow. The show notes blog is a must, at least for this episode, because Jean packs the podcast full of information, links and tutorials. The episode to which I have linked is episode 11, which is about tote bags. I downloaded all of the episodes that were available, but listened to this one, the most recent, first. I found it on iTunes and you can find it there, via a link from the show notes blog or also on Libsyn at http://quiltedcupcake.libsyn.com/.
Some of the blogs and sites to which Jean links are sites that I already claim to read.
Jean mentioned Rachel Griffith’s P.S I Quilt blog, which has a great tutorial about gussets. I haven’t tried it yet, but will, especially since I am thinking about expanding my bag making horizons. Jean also does a great book review and mentions several tips and tricks that should have been obvious, but were revelations to me.
She also mentioned a couple of books, Sew Sublime Bags and Sew What by Lexie Barnes. I was able to reserve the former at the library, but not the latter. Will have to think about that. I’d like to see it and not buy it at the moment.
I spent some time listening to her earlier podcasts and she has definitely improved her style. Some of her discussions talk a lot about thrift store shopping and saving money. She mentions a lot about how much she spends on things in the course of the discussion. It is apparent that saving money and getting a deal are important to her. My only criticism would be to leave the price tags out.
Her episode on aprons (#5) was really good and I do like her book reviews; they are very complete.
2. Flickr Creative Prompt Project Group: I am very pleased to report that a number of participants in the Creative Prompt Project have joined the group and uploaded their responses. Quilt Rat, SherriD, and Kathy (new member-YAY!) have all joined. Quilt Rat and SherriD have uploaded all of their responses and Kathy has uploaded several photos so 80+ drawings/photos/art are all available to view together. I am really thrilled about this. There is always room for one more, so join in and upload your responses. You don’t have to go back and do them all.
3. Free MOO cards: Get a free pack of MOO cards. There is no free lunch so there are some restrictions, but free is free and the MOO cards are really cool. Thanks to Deirdre for this tip.
4. C&T Publishing has a list of blogs by their authors and fans. Others were new to me, such as Barbara Brackman’s blog, which includes lots of tidbits about quilt history. I also like the logo C&T created for this particular page. the different artistic letters are fun.
5. I am weeding the links. I find that blogs change over time and don’t suit me anymore. If you are using my blogroll as a fave page, you may want to rethink that. 😉
I stayed away from the computer all day yesterday and sewed.
Janome 9000
The 9000 is back and better than it has been in a long time. It is quieter. I can punch any button I want and the machine reacts instantly. It was a pleasure to sew.
I did a lot:
made a receiving blanket
finished the last bit of the Tarts
Tarts cups
almost finished the machine quilting on Beach Town
made some Infinity blocks
worked on some FOTY 2009 blocks
FOTY detail pink
Normally, I sew early in the morning and stop in the evening. I am a morning person and I have learned the hard way that when I sew tired I make mistakes. Last night, however, I stayed up late and sewed. It was wonderful.
Yesterday, I went to CreateIt Studio for a glass fusing session. CreateIt is a place that does pottery painting, but you can also create mosaics and fused glass pieces. They won’t be doing the mosaics in their new location, so go now if you want to make one. I am sorely tempted, let me tell you. I have wanted to make a mosaic for years.
I have been to the pottery painting places and they are really fun. When I saw the glass fusing that Bonnie, the granddaughter of one of the CQFAers, did, I HAD to try it. A group of us from CQFA went and tried it, thanks to Dolores who pinned me down for a date. Thanks, Dolores!
True to form, I didn’t hem and haw, just got down to work. I really did the project quickly and simply, so I was done way before anyone else.
The fused glass technique is really easy. Basically, you place bits of colored glass down on another piece of glass in a pleasing manner and are done. I think part of the reason I was done so fast is because I already had an idea in mind. The others didn’t and had to play around a bit. I think I feel more comfortable and successful if I have an idea in mind when trying something new. I think I might loosen up a bit if I tried this more than once.
Fused Glass Trivet, August 2009
My first job was in a stained glass store, where I learned to make leaded glass windows. As a result I am not afraid of glass, but have a healthy respect for the sharp edges. As with quiltmaking, the glass cutting tools have GREATLY improved, so I just nipped and cut quickly and was done. The gluing down of the pieces, which was done to keep them in place until the firing process, was the most time consuming.
After finishing the trivet, I wasn’t really ready to leave. I decided to add to my casual serveware collection by painting a piece of pottery as well. You might remember the pieces I made in January at Color Me Mine.
Oval Serving Bowl, August 2009
I am thinking salsa and guacamole would work well in this piece.
Dolores' Abstract
I wanted those long, red, roundish pieces but Dolores took them all. I am not bitter, don’t worry. There weren’t enough of them anyway. I love the small bits that Dolores put in between the squares on the border.
Reva's Butterfly
Reva was the first one to use the cut outs. I followed her lead when I found the spiral and it was the right color.
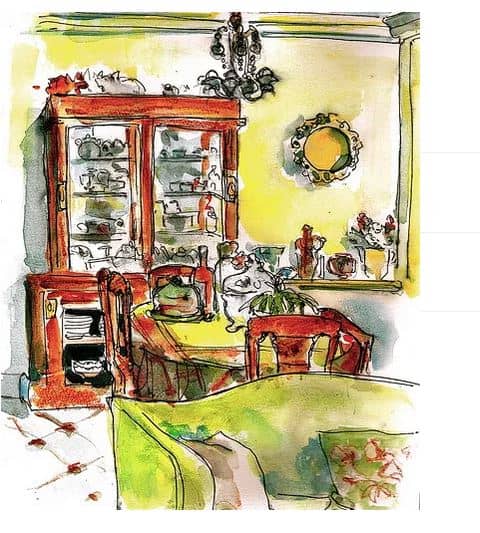
A few days ago, I pointed out Suzanne Cabrera’s blog to you. Here is a watercolor from one of the artists, Casey Toussaint, Suzanne highlighted in her blog. I really enjoy art of ordinary things and this watercolor of the dining room fits. I have been trying to do that with my creative prompt responses and think I am getting better. I have a lot of practice sketches to make before I get to this level, but I’ll get there.
This is the Leopard Tote I made for my sister back in February. I am not sure why I never posted it. Here it is now.
It came back with me after my trip down south in June, because she ripped it along the spot on the inside where I turned the whole piece and then sewed it up by hand. This time, I sewed a bit, made a knot, sewed a bit and made a knot. I also warned the fast moving sis to not load it with heavy stuff.
You might think that this is the same tote I posted last week. It is, however, the opposite of the one I posted last week. I used the stripe for the main part of the fabric as opposed to the flower fabric, which I used for the accents this time.
I think that this may be the best tote that I have ever made. I don’t think that I made any mistakes (knock wood). One thing I did with this tote was sew on the button before I sewed all the pieces together. It was a lot easier!
I guess it is time to move on to another pattern. We’ll see.
I have come across some interesting websites lately. Also, many things have been running through my mind. As a result, today is Catch Up Saturday! That means that you get a bunch of random links, some photos that have been hanging around, and other miscellaneous stuff.
Janome 9K
1. In my post, Caring for Tools, I talked about taking my Janome 9000 into be repaired. Cost=$$$$$. The monster needs a new screen; apparently it could not be recalibrated. What a shocker; I need to find a consulting job to cover the cost. Anyone want to buy a quilt? 😉
The cost notwithstanding, I have more good things to say about Lafayette Sewing Center. Before they started the work, they called me and went over the estimate with me very carefully. I spoke with Audrey who said that she wanted to make sure I wanted the work done and understood the costs so I wouldn’t get sticker shock. No assumptions there! Great service.
2. Suzanne Cabrera did a series of drawings of her home, which I really like. They are simple in an architectural kind of way. She has added comments about various pieces of furniture, which satisfies my need for words. She also has a sense of humor in her drawings, which I appreciated in her post about learning to cook with her husband. See them at her blog, An Open [Sketch] Book.
3. Felt Food (FF). I love felt food. It makes me smile. I first got interested in felt food when I heard CraftSanity podcast episode #66 (what else? My one source of craft information!) with the owner of Lilly Bean Market, Hillary Seabolt. Her sandwich is still my favorite. I saw some pictures of felt food somewhere recently and that has reinvigorated my Felt Food Mania and led me on a multi-day Felt Food Flickr Journey (F3J).
The F3J led me to general felt creations such as softies (we called them stuffed animals back in the day; apparently that term is no longer PC), including a journey around London by Lumpy Bear (made/arranged? by GiantButton), felt sea creatures including a Hammerhead Shark and squid and an unzippable ocean complete with islands by Lizette Greco.
You have to look at this stuff to believe it!
4. Stewart, Tabori & Chang and Melanie Falick: Once again, I was listening to CraftSanity podcast #30 the other day (I really do do other things besides listen to CraftSanity, I promise). Melanie wrote Knitting in America, seminal book on the state of knitting in the US. She is the craft editor at STC AND has her own imprint. WOW! I have heard of her before, because I love STC books and she is the editor who acquires them. I really loved hearing about her journey to that job and found a lot of similarities to my life (you can stop laughing now, thanks). She gave really practical ideas about getting a book published, especially in the area of writing a book proposal. Thanks, I needed that! That was really food for thought for me, since I have a dream…..
You can follow Melanie on Twitter at STC_Craft or take a look at her website.
Tessalated Tile
5. Beth sent me this image when she lived in England. I had asked her to take photos of mosaics and tile. This is a particularly good design for quiltmaking, because it would just be squares and rectangles. Yes, you would have to plan a bit, if you were doing anything more than a 2 color quilt, but it would be quite stunning once finished. Note the L shape at the top.
6. Toy-a-Day: This project is definitely like the Creative Prompt (which you should join) but much more intense. The Wild Things characters, KISS, Pikachu, the Mario Bros, Michael Jackson and Michael Gorbachev are all included in this project. I noticed that the author has PDF downloads of some of his toys so you can make your own.
I have no good reason for liking these. They are not practical, take a lot of work and are single use in many cases. Still I like them. I have seen them before and when I found out Design Sponge had posted another supply list and pattern, I had to take a look. Perhaps if I make one I’ll get over being enamoured.
As you may remember, I bought some fabric at Always Quilting on the day I went to longarm.
After finishing the Clear tote, I looked around for my next project. I had tote bags on the mind, so out came the fabric and off I went.
I cut out two totes. This is the one where the main outside part of the bag is made with the flower print from the Ginger Blossom line by Sandi Henderson. I have used the stripe fabric from the same line for the accents and the lining [inside].
One GREAT thing about this project, aside from geting a new tote bag out of the work, was that I learned to use the button hole function on the Jem. It is much easier to use than the button hole function on the 9000. Now I don’t have to go to Seattle in order to make button holes! TFQ’s machine makes GREAT button holes. The Jem button holes will be a suitable facsimile, not as good as going to Seattle, but suitable.
I have enough of the stripe to make another bag. It is already cut out, but I didn’t do very well making two bags at once, so I just cut both out and lined them. Once that was done I limited myself to sewing one at a time. I’ll sew the other one this weekend.
I also have some blue flowery fabric that I bought for a tote. Perhaps I will get that done as well. It feels like a good time to make tote bags. TFQ asked me if I was still using the Favorite Things Eco Market tote pattern. I am, but she made me think that, perhaps, I should dig out those other tote patterns I have purchased over the past year and try one of them out. I really want to try the Liesel tote. I am a really big chicken when it comes to 3D things, so I’ll have to gear up.
As soon as I got home on Friday, I pulled out the Jem and set it up. I figured that if I didn’t do it right then, I would put it off and all of my sewing projects would languish.
Janome Jem, July 2009
I pulled out the vinyl tablecloth tote bag parts, put on the roller foot and tried it out. I used Valdani quilting thread that I bought at the Chicago Quilt Festival Show a number of years ago. I am now the proud owner of a tablecloth vinyl tote bag.
The roller foot worked really well. REALLY WELL. AMAZINGLY WELL. It really got the job done and I have high hopes that I can make the bathroom “quilt” as well. Perhaps I can even get it done before the 9000 comes back. Perhaps I’ll make one for each bath!
The roller foot worked really well, but wasn’t perfect. I have always had some trouble with the curved corners of the Eco Market tote bag pattern from Favorite Things. Going around the curves with two layers of vinyl was difficult.
Clear tote, July 2009
I didn’t line the bag. I didn’t really think it was necessary so the seams all show and it looks a bit unfinished. There are a number of thread blobs that I would have unsewed with normal fabric, but were pretty difficult to deal with the vinyl, so I left them. On the plus side, the bag was very quick to finish.
I get the feeling that I won’t be able to stuff this bag full of heavy stuff either, but I will try it out and we will see. It sounds dumb, but I felt like a renegade working with the material. In general, I highly recommend the roller foot if you are going to make something with tablecloth vinyl.
One of my CQFA colleagues, as I may have mentioned, borrowed my Jem machine for about 5 months while her Viking was in the shop. She saw some oilcloth type fabric (vinyl or something on one side and flannel-like fabric on the other) pillows and totes and decided to make them. She made them using the Jem and didn’t have any problems. I was amazed that she could do that. I know now that the flannel probably allowed the oilcloth to feed through the machine. I am interested in trying some of that fabric to make a tote bag.