Today may be a Various and Sundry with a lot of Clipmarks, because I don’t know if I am up for writing and editing and cropping a big blog post.
I am really enjoying Weeks Ringle’s blog, Craft Nectar. I am pretty sure I pointed it out before. This week she talks about the craftiness of planning her daughter’s first sleepover party. She also includes a pillowcase pattern for the party favor. A few days ago, they posted a PDF pattern for a sight word game for early readers. So fun!
While you were sipping your cappucinos this morning, I was finishing the edges of my very first ATCs – Artist Trading Cards – and dashing off to meet with my fellow CQFAers.
Maureen had suggested that we do a swap of ATCs. In the spirit of the Creative Prompt project, I decided that making them would be good for my creativity. And it was! I did them when I came home from work on Tuesday after one of the most grueling work days I think I have ever had. Immersing myself in some fiber took my mind off of the lunatics downtown. I didn’t have much brainpower and, thus, didn’t overthink the design. All of the fabrics came out of my scrap basket. I wasn’t sure what to use for the center so I used two layers of Pellon Stitch and Tear, which I use for stabilizing machine applique’. The ATCs felt right in terms of stiffness and I didn’t have any problems with sewing through the 4 layers. It all seemed to work just fine.
ATC backs
The ATCs are 2.5×3.5″ inches and I know that there are a zillion sources for instructions all over the web. Typical of me, I didn’t look at any of them. 😉
Sometimes I just need to do the work. I figured they were small enough and I could toss them if I didn’t like them.
I grabbed more fabric out of my scrap basket for the backs. The red dots and the Denyse Schmidt flowers are my favorites. One of my criteria was that I had to be able to write on the back, so my favorites weren’t ideal. The other plainer fabrics were better. I tried to use the stitch lettering that I used to use for labels on these ATCs, but my machine is starting to act up 🙁 and I couldn’t get it to work.
MPL's ATCs
Maureen’s ATCs include the car in the group. Maureen is a quiltmaker I really admire, because she is constantly trying new things.
Her ATCs were a revelation, because they were all different! Mine are sort of different, but really the same. Maureen created different designs on each card. WOW! Not sure why I didn’t think of that, but perhaps I will do something similar next time.
Terri let me know that Diane and Nancy’s ATCs were mixed in with Maureen’s. I didn’t pay close enough attention to know whose are whose. Sorry ladies!
I thought I would make more of the same for next time, but after doing the swap, I think people will be looking for something new and exciting.
Terri's work
Terri is a mystery writer who incorporates quilts and quiltmaking into her stories. If you haven’t read Ocean Waves, Old Maid’s Puzzle, or Wild Goose Chase, get yourself to the Library or bookstore! Her ATCs had a mystery theme and were business card size. Terri used the business card sized advertisements as the backing! Clever!
In addition to paper and fabric, Terri also added 3D ribbon and rubber stamping to her cards. I have rubber stamps! Perhaps I will drag them out for the next round.
LC's Work
Linda‘s ATCs look marbled to me. She is a talented machine quilter. She produces lots of small works frequently by participating in such challenges as the Fast Friday Challenge. She has recently been doing succulents, which she says are too dark for her tastes. Most of her work is very bright – lime green, fuschia, bright blue, etc as Linda uses lots of hand dyes.
Linda talks about her ATCs on a blog post from a few days ago. It looks like she made a big piece and then cut it up. Another great idea!
Bron's ATCs
I haven’t seen very much of Bron’s work and was really excited when she laid out her ATCs. Bron’s raven piece and her stamp piece both caught my eye. I couldn’t stop staring at them during the entire swap. I am not sure why. I guess Amy over at the Creative Mom podcast is on my mind both because of the ATCs and because of the birds.
Bron also chose to make different designs. Her media varied quite a lot as well. She used fabric, paint, paper, beads and different ephemera such as stamps. I picked up the stamp card from Bron’s offerings.
Bron's Stamp ATC
The colors drew me to this piece. They were really vibrant and attractive. I am like a bee in spring, I guess. 😉 I really liked the textures on this card as well as the airmail stamps.
VS works
Virginia is a quiltmaker I really admire. She has a quiet presence that smolders. When she finishes a quilt or a set of placemats or something, they set the room on fire: excellent stitching, perfect corners, wonderful fabrics and a great design. I really wish she lived closer as I would try to spend more time learning with her.
Virginia did photo transfer with fabric, paper and stitching. I wasn’t as excited about them because of the black and white. I did love the stitching around the edge.
Diane brought some as well and somehow I missed photographing them. Perhaps next time.
While I am not particularly interested in ATCs, I found this to be a good exercise. Not so much in what I made, but in seeing what everyone else made and getting inspired by their work. I may have a chance to try out some of these ideas as Maureen suggested that he group make this activity a regular part of the meeting. Hhmm…
This drawing is different than some of the others. It has a little more detail – different types of detail and was a little more of a challenge. I took the prompt literally; that is a drip coffeemaker and not a percolator, but I often let ideas percolate while I am cooking breakfast. It is usually quiet.
I have a thing about art vs. craft. People obsess about art vs. craft; craft vs. art. For me, it is simply about making stuff all the time. I just want to make stuff. I just want to make stuff all the time. If I can’t be making stuff I want to think about making stuff. As I have said on numerous occasions, I’ll let history decide whether I am a crafter or an artist. Or you. You can decide for yourself. I don’t care right now (may later!)
When I am pout and about, I look at everything with an eye towards inspiration.
Last Saturday, I went to Fisherman’s Wharf with my dad and sister. Dad had been in San Francisco in the 1960s with the Navy. He likes to show us how much he knows about the City and toss out names of fancy clubs he got into for free (The Pine Club?? Anyone heard of it??). He wanted cioppino and decided that Alioto’s on the Wharf, since Scott’s in the City is now closed, was the place to get it. I would, normally, never go there. That’s what he wanted and I didn’t have a better idea, so Alioto’s it was. He loved it and was so happy with his cioppino.
Alioto's Cioppino, June 2009
Afterwards we walked around with all of the tourists. I saw some flowers and walking around art that made me smile.
Garden Art
I love these starfish shaped garden sculptures. I love that they are a bit hidden, but if you look you can see them. I also like the glass rondelles embedded in the metal. I want to hide things like this in my yard. Sadly that means I have to stop sewing and start gardening!
People are coming up with fabulous stuffed pincushion-like items. I saw a chicken not too long ago that made me want to start a collection. Now Retro Mama has a pear. I want this pear, but I am terrible at stuffing things. They always come out misshapen and too soft. Perhaps I will have to practice?
So, this post is about what inspiration can do for you if you look at an inspiring object you long enough. I have been in that kind of mood lately. The “What if” mood. The light has been the way I like it, too, not too glary and not too grey. I have been seeing everything through this light and have been inspired by it all lately. The machine quilting I did on Beach Town last weekend was a direct result of some lines I saw while driving the previous Friday. It is a good reminder for me to look around.
I pulled this batik out of the blue bin for the variety of projects that require blue. For some reason, it ended up on my desk with the detail (left) front and center. For days it lay there. For days I looked at it. For days it lurked in my peripheral vision.
Then, the other night, I just sat down and drew it. When in doubt, what else do you do?
Drawing the Blue Batik
This is what I drew. It doesn’t look the same without the color, other motifs and thicker lines. Still, I like the various elements. It is clear to me that having a variety of sizes of tips on my black pens would be very helpful.
In looking at this version, I wondered what the design would look like if I straightened the lines out a bit.
Blue Batik Extrapolation
In the drawing to the left, I started too far to the right and had to cut off my drawing. I am trying to go with the process and be flexible. Again the thickness of the pen was a problem for me, but I can always do the drawing again later with a thicker pen.
I thought I was finished, so I put the drawing book away and folded the fabric, though I left it on my desk. The way I folded it, however inspired me further.
Batik Ice Cream Cone
I folded the fabric so that the detail motif (blue, above) was almost exactly in half. It made me think of a symmetrical version of the design. tried what was on my mind. Even though I didn’t finish the whole thing, I can see what I was envisioning. I just wanted to get the idea on paper.
As you can see, looking at something over a period of time can make your mind work with the inspiration in different ways.
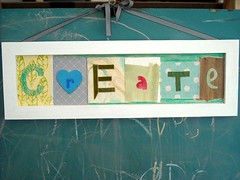
Dana Barbieri has created this wonderful piece that is stuck, like glue, to my mind. I LOVE it and want to make one, perhaps two, myself.
My sister recently received the Cricut software which allows you to print letters out any size and any font up to 6″. My idea for my piece is to have her print some letters on scrapbook paper for me, find a rectangular frame at the Goodwill or other thrift store and then sit down with my art supplies and make something like it to hang in my workroom. I would also like to make one that says “Imagination.”
Have you ever been so inspired by a piece or the concept of a piece that you have made one of your own?
Words are very important to me. I like the shape of them – the way they look when written and the way they feel on my tongue, which is why the title is tools and supplies and not just supplies. Supplies would be more accurate, but I don’t like the shape of that word.
I saw this picture – found from a Twitter link – and really liked it. One thing I like about it is the abundance, but I also like the fact that the background is white. There are no distractions from the background in the picture. This style allows me to focus on the elements of the picture. Take a look at the website.
Some years ago I took a pillow making class at the Sewing Workshop. Sewing Workshop classes are fabulous: thorough, and inspiring. I am sorry to say that, although the class was fabulous (with Linda Lee, no less), the pillows are still part of my UFO pile. I recently saw Stitch magazine.
Stitch Magazine, Spring 2009
I fell in love with the pillow on the cover and may make some pillow covers using the pattern (or my version of the pattern) to brighten up some tired couch pillows to go along with the promised new paint job. If all goes well, I may discard the half made purple covers from the Sewing Workshop class and use the Stitch idea/pattern to cover those rather large forms (14″ or 16″) as well. For once I feel excited about throw pillows!
I also may make a pillow or two to raise money for Cleft Palete. MIL suggested using some poppy fabric for the centers. If I had some squares of that California poppy from a few years ago, it would be perfect, but I don’t, so I will have to make do.
Certain individuals are on a statewide board of directors for an organization that among other things, raises money for Cleft Palete. Each year, as part of the process of running for office, the nominees make gift baskets in order to draw people ino their suites/campaign headquarters. They raffle the gift baskets to raise money for Cleft Palete. Certain individuals came up second in the most money raised this year for his gift baskets.
The convention is always in May, so I, usually, cannot attend due to the demands of The Child. There is a small thing called school and another called food. Leaving him at home alone is really not an option. This has the effect of organization voters wondering if I support him in his volunteer endeavors. I think they might forget what it is like to have school age children. Anyway, I thought a couple of throw pillows would:
show my support
be something different that would draw the wives into the raffle
allow me to try something without having to commit to having it in my house
get some new readers to the blog
I might have showed this site before. I thought the pillows they show are similar to the Stitch magazine pillows and I could use their directions to supplement the Stitch magazine directions. More on Stitch magazine in another post.
In grammar school, I would sometimes walk with my sister over to my grandmother’s house after school. Grama worked, so we would be at her house alone, or with one of our aunts. Still, it wasn’t exactly a barrel of laughs. Soon, as children are wont to do, we found a girl on the next block and became fast friends. Her family had emigrated from Korea a short time before and her parents and older siblings were never at home either.
Homemade Paper Dolls
We discovered a shared love of arts and crafts. Paper dolls offered a cheap way of expressing our creativity. She could draw people in a style I now recognize as manga. Our friend was perfectly willing to draw dolls and dresses and other clothes and we would play for hours. I remember a discussion of her being a fashion designer where she told me in no uncertain terms that she was going to be a doctor.
I don’t remember why we lost touch, but we did, as children often do. I still have the paper dolls, however, and, as a result, I think about her on occasion.
Amy, of The Creative Mom Podcast, as she often does, brought paper dolls to my mind again with her episode #67, the Shape of Paper. She sent me on a trip around the web looking at various paper doll websites. I found a cool site, Kiddley, with some good basic paper doll outlines that offer a lot of scope for imagination. Wouldn’t it be cool to make fabric clothes with your quilt fabric? A great use of scraps!
I’d be interested to hear your stories of paper dolls in your life and see pictures of anything you make in the paper doll realm.
The four Teacher Pillows are complete. I have one more pillow form, but the Child is being uncooperative about the last drawing, so I may just save the pillow form for next year. I could take a drawing out of his drawing book and use that…. We’ll see. I think I am done with this project except for the wrapping the pillows in pretty paper.
Tangled Star - EQ6
The above is the outline/color drawing that can be printed from EQ6. It turns out that this was useless to me when I went to make the block, or so I thought.
Resource Teacher Pillow
This is how my version came out. I keep pictures of all of the pillows so I know what the past pillows looked like. That way I can use the same or similar fabrics and the teachers end up with sets of pillows if they teach the Child more than one year. This is the 3rd or 4th pillow I have made for this teacher.
Key for Foundation Piecing
This block is foundation pieced, so I also printed the segments (see below). When I looked at the printed segments, they made no sense to me. The design page ended up as a wonderful key to the colors and placement of the fabrics. I wrote letters on each piece, which correspond to the letters I wrote on the pattern pieces.
Pattern pieces ready to cut out and sew
You can see, if you click on the picture to make it bigger and look carefully a letter, a number and a color. The color notes which fabric I need to use. The letter corresponds to the letter on the design key, which I added to make sure I didn’t assign two segments to the same section of the block. The number is the piecing/sewing order. Doing the prep took some time, but it was worth it once I started to piece. The segment pieces/patterns really don’t look like they will make the Tangled Star block, so these strategies really helped.
Piecing Order detail
Above shows the segment after I have pieced the fabric on to it. The red and gold needed to be pieced first, which they were. I then trimmed them and sewed on the green. In this photo the green still needs to be trimmed.
Resource Teacher Pillow back
Above is the back. The drawing is a sort of label. The Child has a distinctive drawing style that the teachers seem to enjoy. I usually let him draw whatever he wants.
Teacher Pillow Labels
To make the label, I divide up a sheet of copy/printer paper into 4 sections. Then I draw in the seam allowances and have the Child draw inside the lines. Once done, I copy onto fabric backed with freezer paper or something. I get it from Dharma, but The Electric Quilt Company and many other companies sell similar products. Once the drawings have been transferred, I rotary cut the labels apart on the cutting lines and add each label as part of the back of the pillow cover.
Omega Block Pillow, Social Studies Teacher, 6B
I let The Child pick out the blocks. I do have to guide and encourage him a little as this is a boring exercise for him and he, usually, just wants to get it over with as quickly as possible. This year he took more of an interest. Above is the block (Omega) he chose for his social studies teacher. They just finished studying Greece, so I think the Greek alphabet was on his mind. He also informed me that Omega is his favorite Greek letter.
I printed out the rotary cutting directions for the Omega, thinking that I could just make it that way. The pillow forms were 14″ so I had to scale up which resulted in a lot of 16th inch measurements. After cutting about the 10th 16th inch cut, I decided that foundation piecing was the way to go.
Sometimes he gets a little too enthusiastic. He wanted me to make a Mariner’s Compass for his resource teacher and I flat out refused. If I am going to make a Mariner’s Compass I have to start a lot earlier.
Omega Block, back
The Child used a lot more words on his labels his year than he has in the past.
Homeroom Teacher, 6A
This is the first block I made. I wanted simple blocks. They got harder the more The Child was involved. He did the color selection on this one (orange and purple). I was skeptical until I found the flower print with a similar color scheme.
Homeroom Teacher Pillow, back
I hope she can read the back. It is really squished.
Teacher Aide Pillow
I really like the color scheme of this pillow. The Child went with the colors EQ6 had in their example and I think it works. I took the opportunity to use the blue in one of the Infinity blocks as well. The color scheme reminds me of the color scheme for a RUSH day I organized in college. We wore yellow, red and green dresses and looked really bright and cheerful.
Teacher Aide Pillow, back
I was a little concerned about the drawing on the back as the Aide does not look very happy in his drawing. I asked the Child about the drawing and, being a boy of few words, refused to discuss it with me. I asked if she always had a lot of filing to do and he said no. That was really the end of the discussion. Oh well, I have a policy of not censoring his art if it isn’t rude or p*rnographic, so she will have to make of it what she will.
I know that I ignored you all weekend. I spent about 24 hours over the three days sewing and really got a lot done. It is difficult to be at work today, because I am still desperate to be at my sewing machine. Needless to say, I have a ton to discuss.