Gift Bags From Afar for the Luckiest Girl

I got a surprise on Thursday! Kristen and Mrs. Kristen sent me a dotted package filled with fabrics and gift bags. I was so thrilled and it was just the pick-me-up I needed.

I saw this sunflower fabric on Kristen’s blog and asked her to get me some earlier this year. I never saw it and know that she is really busy, but was so pleased to see it come to live with me.

The dots, of course, will come in very handy.

While they were at it, they worked on some gift bags for me. Aren’t they pretty? They have little cuffs on them, which is wonderful and different from mine. I am so pleased to add them to my collection. I am also pleased that the gift bags phenomenon is spreading. Hope you will make some, too!

They put it all in a gift box covered with dots, which made me happy even before I opened the package. Thanks, ladies!

Denyse Schmidt Fabrics: A New View


countyfairpurse2
Originally uploaded by SarahQFD

I wasn’t that enamoured with the new colorways that DS came out with recently. I like the designs, but the colorways didn’t do much for me. Today I saw this photo (still working my way through the DS Pool on Flickr). These fabrics are obviously designed to be used together. That weird gold looks almost buttery next to the burgundy. It makes me wonder about a fat quarter pack. I have to stop myself, though, because there are many, many gorgeous fabrics that I could use with a bunch of fabrics I already have and these would almost certainly have to be used together and then what would I do with the finished project?

I am glad to see that these fabrics look nice together. Quilt Fabric Delights blogs about these fabrics and this purse at: http://quiltfabricdelights.typepad.com/quilt_fabric_delights/2008/09/i-sewed.html

Bags of the Kemshalls

Linda and Laura Kemshall are quilt artists extraordinaire. I love their Thr3fold Journal and the straightforwardness (is that a word??) and artistry with which they present their projects. They have come out with a new gift bag pattern via Quilting Arts. I looked at the pattern and it is kind of a backwards bag. What I mean by that is that you create, paint, embellish, bead and torture your fabric THEN you make the bag out of it. I can see where this pattern would work for stuff you already had around the house or for test techniques that you didn’t want laying around after you were done testing. These bags look pretty complicated, however. Please note that I haven’t made one, but I am very much a fan of he 10 bags an hour method. Let me know if you make one of these bags and how it turns out. I’ll be happy to post your photo to my blog or link to your blog etc from Artquiltmaker blog.

More “Bags” to make for Your Amusement

The ever ingenious Deirdre sent me a link to this blog post where the writer shows you how to make personalized bubble mailers. I tried to clip using Clipmarks, but it didn’t work, so definitely click on the link to see them.

Seeing as how I never have the right sized bubble mailers and have copious amounts of fabric and bubble wrap, it is a possibility that I might actually make a few. I don’t usually have time to put together something like this when I want to get a package off, but I can see the uses. Something to consider, regardless. I love the web and how you get to see a lot of different types of creativity.

1000 Journals Project Visits SF Weekend of August 1, 2008

You are probably wondering why it took me so long to get to this post.

Life.
Travel.
Back to School.

You know how it goes.

Still, I wanted to post some photos from the actual journals. The Roxie in SF showed the 1000 Journals movie. It was the first commercial showing in the country.

The 1000 Journals project is coming to the SFMOMA as an exhibit starting in November and the exhibit will be open through ~ April 2009.

I think that the images I was able to snap are from the most photographed journals (because they are in possession of Someguy), but I thought I would post some images anyway.


Some entries are homages. Some entries look like a mess, but that is one of the beauties of the project: everyone can express themselves anyway they want regardless of age or ability.

The artistry of some of the pages is remarkable.


I like the way these entries were created in landscape format.

WARNING: Political images next. Stop reading if you may be offended.

I am not exactly sure what these images are saying (remember the journals went out right around the time of 9/11 so there is a lot of 9/11 imagery included), but I admire the creativity and thoughtfulness (especially the double entendre) regardless of whether you think it is positive or not.

Next up in the Tote Bag Department

As you may recall, I made this lining for the Cupcake Tote, but ended up not using it.

After finishing the Eggplant/Lemon tote and embellishing the Chocolate Flower Tote, I, once again, turned my attention to this troublesome lining. It wasn’t intentionally troublesome, but the colors turned out to be a problem.

I looked through my fabric, not really sure what to pick. I pulled out these dots from the Timeless Treasures Basix collection. I love these dots, though I love the ones with the white backgrounds more. I thought I would use them, but when I looked at the three pieces together, I decided that making visually decisions visually was a good idea. The colors in the cake fabric didn’t go with the dots. No purple or pink in the dots and no turquoise or orange in the cake fabric. Too bad, because I have a lot of black dot fabrics that I haven’t used at all. The outside fabrics had to go with the lining, though.

After looking carefully at the focus fabric and looking through my black and white fabrics, I found this red batik and this violet dot.

This is the grouping that I picked. I wanted the fabrics to all go together without being too matchy-matchy. I also wanted to use some dots. The violet dot is very thin and I don’t like it forpiecing. I don’t have much of that red batik, but think it will be nice as an accent. I completely ignored the aqua pockets that I already sewed to the inside of the lining. Nobody will see them much except the owner.

Stay tuned.

Teacher Pillows 2008


Yes, I made Teacher Pillows again. I know I am going to get flak for reprising the project that made me so insane last year. This year my timing was off (summer, which, as you know, happens NOT to be before the end of school) and they turned out to be a lot easier. Spring was just too crazy with work to be able to get to this project in time for the end of school. I think doing them while I was on vacation and not worrying about regular life was a really good thing. The first day of school is Monday, so the teachers will get a little boost from a gift then.

I decided to make them on vacation so I could get my SIL to give me some pointers. She has 3 boys, two of which are out of the house and college, and a lot of Teacher Pillows under her belt. I thought that if she couldn’t give me some pointers to make the process easier, I would really give up the tradition.

These are 12″ square pillows. That size choice made the whole process easier, because I didn’t have to change the size of the block or add a border and could just use the directions straight out of Around the Block. I have EQ, so another idea is that if I want to make 14″ pillows in the future I could resize one of their blocks and use the directions. They have great rotary cutting directions. (note to self).

SIL also suggested that I made the back two panels 10″ x 12″ each. This size is to prevent gaposis. It was hard to get the pillow forms into the pillow cover, but once they were all in, there was no gaposis.

The only thing I don’t like about this group is that the pillow forms are too puffy in the middle, so the corners aren’t filled out. I am ignoring that this time around. Once the teachers lean on them, I am hoping they will squish down. I will look for squishier pillow forms next time. Last time I got feather pillow forms on sale and those filled out the pillow cover nicely.

Amy Butler Tote redux

I found the Amy Butler tote on the K&C Company website. It looks really nice and has gotten rave reviews from some people who have emailed and commented. I’ll have to think about it before I buy. I still want the pattern so I can try and make it from my own fabric.

clipped from www.kandcompany.com

Amy Butler Belle Fabric Scrapbooking Tote Bag

Hold everything! Our exclusive, Amy-Butler-Designed craft bags are great for creativity on the go!

Made of durable, padded canvas, these versatile creativity bags are divided into: one wide 12×12 pocket, one flat 12×12 pocket, one open compartment with three small, wide pockets on each side, and two exterior side pockets that are perfect for photographs or tech gear like a digital camera, cell phone or mp3 player.

Use to hold an album, 12×12 papers, embellishments, paper cutter, fabric, yarn skein, tools, photographs, projects and so much more!

Shell: EVA Foam-Backed 100% Cotton
Lining: 100% Cotton
SPOT CLEAN ONLY

Amy Butler Belle Fabric Scrapbooking Tote Bag
blog it

More Complex Bags

I was at Pacific Fabrics yesterday and saw this great bag from K & C Company and Amy Butler. It is called the Creativity Bag and says it was designed for scrapbooking.

TFQ and I liked it because of the interior dividers. I don’t think I would want to carry it around all the time, but it would make a nice travel bag. Frankly, I would just like to try to make one. Either the design or the fabric is licensed, so, after discussing with TFQ, we are skeptical that they are also selling a pattern. It seems like they would just want to sell the complete bag. I’ll have to look carefully, though, on the Web to be sure.

TFQ found a pattern she bought several years ago, which is similar. It has the dividers inside, but doesn’t have a really good variety of photos of different angles.


Latent Love of Dolls

Deirdre sent me a link to Mimi Kirchner’s blog and it made me start thinking about dolls.

clipped from mimikirchner.com
blog it

I have to admit that I have always loved dolls: Barbie and friends, baby dolls that you could dress and feed, soft huggable stuffed dolls.

I loved dressing up dolls. The dolls always looked glamourous and could walk in their tarty shoes, which wasn’t always the case for me! Dolls always provided an opportunity to play house and have things go my way. Dolls are also a great opportunity for creativity. Now I am too old for dolls and they have been replaced by a family of Mr. Potato Heads on my desk. Yes, I dress them up for the entertainment value.

As I have been washing and pressing the fabric from my trip to the East Coast, I have been cutting off schnibbles. I keep thinking to myself what great hair the schnibbles would be, which further makes me think that Art Warrior and Mother Warrior may need a new friend.

Artist Warrior (left). Mother Warrior (right). On display at the last CQFA show.

Mimi’s dolls are really creative and beautiful, and they also have a lot of personality. They are also BIG, and, presumably, huggable.

I am really glad to have the blogosphere accessible to me, because it is just a fountain of creativity that I can dip my toe into whenever I want.

What I Made on My Summer Vacation

I bought the fabric for this tote at Capital Quilts in Gaithersburg, MD. The flower fabric appealed to me even though chocolate is a major color in the fabric. In making this bag, I realized that using three fabrics makes the totes much more interesting than just using two fabrics (outside fabrics including straps, pockets and body, which is separate from the inside fabric).

This is a tote that I started, what seems like, months ago. I, finally, was able to finish it in Maryland. I love Love LOVE the turquoise bubble dot fabric. The problem is that the straps and the pocket, which are pictured in the photo above, are camoflaged. I definitely see another tote with this fabric in my future.
This is the inside and I think the turquoise bubble dot fabric looks so much better on the Basix dots.


Normally, I don’t buy Christmas fabric. I certainly don’t regularly buy Christmas fabric at full price. I loved these fabrics so much that I couldn’t wait to see if they went on sale after Christmas. The colors and motifs are really fun and cheerful. I wouldn’t exactly classify the toile as fun or cheerful, completely, which is not to say it is ugly or staid and boring. I do love the idea of repurposing the toile idea into something new. As soon as I got home, I sewed the fabrics into Christmas gift bags and am looking forward to using them during future holiday seasons.

I started a cupcake tote made from the fabric I purchased in May at Clementine’s Dry Goods, but have not gotten very far. Photos to follow.

Cleaning up the Junk Drawer of my Blog

The title is paraphrased and re-imagined from a phrase that DebR uses on her blog, Red Shoe Rambling. I have a lot of little bits to pass on and thought this would be a good time to do it.

More on Gabrielle Swain

I forgot my camera on the second day of class. Karen, a fellow student in the Gabrielle Swain class, was kind enough to share her photos with me. We had a little session on features of her camera, which was fun and then we took some pictures. Karen let me look over her shoulder while she took photos.


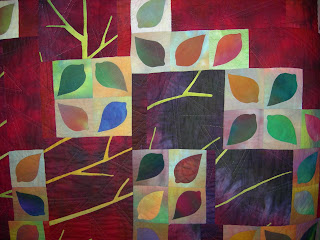
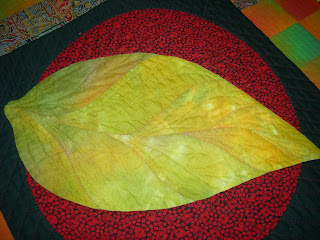
In the above piece, you can see the color placement issue that I described in Gabrielle Swain Class, Day 2. The leaf is made up of separate pieces. If you can see how the veins divide the leaf, know that each of those sections is a separate piece of fabric. In placing the fabric, Swain explained to us how to fussy cut the fabric (using the light box) so that there are no huge breaks in the color of the leaf. I think the above leaf has more color breaks than I would expect there to be in a piece, but since GS did it, there must be a reason.

You can also see the quilting pretty well in the above photo. All of this quilting is done by hand.

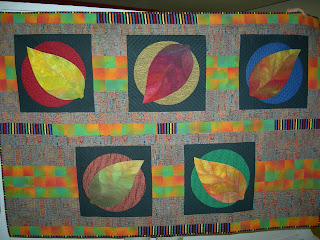
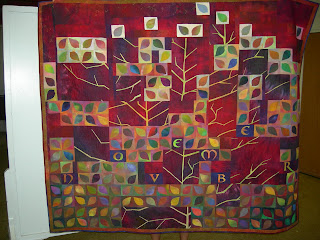
I liked this quilt, because of the way she breaks up the leaves and the branches. I also think the few letters add a lot of interest.


My favorite quilt of Ms. Swain’s was called Even Change (not above, click the link). I think the one on her website might be different than the one she brought to class. Still, I like the idea of temperature that she used in this quilt. The idea was that if she used a cool tone on the background, Swain appliqued a leaf (piece of fabric) in a warm tone on top of that background, then she used a cool tone for the veins. Very successful.

Thinking about Proportion

Periodically, some technique that has been rumbling around in my mind as I try and understand it, clicks into place. What is rumbling around in my mind lately is proportion.
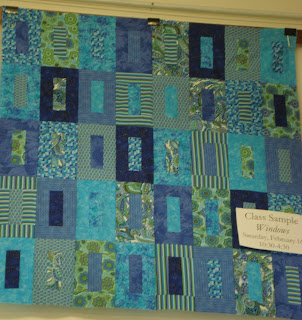
TFQ and I saw this class sample at Black Cat Quilts when she was visiting in April. It is from the Weeks Ringle and Bill Kerr book, Quiltmaker’s Color Workshop: the FunQuilts’ Guide to Understanding Color and Choosing Fabrics. Gretchen was out of the book so I had to buy it from somewhere else. That meant that we couldn’t look at the book or the directions for the quilt.The pattern is pretty easy, so it doesn’t really require a class or a pattern.

I was shocked when I did buy the book, because 1) the colors were a shockingly ugly combination (TO ME). I have little to no appreciation for the colors in quilts made from reproduction fabrics; 2) they put that ugly quilt on the cover; and 3) how small the blocks actually were in the pattern in the book. The above picture shows blocks that are approximately 8″x4″. It was high up on the wall and there wasn’t a ladder available for me to climb and measure the blocks. Also, I forgot my tape measure. Anyway, in the book the pattern directions tell you to create blocks that are about 3″x5″ (the size of an index card). Huh???

Well, obviously, the maker of the class sample was perfectly able to enlarge the pattern. This where I started to think about proportion. I find that the proportion of the blocks in the picture above to be good. I haven’t made one of the smaller blocks, so I can’t say whether I would like that size.*

My thoughts about proportion, which started with this book/class sample encounter, have to do with how to figure out how to find the right proportions (without a lot of complicated math, thanks) of a block. It is easy to say “ok, the pattern says to make this block 3×5, so it would be easy to blow the block up to 6×10”, but what about if I want the block to be 8x something. I have a little fraction to decimal cheatsheet and I want a proportion cheatsheet as well. Let me know if you know of one.

I do have EQ6 and will probably work on it there.

Note we did get permission to take the photo.

*Aside: the smaller blocks might be a good FOTY project.

Prismacolors

At work and personally, I am doing a lot of self examination. In the course of this, we were talking about Myers-Briggs types and how some types don’t like opening gifts in front of people. That brought up a discussion of gifts and how I would really like a super large set of Prismacolors. Gabrielle Swain suggested getting the large set so that I would have every color I ever needed. I have been using a set of colored pencils that were part of my school supplies list when I lived in Austria. They are a few years old, but they have great names like hellgruen and dunkelblau and they do the job. The friend subsequently mentioned that Aaron Bros was having a monster sale and I could get a set for half off. I went to Aaron Bros last night while I was running an errand at Target and looked.

First, I was shocked at how few art supplies Aaron Bros actually has now. Their whole upper floor was filled with framing services and ready made frames. I had no idea frames were such good business.

Anyway, I didn’t buy any Prismacolors, because the 40% off sale was over. Dick Blick has the set of 132 pencils (list $190.00+) for $89. That seems like a good deal.

Swain also mentioned the Prismacolor Art stix. She made them sound like they were some special/new kind of pencil. I looked at them at Aaron Bros and they looked more like pastels to me. I am not into messy, so I don’t know if they are for me. I think I bought a couple last week and will try them out.

I am also interested in the Derwent Inktense pencils. I suppose I should learn some techniques for colored pencils, so I can really test the various pencils in an informed manner.

Making Many Bags

I figured out why it is a GREAT idea to have multiple tote bags hanging around. To date, I have made 6 bags and have 2 or 3 cut out and the fabric ready for at least one more. I have been thinking, and discussing with TFQ, the point of making many bags. The obvious answer is that it is fun to make bags. It is great fun to use large pieces of different fabrics than I wouldn’t normally use for quilts. It is also fun to buy fabrics, such as the cupcake fabric for a purpose. I came across the true answer last Friday, as I prepared to go on a trip.

The true answer is that you need extra bags so you don’t have to clear out the other bag you haven’t unloaded!

Yes, life has been crazy and I haven’t unloaded the dot/flower bag, so when I went to pack for the trip to the lake, my choices were to unload the bag or do something else. I was, as usual, in a rush and late, so I just grabbed the Alexander Henry bag, filled it up and left. Right now, I have two bags laying on the floor of the workroom full of various activities. I guess I am already packed for another trip!

The dot/flower bag also needs to be fixed. I didn’t catch all of the hem when I hemmed the top, so I need to resew that. I started to unsew it and resew it, but haven’t finished.