Cheryl’s IRR

I don’t actually have any IRRs right now and I wasn’t at the BAMQG meeting, so I couldn’t take another. I had three in quick succession, with Cheryl’s being the last before my brief hiatus. Ruth‘s and Claire‘s pieces were the other two in the trio.

Michelle and I met at Trader Joe’s again and exchanged IRRs. I took Claire’s to pass along as she wouldn’t be at the meeting either. I headed up to the North Coast again with DH for NSGW/#politicalwifery events and Michelle was headed to Spain. Rhonda was kind enough to take both bags to the meeting for us and I gave them to her at the CQFA meeting.

All of this meant that I had to get Cheryl’s done in time to get it to Rhonda. I had about a day once I figured out all of the timing, so I got down to business.

Cheryl's IRR - before
Cheryl’s IRR – before

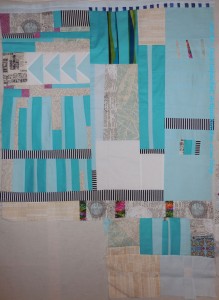
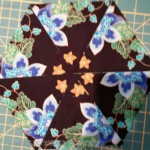
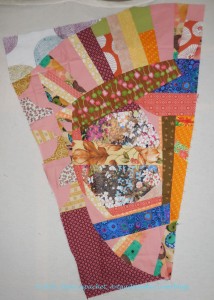
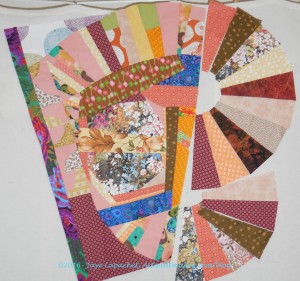
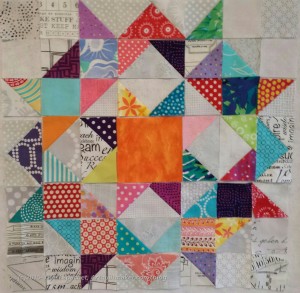
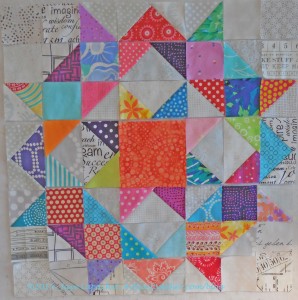
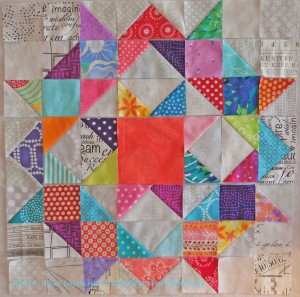
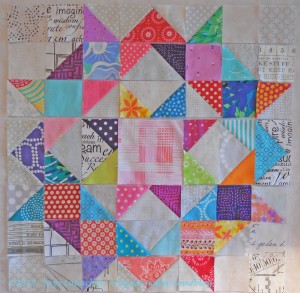
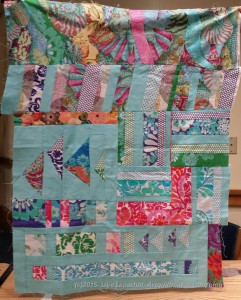
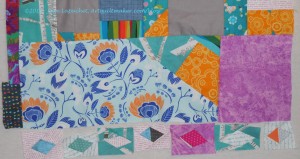
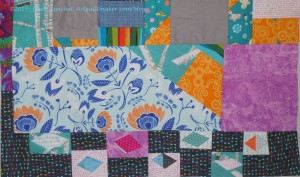
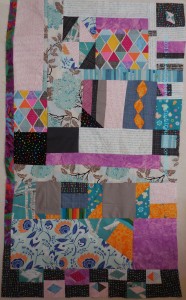
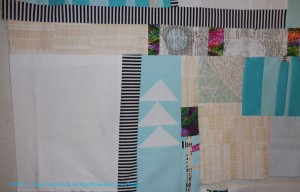
Cheryl’s piece looked great when I got it and I was loathe to wreck it, but Michelle had added half a row, so that missing section was perfect for me to complete.

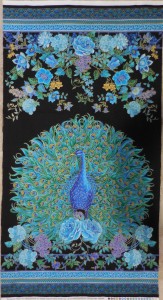
Cheryl’s piece is turning out really well. I love it, thus the feelings of avoiding wreckage. I really wanted to use the Paris map fabric, but couldn’t really fit it in once all was said and done.

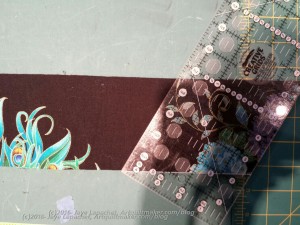
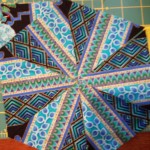
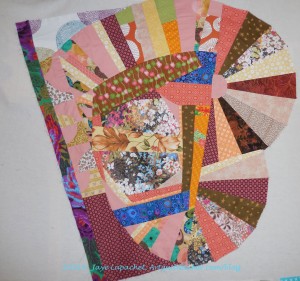
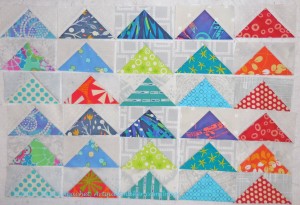
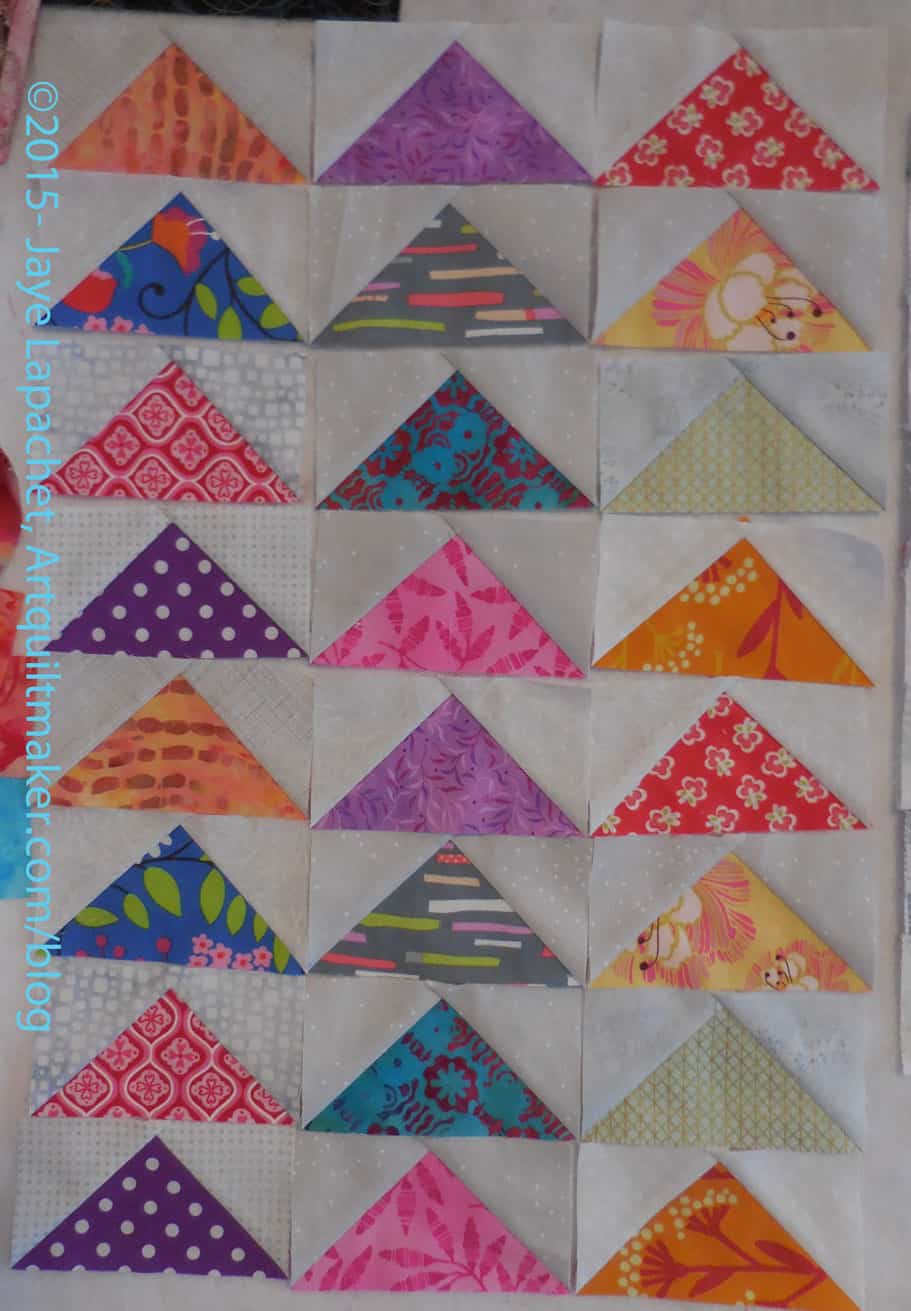
I walked around with it on my design wall for a few days and decided to add some Flying Geese. Yes, I am still in love with Flying Geese.

I also needed to add my signature fabric, but I didn’t want to add a large patch or strip as I have on other pieces, because I wanted to preserve the mainly white and turquoise color story.

There were a few small strips left over from other piecing, so I pieced a few of those together to make another strip large enough to handle my signature fabric. I wanted something that would look like it fit in.

Cheryl's IRR - my part
Cheryl’s IRR – my part

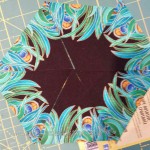
I made some Flying Geese. Since those were the main parts, I started working getting Michelle’s strip completed. I added some white and a strip of the black and white stripe, which came to me after looking at the piece.

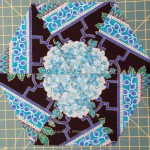
After making my piece, I think the white on the edge needs to be corralled, but someone else, or Cheryl, will have to worry about that. I am pleased with how my part came out and I think my signature fabric piece fits in well without overwhelming the whole design.


Cheryl's IRR - finished with my part
Cheryl’s IRR – finished with my part

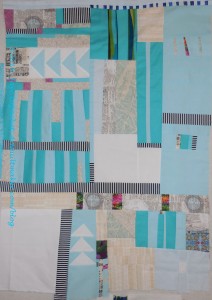
I also think the piece needs some space at the top. The bottom is getting to be quite breezy while the top is looking a little cramped. Not fatally so, but a little. It will be interesting to see what happens.

Good things about this IRR

  • no rules about how much you have to do
  • don’t have to add much fabric

Peacock Quilt

Peacock Panel
Peacock Panel

I realize that I have not discussed the One Block Wonder/Peacock quilt recently. The last time I talked about it was last June!!! I can’t believe so much time has passed.

Frankly, I was stuck and needed some hand holding. This is the main reason I get stuck on projects. Since Pam is in Atlanta, though very willing to help via email, I set up a date with Maureen to work through my issues at the Retreat.

TA DAH! The peacock project is finally moving forward. During the time  I spent with Maureen at the Retreat she talked me back from the ledge with regard to cutting up my panels.

I had read the One Block Wonder book, but being shown is different than reading. This technique is definitely a challenge to learn from a book. The technique is based on repeats, but since panels are panels, I decided that each of my panels would be one repeat. This worked out pretty well.

Cutting Blocks
Cutting Blocks

I had decided on a width for the strips with Pam’s guidance (3.75″, in case you are curious), so with Maureen’s help, I lined up the panels and eventually began cutting. It was good to do this at the Retreat, because we had big tables. I know now that I would not have been able to do this cutting in my workroom.

My panels were about 24″ x 44″. I had to lay out the complete panel flat and there are 6 layers stacked on top of each other after you have lined them up according to the directions in the book. It was helpful to have the big table. I put new blade in my rotary cutter and that was helpful. I only had a 45mm cutter. A 60mm cutter would have been very useful, but nobody had one to lend.

The key piece of helpful information during the cutting process was that there was a little wiggle room if I didn’t cut the panels quite right. One of my panels was not printed like the others and was causing me problems. Maureen’s comment helped me relax knowing that everything would be ok.

Another very helpful piece of info, which relates to wiggle room, was that the cut edge of the panel could be squared up before the next cut. The maker cuts through 6 layers of fabric, which is difficult in any case, but even more difficult when juggling a ruler, a big table you can’t reach across all with spectators watching. I had enough leftover to square the edges, but not enough to make another set of full sized blocks.

I did take what was leftover and make some smaller triangles that I will perhaps sprinkle around the edge.

Peacock Hexies
Peacock Hexies

Each set of triangles is pinned together waiting for its turn under the machine. Some of them look like they will make really interesting blocks. Others are mostly black and may not make it into the quilt.

I also have a number of solids that coordinate with the panel and I may sprinkle those throughout the the quilt. I’ll have to see.

I did start to sew blocks together after cutting them up, but I have not yet made very much progress. I had to try each one to see how I wanted to sew it together. Because you are essentially using triangles, there are three layout options for each block.

The above blocks are some samples. They look a little strange, because they are not sewn into hexagons. Three triangles are sewn together, two sets for each hexagon, then they are pinned together until the layout is finalized when all the blocks are sewn together in rows. I could sew the hexagons together and sew them using set in seams, but I am still not over Attack of the Hexies and I don’t want to go there again just yet.

Yes, I did save a panel to use for part of the back.

I am still a bit scattered with my projects. This will be a good leaders and enders project when I don’t have others ahead of it in line.

Fibershots Pieces

As I mentioned a few times, I made two small quilt-lets to donate to the San Jose Museum of Quilts & Textiles for their Fibershots fundraiser. All the pieces are 10″x 10″ and will be $100. They should have less than 3″ of dimensionality if the piece sticks out from the wall. My piece is basically flat.

I am killing two birds with one stone by making them in the minimalist style for the Mighty Lucky Quilting Club February Challenge. I’ll talk more about that aspect in a later post.

Minimalist Fiber 1 & 2

I wanted to make something that would sell, so I kept the design clean and used popular colors. The piecing was easy – all out of the scrap bins. I got bored by the machine quilting so I added some color to each piece.

I didn’t know I had to put a sleeve, etc on the piece, so I wasn’t able to finish them at the work party after the meeting. I was a little irritated at that, but stayed up on Saturday night (my exciting life!) to finish them so I could start fresh on Sunday morning.

I hope someone buys these. I would really be unhappy if they stayed in the gift shop for the next 3 years.

Ruth’s IRR

Finished: Ruth's IRR - complete
Finished: Ruth’s IRR – complete

Yes, they are coming fast and furious! I got two at the last BAMQG meeting, as I mentioned. I was able to work on Claire’s piece during my last free sewing weekend, but I didn’t get to Ruth’s. While having little time to sew on the weekend, I have had to cram the work into bits of time during the week. Of course, I forgot to take a before picture. 🙁 C’est la vie. If you imagine removing my part, that is the before. 😉

There is something that makes me think of a castle. The ‘mountains’ could be points of a tower and the curved sections could be arches.

My addition to Ruth's IRR
My addition to Ruth’s IRR

Ruth’s piece has a clear color story and large curved center with triangles seem to be a design focus. The piece spoke to me immediately after I put it up on my design wall. I saw the triangles on the top that looked like mountains and decided to add something similar on the bottom.

I had to do some fancy sewing with background around the mountains since I didn’t want to cut off the tips. I think the background looks like Mary Mashuta’s Pushed Neutral concept and I like it.

IRR Again

Claire's IRR
Claire’s IRR

Next on the IRR list was Claire’s piece. Claire was in my original group so I wanted to make sure I worked on all of those quilts. I received her piece at the January BAMQG meeting.

Claire’s IRR was a challenge. The colors are perfect for Claire, but they are not my colors. Also, many of the fabrics had been used up or smaller pieces were left. This is why the project is called a challenge! I did not let these things discourage me.

I put the piece up on my design wall and tried to see the focal point or the place where Claire started. I couldn’t really tell, so I looked at who had worked on the piece and still couldn’t tell what might have been Claire’s start.

Trying out the Grandmother's Fan idea
Trying out the Grandmother’s Fan idea

I put the focal point aside and looked at the piece. I saw some good curved lines and thought something like the Grandmother’s Fan block might work. I cut some blades and put them up on the design wall.

I really did try to keep, mostly, to the 20 minute rule. I find that rule to be hard as the pieces get larger. Of course, cutting is still a challenge. Also, the curves on Claire’s were not an easy design element. And, right on cue, life got in the way and the piece sat on my design wall for a week or more.

Claire's IRR - continuing the curves
Claire’s IRR – continuing the curves

As I walked in and out of my workroom I decided I did like the curves. At one point, I adjusted the fans so the existing curves would be continued — or give the illusion of being continued.

In the photo, I tried to point out to you, in a very obnoxious color, what I thought of as ‘continuing the curve’. No, the blades aren’t all the same size, but the curve seems to be the most important in terms of design. I hope the curves I added work with the existing curves to create a focal point.

The bad part is that I didn’t square off the fans. I know I should have, but I just didn’t feel like it. I know I can offer to do it later, if push comes to shove. I am hoping that someone else will square them off down the road.

Claire's IRR with my addition
Claire’s IRR with my addition

I am happy with what I did. I gave the piece to Michelle on Thursday and will look forward to seeing what she does.

Now I am on to Ruth‘s piece.

Pink Carpenter’s Wheel

Pink Carpenter's Wheel (#5)
Pink Carpenter’s Wheel (#5)

I was finally able to finish this pink (the center is pink so I think of it as the Pink Carpenter’s Wheel) Carpenter’s Wheel block. While I was working on the Sew Together Bags, I didn’t have a quarter inch foot on the machine, so I did barely any quilt work piecing. Very sad as that means very little gets done.

But the Sew Together Bags are done for the moment and I got quite a lot done over the weekend.

This one has more HSTs. I put some in the center, outside the Sawtooth Star, to try and get the look of a ring going. Not sure if I succeeded, thought I do like the look and the opportunity for additional color more HSTs provides.

I am still interested in the low volume background and am adding more of my own fabrics to the mini-charm packs I bought in Corvallis.

I cut and laid out another Carpenter’s Wheel block. I didn’t do it because I wanted an even number. I did it because I had another idea for a variation.

Color Selection on the Carpenter’s Wheels

The Carpenter’s Wheel blocks were off visiting Kathleen in Reno when I started laying out the 5th version. Yes, I had another idea for a variation and decided to try it out. I was challenged by the center square. I got it in my head to use orange (forgetting that I had already made one with an orange center), thus had some fun trying out different oranges.

Carpenter's Wheel with orange
Carpenter’s Wheel with orange

I really thought that the tone-on-tone orange would be the perfect center for the 5th block. Somehow it didn’t work for me. I think the bold patterning of the other fabrics made the tone-on-tone look flat.

Carpenter's Wheel with batik orange
Carpenter’s Wheel with batik orange

I didn’t want a fabric that screamed because it is such a large piece compared to the other patches, so I tried this great orange batik. I thought it was probably the best of the lot, but there was something about it that didn’t quite work.

Carpenter's Wheel with tone-on-tone orange
Carpenter’s Wheel with salmon-y orange

I picked out a more salmon-y orange, thinking more pink might work better. The pattern was better, but the pattern wasn’t bold enough to compete with all that was going on in the block and didn’t work.

Carpenter's Wheel with stripey pink-orange fabric
Carpenter’s Wheel with stripey pink-orange fabric

I did think more pink was good, though, so I looked through my ‘oranges tending towards pink’ fabric to see if I could find anything. This was better. I almost went with it, but though it was a little light. You can see the block evolving as I move some of the other pieces or change them out as well.

Carpenter's Wheel with pink stitch
Carpenter’s Wheel with pink stitch

I finally decided on a pink stitch design. I think it competes well with the other fabrics, but doesn’t overwhelm them.

I am working on stitching it down. As you might recall, these blocks have a lot of pieces, so it takes time. I also laid out another block and will need to pick out another center. Stay tuned.


Flying Geese Swap Update

Flying Geese Swap - mid December 2015
Flying Geese Swap – mid December 2015

I have been making and receiving Flying Geese all along. I finally decided to do an update as the group was getting kind of large and was taking up space on my design wall. Also, the last update I did was on November 14 and that seems like a long time ago.

If I did the math correctly (50 weeks x 4 geese each week), I have at least 200 right now. It doesn’t seem like enough, though. I think I must have more. I am kind of amazed at how easy it is to make these blocks and to have them add up in number. I really want to sew up all the patches I have cut. I am trying to restrain myself.

Some of these TFQ won’t recognize, because I haven’t send them off yet.  They were part of the Wacky Weekend Work I did. Flying Geese make good leaders and enders.

Wacky Weekend Work

Wacky probably isn’t a good way to describe the sewing I did over the weekend, but the alliteration is good. I was working on finishing things and didn’t work on one particular project. I worked on many. I finished two Christmas gift projects (look for posts next week) and was doing some making that was for fishing up projects.

It sounds boring, but it was really good for me. I felt like I was clearing the decks and really getting projects off my list and making space in my head for new projects. Or other projects to finish.

The Great Unwashed - washed
The Great Unwashed – washed

First, I washed a bunch of fabric. I wanted some of it for some squares and additions to projects, so I washed two loads. See that Philip Jacobs print? Don’t you love it? 😉

One load I washed was lights so I could cut some squares for a couple of projects. As a result, I was able to add to my collection of squares and rectangles for FOTY 2015, the Stepping Stones project and add some fabrics to the most recent Carpenter’s Wheel block.

Carpenter's Wheel #7
Carpenter’s Wheel #7

The Carpenter’s Wheel block has been sitting on the design wall half assembled for awhile. I now have enough pieces to start sewing it together, but I am not 100% sure I like that orange center. I am afraid it looks like a big hole.

I made the binding for the Black and Red Improv quilt. I will send that off to Colleen so she can apply it to the quilt when she returns from her holiday travels. That was a huge load off my mind.

I also made several pairs of Flying Geese units for the swap with TFQ. I needed to beef up my supply, though I am afraid I have too many pieces and parts and the swap will end before I run through them.

All in all, I think Sunday was exceptionally productive. I felt good to be sewing.

More Improv Round Robin

I had two recent opportunities, the IRR post and the BAMQG Meeting post, to talk about my round robin piece, which is still circulating, and missed both of them.

Jaye's IRR - December 2015
Jaye’s IRR – December 2015

I was able to glimpse the work done on my piece at the meeting last week. I think my piece is looking spectacular. There is a lot of interest because of the improvisational piecing. There is also cohesion because of the limited palette of fabrics.

I am so thrilled that some of that Philip Jacobs (or perhaps Martha Negley??) fabric was added (shells at the top). I love the boldness of it. I would like to take a better look at it as I see some other fabrics tucked into that top section.

As I said before, the pieces are getting quite large and mine is no exception. I think it is probably NICU size right now, or slightly larger. I want it to be larger, but may have to add bits of my own at the end. People from other groups are still working on it, which is great.

Improv Round Robin Again

Angela's IRR - Before
Angela’s IRR – Before

At the meeting the other day, everyone doing the IRR challenge got together and we swapped pieces. We changed things up and I now have Angela’s IRR piece. We were not originally in the same group. Her group was small and everyone had worked on all of the pieces at least once. I didn’t have one to work on so I volunteered to work on Angela’s.

The pieces are getting quite large. I quickly put a signature strip on the side and then started thinking about what I could add that would look great. I liked the castle fabric, but wasn’t sure about just putting in a big strip of towers.

The diamond motifs caught my attention and I started working on adding free form diamonds.

Free Form Diamonds in Process

I have a hard time being completely free form/improv-y, but I did my best. I tried to make the diamonds not in alignment. I didn’t like the way they looked. I sewed the diamonds to backgrounds and played around with them a bit.

I looked at the piece and saw that dark grey kite fabric. I played around with that fabric and came up with a kind of checkerboard effect.

Finished Angela's Piece
Finished Angela’s Piece

I like the way it turned out. I think the dark fabric adds a bit of a frame to the piece and sets off the diamonds as well. I also like the visuality of the dark fabric going around the corner.

Angela's Finished Piece
Angela’s Finished Piece

Improv Class Piece

I made major progress on this piece during the weekend before Thanksgiving. I have had a lot to talk about, so posts are getting backed up. For someone who hasn’t had  much of a chance to sew recently, I seem to have a lot of content!

Potential Red & Black Improv Back

I walked around my workroom trying to get comfortable with the blue and green backing. I really tried hard to like it. I tried to convince myself that another color scheme would provide a different look and make a good addition to the piece.

No dice.

I had already cut one piece into two and I still couldn’t like what I saw. The blues just didn’t work with the red and black and I couldn’t do it. I admitted to myself that I wanted to save the large piece of red solid for another project and that cleared the way for progress. I found a piece of American Made Brands red solid on sale and bought it. That kind of freed me up to use the large piece of Kona red for the back, which is what I did.

I spent a whole Sunday piecing the back. I wanted to finish and it took me a long time. I did. I just need to make the binding and then I can take it to Colleen’s to be quilted. I like the way the whole piece came out, but I am glad to get it off my design wall.

The thing is huge and I need to take a photo of both sides outside, but that will have to wait for one of my quilt hangers to return from college.

Flying Geese Swap Report and Update

Flying Geese Exchange - November 2015
Flying Geese Exchange – November 2015

I have another batch of Flying Geese blocks to show. In light of my post on inspiration for this project, I also spent some time on Pinterest looking at Flying Geese quilts. I finally feel ready to start thinking about a layout. I am not sure I want to sew a quilt, but looking at designs is finally fun.

This group of blocks looks much more Autumn-ish than previous groups.

Black & Red Improv Quilt

I was kind of shocked to realize that the last time I devoted a post to this project was back in September. I did mention it last week and meant to write a full post. I was out of town for most of the week for work and it never happened.

Red & Black Improv Top

On Saturday, I got back to the machine. I worked on this top, in between other projects. For the Improv top, I seem to be able to make progress on this project, but only while working simultaneously with other projects. For some reason this project does not inspire me to buckle down and work on it by itself.

I tried Improv again and it still doesn’t inspire me. I guess I like the technical precision of regular blocks. Does that make me boring? Perhaps.

Three blocks was the sum total of what I needed to finish to put this top together. The end was in sight! (Let’s not talk about back or binding at the moment). I finished one block completely on Saturday and made major progress on two more.

Sunday, I finished the blocks and then put all the blocks together into the top.

I started on the back, for which I am making different color choices just to give it a different feel. I am choosing some blues so that the back will have a different feel.

Almost there.

Low Volume Journal Cover

I have been working with a lot of grey lately for the Carpenter’s Wheel experiments and for the Flying Geese exchange, so I have bits and bobs of scraps around. After making Henry IV, I thought I should make a snowy owl version. That led to me starting to piece leftover bits of grey and white together.

LV Journal Cover in progress

Somehow making a snowy owl was put on the back burner and I decided to make a journal cover instead. I have made some headway, but am not finished. I like the calm look of what I have, but also think it might need a bit of color.

I have to make the piece long enough, but I am thinking of making a strip of 1.5″ squares alternating a grey and a color and inserting it into the journal cover somewhere.

As I have mentioned before, the greys are very different in the way they look. Those Bonnie and Camille strips look positively beige next to some of the other greys. The Paris writing fabric looks dirty, or something. I still like this piece so far and these observations are just noting thoughts of interest.