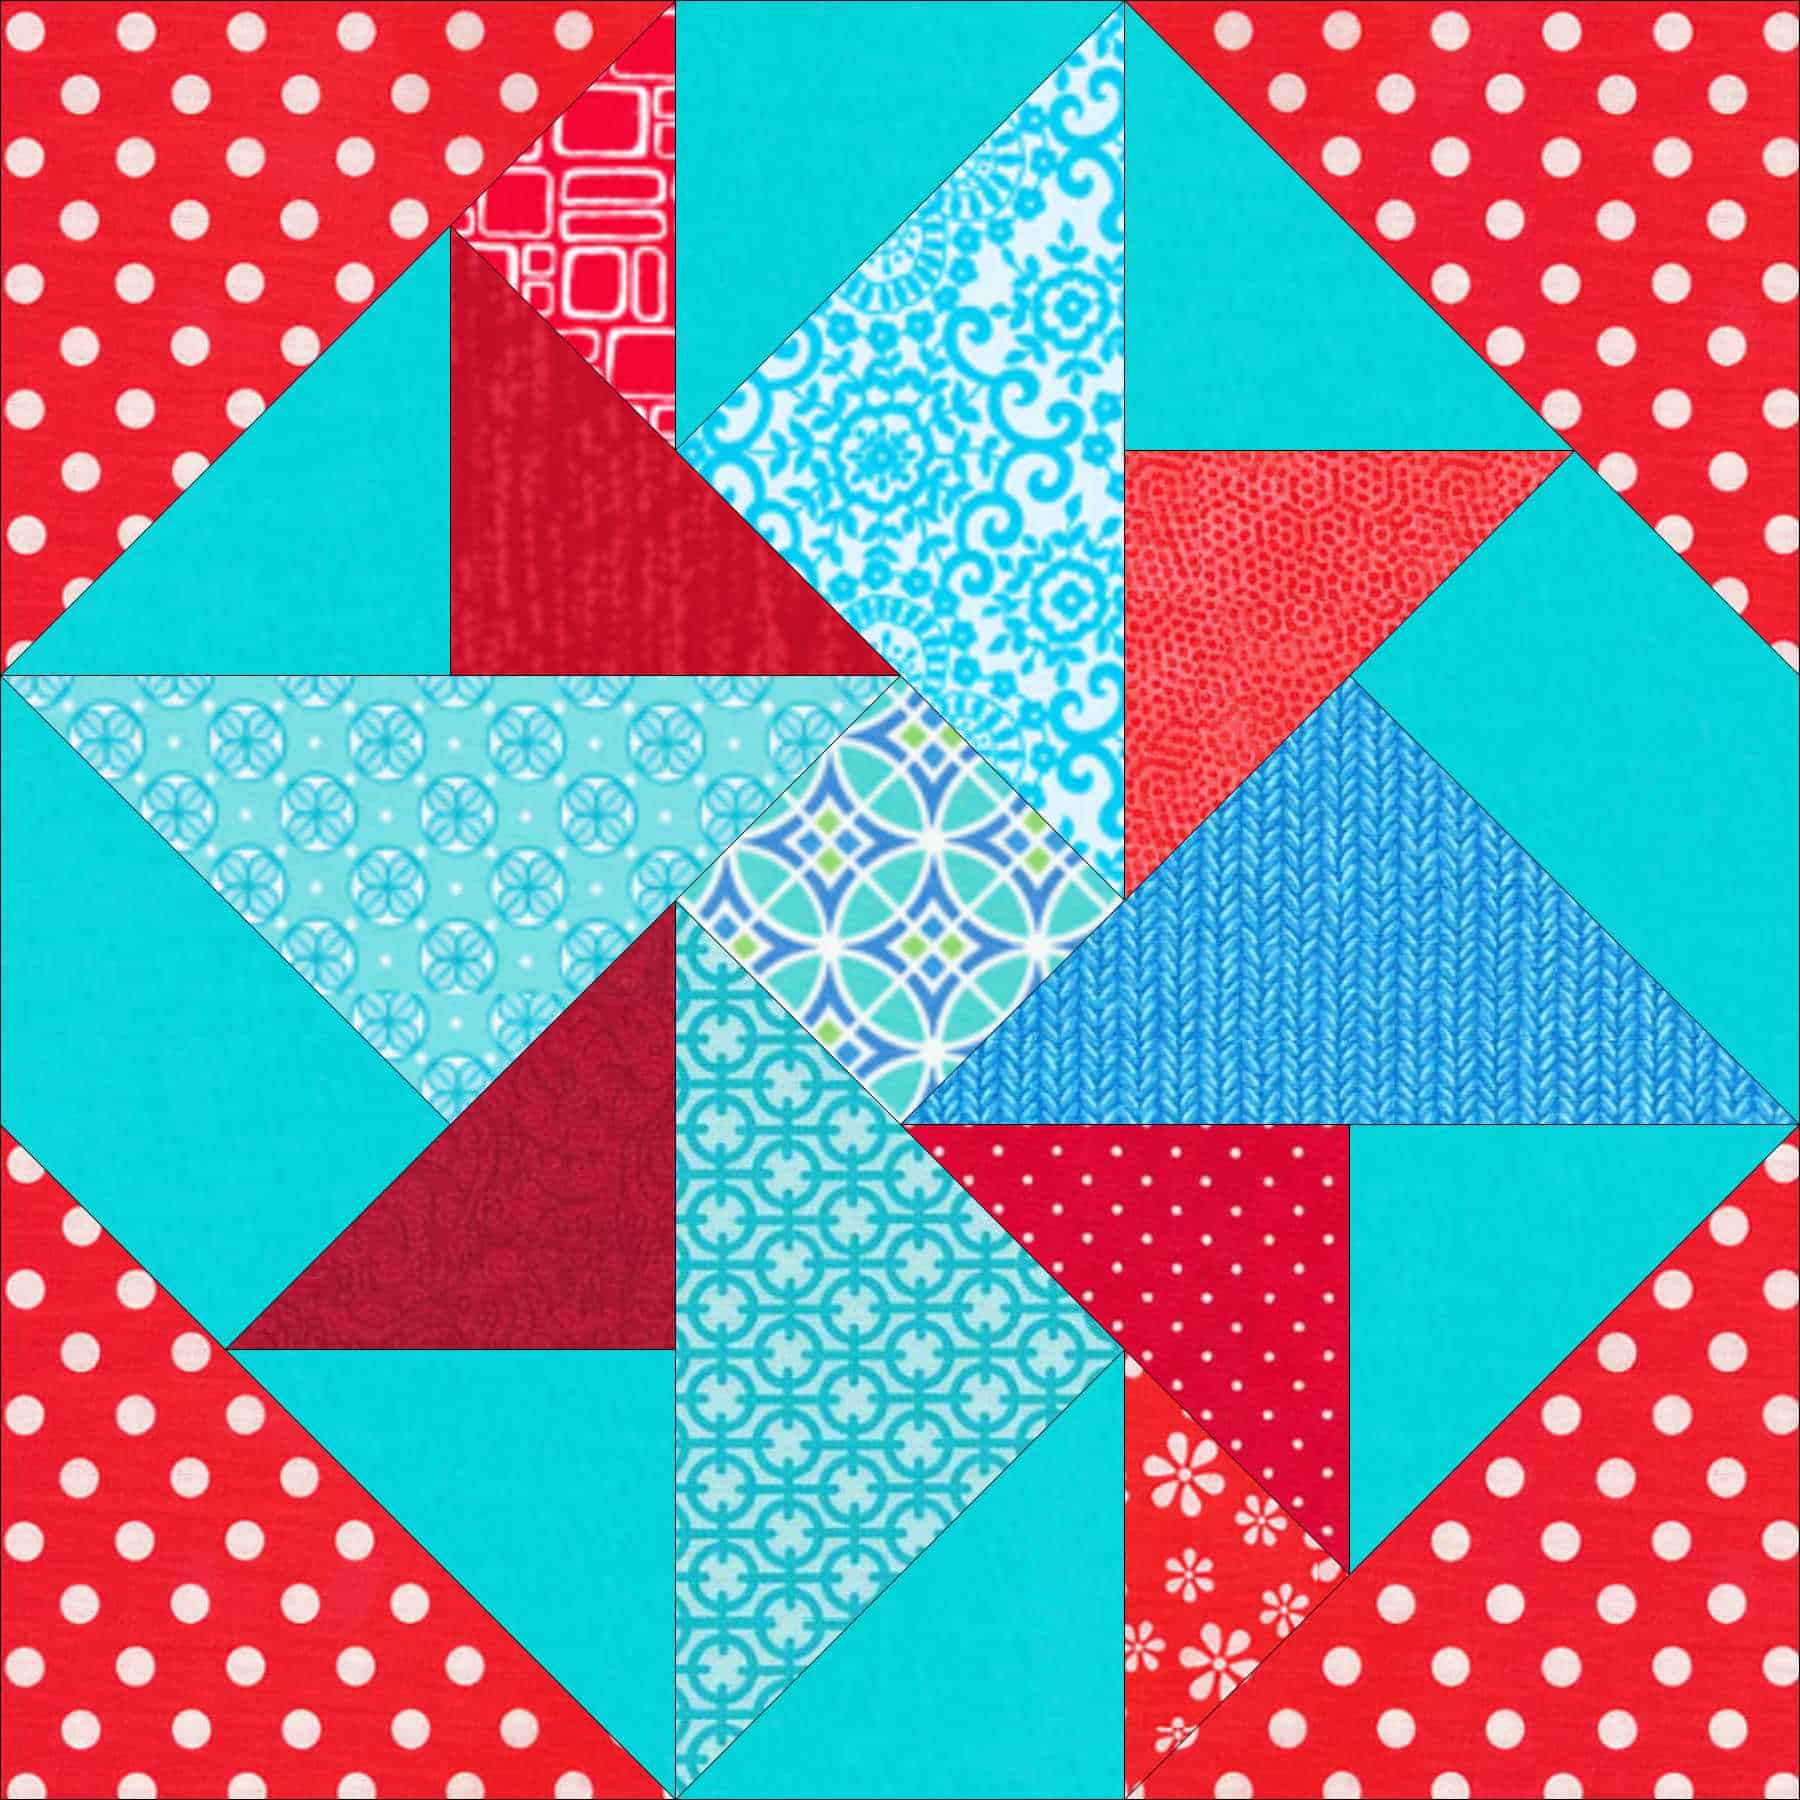
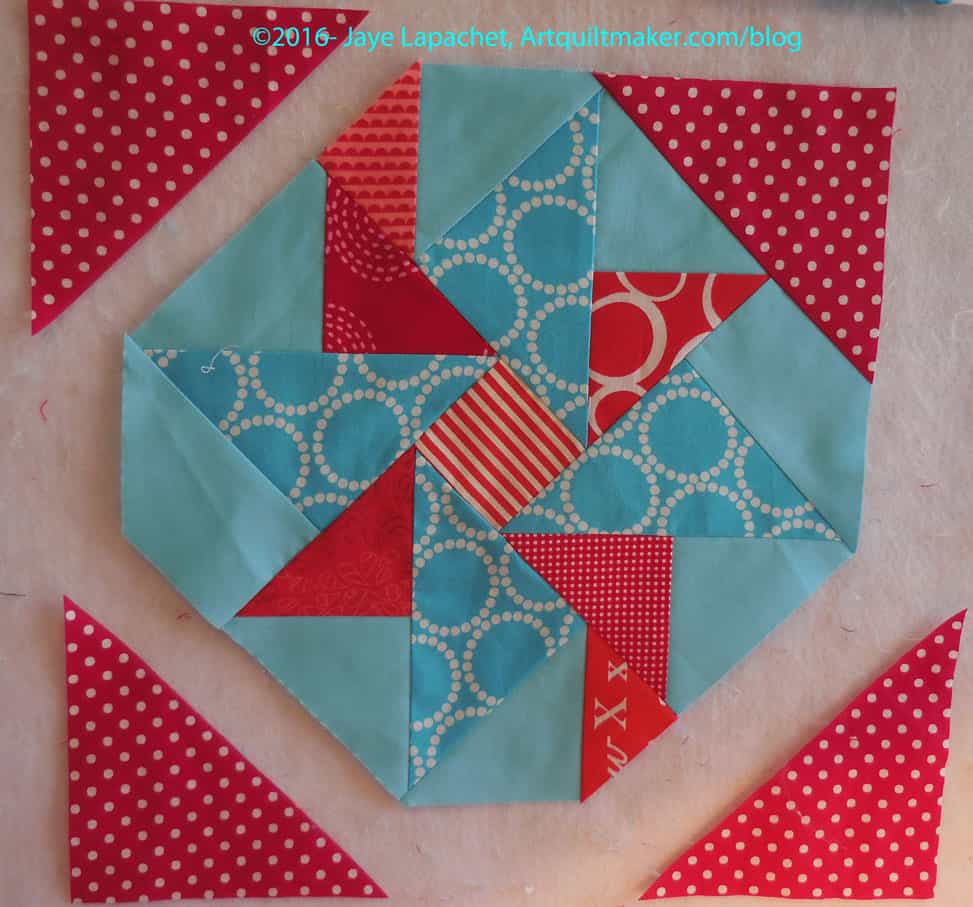
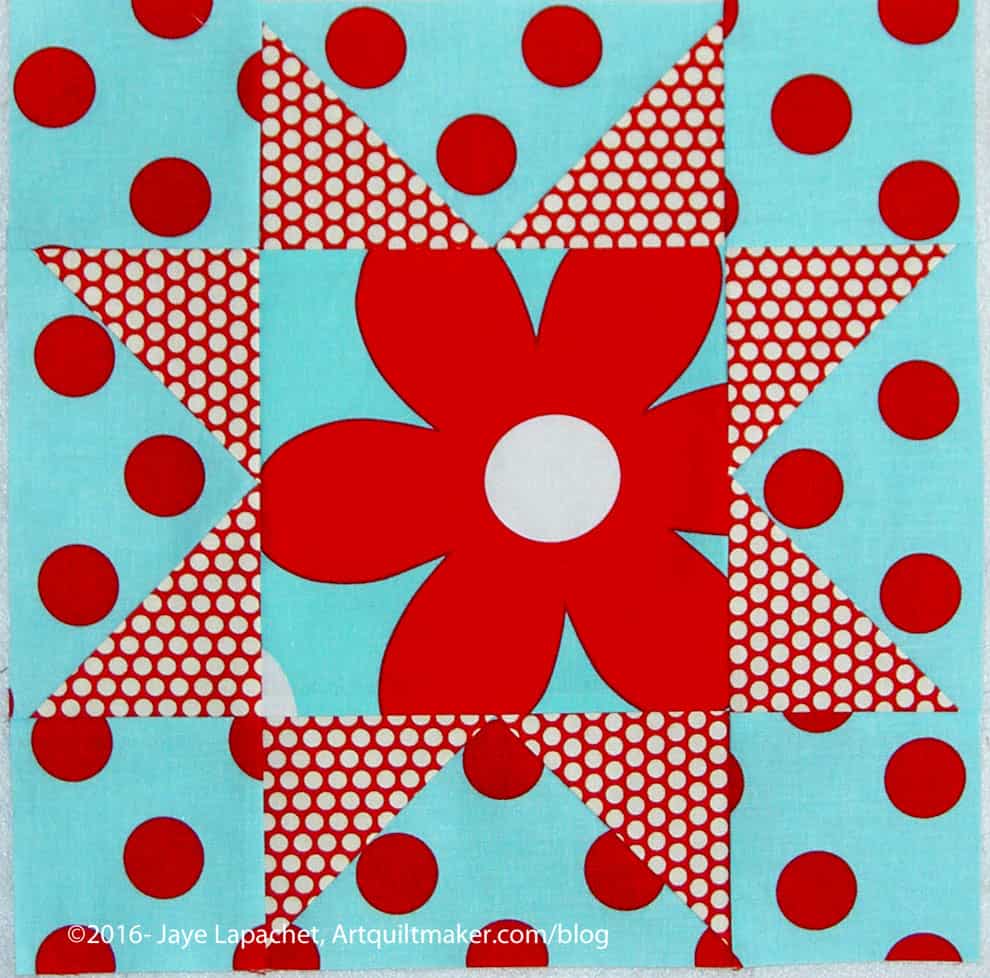
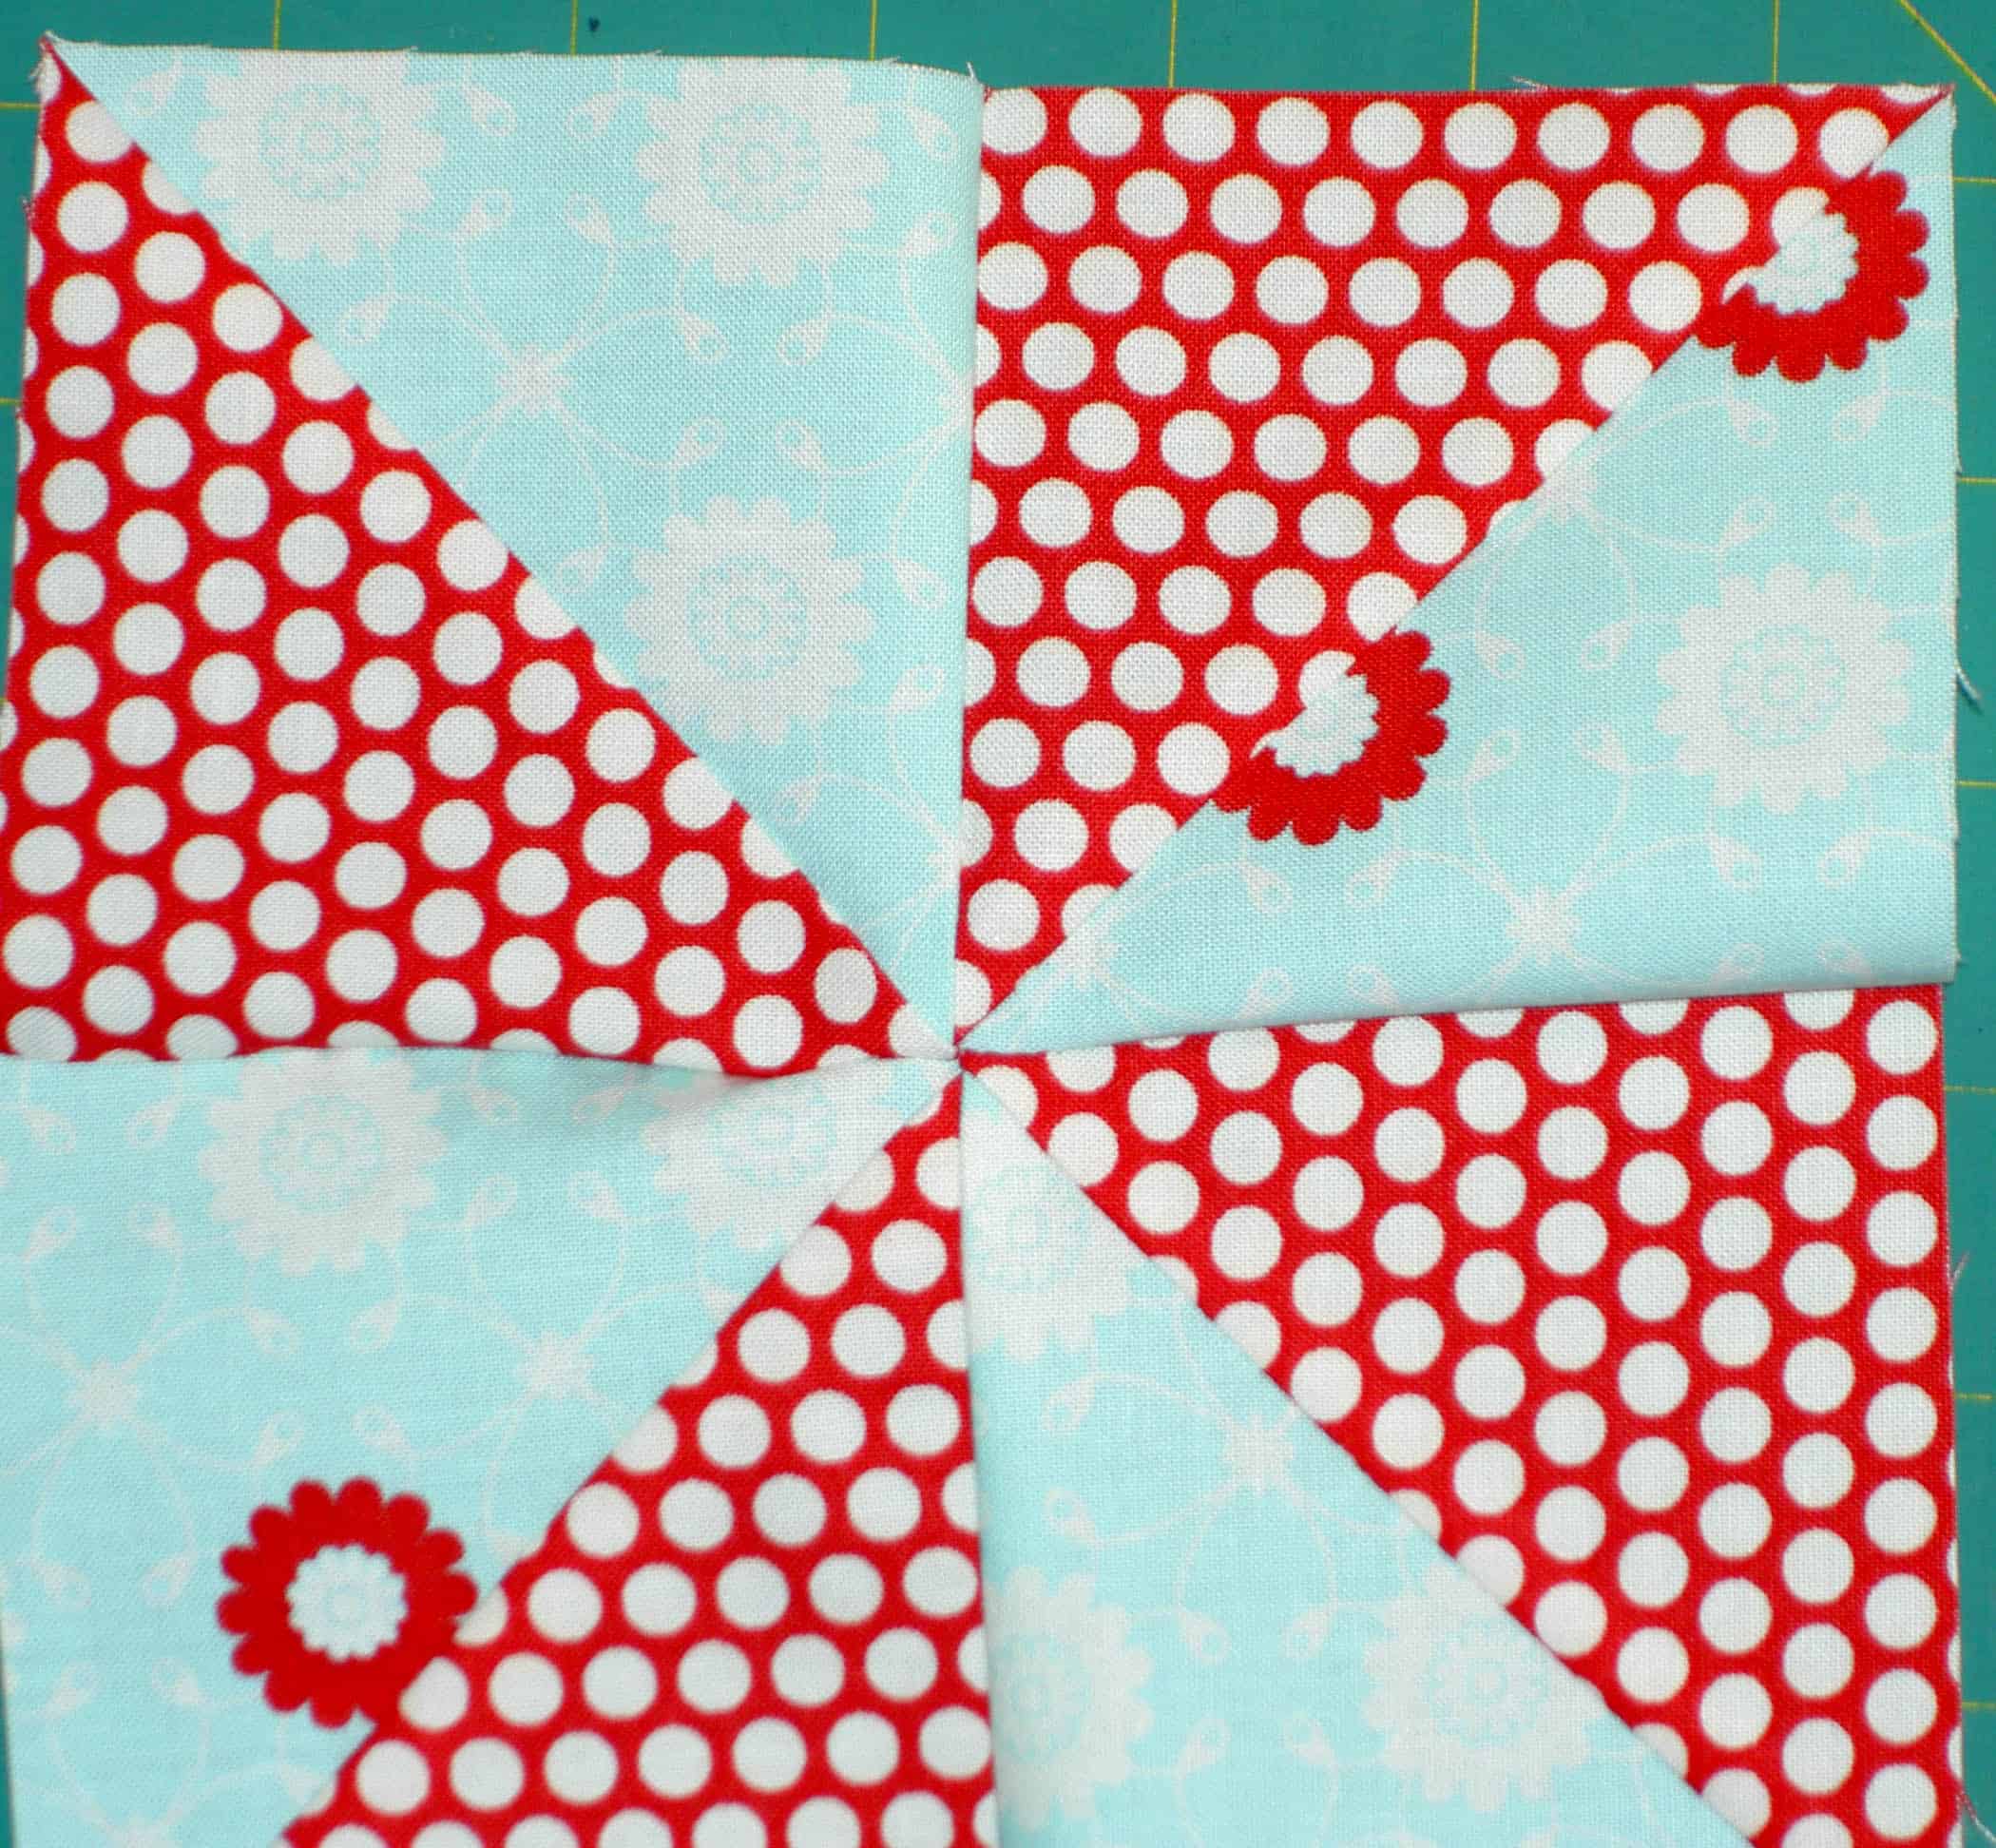
Today we will be making the Sawtooth Star block. You will use your newly formed bias skills as well as cutting. You will also learn to make Flying Geese.
I love this block. I could make tons of them and never get bored. Like the Nine Patch, there are a lot of variations of this block to keep it interesting. I made about 1,000 of them for the Star Sampler quilt. Yes, I got tired of making them, but the end result is spectacular and I would make that quilt again.
In the large size (12 inches or larger), it is good to use large prints, like I did, especially with the center. Alternatively, make one of the variations (see Star Sampler for examples of the variations) with more pieces. For now, if you have large prints, use those for this block.
Flying Geese are a unit comprised of two different kinds of triangles. One of them is the same and the other is different from the triangles we used yesterday. The Flying Geese are also used as a component in many types of blocks as well as as a design component by themselves and in borders.
This is a thinking girl’s tutorial to making flying geese. Knowing how to make Flying Geese allows you to make, not only, Sawtooth Star blocks, but also Dutchman’s Puzzle blocks, borders and many other other parts needed for your quilts.
We will be learning the very basic way to make Flying Geese – no special rulers or tricks. There are many other ways to make flying geese and I use a specialty ruler now that I know the basic method. I’ll see about a tutorial using specialty rulers another time.
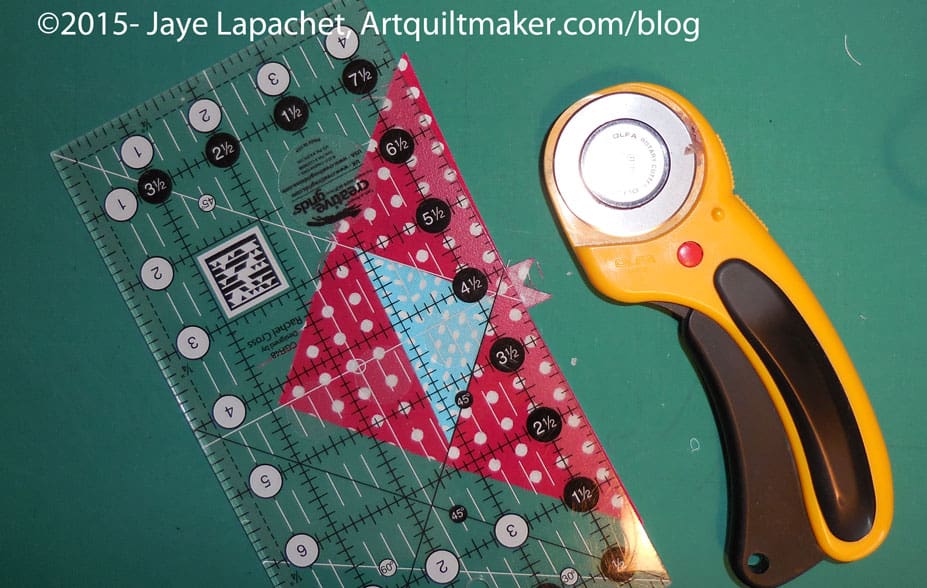
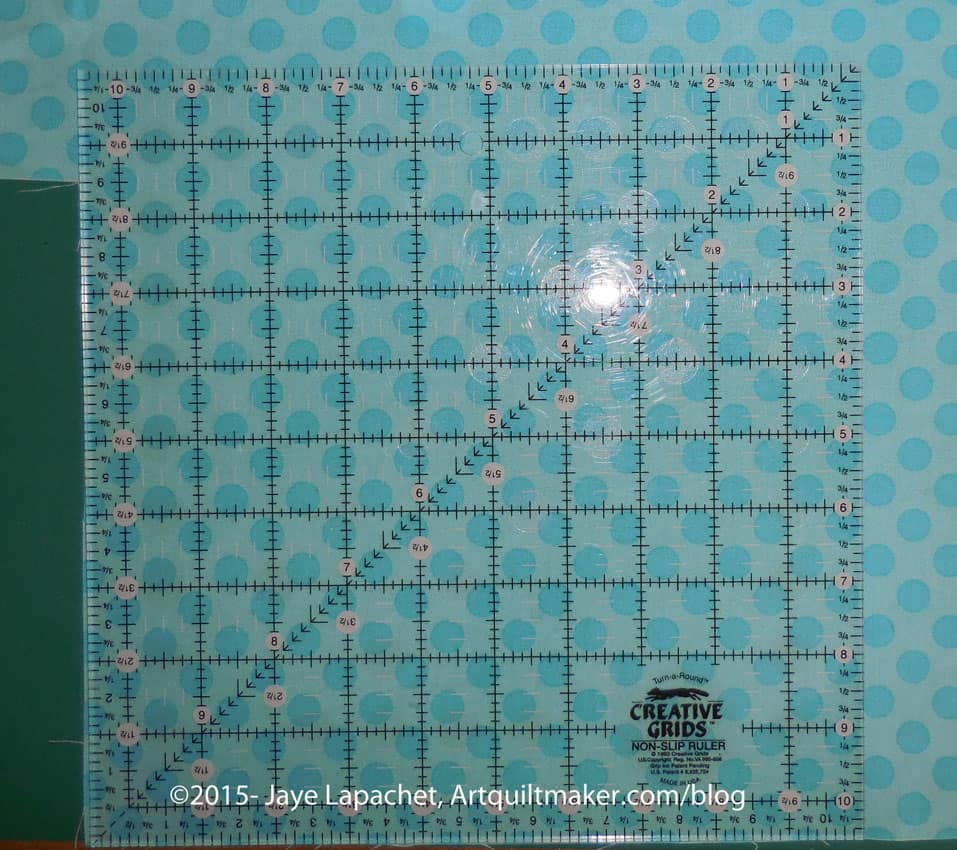
rotary cutting ruler large enough to cut 4.5″ squares
rotary cutting mat
fabric (2-3 different)
Optional: Mary Ellen’s Best Press (or similar)
pins
sharp trimmers or scissors
thread for piecing
sewing machine
Iron
ironing surface
Sewline pencil or mechanical pencil
First print the cutting instructions (pattern) for the Sawtooth Star block.
Cut your pieces according to the instructions.
Cut 2 Squares for each Flying Geese Element
The above is the fabric I will use for the ‘wings’.
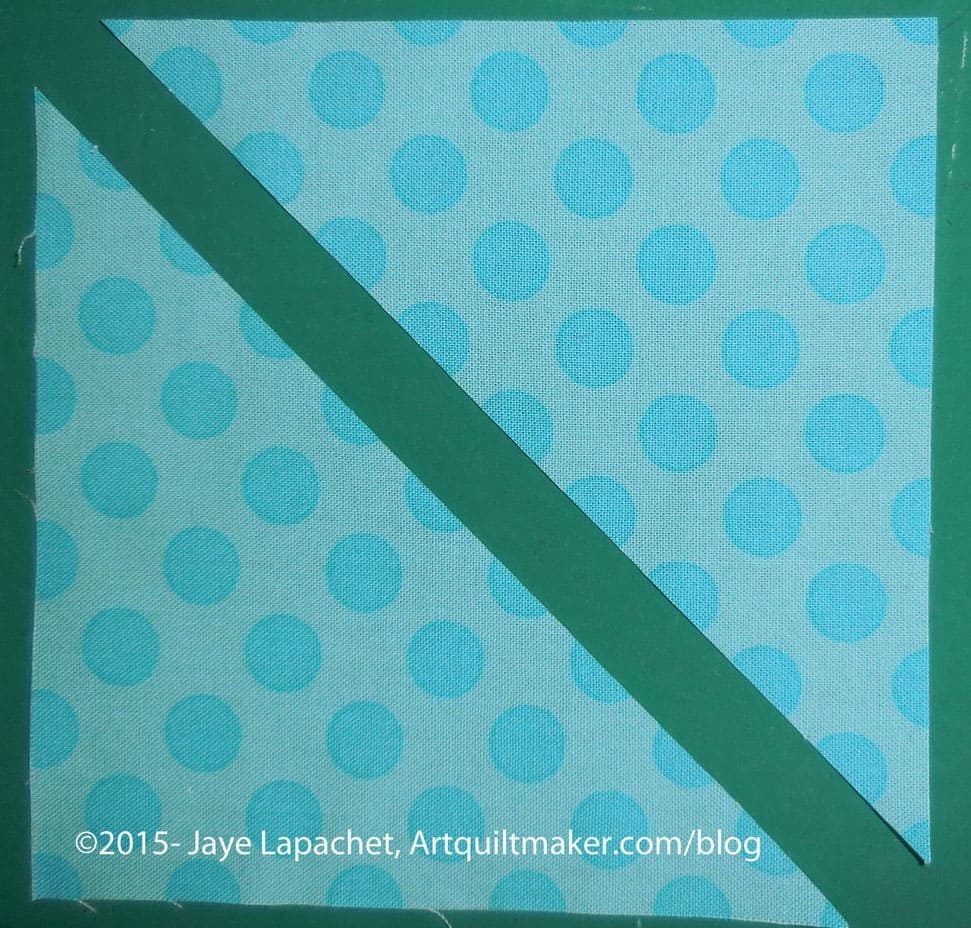
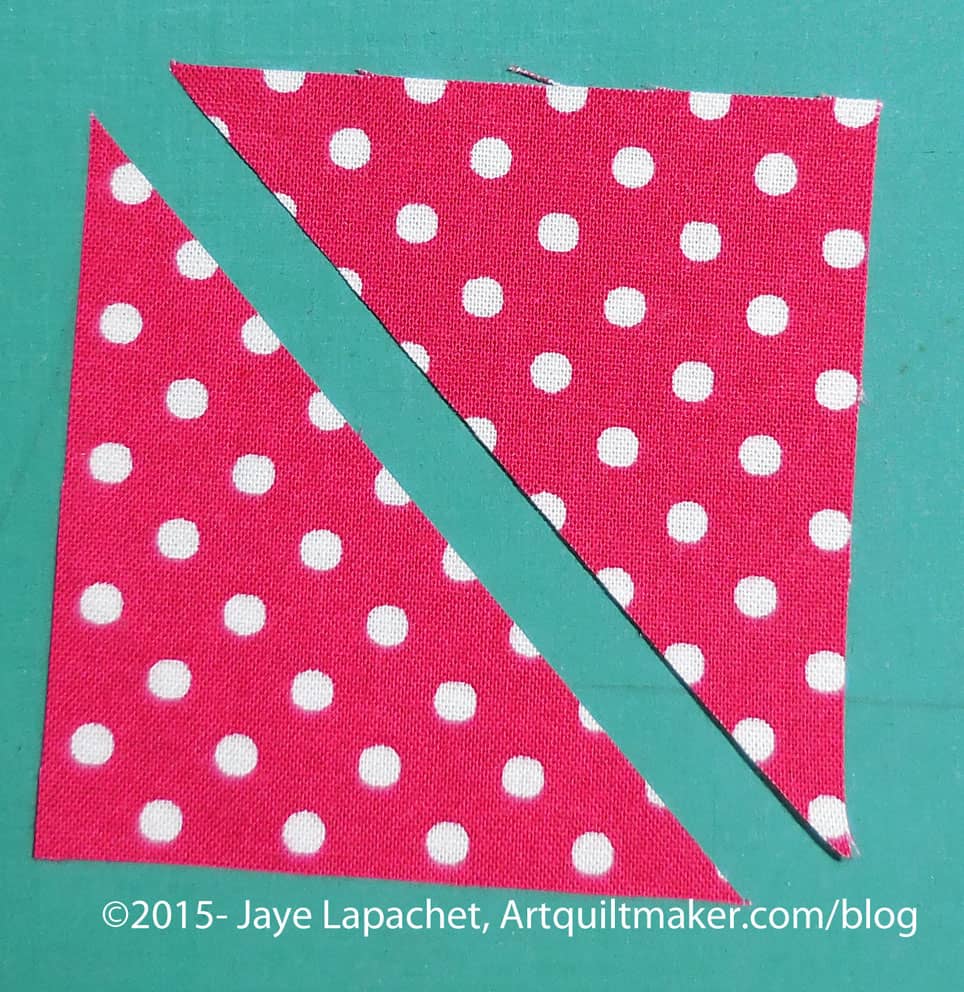
Draw diagonal line from corner to corner
Turn the squares wrong side up and draw a diagonal line from corner to corner. You will need to do this on all of the squares for your Flying Geese.
Cut background
Cut the goose, fabric. Nota bene: above is a different fabric than I used in the final block. In the finished block I used an aqua with red dots.
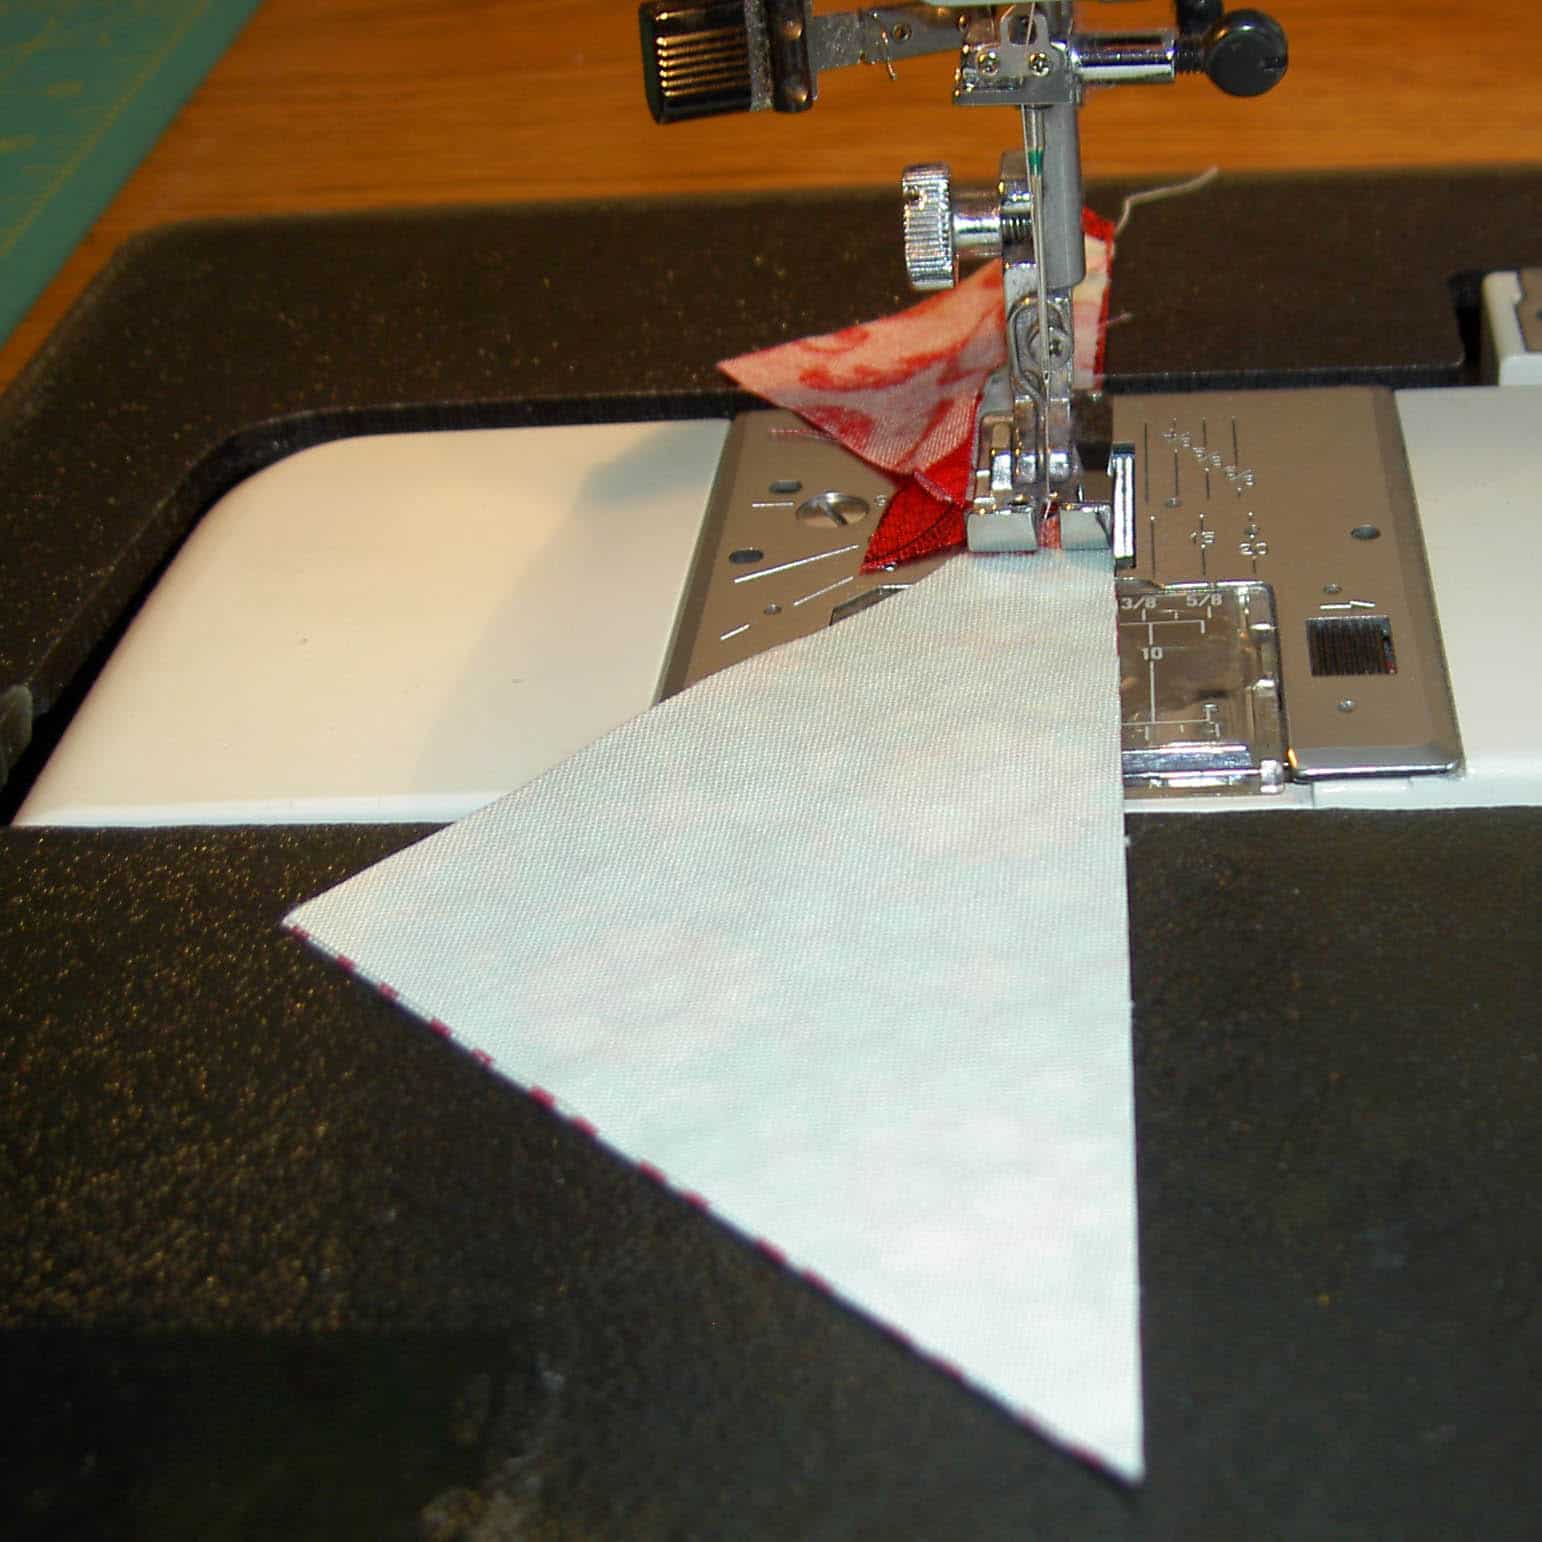
Lay wing 1 on goose
Lay first square that will be a wing on the goose (blue) fabric. The diagonal line should be pointing to the center of the blue piece.
Pin the square to the larger patch. Make sure the pin is out of the way. You will be sewing on that drawn line, so you will need to pin far enough away so the pin doesn’t interfere with the operation of the machine.
Sew along line
Sew along line and trim threads. I use a foot that has an arrow on it. I can line that arrow up with the drawn line and sew away.
Trim
Trim 1/4″ away from the sewn line as shown above. You will cut through the wing and the goose.
Press the wing so the front of the wing fabric is showing. You must press the wing into its final position before you sew the other background on to your block.
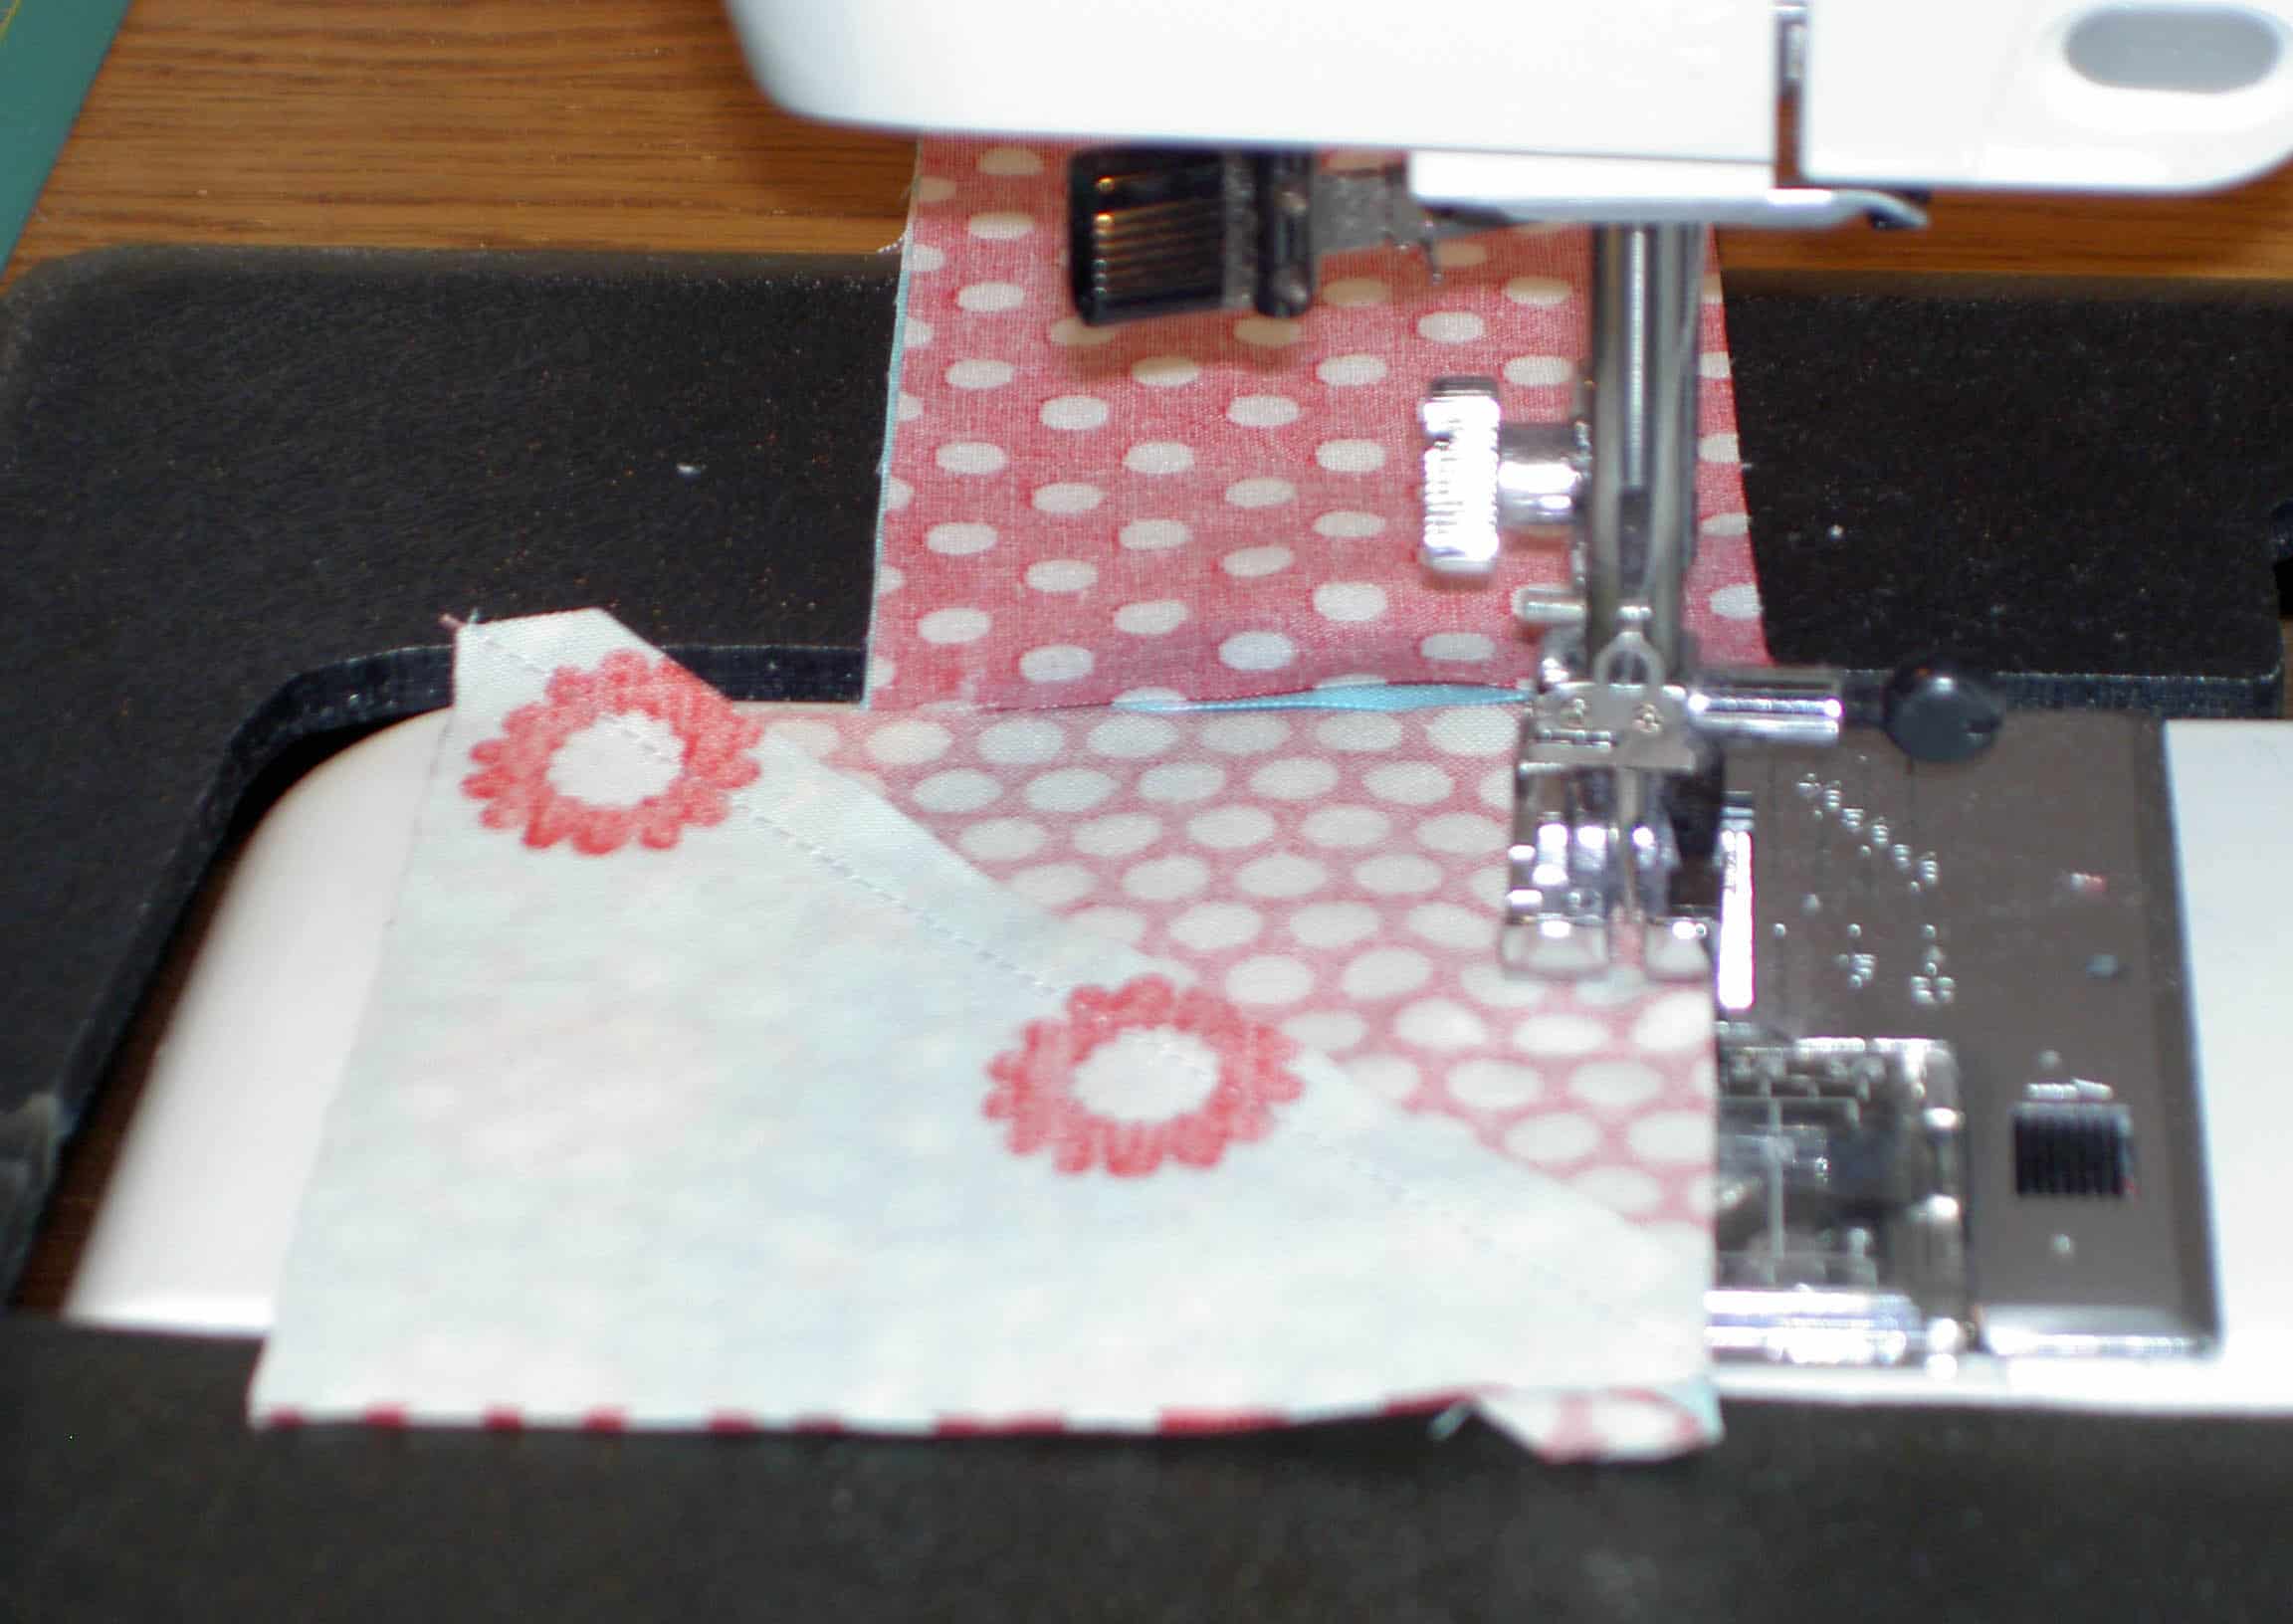
Lay 2d square on goose.
Place the second wing on the other side of the background fabric. Again, the diagonal line will be pointed towards the center of the larger patch.
Trim 2d sewn wingSew and trim second wing
Sew and trim as above. Sew so that you cross the previous sewing line.
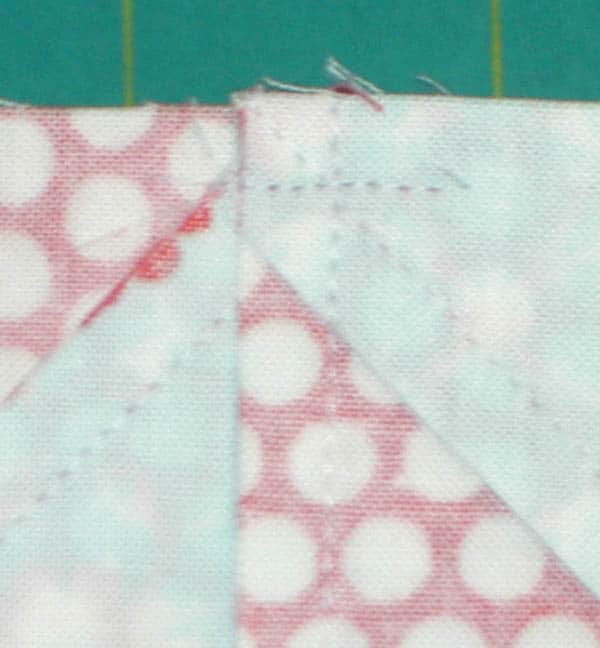
Press back 2d wing
Press back the 2d wing and, voila’, you have a Flying Geese element.
Now make 3 more and cut your squares for the rest of the block.
You can also make these with various rulers. I often use the Deb Tucker Wing Clipper ruler and also have the various sizes of the Quilt in a Day Flying Geese ruler. I teach this basic method so you know how to do it and don’t have to purchase a specialty ruler. If you plan to make many Flying Geese, I suggest you buy either of the rulers listed above.
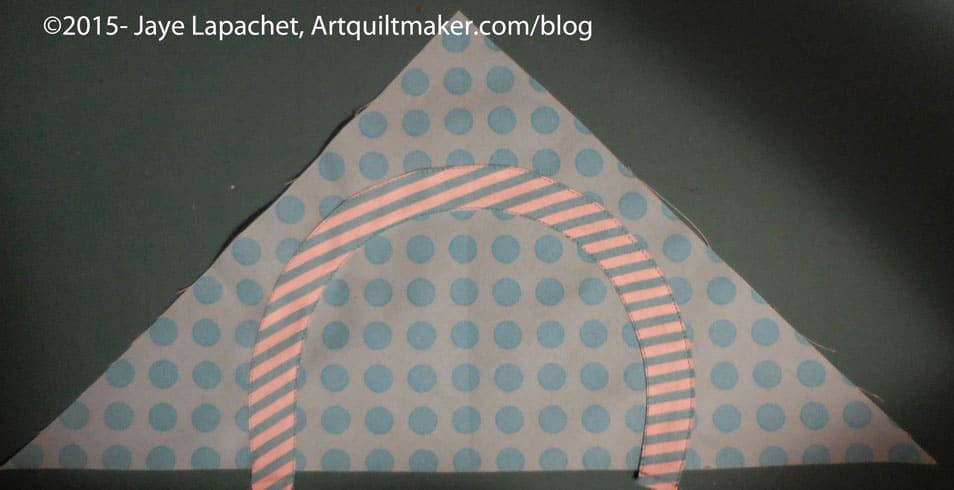
You need four of these to make a Sawtooth Star or eight of them to make a Dutchman’s Puzzle.
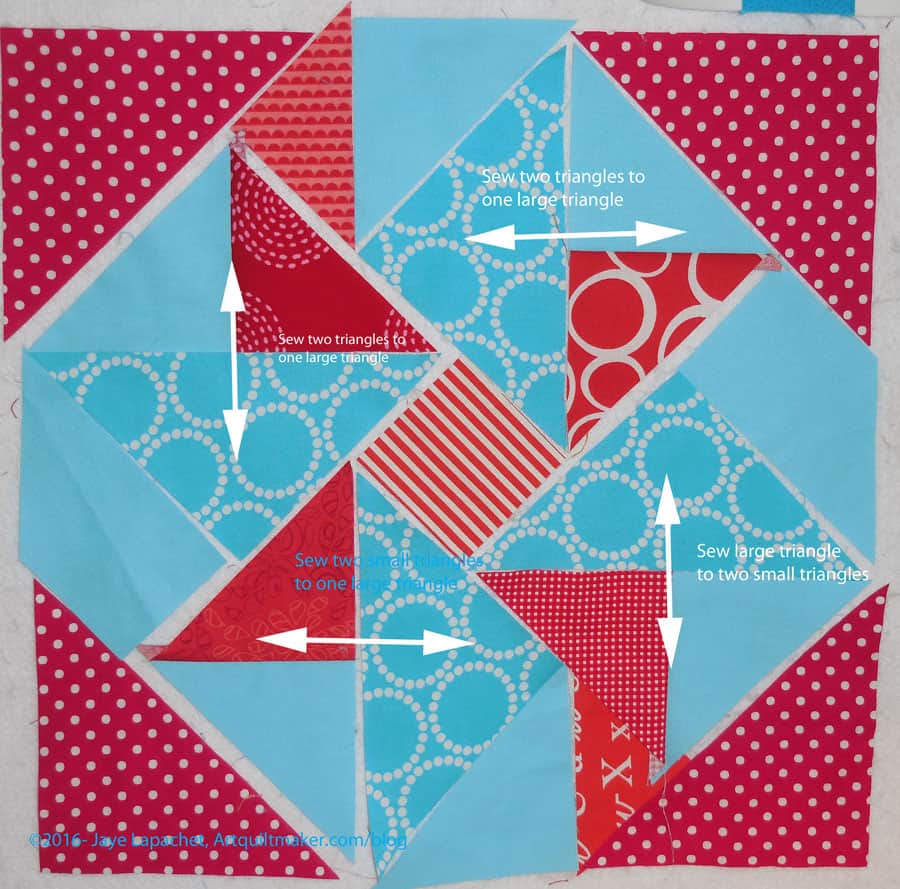
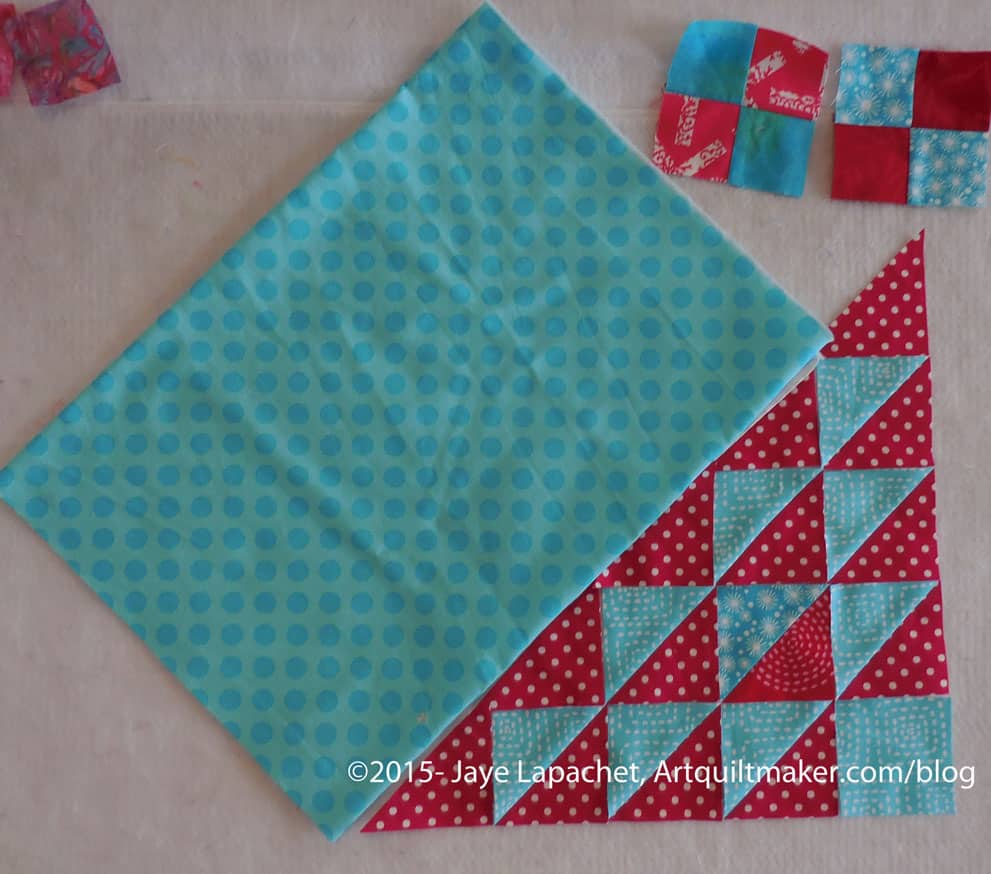
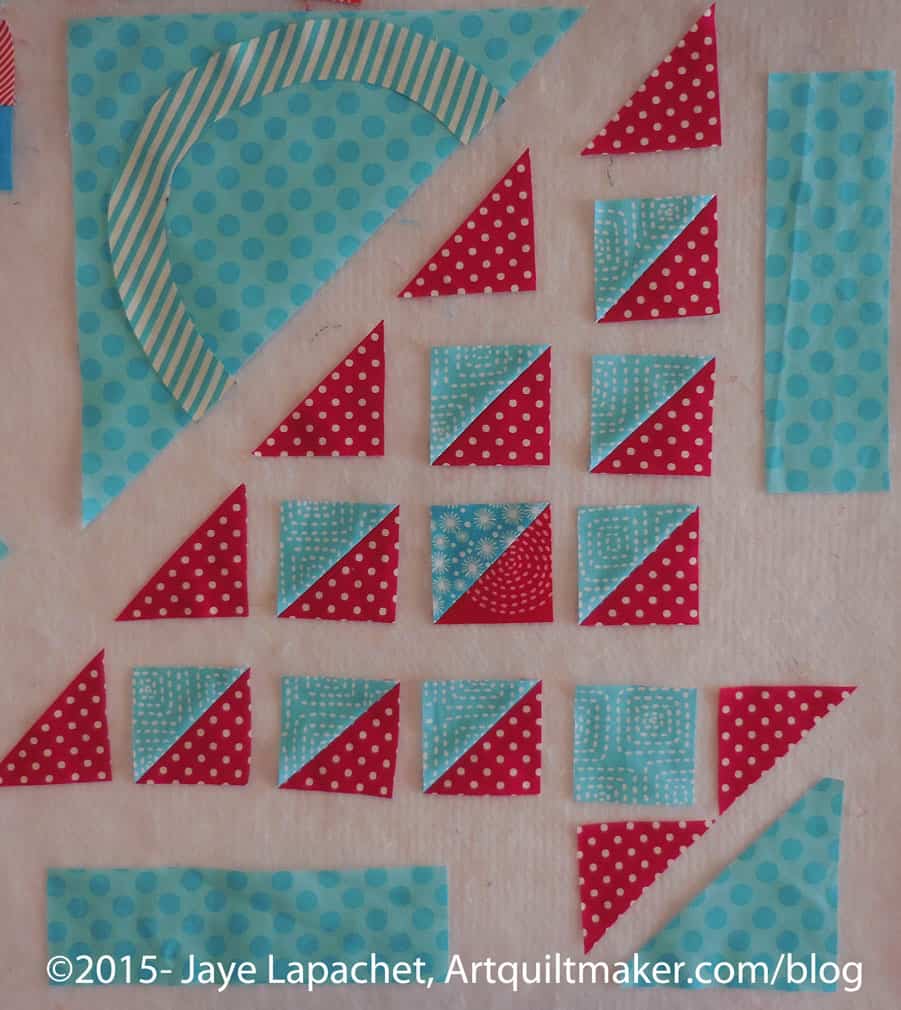
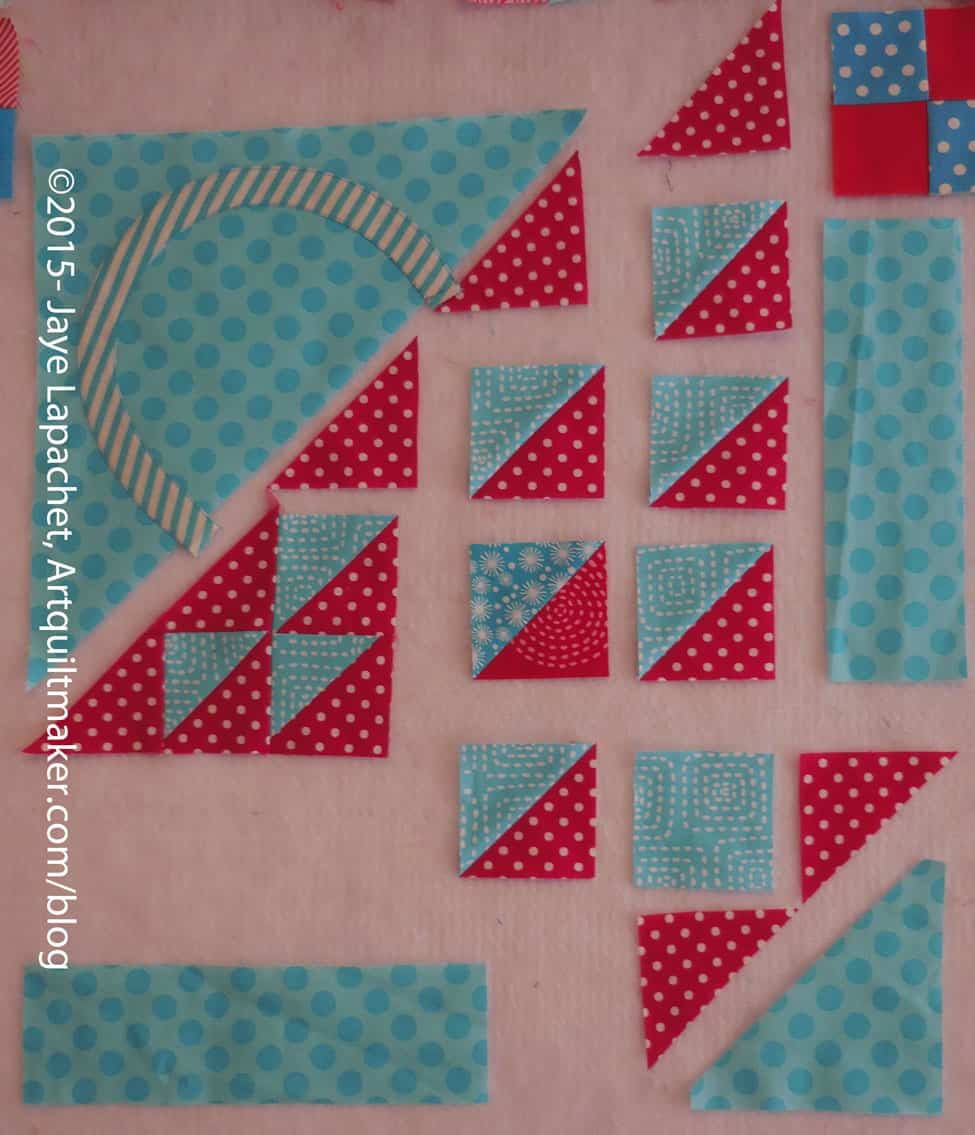
Now it is time for triangles. Triangles are not hard but you do have to pay attention to the bias. There are different types of triangles and in this block you will make Half Square Triangles. Understanding how to sew triangles expands your repertoire of designs by leaps and bounds.
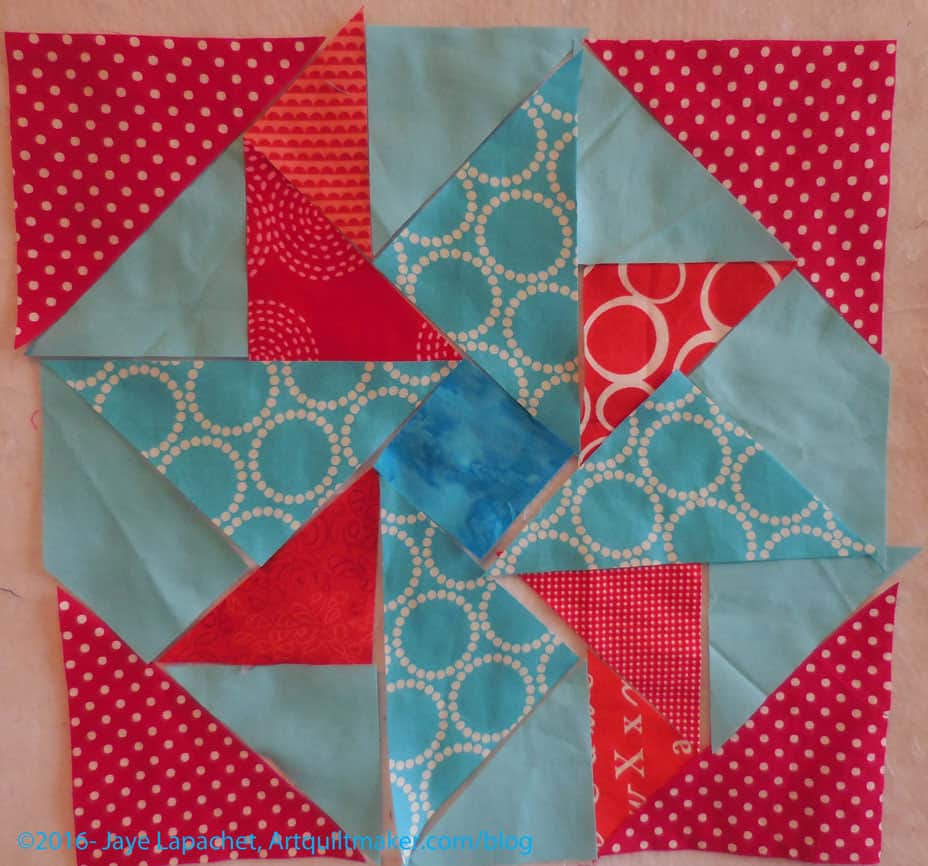
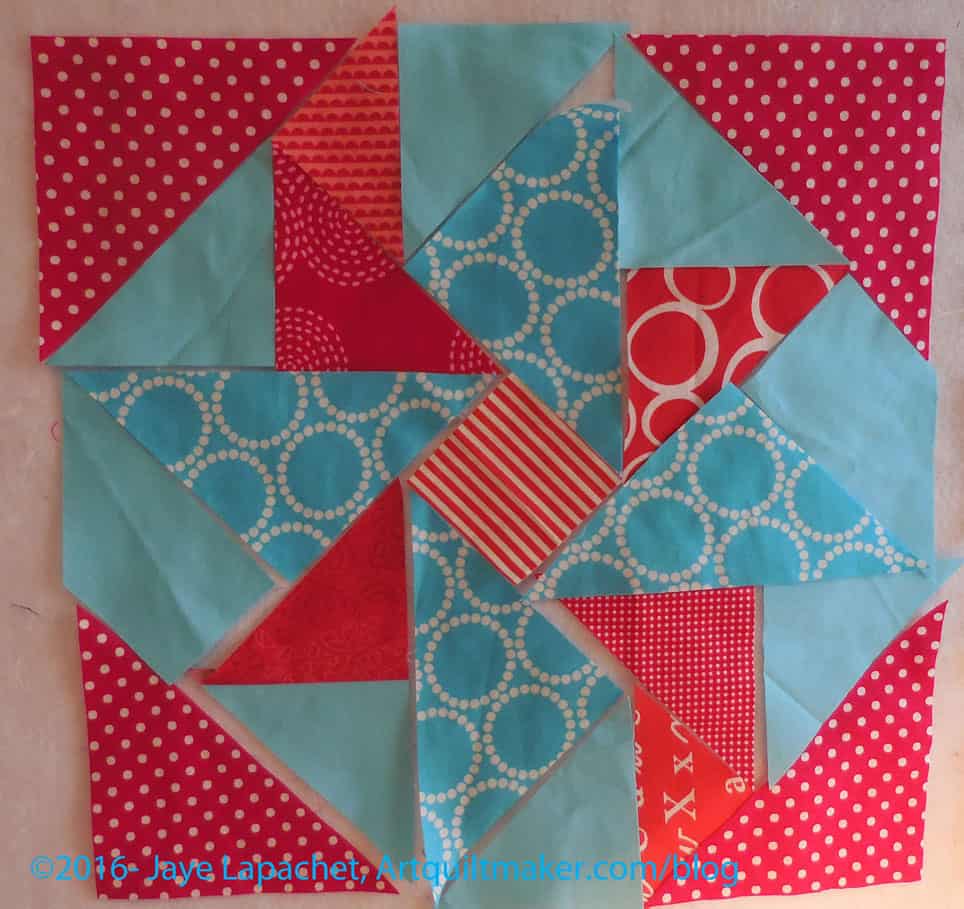
Double Pinwheel
You will make a 12 inch finished Double Pinwheel block. This block is also a 2×2 grid, just like the Double Four Patch. The pinwheels make up one square in each row of the two by two grid. Plain blocks make up the other squares.
4 squares 4in. x 4in. for the blades of the pinwheel AKA the triangles. Mine are red in the above photos
4 squares 4in. x 4in. from the background fabric. My background fabric is aqua in the above photo. This size will allow you to have enough extra fabric to trim the half square triangles before you sew them into the pinwheel. I like trimming
2 -6.5in. squares from the background fabric for the plain background squares.
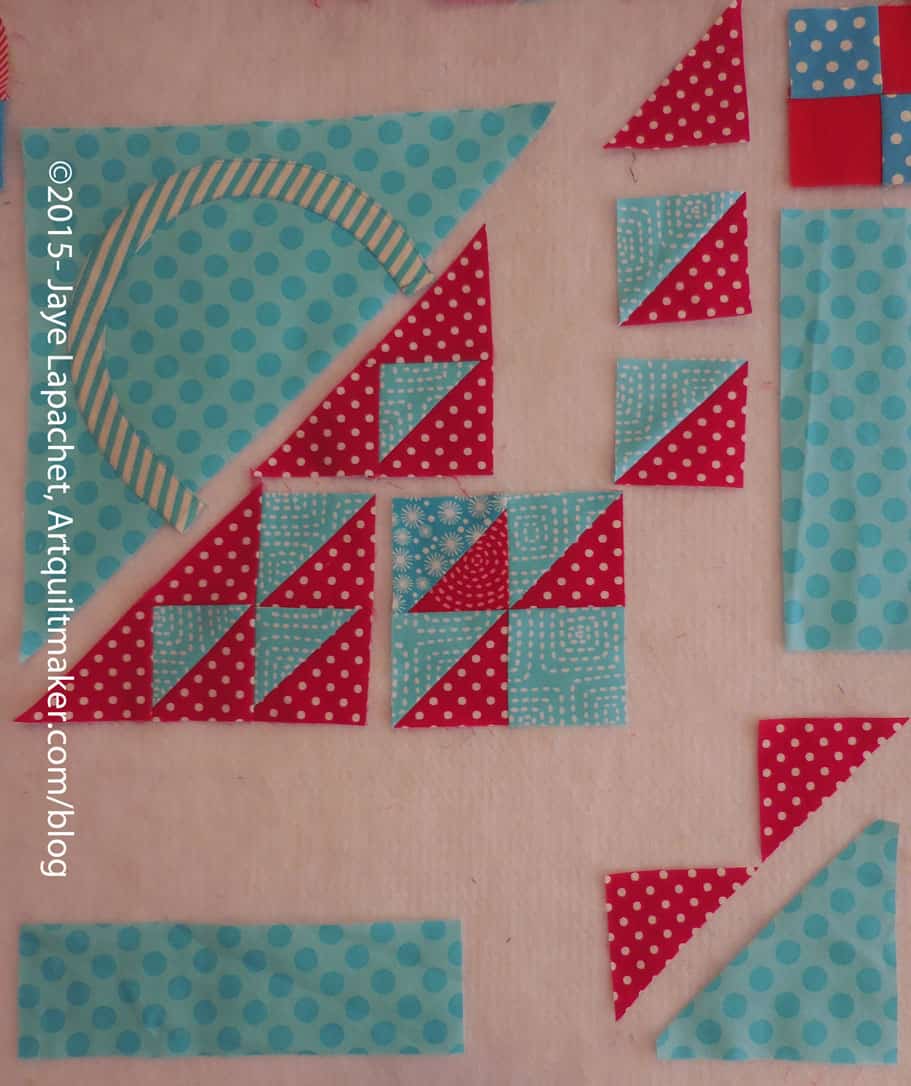
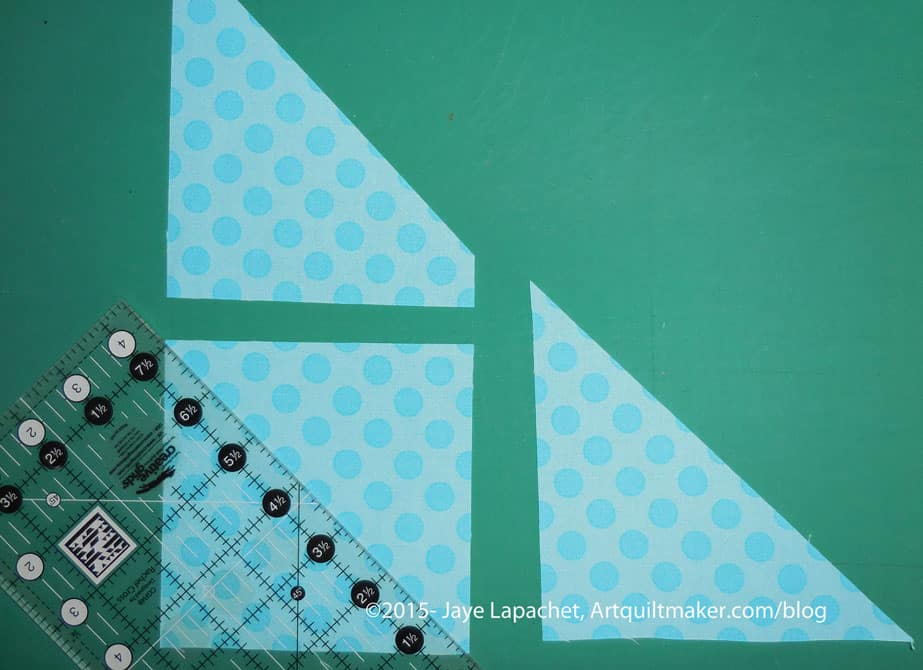
2. Cut all of the 4in. squares in half on the diagonal.
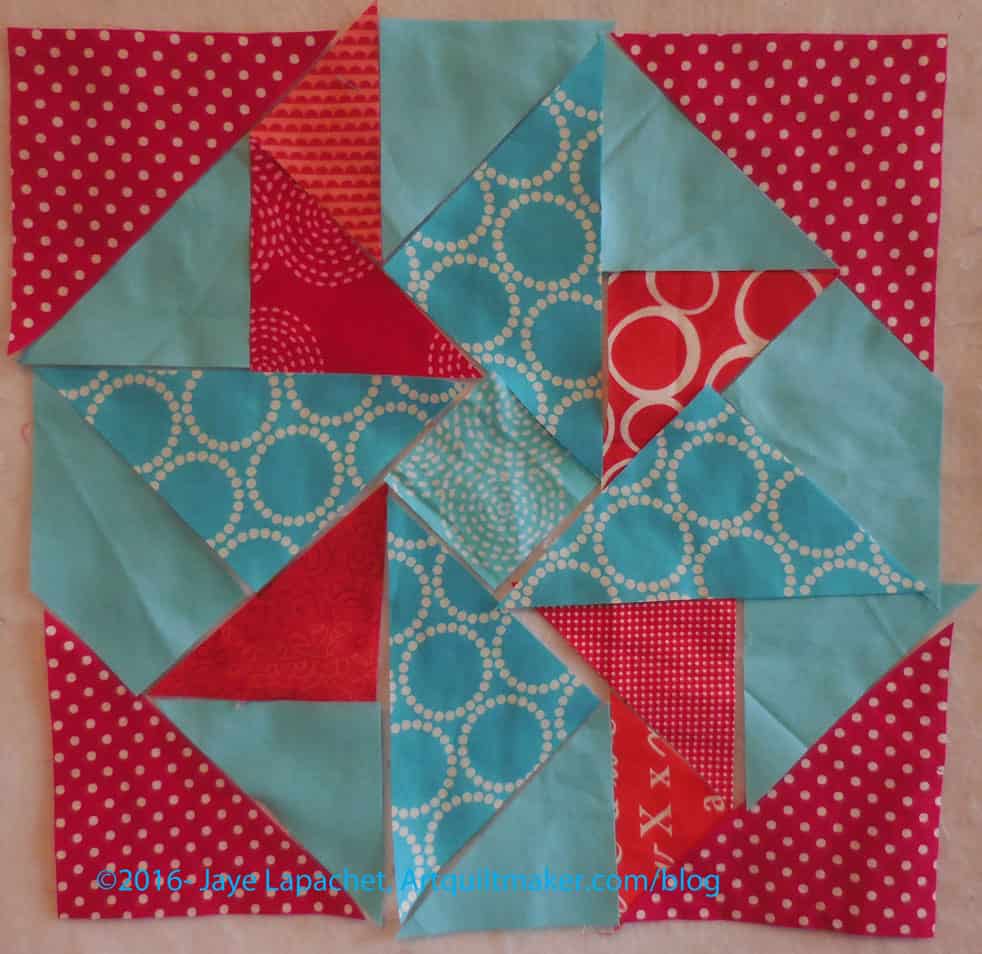
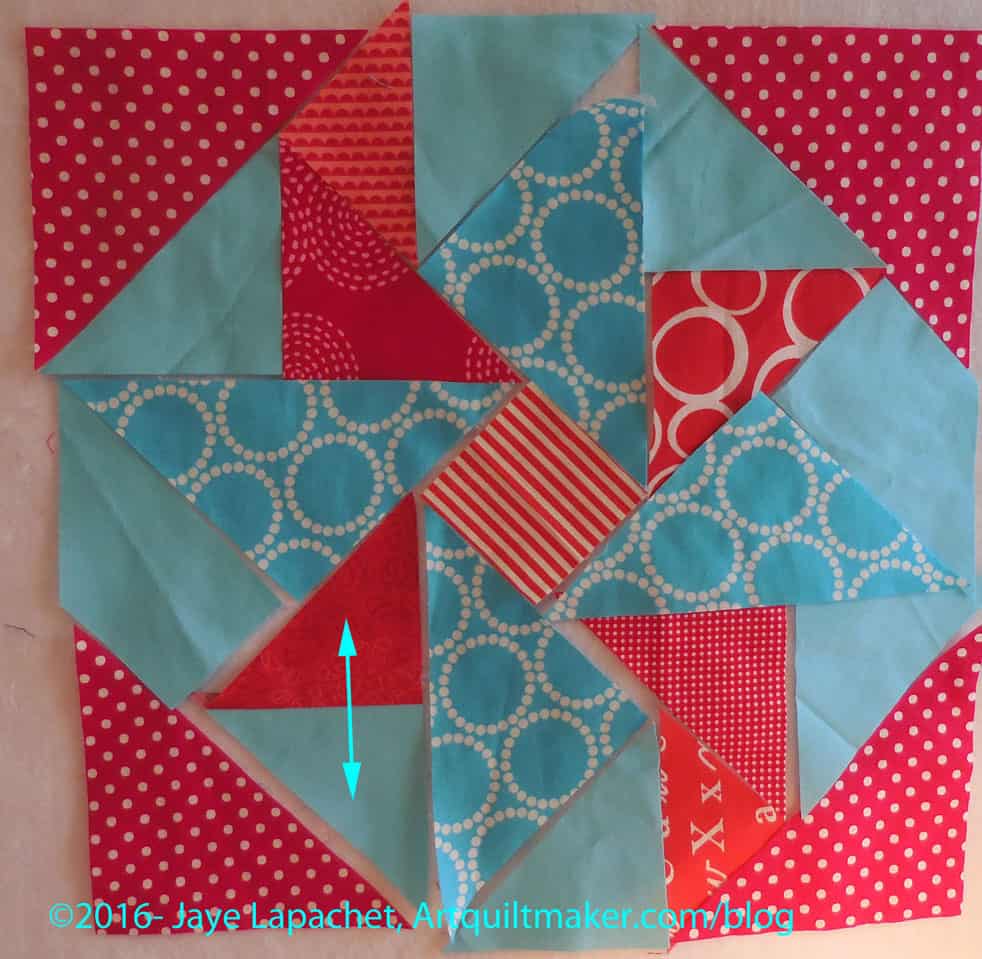
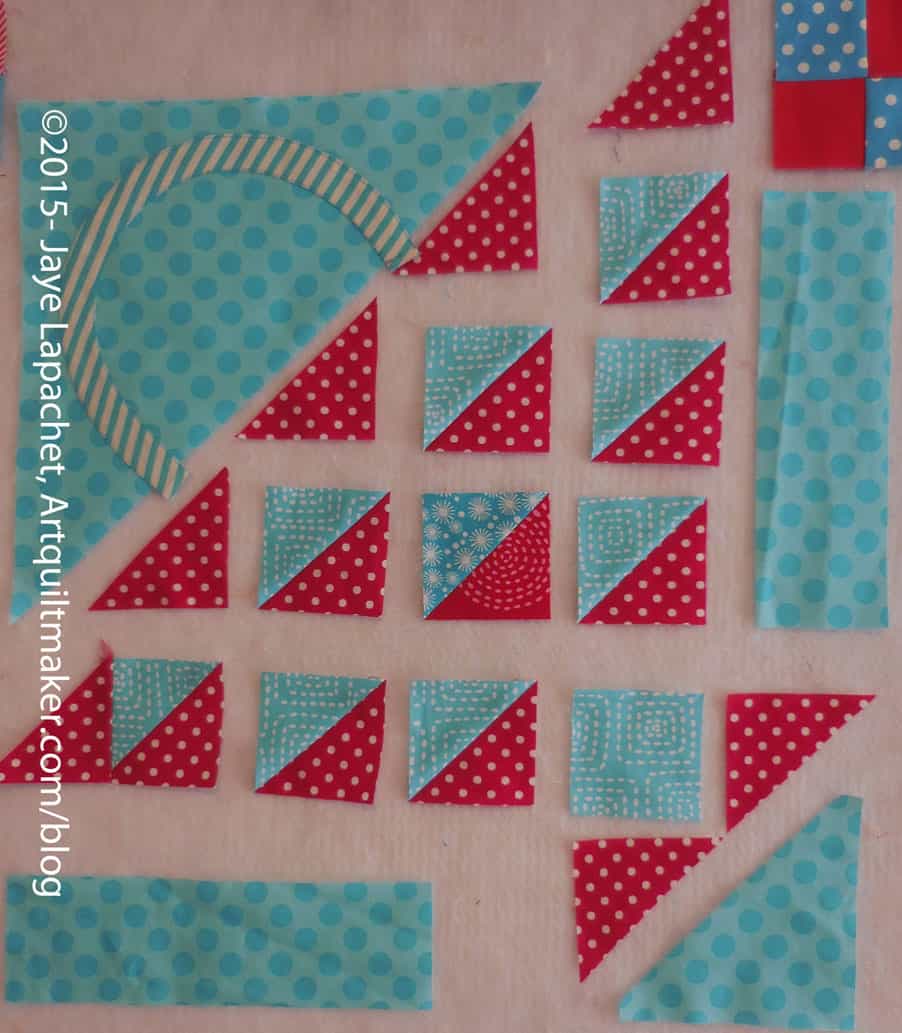
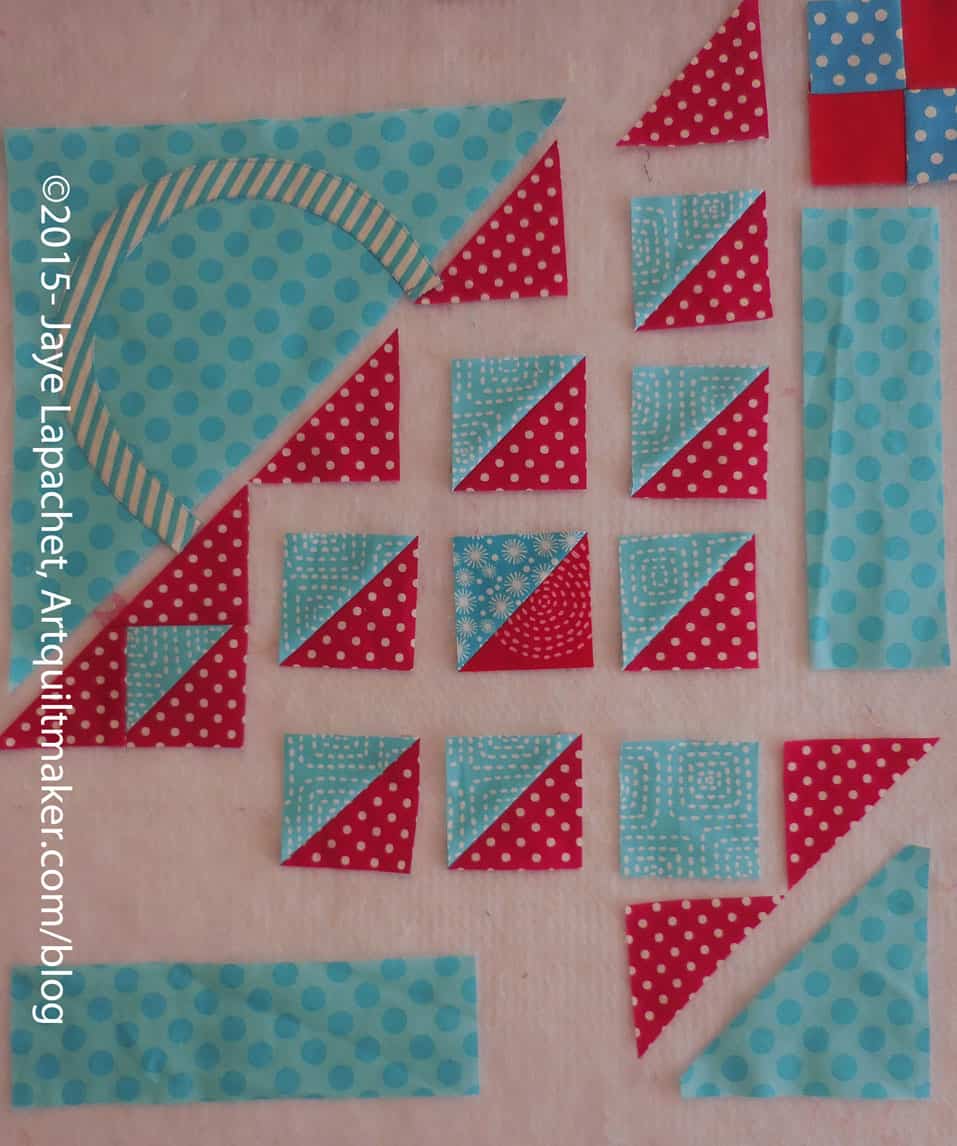
Layout your patchesLayout your patches
3. Lay out all of your patches on your design surface so you can see how the block will look.
The cut patches look like they won’t fit. That is because of the seam allowances. It will all work out in the end. I promise.
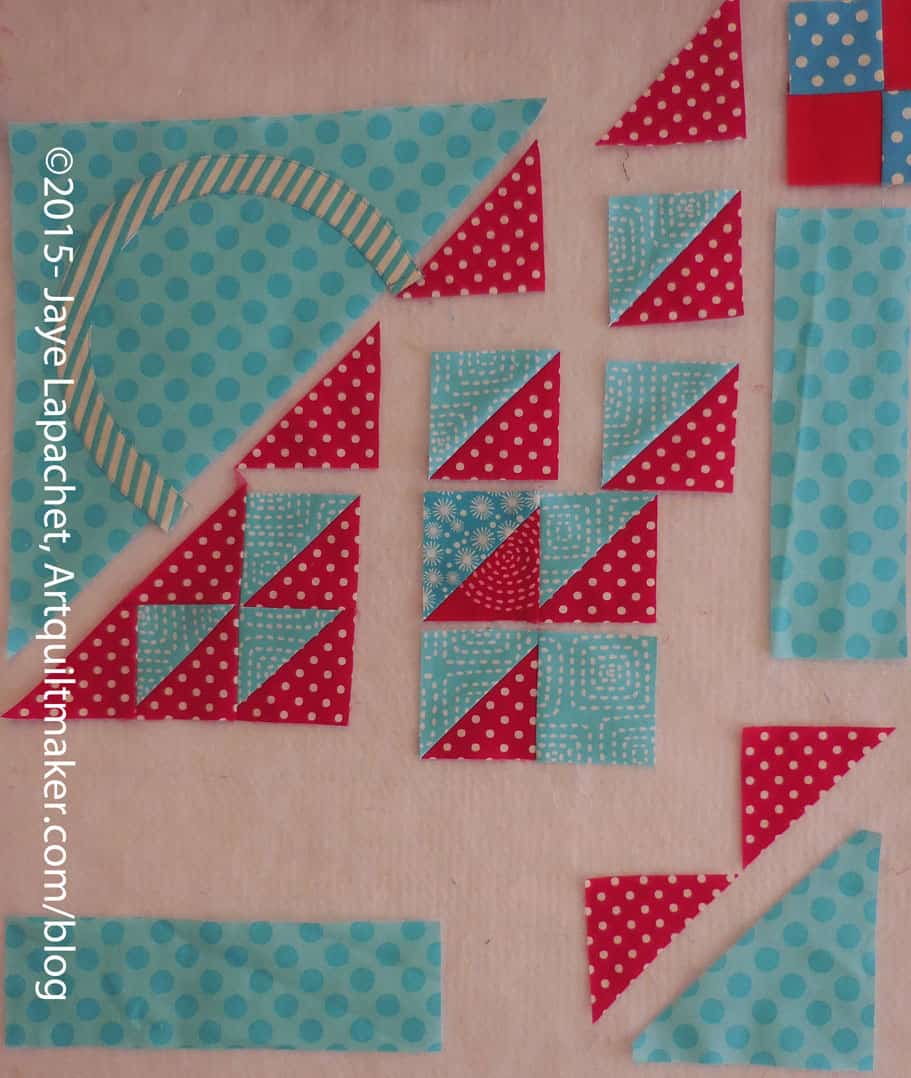
4. Put one background triangle and one pinwheel triangle right sides together matching the hypotenuse (longest side) of the triangle.
4A. Spray the two fabric patches with Mary Ellen’s Best Press. Handle the triangles carefully by not yanking on them.
Gently put triangles under presser foot
5. Sew one background triangle and one pinwheel triangle together along the hypotenuse of the triangle. I sew them with the background patch on top.
Use your hands to guide not yank
Sew all patches with the same color fabric on top. It will help you keep them organized.
My fingers are just keeping the hypotenuse up against my seam guide. The feed dogs are moving the fabric.
Chain piecing, baby!
Sew one triangle after the other without clipping the thread between them. This is chain piecing. I use chain piecing to piece all of the triangles. I try and prevent them from falling off the back of my table so the falling triangles don’t yank on the ones still under the presser foot.
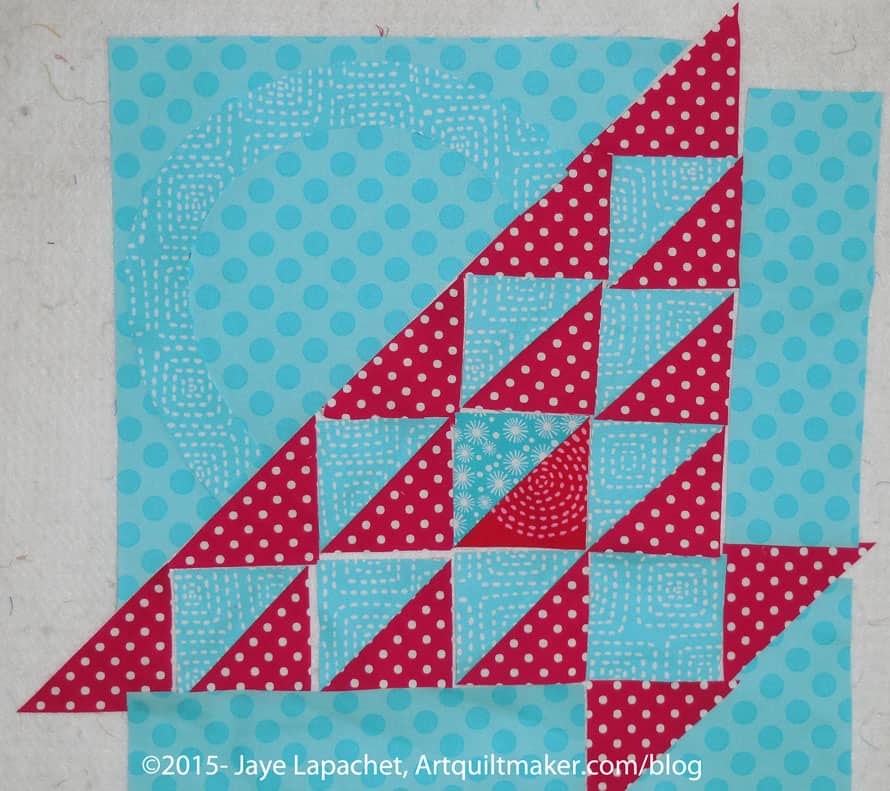
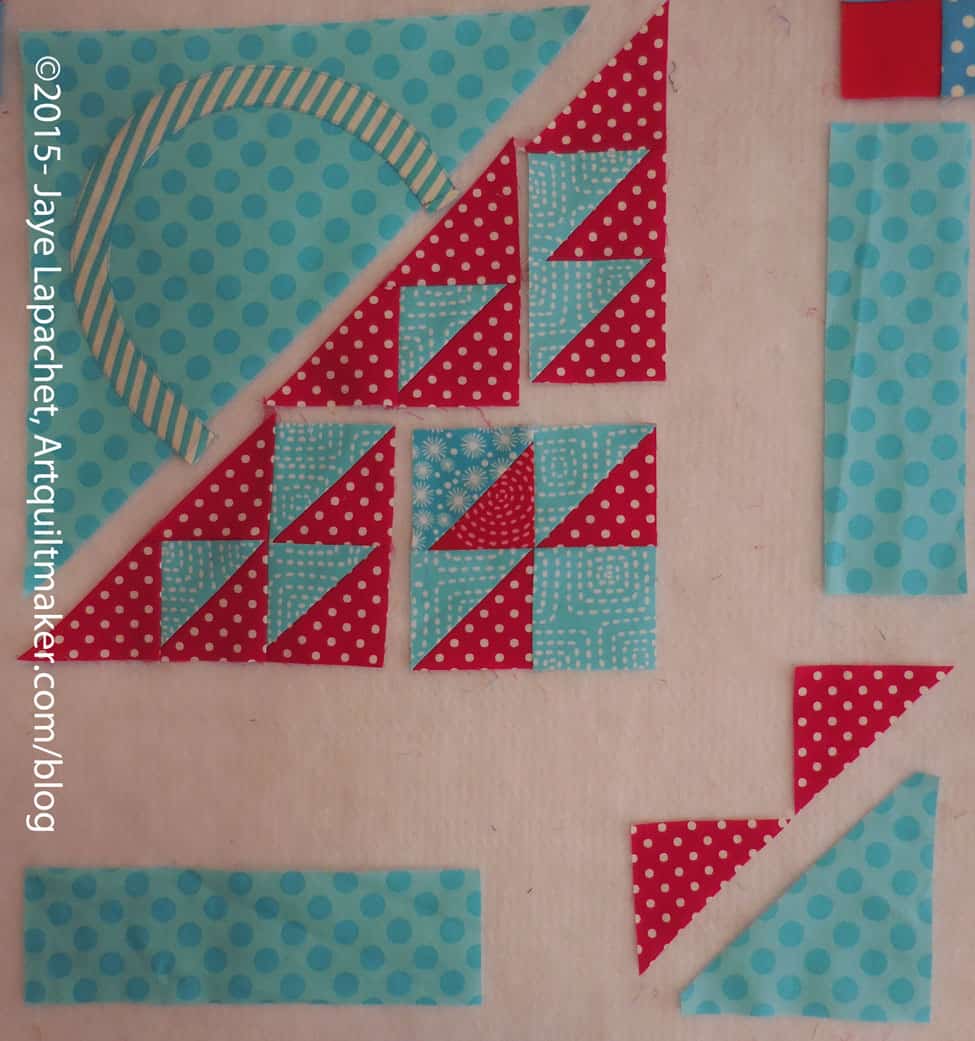
6. Sew all triangles needed to make pinwheels. Take them out of the machine and clip the threads between.
7. Take all of your sewn triangles to your pressing surface. First, I set the seam like Fons & Porter suggest and then open the seam and carefully press the seam towards the pinwheel fabric (red dot in my case).
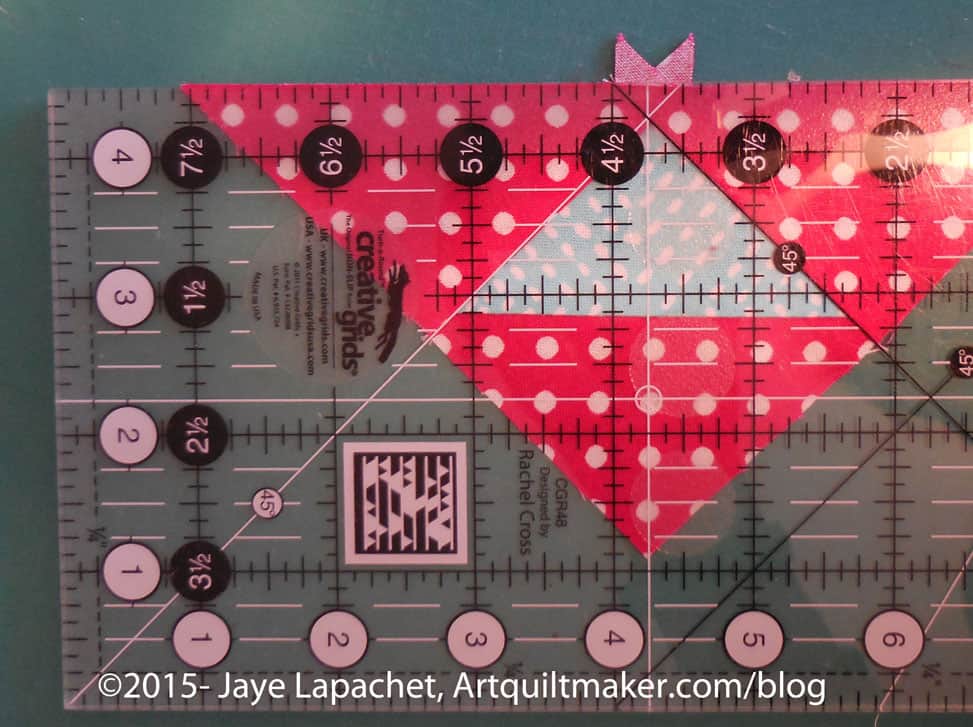
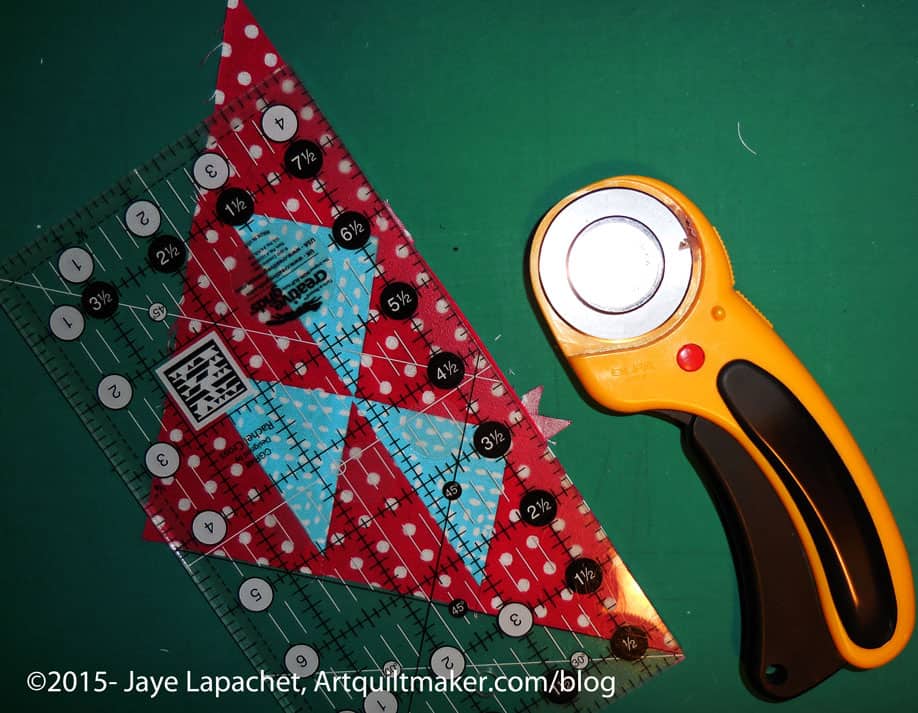
8. Take the pieces to your cutting mat. Line up the diagonal line on your ruler (hopefully you are using a square ruler with a diagonal line) with the diagonal line you have sewed and trim your new half square triangle (HST) block to 3.5in.
You will need to make this cut twice for each patch as you cut two sides. Trim the top and the right side first. Then, turn the block 180 degrees and then trim the other two sides, which are, once again, the top and the right side.
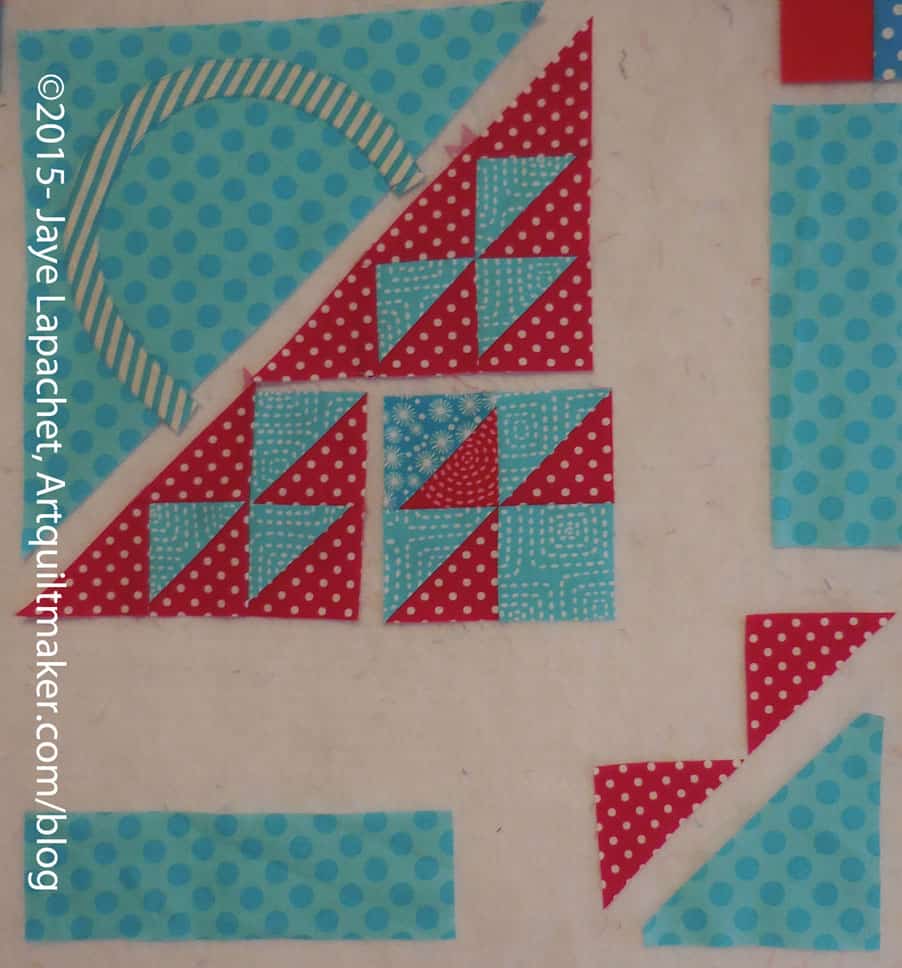
9. Arrange your sewn HSTs on your design wall to you can be sure that they are arranged in a pinwheel block.
10. Make a note to yourself (use a pin, eyeball it, pinch it) which sides you are going to sew together. Nota bene: This is where numbered pins come in handy, if you decided to buy them.
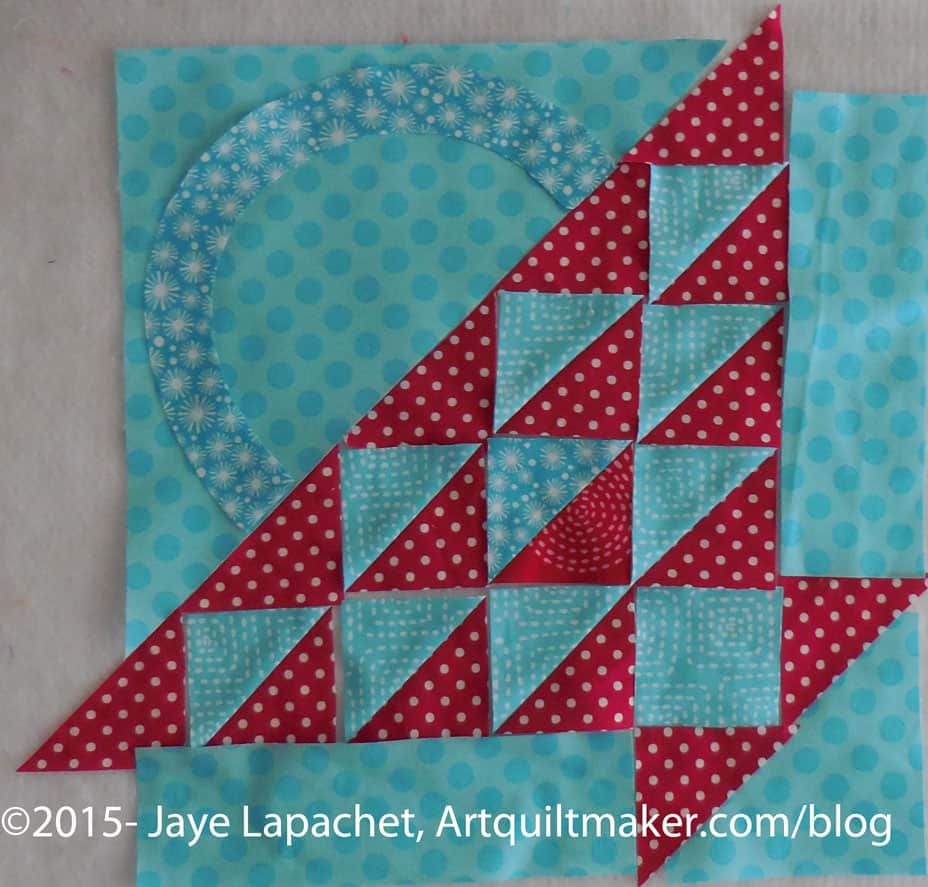
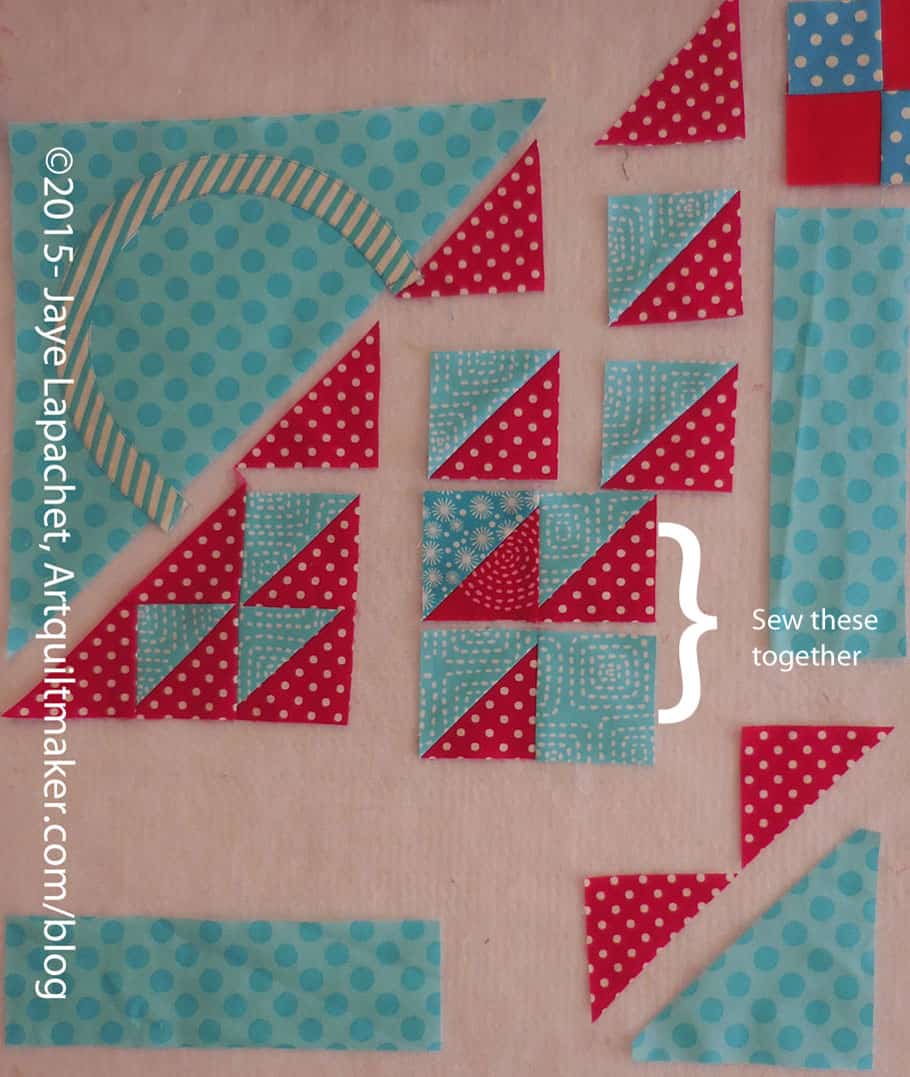
Sew 2 HSTs together
11. Take 2 half square triangles and place them right sides together underneath your machine’s presser foot.
Nested HSTs
The seam allowances on the diagonal should be nested together. This will work if you have pressed all of your HSTs towards the pinwheel fabric. In the above photo you can see how the diagonal seams are lined up when I lift the corner of the fabric to show you. (Professional stunt quiltmaker! Please do not try this at home with your machine running!!!)
12. Making sure you are sewing them in the right orientation, sew two half square triangles together.
13. Press these half pinwheels towards the background.
You should have 2 pieces of 2 half square triangles ready to sew into a pinwheel.
Important Matching Spot
14. Nest the 2 half pieces together. In the above photo I have put the pin in just to show you about where you should sew. Sew along the middle of the pinwheel
When you sew try not to cut off the point of the pinwheel center. You will see a V made by the seams you have sewn previously. Make sure you err towards the seam allowance (on your right looking at the needle of the sewing machine) and don’t cut off that V. Ideally, you want to sew one thread towards the seam allowance on top of that V.
V
You can just sew over the middle (.5in. on either side of the middle point) to make sure your points match, then you can go over the whole seam once you decide if you like the way the center looks. The ripping out is easier if you only have an inch to do.
Middle Sewn to Check Points
When you open the block (with just the middle sewn) you can tell whether or not the center point will match.
A NOTE ABOUT POINT MATCHING: It is really important that you know your tolerance level for points not matching. My points don’t always match and either I leave them or rip them out. If my points are 1/4inch apart, I usually rip them out. If they are 1/16th of inch from one another, I will probably leave them. It is important to know:
what you are trying to achieve (practice block or show quilt)
if you are going to think about that seam not matching late into the night and it is going to prevent you from sleeping.
deadlines
whether the quilt is a gift to a prize winning quiltmaker or a baby who will drool all over it.
How busy the fabrics are (can you actually see the seams matching?)
Be kind to yourself when you think about whether to agonize over a seam not matching. Have fun, there is always more fabric and don’t make yourself crazy.
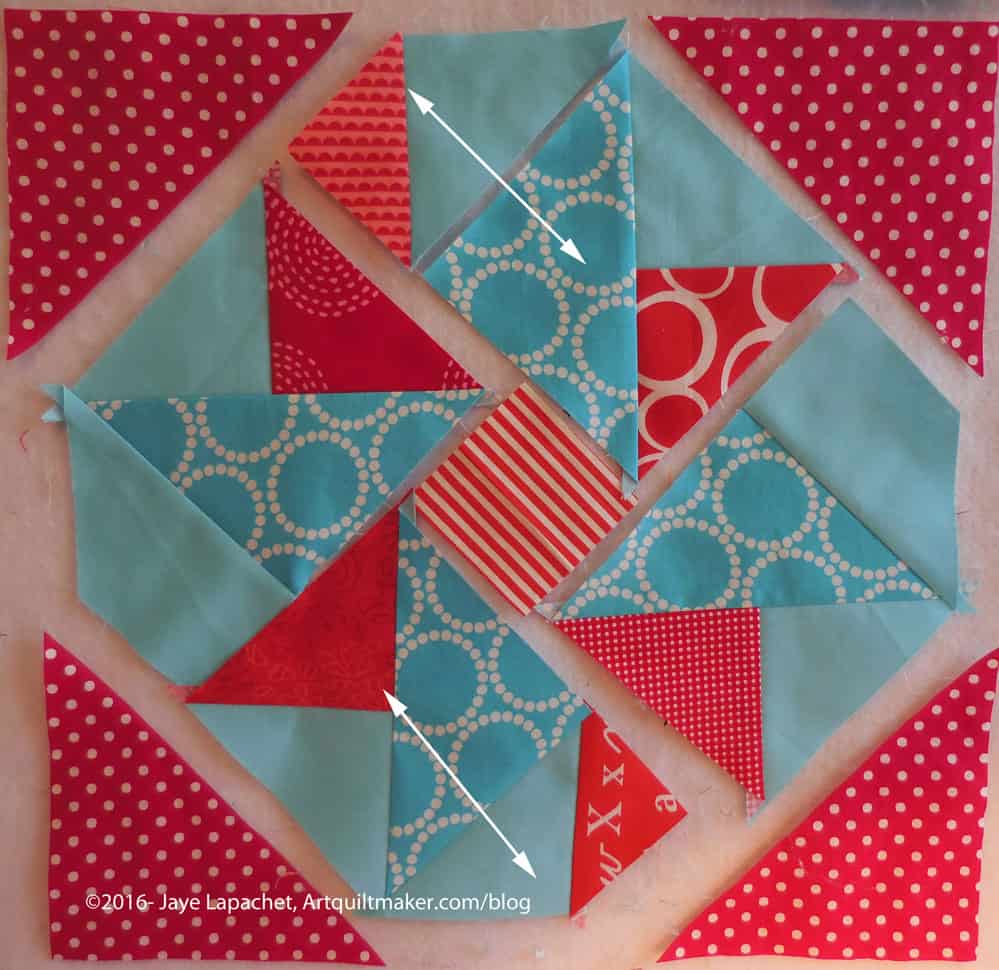
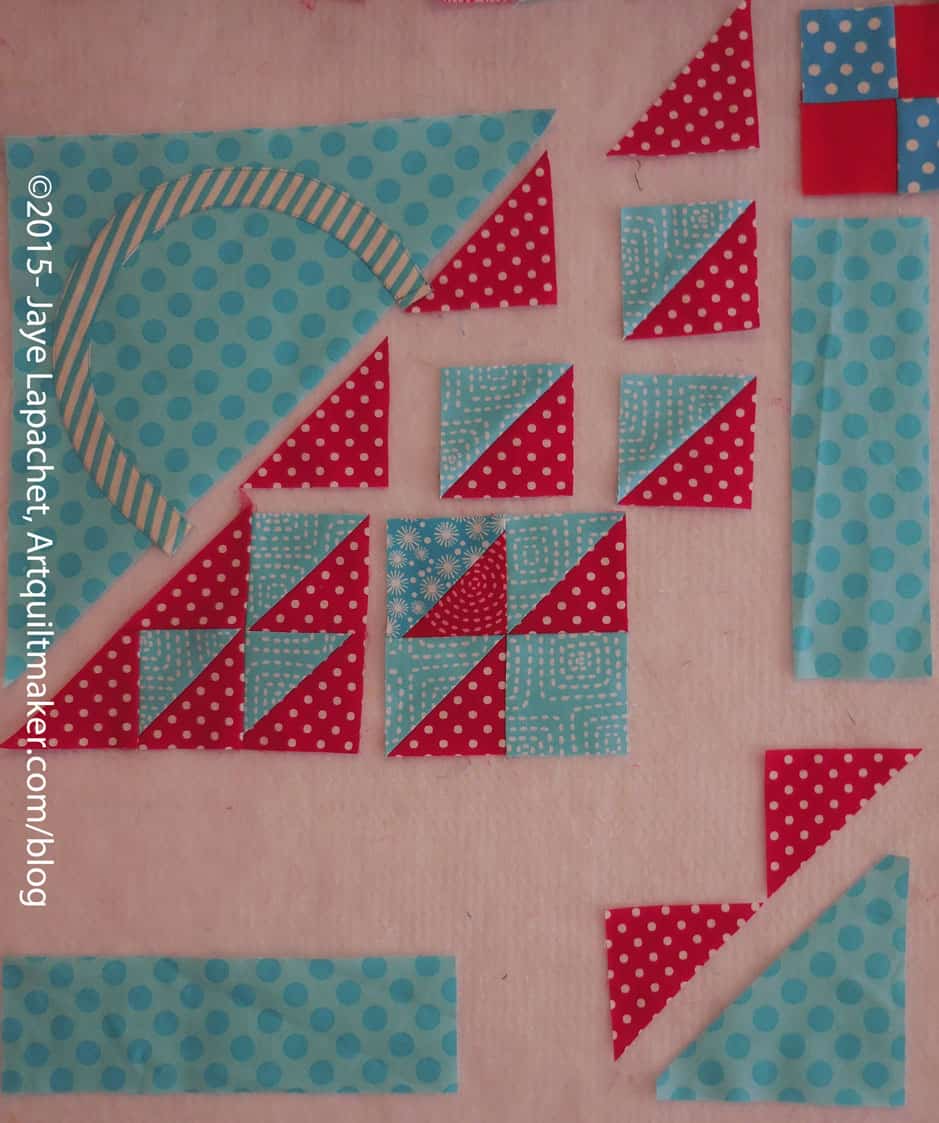
15. Sew the halves together, along the whole side, for both pinwheels. If you have sewn along the middle for an inch, make sure you stay on that line when you sew the whole side together.
Pressing Perfection
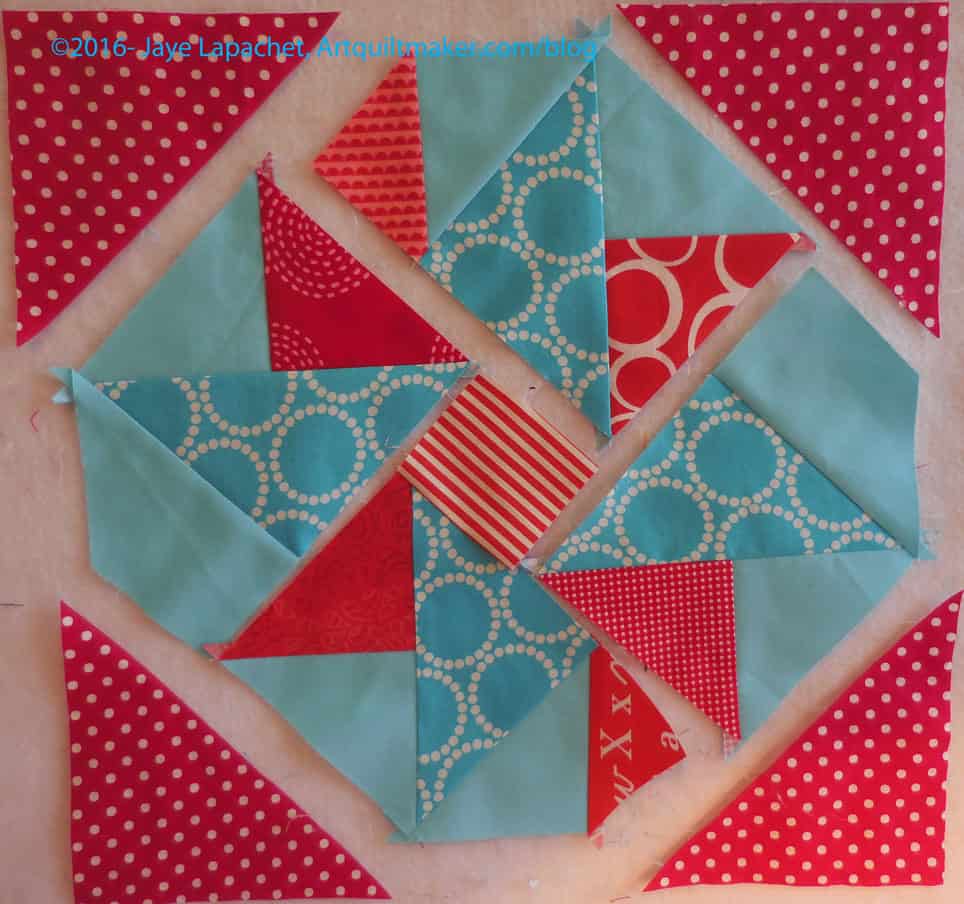
See that nice little square that the pinwheel makes in the center? That means you did it right!
16. Press the pinwheels patches in the same direction as the other triangles. It will look like the seam allowances are spinning. It will also make less bulk in the center of the block.
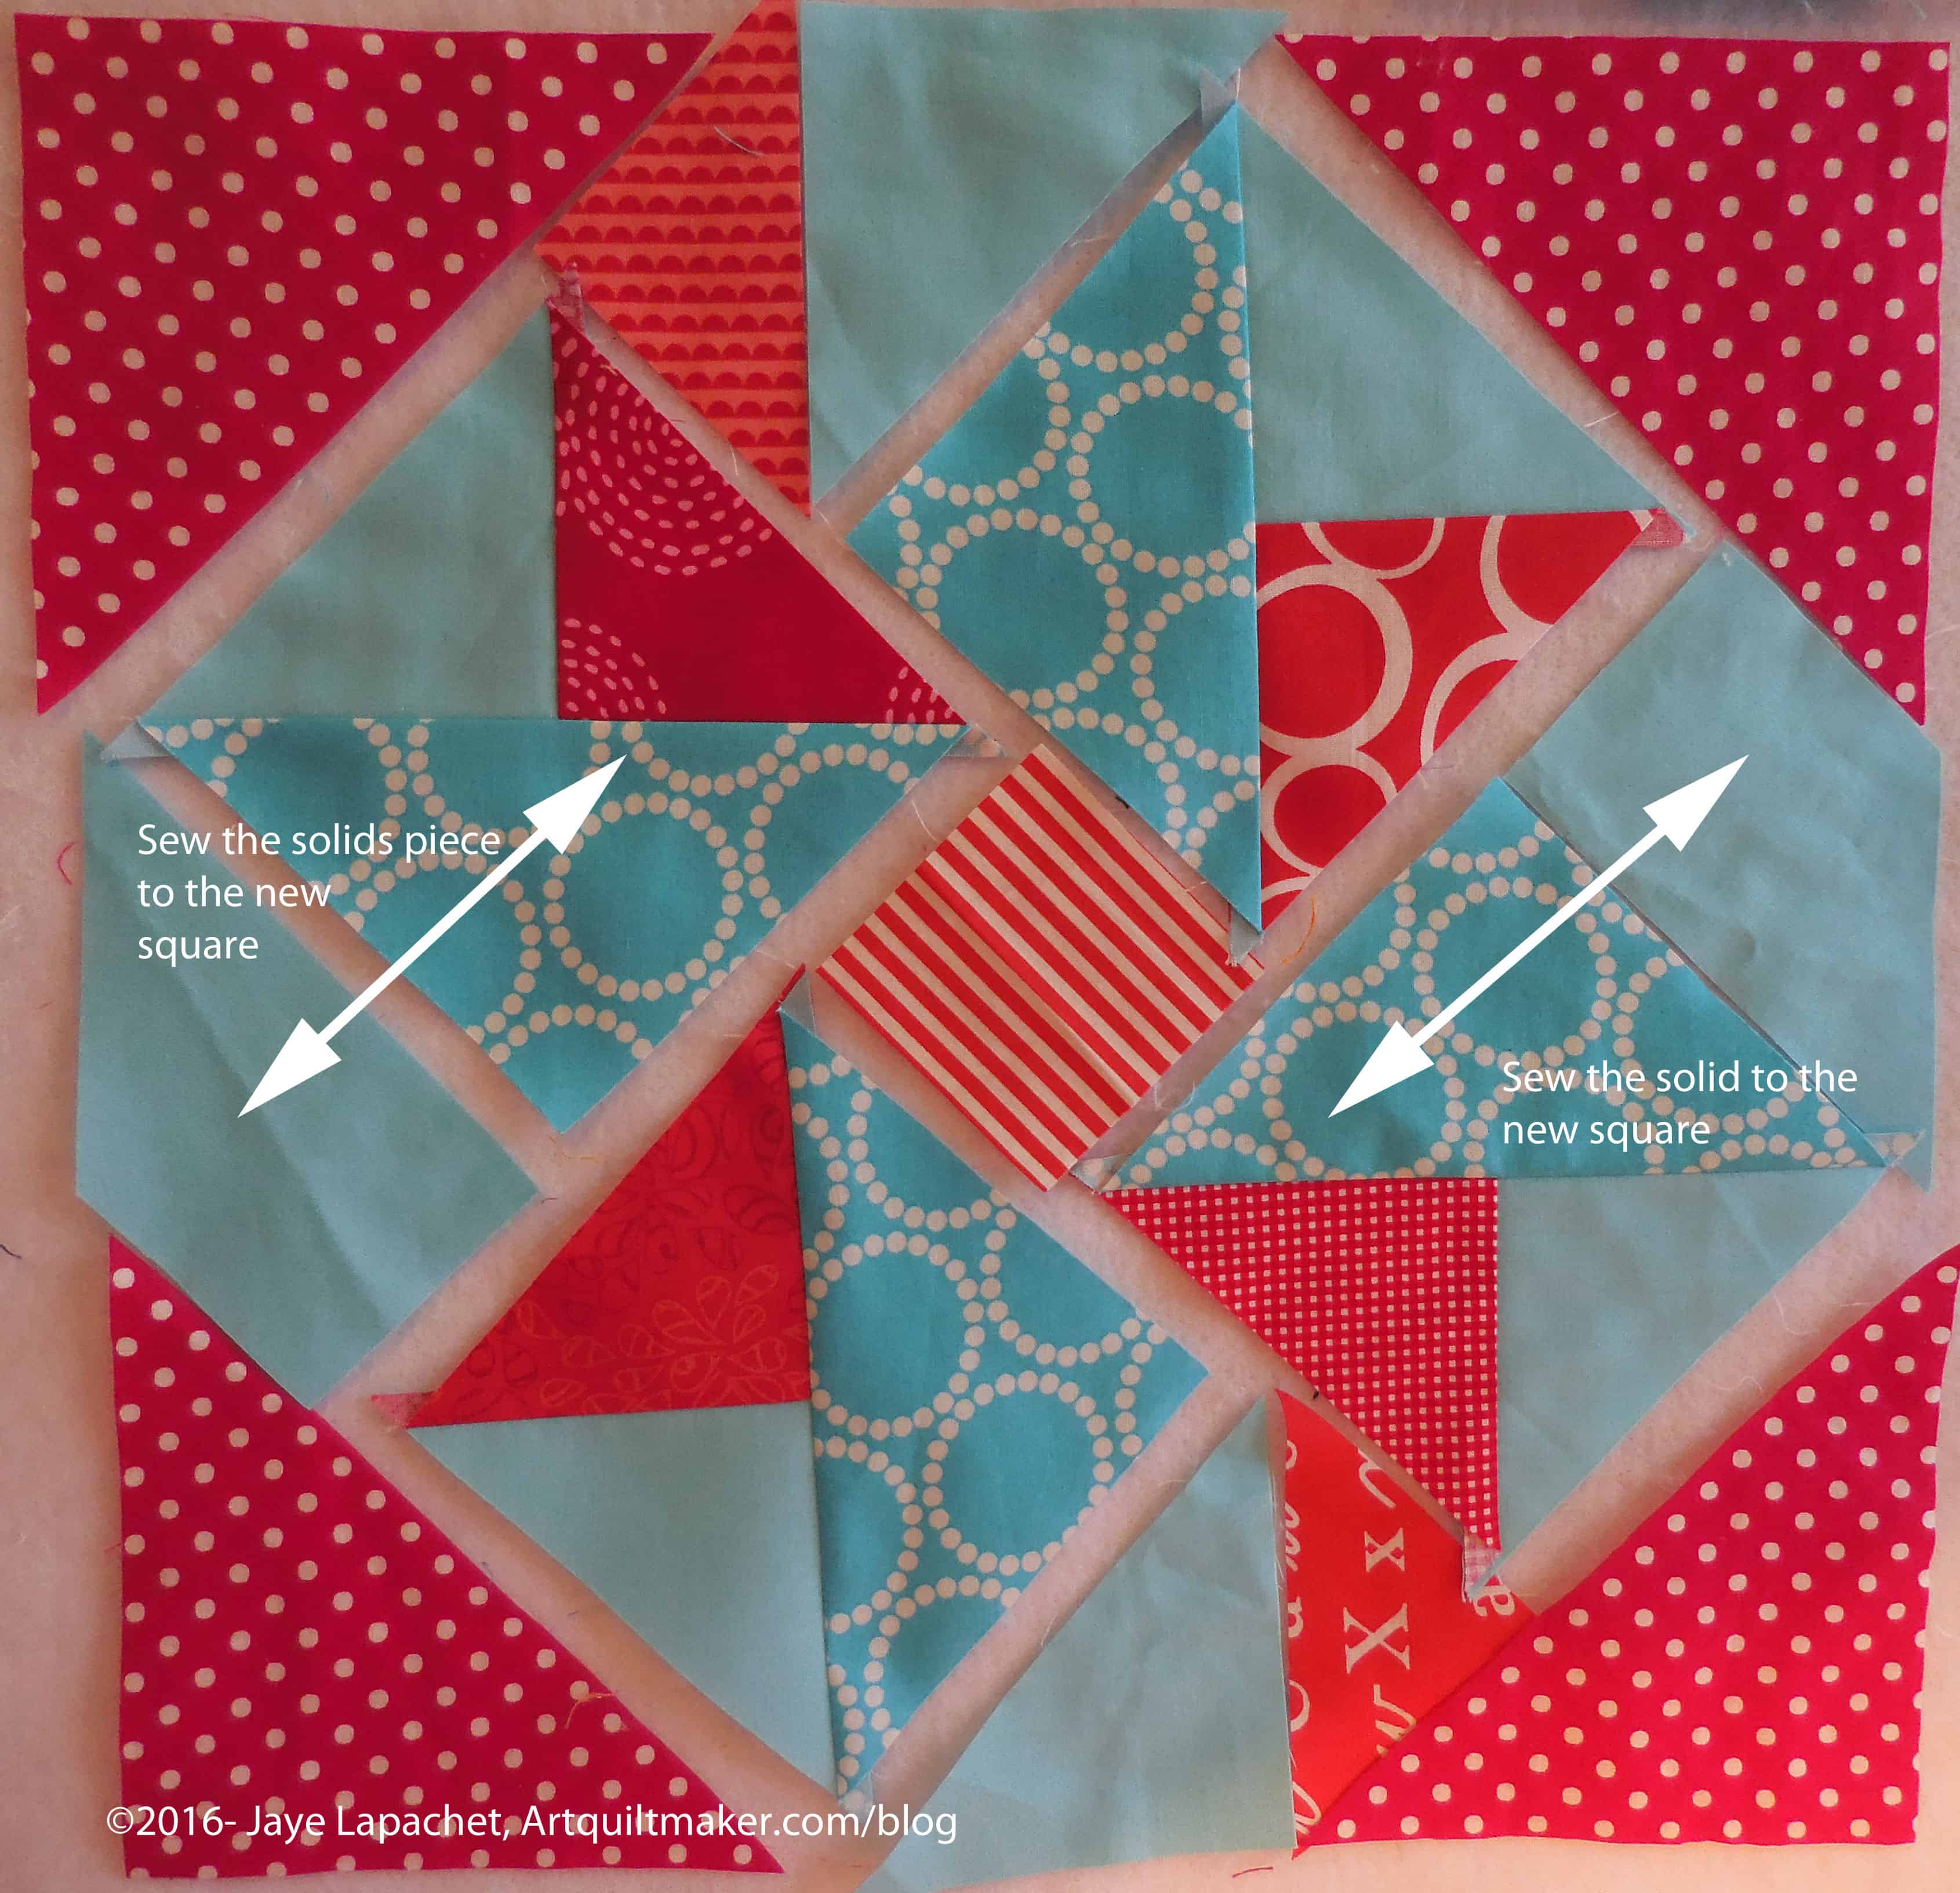
17. Sew the large 6.5inch background square to each of your pinwheels. Pay attention to which side of the pinwheels they are sewn.
18. Press towards the 6.5inch square/background.
19. Nest the two pieces (which are made up of a pinwheel and a background patch).
20. Sew over the middle starting from about .5inch on either side of the middle to make sure your seams match and you have not cut off points.
21. Sew the 2 pieces together starting on one side, sewing over the middle where you have already sewn and continuing to the end of the block.
View of Pressing
22. Press whichever way the seam seems to want to go. I like to press each half of the seam towards the background. It makes for kind of an ugly pressing job, but I am not going to quilt over that center anyway, so, for me, it doesn’t matter. Pressing this seam open also works.
You could trim the seam in the middle, but I don’t do that. Jo Morton talks about doing that and you might want to check out her website and YouTube videos.
This is a bonus block. I would like you to make it and use your fabrics to practice the techniques you learned in making your Nine Patch block. While this block is firmly rooted in square patches, there are a lot more seams to match, but not so many that you can’t do it. You can make this block or not. Remember Practice Makes Perfect.
You will also need these Double 4 patch Cutting Instructions
Use the same group of fabrics you used for the Nine Patch so you can use this block in the same quilt, if you choose.
Some tips:
This block has a different grid than the 9 patch. It has a 2×2 grid. That means that there are, essentially two patch across and two patches down. In this case you make one of the patches up from a Four Patch, so you sew each 4 patch, to a two plain square and then sew the halves together.
Today we will start the actual sewing part of the class by making a Nine Patch. The 9 Patch is one of the easiest and most basic blocks a quiltmaker can make. It can be made from any sized patches and can be a component of more complex blocks. It is a good block to start with because it is fairly easy, gives practice on matching points and choosing fabrics all without making a new quiltmaker crazy. It also is a 3×3 grid, which means 3 patches across by 3 patches down. This grid is used in other more complicated blocks, so learning it’s structure will help you down the road. Knowing how to identify such a grid will enable you to dissect blocks in the future. It gives you a starting point for many skills.
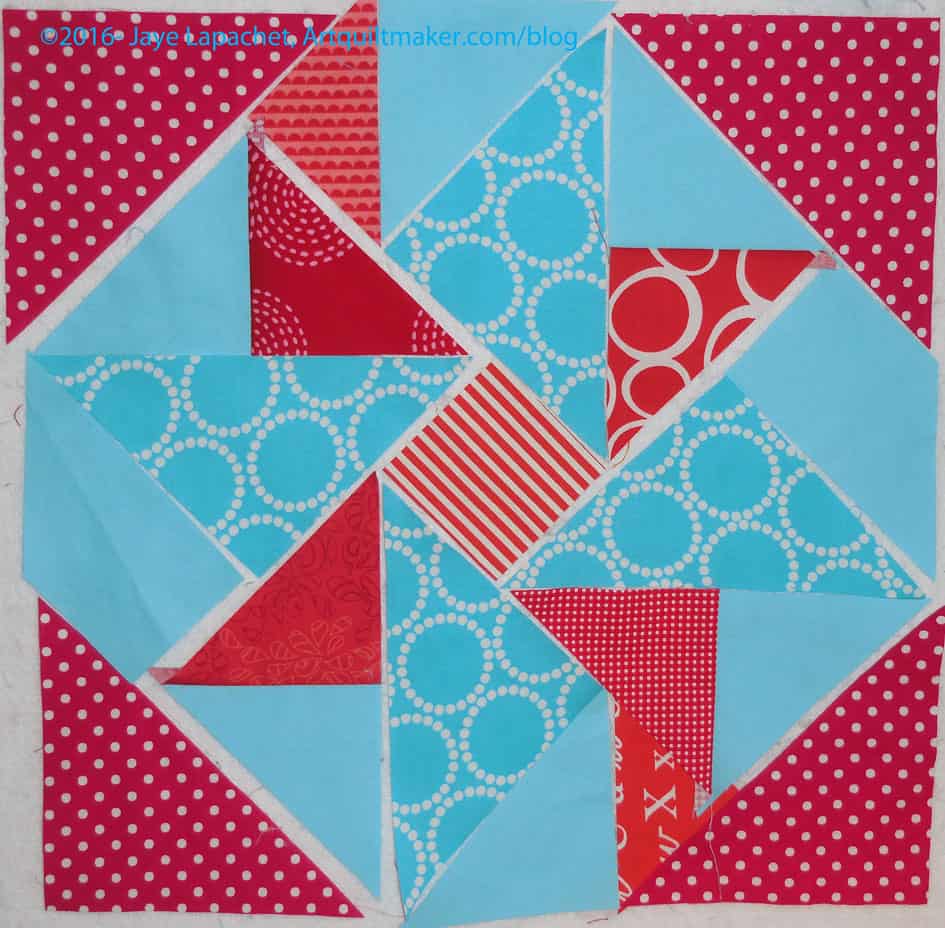
Finished: Nine Patch
This is usually the first block I teach when I teach beginning quiltmakers in a Sampler Class context. You will need:
Supply list:
fabric
rotary cutter
rotary cutting ruler large enough to cut 4.5″ squares
rotary cutting mat
fabric (2-3 different)
Optional: Mary Ellen’s Best Press (or similar)
Optional: pins
sharp trimmers or scissors
thread for piecing
sewing machine
Iron
ironing surface
I haven’t done a cutting tutorial. I have listed some below and you can find others if you search.
I haven’t reviewed all of the above tutorials in detail, but the brands are reputable and you should get some good information. The best way to learn is to take a class on how to rotary cut and be shown in person. Many quilt shops will give you a private lesson, if you arrange it.
Key Block
I have marked the rows and patch with letters and numbers so I can more easily refer to them for you. You may want to enlarge the picture and make a small drawing to keep near your machine.
First, select your fabric. If you selected a large group of fabrics in the lesson on selecting fabric, you will just need a few from that group. As you can see I have chosen 3 fabrics. You should feel free to use more, if you want. The one in the middle is the only one I have placed in one square. I want this to be my focus fabric.
Nine Patch: Center
Step 1: Cut fabric. You need 9 squares 4.5″x 4.5″ each. I like to use a different fabric in the center of the nine patch block. It adds interest, especially to a 12″ finished size.
Adding RedsAdding Blues
While this particular block is the first block I teach in the sampler series, I suppose I could make it easier by teaching a Four Patch. I think you can handle a 9 Patch. This particular Nine patch will be part of the sampler quilt I am making. I always make a quilt along with my students.
Move Fabrics Around
Step 2 (above): After you cut the squares, move them around to make sure you have the placement of the fabrics in the position that is the most pleasing to your eye.
Start Sewing
Step 3: Prepare to start sewing.
I usually start in the upper left hand corner (row 1 patch A and row 2 patch D), everything else being equal.
In general, if I don’t start in the upper left hand corner for other blocks, I start by sewing smaller units/patches into larger patches. This is a good practice for blocks with sections that will later need to be sewn to other sections. Keep this tucked in your mind, but you don’t need to worry about it now.
Sew patches together in groups of 2
Always use a quarter inch seam allowance.
If you have a needle down option, I always use it
Step 4: Place fabrics right sides together and place into machine with the foot on the fabric, but with the fabric in front of the needle. I have a quarter inch foot on my machine and I sew 2 patches together to make a unit that will fit into the upper left hand corner of the block.
Sew patches together in groups of 2 (front view)
The edges of the patches are lined up so that the bottom fabric is not showing when I sew. Fabrics are right sides together.
Patches SewnChain Piecing
Nota bene: You can certainly take the sewn patches out of the machine, but this is a good time to talk about chain piecing. I have other bits and pieces handy so that I can keep sewing, so I will put them (see red rose fabrics above) through the machine after the patches for the block on which I am working. In the above photo, you can see scrap pieces for a journal cover. I find it is much easier to work on sewing scraps together rather than another block. For my journal covers, I sew pieces together any which way. I don’t have to worry about putting the right patch in the right place or not cutting off triangle corners. This method gives my brain space to concentrate on the block at hand. I like to use chain piecing as it saves thread and keeps the machine from eating the corners of blocks as the machine starts sewing a new patch.
Once you have done some blocks and know how you work, you can certainly put the next group of pieces for your current block through the machine after the first set. Also, if you feel confident, then go ahead and put the next set through the machine.
Cut off Chain Piecing
Step 5: After you have put your second group of patches, or your scraps, through the machine, cut off the sewn patches apart from your second group of sewn pieces. I usually just put one set of chain piecing through my machine after the patches for my current block, especially if I have a lot of fiddly placement. I would rather unsew one set of patchwork if I make a mistake than many.
Trim threads
Step 6: Trim threads.
I dislike a bunch of long threads hanging off the back of my finished blocks. The best way I have found to deal with that is to trim as I go along. Trimming threads is a personal preference. I find it makes my blocks look a bit better and there is less of a chance of anything getting caught in my machine as I sew further along in the project. I put threads and trimmings in a bag and use them for cat bed filling.
Set Seams
Step 7: Bring your 2 sewn squares over to your ironing board and press the threads on the seam allowance from the back with the patchwork closed. This sets the seams. You have not yet opened your piecing to look at it from the front.
I have no idea if this step really sets the seams. Fons & Porter do this and since there doesn’t seem to be any harm in it, I started to do it as well. If you skip this step, your patchwork will not fall apart.
Open Patches
Step 8: Open your patchwork so that the seam allowance is pointing towards the patch that will be in the very upper left hand corner.
Seam Allowance Points Away
Step 9: Point the seam allowance, referenced above, away from you.
You could also point it to the side (either right or left depending on which is comfortable based on the hand with which you press). Above is the way I do it, which probably depends on the size of my ironing board and habit.
Press
Step 10: Swoop your iron carefully from the patch without the seam allowance to the patch which is laying on top of the seam allowance. In my case I am swooping carefully from the red towards the aqua dot.
Place Sewn Patches on Design Wall
Step 11: Place sewn patches on in their spot on the design surface.
Place Sewn Patches on Design Wall (detail)
You will notice that this newly sewn set of patches are quite a bit smaller (1/2″ to be exact) than your other cut pieces. No panicking is necessary. The patches are smaller because you have used 1/2″ of fabric for the seam allowance. You are on track, if your block looks like the two pictures above.
Sew Next Patches
Step 12: Take the center patches (from row 1 patch B and row 2 patch E) and sew them together. Again, you will place your right sides together before you sew.
Use Chain Piecing Techniques
Step 13: Follow steps 3-11 for these patches and the right hand patches (row 1 patch C and row 2 patch F).
Press Opposite
Step 14: Above we pressed towards row 1. After sewing row 1&2, patches B&E, you will press the seam allowance towards row 2. Patch E will be on top of your seam allowance.
Used Another 1/2″
Step 15: Place your pressed patch on the Design Wall. You have used up another 1/2″ of fabric.
After you have sewed all the patches for rows 1&2 together, you will need to sew the patches for row 3.
Step 16: Sew row 3 patch G to patch D. Yes, patch D is already sewn to patch A. Don’t press yet.
Step 17: Follow the directions in Step 16 for patch H and patch I. Wait to press.
Step 18: Press patch G towards patch G.
Step 19: Press H towards patch E
Step 20: Press patch I towards patch I
Nesting Rows
Step 21: Lay the column with patches B, E and H on top of the column with A, D, and G. Make sure that your seams look like the photo above – nested into each other, not resting on top of each other.
The reason to pay attention to pressing is that you can ‘nest’ the seams when you go to start sewing the rows. Nesting seams is when the seam allowances are pressed in opposite directions so that they rest against each other. It helps with accuracy in piecing.
Sew Left Column to Middle Column
Step 22: With the column with patches B, E and H on the bottom, sew the column with A, D, and G to the column with patches B, E and H on the right side.
I did use some pins at the seam allowances.
Step 23: Set seam between the left and middle columns.
Step 24: Press seam allowance between the left and middle columns in whatever direction suits you.
Lay Left Column on Middle Column
Step 25: Lay left column (with patches C, F and I) on top of the middle column.
It looks like the top row, but really is the right column. I just have it turned so the right column is on top.
Step 26: Pin at seam allowances, if desired. I usually use pins.
Step 27: Sew left column (with patches C, F and I) to the middle column.
Step 28: Set seam between right and middle column.
Step 29: Press seam between right and middle column.
Finished: Nine Patch
Step 30: Congratulate yourself! You have successfully completed your Nine Patch!!!
I love fabric. I would love, as I have said, a loft as a studio so I could work on and see multiple projects at once. Mostly, I want to be able to store more fabric in a more organized manner. Don’t get me wrong, I am very happy with the space I have and feel very fortunate. If someone is fulfilling dreams, that would be mine.
It is pretty easy for me to make a quilt from fabric I have on hand. I don’t often go to a shop and select certain fabrics with a special project in mind. I do sometimes, but most of the time, I go to my fabric closet with an idea in my head and start pulling out fabrics.
A good way to start is to have an idea in your head:
Brights with a black on white background – this is my go to fabric option since I love brights and black on white prints make interesting backgrounds.
Monochromatic – choose all one color in different prints. You can also use your color wheel to get a selection of hues that are near each other. This isn’t a good choice if you have complex piecing and need contrast for it to be seen. This choice creates a subtle palette
Focus fabric – choose a bold print and then select colors in it in tone on tones and solids to make up your palette. This can be a little boring for me as I like a lot of different fabrics, but it is a good way to start selecting fabrics and gives guidance on color.
Scrappy – one of my fabrics. Use a lot of fabrics with a cohesive background and you will have a sensational quilt. My Scrapitude quilt uses this technique and is one of my most successful quilts.
Pre-cuts – using pre-cuts is a quick way to select fabrics. When I use a line I remove 20% of the fabrics (to use for another project) and replace them with others, especially if I need more darks or lights. This makes my quilt different from others using the same fabric line and allows me to create contrast, if I need it.
Civil War/Reproductions – will give you a specific look
1930s – will give you a specific look that can be more cheerful than other reproduction fabrics
There are other methods of choosing fabrics. What works for you is the right way.
Selecting fabric is a very personal choice. I don’t always have all of my selections picked out from the start. Often, I have most, but will add in some new fabrics later to add something that is missing to the quilt.
In the example below, I had a group of fabrics for a class I was teaching. I needed to choose some background-esque fabric to go with the Four Patches for my Double Four patch block. These are 12″ blocks, which are not my favorite. I like smaller blocks, 10″ at the most, but large blocks are good for teaching. Since the pieces are large, they are easier to handle. As you might have guessed, I don’t normally work in this size, so I found the fabric selection challenging.
To start, I got out my color wheel. I like the Studio Color Wheel from C&T and Joen Wolfrom.
Then, I fell back on Lorraine Torrence‘s advice: Make Visual Decisions Visually. That is the best advice I have EVER gotten in quiltmaking. Go take a class from Lorraine and buy her books. She is awesome.
What this saying means in this context is that you need to get out your fabric and look at it with the other choices.
Plain Jane
I had some four patches made, so I laid them on fabrics I was considering. I liked the bold graphic-ness of this print, but thought the flowers were too large.
Cherries
I thought for sure this would work, but the cherries felt too scattered. It made the block seem too chaotic. They need to be hemmed in a little.
Bliss
Something in the turquoise/ aqua color was off with this print. The aqua in the Bliss print is more green while the small flowered print in my four patch is more on the turquoise side. I thought the difference would be distracting.
Plain Jane (smaller flowers)
This fabric is the same print as the first one, but the flowers are smaller. I like the way you can see more of the flowers. Success!
Final
I chose the last print and above is the finished block. I like the look.
As an added note, I also prewash my fabrics before I use them in hot water and Retayne. Recently the Modern Quilt Studio posted an example of why it is a good idea to prewash
I am particular about my supplies. I don’t always buy the most expensive notion, but I buy the best quality I can afford. If you have had a terrible sewing machine and suffered through the indignities of it’s copious malfunctions, you know way. If not, trust me.
Each post will have a supply list that includes some of the basic materials (called BSK) plus any additional helpful tools or supplies.
Marking pen (I like the Pigma Micron & the Pilot Ultra Fine Point)
mechanical pencil (the sharp point improves accuracy) – I like the Sewline version
heat resistant template plastic
template plastic friendly pen, such as a ballpoint
glue stick
stiletto
Optional: lightbox
Notes on materials and supplies:
Use the good stuff. Don’t save your favorite fabrics for when your skills are better or for the right project. You will regret it.
If you want to do this class by hand, usually the templates are included or you can just add a quarter of an inch when you cut the fabric and sew on the drawn line.
Supplies are items you use up (fabric, thread, etc)
Materials are items you can use over and over (rotary cutter, sewing machine, pins)
I have a number of tutorials listed on the menu above, which are free and you can access any time. Due to some large time commitments in the next little while, which will leave me little time to sew, I have decided to take some of this month (September 2016) and post Sampler Quilt block tutorials most days. I want the blog to seem like a quilt class. They will, essentially be the same as the tutorials, but I will rewrite them and, perhaps, add some information just to make it worth your while to read a revised version. This will start in a few days.
Back in the Dark Ages when I learned to quilt, everyone, or most everyone, learned by making a sampler quilt. [I know TFQ will disagree as she didn’t learn using a sampler, thus the qualifier.] I think it is a good way to learn because students learn most of the techniques required to make any block they can find.
In the class I took, we covered the basic skills of quiltmaking. We made templates and used scissors to cut them out. I have updated the tutorials as rotary cutting is de rigueur. I think it is better to learn to use them early. Also, we can make more quilts if we can cut faster.
I have added a number of additional techniques to my blog class, and I am not limiting myself to once a week. I hope to be able to finish by the end of September, but I may go into October. It will be October 4 before I can expect much sewing time.
The class will consist of the following techniques and blocks:
Selecting fabric
Nine Patch (piecing and rotary cutting)
Double Four Patch (smaller squares) – this is a bonus block
Double Pinwheel (triangles)
Dutchman’s Puzzle (triangles, flying geese)
Sawtooth Star (fussy cutting, flying geese)
Card Trick (piecing, layout of fabrics)
LeMoyne/8 pointed star (Y seams)
Dresden Plate (hand applique’)
Hexagon (machine applique’, Y seams)
New York Beauty (paper piecing)
The Dove (curves)
Drunkard’s Path (small curves)
Rose Wreath (fusible applique’)
Double Windmill (partial seams)
Pieced Backs
Quilting discussion and resources
Binding
Skills need practice. If you have done a block for each tutorial in the past, perhaps it is time to do them again? Perhaps I’ll have a drawing for those who complete a quilt top using my tutorials. We’ll see.
We are going to talk about partial seams. Partial seams are a way to create a more complex looking block without using truly difficult piecing techniques. Even a relative beginner can navigate partial seams successfully.
2. Select fabrics to fit the color scheme of your other blocks. You need contrast between the various pieces.
Partial Seam Final Colors
The one red triangle with the white curves might not be exactly right, but it will look fine in the overall quilt.
3. Cut out pieces using the chart. Press as you cut if necessary.
Partial Seams: Sew Triangles Together
4. As we discussed before, sew smallest to largest. I started with the matching small triangles. Sew carefully without yanking the bias.
Press flat, then press to the red
5. Press flat and then press to the red. Press carefully without distorting the bias.
Partial Seam Triangles Sewn
6. Place the newly sewn triangles back in position on your design wall.
Partial Seam: Sew other like triangles
7. Sew the similar triangles, press and place back in place.
Remember, you are sewing from smallest to largest. This means that you are creating larger and larger sections until the whole block is done.
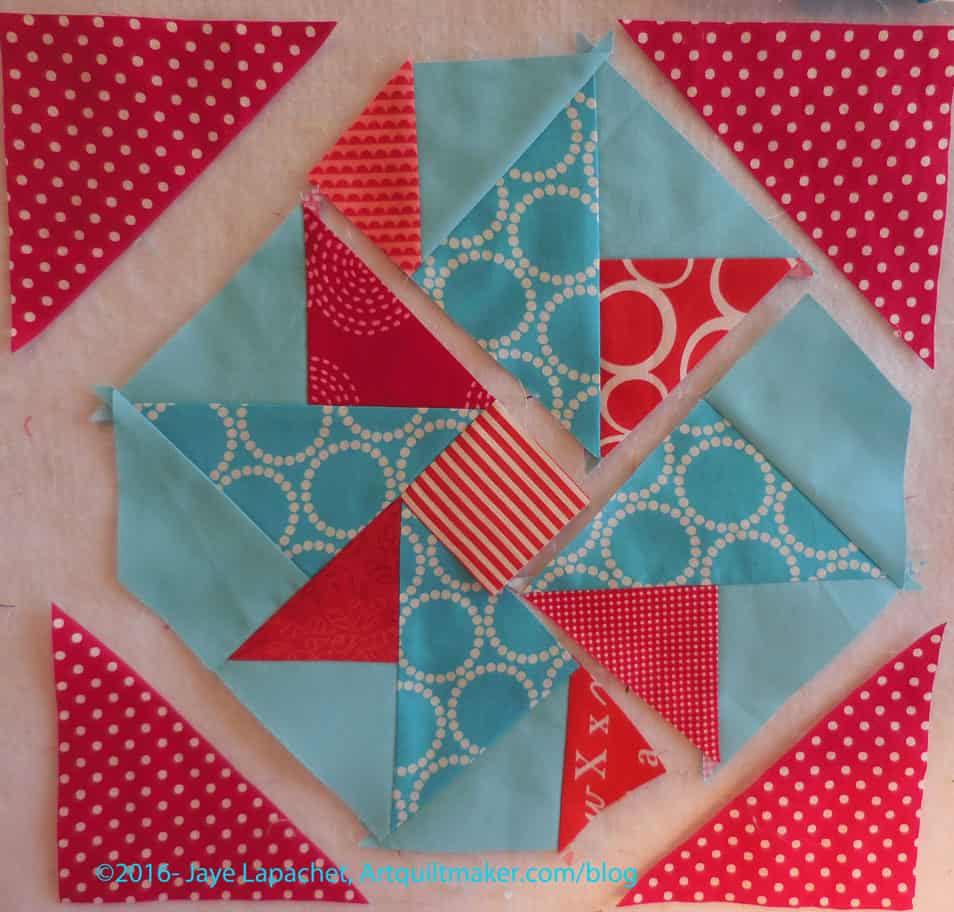
Patches Sewn in 4 sections
8. Once the newly sewn patches are back in place, it is fairly easy to see the next logical step. The large turquoise triangles (mini-Pearl Bracelets fabric in the example) should be sewn to your two triangles. This will make a square.
Sew small triangles to larger triangle
9. Sew the two small triangles, which are now sewn together (step 4-7), to the large turquoise triangle. This step makes the triangles into a square.
Place sewn squares on to the design wall
10. Press flat and then press to the larger triangle. Press carefully without distorting the bias. Place the squares back on the design wall.
Sew squares to solid fabric
11. Sew the solid, rectangle-ish pieces to the squares you just sewed.
Place sewn sections back on the design wall
12. Place the sewn sections back on the design wall.
Sew small red triangles to solid triangles
13. Sew small red triangles to solid triangles
Sew new section to square
14. Sew new section to your squares.
Place sewn sections back on the design wall
15. Place the sewn sections back on the design wall.
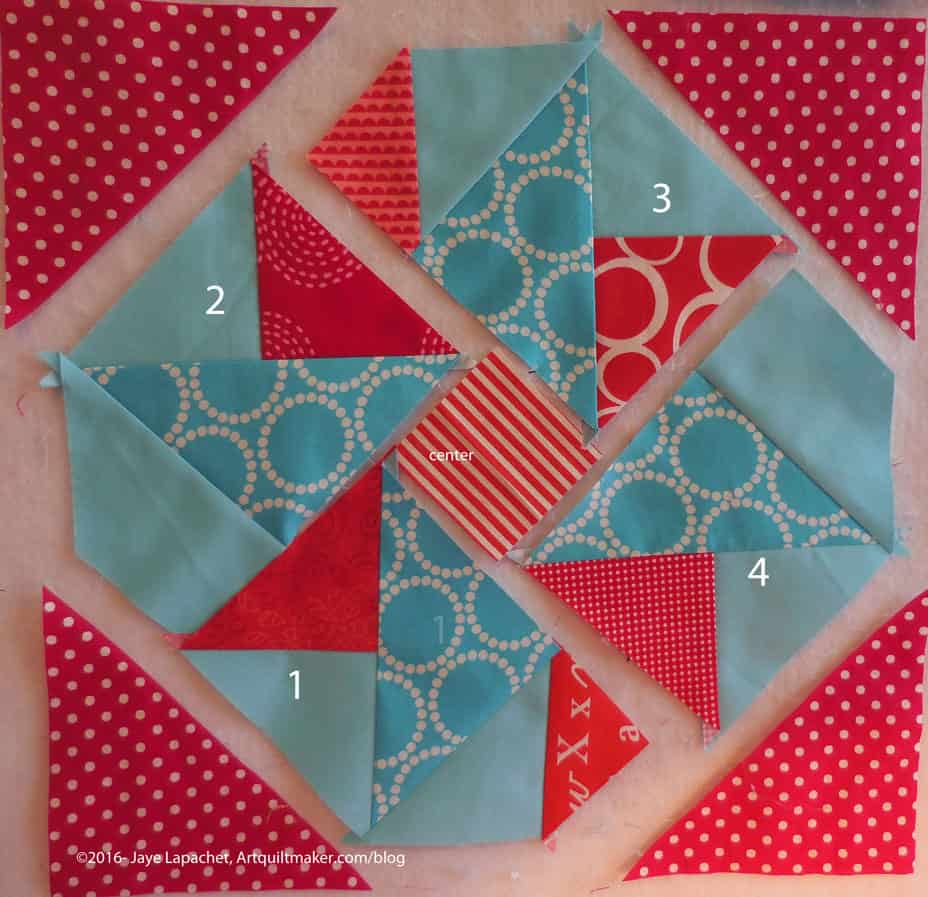
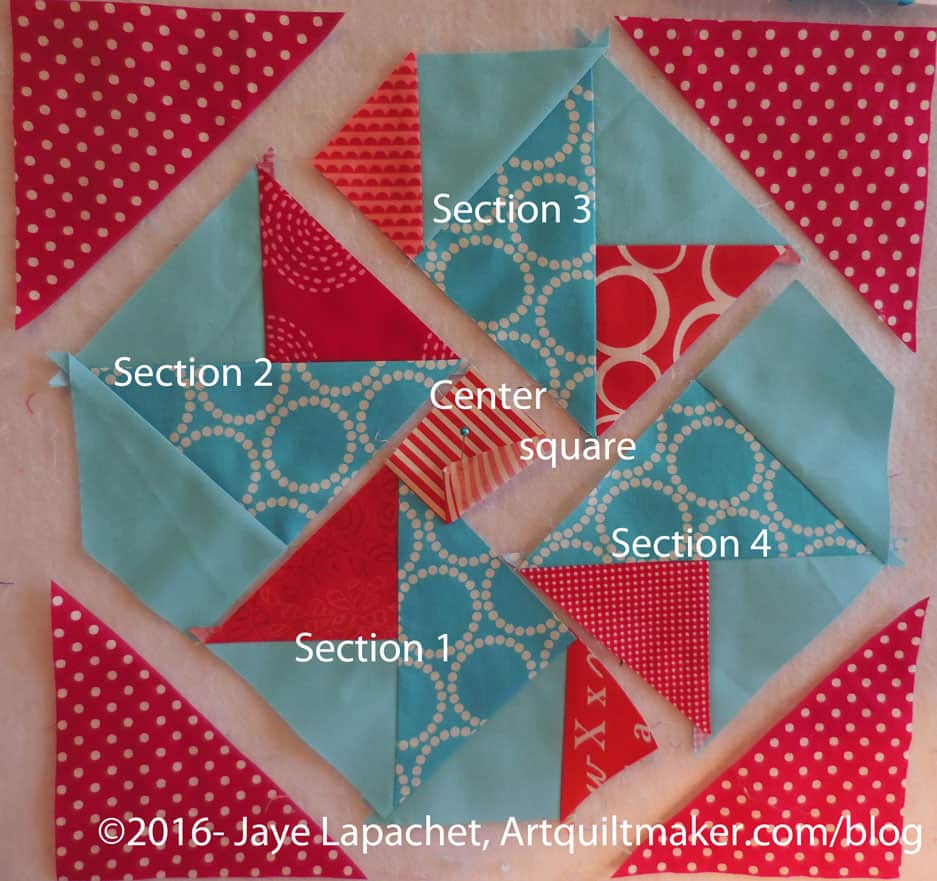
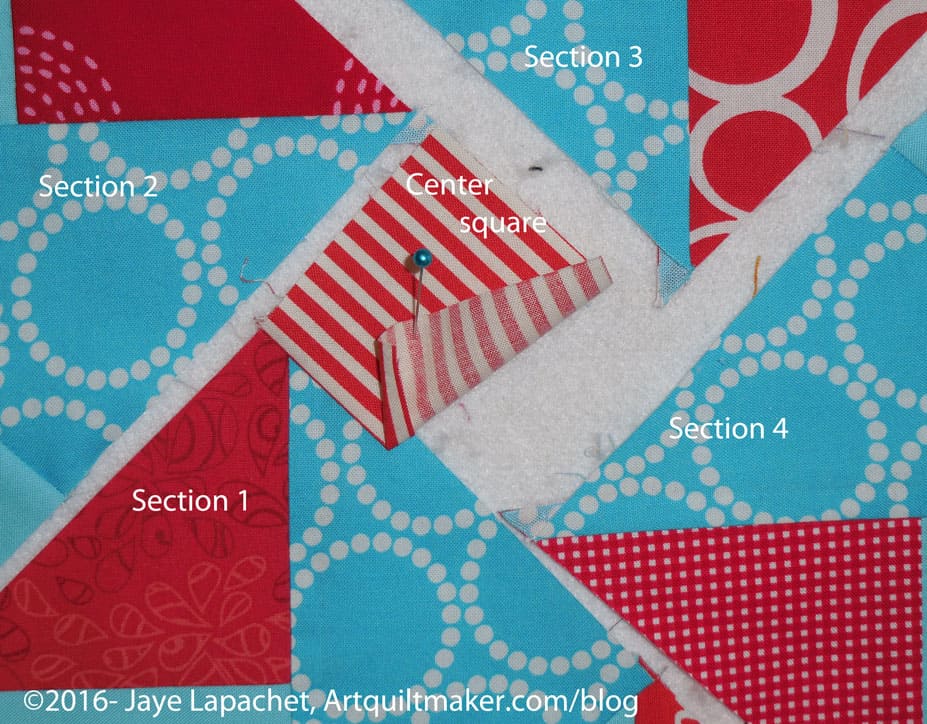
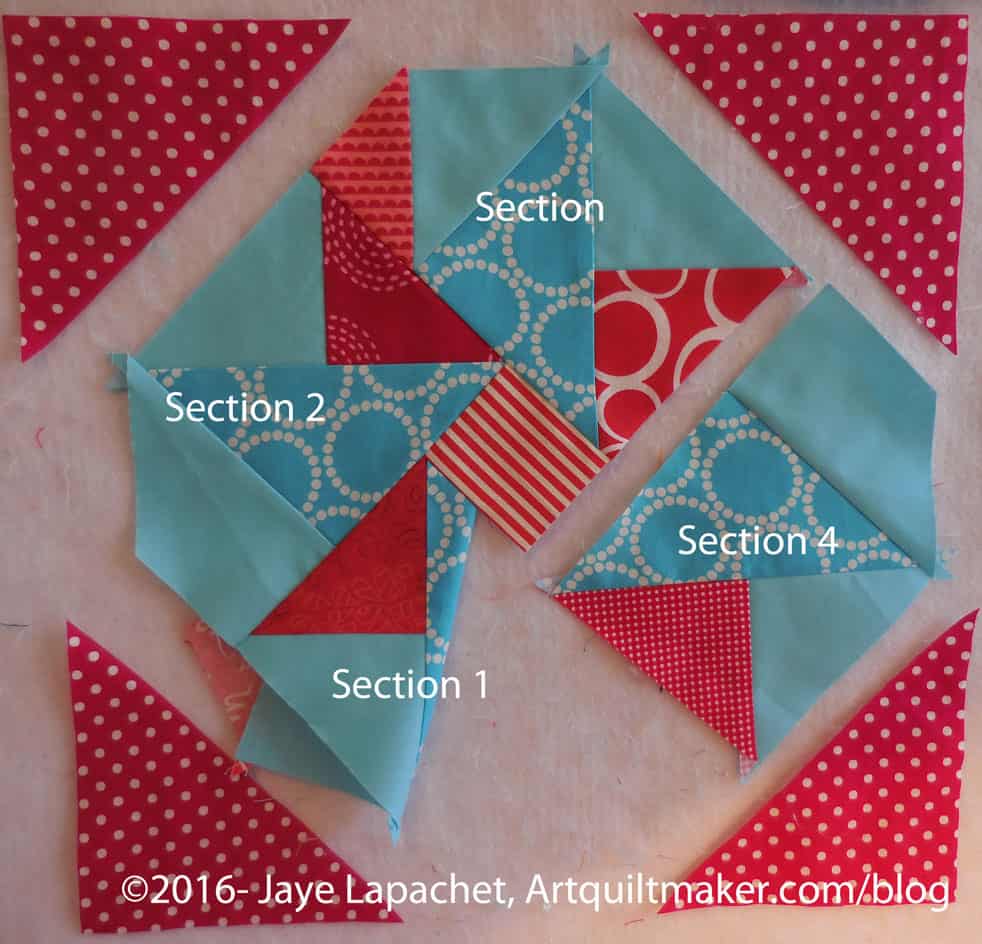
Now you have 4 major sections plus the center and 4 corner patches. Now we are going to get serious with partial seaming.
Take the center and section 1
16. Take the center and section 1.
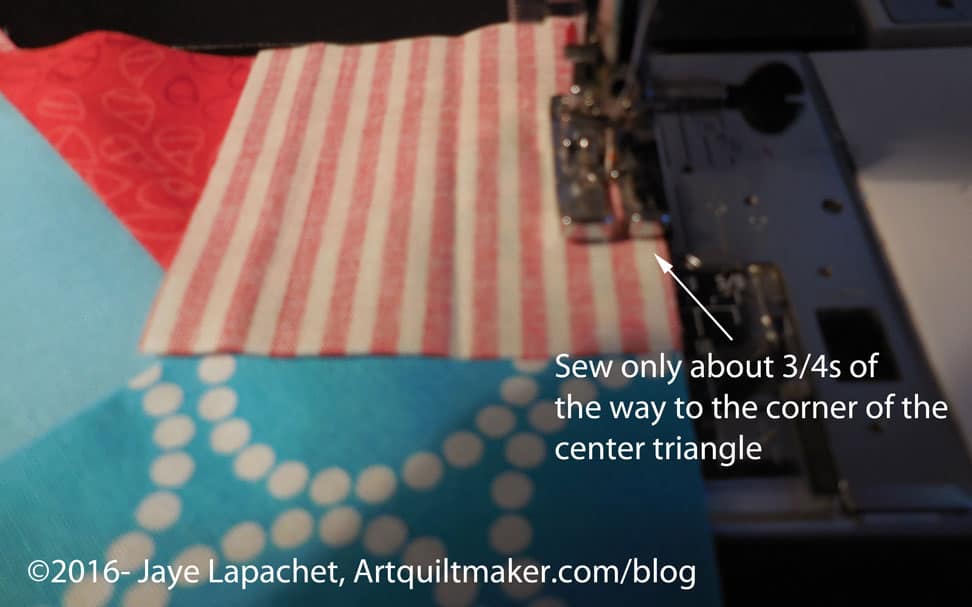
Sew about 3/4s of the way down the center square seam
17. Put section 1 under the needle with the center square on top. Line the center square up with the intersection of the red triangle and the Pearl Bracelets triangle (my fabrics used as a guide).
Backstitch at the end of the seam to secure the seam since you will be playing with it.
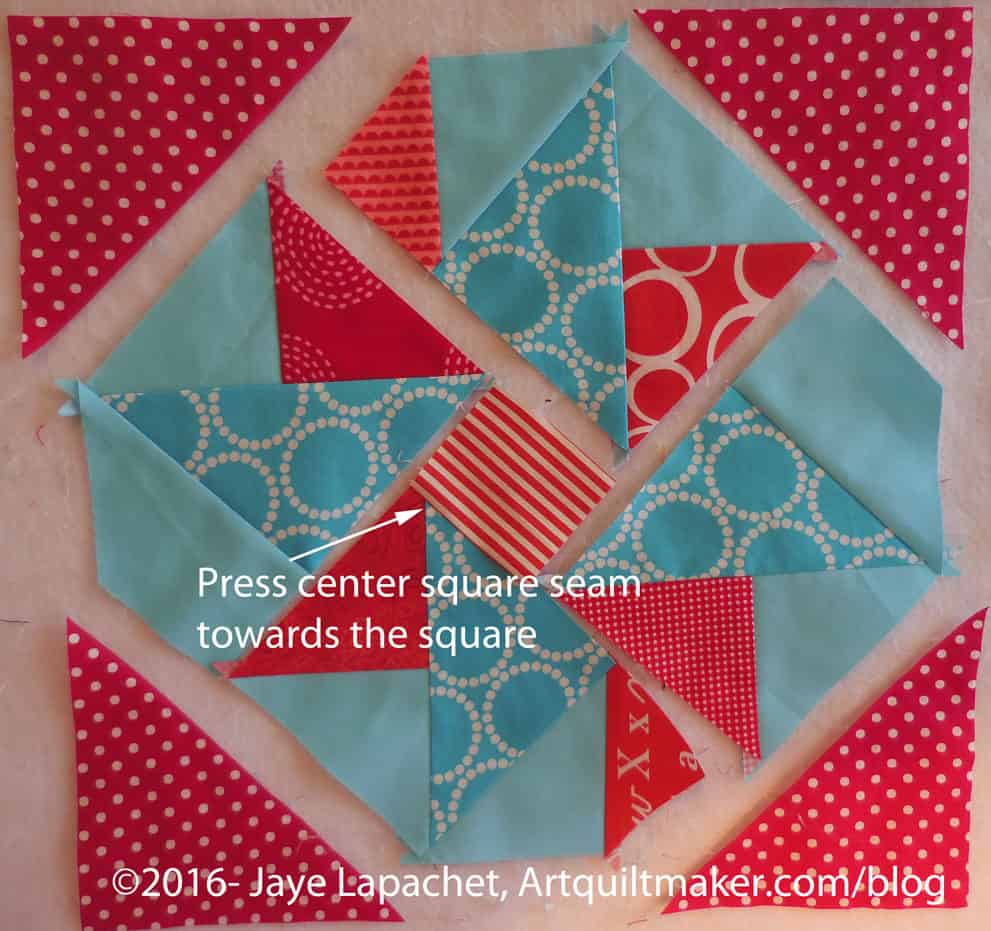
Press seam towards center
18. Press seam towards center square. Press carefully since the whole seam isn’t sewn.
Partially sewn seamPartially sewn seam – detail
The sewn piece will flip up. You can see about how much to sew in the picture above.
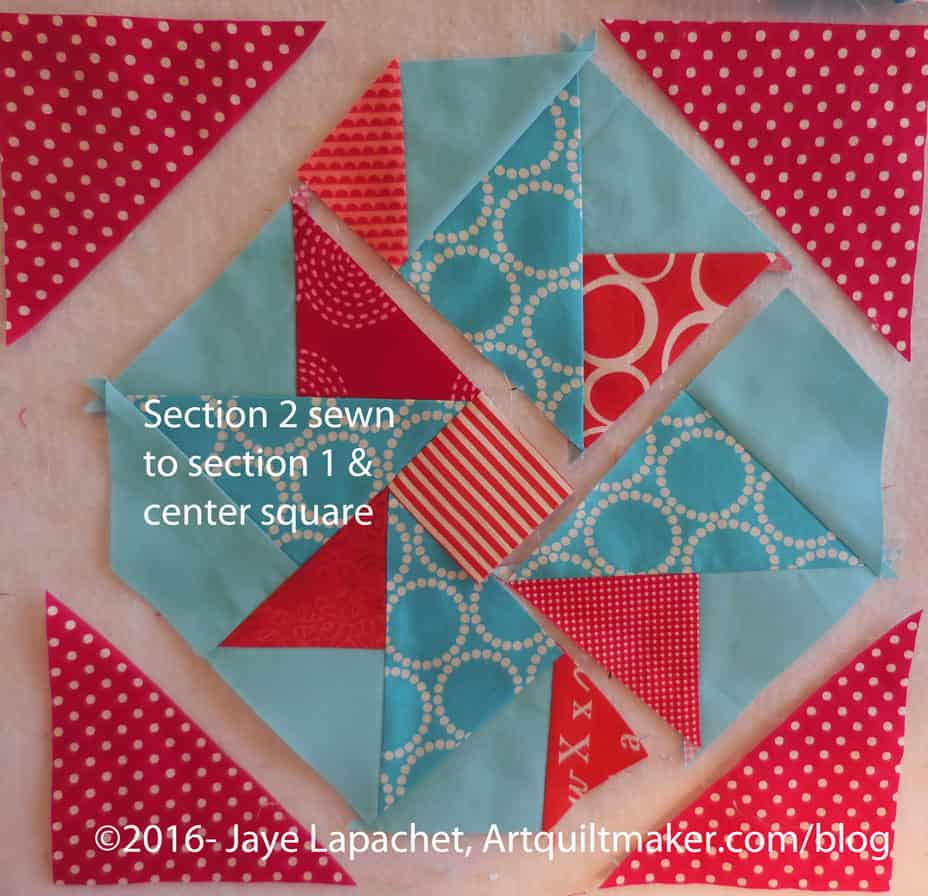
19. Take section 2 and lay it over section one and the center square with right sides together. The lengths should be about the same.
Section 2 sewn to section 1Section 2 sewn to section 1 + center square
Completing the sewing of section 2 makes the section look like it is possible to sew on section 3.
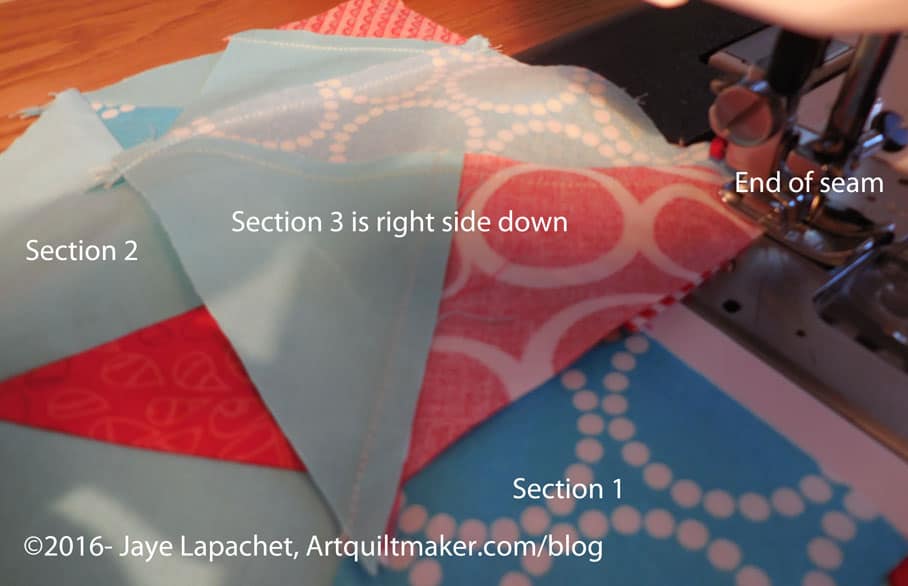
Section 3 right side downEnd of section 3 seam
20. Lay section 3 over section 2 and the center square. Line up the edges so they are event.
Center section almost done
Now your center section is almost done.
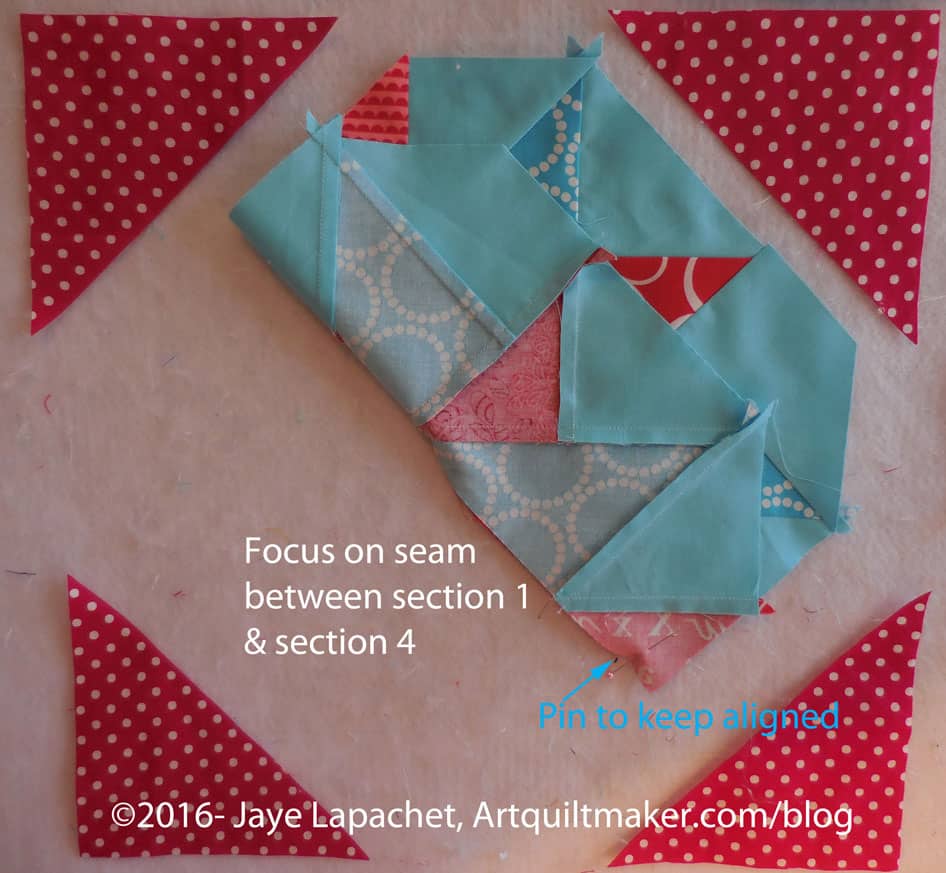
Tuck section 1 under section 2
21. Prepare to sew section 4 to the larger piece you have made by tucking section 1 under section 2. You might want to use a pin to keep it out of the way.
22. Lay section 4 over section 3, right sides together.
Section 4 sewn
Section 4 is sewn. Keep section 1 tucked under and out of the way for the next step. Get ready to complete your partial seam.
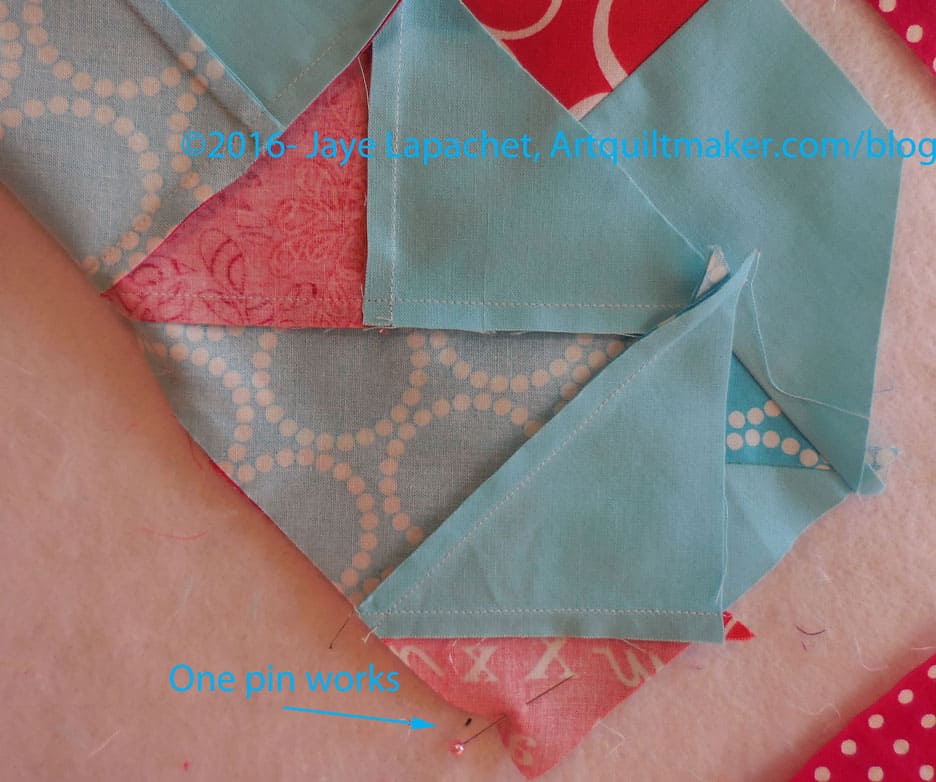
Fold center section upFold section up – detail
23. Fold the raw edges between section 1 and section 4 up like half of it wasn’t sewn. Use a pin near the end of the seam (edge of the section) to keep it in place.
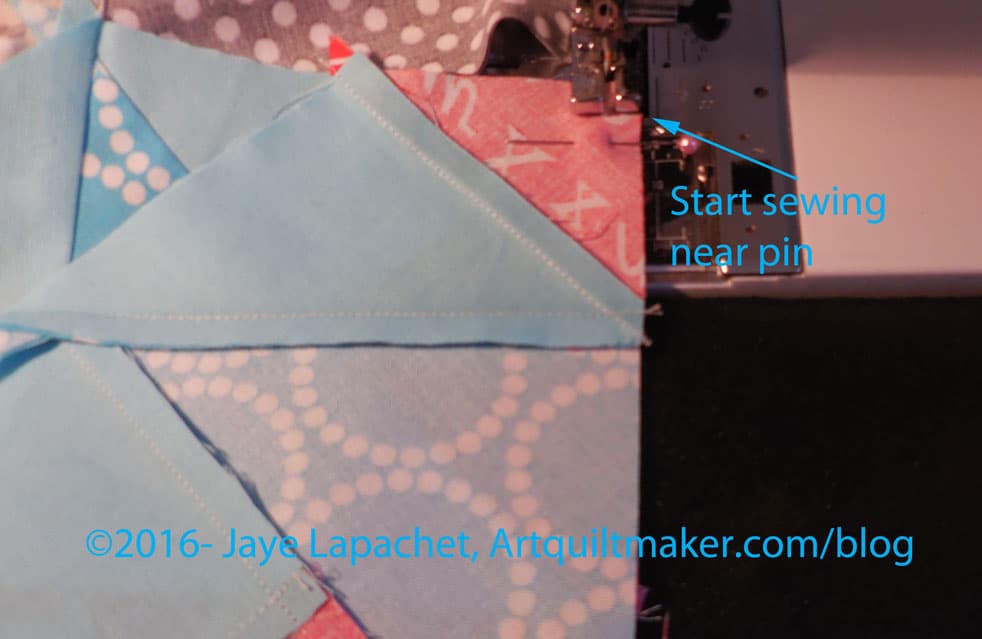
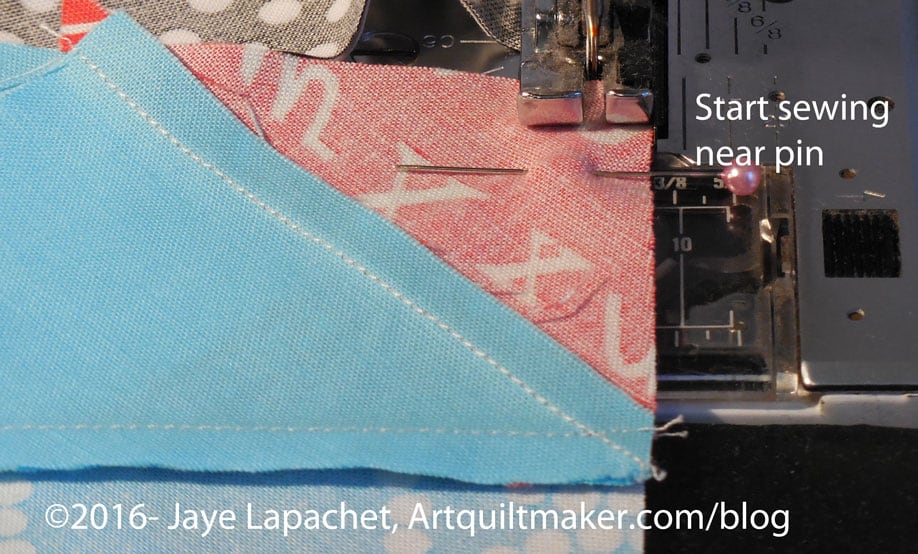
Position piece near pinStart sewing near pin – detail
24. Position piece so you start sewing near the pin.
Now you will sew the partial seam.
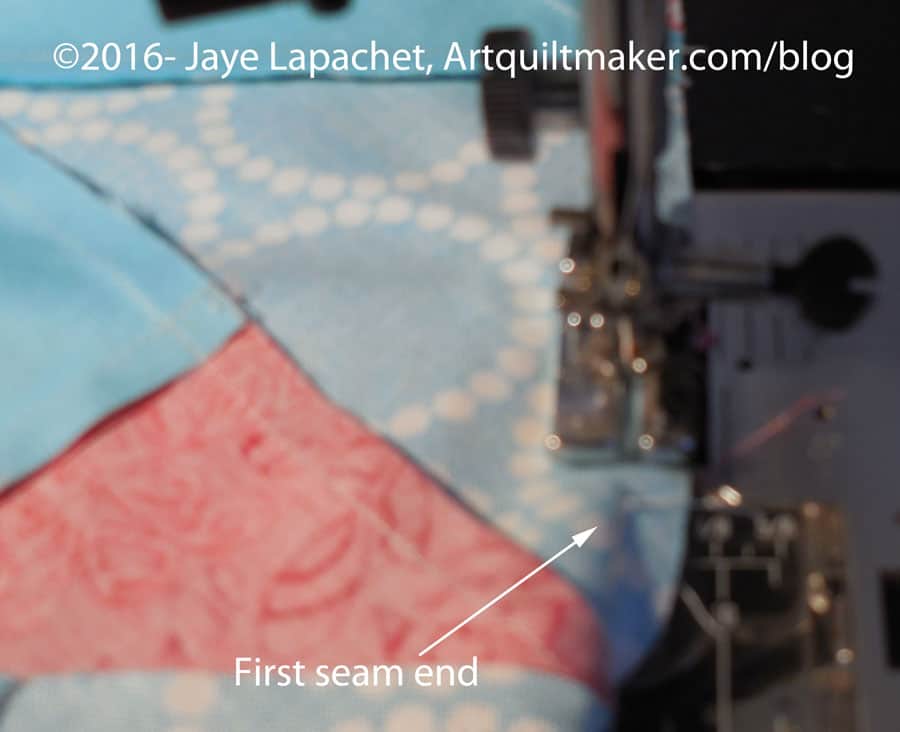
Sew partial seamSew partial seam
25. Once you start sewing from the pin (noted above), you will see the end of the first seam you partially sewed. Sew slowly to the end of previous seam line. To avoid a lump in the middle where the two seams meet, you can tug VERY gently towards your body as you sew. Do this only if necessary.
Center section sewn
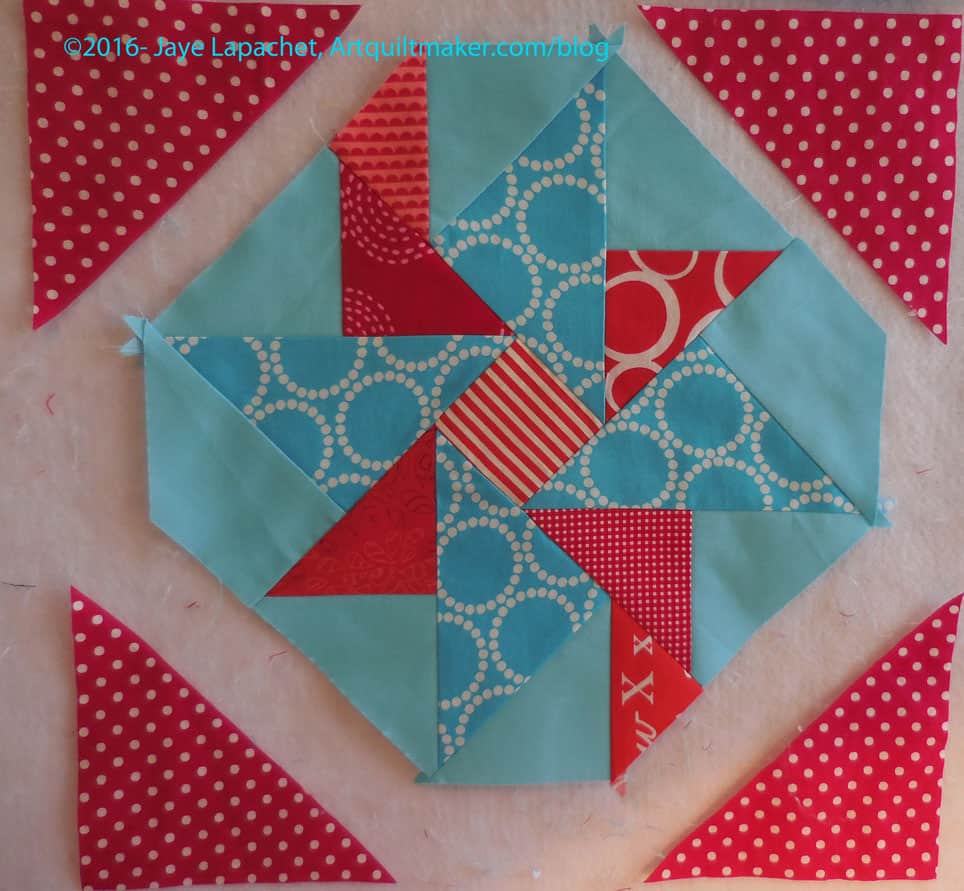
Hooray!!! You have finished the center section
Now you have to sew the corner triangles to the center section to finish the block.
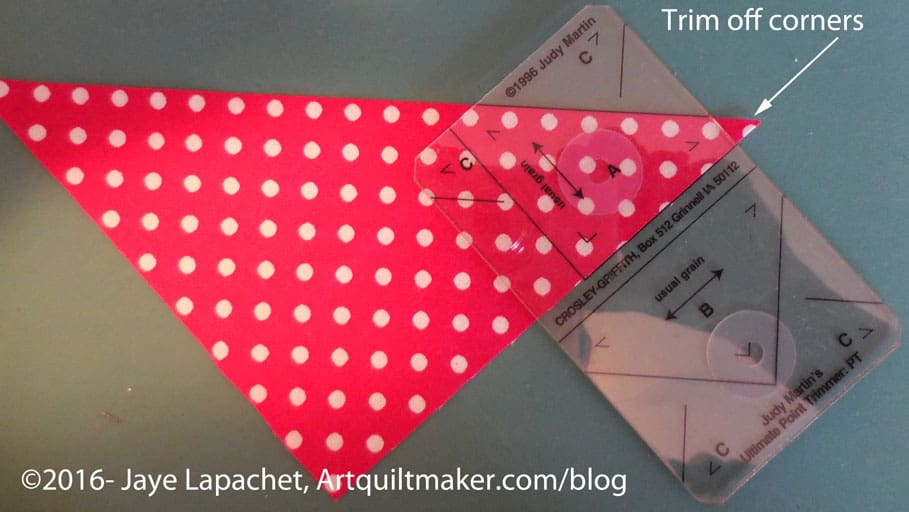
Trim off corners
26. Trim off corners of large corner triangles before you sew them on. You can trim them all at once or one at a time, which is what I do.
Lay out triangle on sewn section
27. Lay triangle on the sewn section, lining up trimmed corners even with edge of sewn section.
First corner triangle sewn
Your piece will look like the above image. Follow steps 26-27 for all corner triangles.
Finished Block
You are now finished! Great job!
___________________________________
Other resources and patterns regarding partial seams:
Laura Nownes tutorial on partial seams. Good tip about avoiding puckering on the last seam. I don’t agree with not pressing the seams until the end. Avoid pressing the first half seam, but press all the rest.
**Obviously, you should shop at local quilt shops and small businesses. However, if you are too busy or can’t find what you need there, I use Amazon affiliate links and may be paid for your purchase of an item when you click on an item’s link in my post. There is no additional cost to you for clicking or purchasing items I recommend. I appreciate your clicks and purchases as it helps support this blog.
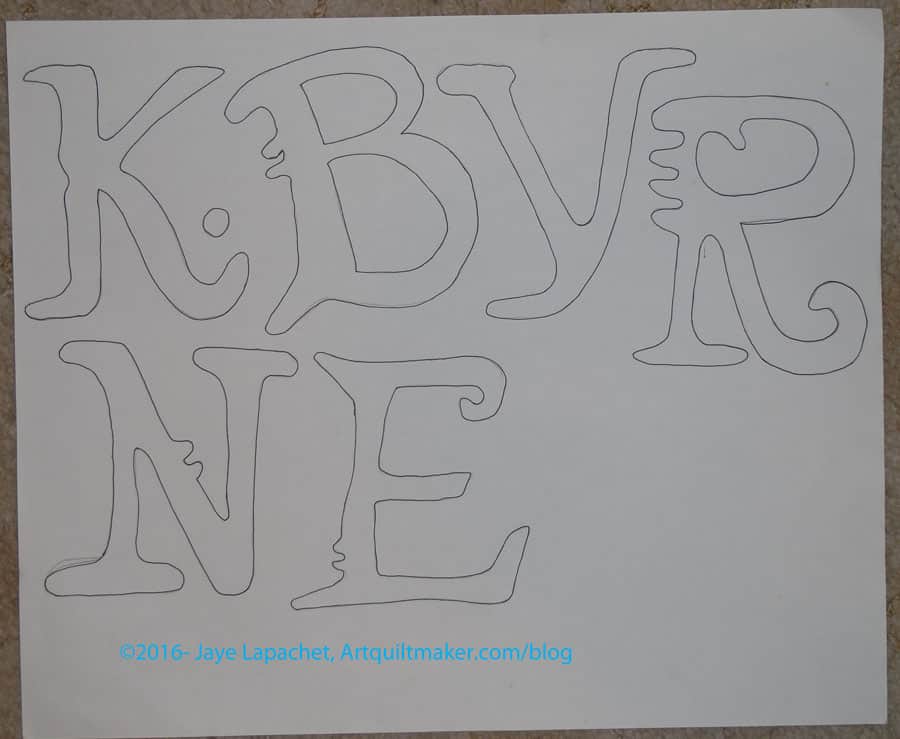
In my previous machine applique’ tutorials, I used designs where the direction of the motif didn’t matter. When I went back to review the tutorial (yes, I do use my own tutorials!) in preparation for doing some machine applique’. I was preparing to applique’ letters, which have a definite right and wrong way. I realized I had omitted directions for using directional motifs (where the direction of the motif matters, such a numbers or letters) for applique’, so I had to figure out how to do them again.
In order to understand this tutorial, you will need to look at How to Applique’-TJW and the 3 Fusible Applique tutorials (pt.1, pt.2 and pt.3). All of these are part of a whole.
Paper backed, double-sided fusible web, such as SoftFuse, Steam-a-Seam 2 or Steam-a-Seam Lite. There are many brands. Use your favorite. Follow the directions.
Draw out your design. I used a pattern for the letters I wanted to applique’. You can draw or print your design. There are a lot of free clipart you can use. Since I had a pattern, I laid out the pattern, placed a piece of drawing paper over the letters I needed and drew out the design using a pencil.
Trace over the pencil lines you used to trace the design with a Sharpie. The lines should be dark. Make sure the Sharpie does not bleed through to your table.
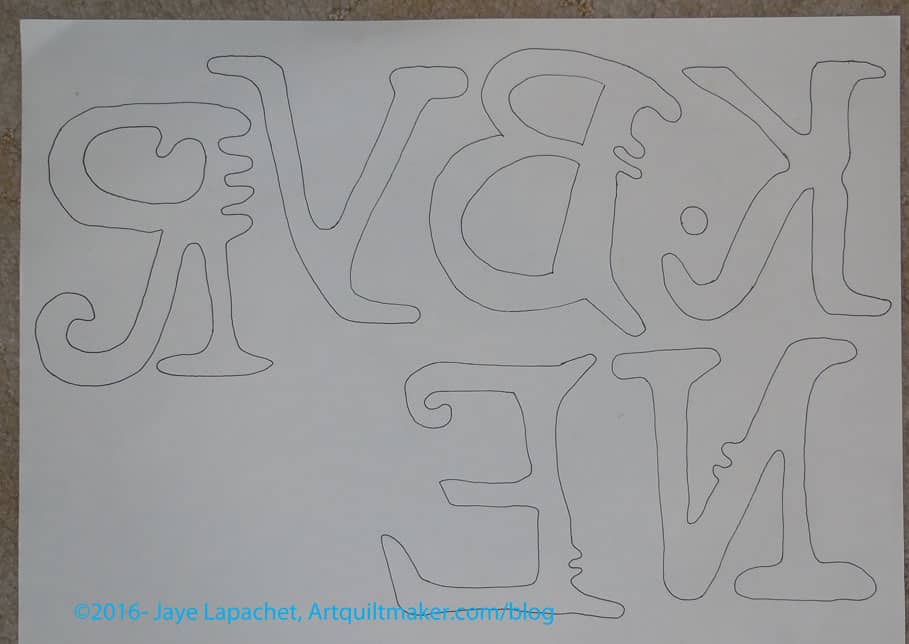
Flip your drawing paper over and put it on your light box. You can also tape it to a window or sliding glass door. The wrong side of the letters or directional motif will show through.
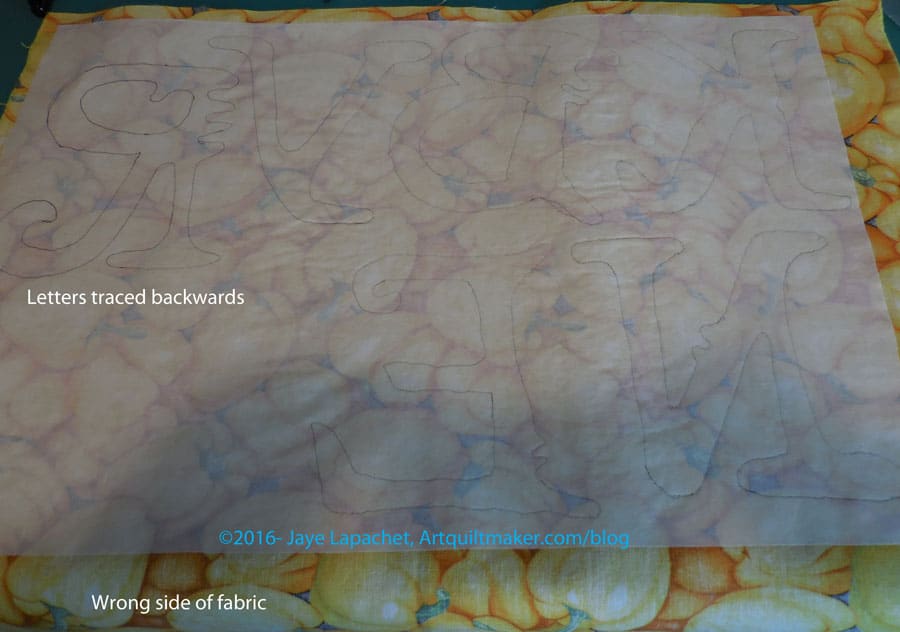
Directional motifs backwards on drawing paper
Using your Sharpie, trace the letters again on the wrong side of the paper. You will be tracing the backwards image of the letters.
Leaving the paper taped to the window (or laying on the light box), tape a piece of paper backed fusible, paper side UP, over your design which is on the window or light box.
Trace the backwards design on to your paper backed fusible using a Sharpie. **Nota bene: my Sharpie tended to smear on the paper of the fusible. I couldn’t find a pen that worked well, so be really careful to keep your hand out of the way to avoid smearage.
Once finished, remove everything from the window or light box.
Place the fabric you will use for your directional motifs right side down on the ironing surface. The fabric should be sized slightly larger than the fusible.
Place the fusible on top of the fabric with the paper side up. Make sure no edges are over your ironing surface.
Place your applique’ pressing sheet over everything.
Press according to the directions on the fusible package.
Fusible pressed to fabric
Once you are finished pressing, you will have a piece of fabric with fusible on the wrong side. The motifs (letters) should appear backwards and you will see the wrong side of the fabric.
Decide on which scissors you will use. I always have a fight with myself about this. I don’t want to ruin my Ginghers, which are super sharp and great for cutting out detailed types of designs by using them to cut through paper. I also don’t want to ruin the edges of my motif with a pair of papers scissors that will not be sharp enough to cut through the fabric. I have a pair of Fiskars that I end up using for this task. Not ideal, but the best I am willing to do.
Cut out directional motifs
Once you have decided on scissors, cut out your designs (letters, in this case). First I do a rough cut, then I cut with more detail.
Cut out directional motifs – detail
Layout your background fabric on a flat surface, right side up. I use my ironing board, so I don’t have to move the motifs in order to press. If I have to sew two pieces of fabric together to make a large enough background, I press the seam open.
Take each motif, one by one, and peel off the paper. Carefully place each prepared applique’ motifs in their desired location before moving on to the next one. With motifs such a letters, I use a ruler to make sure they are straight.
You should be able to see your design correctly. If you are using letters they should not be backwards and you should be able to read the word.
Place your applique’ pressing sheet over everything.
Press your applques so that they are stuck to the background fabric.
Set up your sewing machine with the correct colored thread and a foot suitable for zigzag or satin stich.
I set the zigzag to 3.5 (width), 0.7 (density). I like my satin stitch to be a little open, but you can adjust it to your favorite length and density.
Cut a piece of tearaway the width of your motif and twice as long
Fold the tearaway in half.
Pin the double layer of tearaway to the back of the background fabric. Pins should be out of the way of the machine foot.
Satin stitch all the way around each motif, carefully negotiating curves so the satin stitch looks smooth.
Trim and/or tie off all threads.
Tear away/cut away the excess tearaway stabilizer.
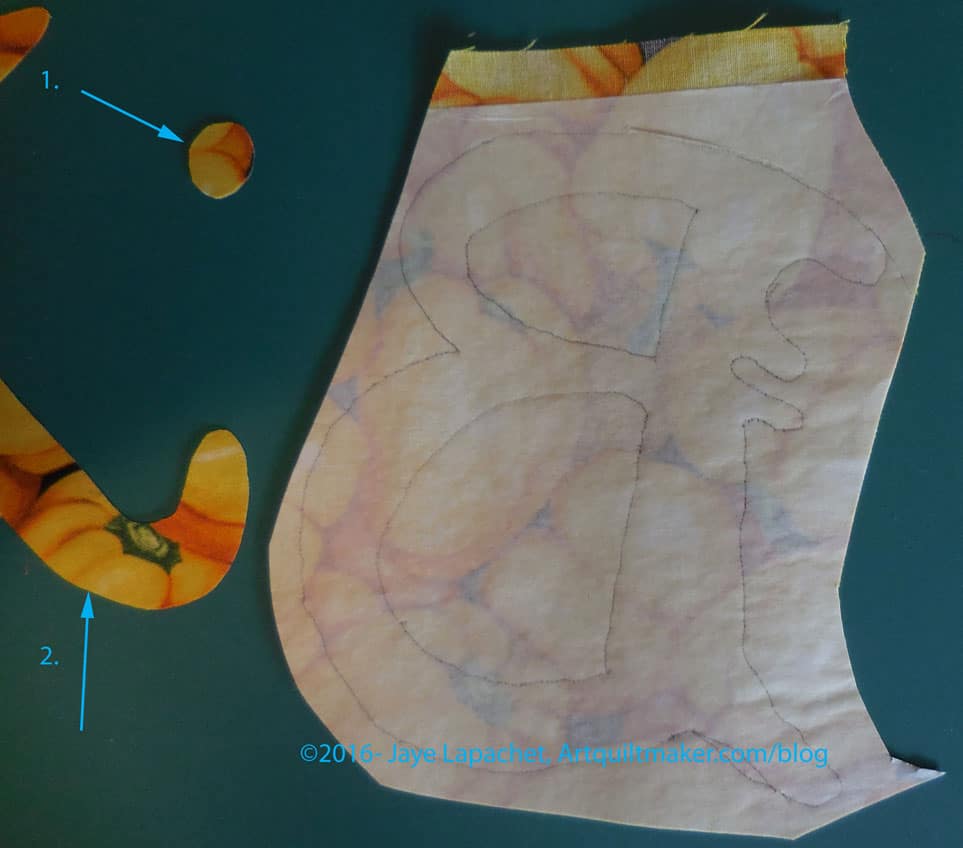
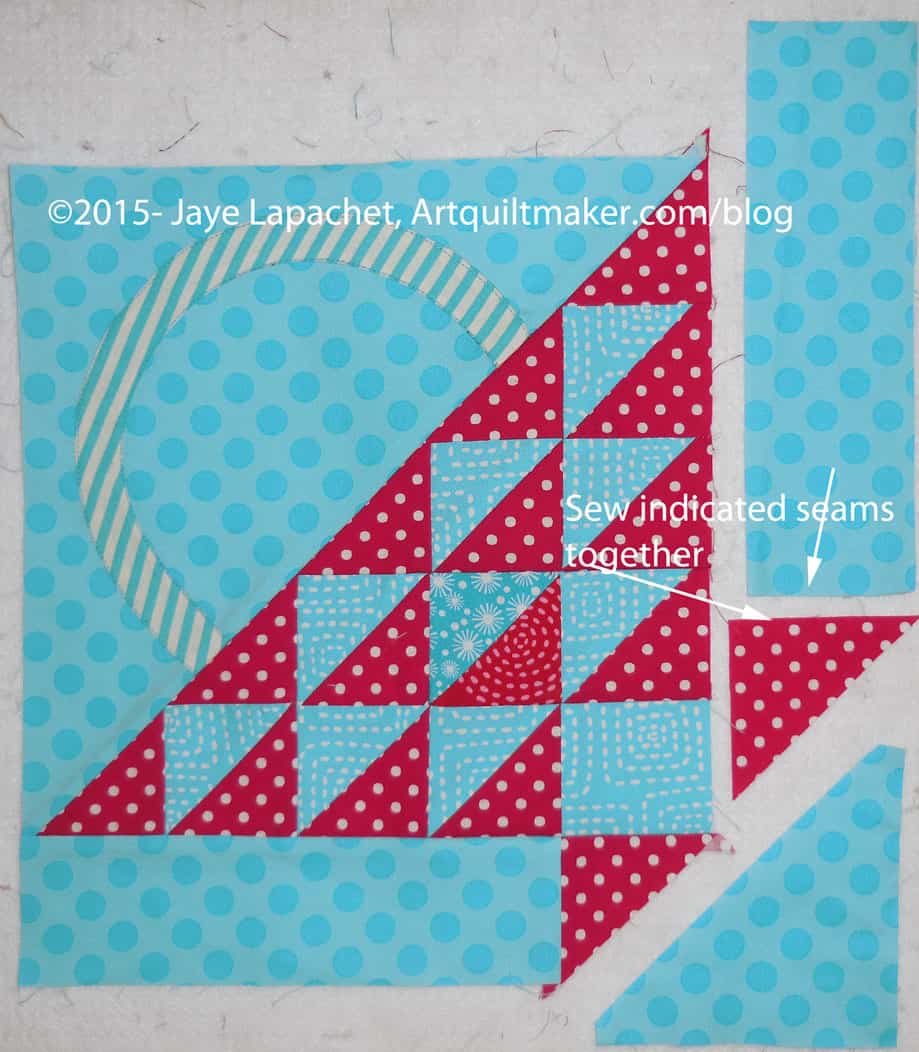
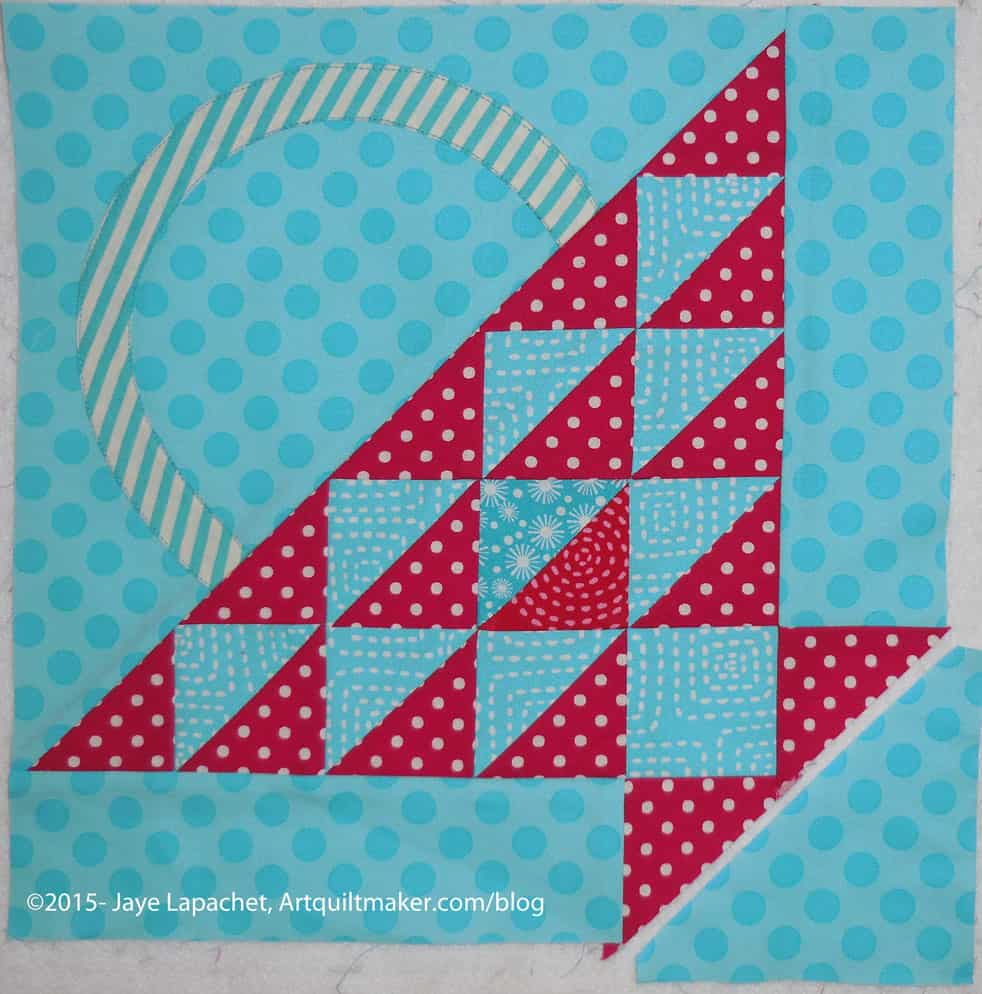
This post is about selecting colors and should have been posted after part 1 of the Basket tutorial. I didn’t think of it until I was almost done with Basket tutorial part 2. C’est la vie.
I ended up wanting the fabric choices to be similar to the EQ rendering. May seem lame or small minded, but it is what it is.
Stitch Blue
The above is fabric I used for the other half of the HSTs. I wanted to match that fabric, but it didn’t work. The stitch fabric blends into the background too much, so I had to figure something else out.
Snowflake Handle
The above snowflake fabric is good, but I was concerned that the snowflake fabric might look too Christmasy.
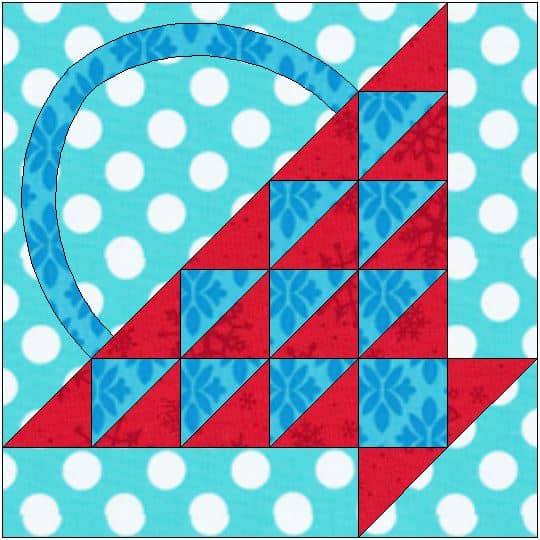
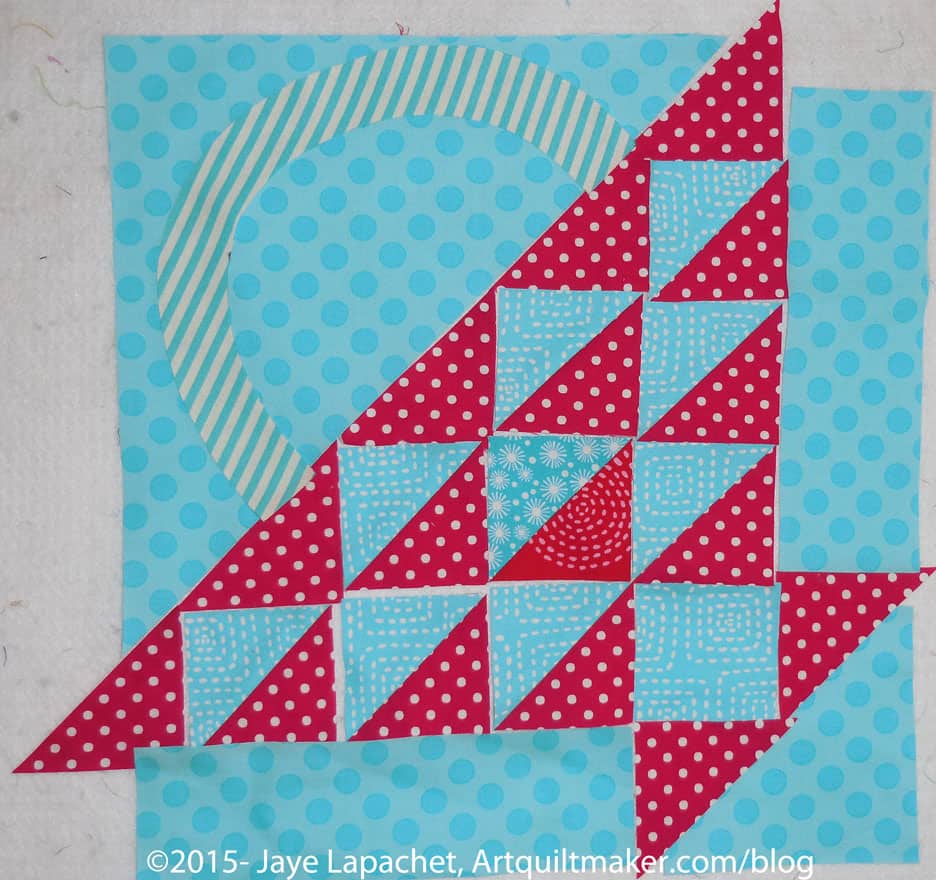
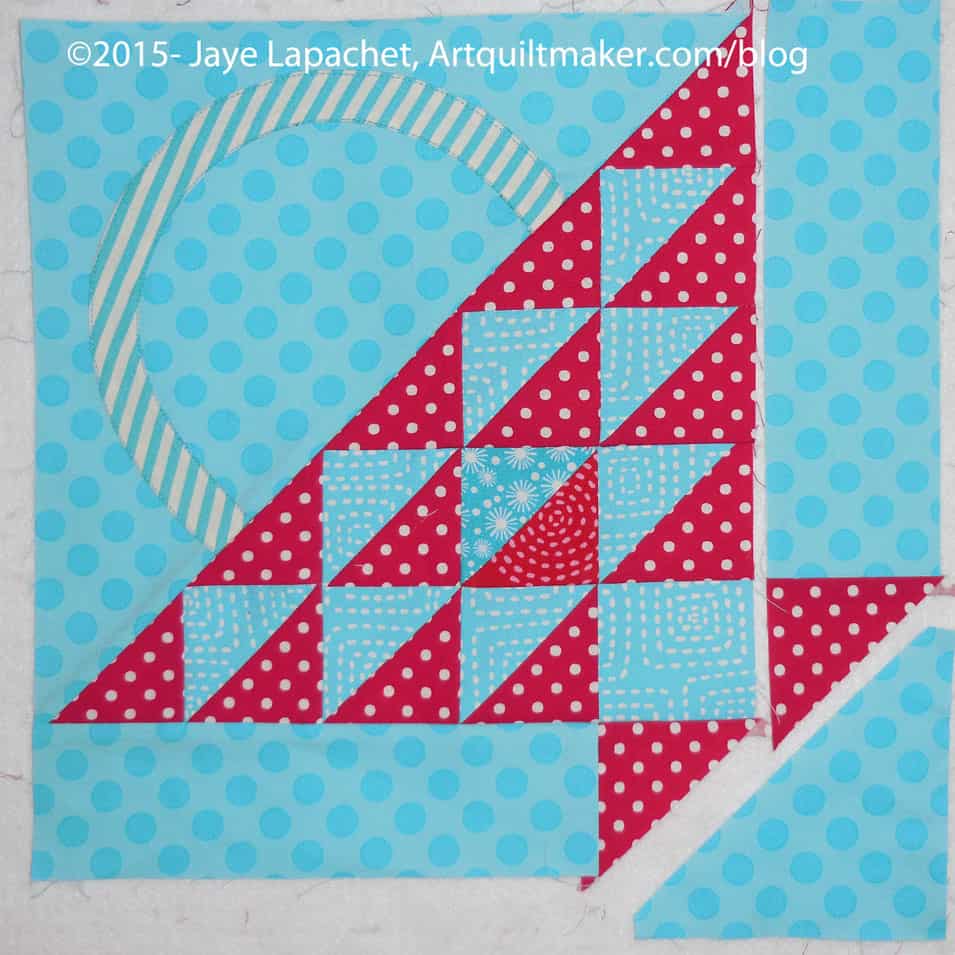
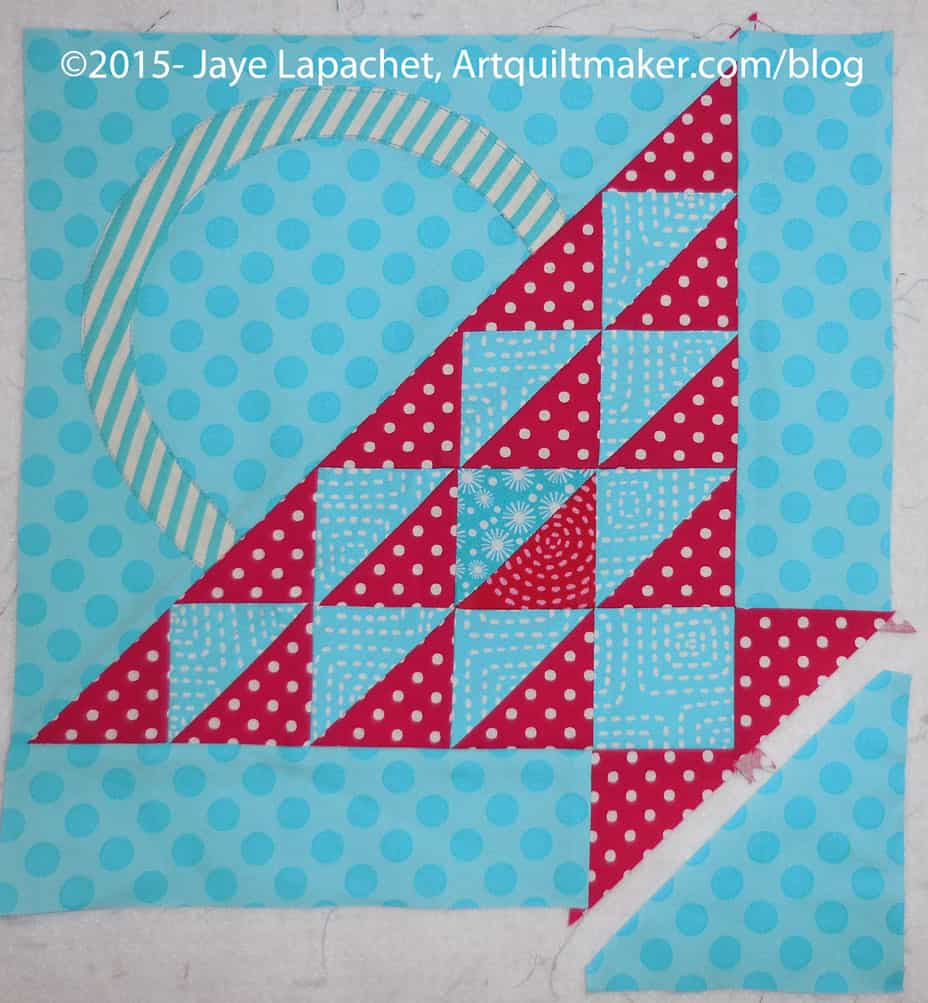
Completed Basket Block
The above fabric selection is what I finally decided upon. The stripe is good, because it is a different motif than any of the others already in the block. The white also stands out a bit from the blues. If I had used a blue with a white dot like the EQ rendering then one of the others might have been ok, but this stripe works well.
As mentioned in part 1, above is the current block in our Sampler Quilt Class. These directions are for machine sewing your Flower Basket and include a little applique’. The applique’ can be done by machine or hand.
Are you playing along? If you are just starting, below is the complete supply list. You won’t need everything for this step, but you will need to start with part 1 and that part requires more supplies. Also, note, there are a LOT of photos in this tutorial.
These directions use a quarter inch seam allowance. Check your seam allowance before you begin. If you don’t know how to do that, there are resources available, including one from Connecting Threads and Craftsy. You can search the web for others if you don’t like these tutorials.
You will be directed to use the Triangle Technique. Make sure you have the chart as well as the instructions handy.
Respect the bias.
After working through part 1, you have already chosen your fabrics, made your templates and cut your pieces. You are ready to sew.
Sewing
Carefully stitch along the hypotenuse of the large background triangle, about 1/8″ from the edge, to stabilize it. This stitching will be covered up when you stitch the handle part of the block to the basket part of the block.
Triangle Technique
Use the Triangle Technique to make your half square triangles. Make sure you have the chart available to confirm sizes. A brief overview is:
Draw an X from corner to corner diagonally on the wrong side of each of your 6.25″ x 6.25″ squares.
Place them right sides together and sew 1/4″ on each side of the diagonal lines.
Nota bene: If I had wanted to pin I would have pinned far away from any of the diagonal lines.
Now you have a piece with four seams forming an X.
Next cut the ‘Plus’ of your sewn piece. This means that you are cutting horizontally down the middle and vertically down the middle.
Line up your ruler with the edge of the fabric and the point in the middle where the two lines forming the X come together.
Cut vertically.
Do NOT move your fabric.
Reposition your ruler and then cut the piece horizontally.
The result is 8-2.5″ half square triangles. The above are actually a thread or two larger than 2.5″, which leaves the perfect opportunity for trimming to make them an absolutely perfect 2.5″.
Trim your HSTs to an absolutely perfect 2.5″.
Now you have 8 beautiful HSTs.
Of course, you can use whatever technique you like to make the half square triangles.
Layout and Assembly
Pieces cut and ready to sew
Now that you have cut all of your pieces, lay them out on your sandpaper board, or put them up on your design wall. It is great to be able to see where all the pieces belong and adjust any pieces that need adjusting before you sew.
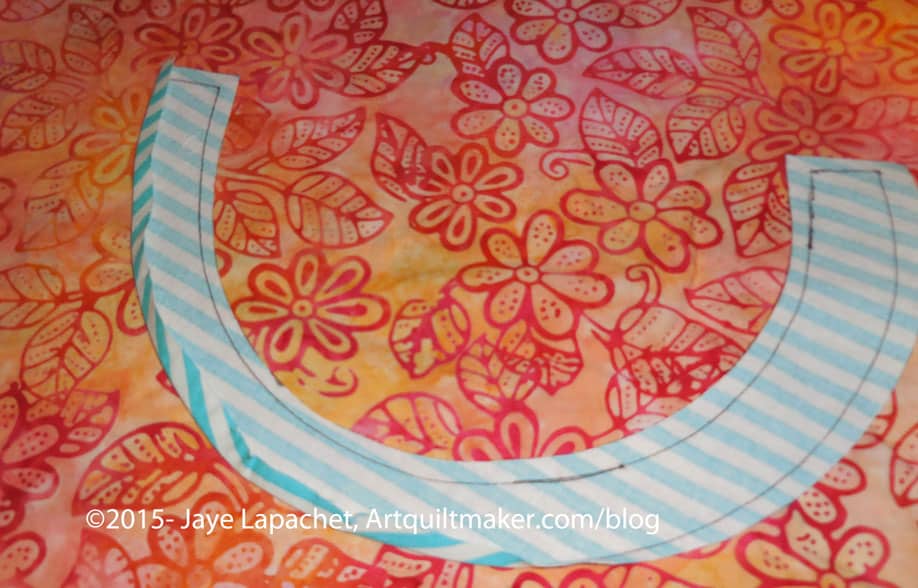
Sew Handle to Background
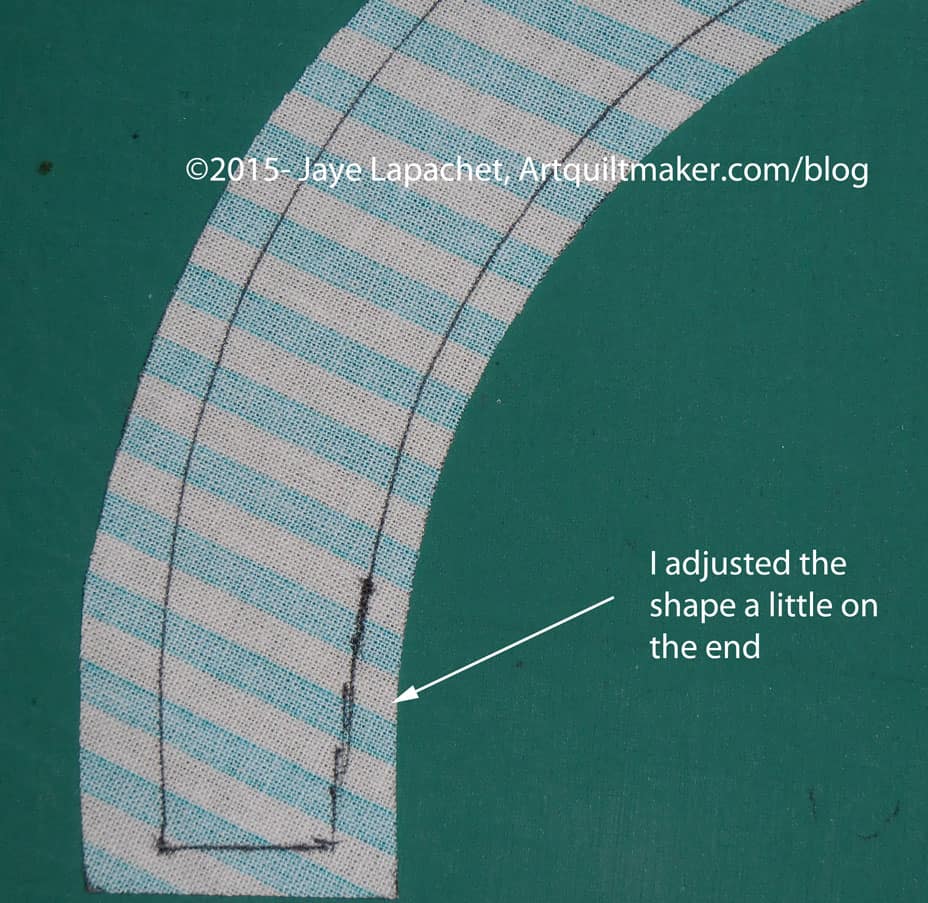
Template on Handle, ready to traceTraced & Adjusted
Because I decided to use the method described below, I made another handle template with NO seam allowance. I placed it on the handle I had cut from the striped fabric carefully so there was an even seam allowance on all sides. Then I traced around it with my thin black pen. I thought the template was a little wide at the end so I adjusted the line a bit to make the seam allowance larger.
Handle & Background Triangle Cut, Laid OutPieces Laid Out
My pieces looked a little weird-not the right size, etc when I laid them out. Have no fear! They will improve.
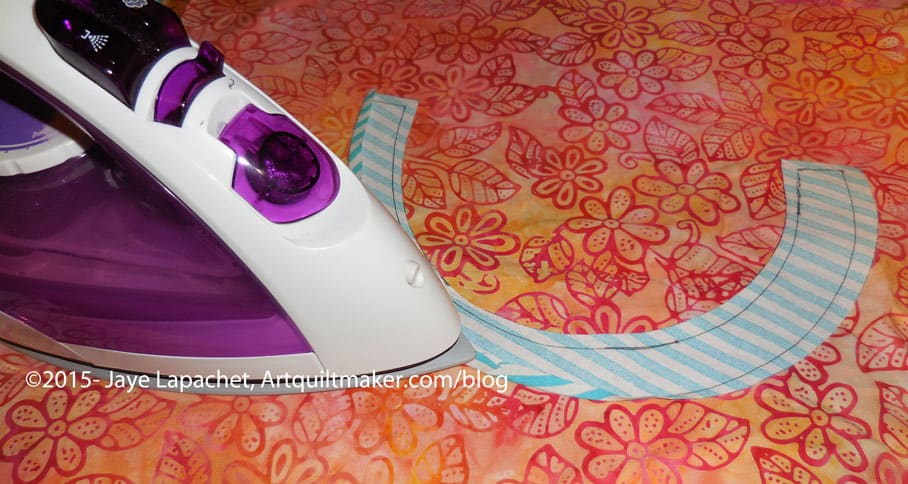
Press seam allowance underPress with hot iron
I was using my stiletto to adjust the seam allowance, but it was impossible to hold the stiletto, the camera and the iron all at once. Press carefully, so as not to distort your pieces.
Watch out for corners
Pay attention to the corners. The layers of fabric will want to pooch in weird directions. This is where one of those mini irons might come in handy. I used my regular iron and a stiletto, so I know those tools work.
Press seam allowance on handle under
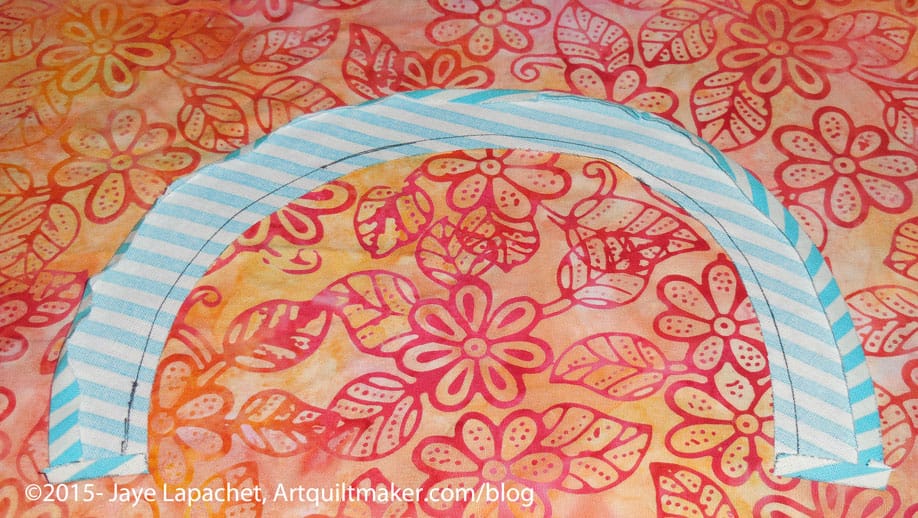
Take your handle and press the the seam allowance under on both sides of the piece. Press so that the drawn line is on the inside of the handle and is covered by the piece once the handle is sewn.
<Nota bene: the orange fabric was selected for good contrast so that the steps would show up well>
Finger press patches in half
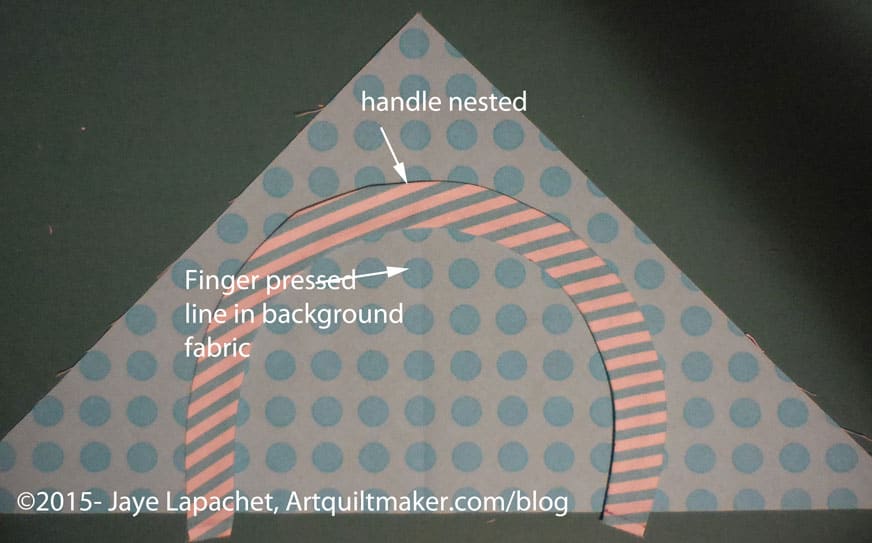
Fold the handle in half with wrong sides together and finger press on the midpoint. Unfold.
Fold your large triangle in half with right sides together and finger press. Unfold and layout.
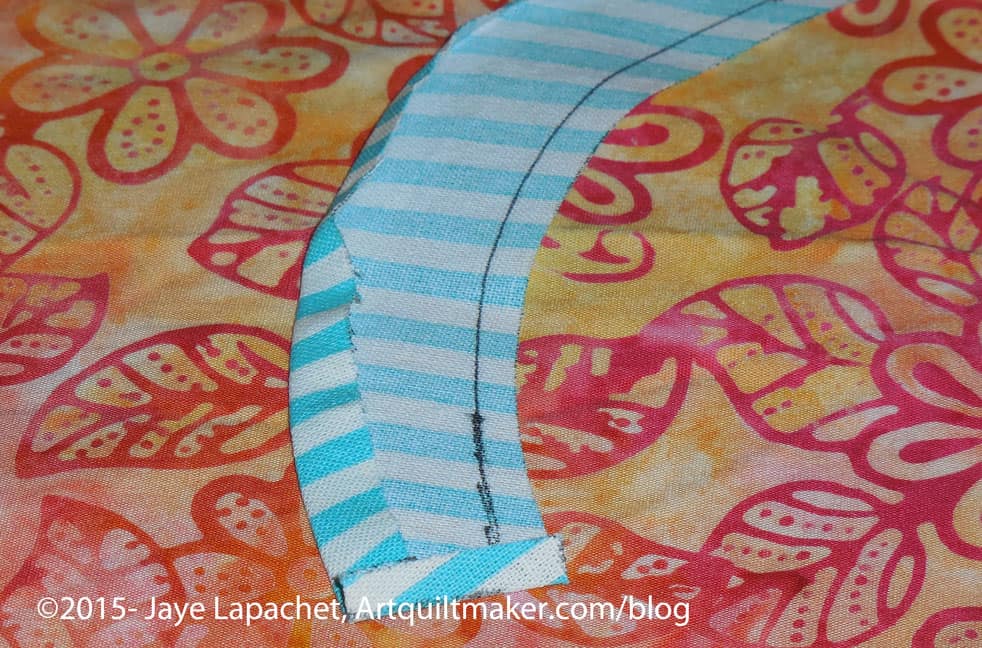
Nesting handle & background
Nest the handle into the triangle with the right sides up.
Line up the bottom edges of the handle with the hypotenuse of the background triangle. If the handle ends are a little over, it will be fine. You can trim them later.
Eyeball your piece to make sure everything looks good and even.
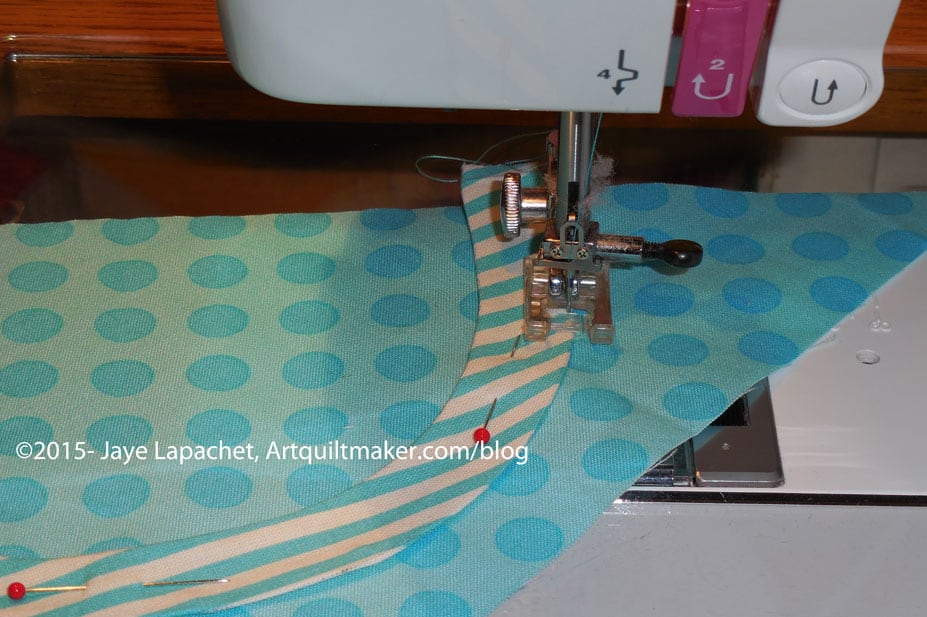
Pin the handle to the background down the center of the handle. Remove the pins as you sew. Try not to sew over them.
Using a lot of pins will help keep the handle in place as you sew
Sew carefully
Sew slowly and carefully along the drawn line around the curve. I chose a matching thread, an applique’ foot and a topstitch/sharp needle.
You will either need to hand applique’ the other side down or using a machine stitch that suits you.
You could sew both sides down with a straight stitch, like I did. There are many options.
Optional: You can satin stitch (see the Machine Applique’ tutorial) or blanket stitch or use some other decorative stitch to machine sew the handle to the background triangle piece. If you use one of these stitches, you may need some tearaway stabilizer
Optional 2: you can hand applique’ the handle to the background triangle.
Handle sewn to background with straight seam
Once the handle is sewn you are ready to move to the woven part of the basket.
Basket Sewing Layout
Sew Basket Together
The block can be broken down into two pieces: the top half with the handle and the bottom half with the basket.
The two colored HSTs are supposed to give the illusion of a woven basket.
Trim off dog ears
Trim off dog ears from the A,B-HST/1 combo.
Sew Basket parts together
Sew HST/2 to HST/5. Press towards HST/5.
Using the diagram above to confirm placement, sew your A,B-HST/1 combo to your HST/2-HST/5 combo. Press towards the red.
Sew basket parts together
Sew HST/8 to Square 10. Press towards the Square 10.
Sew HST/6 to HST/9. Press towards the red part of the HST.
Sew 2 sets of woven basket parts togetherSew basket parts together
Using the diagram above to confirm placement, sew your HST/6-HST/9 combo to your HST/8-Square/10 combo. Press towards the HST/6-HST/9 combo.
Sew Triangle to HSTs
Using the diagram above to confirm placement, sew C to HST/3. Press towards the red.
Sew triangle D to C-HST/3 combo
Using the diagram above to confirm placement, sew D to your C-HST/3 combo. Press towards D.
Trim your dog ears
Trim your dog ears.
Sew HST/4 to HST/7. Press towards HST/7, making sure your seams will nest with the seams you have already pressed.
Sew parts of the basket together
Sew HST/4-HST/7 together and then sew the HST/4-HST/7 combo to E. Press towards E.
Four sections of the Basket
Using the diagram above for placement, sew your HST/4-HST/7-E combo to your C-D-HST/3 combo. Press.
Trim dog ears.
Sew 2 Sections together
Sew your A,B-HST/1-HST/2 segment to the HST/6-HST/9 segment.
Trim Your Dog Ears
Trim your dog ears!
Sew last two segments
Sew the last two segments of the basket part together. You may have to re-press some seams.
I didn’t move the borders the whole time I worked on the quilt See how much the basket part shrank? That is seam allowances for you!
Trim the dog ears
Trim the dog ears, if you haven’t already.
Sew 2 halves together
Now you have two halves of the basket. Sew the woven part to the handle part by placing the woven part on top of the handle part, lining them up and then sewing carefully. You can fold the two sections in half, bisecting the handle, to match them up if you think that you need to trim the handle portion later.
Ready to sew last borders
Now you are ready to sew on the borders.
Sew triangle to borderSew triangle to border with words
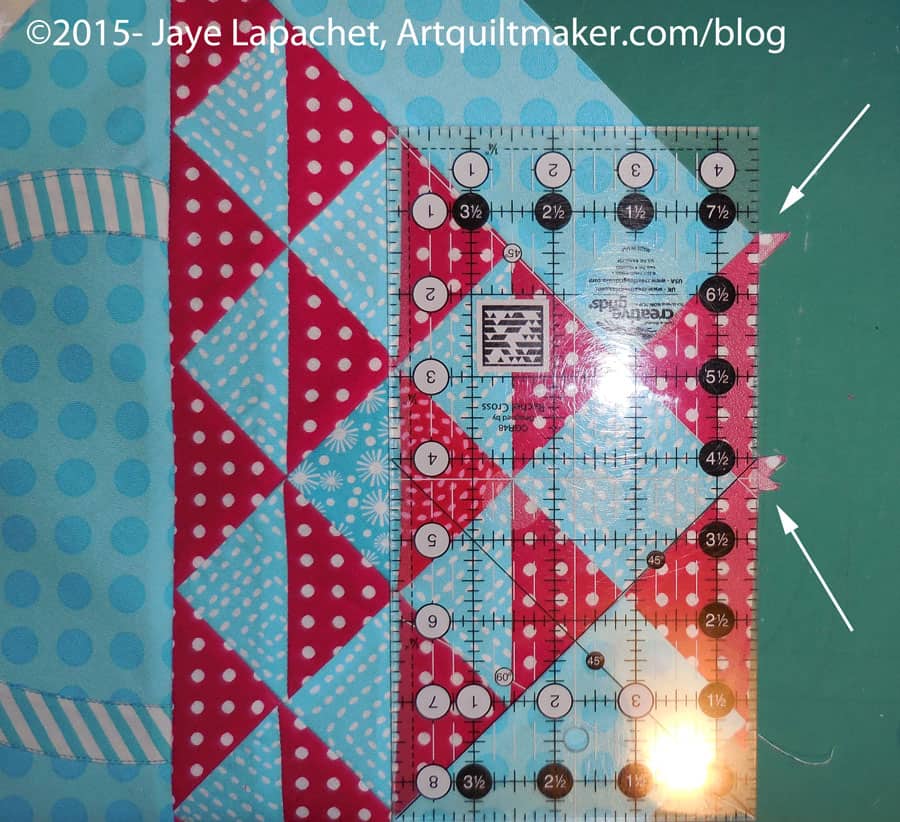
Sew the B2-G background section by placing the red triangle (G) face down on top of background piece B2 and sew the short end of the background to the triangle, as shown in the picture.
Sew on background B2/Triangle-G
Take the basket piece that you sewed together above and place the B2-G background section on top of the basket section. Line up the red triangle’s seam from the B2-G background section with the HST/8-Square 10 section. You want the seams to match, so pin. Press towards background piece B2.
Only one more border to go.
Take the basket piece that you sewed together above and place the B1-F background section on top of the basket section. Line up the red triangle’s seam from the B1-F background section with the HST/9-Square 10 section. You want the seams to match, so pin. Press towards background piece B1.
Sew on Final Triangle
Now you are ready to sew the last piece.
Trim dog ears
Trim dog ears.
Basket almost complete
Your basket is almost complete.
Line up triangle with borders
Complete your basket half by sewing background piece B3 to the basket. You have already snipped off the corners so you just have to line up the triangle piece with the borders already sewn to the block. Press towards the background piece B3.
Your half is complete.
Take the top half of the basket, the piece with the handle, and carefully sew it to the basket half.
Frances finally let me know she was ready to move on with her sampler quilt. We decided to make the Flower Basket Block, so I sent her the pattern, promised the tutorial and did nothing.
These directions use a quarter inch seam allowance. Check your seam allowance before you begin. If you don’t know how to do that, there are resources available, including one from Connecting Threads and another from Craftsy. You can search the web for others if you don’t like these.
You will be directed to use the Triangle Technique. Make sure you have the chart as well as the instructions handy.
Respect the bias.
Templates
You really only a need a template for the basket handle. If you are using templates for all of your pieces, then prepare all the templates for pieces in the patterns as directed below.
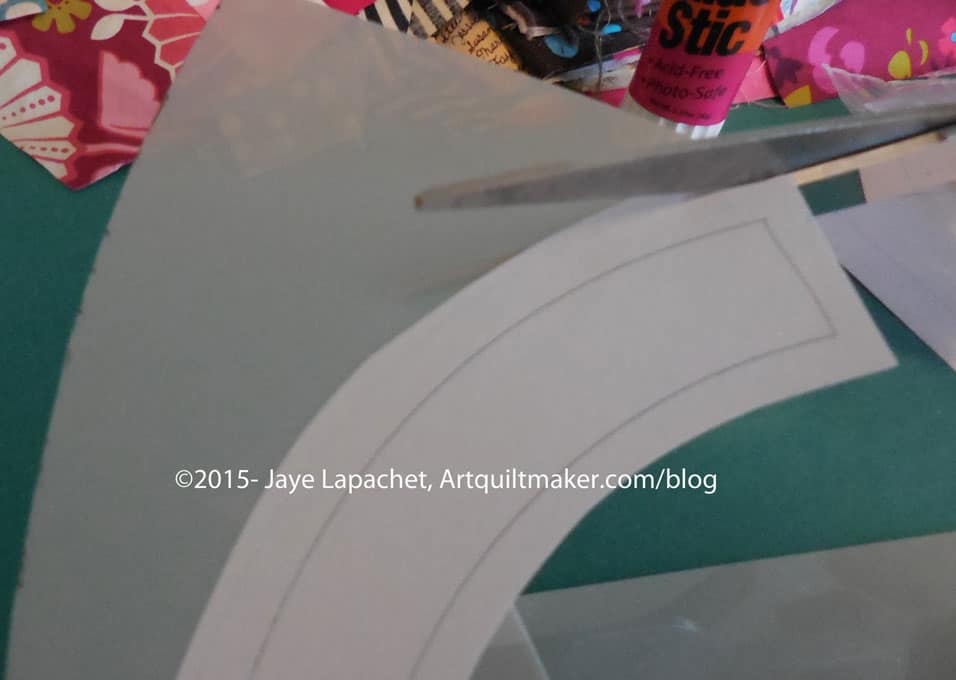
Prepare pattern for your basket handle template by printing two copies of the pattern. I am telling you to do this first so when you get into the throes of sewing you won’t have to stop and fiddle around with templates.
You will eventually place one copy of the pattern in your binder, but keep it handy so you can use it as reference.
Nota bene: You probably know how to make templates. However, I am including a quick refresher. Look for a comprehensive tutorial soon. (I’ll update this post and link it from here)
Rough cut* the handle pattern out of the second printout.
Rough Cut Pattern
Glue the paper pattern (with seam allowances) using the glue stick (or other suitable adhesive) to the template plastic.
Ok to use scraps of template plastic
It is okay to use scraps of template plastic. Put a piece of tape on seam lines to keep the joins stiff.
Fine cut templates
Fine cut** the paper pattern and template plastic you have adhered so you have an accurate template, cutting off any seam allowance that may have printed.
If you plan to machine sew the handle at all, you will want to prepare another basket handle template, in the same manner, without seam allowance.
Fabric
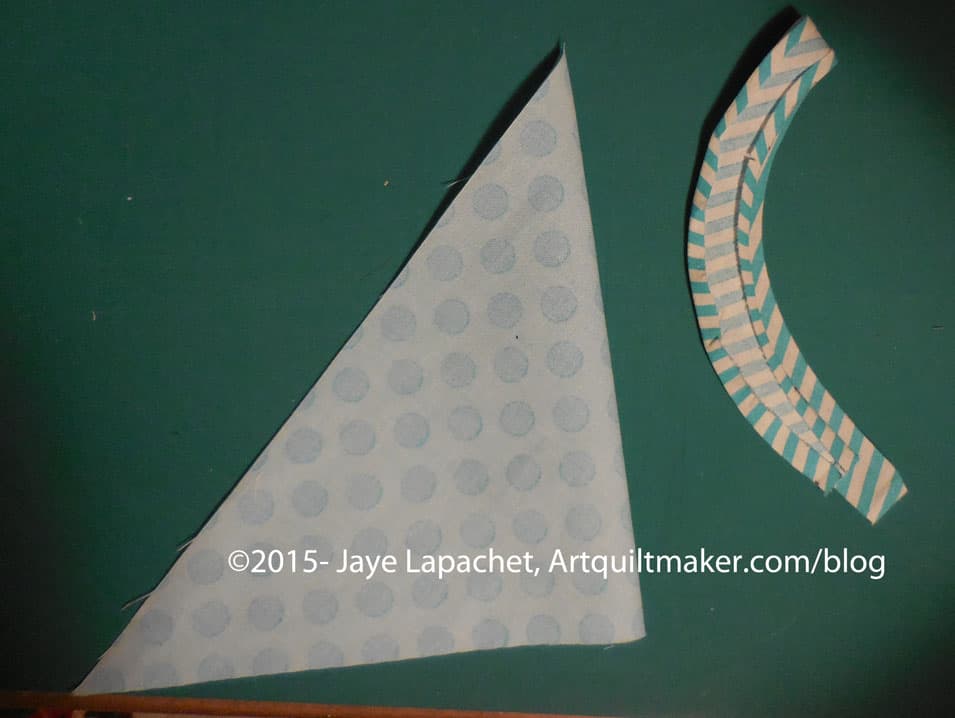
Gather your fabric and press it all. You can rough cut some pieces and press it with Mary Ellen’s Best Press to help deal with the bias. Consider this step for the large background triangle and the basket handle.
Cutting
Flower Basket
Basket Handle
In my example basket, above (same as at the beginning of the post), this fabric is the medium blue.
Lay out template piece
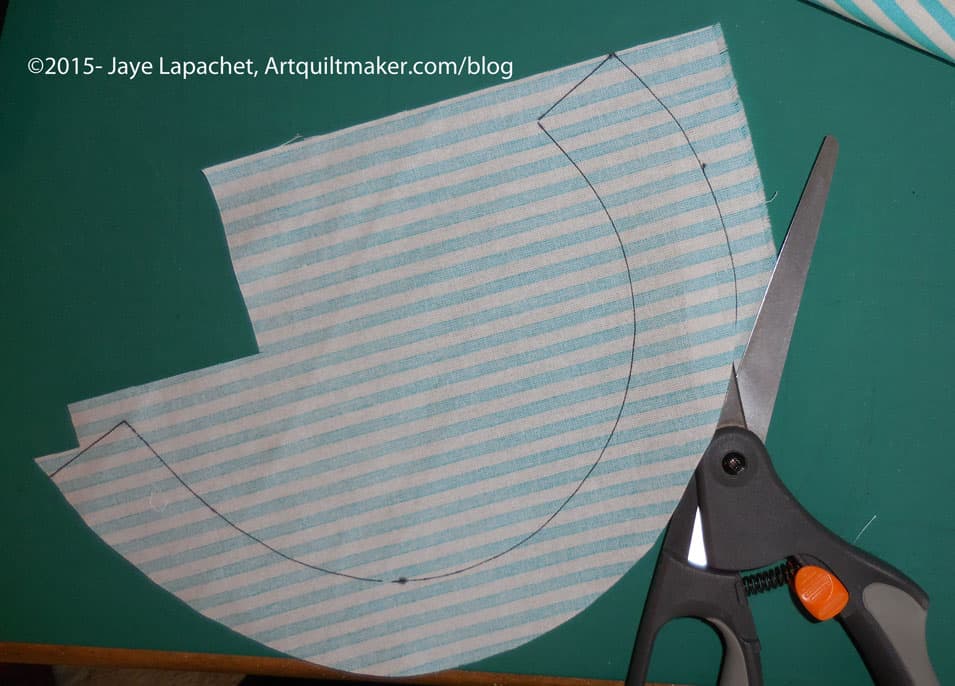
Draw around the template with your black fine tip marker. Rough cut a piece of fabric large enough for your basket handle.
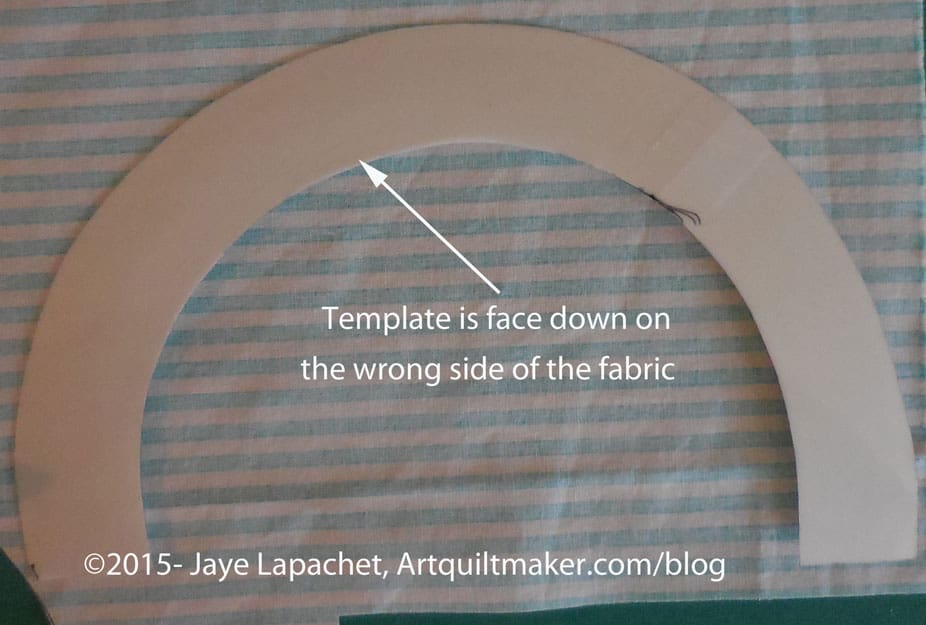
Place template face down on fabric
Place your handle template right side down on the wrong side of the fabric. Trace around the template carefully with your Pigma pen. Trace carefully without pulling or tugging at the fabric. You will be dealing with some bias on the curves. You will need to carefully move your hand along the template to keep it in place while you trace. Use the Pigma pen with a light touch.
Cut out handle
Using your fabric scissors, cut around the traced image, cutting the drawn line off. If you are using a template with no seam allowance, leave approximately a quarter inch seam allowance on all sides.
Background:
In my example, above, this fabric is the blue Michael Miller Ta Dot with white dots.
Measure background
Measure the template for the large triangle of background fabric. It should be 10″ on each of the outside edges WITH seam allowance. Cut a square 10.5″ x 10.5″. You can trim it later. Better safe than sorry. Press the square with Mary Ellen’s Best Press.
Cut square on diagonal
Cut the square in half along the diagonal.
Cut the following additional pieces according to the measurements given:
Background fabric:
2 patches: 2.5″x8.5″
Nip off Bunny Ears
1 patch: square 4 7/8″x 4 7/8″. Cut in half. Nip off the bunny ears with the Judy Martin Point Trimmer
1 square: 5″ x 5″. Cut in half on the diagonal and set your second triangle aside
Remember: you have already cut the large background triangle
Cut some pieces from extra background triangle
You can cut some of the background pieces out of the leftover triangle.
Foreground fabric:
The foreground fabric is used for the basket. You will need at least two fabrics for this part. In my example I am using a scarlet red and a medium blue. See picture above for placement of foreground fabrics.
1 square: 2.5″ square
For the HSTs, you will need 2 squares, according to the Triangle Technique Chart, 6.25″ x 6.25″. Each square should be from a different foreground fabric. See the picture above.
Nota bene: The above Triangle Technique only yields 8 HSTs. You can make another set using the Triangle Technique directions and have some extras, or you can cut the triangles themselves
1 square 2.5″ x 2.5″
Cut trianglesCut squares in half
Cut 4 squares 2 7/8 in by 2 7/8 in the second background fabric (red in my project). Cut in half. These are the base and top line of your flower basket.
Cut Pieces
You should now have all of your pieces cut. Look for the next part of the tutorial on sewing the block together.
* Rough cut means that you cut around the outside line and a little away from it, leaving some extra paper. This helps to position the template properly and eventually cut it accurately.
** Fine cut means that you cut the template out very exactly and carefully getting rid of any extra paper and template material used when you rough cut. This is the shape you will use to cut your fabric so prepare this step with care.
Last week, I got a bug in my ear to look at all of my Sampler blocks. I hadn’t done it in awhile and, frankly, I had forgotten where we were with the class.
As soon as I finished the top and back of the Super Secret #4 project, I got it off the design wall and put up the blocks.
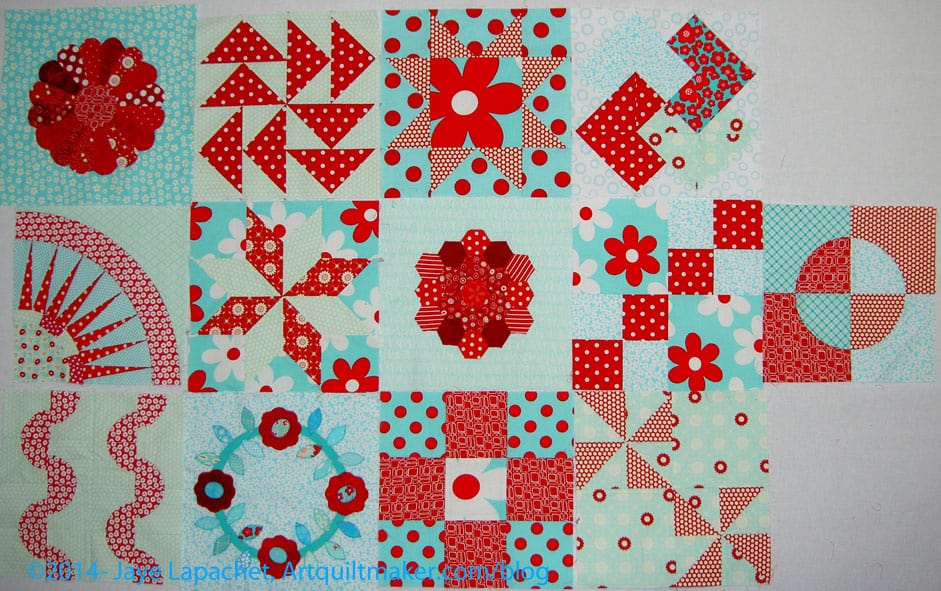
Aqua/Red Sampler Blocks
I had totally forgotten the Double 4 Patch, the Card Trick and the Dutchman’s Puzzle. I had also forgotten what a good job I did using the large Patty Young flowers in these blocks.
I also noticed how some of the backgrounds are very bold and others are more subtle. I think the piece hangs together well despite the differences. I am not sure what block to do next, but I need at least 2 more and could work with more.
The basket block is clearly missing. That block teaches combining piecing and applique’. If I did a different one, such as the Tea Basket block that would be an interesting addition that I haven’t done AND be challenging.
Other than a basket block I can’t think of what skills I haven’t worked on with Frances. I don’t think an art quilt block would work with this piece and I am not sure what something like the Spiderweb would buy. I could do a block with some weird shapes like trapezoids.
Fabric scissors (see note on using a rotary cutter**)
thread
pins
Design wall or sandpaper board
Wooden kebab stick or similar item you can use with your iron
sewing machine
Optional
Mary Ellen’s Best Press
hand sewing needle
hand sewing thread
Important information:
Block is 12.5? unfinished, 12? finished
These directions use a quarter inch seam allowance.
You will be creating Y seams.
Chain piecing is not part of this tutorial.
Respect the bias.
Do not sew into the seam allowance.
Templates
1. Prepare pattern for your hexagon template by printing two copies of pattern.
Place one copy of the pattern in your binder, but you can use it as reference first. Rough cut the hexagon pattern out of the other pattern.
Add Seam Allowance if it doesn’t Print
Nota bene: Sometimes the seam allowance don’t print out, so you may need to add 1/4″ seam allowance to the pattern before rough cutting.
Glue the paper pattern (with seam allowances) using the glue stick (or other suitable adhesive) to the template plastic.
Fine cut the paper pattern you have adhered to the template plastic so you have an accurate template.
Gather your fabric and press it all. You can rough cut some pieces and press it with Mary Ellen’s Best Press to help deal with the bias.
Cutting
Place Templates Face Down
Place your template face down on the wrong side of the fabric and trace carefully around your template directly on to the fabric.
Cut using scissors.**
**Do not cut around your template plastic template with a rotary cutter. There is not enough protection for your fingers. I want you to be able to finish the block with no blood. A rotary ruler gives your finger some protection from the blade of your cutter cutter. If you use a rotary cutter, you may want to use a hexagon ruler, such as the Fons & Porter Hexagon ruler. The smallest hexagon on that ruler is larger than my template, but 19 of those will still fit in the 12.5″ block. You can also cut using a rotary ruler and rotary cutter by lining up the ruler on the line you drew around your template.
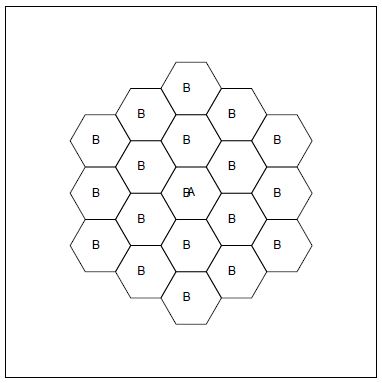
Cut 19 Hexagons
Cut 19 hexagons from your fabric.
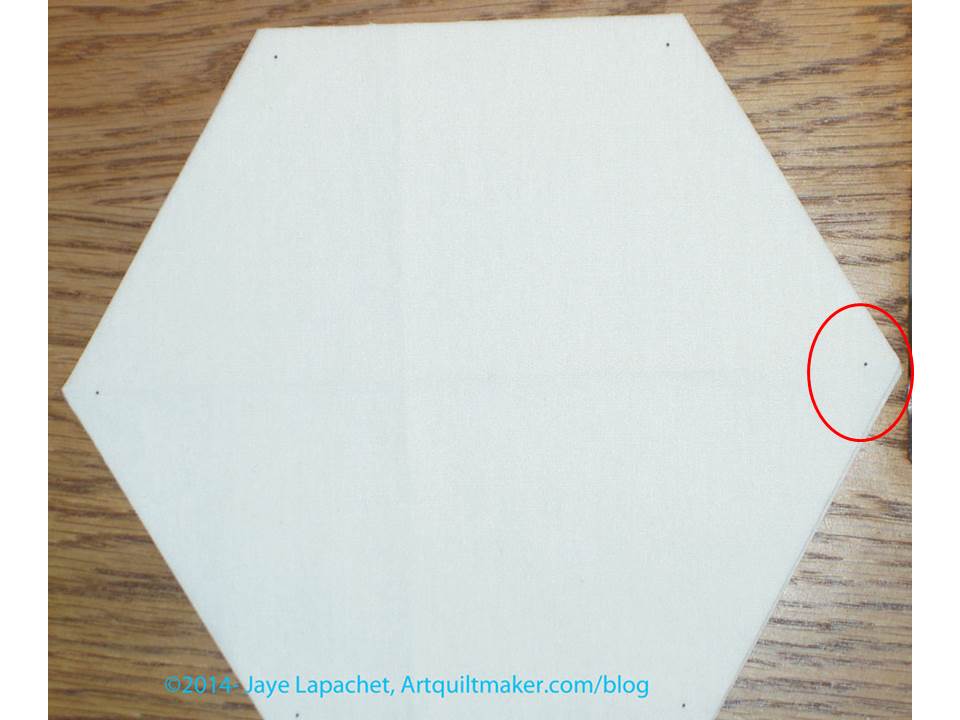
Mark your hexagons
Marking
Now, mark your hexagons so that the Y seams will be easy to sew. As mentioned in the supply list, I use the Jinny Beyer Perfect Piecer.
Hexagon Markings
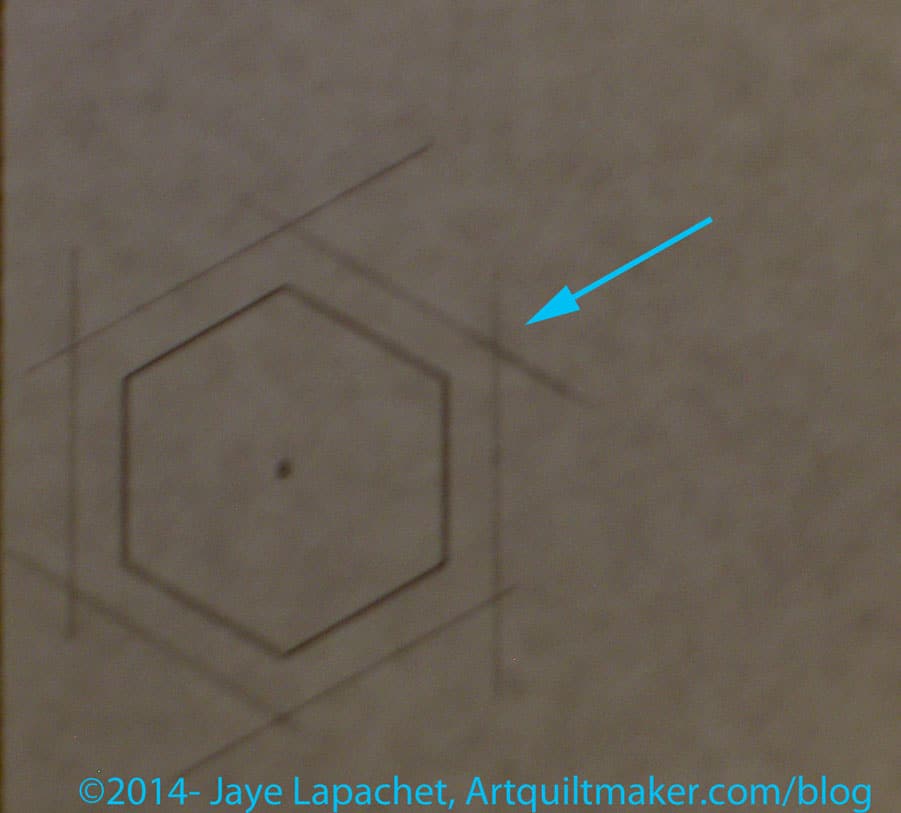
Line up your ruler in every angle and in every hexagon and make a dot.
You can also make a cross at the seam allowance by lining up a regular ruler along your cut edge and drawing a line near the angle. See the tutorial called Hexagons -Preparing to Sew, which gives more information.
Sewing
Remember: you will sew between the dots only NOT into the seam allowance. This is how you sew Y seams and we have done that in other tutorials.
Arrange Hexagons
Arrange your hexagons in a pleasing manner on your design wall or on a sandpaper board.
Hexagons right sides together
Take two hexagons, that will be next to each other in the final block, place them right sides together.
Put them under the presser foot, lining up your Perfect Piecer mark under the needle
Sew a few stitches, then backstitch.
Sew the entire seam to the second Perfect Piecer mark. Backstitch to secure.
Nota bene: You want to backstitch even though it is a bit tedious, because no other seams will cross the seams stitching the hexagons together. If you do not backstitch, there is a chance your stitches will come out before you get to the quilting part. You can also leave long tails and make a knot at every intersection.
I like to to sew my hexagon patches together in groups of three, thus we will need to add the third hexagon to the two you just sewed together.
Add 3d Hexagon -seam 1
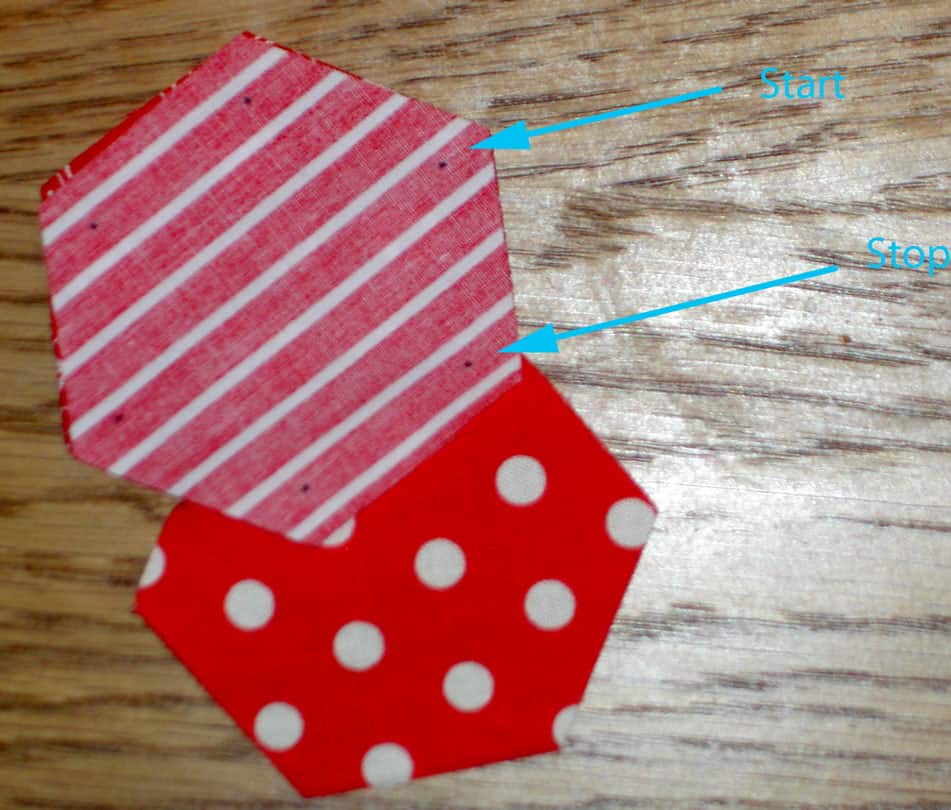
Lay the piece of two hexagons you just sewed on the table and place the third hexagon patch on top of top one, right sides together. Sew the third hexagon to the piece of two hexagons starting at the dot marked Start and stopping at the Perfect Piecer mark indicated as Stop. Backstitch as described above.
Remove from the machine and clip your threads.
Add 3d Hexagon -seam 2
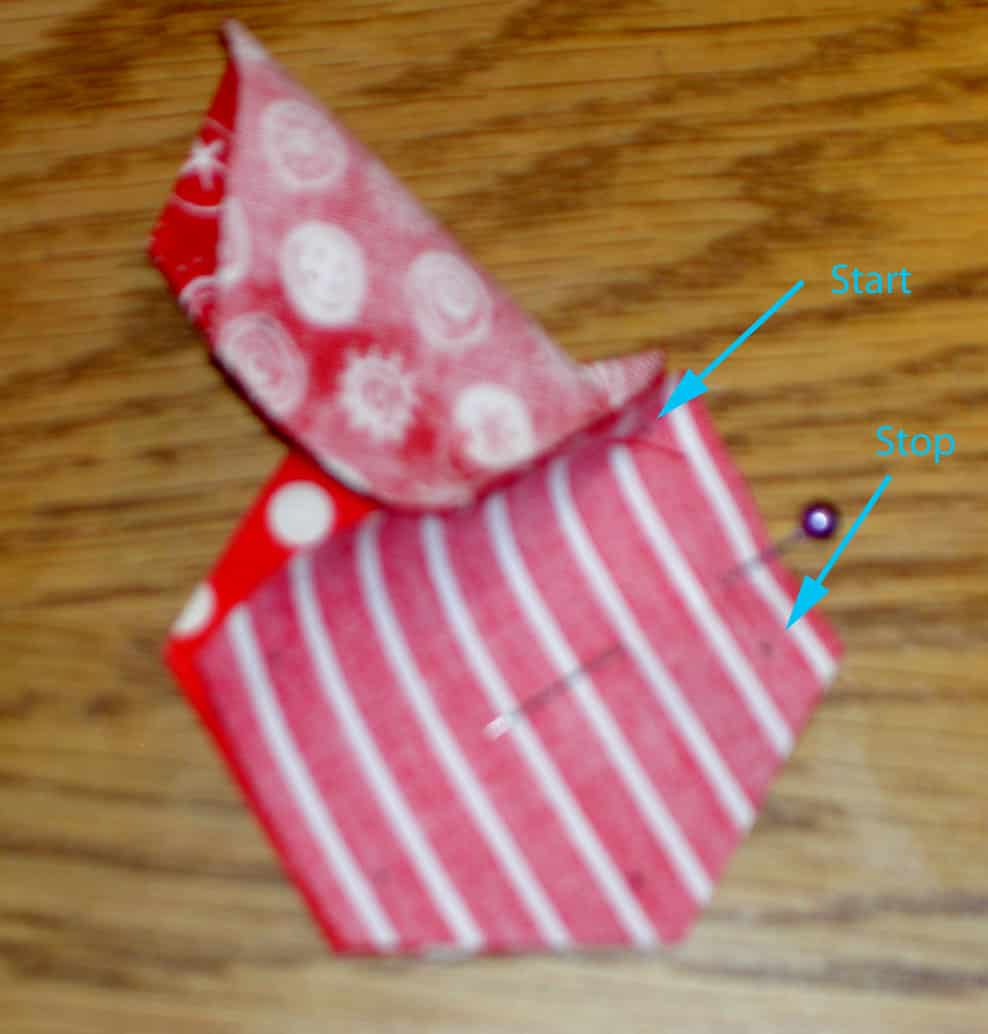
Now you are ready to sew the last seam to make a piece of three hexagons. Line up your third hexagon with the hexagon you didn’t sew a minute ago.
Pin. I put the pin in a place closer to the stop mark, so I can fit the sewing machine foot on the Perfect Piecer Start mark.
Nota bene: I don’t normally pin small hexagons, but when I am sewing the last seam it is useful.
The second hexagon will be kind of rolled up. Just keep it out of the way of the needle. You don’t want to sew it to the underside of the other hexagons.
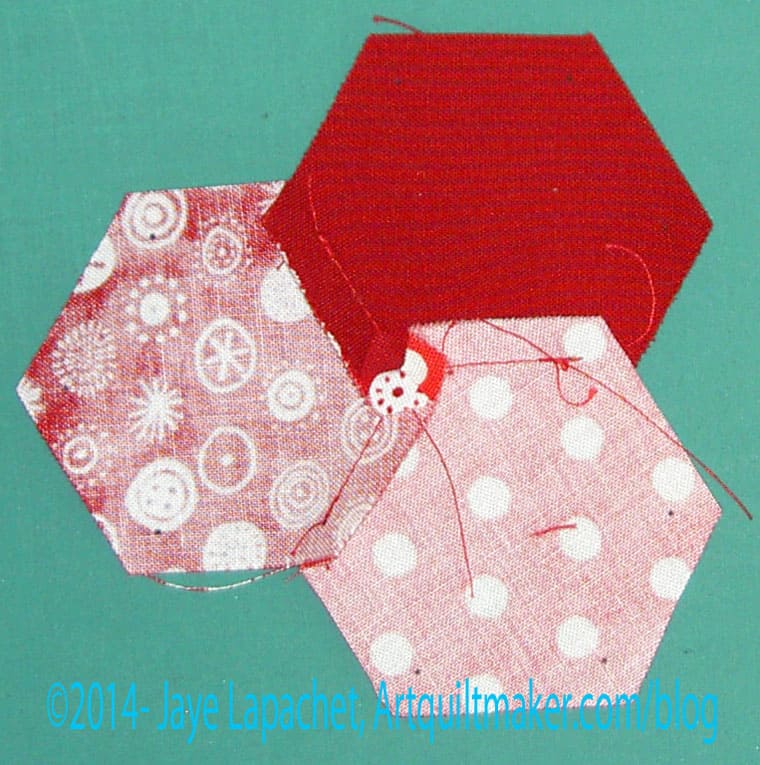
Sewn hexagons on the design wall
I keep my pieces on the design wall (you can also use a sandpaper board) as I sew them in order to keep them in order.
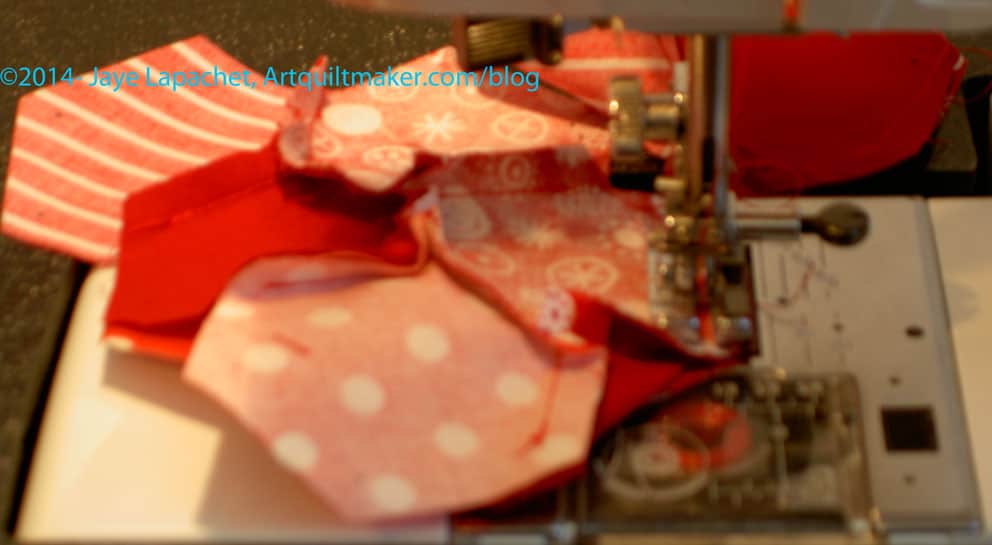
Sewing patches together
Keep sewing your patches together in chunks, then into larger chunks until you get all of them sewn together. Sewing groups of hexagons together is like sewing 2 or three together. Sew between Perfect Piecer dots. You just have to be carefully to keep the other, already sewn, hexagons out of the way.
Nota bene: It is useful to have a digital camera handy and take a photo of your layout in case of confusion while sewing. You can also number your patches.
More on sewing hexagons can be found in a previous post.
Press
For small hexagon blocks, I usually don’t press until I am done sewing all of them, because I want all the swirls to be orderly.
Press in a circular motionPress in a swirl to create mini hexagons
Press from the back, one seam at a time so all of the seams look like they are pressed in a circular motion. The center where the patches meet will look like a mini hexagon.
Pressed back of hexagon piece
When finished the block will have a lot of mini hexagons on the back.
Applique’
In order to prepare for applique’, you have to do something with the edges. If you want to do raw edge applique, you will need to trim the seam allowance off the outer edges, using the Perfect Piecer marks as a guide.
I suggest pressing the seam allowance on the outer edges in to make a clean edge.
Lay your hexagon piece right sides down on ironing surface
Lay your hexagon piece right sides down on your ironing board.
Use the Perfect Piecer marks as a guide. Fold and finger press the outer edges in.
Press edges in
Get your fingers out of the way and press using a hot iron so the edges is pressed permanently in. You a chop stick or kebab stick to hold the edge under the iron.
Once all of the edges are pressed under you are ready to place your piece on the background.
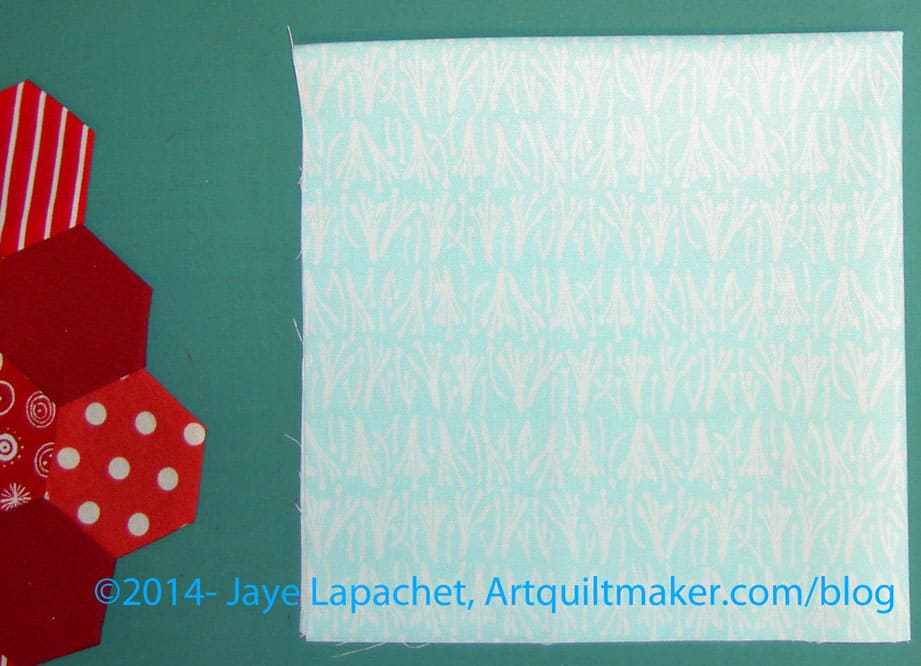
If you have not already done so, cut a background piece 12.5″ x 12.5″.
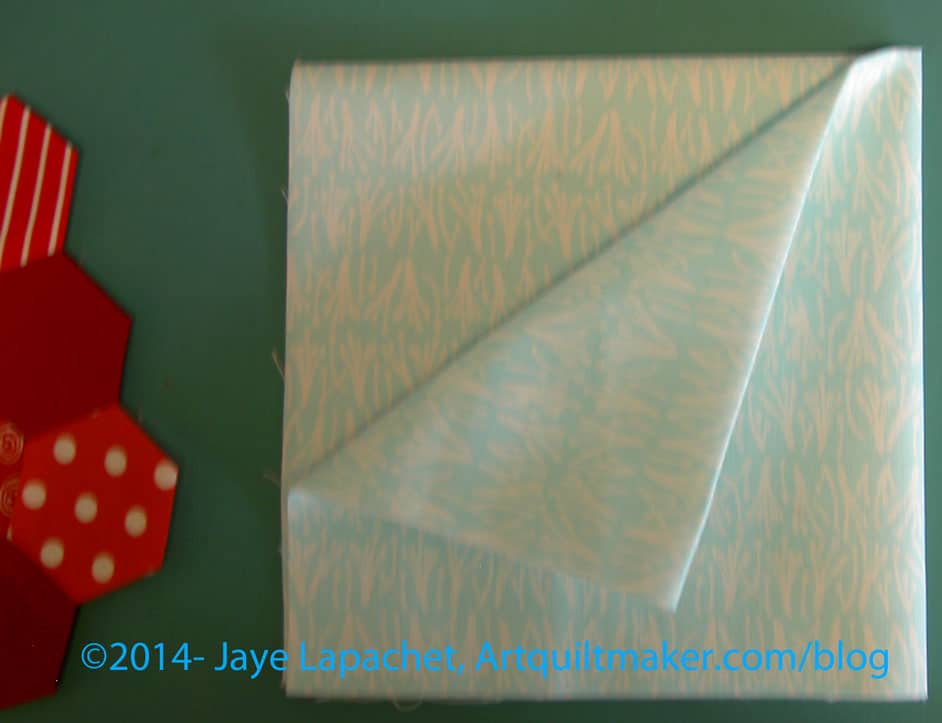
Fold background into quartersFold background into quartersFold background into quarters
Fold in quarters and finger press just so you can see the lines. DO NOT press with an iron.
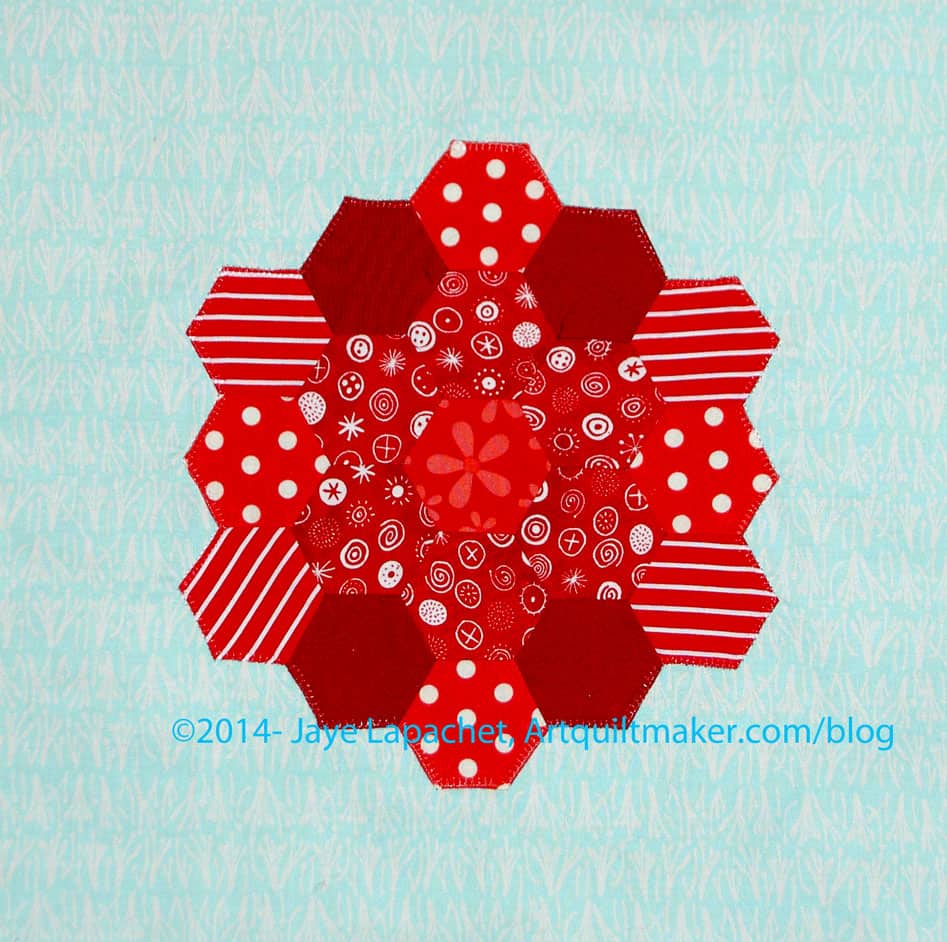
Using your finger pressed lines, center the hexagon piece, right side up, on the background.
Tomorrow I will talk about how to make a hexagon block. I realized that I haven’t been talking about the actual blocks that *I* make for the sampler more than what is in the tutorial. I decided I wanted to talk about it a little bit.
As with the other blocks, the reasons I have my students make this block are:
More practice on Y seams
Hexagon quilts are popular and my students may want to make one one day
More practice with color is always good
More practice with pattern is always good.
You may think that Y seams are tedious PITA that aren’t worth it, but becoming comfortable with Y seams has truly expanded my repertoire of techniques. I can make so many more blocks knowing how to complete Y seams.
I never thought I would make a whole hexagon quilt, but I did. I was even shocked. I don’t think I will make another, but you never know. I also watch TFQ make one with a similar sized hexagons to the hexagons in the block above.
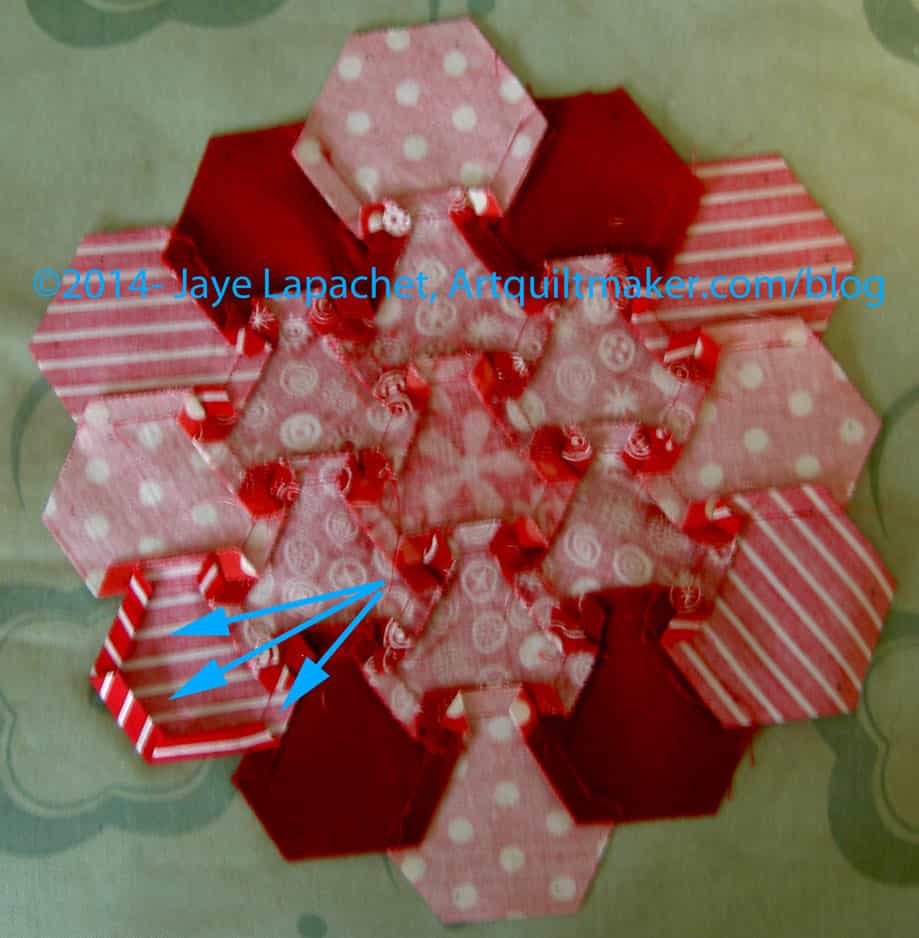
Since my sampler quilt is basically a two color quilt, I need to create contrast within that palette for each block. With all of those Y seams, you can bet that I do NOT want you, as the viewer, to see a big blob. I want you to see every single Y seam. 😉 While I am comfortable with Y seams, they are still a technique worthy of celebration and the choices of fabric that I made reflect that.
The result of using only two colors is that my color choices have already been selected. For the foreground, I am working hard to stay in the bright red arena – like scarlet. No blood red or rust red. As a result, I had mostly pattern with which to work . Using the different patterns of the fabric draws the viewer’s attention around the block.
For the background, I am trying to stay in the aqua arena. Some of my blocks have red in the background, but for continuity’s sake, none of the blocks have a completely red background and most have more aqua than red.
In the past I have hand appliqued the piece of hexagons to the background, but I was impatient this time. I machine appliqued it using Aurifil invisible thread. I didn’t scream through it, I sewed slowly and the blocks is pretty flat. I am pleased.


")


")


")