Post the direct URL (link) where your drawing, doodle, artwork is posted (e.g. your blog, Flickr) in the comments area of this post. I would really like to keep all the artwork together and provide a way for others to see your work and/or your blog.
The Creative Prompt Project, also, has a Flickr group, which you can join to post your responses. I created this spot so those of you without blogs and websites would have a place to post your responses.
As I mentioned before, I find pencil rolls to be a pretty quick project. I have have the hang of them now and they put themselves together, pretty much, as long as I am paying attention.
Deirdre’s Pencil Roll closed
or so I thought.
Not so with this beauty. Trying to be the good little green girl, I used a beautiful teal, feather design FabMo fabric for the outside. I talked about these fabrics before. That fabric became the bane of my existence.
Deirdre’s Pencil Roll half open
It would not stay put. I tried to sew all of the pieces (back, front, flannel, pocket) together, like the directions say, and that upholstery fabric wouldn’t cooperate. It was very slidey for some reason and I would end up with an inch of flannel on the top and an inch of upholstery fabric on the bottom. I ripped the whole thing out three times. It was very frustrating.
Deirdre’s Pencil Roll open
If you don’t look too closely the piece turned out ok. That FabMo fabric looks really good, but I will pay more attention to my how my selections feel next time. This is a gift and I hope the recipient likes it. I can’t, however, send it off until I show it at CQFA on Saturday.
Yes, it is possible to finish a spool of Aurifil thread. I did it! I love Aurifil because of the high thread quality and the amount that can fit on a bobbin.
I first bought a bag of spools in a Kathy Sandbach machine quilting class in about 2001. I still have some of those spools, but not the grey. I have never had a problem with the thread except having a lot of colors that I don’t use.
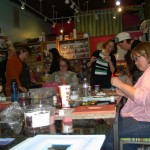
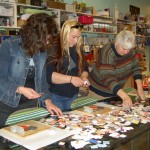
I went to A Work of Heart on Sunday with a group of friends to belatedly celebrate my birthday. I LOVE LOVELOVE that place! I love the space, the creative energy, Andrea (the owner). I want that creative wonderland to be down the street from my house. Really, I want to live there, but I would settle for it being down the street from my house.
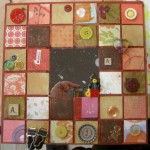
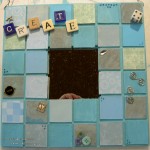
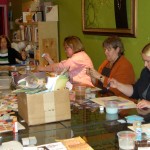
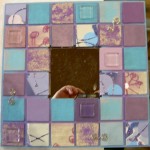
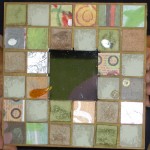
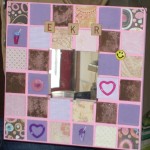
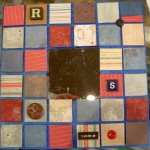
I invited some non-crafty people so Andrea the Awesome suggested the Altered Mirror project. I wasn’t that excited about that project, but went with it and am very pleased at how mind came out (top), how successfully everyone was able to work and how well all the mirrors came out.
Adrienne’s
Valerie’s
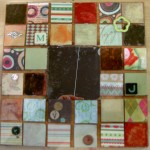
Kathy’s piece
Step Near the End: Embellishing
Step 1: Paint the Frame
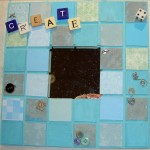
Step ?: Distress Some Squares
Creativity Mirror
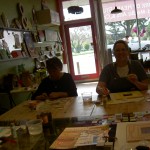
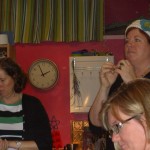
Maureen, Andrea, Sharon, Julie etc
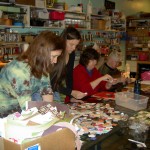
Mary & Maggie
Helen, Adrienne, Maureen
Julie & Sharon
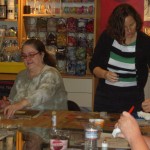
Kathy, Kim, Terri & Bron
Valerie, Helen & Bron
Kim & Jaye
Andrea, Maureen & Sharon
Helen’s
Bron’s
Mary’s
Maureen’s
Terri’s
Camille’s
Maggie’s
Kim’s
Kim’s also
Sharon’s
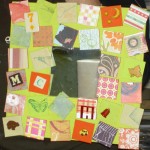
Julie’s
The place is great and all of the supplies you see in the backgrounds of the above photos are available to use.
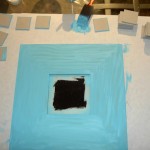
Step 1: Paint the Frame
The first step was to paint the frame and the little chipboard squares. I ended up painting all of them (top and sides). Above it shows the squares as I was painting the sides.
The color scheme I chose was to coordinate with the way we are going to paint our bedroom. I didn’t mean to put ‘CREATE’ as the message, but creativity is on my mind lately and it seemed like the right thing. I don’t know if the mirror will end up in our room ultimately, but we will see.
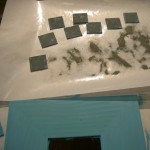
Step ?: Distress Some Squares
Each of the squares has something done to them: cover with paper, paint with crackle paint, ink, etc. Above I was using distressing/embossing powder on some of the squares. BLECH!!! I sincerely disliked how they came out and the effort was not worth the result. Live and Learn, though. I am glad I tried it and now I know.
Step Near the End: Embellishing
Above I have lined up all of the squares and glued them to the frame. I have also started to embellish. Andrea has FABULOUS glue and I only had to stick down some of the papers a little bit. The glue used to stick the squares down is different from that she suggested I use to apply the embellishments.
Kathy's piece
Kathy, from Everyday Bliss, wrote a great post about the day. She expresses some self doubt in the post, but I didn’t see that at all. I saw her start looking at the paper and dive right in. Kathy’s piece, with its orange base, reminds me so totally of her. It has whimsy and a little reality check (see the martini glass? She is the parent of a 2YO, after all) and a fabulous girly, but elegant girly look. Check it, and her project out, at the Everyday Bliss blog.
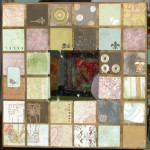
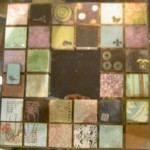
One of the great things about the afternoon, as I mentioned, was that everyone was successful. Everyone worked on their mirrors and created beautiful pieces. Everyone seemed happy and to have a good time. There was a nice creative and relaxed feeling that permeated the event.
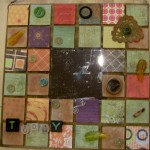
Julie's
I love Julie’s message. Her message of “Today” makes me think about not looking to the future too much. It is a good reminder to be in the moment – or to balance planning for the future while living in the moment.
Helen's
Helen seemed really uncomfortable when she started. I don’t know what Helen’s creative experience is to date. She did the most amazing work. I love the color scheme and her selections of paper and embellishments. It was so fantastic to watch her work.
Bron's
Bron’s embellishments came across to me as delicate.
Mary's
Mary knew not getting the squares straight would drive her crazy, so she made the squares wonky. That small changed added movement and now the straightness is not an issue. I adore her background color.
Maureen's
Maureen used her hand dyed fabric instead of paper to cover the chipboard squares. It reminds me of a painting I saw at the SFMOMA. I’ll amend this post if I remember which one it was.
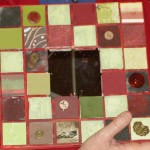
Terri's
I love the red that Terri used for the background color. Her piece has a bit of an Asian feel.
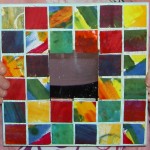
Camille's
Camille insisted that she was not crafty. Her piece, for her daughter’s new bedroom, tells me otherwise. I had a pink and purple bedroom when I was a girl, so I am partial to this piece.
Maggie's
Maggie wanted to make a piece to commemorate our sorority. I love it that she used yellow to to prevent the pink from getting to sickly sweet. This piece is very cheerful.
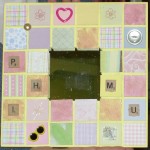
Kim's
Kim has more experience than anyone with the various tools and supplies. If you look closely at her piece, you can see where she used a rubber stamp and then embossed. The embossing actually came out well on hers.
Kim's also
I think the above photo reflects the colors she used a little better.
Sharon's
Sharon’s piece reminds me of sailing and code flags. She says that she chose a color scheme that would coordinate with her duvet cover.
Adrienne's
Adrienne, or AJA, is one of the quiltmakers with whom I do the Bullseye Project. She came all the way from Tucson to be at my party. I was so happy! She and Julie and I went to dinner after the party. I love the way she used the bottle cap and the garter hooks.
Valerie's
Valerie and I see each other once a year. We met in the baby class when we were both pregnant and our kids used to play together when they were small. Now we see each other about once a year, but it is great. She is a great sport at being creative with me.
I am thinking of having my birthday there again next year.
Update: 9/12/2011: due to spam this post no longer allows comments. Sorry!
I really like Judy Martin and always have. I especially love her block books, but they are old and she doesn’t seem to be publishing those types of books anymore. I love block books, but think I am in the minority. I kind of wish she wouldn’t rush out her books, but she does have to make a living, so I do understand why she seems to produce a book a year. She has finally reached the YouTube age with a new video.
The video talks about how to rotary cut odd shapes, specifically the kite shape for her Kyoto Garden quilt from the new book she just published called Stellar Quilts. I have long wanted to take a class with Judy Martin and this is a great start. The video is filled with good information and I really learned something. It is about 5 minutes long and I recommend it.
Podcasts
As I have mentioned, I really like podcasts. I listened to two episodes from Notes from the Voodoo Lounge recently that I thought were really good. One was an interview with Deborah Rapaport, who talks about style. She talks about wearing things that make you feel good and is adamant that sweats do not make you feel good. She does not talk in a way that made me feel like a loser. She talks in terms of transformation using baby steps and she talks about all of this regardless of a person’s size. I have been thinking of changing my wardrobe and my style, especially since all of my clothes are wearing out (great timing!). Perhaps I will take this podcast as a kick in the pants to go to the thrift store and see what I can find?
I also really liked Rice’s podcast with Diana Trout. I have never heard of her, but I liked the fact that she talked about her workroom being a pit until recently. It was a good reminder that things take time.
Paper Craft
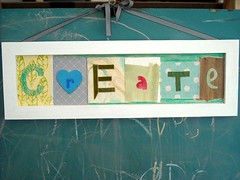
My sister loves scrapbooking and paper crafts. She does really amazing work. She also has all the toys and has brought them with her while she is up here working. I have had a piece on my mind which was inspired by a piece by Dana Barbieri. I want to make a piece like this to start the process of transforming my workroom into an inspirational space.
My sister has a machine called a Cricut, which I plan to use to cut the letters. Then I will put them on other paper for the background and frame it. I may use bits of wood or foam to make the letters stand out from the background paper. I haven’t decided. Dana used fabric in her piece and I am not sure I will. I’ll have to play around. I am getting closer to execution. My next task is to pick the papers I want to use. You can be sure they will be bright!
Classes
I signed up for an EBHQ class in April. It is with Dale Fleming and s/he will be teaching a class called 6 minute circles. I have had a circle quilt on my mind and thought this might be a good jumpstart. There are a lot of odd things on the supply list that I need to start collecting. I am glad I have time.
Mark Lipinski’s Big News
I have heard rumors about what happened between the publisher of Mark’s old magazine (now run by Jake and Melissa) and Mark (bankruptcy, creative differences, the usual). Now he has landed on his feet and announces his new partnership with All American Craft. I have never heard of them, but they must have enough confidence in his star power, because he will be heading up 3, yes THREE, magazines not just one. Good luck, Mark!
Moon & Stars is an old, old project. I started it after my mom gave me a FQ pack of the moon and stars fabrics in the middle. I wanted to show them off, so I made this kind of window scene with very little piecing.
It was in the same bag as Kissy Fish, except wadded up at the bottom. Who knows what I was thinking? Some of my bags tend to turn into dumping grounds. I pulled it out last week when I, once again, needed a hand project for a serious amount of TV watching. I don’t remember when I last worked on it or when I started it, but it had to be around the time I was working on the Sampler, because, I am apparently, hand quilting it.I don’t do much hand quilting anymore with regular quilting thread.
Moon & Stars (detail)
The thread for the middle is really thin – or seems thin – and I couldn’t find it in the depths of the bag. It appeared that I was pretty much done with the hand quilting of the middle, so I took some of the Laura Wasilowski hand dyed thread and worked on quilting the border.
I may add some machine quilting to it as I like my quilts quilted close together and there is only a very small chance that I will hand quilt it as close together as I like it.
A friend and former colleague, Sheila, emailed me in her capacity as secretary for the South Asian Bar Association of Northern California Foundation and asked me if I might have a piece to donate for the silent auction at their annual gala, which was held yesterday at the Green Room in San Francisco. A large number of attorneys and other professionals will attend and bid on various items and services at the silent auction. Sheila told me that the items and services were donated by prominent individuals and businesses. All proceeds raised fund public interest fellowships for Bay Area law students.
While I don’t really think that the world needs more lawyers, I do think that scholarships are important and it isn’t up to me to decide how people spend their lives. It also made me feel good to be considered a “prominent individual.” It will be interesting to see where House and Garden goes on its journey.
Post the direct URL (link) where your drawing, doodle, artwork is posted (e.g. your blog, Flickr) in the comments area of this post. I would really like to keep all the artwork together and provide a way for others to see your work and/or your blog.
The Creative Prompt Project, also, has a Flickr group, which you can join to post your responses. I created this spot so those of you without blogs and websites would have a place to post your responses.
No, this is not another insane project of mine. The Pineapple is my insane project and I am not starting another until that piece is done.
Mom's DWR
A few weeks ago my mom and I went to the DeYoung to see the Amish Abstractions Exhibit, as you might remember. In that exhibit was a Double Wedding Ring quilt. My mom has been working on a DWR for awhile. She is a really good seamstress and the arcs, etc don’t bother her. She is also fearless. She was going to give it to someone and then decided it was too much work for that particular recipient. When I saw the DWR I asked her about hers and we decided that hers might be about the size of the one in the exhibit. She was under the impression that she needed to make 190 arcs or some such crazy number. I asked her to bring the pieces over.
Mom's DWR (other side)
A few days later she brought them over and we laid them out on my living room floor to see the approximate size. I know the photos are not the best, but they were hard to photograph given the angle of my living room. You can kind of see the curves in the way we laid out the pieces.
Mom's DWR detail
As you can see from the photo (above) she is using foundation piecing. She is having some challenges:
She recently gave away all of her scraps in a fit of cleaning. Now I get to cut scraps for her.
She was having a hard time visualizing the size. She doesn’t have a design wall (or a wall big enough to hang a design wall) so she uses my living room floor as her design wall.
Fortunately, she was able to see the size when she laid it out while having the quilt from the exhibit in her mind. I think she is going to finish the arcs that she has and then start putting it together.
When I took art classes in college I always enjoyed contour drawing. Contour drawing is where you look at the object you are drawing and NOT at your paper.
I got quite good at it and decided that I would use that technique for my Inspiration drawing. It took me awhile to actually get to it and when I finally did I just sat down and drew with what I had – no fancy drawing book or paper or pen. I used the following two photos as the basis for my inspiration drawings.
Crate & Barrel Regent Serveware
Dishes are below:
Crate & Barrel Regent Place Setting
And here are the contour drawings:
Serveware:
Serveware Contour Drawing
I left a little of the notebook page in when I cropped the picture so you could see that I just used my working journal; I didn’t use anything special. I did the drawing at a Starbuck’s using a picture on my phone and the pen I had in my purse.
Here is the place setting:
Place Setting Contour Drawing
This one came out much better. I am out of practice using this technique. One of the things I like about contour drawing is the movement you get in the drawing.
Update: Bohemian Rhapsody is found, apparently thanks to the outcry and connections of quiltmakers! Nice work, everyone!
I am not a member of the Quilt Show and I know only peripherally about Ricky Tims and Alex Anderson (don’t dislike them, BTW). I am, however, generally annoyed with airlines and air travel and United Airlines in particular.
I heard from Douglas Eagleson of Kona Bay that Ricky lost his Bohemian Rhapsody quilt due to UA baggage error. It is described in Ricky’s blog post. United Airlines policy about customer service seems to be non existent.
I was going to tell Ricky to have his local TV station get on board and do an investigation, but I am prevented from leaving a comment on his blog since I am not a member. I could join, but am just too lazy.
One of Libby Lehman’s quilts was in the bag as well. I think that United has a fee per bag, so it makes me wonder what passengers are paying for if not to keep their bags secure.
I have returned from the most fantastic trip to Dubai only to have the joy and excitement overshadowed by the fact that United Airlines has lost one of my bags. What was inside? Along with the unique and wonderful items I obtained in Dubai was my quilt, Bohemian Rhapsody.
When we went to the North Coast, I also brought along this scarf, which I discussed before. I only had a few rows to knit before I was ready to bind it off.
I knitted a few rows and started to bind it off. When I had about 10 more stitches to bind off, I realized that I didn’t have enough of a tail to finishing the binding off. I was in a patient mood, so I unbound what I had done and unknitted a row, then bound the scarf off.
This was a really good reminding experience. I have knitted a few things and once I get going, I am ok. I liked the stitch, especially since the edges don’t curl. It is no great masterpiece, but I enjoyed working on it.
I didn’t measure it, but you can see the approximate length (25″??) because the charm pack is 5×5″.
I would like to get more yarn and make another scarf. I don’t think this one is long enough, so perhaps I will use 2 skeins next time. Perhaps I have a knitting needles roll in my future?
Thanks to Michele and Ginny for getting me going on this project.
I finally buckled down this past weekend and got some of my ‘rote’ sewing out of the way. Rote sewing is stuff like making backs, putting on bindings, etc. I usually consider it to be stuff that I have to do at the machine, but isn’t very creative. I often have a hard time getting started on it. The good thing about rote sewing is that it usually goes fast once I buckle down and I can often cross a lot of tasks off my list after a rote sewing weekend.
Fluttering Hearts Test
This time I worked on backs and tossed the Fluttering Hearts into the mix. Above you can me trying out the Fluttering Hearts. I have had 3 on the piece on my design wall since November or December. I really wanted some at the top and decided that Saturday would be good day to try it out.
Fluttering Hearts Appliqued
I spent a lot of time sewing carefully around the hearts with the satin stitch. I am out of the thin Maderia embroidery thread so I used a spool of Robison-Anton that seemed relatively new. I love the sheen of that thread. It is also thick like quilting thread, so the satin stitch looks pretty full on the hearts.
Tarts with Fluttering Hearts
Above is the Tarts with the Fluttering Hearts appliqued. I thought I would be done, but I am thinking that I need to applique’ something to the tea kettle (lower left), some steam or stars to the Chocolate Pot, like I showed in this post.
I think I might be getting too mired in the layering thing that is going on in my head. I have to remember that I put the label on the back and it says I finished this quilt in 2010, so I have to finish it!
Tarts Back
Here is the Tarts back, another bit of rote sewing from the past weekend. It went together really fast! I was shocked. I guess I really do need to finish this quilt!
Give me your opinions about more bits of applique’ of it you think I should just wait to embellish with buttons and beads and embroidery.
Yes, boys and girls, I finally finished Beach Town. You can read about starting it in the post about the Pamela Allen class from last year. I liked looking at the piece in that post (one of the things I LOVE about blogging!), because I could see the differences including all of the handwork I have added.
Beach Town Back
I made a smaller version of the Robbi Joy Eklow sleeve (from her book Free Expression) for this piece. I don’t know if it will ever be hung using a rod, but it is ready if someone wants to hang it that way.
One of the things I need to think through when I use this technique in the future is the back and the label. I like to include the label as a part of the back. As you may have noticed, I often piece the back and include the label in that piecing. This allows me (or my quilter) to quilt over the label so that it cannot be removed if the quilt is stolen. Jill, one of the creative prompt participants, talks about this in her recent blog post.
Another reason I piece the back is that I have the fabric, so I might as well use it.
Smaller quilts, and particularly this Pamelala technique are free form and quick. The maker usually lays down the back and batting first with no opportunity to piece the back or make a label. When I take a Pamela Allen class again, perhaps I should just put down the batting and work on the back later?


")
")


")


