The CPP is on vacation. See previous words and information on the Creative Prompts Inspiration Page. See about Stress free Art Journaling at Cloth Paper Scissors.
And the Winner is…
I posted a review of Sensational Bead Embroidery last week. This book was one I wanted to give away to a lucky reader and two people entered.
Sharon is the winner! Sharon: I know where you live and the book is in the mail.
Look for other giveaways in the future. Thanks for reading and playing.
Selecting Fabric
Selecting fabric is a very personal choice. I have a group of fabrics for my sampler class with Frances and I needed to choose some background-esque fabric to go with the Four Patches for my Double Four patch block. These are large blocks and I don’t normally work in this size, so I found it challenging.
I fell back on Lorraine Torrence‘s old adage: Make Visual Decisions Visually. That is the best advice I have EVER gotten in quiltmaking. Go take a class from Lorraine and buy her books. She is awesome.

I liked the bold graphic-ness of this print, but thought it might be too large.

I thought for sure this would work, but the cherries felt too scattered. They need to be hemmed in a little.

Something in the color was off with this print. The aqua in the Bliss print is more green while the small flowered print is more on the turquoise side.
")
This is the same print as the first one, but the flowers are smaller. I like the way you can see more of the flowers. Success!

I chose the last print and above is how the finished block looks.
Finished: It’s a Merry & Bright Wrap

I really finished this in December, but never got around to taking a photo. Here it is in all of its glory. It will be a gift. This is a pattern from Sandy Gervais called It’s a Wrap. Someone thought the packages looked like elephants.
The last post about this project talks about selecting the border.s
Various & Sundry 2011 #7
Inspiration
I saw this photo on Camille Roskelly’s blog and couldn’t get the sentiment out of my mind. I like her blog. I like the colors and the feel. I like the look of it and the hopeful tone of the way she writes. As an added bonus, Bonnie and Camille (of the Camille referenced above) are coming out with a new fabric line called Ruby. It looks very similar to Bliss in the coloration and in a few of the motifs. I can’t see the motifs very well, but what I can see I love. I want a full half yard set of all of the prints. I have to resist.
If you haven’t looked at Nina Johansson’s blog recently, it is worth a look. Her drawings are lovely, especially some food drawings she did in Barcelona.
Exhibits
From the American Museum of Folk Art newsletter: See http://www.folkartmuseum.org/infinitevariety for more information. Thanks to TFQ for passing this along.
|
|
More than 24,000 people came to see “Infinite Variety: Three Centuries of Red and White Quilts,” presented by the museum at the Park Avenue Armory last month. It was the largest exhibition of quilts ever held in New York City. Visitors from around the world filled guest books with thank-you notes expressing their gratitude to Joanna S. Rose for sharing her singular collection, and many have posted images to the museum’s Flickr group. We will upload footage of lectures and interviews to our YouTube channel soon.
This magical but ephemeral moment will ultimately be captured in the pages of a fully illustrated catalog copublished by the American Folk Art Museum and written by Elizabeth V. Warren, guest curator of this spectacular presentation. Stay tuned for information about the publication date. A digital guide to the exhibition, including images of all 650 quilts that were on display, is available as a free app for your iPhone, iPod touch, iPad, or Android smart phone. Go to the Apple iTunes App Store or Android Market for the free download. |
I downloaded the iPad app and found it to be quite inspirational. It took awhile to download, but it is great to have a quilt exhibit at my fingertips.
Fabric
Do you need an explanation of what exactly those dessert bundles Moda is selling contain? As your info resource, I found one for you at the Moda Bakeshop. Take a look.
Other Artists
Freshly Pieced is having a SuperNova challenge/exchange. The blog author posted some examples of participants’ work. The post is a great example of how, using one block, everyone’s work will be different.
The Molly Flanders blog author has started a Flowering Snowball quilt. It is flattering to think that I started something, but I doubt it. Remember mine? I haven’t done anything lately on it and need to make the border.
Workspace
Ever since I did some spring cleaning last week, I have been thinking about upgrading my space: paint, shelves, clearing out more junk, eh-hem unneeded, perfectly good items. Of course, in my travels around the web and other media I keep seeing different workspaces. I saw this one and this one and this one (another view here here). How these artists work in their lovely chairs? Don’t get me wrong, they look gorgeous! I need an office chair with lumbar support and adjustable height otherwise my body hurts and I feel like an 85 year old. And all of those sensible shoes kind of chairs don’t fit with any decor. Yes, I drape fabric all over them, so what does it matter?
Stars for San Bruno #1 Top

I finished the Stars for San Bruno #1 top Saturday afternoon. I will, hopefully, take it to the quilter next week and send it off to its new owner soon thereafter. Stay tuned! Thanks to everyone who contributed and helped.
Stars for San Bruno #1 Design Process
You want to know my biggest problem with this quilt? I don’t have enough dark blue fabric. I have used EVERY scrap, except the tiniest (I mean, really, why bother?), for this project and I haven’t even gotten through the first quilt. I kid you not. Now I know that I never buy dark blue. No big loss, but, yes, I went to the fabric store to see what would work.

I tossed all the blocks out like this to see what inspiration I would get. It actually worked pretty well, because I could see some patterns start to emerge.
DH really liked the layout above and thought I should applique’ everything down like this. In an ideal world, with a fleet of sewing ladies, i would have done this, but I am still waiting for my fleet.

Once some patterns started to form, I began editing. Above is what is left after the first edit. The edited blocks will go into one of the other quilts. All the blocks will be used, don’t worry.

Sue’s blocks really wanted to be the border, so I tried them out in different ways. Tossing is a lot easier than sewing, so they won’t be as wonky as they seem here.

The editing is done, though I haven’t worked much on the bottom left hand corner and will need to pay some attention down there, so I started to line up the blocks and start filling in with pieces of fabric. I added some triangles to get some movement.

This is the top of SfSB#1. I have the border put together and am starting to sew rows together. It is harder to chunk with improvisational piecing, but I will do some chunking.
I really like how well the blocks fit together in terms of color.

You can see some chunking going on above. You can also see the neglected stepchild that is the lower left corner. I’ll get to it. The ultimate goal is to have a square or rectangle that is not to big, but will be big enough to snuggle with.

I thought of putting some coping strips in, but then I looked through the blocks again and found some smallish blocks (thanks, Diane!) that would fit and add interest to the bottom.

The piece is coming together.

Looks a little unfinished.

A little bit of breathing room around the edge should do the trick.
Do you like it?
Art Quiltmakers Speak

Did you go and see the show? Primal Green is a show of environmental art quilts at the Main Branch of the San Francisco Public Library. AND! Quiltmakers will be speaking tomorrow about their quilts, the process and art quiltmaking, in general.
The event is called Art Quilters in Conversation. It will be held in the Latino/Hispanic Meeting Room, April 17 at 1pm. See more information on the San Francisco Public Library website’s calendar page.
The Wallace Stegner Environmental Center is one of the special collections at the Main Branch and, after a year of work with the Library, CQFA has over 20 quilts and fiber art pieces on display. The quilts all have an environmental theme. The show will hang until July 31 and be available to viewers during the Library’s normal open hours. Hope you can stop by and see it, especially if you can’t make the presentation. Check the library’s website for hours.
Primal Green, the art quilt exhibition at the San Francisco Public Library, has some information on the Green Stacks portion of the SFPL website. Hope you can see the show.
CPP
The CPP is on vacation. See previous words and information on the Creative Prompts Inspiration Page. See about Stress free Art Journaling at Cloth Paper Scissors.
Book Review: Sensational Bead Embroidery
 Sherry Serafini’s Sensational Bead Embroidery: 25 Inspiring Jewelry Projects by Sherry Serafini
This is another book that I received from Lark Books for free. Thanks, Lark! I will be giving this book away to a lucky reader, so read on for instructions on how to enter.
Lark is really stretching my creative boundaries with the last two books they have sent me. This one isn’t quite as completely out of my realm as the last one. I have done some beading. Still, it is kind of interesting to review a book on a topic I don’t know much about.
Sensational Bead Embroidery feels and looks really nice. It is hard cover and about 8.5″x11″. The layout is appealing. The font is a soft grey color, but not so soft that older eyes can’t read it. I found the color of the font to be different from other books I have seen. I found it easy to read.
There are, like the book Creating Glass Beads, lots of good photos in this book. Each page is decorated with different images. On the first page of chapter one are spills of seed beads and examples of cabochons. The images illustrate points on the page.
The first photo in the book is a pendant on a stiff gold metal hoop (like hoop earrings, but for the neck). It is complicated looking and my first thought was that this was a piece to show off the epitome of the author’s work. Wrong! Some of the pieces are smaller, but they all look elaborate and quite complex.
In the introduction, the author acknowledges that she and the reader may have different focal point beads, because the reader may not be able to locate the exact same materials. This sets the reader up for not remaking the exact pieces, but bringing their own creativity into the process.
Chapter 1 is an explanation of basic materials and tools. I am so glad she defined cabochon, because I had read that word in the introduction and was already at a loss. The book doesn’t have a glossary, but chapter one is a pretty good replacement for a glossary. Serafini talks about everything from synthetic suede for backing to marking tools and thread burners. She has a tip box which lists basic supplies. She also has describes optional tools. I like those types of explanations, because people may have questions about certain tools from what they have heard ‘around’ and it is nice to have the answers handy. She also mentions that a task lamp is a must-have. Good lighting is something we don’t always think about and this tip is a good reminder.
Chapter 2 is all about stitches and general techniques. The illustrations are very clear and coded to the text. Any quiltmaker who wants to add beads to a quilt could benefit from this section. Ms. Serafini also talks about patternmaking, which I think is something lacking in many quilt project books. There are outline drawings of patterns in various projects. She gives a basic overview of cuffs and collars. There is also a page on color and design.
The projects start after the first two chapters. There is a large ‘head shot’ of each finished project, a brief description of her inspiration or process, and a supply list, which does refer back to the basic supplies list. In the first project, Spike Angel Brooch, the first few instructions have to do with designing the piece.
The projects range from collars and cuffs to earrings. The Simply Sweet Necklace is one of the least elaborate designs and looks like something non-beaders could wear, which is to say that many of the designs are quite elaborate and might take a special wardrobe to pull off. Finished pieces for which there appear to be no instructions, AKA inspirational pieces, are scattered in between projects throughout the book.
Probably my favorite piece in the book is the Donut and Pearl Cuff. I like it because of the use of sequins. I really like the way they border and highlight the center of this bracelet. I also like the asymmetry of the Triple Play Brooch. This piece also uses some sequins as accents. The Rivoli Brooch is one that I would wear. I noticed in many of the projects that the coloration was subtle. Each piece has color, but it doesn’t scream, which is better for jewelry.
The Gallery at the end shows some really amazing work by other artists. Sherry Serafini doesn’t say whether the pieces are by her students or just people that she knows. She does say that these are possible variations (the equivalent of alternate colorways?) on the projects. The Polar Bear bracelet by Heidi Kummli is pretty amazing. It looks like a cuff sort of bracelet with a polar bear head on it. The description says that the animal [beads?] are cast animals. The author points out that a focal bead can really change the feel of the piece and Kummli’s piece demonstrates that.
I also like Diane Hyde’s Opulent Spring. It is a round ball that I would love to hang in a window so that light could show off the beads.
I would like to see an index and a bibliography so interested readers could investigate this craft further.
Good inspiration and instructions if you want to take up this creative endeavor.
If you would like to enter the giveaway, please leave a substantive comment in the comment section of this post on any topic you want. I will draw the winner’s name on or around April 20, so your comments should be added before midnight on April 19.
View all my reviews
4/20/2011 Update: No more comments! Sharon is the winner!
Book Review: The New Handmade
 The New Handmade: Simple Sewing for Contemporary Style by Cassie Barden
I like this book.
I first heard about from Angela, a fellow BAMQGer who made the Bird-Watcher Messenger Bag and brought it to a Bay Area Modern Quilt Guild Meeting for show and tell. My thought was that some of the projects might make good gifts. I tried to borrow the book from the Library, but they didn’t have it. I finally ended up buying The New Handmade with a gift card. I am glad I did, because I really like the writing style and the projects are interesting and useful as well.
First and foremost this is a project book. I know I often complain about books being all about projects, but the tone of the writing makes it much more palatable. Cassie Barden writes in a friendly and, especially in the back where she lists general instructions, as though her readers are intelligent. In the section on topstitching, Barden writes “Oftentimes I will call for a scant 1/8th inch, which basically means to topstitch very close to the edge. Just how close is often an aesthetic choice, so if you prefer a slightly larger space between the edge and the stitching, do so” (pg.106). I really appreciate that kind of writing, because I have been sewing for awhile and I know my tastes and my skill level. Also, I am not going to be able to hold a ruler while I am sewing close to the edge to measure the 1/8″. I appreciate the added explanation.
It is a very easy read, if you don’t scrutinize every step of every pattern, which I didn’t. I may update this review after I make some of the projects.
The books starts out with a brief introduction and some information on color, inspiration, choosing fabric, and mistakes & modifications. The sections are brief-a couple of paragraphs at most. In the inspiration section, Ms. Barden says “inspiration is everywhere” and I don’t think I can hear that too often. In the mistakes and modifications section, she does perpetuate, which I believe has been debunked, the thought/myth that the Amish intentionally added an error to their quilts because only God is perfect (pg.10). I would have liked to have seen a footnote, if that has not been debunked. Barden has a nice array of fabric illustrating appealing color choices.
I didn’t realize how nice it is to get straight to the projects after only a brief amount of text until I was near the end of the The New Handmade where the general instructions appeared. I was ready to hear what she had to say after getting an idea of her style by looking through the projects. I thought that was a good layout and I applaud Martingale for trying out such an arrangement.
Each project has some brief text about Miss Barden’s inspiration or her thoughts about the project, then there is a list of supplies and the instructions. In some cases, an illustration showing how to layout the pattern pieces on the yardage is also included. Some of the patterns include illustrations on how to execute certain steps and most of the projects include a ‘head shot’ of the completed project. I would have liked to have seen the projects done in an alternate colorway, but there is a New Handmade Flickr Group with lots of great examples of the projects in alternate colorways shown.
Another thing I like about this book are the tip boxes. They explain a concept or technique further. You might remember how annoyed I was with the Amy Butler Sweet Harmony bag pattern, because one of the instructions was to shorten the zipper, but the pattern didn’t actually say how to do that. In The New Handmade, Cassie Barden has a tip box on how to shorten a zipper (pg.53) WITH illustrations and arrows pointing to various important information/steps. The other thing I like about tip boxes is that they stand out from the regular text and project instructions, breaking up the layout of the book. They are not as colorful as C&T’s tip boxes, but they do the trick.
The part about shortening a zipper is also optional. Barden says, in the project materials list for the Evening Essentials Wristlet, “This length may be hard to find in the color you want. You can purchase a longer zipper and follow the instructions in the tip box (page 53) to shorten it.” Again, she is not being dogmatic, but providing options and the tutorial to back them up. I really like that about this book.
The projects on my (very long!) list to make are the Novella Composition Book and the Bird-Watcher Messenger Bag. Both would make great gifts some some of the twenty-somethings I know. I would also like one of the Bird-Watcher Messenger Bag and might modify my journal cover tutorial to feature some of the pockets in the Novella Composition Book project. I kind of like the I {heart} Coffee French Press Cozy, too, but don’t really think I would use it. I don’t drink coffee much, but will think about how I could adapt it for another use. Yoga mat cozy, perhaps? I would definitely make one if I were giving a French Press as a gift.
The Dinner Party Grocery Bag is appealing, but is not on my ‘must make’ list at the moment. It shares a bottom technique with the Bird-Watcher Messenger Bag concerns me. I really prefer making bottoms like Cassie Barden shows in the Flea Market Purse project, which is also how Anna Maria Horner makes a bag bottom in her Multi-tasker Tote pattern. The Dinner Party Grocery Bag and the Bird-Watcher Messenger Bag patterns both require the maker to cut a separate bottom and then sew it on to the sides. This way of making the bottom seems very difficult and a little scary to me! I keep thinking about whether I could modify those two patterns to use the other method. I suppose I should at least try Barden’s method.
I like the pattern layout instructions for the Bird-Watcher Messenger Bag, but I wish that she had included the name of the piece on that layout in addition to the dimensions. Angela gave me her notes, so I wrote the pattern piece names in my book. I think it would have just been a nice additional feature.
In the laptop sleeve, All Business Laptop Sleeve, instructions Ms. Barden includes some helpful measurement information. She writes, on the project introduction page (pg.71) “…though anything more than 1″ wider won’t fit. Instructions for measure and adjusting the pattern for a different sized laptop are found at the end of the instructions.” It is really great that she is providing her readers with the tools to adjust the project to fit their needs. It makes the book so much more useful. People don’t have to pass a project they want to make by, because they don’t know how to adjust the projects to fit their needs.
The general instructions, as I said are at the back of the book and are about 10 pages long. Again, the tone is friendly. She talks about sewing machines, needles and thread, scissors, irons, marking tools and much more. Again, the writing style is not dogmatic and very informational. Throughout the section, Cassie includes personal tips and tricks that work for her. I like the tip to use a sewing and knitting gauge for quick measurements. She also includes some shopping tips, such as (regarding template plastic) “…I recommend giving it a shot, try to find the large sheets, which are commonly found at quilting stores. Craft stores sell the same stuff, but sometimes it’s only available in 8.5×11″ sheets and at several times the cost of the larger sheets” (pg.103).
I think Martingale missed an opportunity to suggest another one of their books on machine applique’ in the section on the same topic. Miss Barden tells the reader how she does her machine applique’, and infers that the reader can choose her own. I think it would have been a great addition to say something like “see X book on machine applique’ for more techniques.”
This book has fun projects and a great writing style. Recommend your Library buy this book, buy the book yourself and let me know what you think.
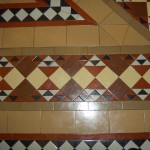
Mosaic Monday
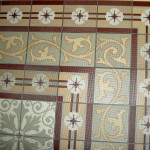
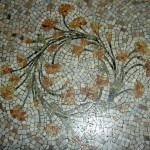
One of the things I enjoy about my city are the unexpected mosaic and tile art I see around. At one point, apparently, mosaics and tiles were used commonly for entry ways and they are little pieces of art hiding in unexpected places.

I went to get my hair cut the other day and walked past a doorway I must have walked past 1,000 times only to notice a mosaic design I have never seen before. I feel fortunate to have a camera on my cell phone which I can use to snap pictures of things I see around town. I know this photo isn’t great (someday I will learn Photoshop), but you can get the idea. I don’t remember seeing many circles like this in other entryway mosaics I have seen. The idea could be used for a quilt block, but it wouldn’t be for the faint of heart.

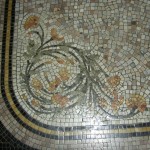
Corners are always the hardest part of borders, so I try to take a photo of the corner of the mosaics also. This one isn’t very difficult to piece. I wish I could talk with some of the craftsmen who did these entryways.
Also, last week I went to the State Capital with the Young Man’s class (As an aside, it was exhausting being around 60 teenagers!). It is the last chance I have to go on a field trip with him and I haven’t been to the Capitol in awhile. I went with DH some time ago and it was interesting to see the changes.


Book Review: Quilter’s Academy Vol. 1–Freshman Year
 Quilter’s Academy Vol. 1–Freshman Year: A Skill-Building Course in Quiltmaking by Harriet Hargrave
I have mixed feelings about this book. The idea is GREAT. I applaud the idea, especially in light of the recent Piecemeal Quilts discussion. There is a lot of good information in the book and I think it fills a need. As an experienced quiltmaker, I was pleased to learn some tips and tricks.
My two concerns are the tone and discussion of fabric. The tone is bossy, very much “my way or the highway” and I am concerned that new quiltmakers, without other local resources, would be overwhelmed by the content and, then, turned off by the tone. I am pretty sensitive to tone, so others may not notice.
I was hooked on the book from page 4 after reading “A Note from Harriet.” She says “…there are many classes taught as projects, but the basic skills needed to really understand the process are severely lacking.” When I read this I thought about the Sampler quilt class I took and how we learned butting seams, matching points, curves, triangles, etc. I am sad that quiltmaking isn’t taught using sampler quilts very much anymore. At some point , I think every quiltmaker would benefit from a Sampler class, but I understand that time is valuable and people are busy.
The book is broken up into classes, which cover everything from setting up an ironing area, sewing machine, selection and presser feet to piecing and binding your quilt.
The sewing machine section is biased towards Bernina machines. While the authors make some valid points about drop in bobbins, they don’t discuss ways around them. I have successfully made quilts on a Janome machine for years.
There are multiple projects in this book. Ironically, the projects are not Sampler quilts. The authors do, however, use the projects well to teach skills, and may use the ideas from Sampler classes in future books. Each project has full directions. It is nice not to have to refer to previous pages to find the basics of one step. I applaud C&T for adding this extra information.
The step outs, drawings, charts and tip boxes are all very well done. They also break up the page, making the information easier to digest.
There is a comprehensive section on rotary cutting which covers the cutter, mats and rulers. The ruler section is expanded to discuss basic sizes, slippage prevention and measuring guides. One major omission is a discussion of the placement of the ruler. There is some discussion about it on page 19, but the extent of it is “align the line of the measurement you desire with the cut edge.” Harriet Hargrave and Carrie Hargrave don’t say anything taking the width of the ruler’s line into consideration. While this might be a picky detail, tricky because of different rulers on the market, and not important, I think it might be worthy of a few paragraphs.
Harriet Hargrave and Carrie Hargrave repeat information in different places where relevant. We don’t learn something the first time we hear it, so the repetition is helpful.
One thing I found helpful was the thread and needle size chart on page 21. They also talk about thread size, which is something I can never hear often enough.
Harriet and Carrie also give a definition for a scant quarter inch and why to use it, which is not only helpful, but also interesting. They give a variety of options for creating a quarter inch seam, which is useful for the wide variety of machines in use.
I like the way the Hargraves talk about the tools. In Class 140, their topic is upgrading a sewing area, a subject quiltmakers start to thinking about when they get a little piecing under their belt. Lighting, irons, ergonomics and useful gadgets are also discussed. The authors mention starch, but don’t mention that some types can attract bugs.
One topic covered that many quilt books skip is drafting. Class 150 covers the foundation of drafting quilt blocks. While I don’t agree with Harriet’s assertion about quilt software, I am glad to see this section included, because I believe that if you can dissect a block, you can piece it. My drafting habits include both graph paper and EQ7.
In Class 120, the authors talk all about fabric. They prepare their fabric in ways that I never have, but may have to try. One tip in this section that gave me pause said, “for beginners, Carrie recommends sticking with safe colors.” (pg.15) In fairness, most of this tip discussed transferance of dye, however I really think the maker should love the colors with which they are working.
There are a lot of good pictures of groups of fabric. In this section the authors’ opinions definitely come through. In Freddy Moran‘s book, Freddy’s House, she uses all dots and bright colors in every quilt. In Quilter’s Academy Vol. 1Freshman Year: A SkillBuilding Course in Quiltmaking, Hargrave says about dots “Dots can add interest, but as with calicoes, too many can become very busy and detract from the design of the quilt. The fewer fabrics your quilt design has, the more important it becomes to limit the use of this type of print. (pg.69) Hargrave likes small prints and suggests their use frequently. She does mention large prints and gives standard observations and advice for using them. I would suggest that readers read this section carefully and consider the advice, but to buy fabric that will be enjoyable to work with and pleasing to the eye.
Harriet Hargrave and Carrie Hargrave include a section on color in this book. I don’t agree with everything they write, but I applaud the inclusion. My main quibble is the style of the fabric. I am a bright and bold fabric kind of girl. I know that the fabrics I love will go out of style or look dated, so perhaps the authors’ choices were picked so the book wouldn’t look dated in a few years. The authors comment that neutrals will enhance any quilt is a bit of a stretch, in my opinion, but if the Hargraves consider red and turquoise to be neutrals in some circumstances, then I am on board with these comments. 😉
Harriet Hargrave and Carrie Hargrave give some basic color terminology and show a color wheel, which in the context of the rest of the book makes the color subject matter not scary.
I really liked the section on value (pg.71), especially the examples of light colors looking medium when placed next to a dark fabric and medium fabrics looking dark depending on what colors/values they are placed near. It is a really important point and one exercise that is good for quilt playtime. You can use scraps to test out this theory.
The authors give good advice about selecting colors in the “Design Elements: Color” section (pg.70). They suggest NOT to assume you have ‘trouble with color’ if you are not happy with your quilt’s end result. They suggest looking at it critically and figuring out what you don’t like before you assume you are not a colorist. They have specific elements to look for that the maker might want to change with future quilts. Hargrave reminds us to trust our instincts, which is very good advice. I think the section above is one of the most important in the book.
I did like the section on precision piecing (nine patch, pg.74). It was really good. The quilt lesson that follows reinforces the precision piecing skills.
I like books where I can look at the pictures and identify the blocks in the quilt examples. Some of the quilt photos in this book are not in high enough resolution to do that. However, the authors have provided a colored line drawing for each block in the various project sections, which is helpful.
I would have liked to have seen the various projects done in an alternate color way (gallery in the back?). I think such a feature would show beginners the variety of possibilities in a single design.
I learned a lot from the border section. The section has good examples on measuring for mitered borders. One thing I read in this section was about choosing types of borders (butted or mitered) (pg.98). The comment made me realize that the authors have sprinkled design advice throughout the book. In lieu of a design section, which might intimidate beginners, the design advice is offered where it is needed. Great feature.
The authors have had a shop and taught for years. Part of their tone seems to be that “this is a job.” One lack in this book is communicating the joy of quiltmaking. Quiltmaking should be fun.
The book could use a glossary and index.
All in all, I think this is very useful book, despite my concerns about tone and fabric. At a minimum there are very useful section that would help any level of quiltmaker hone her skills. At a maximum, a determined newbie could gain good skills from this book. I plan to take a look at Quilter’s Academy Vol. 2 –Sophomore Year: A SkillBuilding Course In Quiltmaking.
Book Review: Creating Glass Beads

Creating Glass Beads: A New Workshop to Expand Your Beginner Skills and Develop Your Artistic Voice by Jeri L. Warhaftig
This is a book that I received for free from Lark Books. Thanks, Lark! The main subject matter is completely out of my realm, though I did start my creative life making leaded glass panels, so I settled in to expand my horizons.
The author describes the books as a “workshop in intermediate glass bead making.” I applaud Lark for not publishing another beginner book. I like the various appendices in the back, especially Appendix D, which gives a little bit about the project testers.
There are many photographs in the book. Each of the pages has two photos at a minimum. Most of them have many more. My favorites were the pages showing many beads. There were a couple of pages of beads with what looked like eyes on the beads, which were interesting. I was less enamored with the beads that depicted faces, though there were elements of those beads that I really liked. The technical skill is obvious in the photos.
The second section of the book talks about the basics. Unlike quiltmaking, I needed to read this section since, as I said, I know nothing about this art. The tools are all metal and a lot of them have names that meant nothing to me until I read the description. This section also includes detailed information about safety, not just the “be careful, this work is dangerous” type of warnings several columns of information about clothing and eye protection, ventilation and how to set up your studio for optimum safety.
Jeri Warhaftig has a friendly writing style that includes tips and tricks in the writing as well as little stories. The large amount of text is not only broken up on the page by the many images, but also by tips boxes called workshop wisdom. The author provides vocabulary, additional information and practice pointers.
Each session starts with an overview of what the session will teach, they types of glass and materials the artist will need as well as list of tools. Ms. Warhaftig includes some notes on tools and materials, then jumps into a detailed description, which is fully illustrated, of how to master the techniques of the session. The last part of each session begins with a description of the experience of the project testers as well as photos of their work and a gallery of other projects.
As with all project books, this one sets out to teach specific skills. Cane work, ruffles, eyes, and glass portal, are, among others, covered. For those who are moderately interested, the book is full of lots of eye candy. I particularly liked a bead called Modern Artifact by Bernadette Fuentes (pg.71) which is described as soft glass, blown, layered, cane work.
CPP
The CPP is on vacation. See previous words and information on the Creative Prompts Inspiration Page.