I was over at Tim’s the other day for an impromptu Sew Day. Yes, I have a million holiday related things on my to do list, but who cares? It’s sewing! How could I say no?
He was tidying up after finishing a couple of quilts while I cut out more bags that will be gifts. In the process, he found a lot of scraps.
Tim’s chips
He described creating “chips” to me. This is a method to use up scraps. It is based on strips and called Stashbuster #7 on the Just Get It Done Patterns page. He created some ‘chips’ while I was there. (photo, left) . The process went pretty fast, because he found pieces with straight edges and sewed them together. Like everyone, Tim has a palette, so with a little juggling of fabrics, his strip sets went together well.
More of Tim’s chips
He sent me a photo the next day with a few more chips. I think he is close to having enough for a baby quilt. I don’t have a good sense of the sizes, so it is hard to tell.
I think this process can be done as leaders and enders while you are working on something else.
What I noticed about the Just Get It Done Patterns page is that there is a pattern as well as a video AND a coloring page. Perhaps you just want to color and relax that way? Great idea.
Tim commented “I sew the pieces together and trim them to 1.75 x 4. [To do that,] … I measure 1.5 from the seam and trim before I open and iron. More accurate.” This is interesting. I never thought of measuring before I opened and pressed the strip sets. Interesting. I’ll definitely try it when I made one of these quilts.
This might be the perfect project when you are busy or can’t concentrate on something complicated. It looks complicated, however, so it satisfying.
Tim’s finished chips quilt -2019
Tim showed me the finished version he made back in 2019 or so for friends.
I like the addition of the squares. It breaks up the rectangles.
This is the great thing about being a member of a guild. As much as I try, I can’t watch every video or see every pattern. Having quilt friends do some of the work is a boon.
I visited Birch Fabrics back in October and forgot to post about it. The last time I visited was over 10 years ago. I thought I had been there since then and it is possible. I may not have written a review on those in between visits. It is also possible I have just purchased from their online store. I don’t know.
They have moved to a new space away from downtown and nearer to their warehouse.
Birch Fabrics – first room
The space is MUCH smaller than their previous space, just two small rooms. DH was with me and we also found it a little hard to find. The sign is pretty small.
Still, the space is super clean and well organized. It was very quiet. There was one person working and she was cutting for online orders.
Mostly they had Birch Fabrics, including Charley Harper fabrics, but I saw some Tula fabrics also. There was a small number of notions.
Birch Fabrics – 2d room
One thing I found was a couple of different Sun Hat patterns. One was the Sew Hungry Hippie Bardot Bucket Hat pattern. You know that my first Sun Hat didn’t work out very well. I had been thinking about this pattern and was glad to be able to see it in person. You can buy it at Birch, but also on the SHH website. On the website, they also have a video course and SVG files for separate purchase.
Birch Fabrics, 2024
Anyway, the second room had all of the Charley Harper prints. I have to admit I went a little crazy with those fabrics. I bought quite a few pieces and they are not my normal purchases. I really liked the Charley Harper fabrics, but I tried not to buy them all.
I might make myself an Atlas Zipper Pouch with the turquoise bird fabric. I bought the fish fabrics to make DH a Hackney. I haven’t gotten to it yet.
I’d visit this store again, especially now that I know where it is. Small, but mighty!
I am behind on Bonnie Hunter’s Old Town Mystery Quilt, but trying not to stress. I thought I would get more done at Sew Day than I did. As much as I love Sew Days, it isn’t a good environment when I am trying to concentrate. I am also trying to remind myself there is a LOT of piecing in Bonnie Hunter Mystery quilts and I’ll get there.
I did sit down on Saturday and Sunday and really work on various pieces. I decided to focus on Clue 1, so I could at least say that I was finished with one clue.
I am making progress on the Flying Geese, though I haven’t made many. One thing I had to do was figure out what pieces and parts I needed to make a set of four Flying Geese. That took a little time. I really got going once I reacquainted myself with the steps. It was helpful that I had already cut the pieces I needed. The picture above is my progress on Saturday. I had other stuff I needed to do, like make gift bags, so I couldn’t focus on this project all day.
Old Town Clue 2: Four Patches
I pressed some of the strips sets for Clue #2 that I made at Sew Day and was able to make a few of the Four Patches.
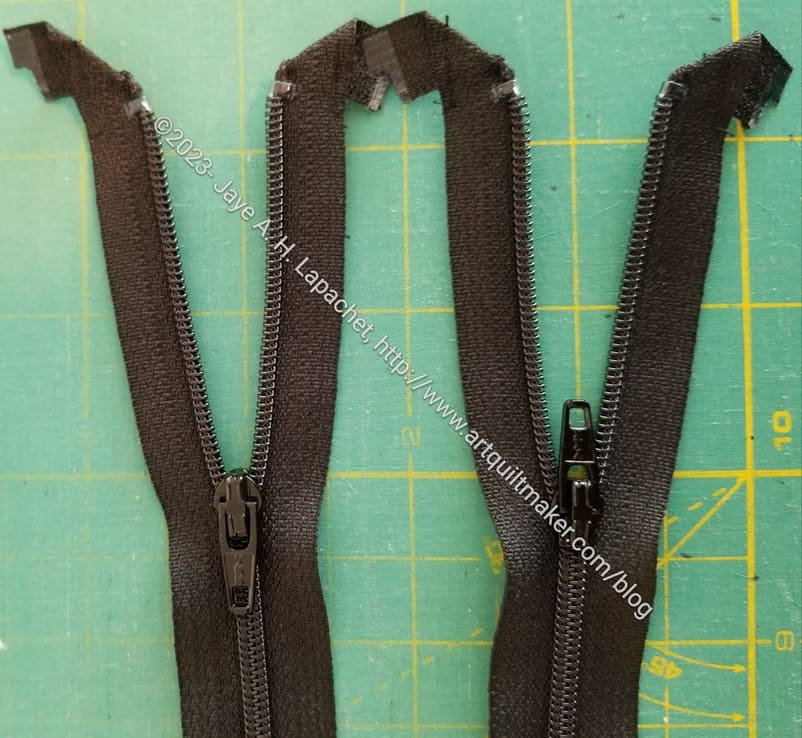
I didn’t really understand the directions for curving the zipper at the top of the Atlas Zipper Case pattern. My first one came out a little weird looking. There is a weird lump in the curve on the top. Underneath the end sticks out a little bit. None of this is fatal, but I wanted to do better on the second one.
Zipper tape at 90 degrees
I decided to make a triangle out of the end of the zipper. It makes a neat end with no lumps or bumps. I sewed the end down in the triangle, like in the photo (from another project). This keeps the end of the zipper in place, so I wouldn’t have to worry about it moving. As a bonus, I was able to create a nice curve as well.
Atlas zipper – better ending
The zipper on the Cal Atlas came out much better than on the Paris Atlas. There are no lumps and the curve is much flatter. In the future, I’ll do that to finish the zipper ends.
I recommend this method for crating zipper ends in the right circumstances. If you have a zipper tab, then you don’t need to do this. This is a great finish if the end of the zipper will be exposed for whatever reason.
Tim got his longarm up and running again. To test it and practice, he quilted some donation quilts, including the one I talked about the other day. He showed them to me when I stopped by a few days ago.
The good thing about these quilts is that they are actual quilts not just tops. The bad part is that I can take no credit for any of them. Still, like the designs he used for quilting and the patterns are fun, too.
Donation quilt quilted by Tim
This one uses a similar block to my Corner Store quilt. The arrangement is different than the one I used and makes me want to revisit the block. Maybe it would be a good idea for a donation quilt?
On both quilts Tim used different quilting patterns in the foreground and background. I think that adds to the quilts.
The testing was good as he is ready to quilt his Courthouse Steps quilt. It also means more quilts for BAM to give to those in need.
I bought this Sew Hungry Hippie Surprise Gift Box for myself. I wasn’t disappointed. While most of these subscription type boxes are not ideal, they can be quite fun and this one was.
It was STUFFED with various self care items.
The picture on the left is what I saw when I broke the seal keeping the box closed through the mail. Natalie of SHH, has a fun 1960s flower theme going on her packing materials.
SHH Gift Box – top layer
I wanted to open the box in layers so I could see everything the team put in. The first layer was Caramel Sea Salt popcorn and some zippers.
I haven’t tried the popcorn yet, but I like the idea that it is a small batch manufacturer. (N.B. Writing about this is making me want to eat the popcorn!)
At this point I saw a lot of little items peeking through and I was eager to open more.
SHH Gift Box – 2d layer
Once I took the Caramel Sea Salt popcorn out of the box, there was a lot to see!
There were a couple of zippers, a notebook, a Swiss Army type knife some iron cleaner, a charm pack and lots of little items I couldn’t identify at this point.
The colors are hot! Lots of pink, orange and red. Lovely, especially since it has been rainy and cold here.
SHH notepad – inside
The little notebook (notepad?) is really cool. I like that it has a spot for Post-it notes. I use them all the time, so having them handy in my handbag will be useful. I took out my previous notepad and replaced it with this one.
Each time I took something out, I could see more fun items.
SHH gift box – all the things #1
SHH gift box – all the things #2
The box included a lot of self care items, an iridescent ruler, some zipper pulls, a lapel pin and some fabric and vinyl. The vinyl is printed with a flower motif. It might be fun to use the Hemingway pattern with that vinyl. We’ll see.
Life has been a little hard lately, so this was a fun gift to myself.
I went out the other day and encountered some random quilt stuff. I wanted to share some things with you.
On-the-go-snack-case
First, at the Granary, I saw some interesting patterns. I have Organizational items on the mind as that might be the theme of the guild’s next swap. (N.B. Click the ‘join here‘ button so you can participate, too!). I saw a couple of interesting ideas. I thought they would be a little different than the Desktop Cube type project I made recently. One was a pouch for reusable silverware. I saw the larger one made up and it is a little on the large size, but the small size might be really useful.
Pockets to Go
Next, was the Atkinson Designs Pockets to Go** pattern. As you can see in the pattern, there are two sizes. The larger size looks like it would be great for a car trip or to corral personal items in a hotel room. Obviously, this would work very well for Sew Day. It is a little like a purse organizer for things other than purses.
The smaller size would fit very well on desks and next to sewing machines.
This is more like the Desktop Cube type project I made recently, but the handles and pockets make them a little more useful .
The larger size reminds me of the Oslo Tote I made for a swap several years ago.
Madelyn Bag panel
Second, also at the Granary, Julie pointed out a tote bag kit where the fabric is a printed panel. The various pieces of the bag are printed on the panel and labeled. For example the long strips at the top are labeled ‘straps’. Sadly, there was no picture of the finished bag on this package. Still, this is a great idea for new bag makers or if you want to make a quick bag as a gift.
I had to go out and do some research to see if I could find out more about this product. I found the Quilt Trends site. On it was the following description “a 36” panel featuring Lazy Girl’s popular Runaround Bag pattern, you’ll be able to make two bags with this versatile panel. The pieces are printed, just cut them out. Basic directions are printed on this panel. If you would like a more complete pattern, the LGD Runaround Bag Pattern is available on this site.”
I also found out that the panel is part of the ‘Madelyn’ line of fabric from Joan Hawley. The site describes this fabric as “Madelyn is Joan’s latest collection for QT Fabrics. The Madelyn Collection is anchored by a Jacobean print in Joan’s 11 piece collection done in her signature colors of aqua and purple. Supporting fabrics contain florals, scallops, tossed leaves, geometrics and a stripe.”
Well, I am impressed that Joan or QT Fabrics thought a great panel to include would be a bag. Good work!
Axe Yamazaki sewing machine
Third, from the MOMA is a fun little sewing machine called the Axe Yamazaki. I don’t think it is really that useful, but it is cute and I would love to take it for a test drive.
Again, I wandered around the Web and found the Axe Yamazaki website, which has better pictures of the machine. “This lightweight, only 4.6 Pounds,
cordless machine can be used anywhere.” The machine’s size is given as 4.5″D x 11.5″W x 10.4″H. Cost is $168 and the machine comes with a cell phone stand.
**N. B. : Obviously, you should shop at local quilt shops and small businesses. However, if you are too busy or can’t find what you need there, I use Amazon affiliate links and may be paid for your purchase of an item when you click on an item’s link in my post. There is no additional cost to you for clicking or purchasing items I recommend. I appreciate your clicks and purchases as it helps support this blog.
Tim is getting his longarm back in order. In order to test it, he quilted this quilt, then handed it over to me to bind. I didn’t know he would do that, but I don’t mind.
He has had this quilt in his pile for a long time and doesn’t remember who made it. I think it is an interesting design.
I plan to cut off the excess back and use that for the binding. It’s small and shouldn’t take me that long. No fabric usage for me from this quilt.
There were 34 people at the Sew Day/Meeting the other day, which is some kind of record. I am not sure what generated the interest, but I am glad so many people came. We have four new members and they came, too.
BAM Pouch swap 2024
The swap was really successful. I was amazed that almost 20 people participated!
Some were wrapped and some weren’t. Mine was very popular and got stolen twice. It finally ended up with the guild president.
People did nice work, too.
Swap pouch 2024
I chose a pouch made by SueG. It matches the Poolside tote I was gifted by Angela a few years ago.
I worked hard at posting different patterns on our member forum and trying to generate interest. I guess it worked!
I did finish the Ends n.20 top and back in time to take it to the guild sew day to hand in.
I cut the piece in half and rearranged the strips as I described the other day. I think it looks a little better, but it isn’t perfect. I know someone will like it and it is certainly improv!
I used a large piece of a sea green solid with some added white strips to make the back.
I have only one more set of strips to use up, though I should be getting some quilts back soon.
Old Town is the latest Bonnie Hunter Winter Mystery Quilt. In case you don’t know, you need to grab the directions while you can, because she takes them down sometime in February. You aren’t out of luck as Bonnie, later, makes the patterns available for sale.
I have done Frolic! and En Provence. I have the directions for many more, but haven’t quite gotten around to them. Bonnie’s directions are amazing and both of my quilts have come out very well.
Old Town clue #1 – cut
Right now, the group is in week three or four. I did not get started until after the second clue had been posted. Instead of my usual practice of saving all the clues and deciding whether to start sewing later, I just started on Old Town. I didn’t have a quilt going, though I needed and wanted to start on the Sad Quilt. Also, I had posted the information about the mystery quilt on the guild site and thought I might need to sew a long as well. The colors Bonnie posted appealed even though I know I can choose whatever colors I want. It is easier when I like the colors she chooses.
I did make a small change in the colors. I am using pink instead of red. Why not? I like pink and I am acknowledging that I do.
Friend Julie had a good idea to try out all the different techniques Bonnie Hunter provides in the directions. She shows at least two methods of construction of the units in each clue. These Mystery Quilts are a great way to practice different techniques, try out different tools and get practice on accuracy in the process.
Anyway, I thought I would try out the different techniques as well. Then I panicked when the second clue was posted and I was lounging around in the sun on vacation. I cut up a bunch of squares to make Flying Geese using the Wing Clipper** and just went with it.
**N. B. : Obviously, you should shop at local quilt shops and small businesses. However, if you are too busy or can’t find what you need there, I use Amazon affiliate links and may be paid for your purchase of an item when you click on an item’s link in my post. There is no additional cost to you for clicking or purchasing items I recommend. I appreciate your clicks and purchases as it helps support this blog.
I finished Ends n.20 the other day, but I am not sure the top is really finished.
I don’t like the distribution of the strips. It looks unbalanced to me.
I know it is a donation quilt and I shouldn’t care that much, but I don’t like sending ugly quilts out into the world. It isn’t ugly, but it isn’t right either. It also isn’t good for me to not do my best. I use these quilts as a design exercise and need to do my best.
Ends n.20 where to cut
I am thinking of cutting the quilt as shown and sewing the right edge to the center. That is flipping the cut off piece 180 degrees. The dark and the grey ‘L’ will be in the middle if I do this.
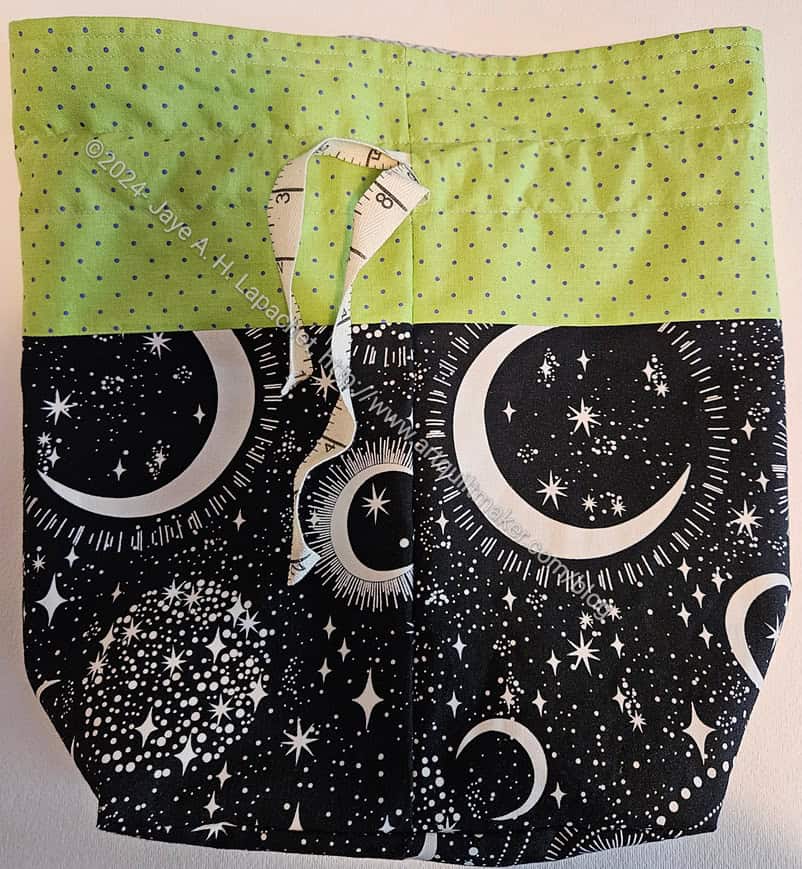
It is once again time to make gift bags. Obviously, Christmas is coming and these types of gift bags make wrapping a breeze. I know many of you don’t celebrate Christmas. These bags are great for any holiday including birthdays, anniversaries, saints days, Hannukah and any other you can think up. I use them for most birthdays. There is always more fabric, after all.
The great thing about these bags is that they are reusable. The other great thing is that you can use ANY fabric; it doesn’t have to be quilting cotton. I have made some gorgeous bags from upholstery fabric I got from FabMo.
Supplies:
Fabric – I use either a half yard, a yard or a fat quarter. If you use a yard you can make 4 smallish bags, two medium bags or one large bag. You can make bags with any size piece of fabric and you can make a specially sized bag for a special gift. I once made a gift bag for a weed whacker!
thread
ribbon- I often save ribbon from packages and other gifts and reuse it for gift bags.
Sewing machine
basic sewing kit
For this tutorial, we will use a fat quarter of fabric
1. If your fat quarter does not have a selvedge, create a hem using two folds so there are no raw edges. If your fat quarter has a selvedge, use the selvedge for the top. It won’t unravel.
2. Press hem in place.
3. Sew hem with a decorative stitch, if you have it, a zigzag or straight stitch work fine as well.
Optional: you can use embroidery to liven up or personalize the front of the bag.
Optional: If you have stitch letters on your sewing machine, stitch your name and the year so you know when you made the bag.
4. Fold hemmed bag in half WRONG SIDES TOGETHER so that half of the hem is underneath itself towards the top and the fold is on the left. You will be making a French seam.
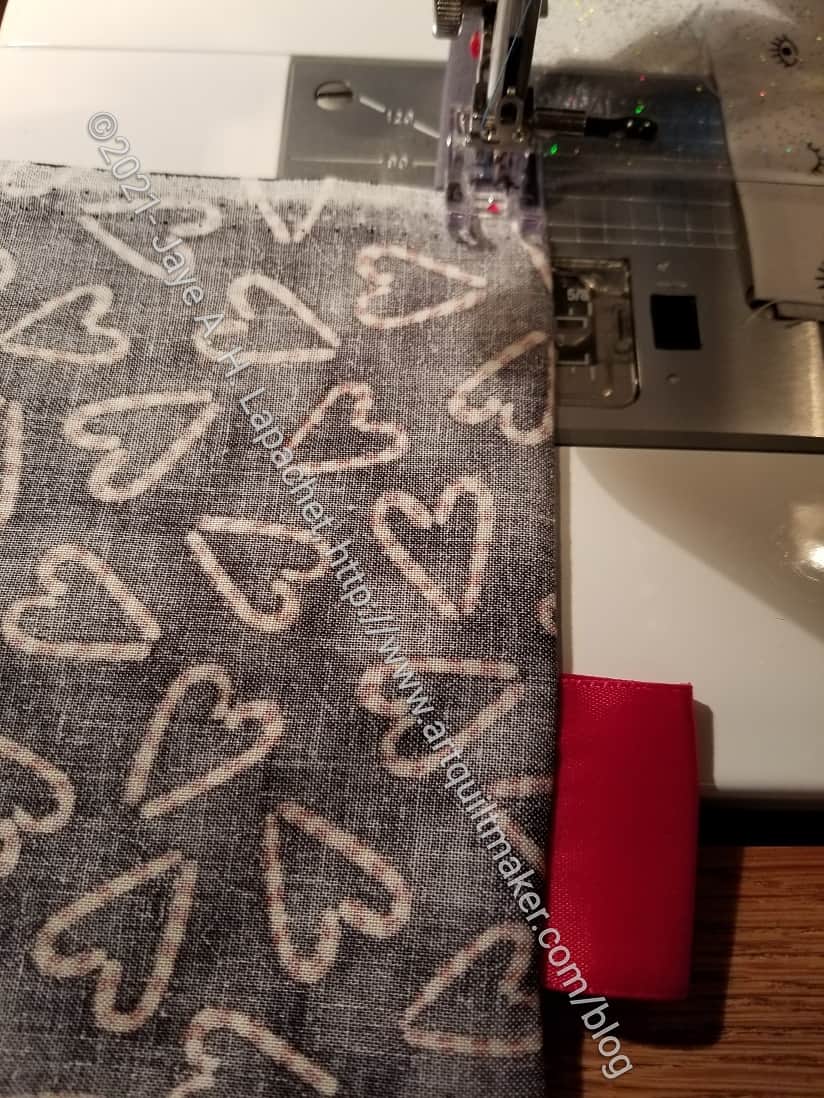
5. Fold a piece of ribbon about 1.5 feet long in half. You can adjust the size of ribbon you use depending on how much ribbon you need to make a nice bow when you tie.
6. Place the folded ribbon in the open side of the bag about 4″ from the top edge/hem.
7. Pin ribbon in place.
8. Pin rest of the right side and bottom closed.
Use an 1/8″ seam allowance.
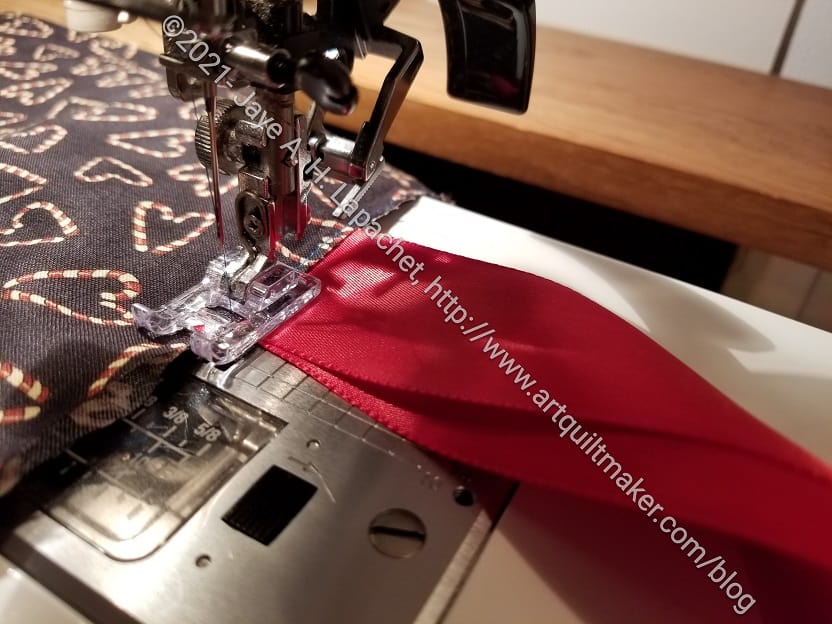
Sew first seam on gift bag
9. Starting from the top, sew down the right side, backstitching at the beginning and over the ribbon, 2-3 times. You want to backstitch at stress points to keep the bag from ripping apart.
10. Turn at the corner and continue across the bottom, backstitching at the end.
Optional: round the corner. It makes sewing and turning easier.
11. Turn the bag inside out, so the right sides are together and the ribbon is out of the way of the seam (It will be inside the bag, but I put mine as straight as possible towards the opposite side of the bag.
12. Press seams, taking care to push them as far out as possible so there is no extra fabric folded near the seams.
Use a 1/2″ or 5/8″ seam allowance.
Finish French Seam
13. Starting at the top, sew down the side and across the bottom again to finish the seam.
14. Open bag to make sure the raw edge is completely hidden inside the seam.
15. Turn bag inside out and press.
Voila! Your bag is really to use!
Many people ask about labels. I punch a hole in a gift tag and thread the ribbon through it. You can also buy basic tags with strings** or gift tags** and use those or stick a sticker onto the bag. I would recommend reusing gift tags. We do that, too.
Benefits:
reusable
reduces garbage
good way to use fabric you might not use for quilts
Novelty fabrics
fabric you don’t love anymore
Use fabric you already own
orphan blocks
vintage sheets
Any fabric is suitable including velvet, brocade, knits, etc
provides you with the opportunity to buy holiday fabric without committing to making a holiday (or birthday) quilt
quick method for wrapping
If you track fabric usage, this a good way to use fabric quickly
no need to rush out to buy gift wrap
no tape or scissors needed
small children can help wrap, or wrap their own gifts
Fabric costs can be amortized over the years of the gift bag use 😉
bags are made quickly
hems provide a good opportunity to try out decorative stitches
can quickly make a gift bag for an oddly shaped gift, such as the weed whacker I mentioned
odd sized bags can be cut up later and used for different sized gifts
I reuse ribbon I get from other places for the ties
Easy to open and close the gift bag up again if the gift tag falls off
Embellishment possibilities are endless, if you want to take the time. Gift bags are a great way to try out different techniques, stitches, embroidery. embellishments or use orphan blocks
Blue Flower gift bag
Drawbacks:
takes time to develop a stockpile
reusable gift bags have to be stored
fabric costs are not insignificant
You don’t get beautiful mounds of boxed gifts under your tree
Any gift bags you make will add to your stockpile. You can use leaders and enders to make them, which means that your regular sewing isn’t interrupted much .
Resources:
In Color Order pattern (and some information from another post)
**N. B. : Obviously, you should shop at local quilt shops and small businesses. However, if you are too busy or can’t find what you need there, I use Amazon affiliate links and may be paid for your purchase of an item when you click on an item’s link in my post. There is no additional cost to you for clicking or purchasing items I recommend. I appreciate your clicks and purchases as it helps support this blog.
Yesterday was the guild’s Holiday Extravaganza. SIL#2 organized a pouch swap. I didn’t participate in the last swap, which featured potholders. I am not a fan of potholders, so I didn’t want to bother. There were plenty without me. However, I want to encourage people to make bags, and I like making pouches, so I planned from the beginning to participate in this latest swap.
Swap Stella pouch
After seeing the Center Street Quilts video on IG showing the making of a half vinyl pouch, I decided to try and make one for the swap. I thought I could probably make the pouch after watching the video, but decided to buy the pattern, the Stella Pouch from Center Street Quilts just to make the process a bit easier.
I looked for more specific directions on the Flying Geese and the vinyl, but didn’t find any. Even with the pattern, I still had plenty of figuring out to do. It wasn’t a problem. I knew I could figure it all out. That is one reason I enjoy making bags. There is always something to figure out.
I think I forgot to trim the height, so the pouch is bigger than the pattern states. Still, I think it will be useful. Small project bag?
Swap Stella pouch – back/vinyl
I am pretty happy with the way the pouch came out. I am getting more practice with binding the inside edges and I was thrilled to get more practice on the zipper tab technique I talked about a week or so ago. I have big plans to make a bunch of these, but we will see.