While I was making my sister’s Enigma bag back in July, I also made one for Gerre for Christmas. This is Enigma #6.
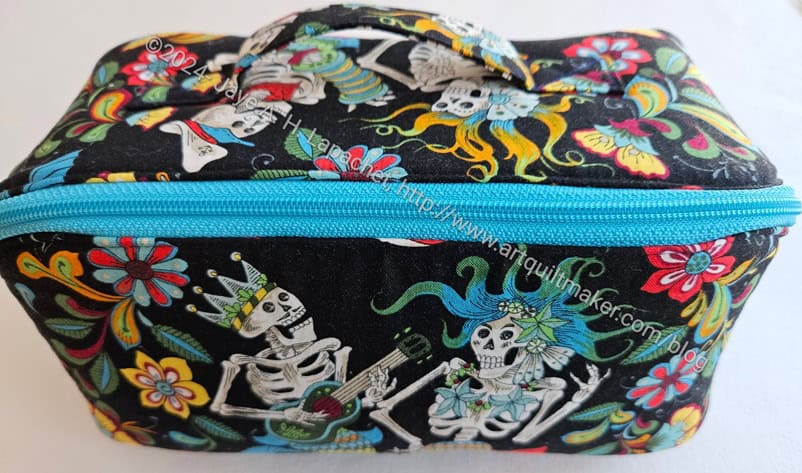
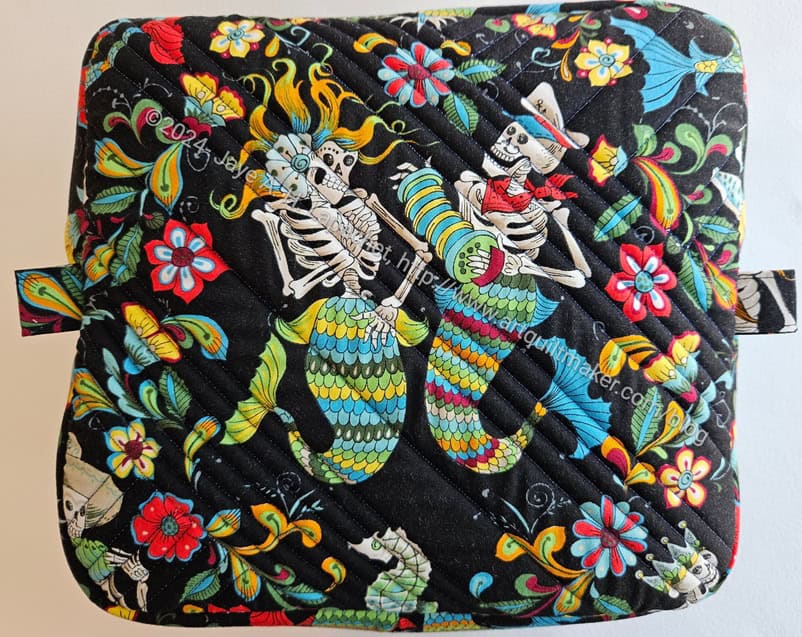
Skeleton Mermaid Enigma – bottom
I didn’t use my ‘regular’ sugar skull fabric for this one. I used a fabric I bought on my trip to and around Portland and I can’t decide if I like it. The key is whether Gerre likes it. I thought the seahorses and some of the ocean life were cool, but the skeletons started to creep me out after awhile. If she feels the same, I will make another one of these for her. I’ll have to see what she says.
I am pleased with the fussy cutting on the bottom. I didn’t have a lot of the fabric and was glad I had enough to highlight the main motif.
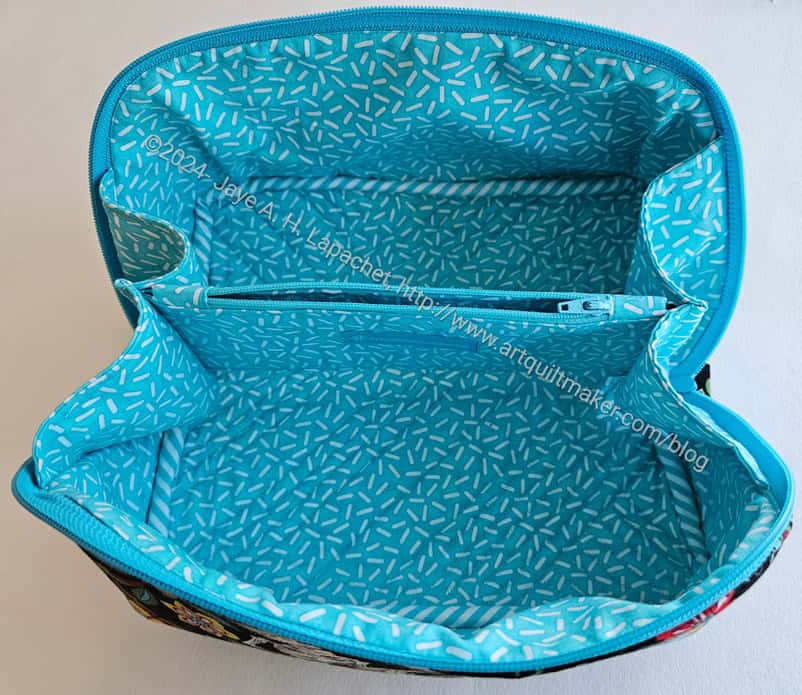
Skeleton Mermaid Enigma open
I am also pleased with the way the inside came out. The stripes I bought at the Granary are perfect for the inside.
The pattern calls for a 2.5 inch wide binding. I made the binding 2.25 inches wide, which is my norm for quilting binding. I had to stretch the binding a bit in certain places and trim seams, but mostly the 2.25 inch binding worked well.
Skeleton Mermaid Enigma – interior detail
I figured out a great place to put my label on these Enigma bags. The label fits well in the middle of the inside pocket. The label isn’t tucked away unobtrusively and I am not sure how I feel about that. I am not sure why I didn’t think of it before as it was also easy to install.
As with my sister’s Enigma bag, this one went together pretty easily. I like making the same bags over and over as they get better each time I do it.
I finished the Atlas Zipper Case right before Thanksgiving. Of course, I couldn’t talk about it before now because I wanted to be a surprise. Even this is a little early!
I am super pleased with the way it came out. I hope my Lil Sissy likes it, too. She shared the original IG video about the pouch (portfolio) with me.
I didn’t find the project to be very difficult even though I struggled to get started. Cutting is always a hassle. I always want to get straight to sewing.
For this piece, I used a piece of the Paris fabric I have been using to make gifts for my sister. The fussy cutting, after I quilted it, came out really well. I used my 20.5 inch x 20.5 inch Creative Grids ruler**. That ruler is really big and a bit unwieldy on my small cutting table, but I wanted to be able to see the whole piece and trim exactly. It worked really well except for pushing my entire scrap bin onto the floor in the process! LOL! The Eiffel Tower is perfectly placed on the front.
Paris Atlas Zipper Case – back
The bicycle on the back looks good, too. I haven’t ever asked my sister if she likes this fabric. I hope so as I just bought more of that yardage. I feel like I was lucky to find some as is isn’t new.
I forgot to sew the label on before I added the inside pockets, so I hand stitched it later.
The portfolio has a zipper that goes all the way around, so the bag is completely closed when it is zipped.
Atlas Zipper Case Open
It has smallish, but useful pockets to keep some of your tools, or, possibly, project pieces organized.
There is also space for flat items, like a 6.5 x 6.5 ruler** under the pockets.
Atlas Zipper Case -open, right
I am on the fence about the fabric pocket on the lower right. All of the other pockets are vinyl. I like seeing what I have available, but I guess you could use that pocket for things you didn’t want everyone to see. Credit cards or your driver’s license? I don’t know. I keep those things in one place so I always know where they are. If I make this again, I might make it into another vinyl pocket.
Atlas Zipper Case -open, left
The left side has a larger pocket completely made from vinyl. This is a really useful pocket.
I really like this project and am looking for ways to make more.
**N. B. : Obviously, you should shop at local quilt shops and support small businesses. However, if you are too busy or can’t find what you need there, I use Amazon affiliate links and may be paid for your purchase of an item when you click on an item’s link in my post. There is no additional cost to you for clicking or purchasing items I recommend. I appreciate your clicks and purchases as it helps support this blog.
I didn’t really understand the directions for curving the zipper at the top of the Atlas Zipper Case pattern. My first one came out a little weird looking. There is a weird lump in the curve on the top. Underneath the end sticks out a little bit. None of this is fatal, but I wanted to do better on the second one.
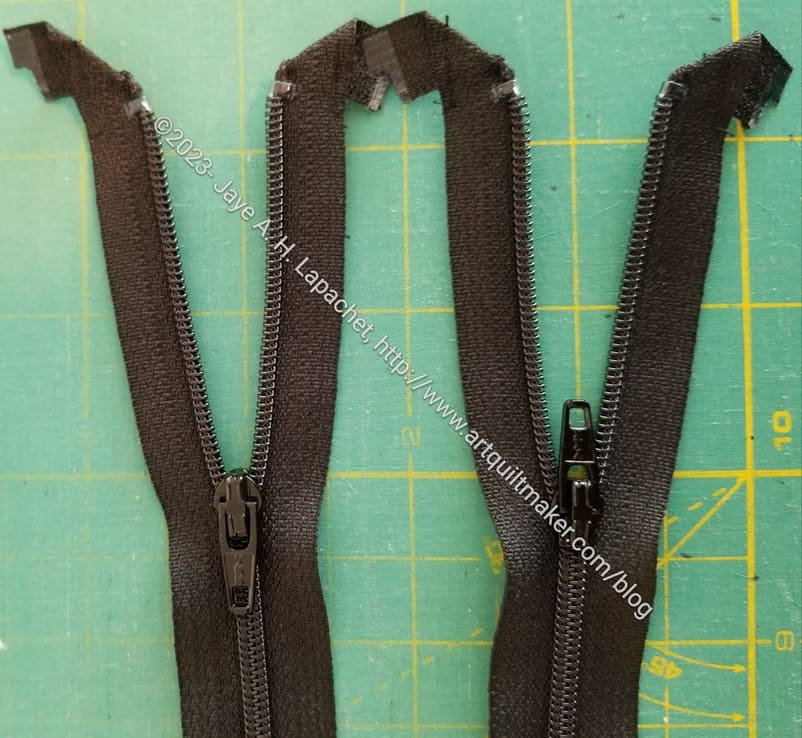
Zipper tape at 90 degrees
I decided to make a triangle out of the end of the zipper. It makes a neat end with no lumps or bumps. I sewed the end down in the triangle, like in the photo (from another project). This keeps the end of the zipper in place, so I wouldn’t have to worry about it moving. As a bonus, I was able to create a nice curve as well.
Atlas zipper – better ending
The zipper on the Cal Atlas came out much better than on the Paris Atlas. There are no lumps and the curve is much flatter. In the future, I’ll do that to finish the zipper ends.
I recommend this method for crating zipper ends in the right circumstances. If you have a zipper tab, then you don’t need to do this. This is a great finish if the end of the zipper will be exposed for whatever reason.
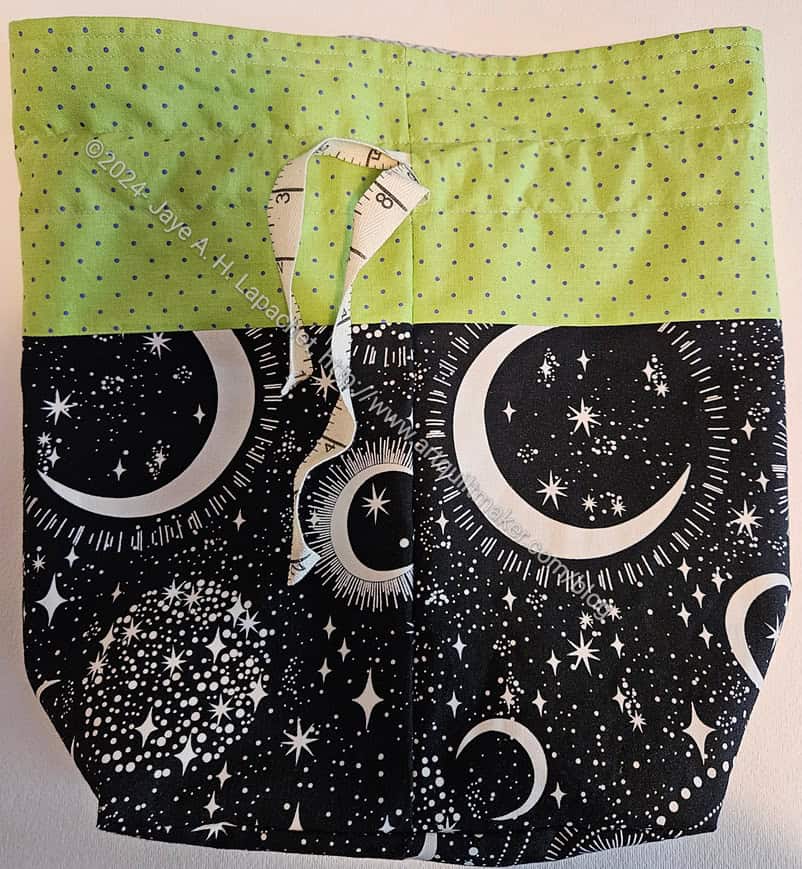
It is once again time to make gift bags. Obviously, Christmas is coming and these types of gift bags make wrapping a breeze. I know many of you don’t celebrate Christmas. These bags are great for any holiday including birthdays, anniversaries, saints days, Hannukah and any other you can think up. I use them for most birthdays. There is always more fabric, after all.
The great thing about these bags is that they are reusable. The other great thing is that you can use ANY fabric; it doesn’t have to be quilting cotton. I have made some gorgeous bags from upholstery fabric I got from FabMo.
Supplies:
Fabric – I use either a half yard, a yard or a fat quarter. If you use a yard you can make 4 smallish bags, two medium bags or one large bag. You can make bags with any size piece of fabric and you can make a specially sized bag for a special gift. I once made a gift bag for a weed whacker!
thread
ribbon- I often save ribbon from packages and other gifts and reuse it for gift bags.
Sewing machine
basic sewing kit
For this tutorial, we will use a fat quarter of fabric
1. If your fat quarter does not have a selvedge, create a hem using two folds so there are no raw edges. If your fat quarter has a selvedge, use the selvedge for the top. It won’t unravel.
2. Press hem in place.
3. Sew hem with a decorative stitch, if you have it, a zigzag or straight stitch work fine as well.
Optional: you can use embroidery to liven up or personalize the front of the bag.
Optional: If you have stitch letters on your sewing machine, stitch your name and the year so you know when you made the bag.
4. Fold hemmed bag in half WRONG SIDES TOGETHER so that half of the hem is underneath itself towards the top and the fold is on the left. You will be making a French seam.
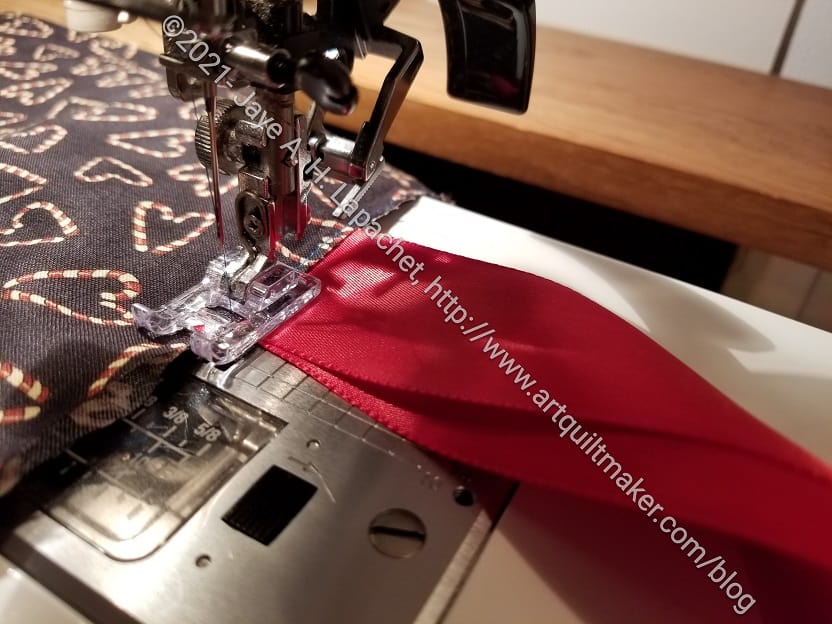
5. Fold a piece of ribbon about 1.5 feet long in half. You can adjust the size of ribbon you use depending on how much ribbon you need to make a nice bow when you tie.
6. Place the folded ribbon in the open side of the bag about 4″ from the top edge/hem.
7. Pin ribbon in place.
8. Pin rest of the right side and bottom closed.
Use an 1/8″ seam allowance.
Sew first seam on gift bag
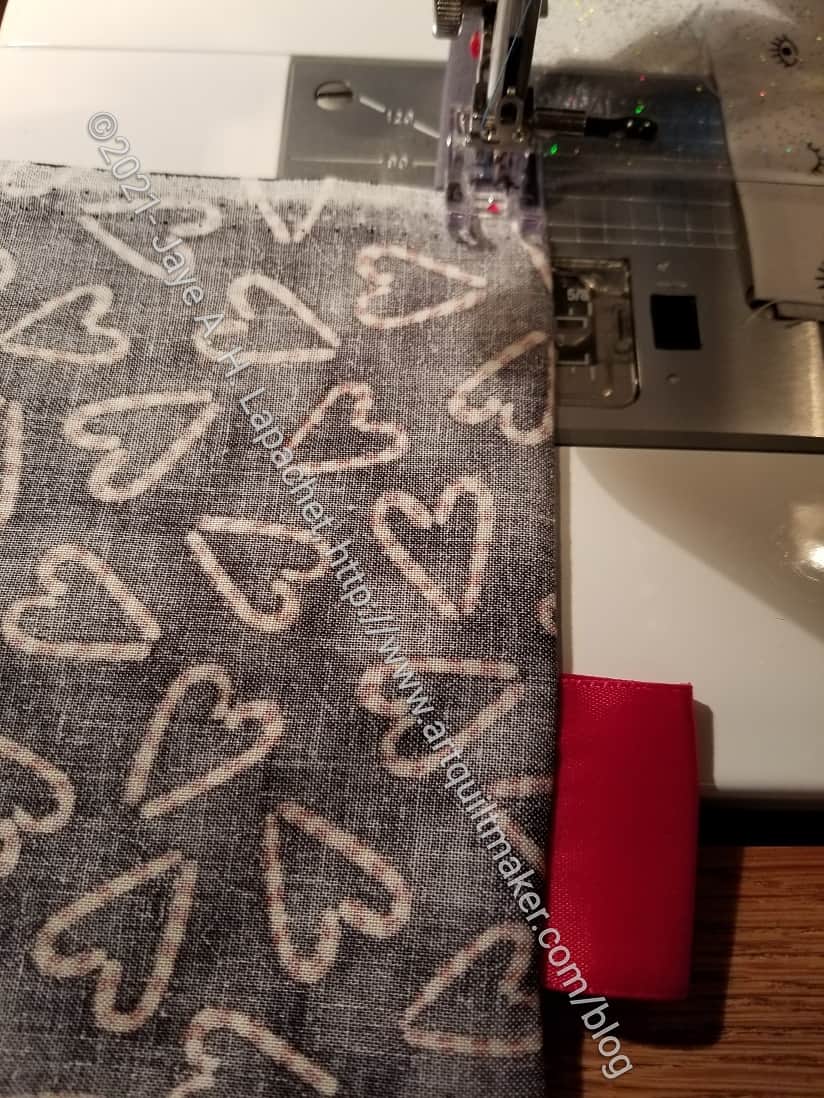
9. Starting from the top, sew down the right side, backstitching at the beginning and over the ribbon, 2-3 times. You want to backstitch at stress points to keep the bag from ripping apart.
10. Turn at the corner and continue across the bottom, backstitching at the end.
Optional: round the corner. It makes sewing and turning easier.
11. Turn the bag inside out, so the right sides are together and the ribbon is out of the way of the seam (It will be inside the bag, but I put mine as straight as possible towards the opposite side of the bag.
12. Press seams, taking care to push them as far out as possible so there is no extra fabric folded near the seams.
Use a 1/2″ or 5/8″ seam allowance.
Finish French Seam
13. Starting at the top, sew down the side and across the bottom again to finish the seam.
14. Open bag to make sure the raw edge is completely hidden inside the seam.
15. Turn bag inside out and press.
Voila! Your bag is really to use!
Many people ask about labels. I punch a hole in a gift tag and thread the ribbon through it. You can also buy basic tags with strings** or gift tags** and use those or stick a sticker onto the bag. I would recommend reusing gift tags. We do that, too.
Benefits:
reusable
reduces garbage
good way to use fabric you might not use for quilts
Novelty fabrics
fabric you don’t love anymore
Use fabric you already own
orphan blocks
vintage sheets
Any fabric is suitable including velvet, brocade, knits, etc
provides you with the opportunity to buy holiday fabric without committing to making a holiday (or birthday) quilt
quick method for wrapping
If you track fabric usage, this a good way to use fabric quickly
no need to rush out to buy gift wrap
no tape or scissors needed
small children can help wrap, or wrap their own gifts
Fabric costs can be amortized over the years of the gift bag use 😉
bags are made quickly
hems provide a good opportunity to try out decorative stitches
can quickly make a gift bag for an oddly shaped gift, such as the weed whacker I mentioned
odd sized bags can be cut up later and used for different sized gifts
I reuse ribbon I get from other places for the ties
Easy to open and close the gift bag up again if the gift tag falls off
Embellishment possibilities are endless, if you want to take the time. Gift bags are a great way to try out different techniques, stitches, embroidery. embellishments or use orphan blocks
Blue Flower gift bag
Drawbacks:
takes time to develop a stockpile
reusable gift bags have to be stored
fabric costs are not insignificant
You don’t get beautiful mounds of boxed gifts under your tree
Any gift bags you make will add to your stockpile. You can use leaders and enders to make them, which means that your regular sewing isn’t interrupted much .
Resources:
In Color Order pattern (and some information from another post)
**N. B. : Obviously, you should shop at local quilt shops and small businesses. However, if you are too busy or can’t find what you need there, I use Amazon affiliate links and may be paid for your purchase of an item when you click on an item’s link in my post. There is no additional cost to you for clicking or purchasing items I recommend. I appreciate your clicks and purchases as it helps support this blog.
Yesterday was the guild’s Holiday Extravaganza. SIL#2 organized a pouch swap. I didn’t participate in the last swap, which featured potholders. I am not a fan of potholders, so I didn’t want to bother. There were plenty without me. However, I want to encourage people to make bags, and I like making pouches, so I planned from the beginning to participate in this latest swap.
Swap Stella pouch
After seeing the Center Street Quilts video on IG showing the making of a half vinyl pouch, I decided to try and make one for the swap. I thought I could probably make the pouch after watching the video, but decided to buy the pattern, the Stella Pouch from Center Street Quilts just to make the process a bit easier.
I looked for more specific directions on the Flying Geese and the vinyl, but didn’t find any. Even with the pattern, I still had plenty of figuring out to do. It wasn’t a problem. I knew I could figure it all out. That is one reason I enjoy making bags. There is always something to figure out.
I think I forgot to trim the height, so the pouch is bigger than the pattern states. Still, I think it will be useful. Small project bag?
Swap Stella pouch – back/vinyl
I am pretty happy with the way the pouch came out. I am getting more practice with binding the inside edges and I was thrilled to get more practice on the zipper tab technique I talked about a week or so ago. I have big plans to make a bunch of these, but we will see.
I finished the Grab & Go Sleeve very quickly and sent it straight off to my mom so she could use it right away.
Both sides essentially look the same. The only difference is that I put a label on only one side of the exterior.
I also used some ‘webbing’ that Cyndi made me take from one of the Sew Day Free Table offerings. The webbing is made out of cotton rather than plastic, like the Tula Pink webbing I used for a couple of the Take a Stand bags.
Grab & Go Sleeve interior
Since this is for my mom, I dug out the Laurel Burch fabric I used for her Mustang Organizers and used that for the lining.
She received it on Wednesday and said that it fits her portfolio perfectly. She said she really liked it, which makes me happy.
If I can think of things for which to use these bags I’ll make more as they are a quick bag to make, especially if you use pre-made webbing for the handles.
My Sister has taken to sending me Instagram videos. One of them showed a new Pattern by Center Street Quilts, the Atlas Zipper Case. It is a portfolio like case that can be used for tools or small projects.
I was on the fence about another new pattern until I visited with Mary. She had bought and printed out the pattern. I was able to look through it. I decided that the pattern would be a good gift.
Atlas Zipper Case start
I started right away, but struggled to get past cutting. I was dreading the quilting part until a friend mentioned MistyFuse. I used MistyFuse to fuse the lining to the foam so I could quilt it. I never tried it before, but it adhered the fabric to the foam really well.
I haven’t tried quilting it yet but my fingers are crossed that it will help keep the pieces flat.
The Grab & Go Sleeve is a project from Minikins Season 1. Honestly, it is one I never thought I would make. I have at least two laptop bags, so I really don’t need anything else. Also, there is nowhere in the bag for the mouse or the cord.
However, it is a good bag for other things like files and notepads. My mom has a portfolio she is using to take notes during a series of appointments she has. She is using the project bag I made her to carry around her portfolio. It doesn’t really fit very well.
This project immediately occurred to me once I saw what was happening. I am not sure why as I really never thought about this bag before.
This project serves a second purpose as well. I want to make the Heartlands Backpack. It is a ‘choose your own adventure’ bag. The Grab & Go Sleeve is a lighter version of a ‘choose your own adventure’ bag. It has only a few pieces and not many options. I wanted to try an easy ‘choose your own adventure’ bag before I started the Heartlands.
Grab & Go Sleeve- lining with pockets
I decided to add some mesh pockets to the inside to provide a bit of organization.
I also added a D-ring (but rectangular) so she can clips things to the bag if she needs to do so.
I was very pleased to learn a new zipper tab technique after working on the Stella Pouch. I actually emailed Sara Lawson from Sew Sweetness about it. She said it was new to her. I really like the technique, because it makes zipper tabs really easy and you don’t have bits sticking out as you do when you fold them.
Note this is not a tutorial. I am just showing a technique you can try. It is well explained in the Stella Pouch pattern. You can probably figure out how to sew zipper tabs using this method from the photos below.
CSQ Zipper Tab Technique step 1
First you cut two pieces of fabric and place them over the zipper. You don’t put the fabric quite to the end.
CSQ Zipper Tab Technique step 2
Next sew a big U starting away from the end of the zipper. Do not catch the zipper tape in the stitching. It is pretty easy to see the zipper tape through the fabric.
CSQ Zipper Tab Technique step 3
After the tabs are sewn, turn the zipper tabs out to cover the raw edge of the zipper. You might want to trim the corner where the vertical stitching meets the horizontal stitching to reduce bulk.
CSQ Zipper Tab Technique – turned tab detail
Now you can sew your zipper into a bag or pouch.
CSQ Zipper Tab Technique – info
However, one thing I didn’t like was that I couldn’t poke the turning point corner out to be crisp. I even tried my awesome Modern American Vintage turning tool. It was a little large for the job. I wonder if they have a smaller version? I didn’t trim around the corner, but I would try that next time (see above).
Zipper tabs sewn in
Fortunately that particular area is sewn into the seam allowance when you sew the zipper into the bag or pouch. It makes the technique really crisp and clean. Of course, if the zipper is sticking out like in the Cotton Candy pouch or the Boxy Clear pouch, then a different technique needs to be used.
We are thanking Laura, a longarmer in Half Moon Bay who has been longarming donation quilts for us for a year or more. Carrie is gathering gifts to make a nice basket for her.
Stella Pouch for Laura
After seeing the Center Street Quilts video on IG showing the making of a half vinyl pouch, I decided to try and make one. I actually made two. One will be for a guild swap. I thought I could probably make the pouch after watching the video, but decided to buy the pattern, the Stella Pouch from Center Street Quilts just to make the process a bit easier.
Stella Pouch for Laura – vinyl side
I looked for more specific directions on the Flying Geese and the vinyl, but didn’t find any. Even with the pattern, I still had plenty of figuring out to do. I knew I could do it. That is one reason I enjoy making bags. There is always something to figure out.
I think I forgot to trim the height, so the pouch is taller than the pattern states. Still, I think it will be useful. Small project bag?
One of the good things about using vinyl for this bag is I was able to use a very pretty lining fabric. Having a good fabric show through the vinyl is an added bonus.
I think I might have a few more of these pouches in my future.
**N. B. : Obviously, you should shop at local quilt shops and support small businesses. However, if you are too busy or can’t find what you need there, I use Amazon affiliate links and may be paid for your purchase of an item when you click on an item’s link in my post. There is no additional cost to you for clicking or purchasing items I recommend. I appreciate your clicks and purchases as it helps support this blog.
I received an email from DH’s cousin last week saying “i was canvassing for kamala in both reno and racine WI for 5 and 7 days in october, respectfully, just home this wednesday…..i needed a shoulder bag that would hold the door hangers we were distributing….i looked in my closet and found the bag you had made for me one christmas….it worked perfectly through many days of heat and rain!!!…just wanted to let you know you came along with me!!!”
This bag is from 2011! I am so thrilled to see it again. I didn’t remember giving it to DH’s cousin, however I am really glad it was useful.
I finished the Running with Scissors tote the weekend after I returned from Portland in October.
Running with Scissors tote – front
The time I spent in Portland working on the Running with Scissors tote was well worth the time. I am pleased with how it came out.
I used the foam that Colleen quilted for me and that made the whole project go a lot quicker.
The pattern calls for a border on the front, but I like the large flowers of this Philip Jacobs print so much that I didn’t put it on. Both the front and the back look similar, but I don’t mind.
Running with Scissors tote – inside
The inside looks really great IMO. I forgot to cut all of the zipper and pocket bindings. Fortunately, I had the turquoise stripe with me and it went well with the zippers and the general overall look of the bag.
I customized some of the pockets for my tools. For the mesh pocket, I divided it into a very large section and a small section. The large section will be used for a rotary cutter and the small section will be for Sewline pencil refills.
Running with Scissors tote – outside
I thought the webbing I used for the handle would hurt my hand, but I think the bag won’t get heavy enough to be a problem. I do like the glitter of the webbing. Perhaps having a little sparkle in my life is a good thing.
I was surprised at how small this bag is. I think of it as being much larger. I wonder if I could enlarge the pattern. The pattern is so complicated that I think it would be difficult.
Take a Stand & Running with Scissors
This bag is designed to be used with the Take a Stand bag**. I made a Take a Stand bag for myself awhile ago. As soon as I was finished with this RwS tote, I tried it with the Take a Stand bag and I was so pleased with how it looked.
Now I need to fill this bag up and take it to Sew Day.
**N. B. : Obviously, you should shop at local quilt shops and support small businesses. However, if you are too busy or can’t find what you need there, I use Amazon affiliate links and may be paid for your purchase of an item when you click on an item’s link in my post. There is no additional cost to you for clicking or purchasing items I recommend. I appreciate your clicks and purchases as it helps support this blog.
Despite my objections to the zipper installation, I decided to make another Holland Pouch. While I was in Portland, I went to Modern Domestic and bought some fabric, then went back to my AirBnB and made the pouch. The second time it only took me about 4 hours from cutting to completion. I couldn’t make these for a living, but I was pleased with how fast I did it.
Bird Holland Pouch Interior
I have been buying a few Charlie Harper bird prints lately. I don’t know why as I don’t usually make projects out of novelty prints. I bought this particular print because Amanda loves animals. The print is sophisticated as well. Most of Charlie Harper prints have a bit of humor as well as some sophistication.
The inside of the bag is made from a Ruby Star scattered star print. The color doesn’t exactly go with the outside, but choices were limited at Modern Domestic. I think the variation looks nice.
I also couldn’t wash the fabric (AirBnB and all), but for a bag, just this once I was ok with it. I was concerned about the smell from ironing the fabric, but I didn’t smell anything and didn’t have any breakouts, so it was all ok. The Charley Harper fabric is organic, so maybe that makes a difference?
Quilting Bird Holland
This pattern requires quilting the exterior, foam and lining fabrics together. Instead of quilting on each side of blue tape only, I put down a piece of blue tape, measured 3 inches to the right and put down another piece. I did that on both sides of the center piece of blue tape until I ran out of space. This means that my quilting isn’t as close together as in the Oxbow tote. It also took less time and I didn’t get as irritated.
Holland Pouch side
The quilting went faster, but it means there is a 3 inch gap between some of the quilting lines. You can see that there is a dearth of quilting lines on the side towards the top, because of the 3 inch gap. I probably should have turned the fabric around, so there was more quilting on the top.
I also had a bit of trouble keeping the fabric taut, so the 3 inch spacing may not have been the best interval. Oh well. Live and learn.
Bird Holland pouch top
This bag has a bit of an accent around the zipper, which I think looks nice in this bag.
This is a very quick bag to make and I am pleased with the outcome. I was more pleased that Amanda loved it. She really helped me during the visit and this was a small token of my gratitude.
I have wanted to make myself a Running with Scissors tote for awhile. I made one for my mom, and one for a friend, Mrs. K. I thought I had made another one, but I guess not. This photo is one I took in Portland after I had done most of the prep.
Shockingly, the prep all went very well except for the pressing pad. The directions had some nonsense about double Soft & Stable**. I ended up ignoring it, because I didn’t think it mattered and I couldn’t understand what they were trying to tell me anyway.
I realized after I had cut the tote out that I am in overdrive in terms of finding a new solution for taking my tools to Sew Day. Crafty Carrier, Hildegarde, Kit Supply Tote and now the Running with Scissors tote**. What am I thinking? Clearly I am not thinking; I am just making bags for myself. I have made a lot of bags for others so I think this is ok for now.
I really thought this bag was much harder and was kind of dreading it even though I wanted one. I think it helped that I used the pre-quilted foam that Colleen quilted for me. Much less fussing around at the beginning. Still, it didn’t feel hard at all and it has been awhile since I made the last one, which was in 2020.
I thought I had cut out everything, but I hadn’t cut out all the pocket and zipper bindings once I got to that step. Fortunately, I had some turquoise striped fabric that worked very well. I think it will look good.
**N. B. : Obviously, you should shop at local quilt shops and support small businesses. However, if you are too busy or can’t find what you need there, I use Amazon affiliate links and may be paid for your purchase of an item when you click on an item’s link in my post. There is no additional cost to you for clicking or purchasing items I recommend. I appreciate your clicks and purchases as it helps support this blog.