Tutorial: LeMoyne Star

Finished LeMoyne Star

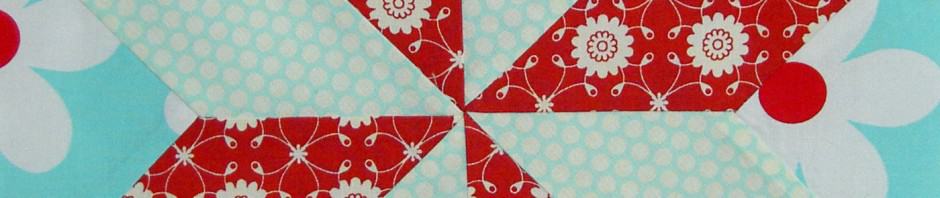
This is a tutorial on making a LeMoyne Star. This block is also called an Eight Pointed Star. This is one of the ways that I make it. There are many methods and I encourage you to try different techniques.

Alex Anderson has a great tutorial on one of the Quilt Show episodes on making a Split LeMoyne Star.

Before you do anything else, print the rotary cutting instructions below (first item under supplies). All the sizes, etc are there.

Supplies:

  • 8 Pointed Star Rotary Cutting Directions
  • 4.5″x 12.5″ Creative Grids ruler
  • 4.5 x8.5″ Creative Grids ruler
  • Optional: Jinny Beyer Perfect Piecer ruler
  • Optional: Mary Ellen’s Best Press or similar
  • Optional: stiletto
  • fabric marking implement (pencil, Sewline, Pilot SCUF, Pigma Micron, mechanical pencil, etc)
  • rotary cutter
  • mat
  • sewing machine
  • thread
  • iron
  • ironing board
  • 3 fabrics (I will name them A, B, C)
    • 3″x23″ strip of fabric A for 4 diamonds
    • 3″x23″ strip of fabric B for 4 diamonds
    • 1 fat quarter for the background (fabric C)

Important information:

  • Block is 12.5″ unfinished, 12″ finished
  • These directions use a quarter inch seam allowance.
  • You will be creating Y seams.
  • Chain piecing is not part of this tutorial.
  • Respect the bias.
  • Do not sew into the seam allowance.

Cutting

Line Up Ruler to Cut 1 Side of Diamond

Cut a 3″x23″ strips. That should be long enough for 4 diamonds (parallelograms). Cutting a 3″ strip across the width of a half yard of fabric will generate a strip that is long enough. You will need two and using 2 different fabrics looks good.

As shown (left), line your ruler up so the 45 degree angle on your ruler is along the bottom of the strip.The side of the ruler should be lined up right in the corner of your strip.

The idea is to cut off the end of the strip, so you have the correct angle of one pointy end of the diamond. I did try my diamond ruler, but none of the lines were quite the right size, so I couldn’t use it for this particular block.

Line Up Rulers to Cut the Second End

I used the two rulers to  make sure that the diamond were accurate. The first ruler, on the left, should be even with the far left [soon to be] diamond point so that it would measure 4.25″ along the bottom edge. I used that measurement to line up the 45 degree angle of the second ruler so I could cut the angle in the right place. I butted the second ruler up against the first ruler (carefully) so everything was in alignment. The second ruler (on the right) must have a 45 degree angle that intersects with a corner or this trick won’t work.

I removed the left ruler before I started cutting, as it was easier to cut with just one ruler on the mat. I was careful not to jostle the ruler in the 45 degree angle position. Line your ruler up exactly as shown in the photo. You don’t have to have exactly the rulers I have. You can use any rulers with the correct lines.

Cut 2d End of Diamond

I found that the method really does work. You will need to repeat the step above 8 times to get 8 diamonds. After the first diamond, it will be easier, since you can use the 2d cut for each diamond as the first cut for the next diamond.

Aside from having to watch out for ruler jostling, I was really pleased with how easy this was and well these diamonds came out. Don’t get me wrong, I wouldn’t have wanted to cut the 300+ diamonds for FOTY 2010 using this method, but for a LeMoyne Star, it works very well.

I cut all the diamonds at once from two strips of two different fabrics. My fabrics are:

  • background: Lil Plain Jane
  • red diamonds: Moda Bliss #55021
  • aqua dot diamonds: Moda Bliss #55023
Side Triangles
Side Triangles

Cut the squares and triangles according to the cutting directions on the PDF in the supply list. The triangles are quarter square triangles, which means that you cut the triangles so the straight of the grain will be along the hypotenuse (the long side of the traingle).

If you have some reason for not being able to cut the side triangles as shown, be careful sewing the block together and then stay stitch the outside of the block once you are finished.

Pieces cut
Pieces cut

Once your pieces are cut, lay them out or adhere them to your design wall, so you know what you have.

Cut Diamond, Face down

I like to keep them where I can see them because it helps me know where I am. As I sew, I put the sewn elements of the block back up on the design wall.

Once you have cut all the diamonds, you will need to mark them. You need to mark 1/4″ away from the seam line, because if you want this block to come out right, you cannot sew into the seam allowance. The biggest rule I have for making the LeMoyne/8 pointed star block is NOT to sew into the seam allowance. There are exceptions, but I am not going into those now.

Put your diamonds face down on a writing surface and prepare to mark. As you can see from the photo, I used my cutting mat as the hard surface. You can use a table or whatever else works for your work area. I used the Sewline pencil to make the marks. Pilot SCUF pens, a mechanical pencil, etc also work.

Get ready to mark the seam allowance on all of your pieces (squares, triangles, diamonds).

Mark with Perfect Piecer

I like using the Perfect Piecer ruler by Jinny Beyer for marking weird angles, because I only have to move the ruler once to mark the ‘corner.’

With the Perfect Piecer (they aren’t giving me free stuff, BTW!), you put the ruler in the ‘corner’ as shown in the photo. Where I have placed the circle is a hole. Note it is a small hole, so a regular No.2 pencil usually won’t work. Stick your Sewline (or other fabric marking implement with a very thin point) in there and make a dot. Voilà!

You will need to use two different parts of

Ruler Angle Does Not Fit Side

the Perfect Piecer ruler to make the marks on all four ‘corners’. There is no angle for the sides of the diamonds, so just use the straight edge (as I describe below). You don’t need to know the angles, if angles make you crazy. Just match up the shape of the ruler with your cut piece.

Use Straight Edge for Marking

You can certainly use any kind of ruler. Take your regular ruler and line up the 1/4″ line with the cut edge. Make a line around where you think the quarter inch would be. Make it longer, so you don’t have to go back and do it over. Move the ruler to the opposite cut edge of the diamond and cross your first line with a new line. It makes an X. I have done this numerous time and there is no problem using an X instead of the Perfect Piecer dot.

Beautiful marks!
Beautiful marks!

In case you were wondering what the marks look like, the photo (red diamond with blue circles, left) shows  examples.

The upper left hand mark inside the blue circle is the mark made with a Perfect Piecer and the Sewline pencil.

The lower right hand mark is made using a regular rotary cutting ruler and the Sewline pencil. Either mark works, as I said. You will use these marks to stop and start your seam lines. NO sewing into the seam allowance!

You will need to mark the squares and the triangles, too. You can use the Perfect Piecer to mark those pieces as well.

At this point, you might want to use some Mary Ellen’s Best Press to stiffen your pieces since you will be sewing along a lot of bias edges. You can either spray it on all of your pieces all at once, or as you are getting ready to sew. If you don’t want to use Mary Ellen’s Best Press or spray starch, no problem. Just keep in mind that you are working with bias edges, so work with them carefully. You don’t need to be afraid of bias edges. Just work slowly and carefully. Respect the Bias! 😉

Position Triangle over Diamond

Sew Segments Together

Now you are ready to sew!

First, position one of your side triangles over the diamond as shown, right sides together. You are lining up the diamond with the left non-hypotenuse side of the side triangle.

Line up the marks you have made on the diamond with the marks you made on the triangles.

I used pins, but only stuck them through vertically one time to keep them in place until I got to the sewing machine.

You can give the pieces a little press to stick them together, too, if you want.

Sew from Mark to Mark

Next you sew from mark to mark. Stay out of the seam allowance! You can back stitch, if you want, but stay out of the seam allowance. Start sewing at one mark and stop at the second mark. Easy!

An Aside: You are probably wondering about the lemon fabric. I press fabric on my ironing board and if I am pressing a lot of pieces, then I will put a larger piece of fabric so that I can get more bang for my buck. As I press the smaller pieces the larger piece gets pressed as well.

Press Carefully
Press Carefully

You can press now. If you do, press carefully (remember the bias, respect the bias) towards the diamond. If you don’t want to press until later, that is ok, too. I usually create the entire segment (2 diamonds, one triangle) before I press.

Now you have your first piece. YAY!

Not hard or scary, right?

Repeat this step for all of the diamonds that will be in the same position as my aqua with white dot diamonds.


2d Diamond with Pieced Segment
2d Diamond with Pieced

The next step is to sew the second diamond on to the segment (above: aqua with white dot & Lil Plain Jane fabrics) you have just made. You will be doing an inset seam. An inset seam is also called a Y seam. A lot of people hear this and panic. It isn’t difficult, but you can’t chain piece them and you have to pay attention. This method is similar to sewing hexagons together. Y seams really expand your quilt block piecing repertoire.

As you can see I have lined the red diamond up with the segment I sewed and am ready to line up the pieces, pin and sew.

Line Up 2d Diamond & Pin

First, line up the marks on the triangle and the diamond.

I just used vertical pins to make sure that everything was lined up before I sewed. I put a pin in the middle of seam line right before I sewed just to hold everything together.

You will be sewing in two stages. I like to sew the triangle to the second diamond before I sew the two diamonds together.


Sew 2d Diamond
Sew 2d Diamond

Next, place the group of 3 patches (2 diamonds and a triangle) under the needle, lining up the marks so that the needle misses the seam allowance and goes straight into the first mark.

Sew from mark to mark. The triangle and the second diamond will now be sewed together.

Sew from Top to Middle

Second, line up the new diamond with the diamond you have already sewed to the triangle.

Line Up 2d Diamond & Pin

Match up the marks on the top and sides of the diamond. Right sides should be together.

Put the top of the 2 diamonds into the machine. You will start sewing at the mark, which is 1/4″ in from the top of the diamond. Sew between the two marks, avoiding the seam allowance.


Top View of Sewing Mark to Mark

Sew down to the mark at the bottom of the diamond. If the pressed seam allowance looks like it will go under the needle, move it out of the way with your finger, the tip of some sharp scissors or a stiletto.

Stop at the second mark.

Remove the piece from the machine.


Segment 1 Complete
Segment 1 Complete

Once you have sewed the the three patches together, you will have one full segment completed.

Next, press the 3 seam allowances into a swirl. This is similar to what you do with hexagons. As a guide, use the first seam that you pressed after sewing the first diamond to your triangle.

The reason I suggest the ‘Swirl’ is that it reduces bulk later. This particular pressing point isn’t as important in terms of bulk as the center, which has a crazy number of layers, once finished. Consistency is good, though.

Repeat to make four of the above segments.


Sew Quarters into Halves

Segment and Square
Segment and Square
Sew Square to Segment

Line up the square to the [red] diamond, matching the marks.

Arrange your pieces like I have done.

Line up the marks in the square with the marks on the outside side of the bottom (in the picture it is red) diamond.

Press, if you like.  Pin, if you like. Go back to the sewing machine and sew from mark to mark.

Repeat this step for all four segments.

Sew Square to Segment 1

If you just look at the next photo, you might have a heart attack. Please don’t. Add the square is not hard. The key is to NOT sew into the seam allowance.


Two Quarters of the Block

Once you have two segments sewn to two squares, prepare to sew the two quarters together.

An Aside: You can actually sew into the seam allowance on any seam that will end up on the outside of the block. If this thought is going to make your head explode, then just remember my mantra: don’t sew into the seam allowance and you will be fine.


Line up 2 Halves along the Center Diamond


Sew Diamond Only
Sew Diamond Only

Sew the [red] diamond to the aqua diamond on the bottom. Stay out of the seam allowance and sew mark to mark.

Seam Line After Sewing Diamonds


After Diamonds are Sewn

It looks weird once you have sewn the diamonds together, but it will work out.

Line up Square
Line up Square

Line up the square with the [aqua] diamond and sew from mark to mark.


You Finished Half of Your LeMoyne Star

Two Halves of Block

Center detail
Center detail

Finally, we are ready to sew the two halves together. You should have pressed in such a way that you can nestle the diamonds together using your pressed opposing seams.

Match up the marks with pins. I used really thin ones this time. I normally use the kind shown in the center detail photo, but switched to thinner ones as I worked on this step, because my normal pins weren’t giving me the results I needed for this tricky piecing. Note that I don’t pin right in the center. I pin well where I am not going to sew and may put another vertical pin in the center temporarily. There are so many layers in the center that it doesn’t always make sense to pin there. Do what works for you.

Sew Halves Together
Sew Halves Together

Line up your piece carefully.

Hold on to your pinned halves tightly.

Sew over the center only. Start about an inch from one side of the center and stop about an inch after the center.

Sewing only a couple of inches makes it much easier to rip out, which I had to do. You might think that this will be a piece of cake, which it might be for you. It can be tricky also, because of the many layers of fabric that you are sewing through. My sewing machine did not want to go straight over that center section, which is why I had to rip out the first time.

Take the piece out of your machine, open it and see if you were able to match the center.

Once you have the center matched to your satisfaction, sew from the edge of one diamond across the entire center to the edge of the opposite diamond. Remember the mantra? Refrain from sewing into the seam allowance.


Finished and Pressed (full)

Once you have sewn the squares to the last sides of the last diamonds, pressing becomes very important. I have indicated with the circles how your pressing should look. If you need to re-press, spray the piece with water and that will make it easier.

By creating a swirl during the pressing of the center, you will reduce bulk for your quilting step. You will thank yourself if you quilt your own quilts. Your quilter will thank you, if you have someone quilt your quilts.

Finished and Pressed (detail)

Once you have sewn the squares to the last sides of the last diamonds and pressed the piece, you should have a gorgeous block and feel very proud of yourself.

Finished LeMoyne Star

Block-a-Long #24: Sideways Rectangle 4 Patch

Sideways Rectangle 4 Patch #24

This looks similar to the block from last week, Off Center 4 Patch Rectangle. There are some differences in the cutting, but you could make a second version of last week’s block and use that instead.

Here the very simple Sideways Rectangle 4 Patch Directions

If you have made blocks or a quilt from these patterns, please post a link in the comments section of the relevant block or on the AQ Block-a-Long Flickr group. I would love to see what you have made.

BAMQG

BAMQG October Block Exchange #1

I have mixed feelings about 12″ blocks. They are big. I don’t like making them, because they take up so much fabric. I can’t use scraps, in general for them. However, I seem to be making a lot of them lately. I can use up a lot of fabric making 12″ blocks. I can also use these large expanses of patchwork to showcase the luscious large prints that I adore.

The latest batch of 12″ squares are 9 patch blocks for BAMQG. Not only are the 12″ finished, but they are also Halloween colors. Not my favorite, but not brown and beige either. I was kind of hoping I didn’t win the blocks (I didn’t), but then I remembered the Disappearing 9 Patch. I thought that this group wouldn’t be as controlled as the Food Quilt, but using the Disappearing 9 Patch pattern would also alleviate the large expanse of fabric problem.

Any size 9 Patches are so easy to make that they are like candy. I don’t seem to be able to make just one.

2 9 Patches
2 9 Patches
Adrianne's Lozenge 9 Patch

It turned out that we were able to use any 9 patch grid pattern not just the regular simple 9 patch. I am not sure why I didn’t know that.

I had a problem with my camera and didn’t take many photos, but people did some really great blocks and wonderful color combinations. I have that lozenge shape on my mind, so Adrianne’s block (left) really appealed to me. I think that it is more Fall than Halloweenish, but still a very nice block, and one I might want to try sometime. My blocks looked a little sad in comparison.

Angela's Rose
Angela's Rose

Local quilt work is really good and the BAMQGers work is no exception. Angela, in particular, is really taking off in terms of work. Kathleen asked me to write down the names and descriptions of the quilts as she took photos, so I didn’t hear all the details about this quilt. I do know that she took a class in reverse applique and that this technique was different from traditional reverse applique’. I really am excited that Angela is trying new things and really pushing herself in her quilt work.

Her Kona Challenge quilt was accepted into the New Quilts for Northern California along with the Zig Zaggy quilt.

The next challenge will be with a line called Heirloom. I am not familiar with it, but what I saw of it I liked. This is a guild sponsored challenge. Adrianne was going to hand out fabric, but the block the group voted on required some solids, which people wanted to coordinate, so there was a little back and forth about that. The Board decided to decide what to do about the solid and hand out fabric next month. I am not going to do that challenge, because I don’t want to do a challenge where the fabric and block are dictated to me. I like the Roman strip block, but not enough to take time away from my own projects.

C&T Goodies
C&T Goodies

The awesome, Lisa, at C&T sent us a prize pack. We did a giveaway and I handed out all the postcards. I asked her for the Studio Color Wheel postcards to hand out and she sent me a giant box of goodies, including a copy of the Studio Color Wheel, which Deborah won, and an Ultimate Color Tool.

There was a lot of business and I felt the generational gap hit me. I like to have some privacy online (I know I am walking the line having a  blog and a big online presence) and that view isn’t shared by some of the younger crowd at the meeting. I felt old.

Block-a-Long #23: Off Center 4 Patch Rectangle

Off Center 4 Patch Rectangle #23

This blocks is similar to the four patch and the other rectangle block I have posted, which I called Rectangle Four Patch.

This blocks is slightly off center, so the squares and rectangle are slightly different sizes than what you have been cutting.
This block is also suitable for 3 fabrics.

Off Center 4 Patch Rectangle Directions

If you have made blocks or a quilt from these patterns, please post a link in the comments section of the relevant block or on the AQ Block-a-Long Flickr group. I would love to see what you have made.

Sampler Quilt: LeMoyne Star

LeMoyne Star
LeMoyne Star

I worked on the LeMoyne Star today. I had some work, which languished while I was out of town,so I had to do that as well, but it was great to get back to sewing a bit.

The LeMoyne Star has some tricks, but is not very difficult to piece. I took pictures as I pieced it and will work on a tutorial for a future post. The key trick is to NEVER sew into the seam allowances. I did sew into the seam allowances along the outside edge towards the end of the process, but otherwise, I stopped shy of the seam allowance, or moved it out of the way as I was sewing. My stilletto came in handy. Choosing fabrics was a key piece of the process and took longer than I expected. The ‘make visual decisions visually’ adage worked well, though, because what I thought would look good didn’t look good at all. Below are some of the choices I considered:

Alternate colorway from the Moda Bliss line
Dots from Quilted Fish
Bright Flowers
Bright Flowers
Another Bliss Fabric
Aqua-Red Sampler Quilt Blocks -September 2011

Above are all of the blocks I have made for the class so far. Don’t they look nice? They are hogging up space on my design wall, so I will need to take them down, but I am pleased with how they are coming out.

Mean Teacher

Dresden Plate in progress

I had to be mean teacher to Frances. Do you know how hard it is to be mean to Frances? She is such a nice person and has such a lovely podcast that I found it difficult. I had to do it, though, because our class wasn’t progressing and we need to move on.

The irony is that when I spoke to her I hadn’t sewn (sewed?) down the middle circle for my DP either! I confessed and she was gracious about it. My problem is 1) I can’t decide the size of the circle I want to applique’ and 2) I can’t decide on the fabric. The 2 go hand-in-hand, I think. I thought I had figured out what I want with the lovely Little Plain Jane flowers from Michael Miller. As Lorraine Torrence says “make visual decisions visually,” so I cut one out, pinned it on (see above) and looked it. No go. I think the size of the Little Plain Jane flowers from Michael Miller is a little too big, but it might look ok in a different fabric. The fabric just wasn’t working for me in this context. I love it, don’t get me wrong, but not for the center of my Dresden Plate.

My next thought was to find another red that has a bit more white in the design and see if that works.

DP with Bliss dot circle
DP with Bliss circle
DP with Pimatex Basics Dot circle
DP with an RK print, Mingle


In different ways, I liked all of the choices, but I finally decided on the Mingle circle and appliqued that on.

Dresden Plate with Mingle Circle - Final

Just a note about the applique’. Hand applique’ is not my strong suit. Still, I firmly believe that a quiltmaker should learn all different techniques so s/he can select the appropriate technique when making quilts. I know that Frances struggled with the hand applique’, but at least she knows how to do it. This was the hardest lesson yet, because it really requires looking at someone actually doing the applique’. Frances is a trooper for trying.

Block-a-Long #22: Square House

Square House #22
Square House #22

I have house blocks on my mind this week.

Chris from Quilt Bits sent me the directions to make a cover for a composition book. I bought one to test the directions (which I am sure are perfect!), but haven’t done it yet.

DH & I thought that having a book where we could write things about the house would be a good idea. I further thought that I would use Chris’ directions to make a cover for the composition book and incorporate a Liberated Quilting house block into the cover. I haven’t done it yet, but that whole thought process led me to the name for this block.

PDF Directions for Square House #22

If you have made blocks or a quilt, post a link in the comments section of the relevant block or on the AQ Block-a=Long Flickr group.

Block-a-Long #21: Off Center 4 Patch

Off Center 4 Patch #21

I love the 4 patch block. Mostly I like the simplicity, but I also like how it can be used as a building block for other blocks and projects.

You can use two fabrics, placing them on the diagonal from each other or you can use 4 fabrics for a more scrappy look.

This is block number 20 (I put up the 9 patch twice and haven’t replaced it yet), so I have made a quilt from all the blocks in the project to show you.

The quilt is made from all 20 blocks and you can see how complex it looks, even though each block is pretty easy to piece.

20 Block Quilt
20 Block Quilt

I probably wouldn’t put a black border on the quilt again, but it does contain the variety.

If you have made blocks or a quilt, post a link in the comments section of the relevant block or on the AQ Block-a=Long Flickr group.

Block-a-Long #20: Fat Short Columns

Fat Short Columns #20

Attractive name, eh? I couldn’t think of anything better. If I do, I might change the name.

This block is another easy one and very suitable for 4 fabrics.

Directions for Fat Short Columns #20.

You might think that the blocks are too simple, but when they are all put together in one quilt without sashing, they will make a very interesting quilt.

If you make this block, please put a link to it in the comments. If you do not have a blog or website, you can post it to the AQ Block-a-Long Flickr Group.

Block-a-Long #19: Backwards Flag

Backwards Flag #19
Backwards Flag #19

This very simple block reminded me of a flag motif, probably an American, Australian or Union Jack flag, since there is such a wide variety of flag designs. Also, the symmetry of various flag designs varies greatly. Another easy, small block. Backwards Flag are available.

All blocks are 6″ finished.

This block is probably best suited for 3 fabrics.

If you make this block, please put a link to it in the comments. If you do not have a blog or website, you can post it to the AQ Block-a-Long Flickr Group.

ABC Challenge: ‘C’ Block

Cake Stand
Cake Stand

I am a sucker for basket blocks. Cake Stand is a classic. Even though I said I was going to use Around the Block Again and Once More Around the Block, I took a quick peek at Around the Block and couldn’t prevent myself from making this block. I have to admit that the templates that I mentioned in the last post about the project make me not want to use those books. They are not hard to use and it isn’t that I can’t measure the templates and cut them, but I just don’t want to be flipping back and forth. I will get over myself, because I don’t want to give real estate to books that I don’t use.

The gold color is, again, one of the Pat Bravo Pure Elements. I believe it is the Empire Yellow. It has kind of a green tinge to it. I used it, because it was next on my stack to be ironed and I want a bit of a challenge in this project. The dots are a bit light for the background, so I may try the block again with a different background, but we will see.

For the moment, I am still making one block for each letter. I may make seconds for some of the letters. I am going to kind of go with the flow and see how the project evolves.

Block-a-Long #17: 9 Patch Tile

9 Patch Tile #17
9 Patch Tile #17

This block reminded me of a part of a tile floor. I wanted to name it tile floor. I am trying to keep these blocks organized by grid. This is, essentially, a 9 patch grid and shares a lot of elements with the 9 Patch Go Round. You probably need at least 3 colors for this, but 5 would add interest.

9 Patch Tile #17 Rotary Cutting Directions

ABC Challenge

Two ABC Challenge Blocks

I really did want to do the Farmer’s Wife Quilt-a-Long, the Summer Sampler Series and the ABC Challenge at BAMQG, but decided that I can’t do everything. I have other projects to get busy on, too. As much as I would like to just make blocks forever, I have to do other things. The most important group block project right now to me is the guild’s ABC Challenge. The group is doing two 12″ blocks every month. I am doing one 6″ block.I want to support the BAMQG, so, finally, after getting behind by 2 letters, I sewed two blocks on Sunday.

I might do two if I have time and find two block patterns I like, then I will do two. For now my parameters are:

  • 6″x6″ blocks
  • One per month
  • Pat Bravo Pure Elements solids
  • Riley Blake Sweet Nothings by Zoe Pearn dot

I didn’t find any blocks I felt like making in my favorite block book, Around the Block, so I pulled out Around the Block Again and Once More Around the Block and found the two blocks I made in the former. I was shocked to find that some of the directions included ‘T5’ and ‘T42’ rather than a number of how to cut the patch. It turns out that there are templates in the back. I assume the author intends me to cut them out and use them that way. Instead I measured them and realized that she used templates, because the sizes are weird: 1 5/8, 2 7/8, somewhere in between 3 5/8 and 3 3/4, etc. I just cut to the nearest larger size and trimmed as I was making the blocks. Perhaps that is why I haven’t used this book much until now?

Basement Window
Basement Window
Air Castle
Air Castle


Yes, the blocks are bright. I want bright and I want to use some of the new fabric I have purchased recently. I may add other prints. I will use more of the Riley Blake/Zoe Pearn dots. For now, I am still experimenting with how much white works and how the solids I have look with each other. The next block may be different.

Some of the blocks that other members made are below.

BAMQG ABC Challenge Blocks

I have always enjoyed making blocks. I don’t do it enough. As I have been walking past these blocks all week (they are displayed on my design wall) they are making me feel happy. Perhaps they don’t have as much interest as some blocks with other fabrics would, but they are really cheerful and are making me itch to get back to the sewing machine. I wonder what block is next?

Block-a-Long #16: Bow Block

Bow Block #16Bow Block #16
Bow Block #16

Somehow I got it into my mind that this looked like a gift. Not sure why, thus the name.

To make this block, please print or look at the rotary cutting guide (see below). Piece the 3 small squares and then sew them to large rectangle.

I would suggest a minimum of 3 different colors or fabrics, but 4, as I have used, would work well, too.

Bow Block Directions