Gift #4: Finished Percheron Pouch

Percheron Pouch Finished

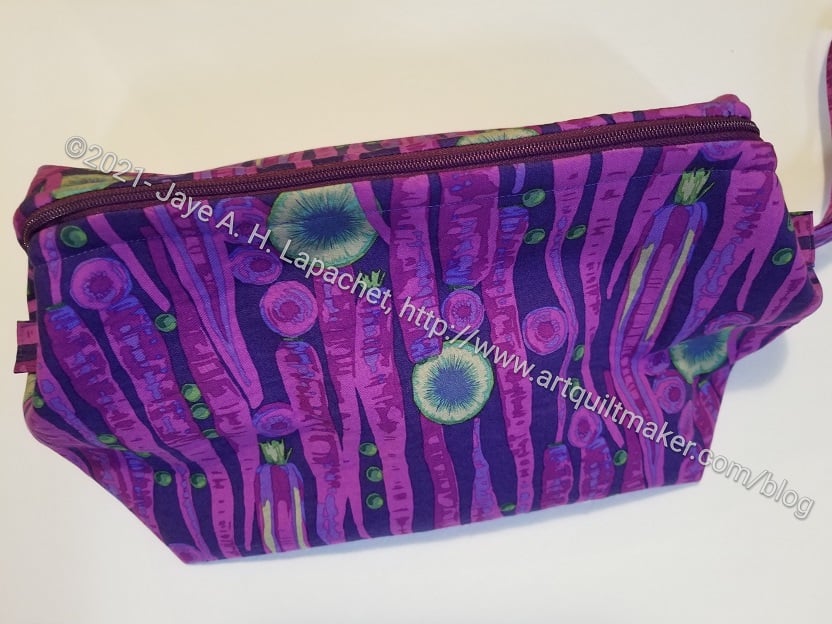
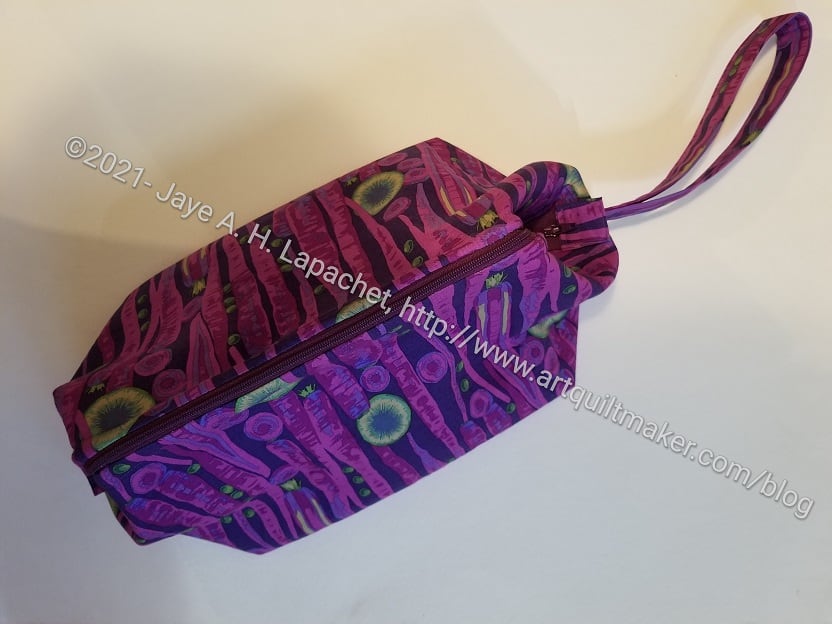
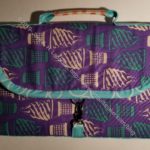
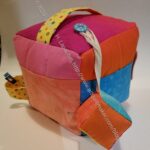
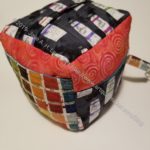
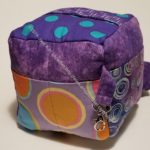
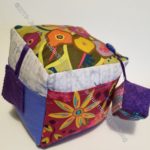
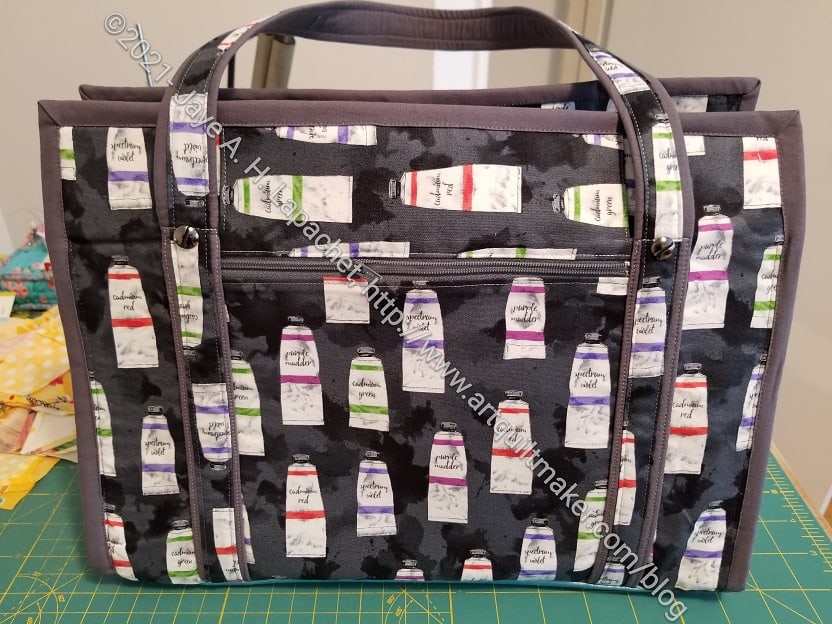
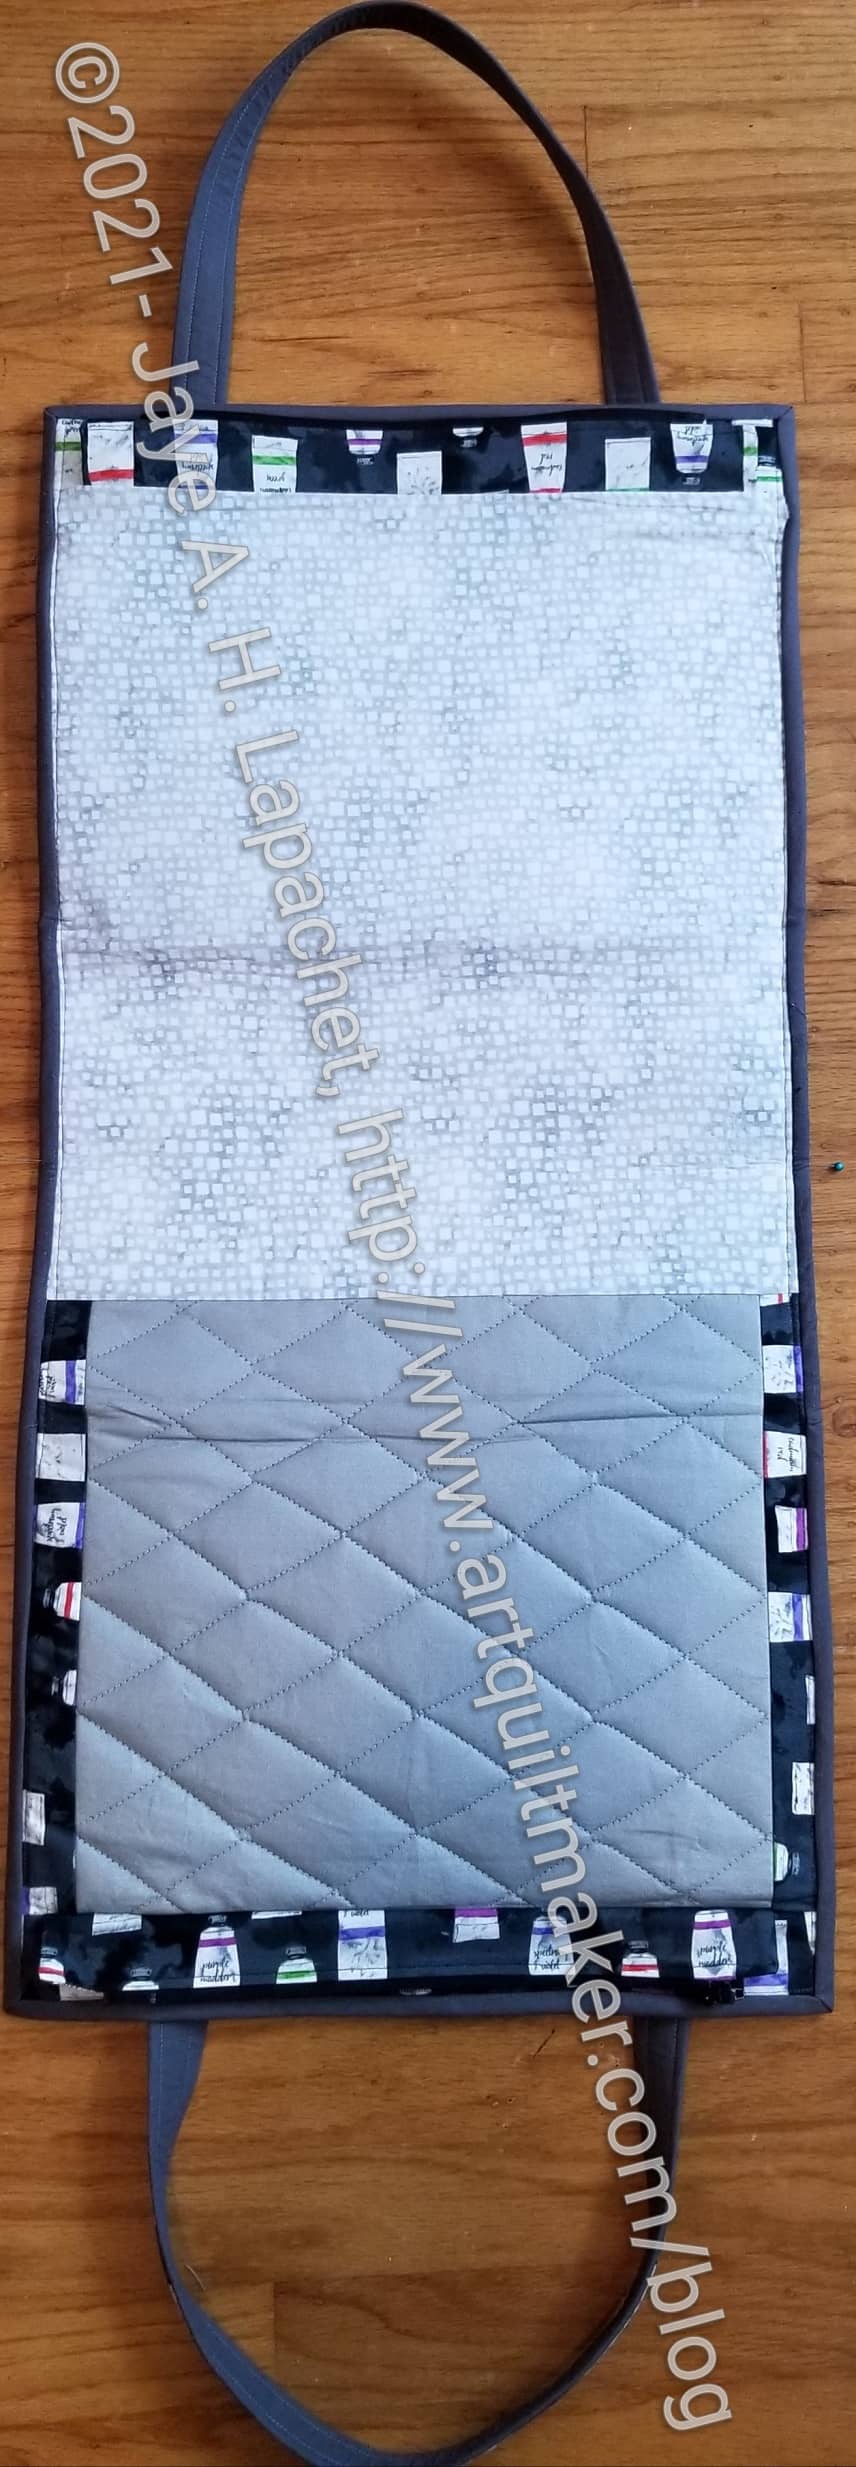
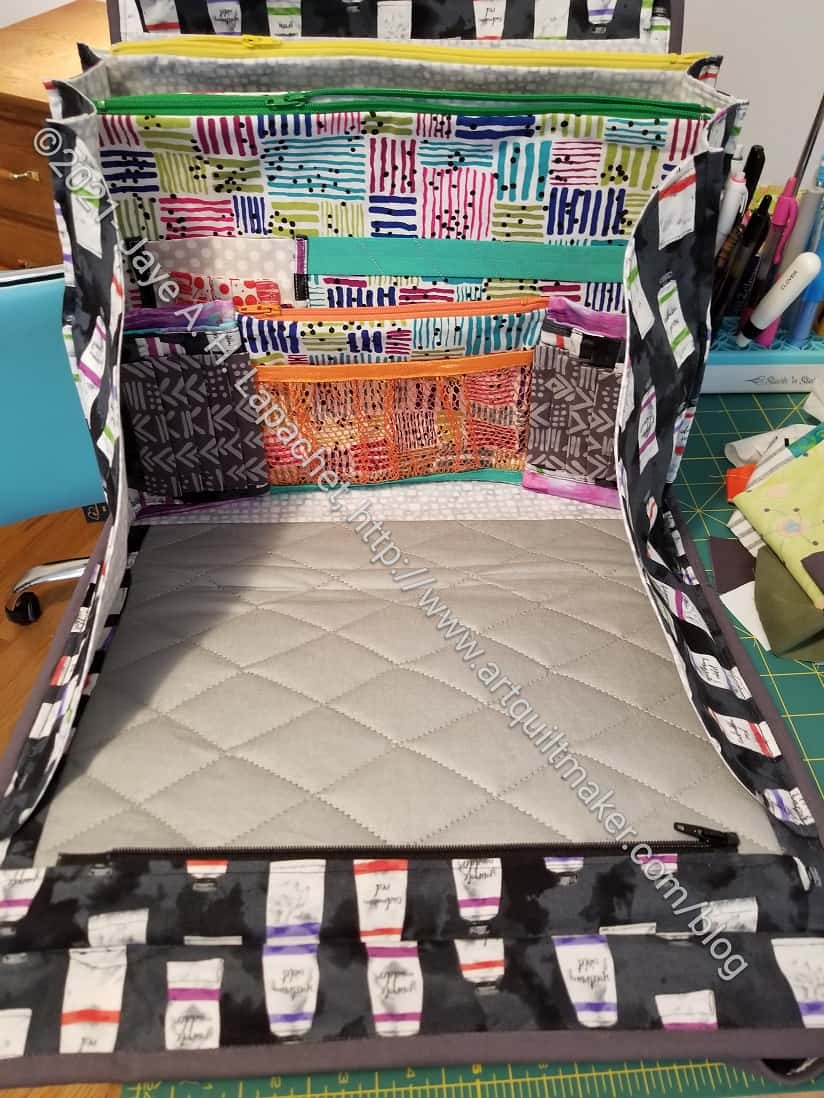
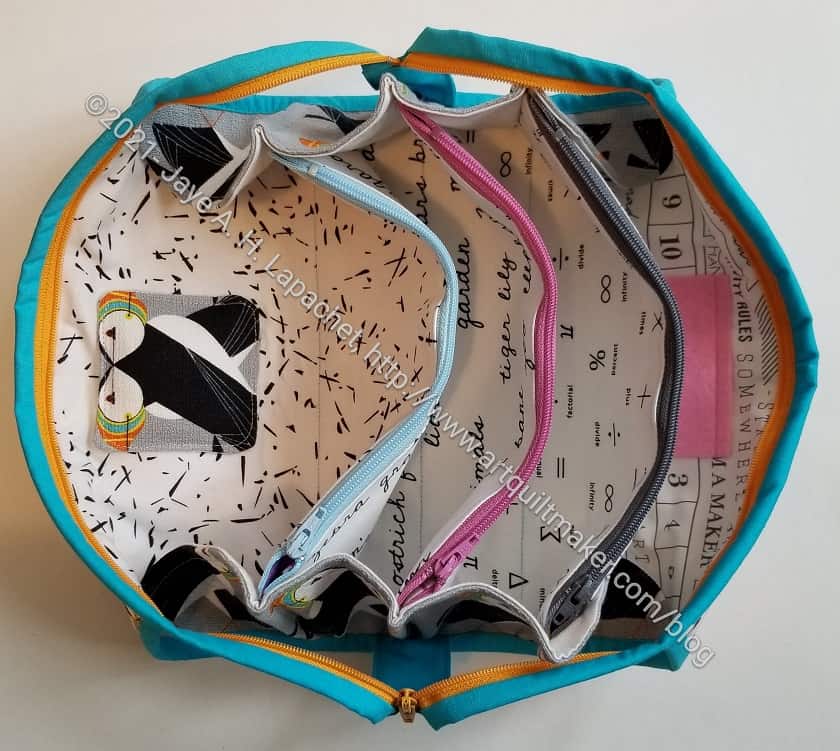
I finished the Percheron Pouch over the Thanksgiving Weekend, which was a great relief. I couldn’t show it because it was a gift for my mom and she reads this blog.

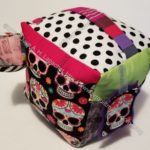
I gave it to her on Christmas and she really liked it. She filled it up with all of the other gifts she received.

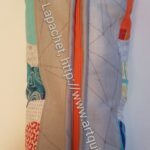
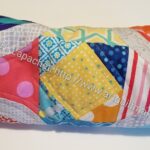
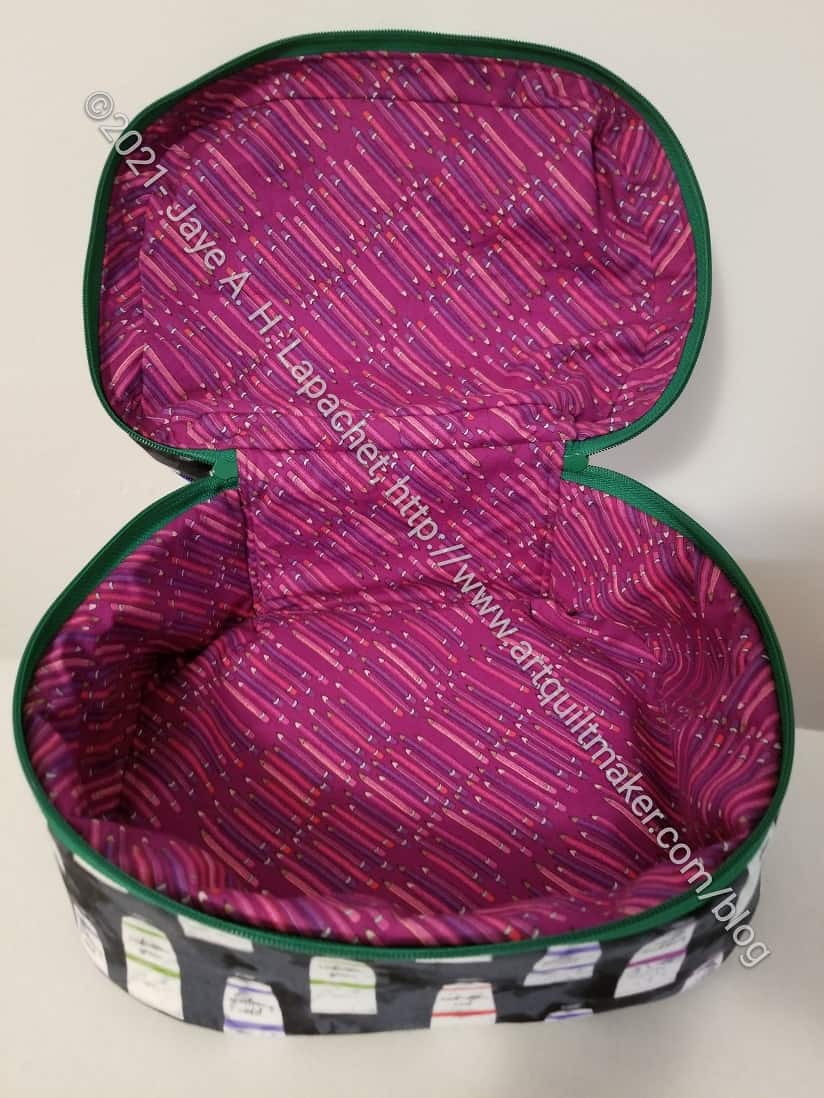
I really liked the look of this bag, which is why I decided to make it for my mom. I like making her bags I think are interesting. She always seems to appreciate them.

Percheron Pouch top zipper area

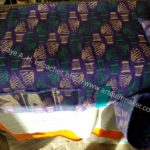
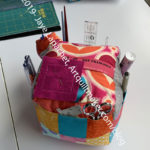
I really struggled with this bag. As I said before, I cut this bag out in June. Then it languished for all the same reasons that other projects languished: workroom upgrade and work.

I worked on it a little, but was frustrated with all of the sewing and ripping that I had to do. I don’t know what the issue was with this bag, but I struggled with the pattern and the video.

Percheron Pouch bottom zipper area

Finally, over Thanksgiving, I decided to work on it in earnest.  Yes, I still ripped and sewed and ripped some more, but I was able to finish it.

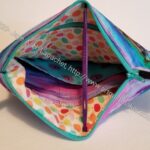
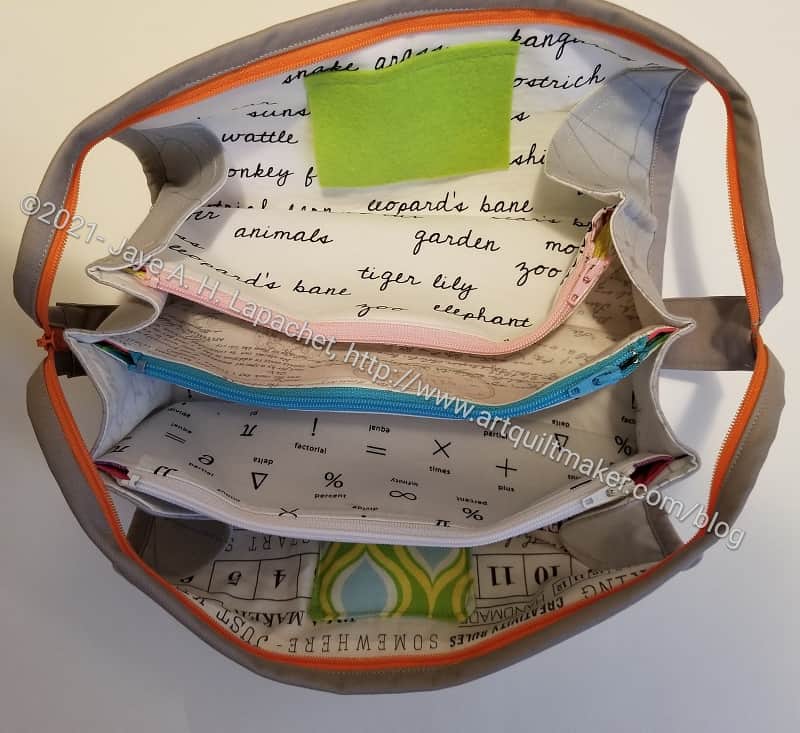
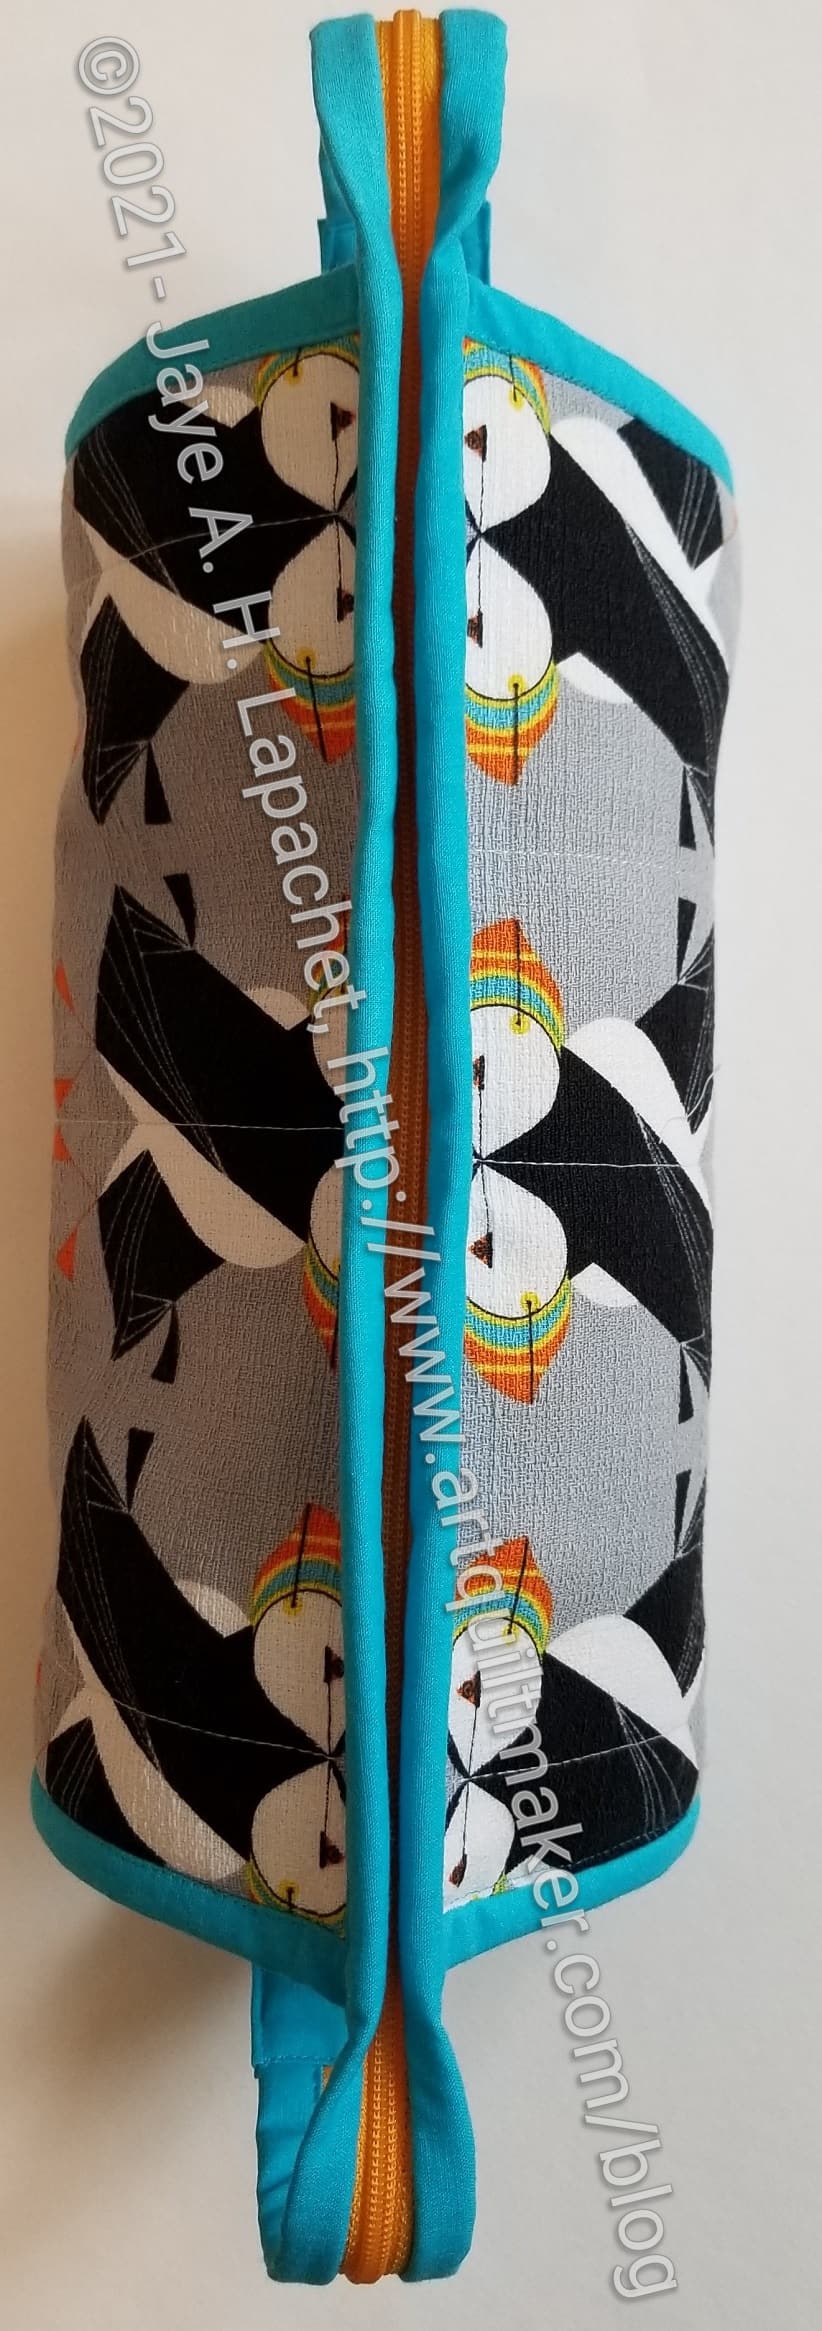
I thought it looked good enough to give away even if it isn’t perfect.

Gift #3: Large Retreat Bag Finished

Large Retreat Pouch - Carrots
Large Retreat Pouch – Carrots

I gave Julie this Large Retreat Pouch for her birthday the other day. This is the bag I made over Halloween weekend, but couldn’t show you since she reads this blog.

The Retreat Bag is a free pattern from Emmaline Bags. It requires a frame and the frame is not free, but also not very expensive. The frame allows it to open all the way, providing easy access to the contents.

Large Retreat pouch -aerial view

I realized around that time that I needed to get busy and start making any gifts that I wanted to make for the holidays. That weekend, this was one of two Large Retreat Pouches that I made. As I mentioned then, it was the first time I had made the large version of this pouch. I added a leash to this one, because I thought it would make the bag more useful.

Large Retreat pouch open -aerial view

This is a pretty large bag. It would be great for a few balls of yarn and knitting needles as well as some EPP. I think it could also be used for a sponge bag or makeup kit.

The lining actually fits pretty snugly though it looks baggy in the photo.

I used some of my favorite purple fabrics since this was going to one of my favorite people.

Revisiting Gifts for Gerre

I know it wasn’t that long ago that I wrote a post about the gifts I have made for my friend Gerre. I have made her a few more gifts this year and wanted to post them all together again. Surprisingly, I had forgotten to list a few of them, like the travel pouch, so I have added them.

I have enjoyed revisiting gifts I made for Julie and my mom. I haven’t made as many gifts for Gerre, but I decided to revisit them anyway.

I enjoy making gifts for other people, especially useful gifts. Revisiting them is just a way to enjoy them again. I also like to see what gifts I tend to make for multiple people.

Finished: More Bowl Cozies

Amy's bowl cozies
Amy’s bowl cozies

At work I have a team meeting every Monday. For some reason I started to show whatever items I made over the weekend to my workmates. Now it is a regular feature of our meetings.

Amy's bowl cozies - top view
Amy’s bowl cozies – top view

After showing the bowl cozies I made for the BAM swap, a big discussion ensued about what they were, how to use them. I offered to make some for everyone, but only my boss took me up on them. I finished them yesterday.

I am really pleased with the fabric choices. I am glad she wanted red and black!

After making these using the same tutorial I used before, I am thinking of making bowl cozies as family gifts. I could make gift bags as soon as I finish the bowl cozies and I wouldn’t have to do anything in December. If I start in January it won’t be so bad. You can remind me of my big plans when I am moan about family gifts in December. 😉

Gift #1: Finished: Sotak Purse Organizer

I bought this Purse Organizer pattern from Sotak Handmade sometime in December 2020 when she was having a sale. It was an impulse buy. I thought that the bag would be useful in my work laptop bag for carrying my wallet and some items I would normally put in my purse. When you don’t have a desk, everything has to be portable and carrying a purse in addition to a laptop bag and a lunch bag makes me feel like a small pack animal.

I cut out this pouch on New Year’s Eve eve 2020 and sewed it together on New Year’s Day 2021. Once cut out, it was an easy project.

The excellent thing is that I was reminded how easy Zipper slip pockets are to add! Tim and I have talked about these types of pockets, but I was reluctant despite the cool zipper ruler I bought. This pattern got me back into the swing of those zipper slip pockets and I feel more confident that I can put them into any bag. I did have trouble keeping the zipper straight as I sewed it, so that is something to work on.

I also should have clipped the corners of the bag before turning it as I couldn’t poke the corners out and make them look sharp.

I decided to make this as a gift for my mom for Mother’s Day, but ended up giving her something else, so it was a Christmas gift.

All of the Mega Pinnies

I have gifts on the mind. Time is short for some winter holidays so gifts that have not been started have to be quick. I don’t like to give handmade gifts that are only quick. I like to give things that people will use.

Here are the Mega Pinnies I have made.

I have an idea to make another one. Maybe for the Door prizes for next year?


Resources:

    • A Note to Follow Sew example – has some nice applique’ with hexies.
    • Blue Patch Quilter Mega Pinnie ideas
    • Flying Blind on a Rocket example – I like how the bottom doesn’t bulge. I need to work on that.
    • Quilting RDH example
    • Running with Rocket example
    • SLIKStitches example has some great modifications including not quilting it (no batting)

Finished Bowl Cozies

Two Bowl Cozies
Two Bowl Cozies

As I said the other day, these were a pretty fast gift to make.

The tutorial is one page of instructions plus the template for the darts. The tutorial makes total sense and isn’t difficult or complicated. I wanted to see what other tutorials were available so I put “bowl cozy tutorial” into Duck Duck Go (a search engine that doesn’t track your movements) and got a number of blog posts and videos.

Two Bowl Cozies (bottom)

Crafty Gemini has a video tutorial for a more more petal shaped cozy. The Caffeinated Quilter tutorial has thinner triangles for darts and the back is pulled around the front for a border/binding. Tara Reed’s blog post tutorial reminds us we can use orphan blocks or ‘made’ fabric as parts for the bowl cozy.

Bowl cozy side view
Bowl cozy side view

One reason I like this pattern is because of the angle of the darts. It would fit one of my soup type bowls really well. We have some larger bowls that we use for chunky dinner (not leftover) soups and stews. Those might fit better in a larger cozy with steeper sides. The good thing about this pattern is that you can adjust it and use the same directions. They only thing would be to keep the angles of the triangles consistent.

I think you could also adjust the shape of the corners to make different looks.

Bowl cozy 2 side view
Bowl cozy side 2 view

I am trying to decide if I want to make a bunch of these for DH’s cousins and siblings. While I can make them quickly, I would still have to pick out fabric. That takes time just because of the logistics. As well, most people won’t know what they are, so I would have to make a little tag to let people know how to use them. I also think one is kind of a mean gift. What happens if one gets dirty? I would want to make two for each family. I suppose I could start with one and see how things go. I’ll have to talk to DH and see what his thoughts are.

Try one out. Even if you decide not to make them as gifts, you will have something useful for your kitchen.


Trying Out Gift Ideas

Awhile ago, Mrs. K made me a bowl cozy.I never thought I needed such a thing, but I use it all the time and it is very helpful.

Bowl Cozy in progress

Someone told me about a bowl cozy tutorial and reminded me of that great gift. I decided to try it out over the weekend.

They are fairly easy to make. The process goes quickly.

My issue was sewing. I wasn’t sure whether to sew all the way to the corner, so I didn’t do it at first, because of the change in height of the layers. The batting bunched up as my sewing machine foot got to it, so I started sewing from the batting on the other corners. This looked bad, so I went back later and sewed to the edges.

Large Retreat Bag Zipper

While this is the first Large Retreat Bag I have made, it is the third Retreat bag I have constructed (total). This is a free pattern from Emmaline Bags that requires a frame. The frame is not free, but also not very expensive. The frame allows it to open all the way (widemouth), providing easy access to all of the contents.

I like this bag, but the Large size is LARGE. I am not sure what I would use this size for so I don’t know that I will make a large one again, though I have another frame, so I might.

Sugar Skull Interior

The pattern doesn’t call for it, but I put in an interior zipper pocket. Tim thought up the idea of an interior pocket to use to turn the bag. This means I (we) can turn the bag without leaving the bottom seam open. Yes, the bottom of the interior zipper pocket is left open, but it is much more hidden than the bottom.

It has been awhile since I made an interior zipper pocket (also called a flush pocket), so I screwed up a few times on the first one. I definitely didn’t remember how to do it at all and had to get Tim to remind me which resources he used. I did find a couple of tutorials, but they were lacking.

The most helpful tutorial was Sara Lawson’s video (of Sew Sweetness), which is the one Tim uses. I started out using the directions in the book, the Bag Making Bible** by Lisa Lam. The part after the zipper installation are a little skimpy, so the video filled in the gap.

I made two of these bags over the weekend and the second zipper went much more smoothly. Now I have a couple of gifts ready for the holidays. As a result, check back to see the whole bags.


**I use affiliate links and may be paid for your purchase of an item when you click on an item link in my post. There is no additional cost to you for clicking or purchasing items I recommend. I appreciate your clicks and purchases as it helps support this blog.

Maria’s Potholders

My guild had their first in person meeting over the weekend. Maria organized a swap as a fun thing to welcome everyone back. I joined and was assigned Maria who wanted potholders.

Maria's potholders
Maria’s potholders

Potholders are almost the last thing I would consider making. When I use potholders I want them to protect my hands from the heat and I have not found that homemade potholders do that. Still, Maria wanted potholders, so I made potholders.

I had some Insulbright on hand, so I used that in addition to two layers of batting. The sandwich was super fat. I didn’t want to do very much thread sinking, so I didn’t quilt it as much as I could have, but they turned out pretty thin in the end. I hope all the layers will protect Maria’s hands.

She also wanted lime green. Since I made her a pillow before, I decided to stick with that theme and use the same block. I had to redraw the block in EQ8, because I couldn’t find my block from the swap. The proportions came out a little different in this piece, but I think they still look good.

I didn’t think about a hanging loop until it was too late to put one on. Oh well.

I added in pink because I like pink and it made the potholders look cheerful and celebratory. The theme of the swap is Celebration! so the colors fit. I made a gift bag in the same fabric as the binding. The gift is ready to go.

Working UCAB

Mom's UCAB to go
Mom’s UCAB to go

While this is Mom’s UCAB, I tested it on my travel sewing machine bag to see if it would work for me. The key is to adjust the back sleeve to fit over your rolly bag handle. I have no idea if there are standard sizes for those, so make sure you check before you sew everything to the exterior.

I plan to put my smaller items in the UCAB. I am not sure how I am going to reconcile this bag with the Tupperware box.

The picture below shows the bag empty, but trust me when I say I filled it up. It isn’t completely filled.

Sewing machine cart - front pocket
Sewing machine cart – front pocket

I need mine to contain all my to go items – notions and rulers, etc. I put them in the various pockets of the sewing machine bag, which has a lot of pockets, but it makes some of the zippers hard to open.

Finished: UCAB #1

Art Themed Ultimate Carry All Bag

I can’t tell you how excited I am to be saying that I finished the UCAB for my mom and gave it to her for her birthday! This bag goes with the set of items I am making from the Paint Tube fabric.

I am so excited because I spent a lot of time on this bag and got everyone excited about it, then the pandemic hit and all the excitement died.

I finished the bag on September 12, 2021 after spending September 11 ripping out a lot of what I had sewn the prior week. I spent the Sunday morning of the 12th thinking about construction and how I could avoid putting the bag together the way Natalie does. I know she has had success putting together a million of these bags, but the construction did not work for me. I can’t believe how flat she gets her binding.

Ultimate Carry All Bag - binding applied
Ultimate Carry All Bag – binding applied

What I ended up doing is putting the binding on before I constructed the whole bag. I know the binding is supposed to cover the edges of the sides. This made no sense since the sides were finished.

After thinking about how I could construct the bag without killing myself, I decided that I would put the binding on the exterior, then sew the side section to the exterior. The sides were already finished and the process worked very well. I lined up the bottom of the sides right next to the binding and clipped the living daylights out of it, then sewed that section to the exterior. It looked a lot better than my previous effort, which was a big mess. My effort is not as neat as Natalie’s, but I am happy with what I did. I am not embarrassed to give this bag as a gift.

Ultimate Carry All Bag - interior
Ultimate Carry All Bag – interior

The other thing I thought about is not finishing the bottom of the side panels. This would mean that only two layers of fabric along with the thickness of the exterior would need to be under the binding. I might try it that way on the other version of the bag.

Ring Toss Sew Together Bag

Ring Toss Test Block

Remember the Ring Toss block that I agonized over? I am pretty sure I told you I wasn’t going to make the quilt. The block, which I like has been hanging on my design wall since December of 2018. It occurred to me that it would make a great exterior for a Sew Together Bag.  I thought this was an especially good idea since I had no idea what colors the recipient likes.

While I am sad I won’t have this block to look at, I am pretty pleased with how it came out as a Sew Together Bag.


I wish I had thought of how the bag would look from the top. I added grey around the block to make it large enough for the exterior. The viewer can’t see the Ring Toss block from the top. Mostly you see the grey. I think it is fine, since I mostly look at mine from the side or end.

Ring Toss STB open
Ring Toss STB open

This bag has similar insides to the Leaf STB, the Puffin STB and the Brocade Peony STB. I chose different colors for the zippers, needle holder and pincushion so they are different from the other bags.

I meant to hand this off to my DH to deliver at a Native Sons event, but I forgot until he was already gone, so I’ll have to mail it.


Puffin STB

Puffin Sew Together Bag

I made this Sew Together Bag as a gift. I want to send it off now, but am trying to wait until Christmas.

The outside is a Charlie Harper print made from Barkcloth. I have never used Barkcloth before and it was fine. I interfaced it with SF101 and didn’t have any problem with the looseness of the weave. I am not sure how it will be if I cut squares and try to use them in a Fabric of the Year quilt. I only bought it to make this bag because my friend loved it. Ordinarily I wouldn’t have bought it.

I really struggled with what to put with it for the binding. I don’t think the turquoise is perfect, but I think it looks pretty good. Black was my other choice, but I think with the grey background and the black on the puffins the whole project could have easily gone towards depressing. I chose the turquoise binding to make it super cheerful.

Puffin STB interior
Puffin STB interior

I fussy cut some more puffins for the mini pincushion. I think they look really cute.

You can see similar interior fabrics to my Brocade Peony / La Pass Sew Together Bag. Same fabrics- different order.

I haven’t talked much about zippers as I have spoken about these projects. Each bag requires 4 zippers. I chose, mostly, different colors for each zipper to make the bags more visually interesting. I also think that zippers are another visual cue to where the maker put a tool or supply. I kind of wish I has used another orange zipper on this bag, but I think it looks good as is.

Finishing the Leaf STB

Leaf Sew Together Bag

I worked on the leaf Sew Together Bag over the weekend and was able to finish it. Yay!

As shown the other, this used a Jane Sassaman leaf fabric for the outside. I used black for the binding, though green might have worked as well. I don’t have a lot of dark green. I think the black is a good choice.

Leaf Sew Together Bag - open
Leaf Sew Together Bag – open

As you saw on another day, I made all the insides light colored so items stored inside are easy to find.

The recipient works for a public health department and I have been assured she will like the ribs.

I did the pincushion a little differently from my red-violet Sew Together Bag. I made it much smaller and I machine sewed it to the interior. I don’t know if that is better, but we will see.

The flap on the right of the pincushion is for WonderClips. I think Sew Tites could be stored there as well.

Yay! Another finish and one Christmas gift down!