As a librarian, I am completely against censorship. Even as a special librarian and knowledge manager rather than a public librarian, I think people should make their own decisions about what they read. Of course, parents have a responsibility to guide their own children’s reading habits. My mom told me not to read Wifey** by Judy Blume when it came out. Since I loved Judy Blume’s novels, her frank way of talking about topics nobody discussed with me and I had a library card, I read it anyway. Later, my mom told me she was concerned I wouldn’t understand the sex parts. I didn’t, but I also just skipped over them. I do that now when the sex scenes are too graphic. Talking to me about the sex parts didn’t seem to be an option.
As an artist, I also am against censorship. Even though I make a lot of pillowcases and non-controversial items, I do consider myself to be an artist. I have made my fair share of art quilts. In that group is a subgroup of political quilts. When a quilt is pulled from a show, as my quilt Blood & Oil was, it is painful and confusing.
I also don’t really like people telling me, unsolicited, what to do.
I censor myself quite well. I do not watch horror films or anything remotely scary. When the YM is visiting and wants to watch a scary movie with DH, I go sew something with the door shut, or they watch it when I am gone. I don’t need any help with censorship, no matter how good your intentions.
There are three points here.
First, mind your own business. If you can’t mind your own business then compromise. Fighting doesn’t accomplish anything and calmly stating your point of view AND listening to your opponent’s point of view might create some change.
Second, if you don’t want your kid to read something, or look at some art, explain why. Don’t just say ‘it’s filth’. That may be true, but it is a non-answer. Let your emotions simmer down and explain your thoughts in a reasonable way. When the YM was in high school, the Archbishop of San Francisco wanted teachers to sign a morality code. This morality code was a huge problem for my son. We live in an area where all different kinds of lifestyles are tolerated. We talked about each of the points on the way to school each morning. Did I want to talk to my son about sex? No. Not a comfortable topic to talk about with a boy. As a parent, I felt it was my duty to tell him what I thought, explain to him what I thought the Archbishop was trying to achieve, and give him a chance to voice his views.
You’ll get better results from your kids, and compliance, if you explain your views clearly and are not hysterical while you are explaining. Is this easy? No. Communication is difficult. It takes practice and provokes a feeling of fear. Parenting isn’t easy, so don’t have a kid if you don’t want to do the hard things. Kids are not accessories.
Third, keep your thoughts and feelings to yourself when they might adversely impact others. I am not saying don’t discuss controversial issues, I am saying, if you don’t want to read a book, don’t read it, but let others decide for themselves. You are perfectly entitled to think the way you do. However, you are not entitled to tell others what to do. Let other people raise their children and manage their viewing or reading habits in a way that works for them.
I am talking about censorship of art because it happened recently at an AQS show in Daytona Beach. AQS decided that two quilts, “Origin” by Yvonne Iten-Scott and “Your Mother. Your Daughter. Your Sister. Your Grandmother. You” by Laura Shaw Feit would be removed from the exhibit. The exhibit is SAQA’s Color in Context: Red. I did not hear the reason.

This is not the first time AQS has acted in this manner. I remember them refusing to hang Amigos Muertos by Jonathan Shannon. Amigos Muertos was not good enough to be hung the year after Jonathan won Best of Show for another quilt at AQS the year before.
I thought then that it wasn’t possible that in the modern US, an organization would think that AIDs and death too awful of a subject for grownups to contemplate. An article in the Seattle Times at the time describes the various points of view.” In Jonathan’s case, Meredith Schroeder, AQS president, to one of Shannon’s backers dismissed charges of censorship [in a letter] and stressed that his was one of the 587 quilts that weren’t good enough for the 400 piece-quilt show. “Jonathan’s credibility is in question, he has misrepresented the truth to his friends to get them to act on his behalf to pressure AQS to reconsider his quilt and accept it into the show,” Schroeder wrote to the East Bay Heritage Quilters.” I remember the quilt hanging at the EBHQ show that year and signing the petition to get AQS to reconsider.
Hollis Chatelain’s quilt Burkinabe Mother was censored from the AQS magazine in 2005. It shows a woman feeding her child.
More recently, in 2016, Kathy Nida’s quilts were censored. The quilt that was excluded was “ ‘I Was Not Wearing a Life Jacket,’ a piece Nida made to help process a recurring nightmare in which she was losing things in a stream and nobody was coming to her aid.” Kathy wrote about it on her blog. One of part of her post says “So some person objected to my quilt and couldn’t just walk by, moving on to the next quilt (which is what I do when another Sunbonnet Sue shows its ugly head…I don’t call Fox News…I don’t pitch a fit and refuse to ever come back to another show.)…they had to demand it get pulled from the show.”
That is my point exactly. If you don’t like a piece of art, move along and look at something else.
Abby Glassenberg describes two AQS censorship incidents in her Craft Alliance article from 2016. This article also discusses how differently the Mancusos handled a complaint about content, including what they did when Fox News showed up to do a story about one of the quilts. I am sure she will write about this recent incident soon.
There is a lot of noise around this issue.
Kathy Nida is still blogging: YAY! and she writes about the most recent bout of censorship. See the quilts (I don’t have permission to post them) and hear her point of view on a recent post.
Io the Alien also writes about the current controversy in her blog, which I found from a post by Laura Shaw Feit on BlueSky. One thing she says is “Quilts have a long tradition as protest art. From the well-known works of contemporary artists like Bisa Butler and Faith Ringgold, to countless unnamed artists working from their homes over the centuries, quilts have been used to create political messages, both subtle and overt. I daresay quilting and protest go hand-in-hand.”
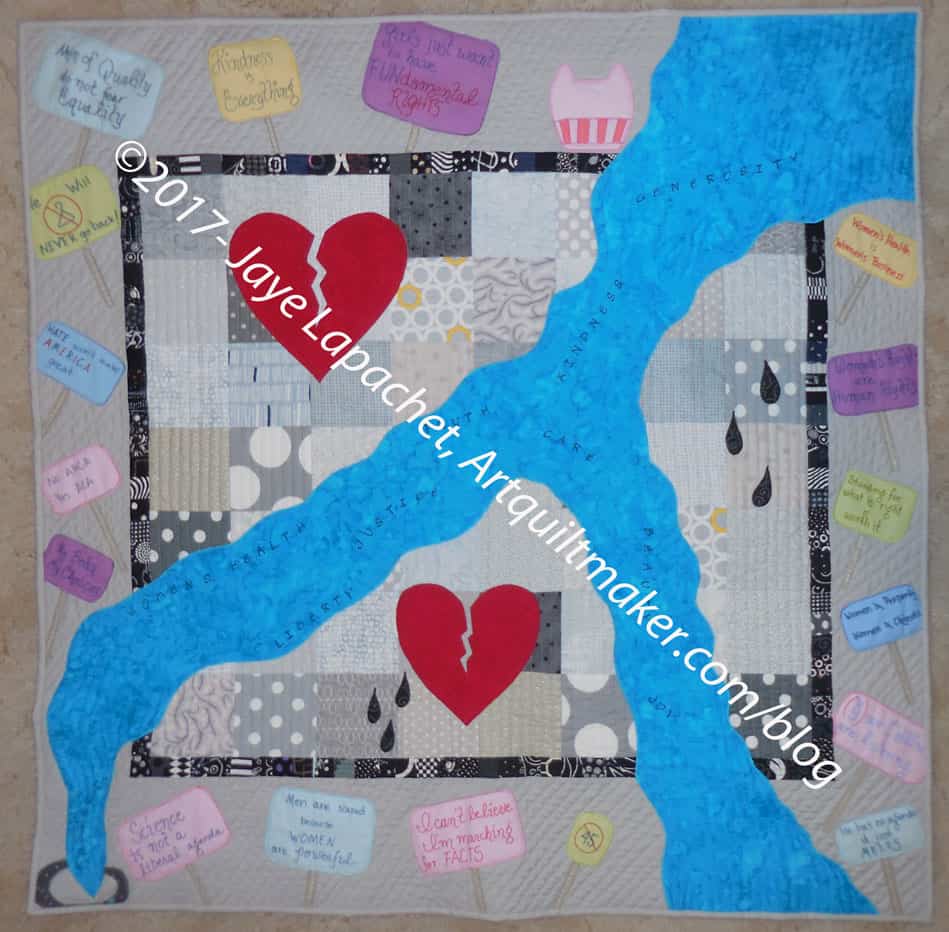
Bisa Butler and Faith Ringgold have certainly been drawn into controversy, but using quilts as a protest media has a long history. Temperance Union. Gee’s Bend. Quilts to raise money for both sides of the Civil War. Red Cross quilts. The NAMES project. How about my own political quilts, the most outrageous and vocal of them is Down the Drain? What would AQS say about my quilt? Io the Alien writes more about AQS censorship on her blog.
SAQA pulled the whole show, which I am sure was a difficult decision. In my opinion it was the right thing to do. People will not get to see any of the quilts in the show, which is really sad, but censorship is also not right. If you are able to see these quilts, tell any AQS people you see that you are glad you were able to see the show.
Keep in mind that AQS is a private organization. In its history section, you can see that the Schroeders underwrote the entire enterprise. The US Congress gave it National Quilt Museum designation in 2008, but that museum is private. It is not a 501c3, at least I was not able to find a record for it in Guidestar. If it is not a 501c3, that means it is for profit. They are making money off of the quilts and shows and books and patterns.
Art is meant to provoke thoughts and feelings. You may not have liked the Andres Serrano piece that swept up a bunch of artists including Robert Maplethorpe in a controversy about NEA funding. I do know that when you saw it, or heard about it, it provoked a response. The article describes the feelings of various Corcoran Gallery workers and their reactions. The pieces AQS censored didn’t look offensive to me. I was intrigued by the structure of the 3D piece by Yvonne Iten-Scott and wanted to see how it was made. I was also interested in how much piecing went into the second piece by Laura Shaw Feit. I love lots of piecing, so the second piece looked right up my alley.
These quilts vaguely gave me the impression that they might be about “women’s issues.” So? More than half the population of the world has to deal with “women’s issues,” including birth, breast feeding, menstruation, caregiving, hysterectomies, terminations, miscarriages and many other naturally occuring issues. As a woman, I think some of these normal bodily functions are gross and I don’t want to think about them much less discuss them. That doesn’t mean I don’t think of them or want to see artwork discussing or depicting them. Because topics like this are censored they have become important issues being discussed in public.
Because some people can’t mind their own business, nobody will get to see any of the quilts at a very large show where they might have changed someone’s life.

In light of this controversy, I find the AQS mission statement to be quite funny, in a “liar liar pants on fire” kind of way.
If you want to do something, here is a letter you can write to AQS sponsors. The letter encourages sponsors to think about the organizations to whom they give money. Pulling sponsorship has more of an impact than not renewing your AQS membership.
I am a grownup and can make my own decisions, especially about what I look at and read. I don’t need AQS to decide I am too delicate to handle looking a quilt. I don’t need others to protect me from art.

Reproduction Number: LC-USF34-008655-D (b&w film neg.)
Repository: Library of Congress Prints and Photographs Division Washington, D.C. 20540 USA http://hdl.loc.gov/loc.pnp/pp.print
Get over the image of quiltmaking as a bunch of prim older ladies sitting around a quilt frame. An Observer article describes “And so we’re going to have to change that image of quilting we have in our heads, the one where matronly figures with prim buns bend over fabric scraps. “
Do what the article says. Get over it. I am not a prim older lady sitting at a quilt frame.
Quilts are art. Discuss.
UPDATE:
-
- Hyperallergic published an article about this topic. I didn’t find it until after this post was published.
**N. B. : Obviously, you should shop at local quilt shops and small businesses. However, if you are too busy or can’t find what you need there, I use Amazon affiliate links and may be paid for your purchase of an item when you click on an item’s link in my post. There is no additional cost to you for clicking or purchasing items I recommend. I appreciate your clicks and purchases as it helps support this blog.