I am entering the Renewed Jelly Roll Race into the Blogger’s Quilt Festival. Amy’s Creative Side is putting on the Blogger’s Quilt Festival. My entry number is 430 (though on some screens, it seems to show up as 431. Very strange). If you haven’t entered, don’t, because *I* want to win!
Me, yes. You can win next time. 😉
OK, truly, I also would like people to be exposed to my blog. Do you have a friend you can refer?
Here is the schedule:
- October 26 – 31 Linky open
- November 1 – 4 Nominations are made (this is where you nominate me)
- November 5 -8 Vote for your favorites
- November 9 Winners announced
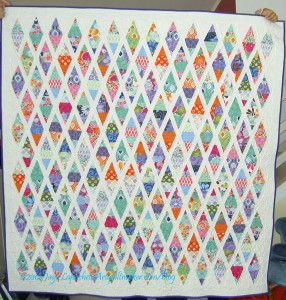
The Renewed Jelly Roll Race is my most recent finish. I have another quilt that is nearing completion, but I am pretty excited about the RJRR! It really is a quilt that came out of something I was going to toss. I felt like the original Jelly Roll Race quilt was a huge, ugly failure. An ugly duckling into a swan.
I became intrigued by a discussion at my Modern Quilt Guild about Jelly Roll Race quilts. I had heard of them in passing, but during the discussion, finally understood the concept. People wanted to do the quilt top at a meeting. I sew slowly, so I didn’t want to race.
I bought a Jelly Roll and got to work sewing the strips together. For a person who doesn’t like really long seams (I prefer chunking!), this project was kind of a nightmare of long seams. It was kind of a tedious job and I soon realized I had no control over color placement, no control over fabric pattern placement. Basically, I had no control.
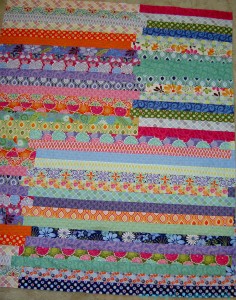
This was a problem for me. While I like serendipity and happy accidents, this quilt was not turning into the successful result of a happy accident. It was turning out very, very badly. My fears were confirmed when the top was done.
I liked the colors. I liked the fabrics. I sincerely disliked the top.
I put it away and left it for awhile hoping it would grow on me. Periodically, I took it out, hoping I would like the top and be willing to put some work into finishing it. My heart sank every time I saw the top and I began wondering what the designers of the Jelly Roll Race concept were thinking.
I began looking at other JRR tops and all of them looked cute or interesting. ARound this time, I heard a CraftyGardenMom podcast. Tanesha was also working on a Jelly Roll Race quilt. She said she cut 20″ off the first strip to make the quilt more irregular. If I had read any directions I might have known that. I wasn’t about to rip all those seams and start over, but I did feel a spark of hope that all was not completely lost.
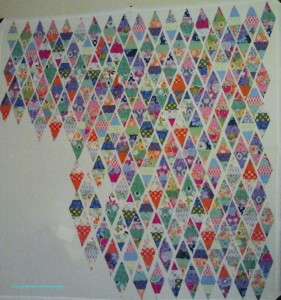
Last year I finished a very successful quilt from my Fabric of the Year series called Fabric of the Year 2010. This quilt is made with diamonds and I still have the Creative Grids ruler. I came upon it and the spark of hope grew brighter. Since the top was languishing, I decided to be drastic. I decided that I would cut the top up into diamonds. What is the worst that could happen? The top could not be any uglier or anymore useless than it already was.
I tried sewing the diamonds together by themselves, but VERY quickly realized that the diamonds were busy and needed their space.
I sewed the diamonds together in chunks with Pure Elements Linen as the sashing. I go into quite a bit of detail about the construction in a post from February. I sewed and sewed and sewed. The sewing seemed never ending. Diamonds are not hard to sew together, but you do have to pay attention and there were a lot of them. I ripped out a lot of seams to make lines match up. There are a few that don’t, but I can live with them.
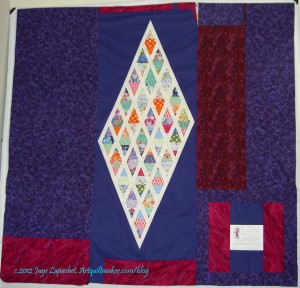
DH helped me with the math, but I still had quite a few diamonds leftover. I decided to put the extras on the back. You could say that the quilt is two sided, but the quilting wasn’t design with the back in mind.
The back is my typical pieced back, but I haven’t done anything like the big off kilter diamond in a long time. I kind of like it.
This is an original design and there isn’t a pattern. If you want to make one of these quilts, make a Jelly Roll Race quilt that you dislike. 😉
The coup de grace may be that this quilt was chosen to be part of the New Quilts of Northern California exhibit at the Pacific International Quilt Festival, which was held in Santa Clara, California October 10-14, 2012.
So, the bottom line is that this hideous mess was salvaged into something that I like. I want to make another Jelly Roll Race to see if I tame the technique even a little bit.
Fabrics:
- Pure Elements Linen by Art Gallery/Pat Bravo Designs
- Terrain by Kate Spain Jelly Roll
- Random purples for the back from my stash
Blogger’s Quilt Festival Stats
Quilted by Colleen Granger of Sew Little Time Quilting.
Sample of Links About this Quilt:
- Renewed Jelly Roll Race at the show: https://artquiltmaker.com/blog/2012/10/piqf-part-3/
- Finished Quilt: https://artquiltmaker.com/blog/2012/09/finished-renewed-jelly-roll-race/
- Renewed Jelly Roll Race Update: https://artquiltmaker.com/blog/2012/04/renewed-jelly-roll-race-update/
- The Beginning and the End https://artquiltmaker.com/blog/2012/04/renewed-jelly-roll-race-update/
- Renewed Jelly Roll Race Progress: https://artquiltmaker.com/blog/2012/02/renewed-jelly-roll-race-progress/
- Trying out backgrounds: https://artquiltmaker.com/blog/2012/02/jelly-roll-race-background/
- Jelly Roll Race Spark of Possibility: https://artquiltmaker.com/blog/2012/02/renewed-jelly-roll-race/
- Jelly Roll Race Beginning: https://artquiltmaker.com/blog/2011/10/jelly-roll-race/
