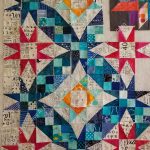
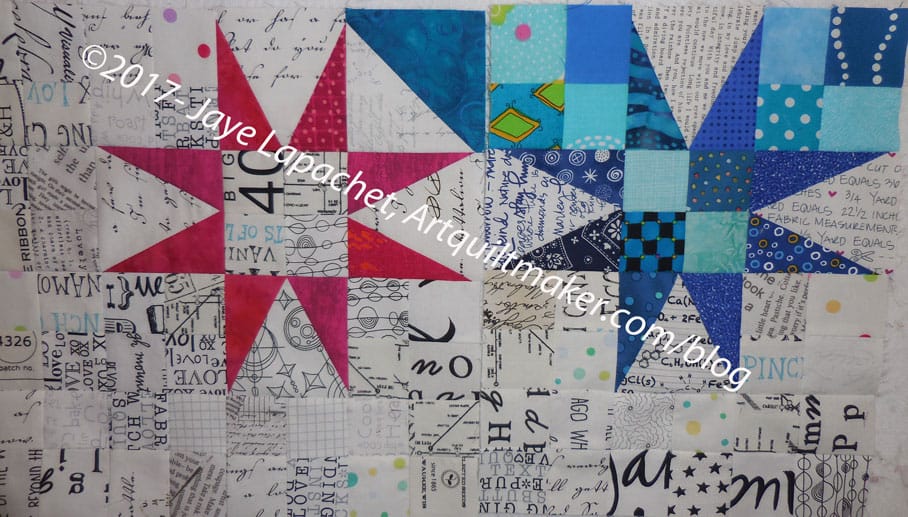
I made good progress on Saturday. I have nearly a quarter of En Provence sewn together. I probably need another row of the pink stars on the top and one the side to have a full quarter, but progress is being made.
I am pleased with the way it looks. I think it is turning out well. some of the light blues are a bit light and do blend with the text fabric background. I hope that will add interest. The larger squares I am adding in are working well. I am very pleased I decided to use a controlled scrappy palette. I think it gives the quilt a cohesion it wouldn’t otherwise have.
I am not sure when I will get to this quilt again, but I hope to finish it soon. I have to day that I kind of just want this piece done. I REALLY like, but I just want it done.
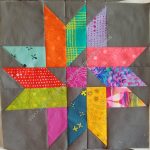
In between putting together En Provence, I made some more Triple Star blocks. I have about six done and have to cut some more pieces to make more. I have ten more to make. They are sewn together pretty quickly with all the pieces cut.
This pattern is from Scrap-Basket Beauties by Kim Brackett. Frances turned me on to this author. There is at least one other scrap quilt in this book I would consider making.
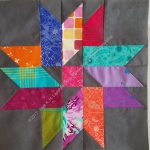
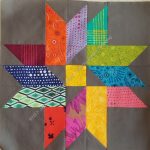
You might remember that I used the flippy corners method to make the weird shapes needed for the Triple Star. This left me with a whole bunch of matched HSTs to be. I didn’t want to have them laying around, because I don’t want to be tempted into another project, but I also didn’t want to toss them out. They would make for a nice donation quilt.
Flippy Corners Blocks
I ended up giving them to SIL and sewed them into blocks within, what seemed like, five minutes.
They came out really well, I think. The colors are wonderful, as I already knew. It is nice to see them in another format as successfully as in the Triple Stars.
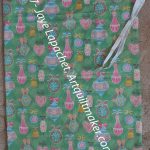
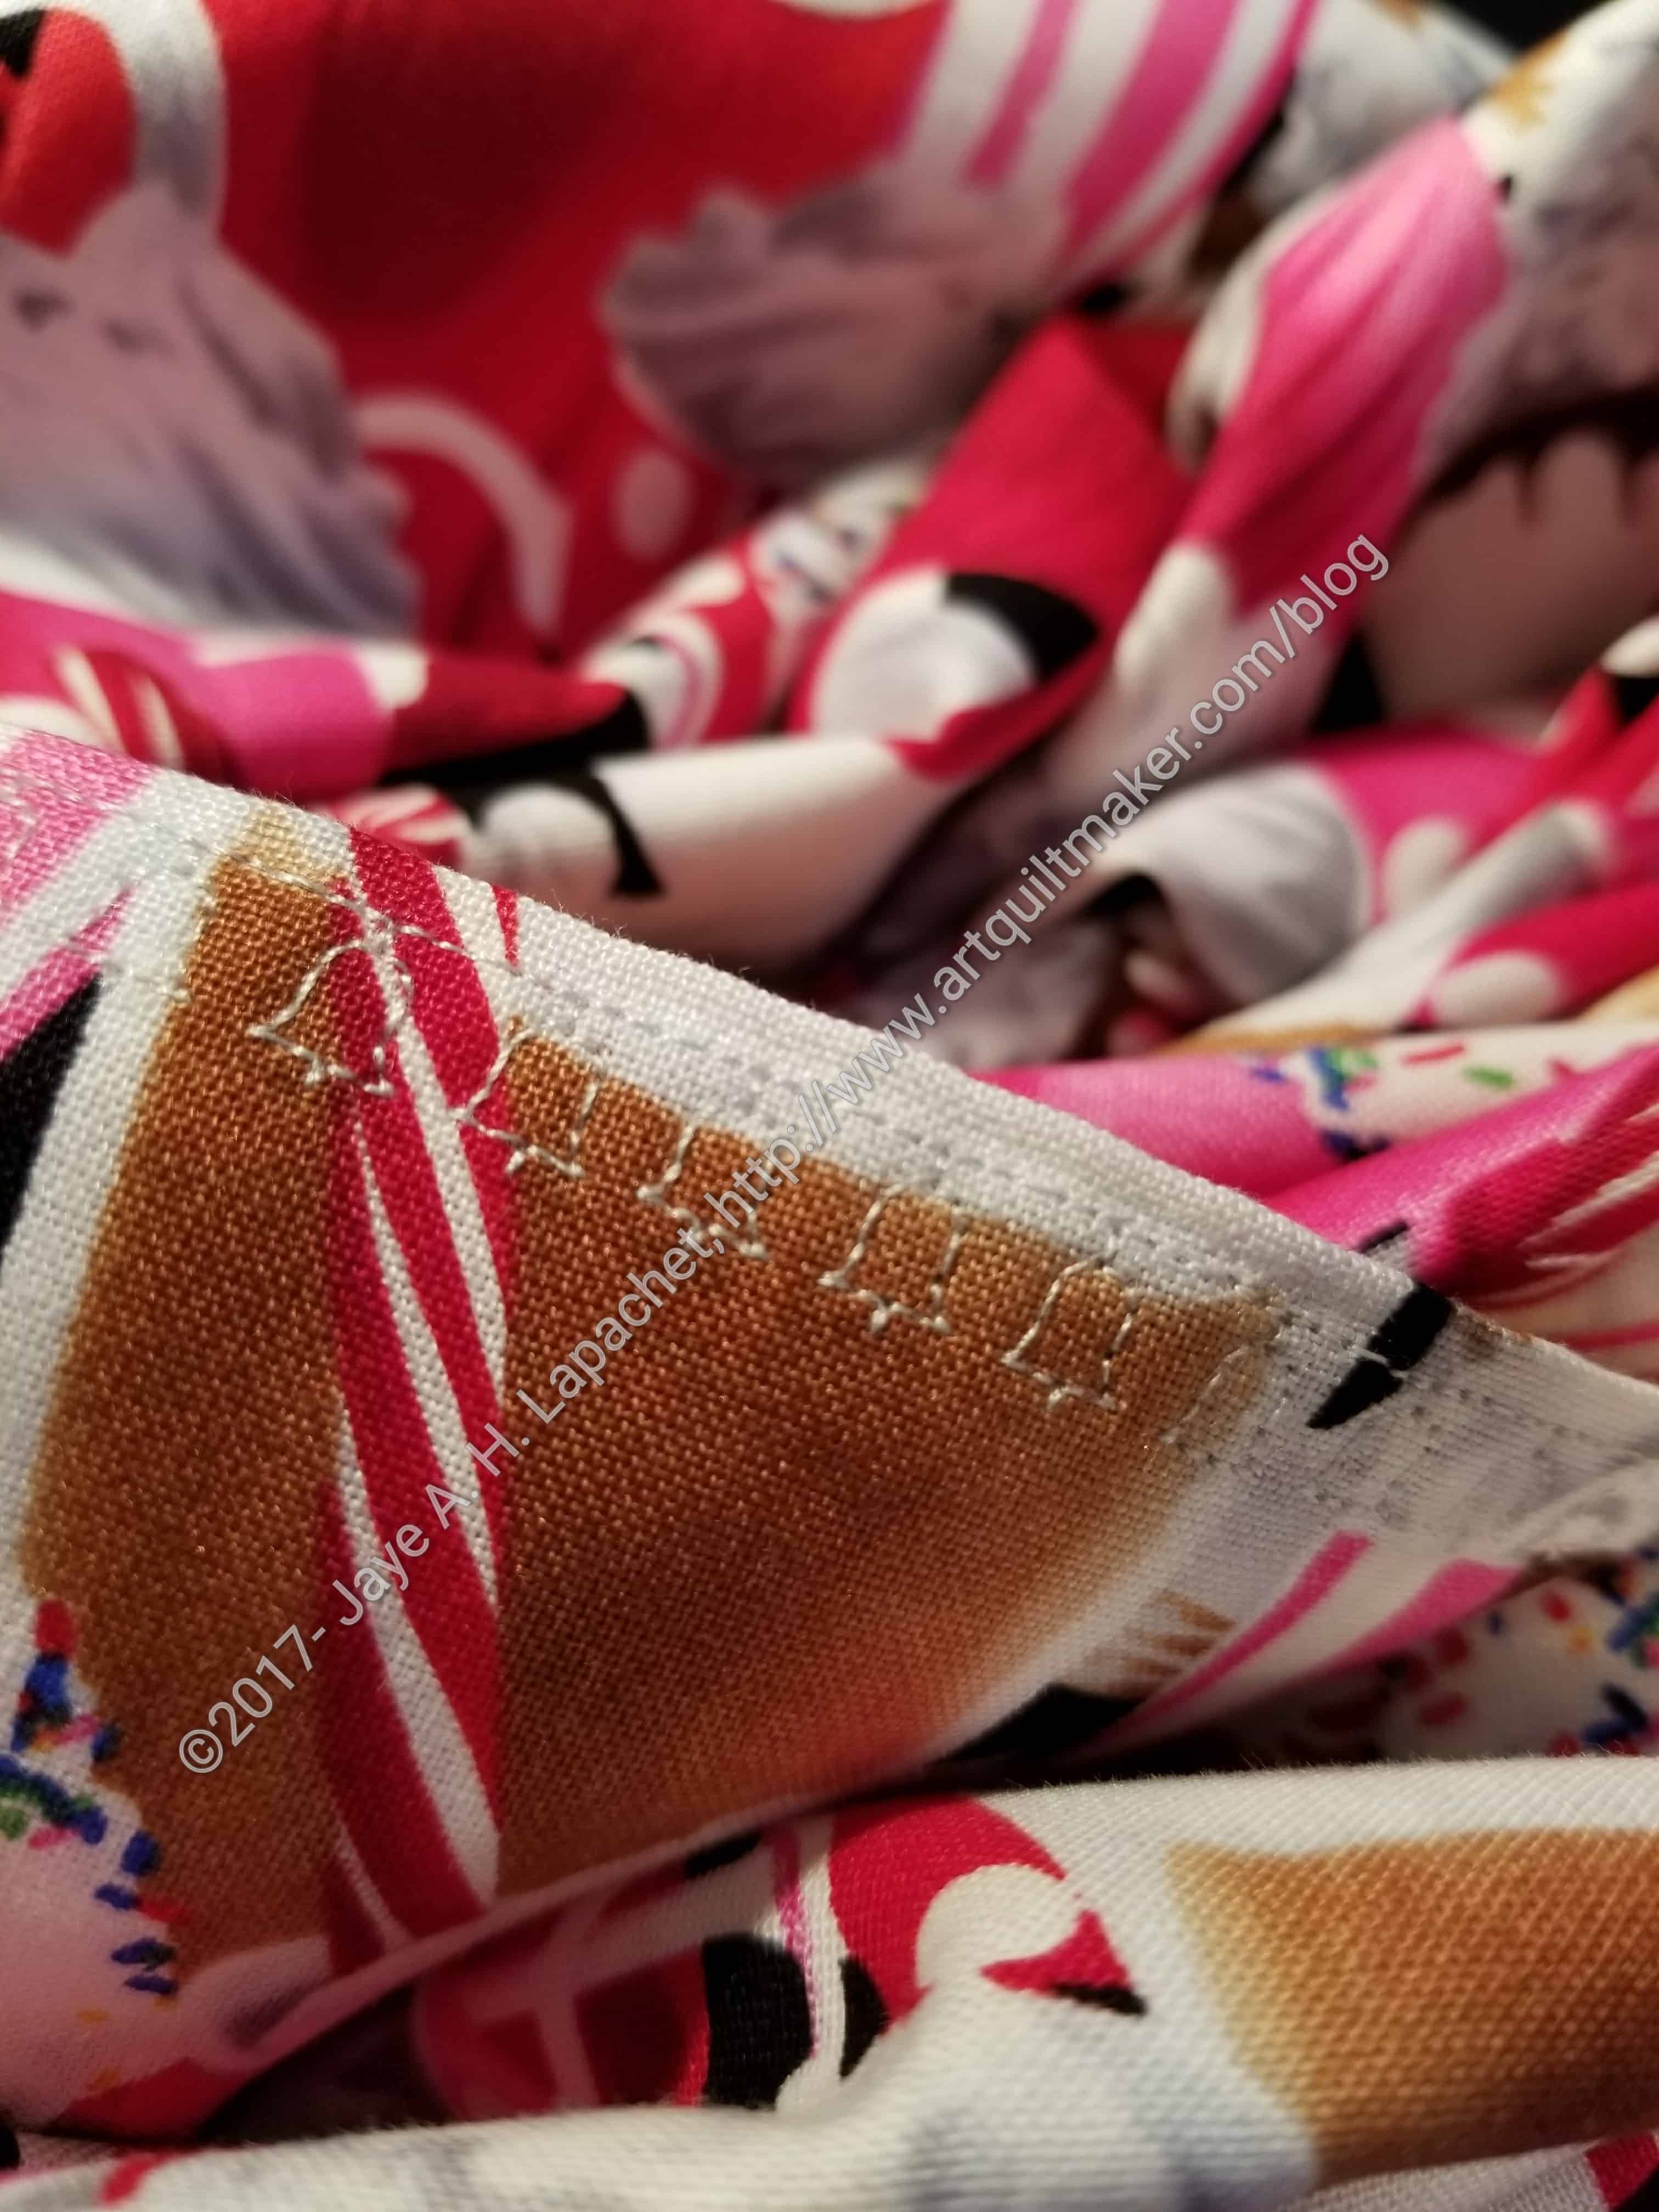
I had some Christmas fabrics laying around. They finally got on my nerves enough for me to cut them into the correct sizes for gift bags. I knew my MIL needed some larger ones, so the ones I made went to her. There are two shown above, but I made about 8.
Decorative Stitches
The 6600 has some great decorative stitches. One I chose for the Hot Drinks gift bags were bells. They look festive,though I am not sure anyone will notice. *I know,* and that is what counts.
As I have said, gift bags are a great way to try out your decorative stitches and a great way to use up fabric. None of those reasons bring up not having to wrap gifts with paper and ribbon. You can find the tutorial for making gift bags on the tutorials page.
I still have the napkins I prepped at Sew Day to make and those are next on my list.
Clue 7 of the En Provence Mystery Quilt is a cheap date. It is 4 clues in one. Bonnie Hunter explains carefully why she wrote the last clue that way, so I understand. That doesn’t make me happy about it. I wish the additional QSTs/Peaky & Spikes had been clue 7, the squares/HSTs had been clue 8, the additional 4 patches had been clue 9 and the assembly had been Clue 10. I know she didn’t have 4 additional weeks, but still.
When I realized what was going on, I gathered the fabrics I wanted to use and took them over to SIL 2’s house for Craft Night. I pressed and cut the shapes I needed for HSTs and Peaky & Spikes. I only needed to pin and the HSTs were ready to be sewn.
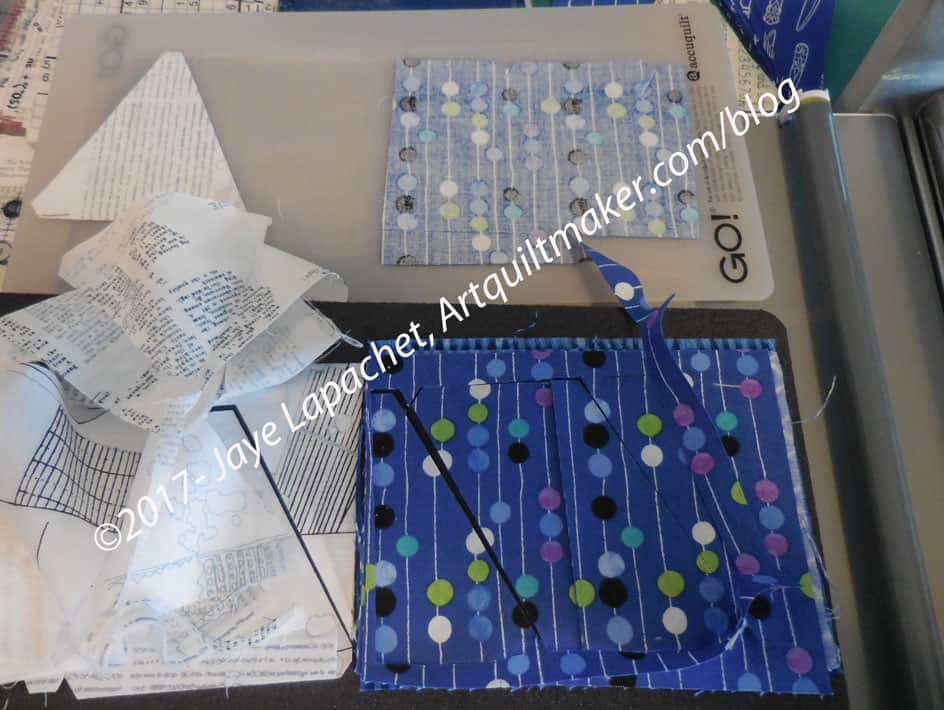
Cutting Peaky & Spikes
The Peaky & Spikes required more work. I was planning on cutting the actual shapes using SIL’s Accuquilt die. I only got the rough shapes cut and then was too tired to continue. I borrowed the die and cut them out over the weekend.
Over the weekend, mostly Sunday since Saturday was the BAM meeting, I ran the Peaky & Spike rough cuts through the Accuquilt and sewed those together. I was short on some of the Peakies and will wait to cut more until I see how many I need.
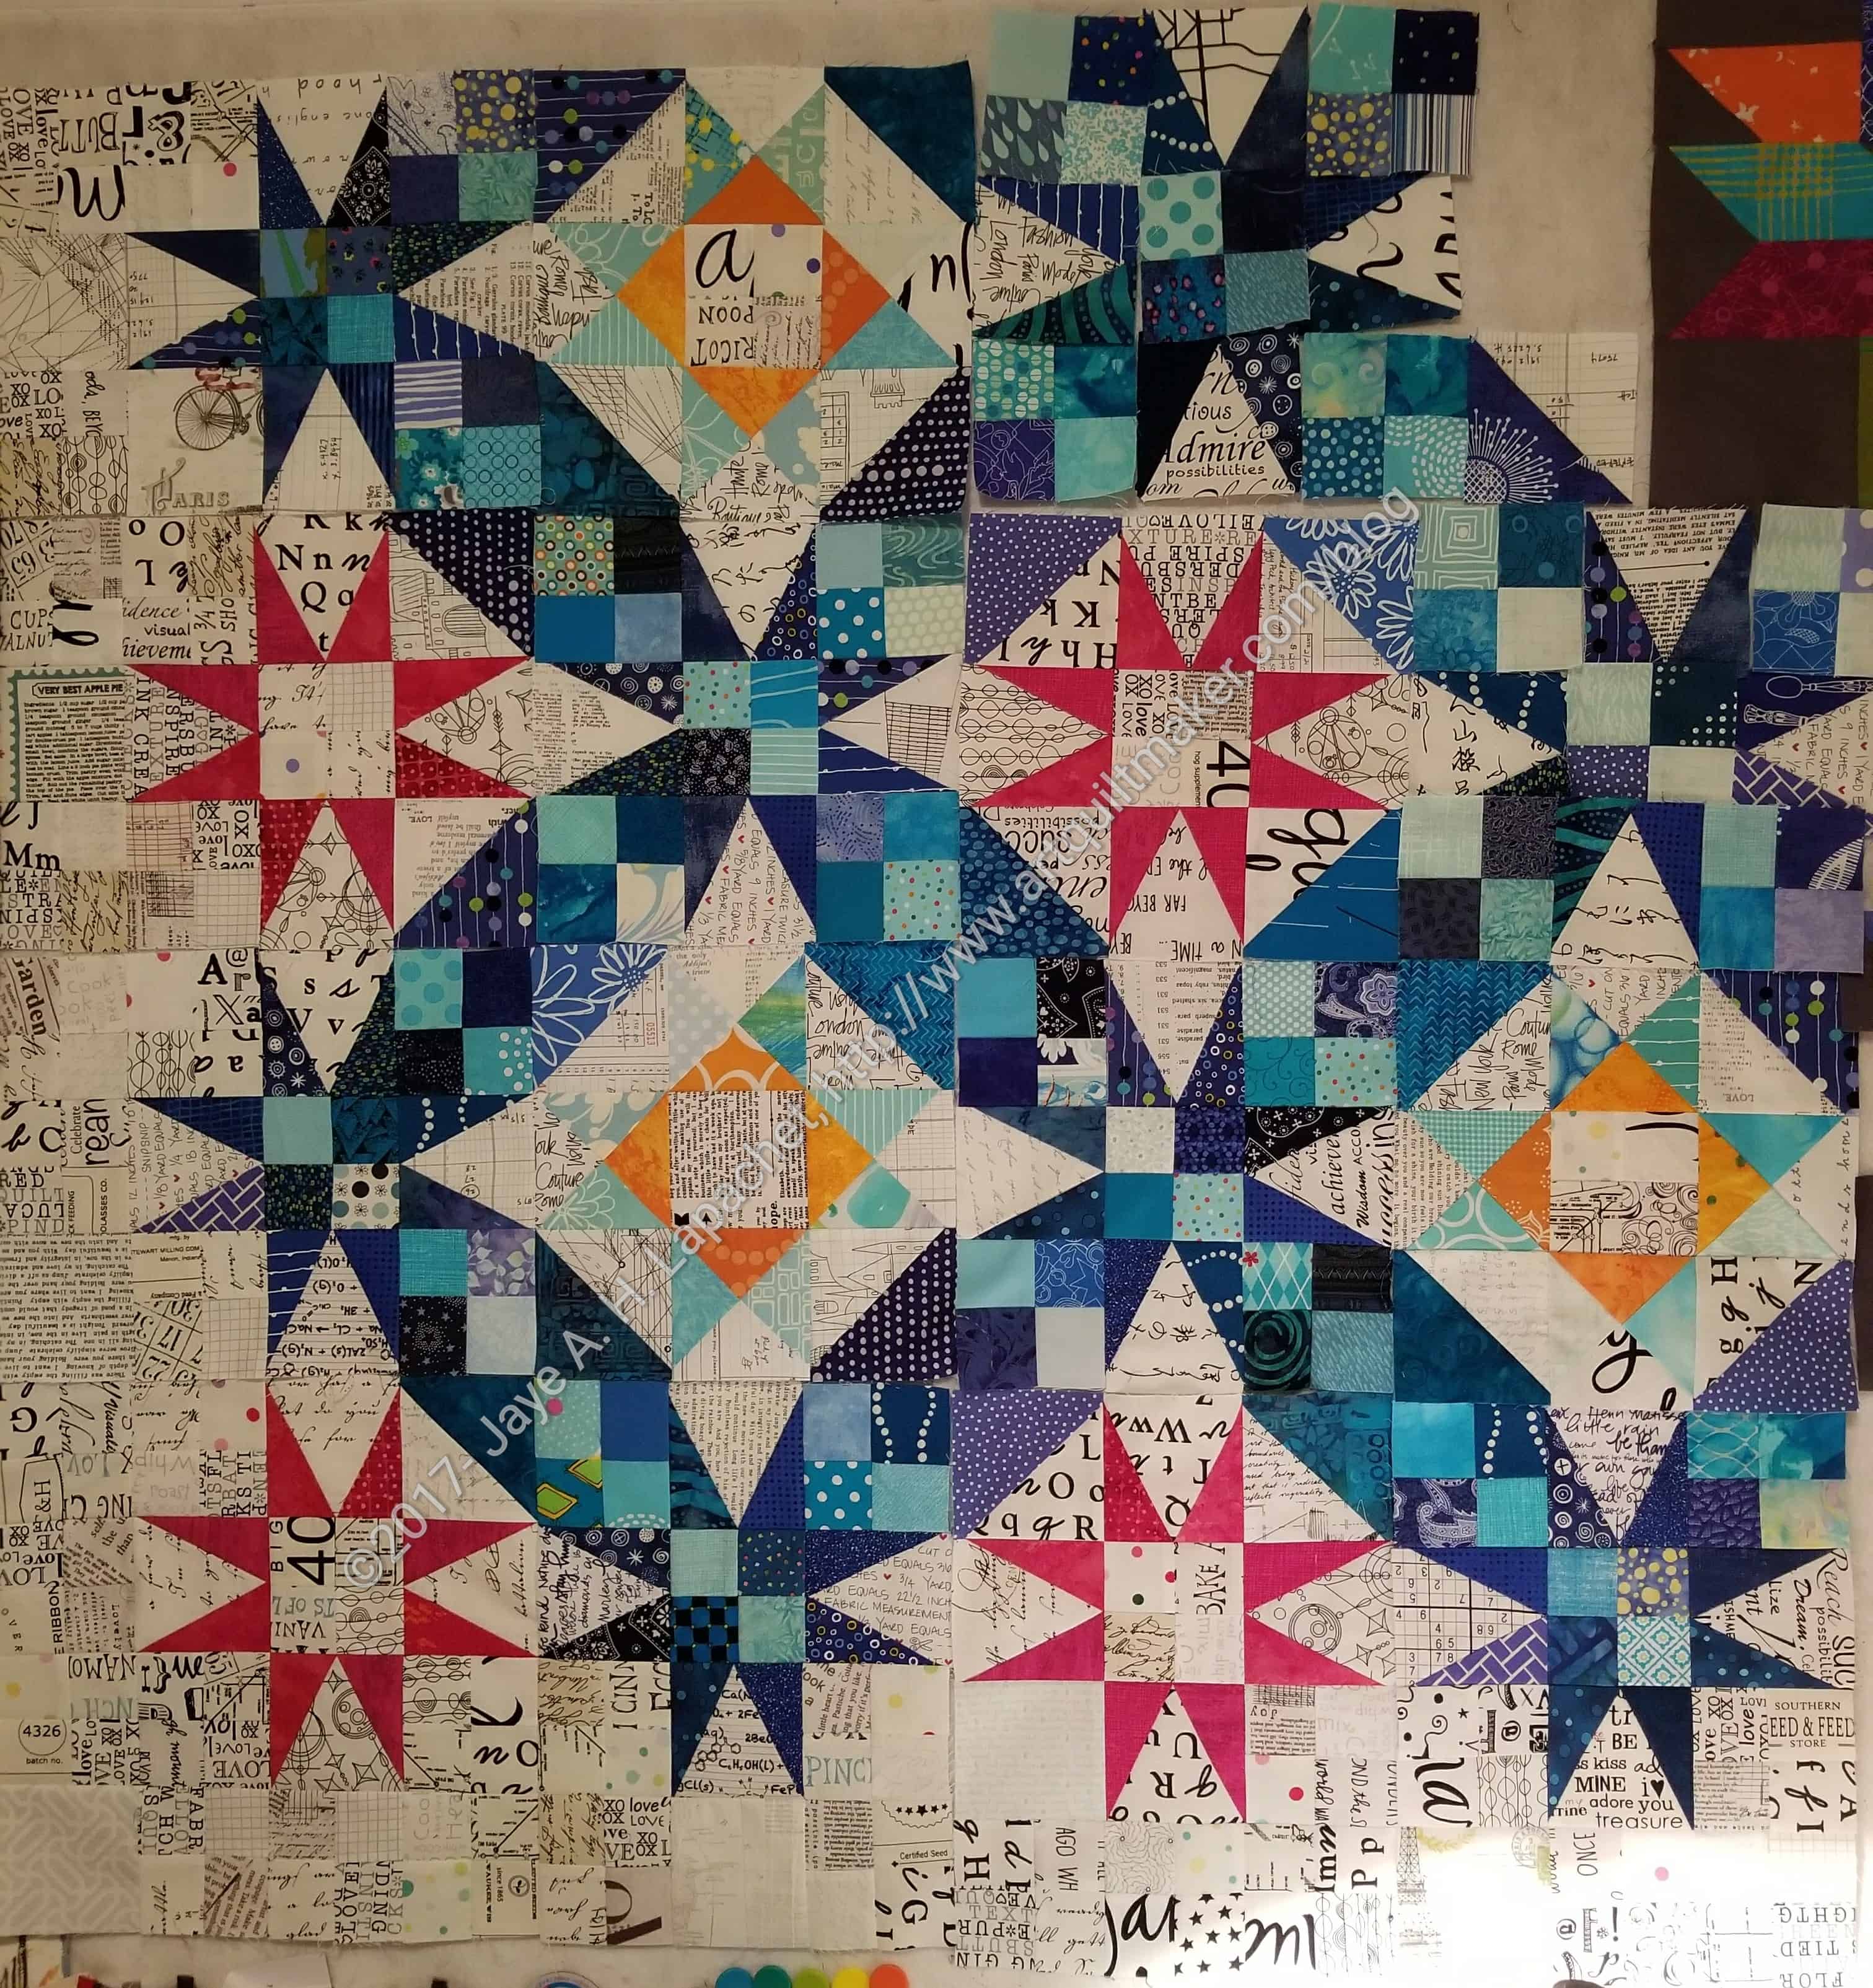
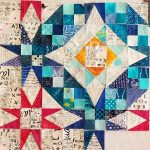
En Provence on design wall
En Provence on design wall – unsewn, detail
I couldn’t really complain too much because I had the directions for putting the blocks together. I decided to put some pieces and parts up on the design wall to see what I had.
WOW!!!
I really like it. I actually couldn’t stop myself from starting to sew the top together. The images above, from bottom to top, show the bottom left hand corner. I have sewn the bottom pink, corner block and the blue star to its right. They look great and I was tempted to just put the whole thing together last night. Of course, it will take me awhile to put the whole top together, so I slowly backed away muttering soothing noises to my hands, which were itching to sew like a mad woman.
I thought about the quilt a LOT and wonder if I should change the pink stars for orange stars. Yes, it means re-cutting and sewing a bunch more Peaky & Spikes. I might try a couple and see what I think. I like the orange I used in the QSTs and wonder if it isn’t too little.
Background Chaos
One of the sub clues for Clue 7 is to make more background 4 patches. Sigh. I wonder why she just didn’t have us make all of them in the beginning? This does give me the opportunity to change up the look of my quilt. I sewed one corner and the four patches are great, but I think they would look better with some larger squares interspersed. I think all of the four patches look a little chaotic with everything else that is going on in the quilt. It will also take me less time to cut them.
I have lost the prepped HSTs from Craft Night, which is frustrating. I went on a frenzy of tidying, which is never a good thing. I wanted to have them sewn together, so I could intersperse the previous HSTs I made with the new fabrics. As it stands, I will need to prep more to finish the quilt. Sigh.
I am really liking this quilt so far. I am glad as mystery quilts are always a crap shoot.
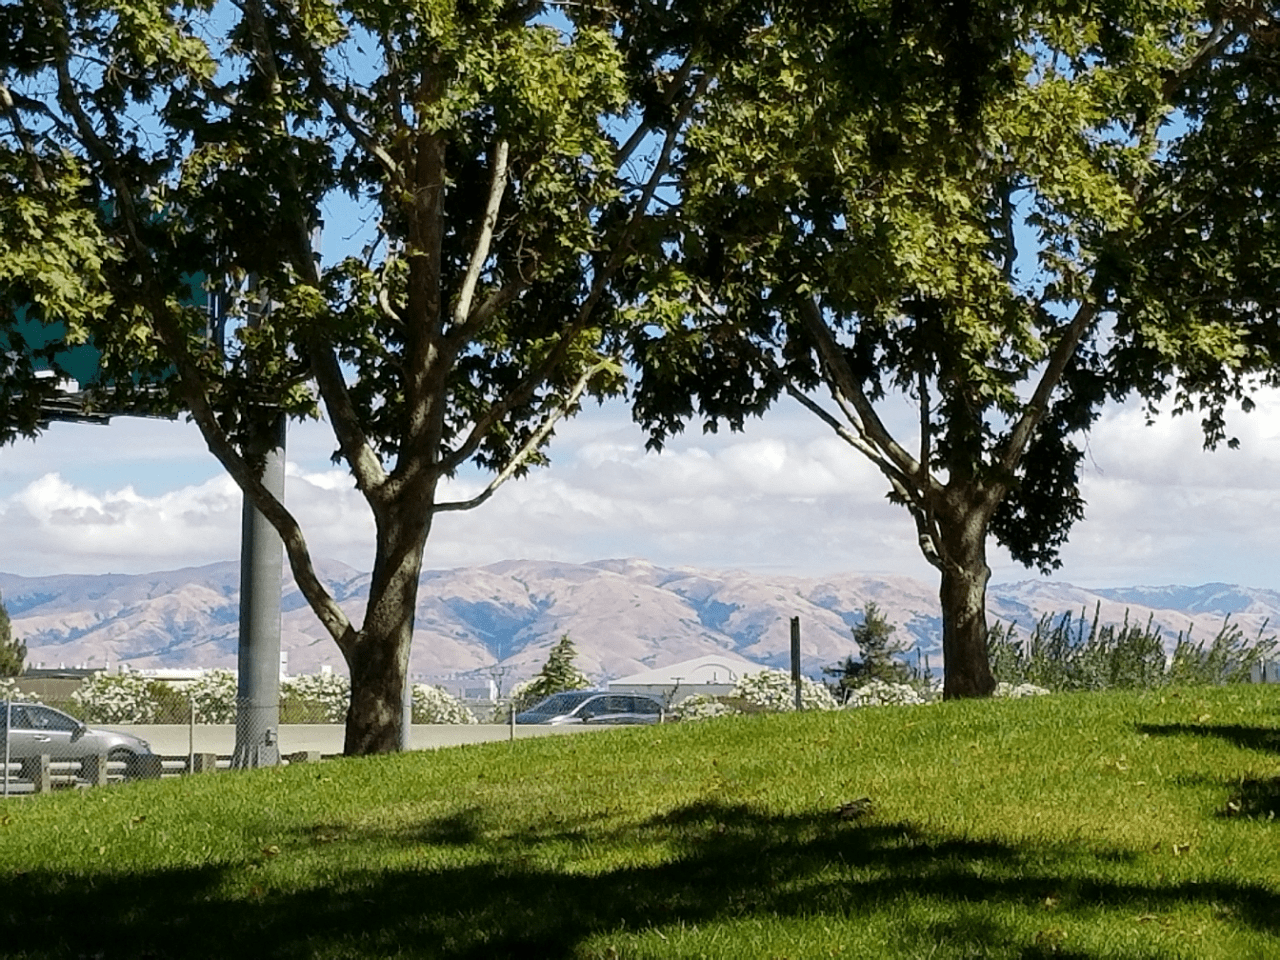
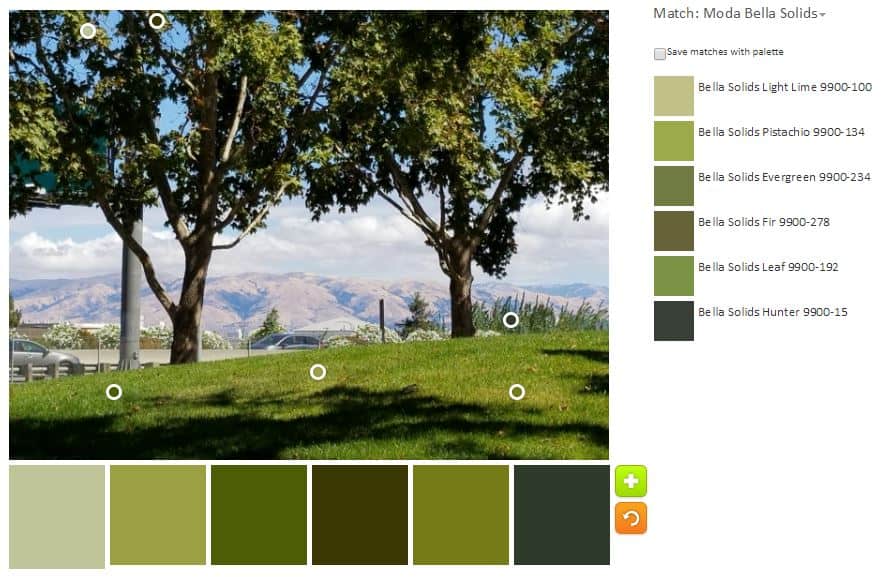
The weather this week has been good. It has not been deathly hot and there have been some lovely clouds. I took a photo while out on a lunchtime walk, which I decided to use for this week’s ColorPlay.
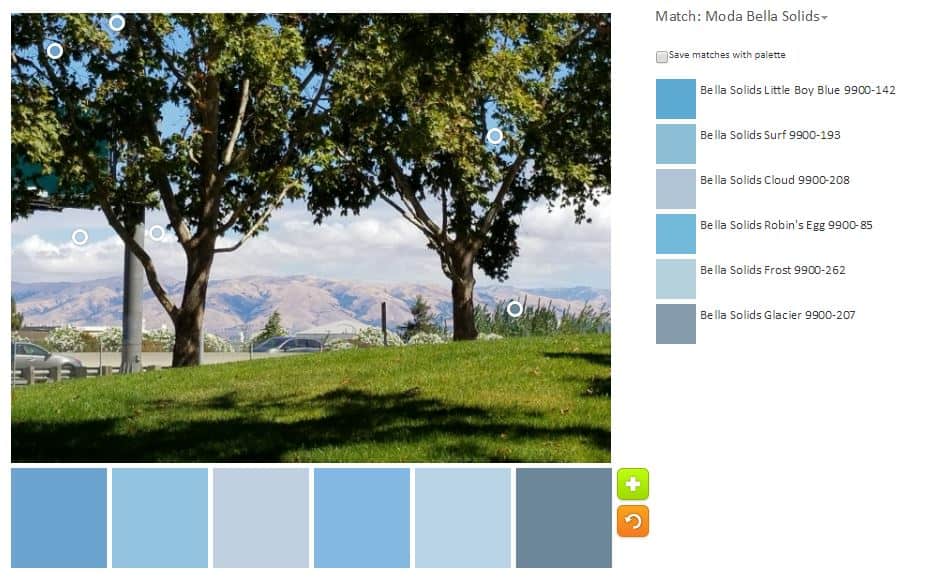
We are using Bella Solids instead of Kona Solids this week.
I tried to click the shutter when there were few cars, but you can still see them through the trees. I liked the green in front with the hills in the back. I prefer green hills, but still thought this was a lovely view.
ColorPlay Sept 22 default
The default, as we have discovered is normal, was heavily neutral. This palette looks like a 1970s decorator showcase house palette.
ColorPlay Sept 22 n.1
I decided to try a monochromatic palette next. I was able to find six different blues in the photo. None of the colors are the bright turquoise I love, but the Little Boy Blue and Robin’s Egg aren’t bad.
ColorPlay Sept 22 n.2
I decided to see if I could create another monochromatic palette and was mostly successful with green. I find the greens to be good greens for nature, but not bright enough for my quiltmaking.
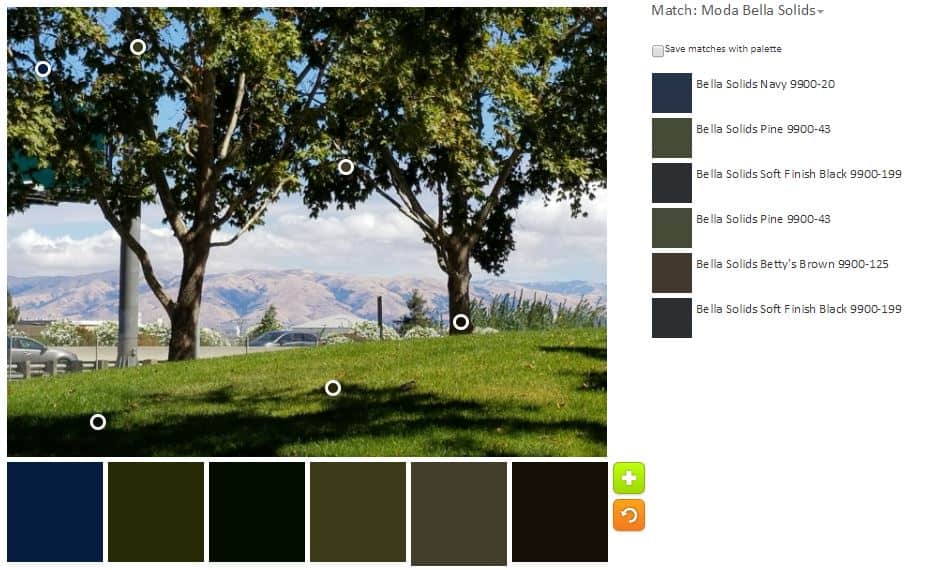
ColorPlay Sept 22 n.3
While really not my thing, I decided to try and make a palette with darks. I think I succeeded and I do like that dark blue. Otherwise, the palette looks more like the dresser of teenage boy than a palette I would use for a quilt.
ColorPlay Sept 22 n.4
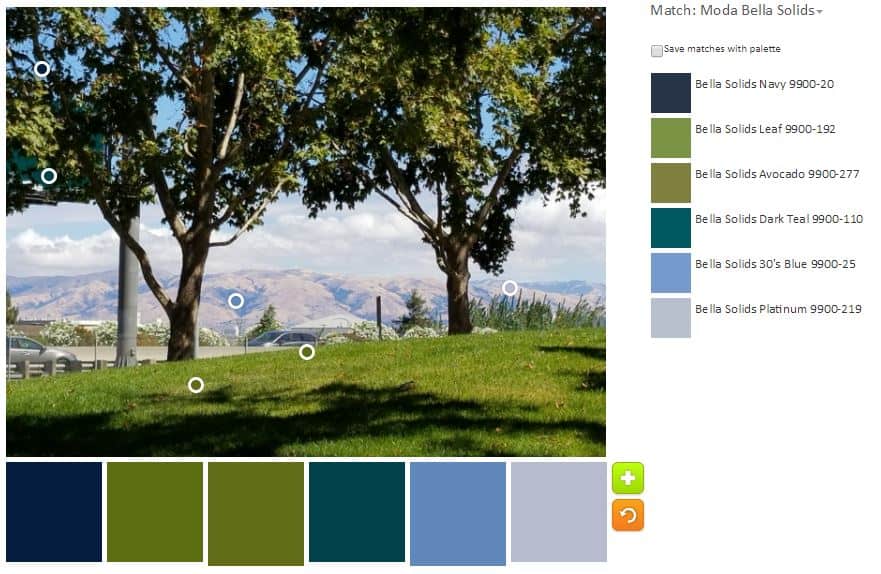
Next, I looked at combining the two monochromatic palettes to see if I could get something that I might actually use in a quilt. This is a nice palette. I really like the Dark Teal color. That makes this palette for me. I am still not much of a fan of the Avocado. The Leaf color is ok, though it takes on some of the qualities of the Avocado when sitting next to it.
ColorPlay Sept 22 n.5
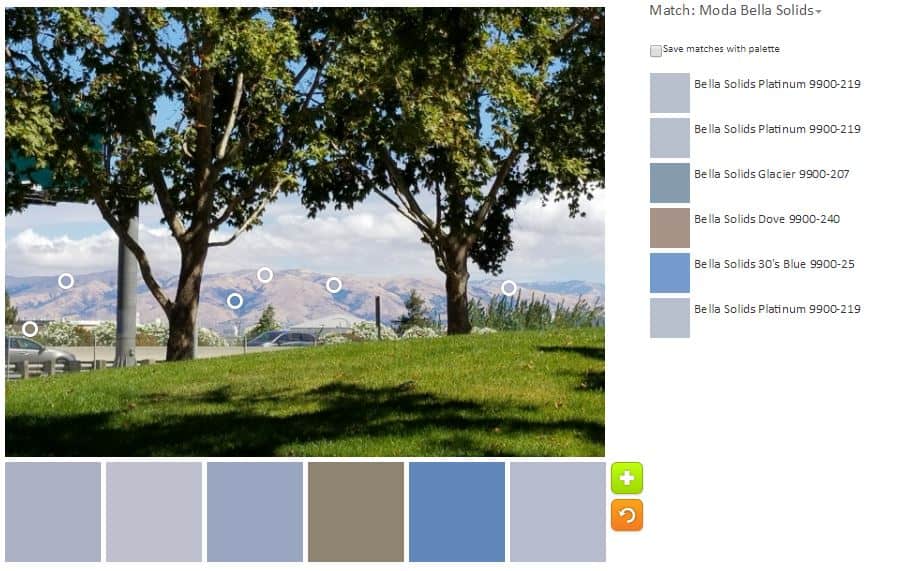
Finally, I wanted to see what I could do with the hills that wouldn’t produce a deadly beige palette. There is that Dove, which looks more beige than grey to me. This might make a nice soft boy baby quilt. It doesn’t have the contrast that people insist babies want/need, however.
Have you made any interesting palettes lately? Please share.
Well, best laid plans. Life, I guess, got in the way of me posting old quilts every Thursday for awhile. I really did intend to do it and here I am again.
She Had to Have Her Latte – 1999
She Had to Have Her Latte was my favorite quilt for awhile. It looks a little dated now, but I still like it.
She Had to Have Her Latte was one of the first Improv quilts, but done in a different way than people commonly understand Improv quiltmaking today. In this quilt, I cut novelty fabrics into shapes with the primary focus being to showcase the motifs. Other pieces were put in between those focus pieces so the quilt fit together. There was no free cutting or rulerless cutting.
I made this with a friend and we had a whole story around the quilt about a woman who had to have a latte every morning. We discussed why and what it meant. I intended this to be the first in a series of quilts, but they were never made.
The last time I wrote on this subject was February. As I mentioned in that post, it had been a couple of years before that. it is always interesting for me to look at this list and see if I still want to work on the projects
Art Institute of Chicago Fusible Applique’ (Ticker Tape Style) Quilt
Status: Dream state
Pattern: Original, I do have a version of the pattern I used for the Whole Cloth quilt and I will use it as starting point.
Fabric: Turquoise and red, mainly, but other colors for the leaves and flowers, perhaps
Steps: need to fuse a bunch of turquoise to some piece of fabric in the ‘ticker tape’ style so i can cut it up into small pieces. I am thinking of making it similar to the Whole Cloth Quilt and using red, again, for the background.
Thoughts: I might make another one with turquoise on top of red with just two pieces of fabric.
Art Institute of Chicago Fusible Applique’ Quilt
Status: Dream state
Pattern: Original, I do have a version of the pattern I used for the Whole Cloth quilt and I will use it as starting point.
Fabric: Turquoise and red, mainly
Steps: need to fuse a big piece of turquoise to SoftFuse or similar, then cut out the image and fuse it to the background. I would satin stitch all around the image. I don’t know that I can make one continuous piece, but will try. The image would be similar to the Whole Cloth Quilt and using red, again, for the background.
Thoughts: I might make it with turquoise on top of red with just two pieces of fabric.
Thoughts: I can’t decide if this is still a dream or if it is already started and I just need to arrange it and start piecing. I have done a lot of cutting, so I think I have started it, thus it may not be a dream anymore. The original idea stemmed from the FOTY quilts. I just decided to do a monochromatic version – using just blues, in this case. I probably have enough patches now and just need to slot the time to work on it into my schedule.
Thoughts: I probably had enough squares to make this quilt, but then I used a bunch of them to make En Provence. Now I am working on cutting more. I hope to slot the time into my schedule int he not too distant future.
Easy Street
Status: have pattern/ dream state
Fabric: pinks
Pattern: Easy Street by Bonnie Hunter
Thoughts: I really liked Daisy‘s version of Easy Street, which she calls Cherry Bomb (she thinks of the best names for her quilts) in terms of color and feel. I don’t want to copy her, but if I do this quilt, I’d like to have the same pinky-red feel to it. One challenge about a mostly monochromatic quilt is getting enough contrast. I look forward to that challenge. Not sure this will become a reality.
Feathered Star Block
Status: Dream state.
Pattern: I haven’t decided on a particular feathered star
Fabric: I decided not to use a layer cake and will use the scrap 2.5 inch squares I have been cutting. I love the cheerfulness of Scrapitude Carnivale as I say over and over and am not done with that combination yet.
Thoughts: I thought about using dots on a white background, as I did with the Scrapitude Carnivale quilt as the background. It makes the Scrapitude quilt look so cheerful. I probably wouldn’t call it Good Night Irene.
Interlocking Triangles Quilt(s)
Status: dream state
Pattern: This is an idea that I designed myself. I made two quilts and have variations on the pattern to make more.
Fabric: I have a few different collections of fabric I want to use. Most are rainbow colored; I also have a lot of stripes to use
Thoughts: This is a quilt from which I get a lot of bang for my buck. The visual impact is tremendous. The easiest way to do the spiky triangles is with paper piecing. I am not that big of a fan of paper piecing (read my laments about the Spiderweb‘s paper piecing). I made Spiky Stars using templates and that was meditative and won a prize, so it is doable.
Jack’s Chain Quilt
Status: dream state
Pattern: Jack’s Chain, a continuous pattern
Fabric: bright scrappy, consistent centers
Thoughts: This is one of the first quilts I saw hanging in a quilt store and thought of making, after I learned to quilt. I have seen a number of variations lately using different hexagons in the center. Making the nine patches would be a good leaders and enders endeavor. As if I don’t have about a zillion leaders and enders opportunities.
Music Quilt
Status: dream state, but not very inspired
Pattern: Top will have a piece of music the Young Man can actually play. That will probably be applique’
Fabric/Colors: music prints and tone-on-tones with a little red
Thoughts: The Young Man has requested this quilt as his high school graduation quilt. I missed that deadline. He has sent me a piece of music, which I printed out. Now I need to make into an applique’
Neutrals and Red/Scarlet Quilt
Status: some cutting of black rectangles done.
Pattern: Slice a approx. 4 in x 7 in rectangle on the diagonal and insert a red strip, resew and set into columns.
Fabric: red, black and whites. I
Thoughts: gift. I have black fabrics cut and am just waiting to slot this into my schedule (sounds like the story of my life). I could use the bias tape I made for the Mighty Lucky January challenge from last year
Pineapple (Hunting and Gathering)
Status: I have strips cut.
Fabric: dots. Have most of the strips cut. Will be much more selective about which strips I use.
Pattern: Pineapple log cabin
Thoughts: I haven’t given up on a Pineapple quilt despite my frustration with the previous attempt. I bought a different ruler: a Creative Grids Pineapple ruler in hopes that it will work better for me.
Pink Rectangles Gradation Quilt (Hunting and Gathering)
Thoughts: I have made a couple of, what I call, Colorblock quilts over the years. One was the Kona Challenge in 2011, another was my 1990 Colorblocks 2 and the first one, Colorblocks, also made in about 1990. I bought the silk fabrics at the Marin Needlearts show about a zillion years ago and they have languished waiting for me to learn to back them so I can use them. I think I have that covered now and there is nothing stopping me except time and will.
Status: half cut; need more greys for the background
Fabric: Scrappy. I will use a grey for the background, because if I use more of the cut fabric patches, the pattern will be lost. The pieces are too oddly shaped and I don’t want to lose the pattern in a mass of scraps.
Pattern: Come Quilt with Me Rotary templates
Thoughts: I think I will buy the Sizzix template and cut grey windmill pieces with that instead of by hand
Out of the Dream State: Below is a list of projects that were on this list at some point that I actually made or am working on:
Half Moon Modern Quilt I made a Chubby Charmer instead of a quilt and am happy with that choice.
Medium Mondo Bag – I actually made the Midi bag. I think I might have another pattern to make another one, so I will have to try it out without the class.
I finally finished Down the Drain on Friday night. Completely finished: quilting done, binding on, sleeve sewn down. Done.
First, as I mentioned, I finished the quilting. Of course I could have stopped any time, but was clearly on a mission. I kept quilting minutely almost every single open space.
I finished hand sewing the binding on earlier this week. Normally, the combination of tightly woven fabric (an AGF solid) and Aurifil make for slow going, but the combination worked great! My needle went through the fabric with no problem and I sewed the binding in only about 4 hours.
I stitched the sleeve down in only about 2 hours. The whole process of making this quilting was so relatively painless. The experience was not and continues not to be painless. The actual process of making the quilt went so smoothly. I guess it was meant to be.
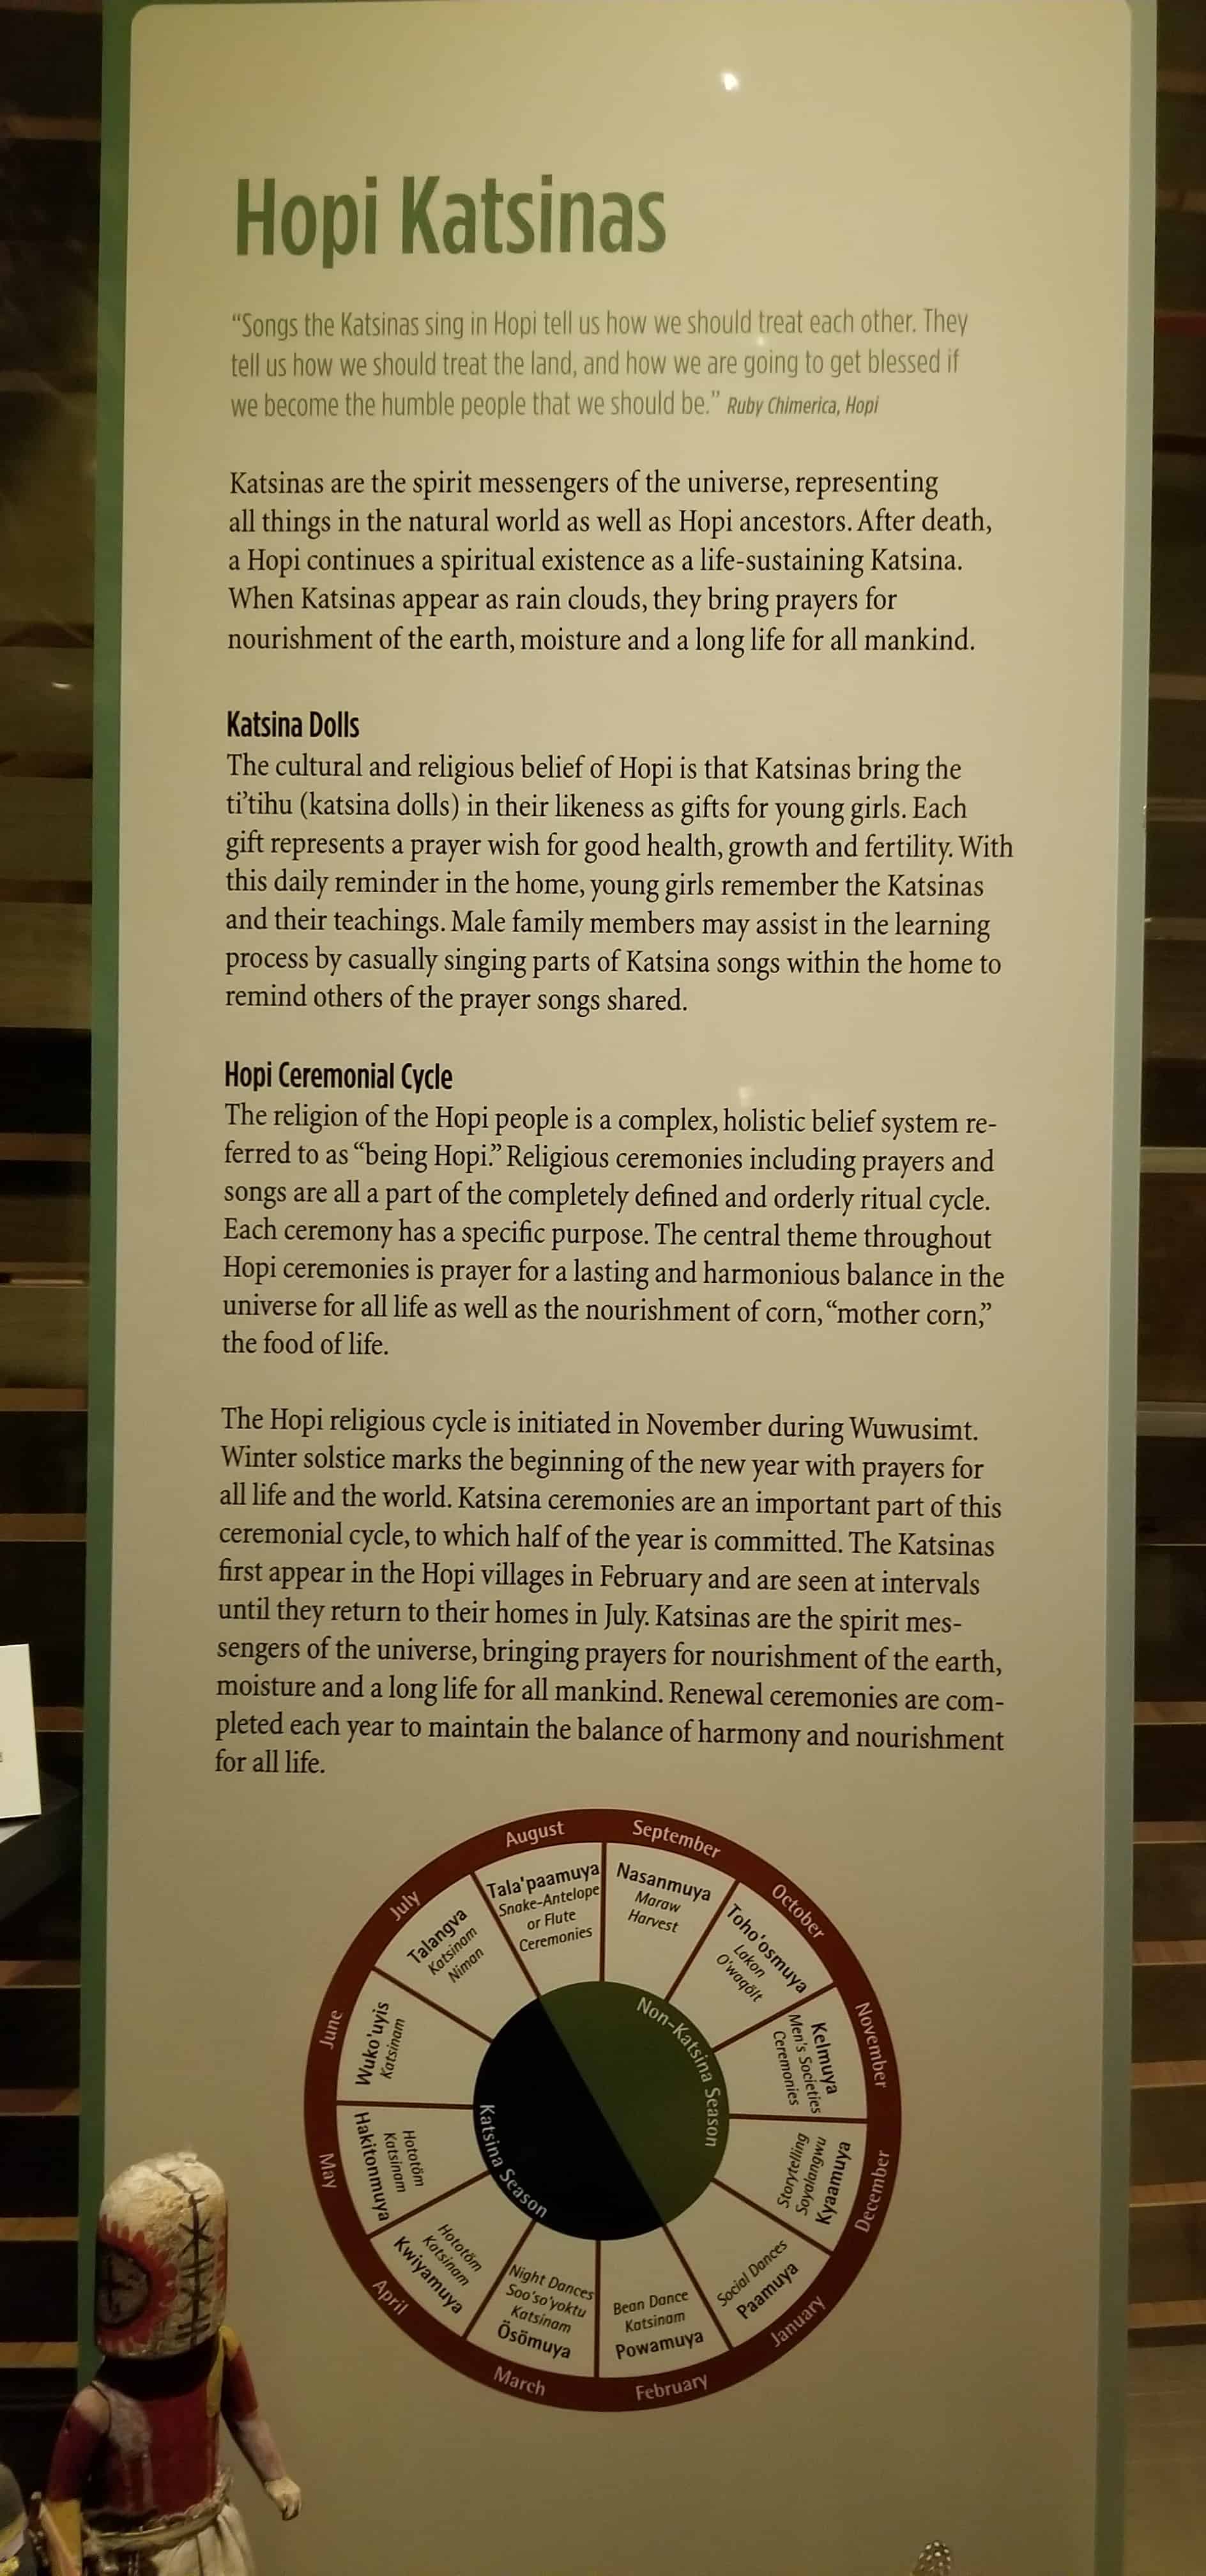
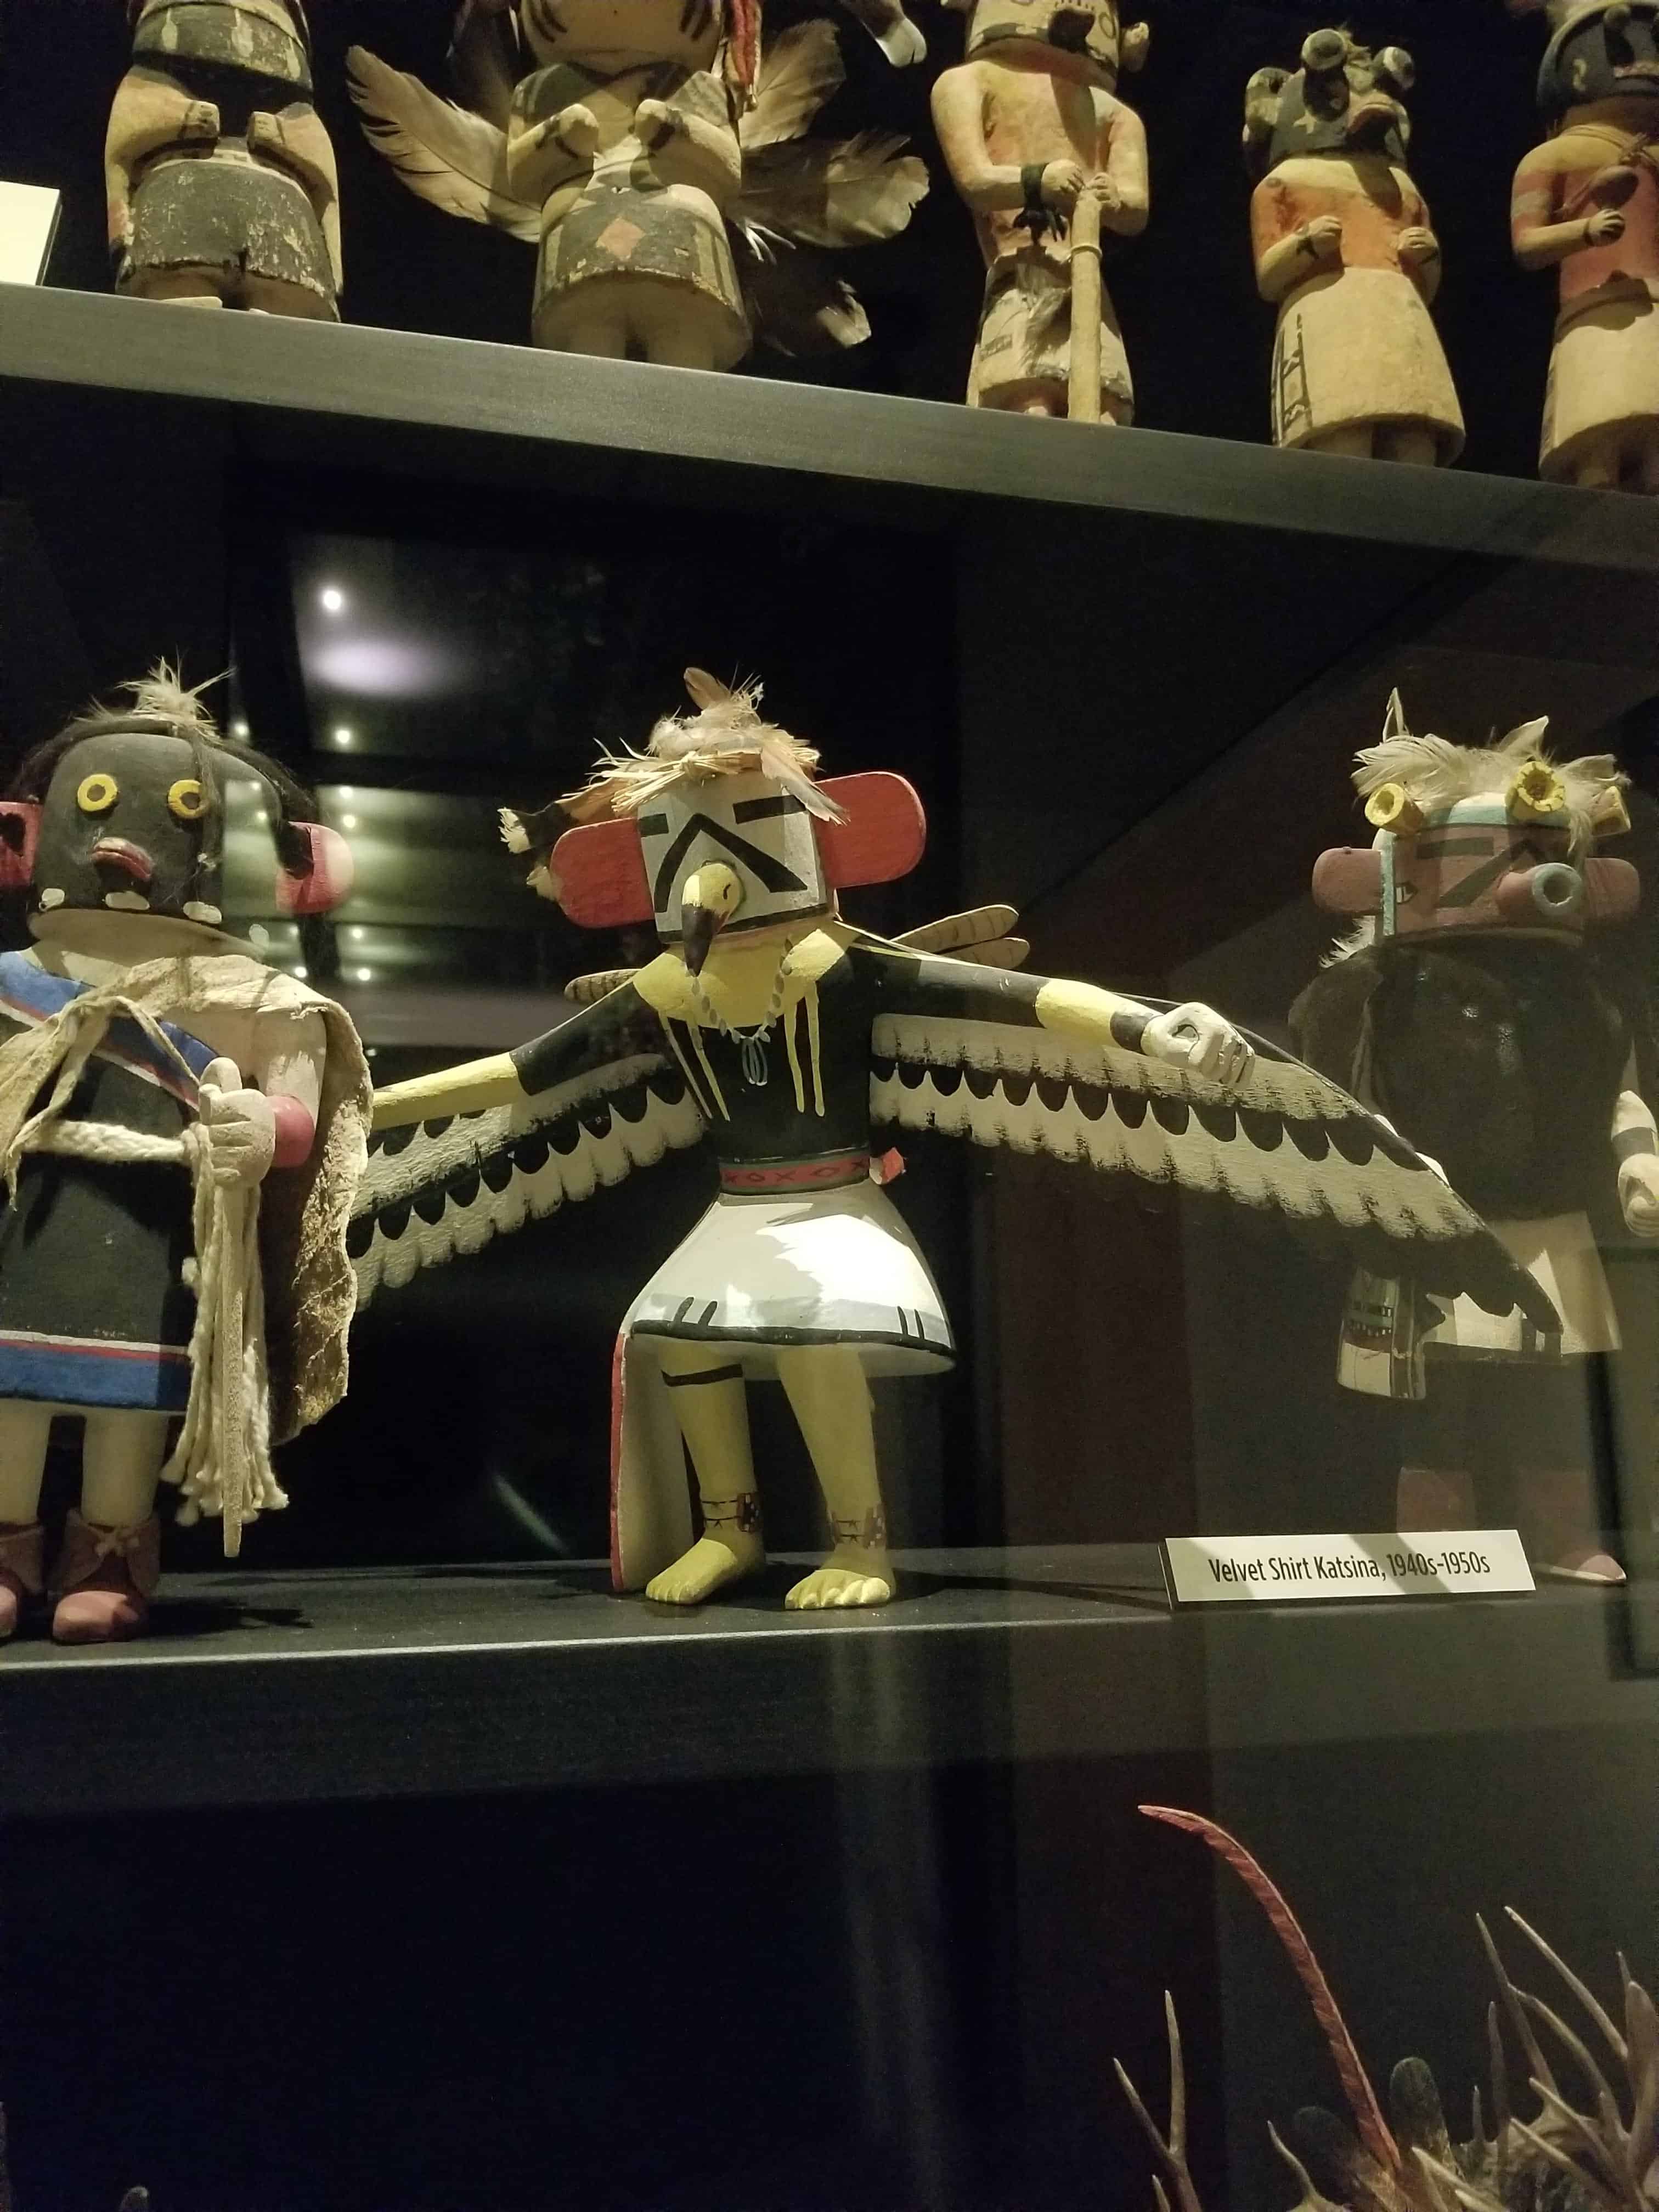
The Heard Museum has an amazing collection of Katsina dolls. Yes, I used the term Katsina instead of Kachina. The docent who showed us around said Katsina was the correct term. I really have no idea, so call them whatever you want.
“Katsinas are the spirit messengers of the universe. After death a Hopi continues a spiritual existence as a life-sustaining Katsina” (information at Heard Museum).
Hopi Katsina, Heard Museum, Phoenix
“The cultural and religious belief of Hopi is that Katsinas bring the katsina dolls in their likeness as gifts for young girls. Each gift repesents a prayer for good health, growth and fertility. With this daily reminder in the home, young girls remember the Katsinas and their teachings. Male family members may assist in the learning process by casually singing parts of the Katsina songs within the home to remind other of the prayer songs shared” (information at Heard Museum).
Katsina Doll, Heard Museum Phoenix
The black and white doll struck me as very funny. I don’t mean to demean another religion by laughing. He looks mischievous and cheerful. I sent the image to the YM and he enjoyed it.
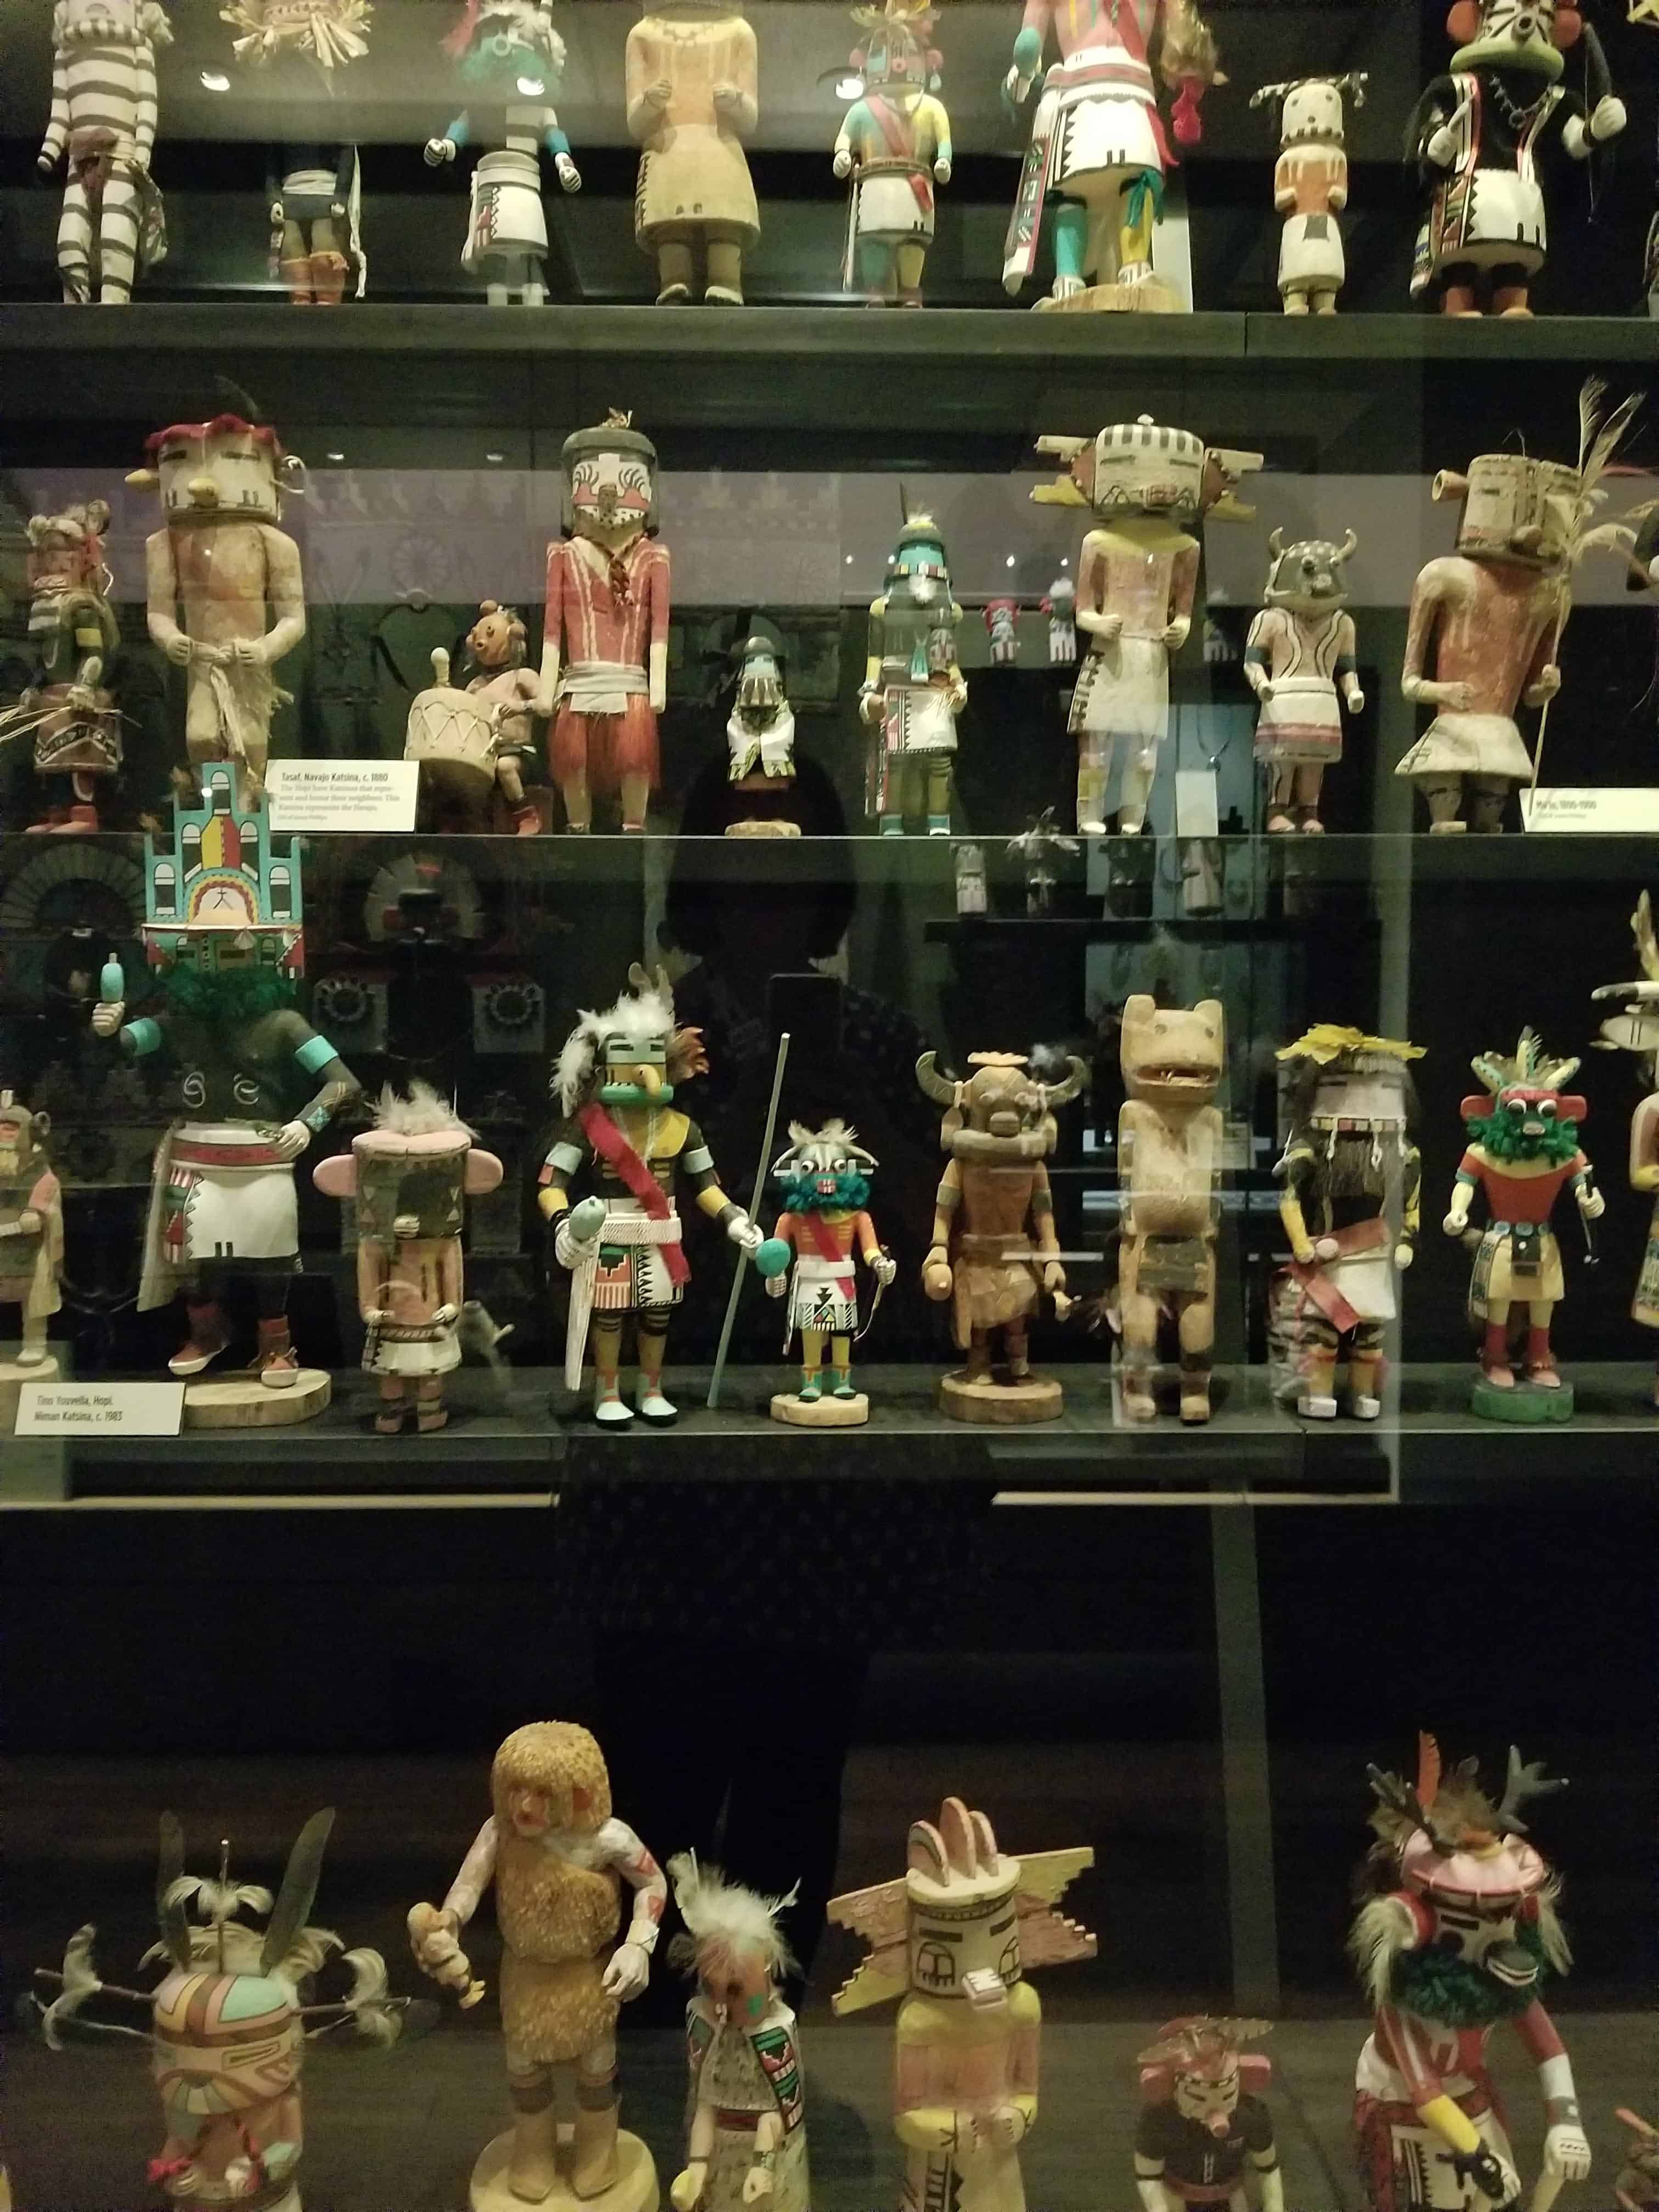
Katsinas were carved at a variety of skill levels and with differing levels of detail. As people started to collect them, artists began carving them to sell rather than for children to play with.
Viewers can tell the difference between the toys and the made-to-sell pieces by looking at the bottom. The art pieces have a base, which make them easier to display.
I really liked the variety of facial expressions.
Part of Barry Goldwater’s Collection, Heard Museum, Phoenix
The collection put together by Barry Goldwater is now in the Heard Museum.
The Goldwater display is separate from the others. The interesting part is the way the collection is displayed: older Katsinas at the top of the case, newer at the bottom. This arrangement makes it very easy to see the evolution of the Katsinas. The newer the doll, the more detailed it is and less likely it is intended for a child.
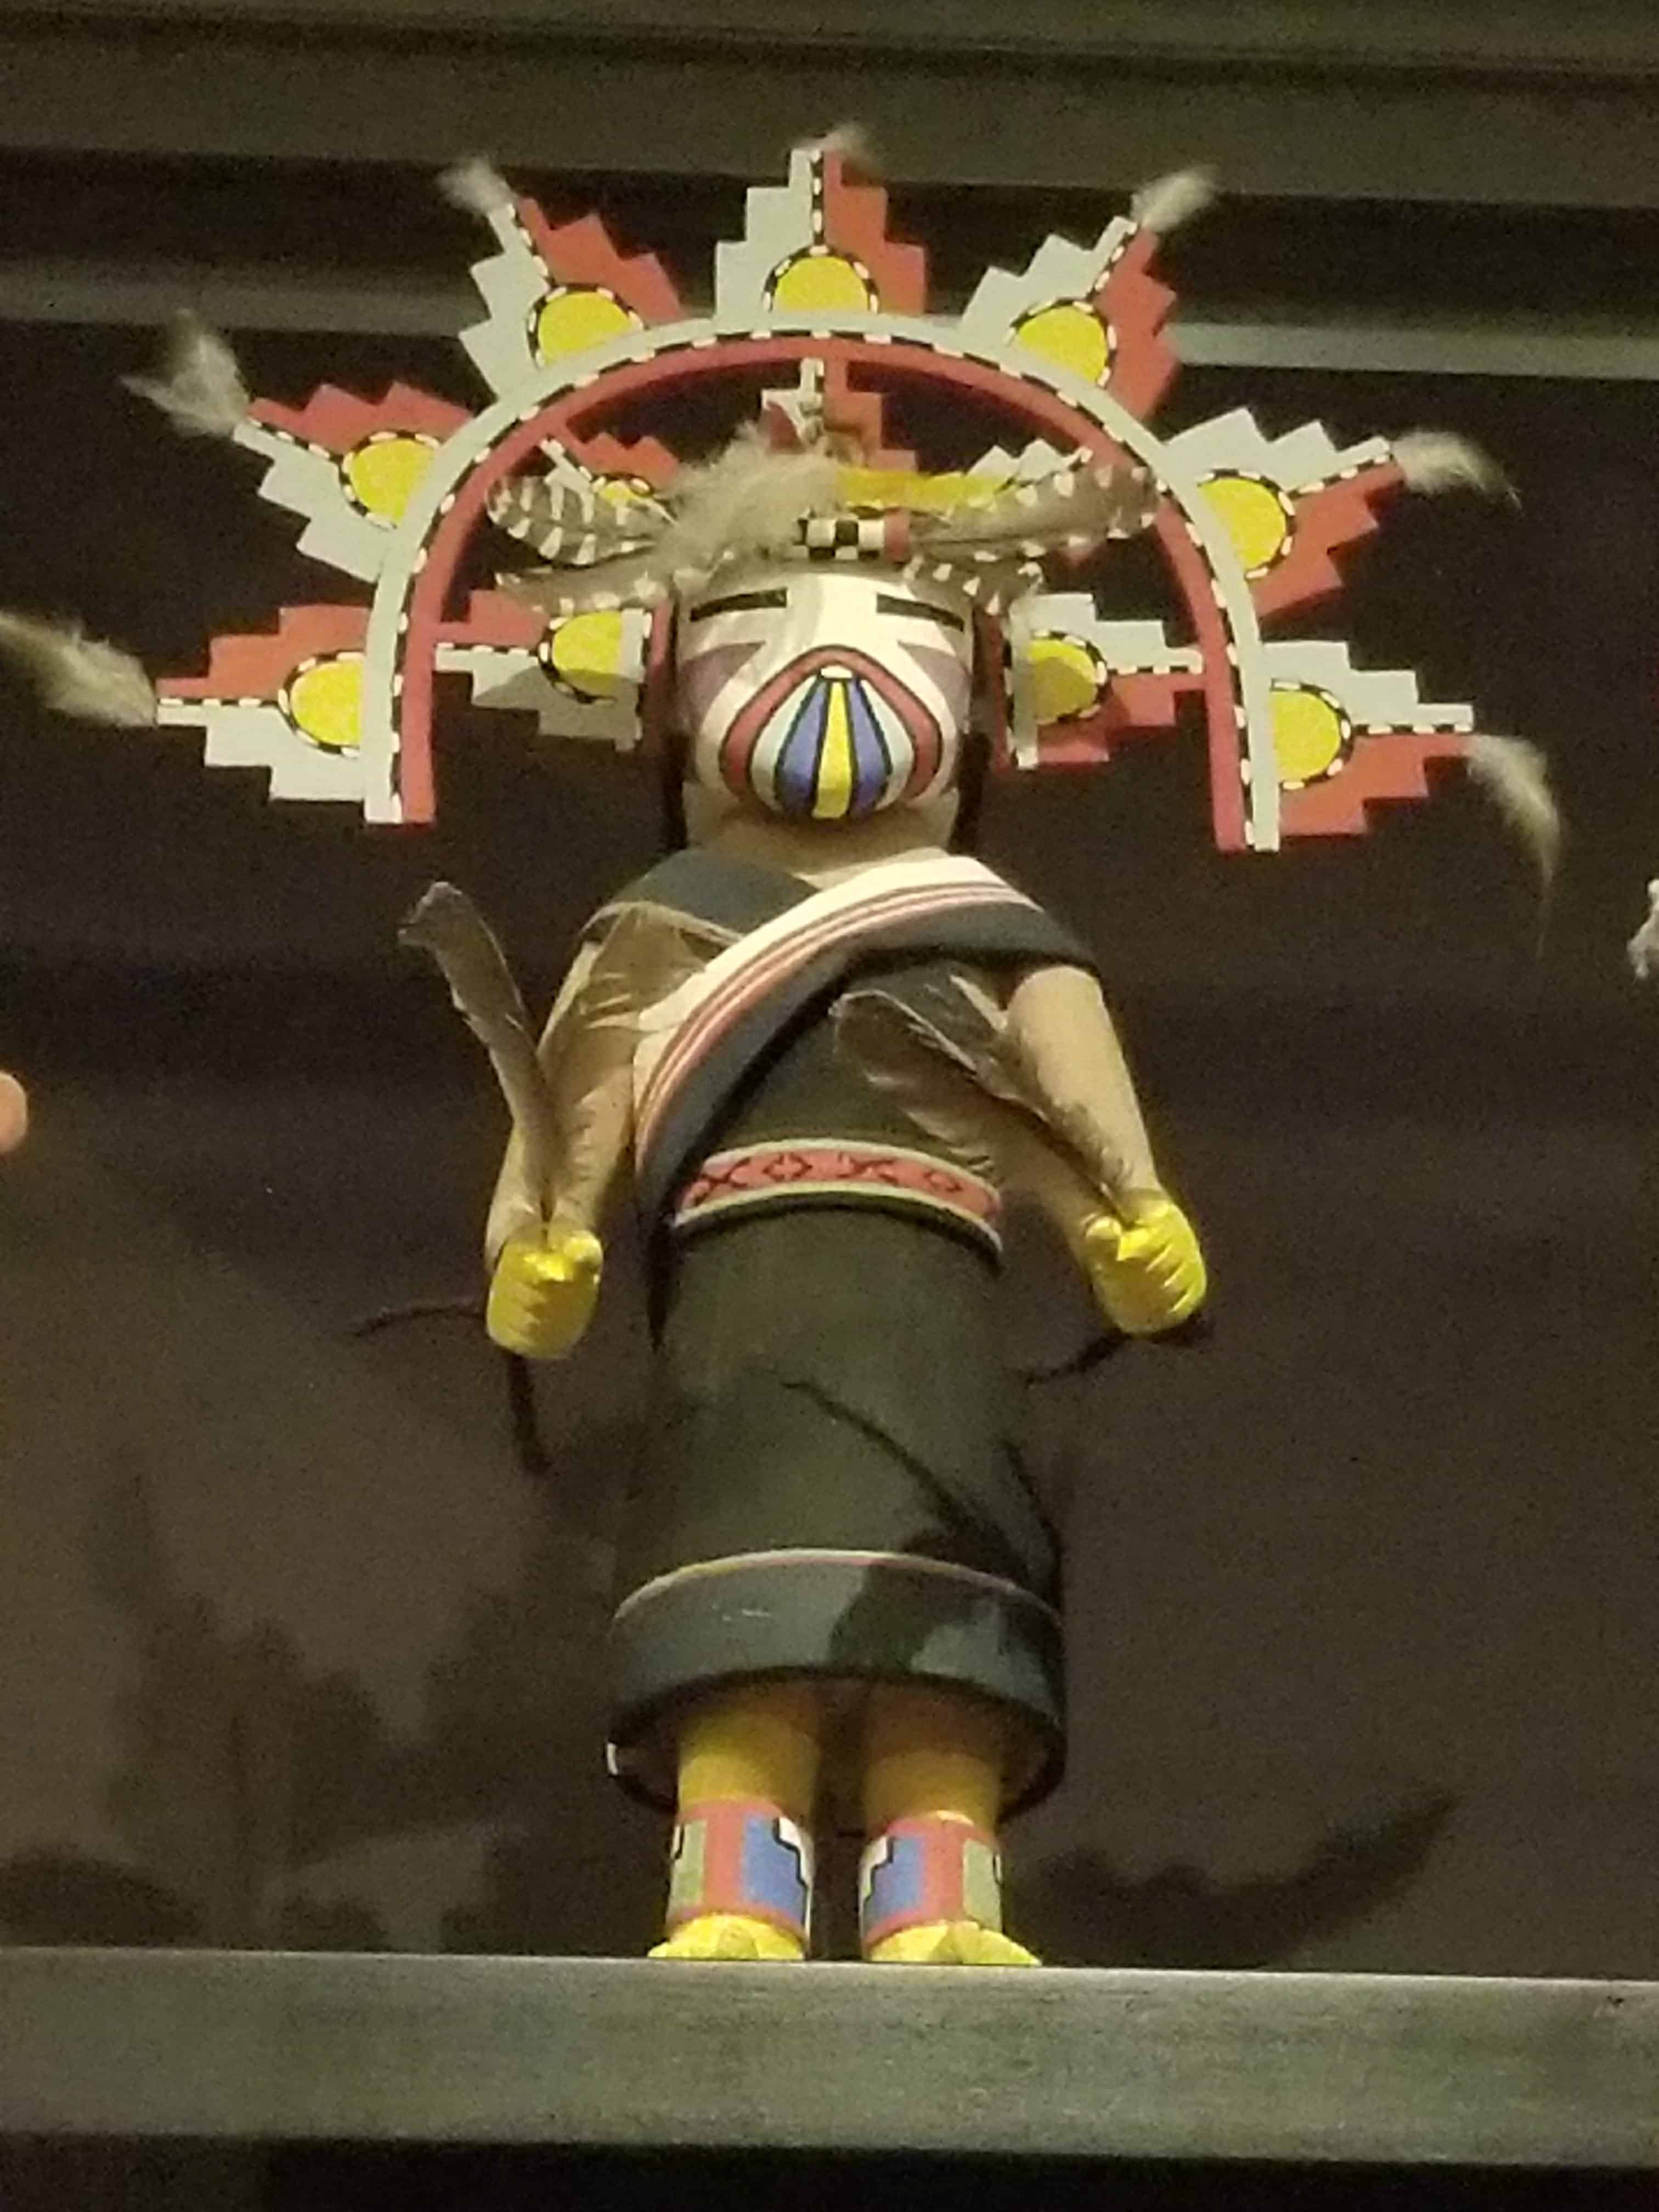
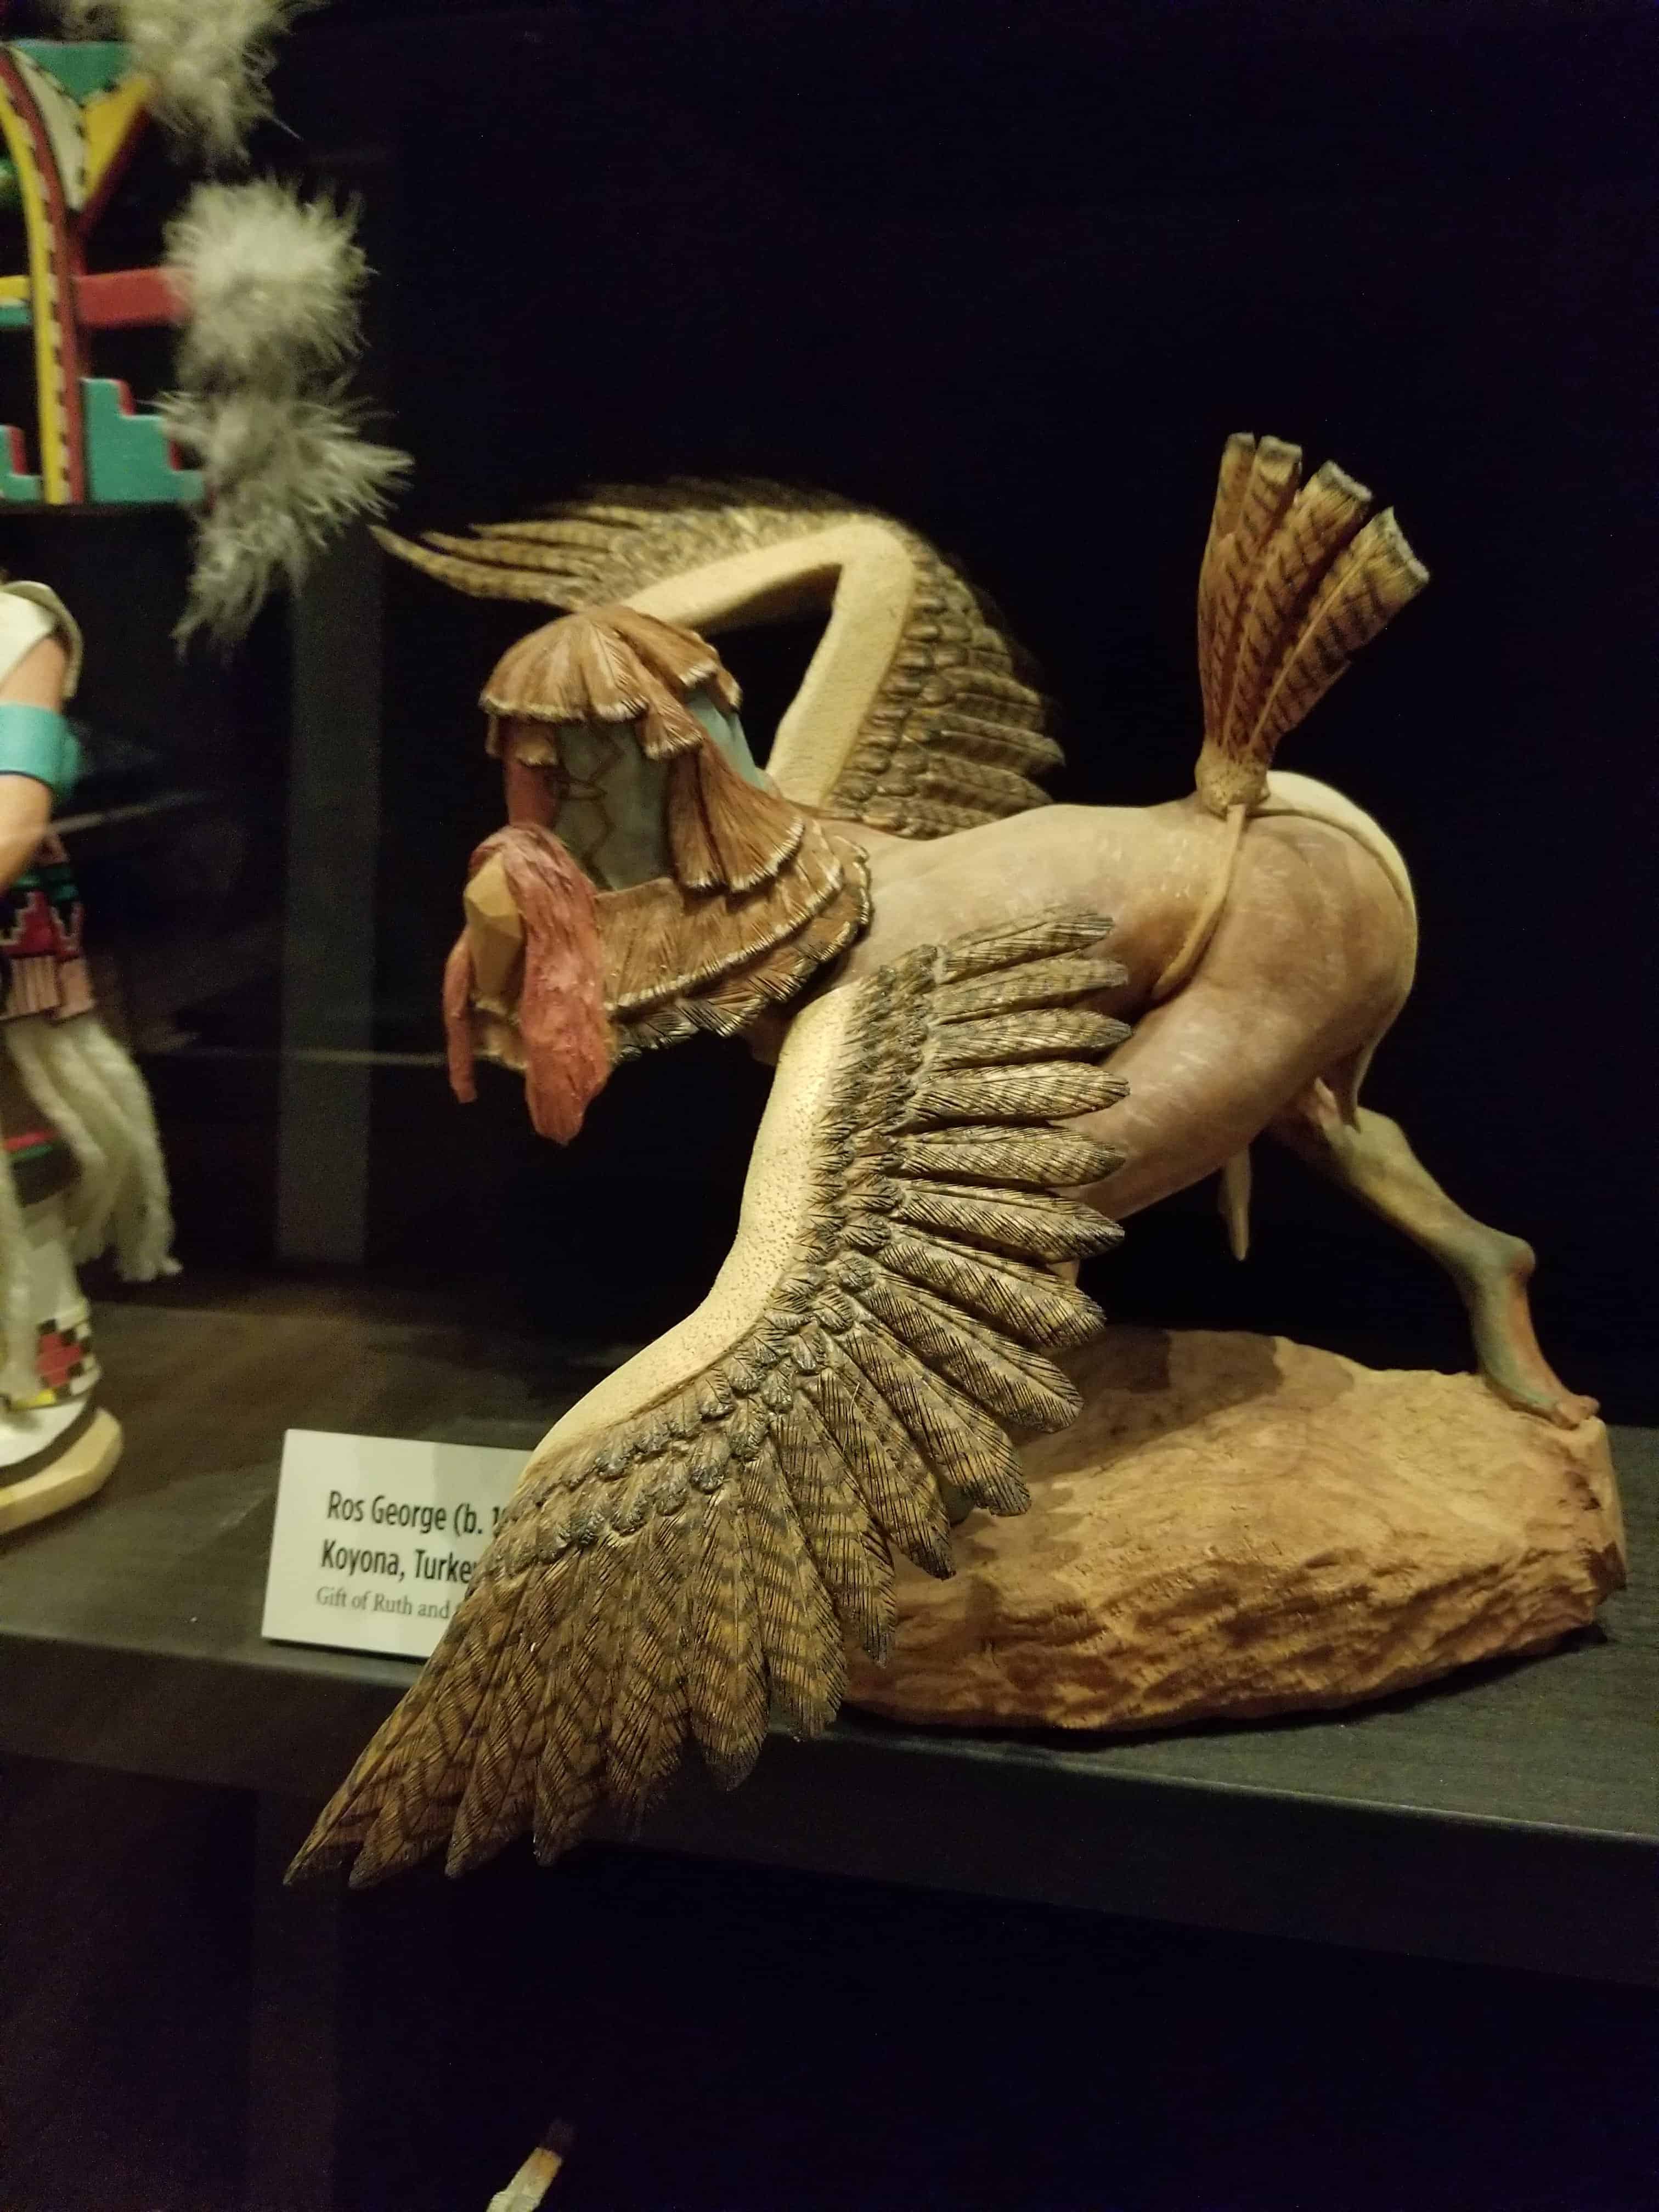
Ros George Katsina, Heard Museum, Phoenix
The Ros George Katsina is a good example of the type of Katsina made as art to sell.
I took a photo of this particular Katsina, because of the feathers. If you click on the photo so you can see it larger, you will see the fine carving on the wings and feathers.
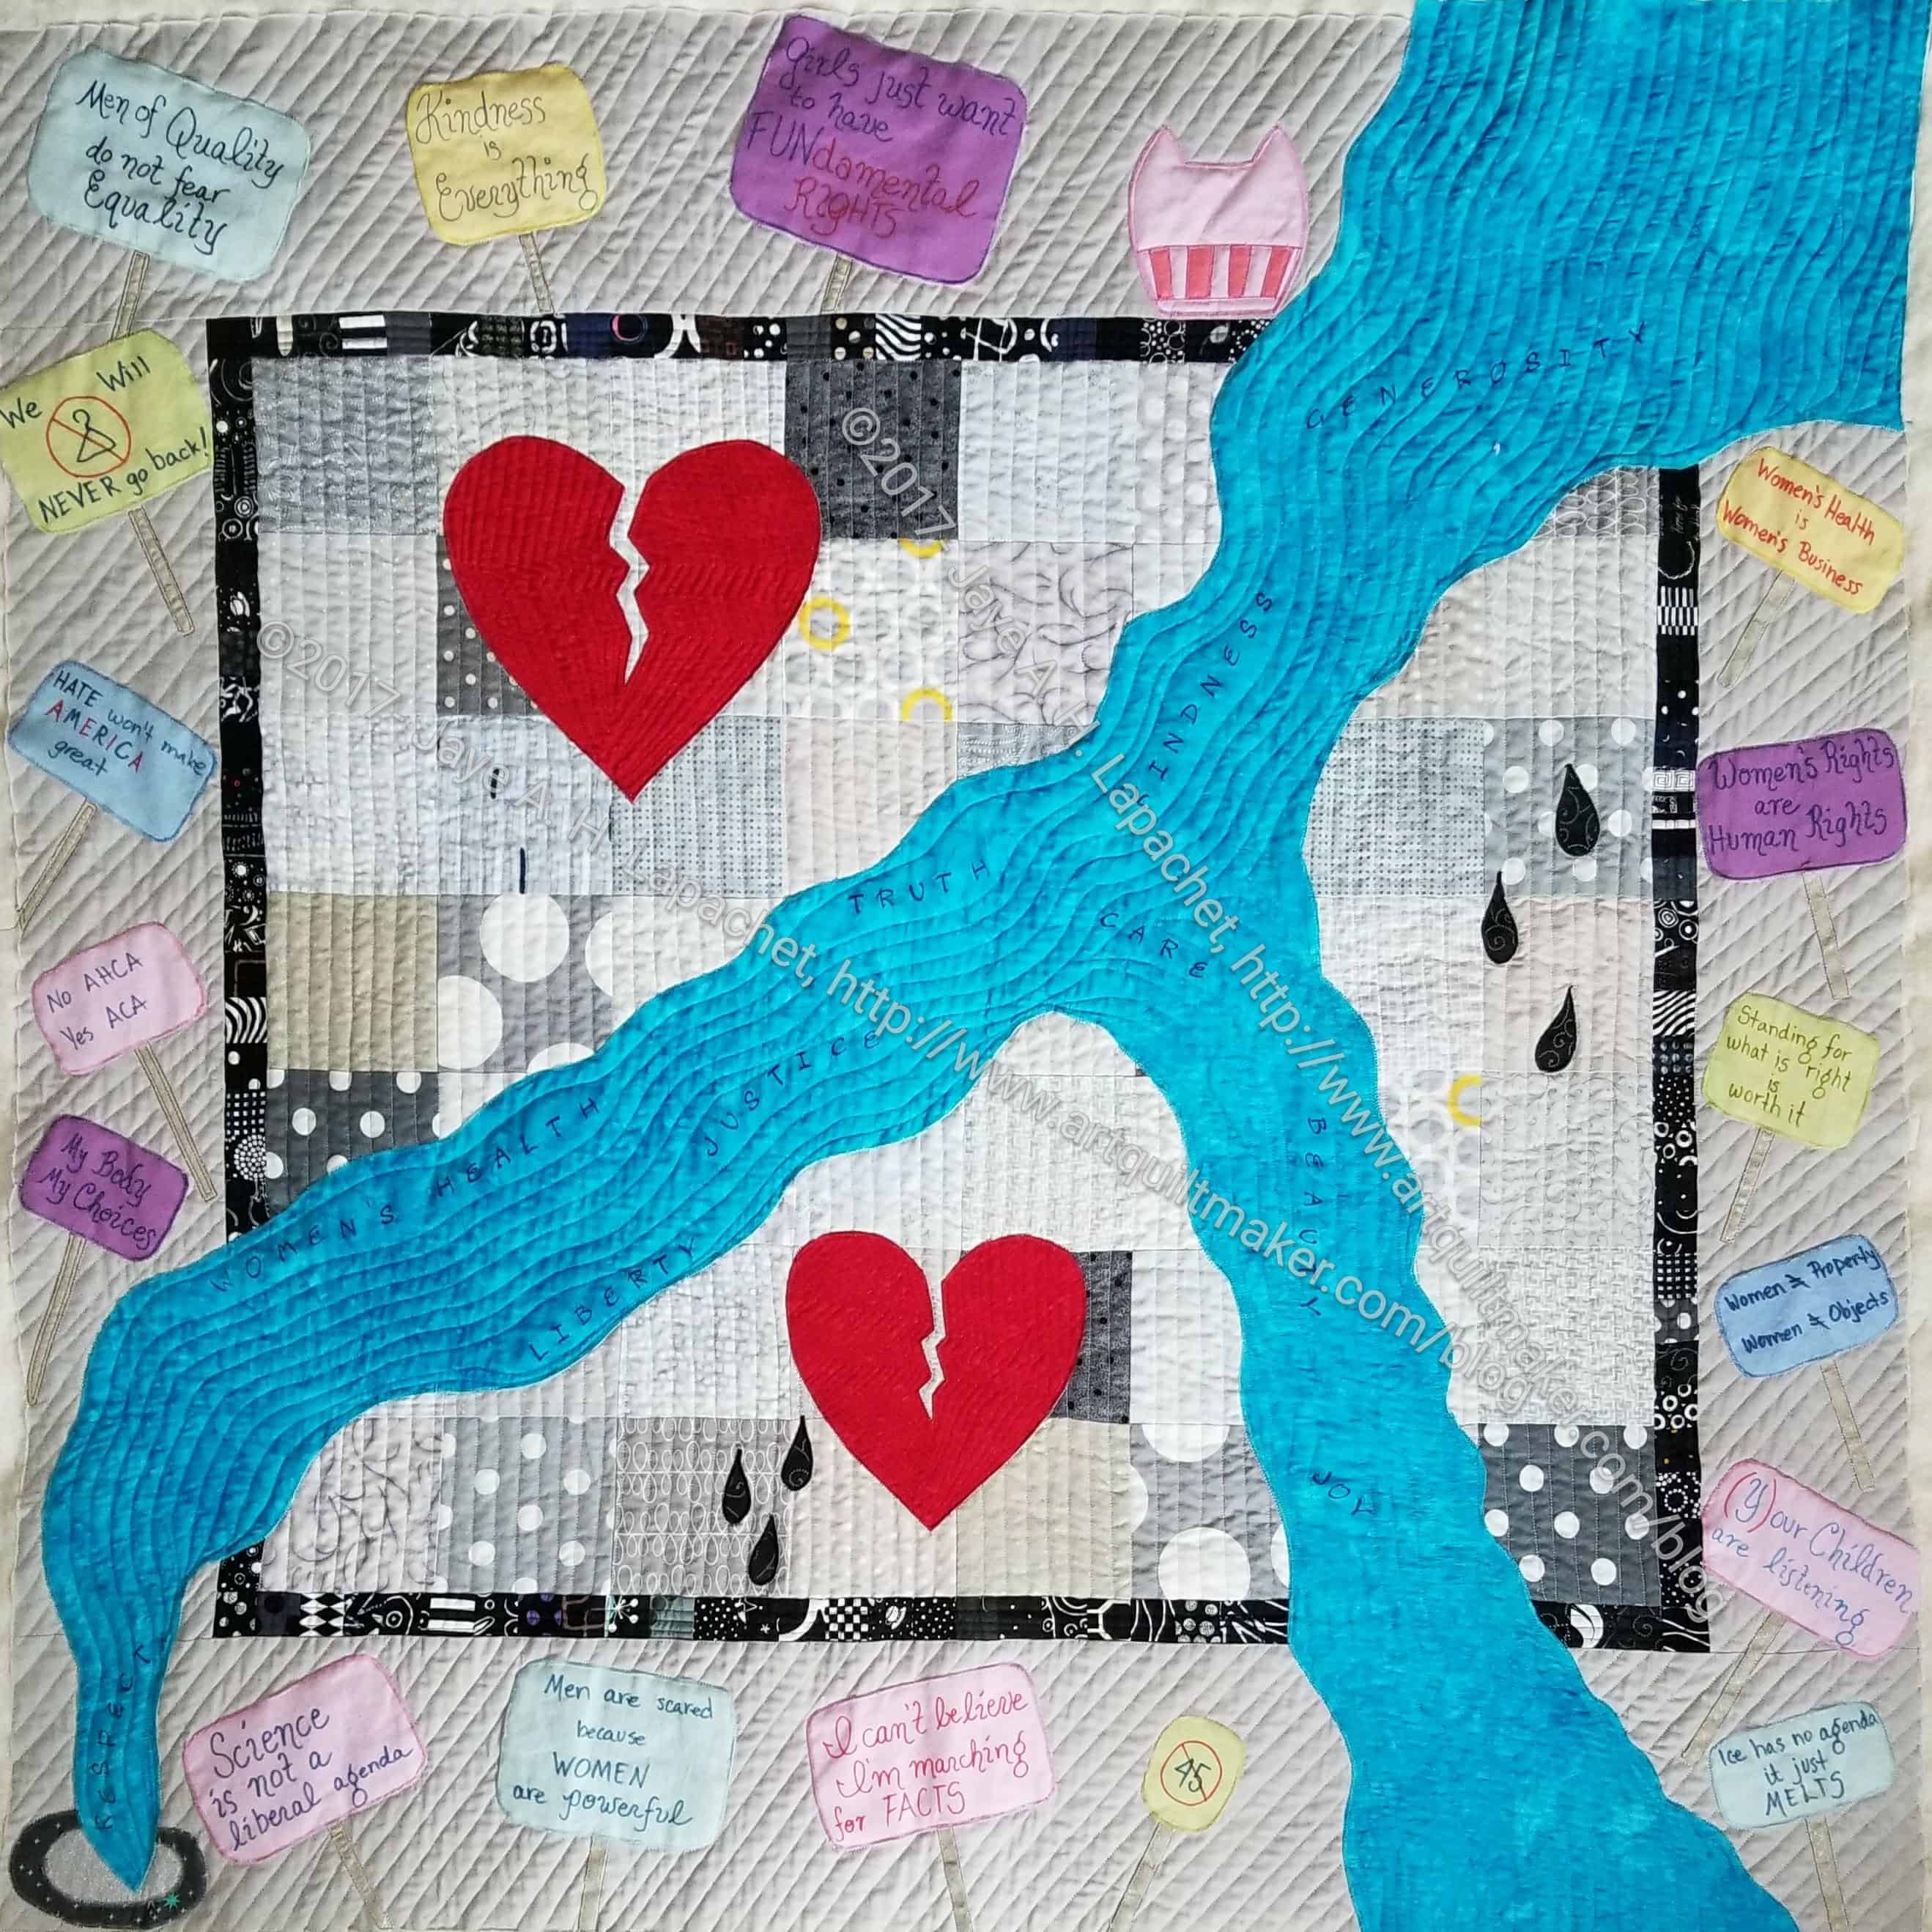
I finished quilting the art quilt, Down the Drain, a few weeks ago. I don’t know why I didn’t post it. My only explanation is life got in the way.
I am pretty pleased with my quilting. I found that doing the work on the 6600 was relatively painless. The border quilting is not perfect. I couldn’t have done perfect quilting if I had wanted, but I also wanted to express that life isn’t perfect, people aren’t perfect and we have a chance to improve.
I have machine sewed the binding and made the sleeve.
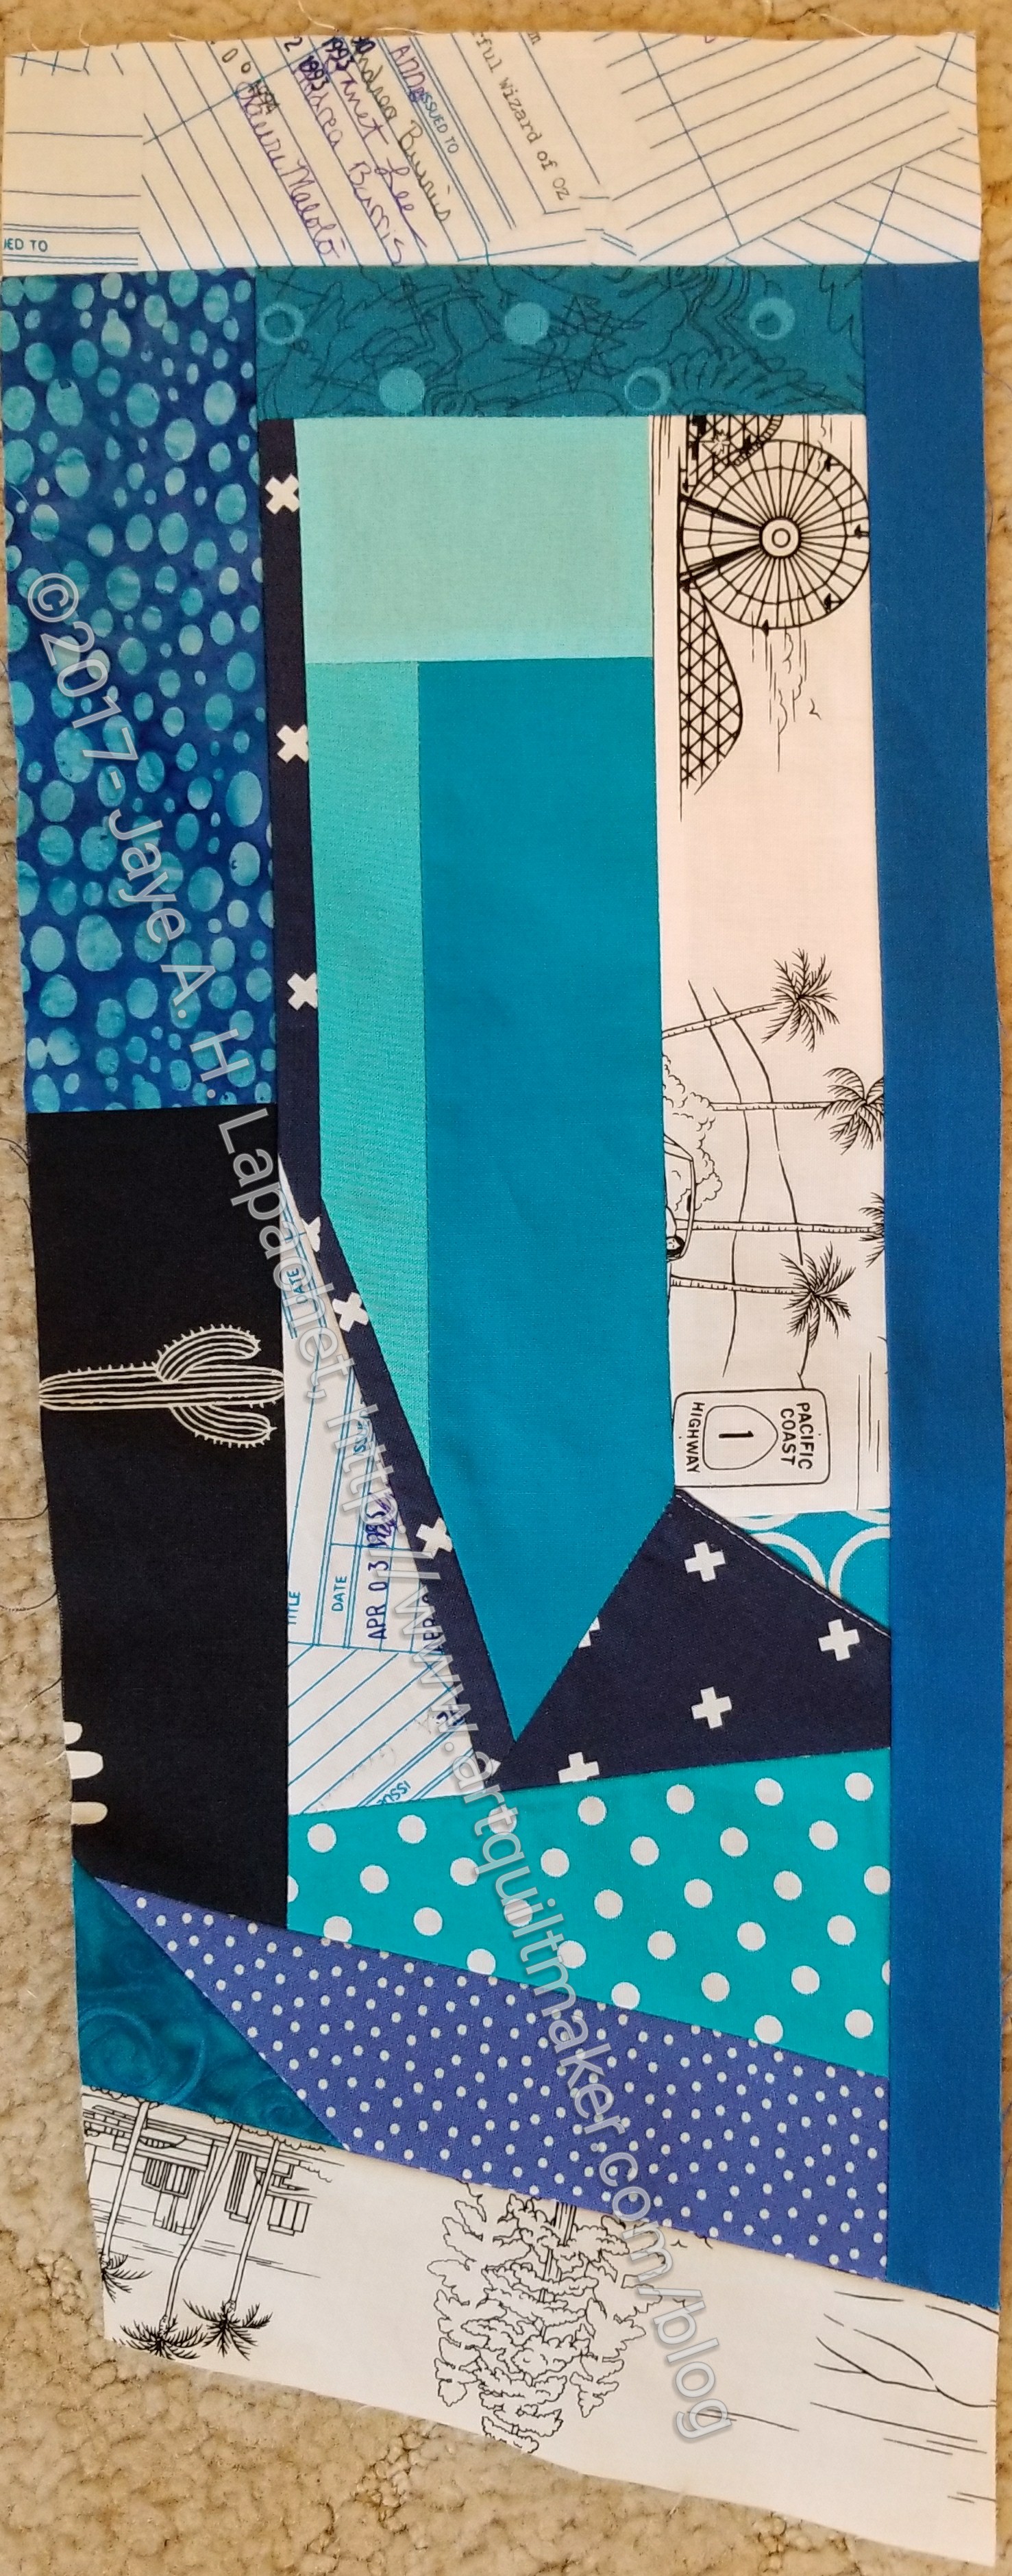
I realized late last week that I really needed to get busy on Joelle’s Color My Quilt piece. I was prepared to start it early, as in right after the August meeting. Somehow time got away from me.
Like I did for Amy’s piece, I wanted to make something that Joelle could cut up and use to put the other pieces together. She also really wanted solids and the combination didn’t work for me.
I just started improv piecing. It probably isn’t challenging me at all, but I seem to be focusing on the color and worrying less about the actual design. I’d be a lot happier with this project if people were making blocks, but I understand that that is not the idea behind this project.
Joelle’s Color My Quilt
I am pleased with my piece, especially the colors. I didn’t have enough solid scraps to do the whole thing in scraps, so I tried to keep it to tone-on-tones. When I started to stray, I stopped piecing. I didn’t intend for it to be so long and skinny, but that is the way it turned out.
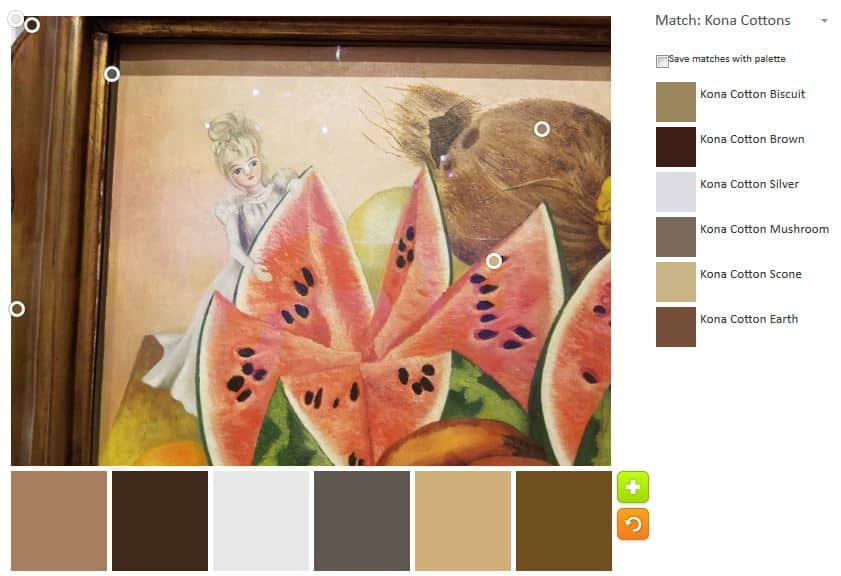
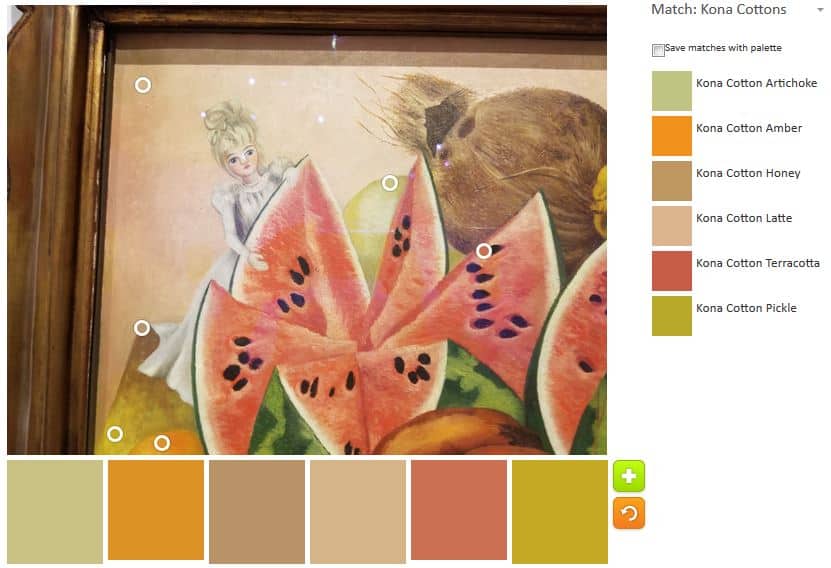
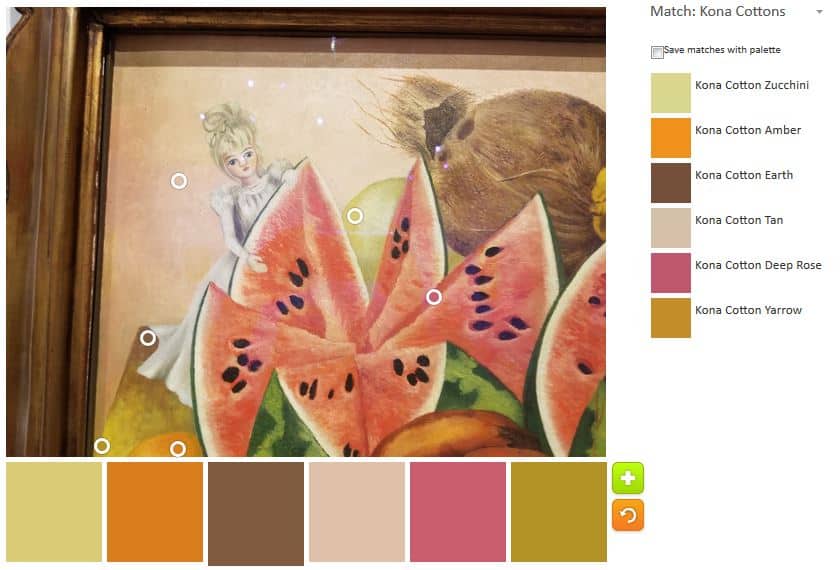
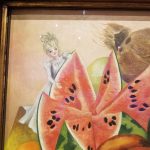
The image I chose comes from the detail of a painting by Frida Kahlo called The Bride Who Becomes Frightened When She Sees Life Opened. You can find more of the interpretation of this painting on the FridaKahlo.org website. I saw this painting at the Heard Museum in Phoenix. It was one of an exhibit that was only making one other stop in the US.
ColorPlay: Kahlo detail default
The default was very brown. I think it would make a good palette for a house. Someone else’s house – not mine, but the neutrals are appealing in some way. Perhaps I am getting used to them or am starting to be able to appreciate their value in the scheme of hues and tones.
ColorPlay: Kahlo detail n.1
I moved the circles around to any colors just to get some colors. There is a sherbet/sorbet feel to the first palette I made. I like the Kona Amber, though I think it looks more like a perfectly ripe apricot.
ColorPlay Sept 15 n.2
This example clearly plays off of number 1. Where the hues in n.1 blend more, this one shows more contrast. Not tons, but some. the Kona Earth looks much different that the Kona Honey above.
ColorPlay Sept.15 n.3
I made some changes to the circles to try to get some brighter colors and the pink kind of fulfilled that dream. I do think that the colors Rivera and Kahlo use are a bit on the dull side – not horrible, but not as bright as I was looking for. Still, the Deep Rose and Gold look great together.
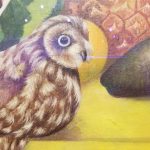
ColorPlay: Kahlo detail – original
Another detail I took was of this little owl. The fruit behind him/her makes it look like s/he has a big yellow beak, but I think the beak is actually small. I was fascinated by the feathers. I also liked the shape of his body. I don’t know if it is real or mythological owl (creature), but s/he is cute.
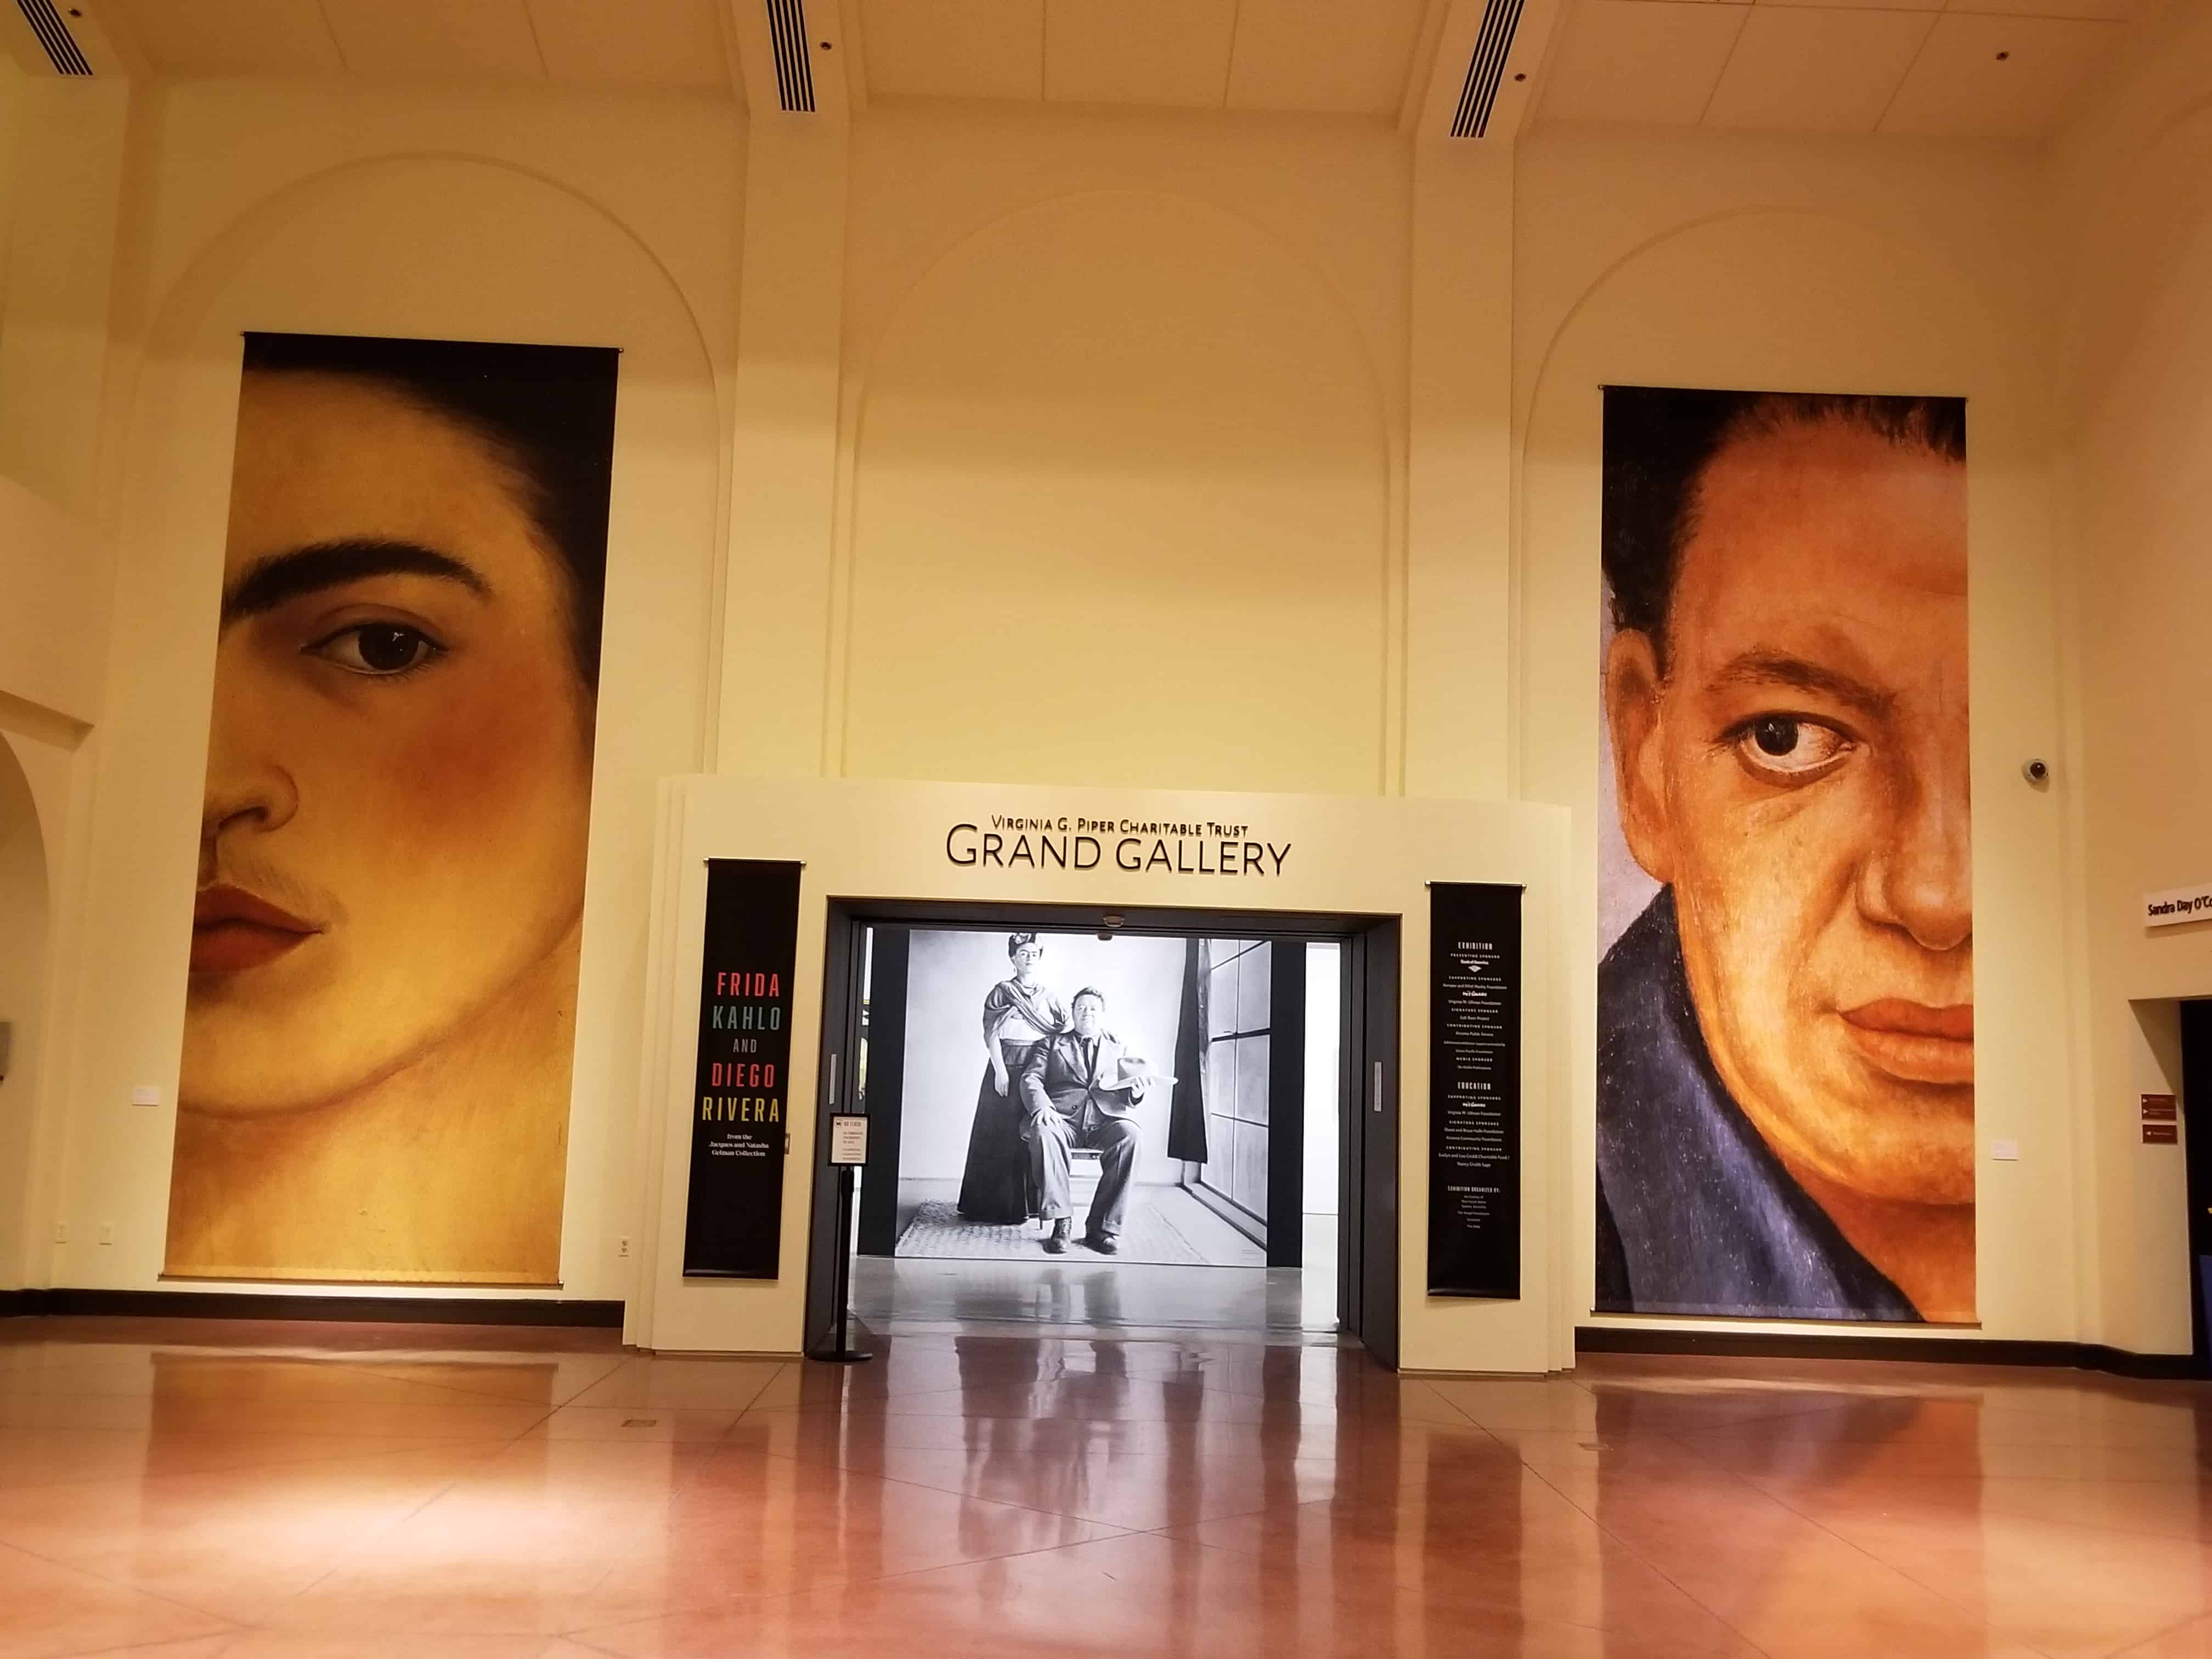
Back in June, I went to Phoenix for work. It was that week that was incredibly hot and I was actually out and about in 119 degree heat. I won’t be doing that again.
I was invited to a vendor event at the Heard Museum. Since I had nothing better to do and enjoy visiting places unique to various cities, I went. I am not much of a fan of Native American art – I don’t hate it, it just doesn’t float my boat – though I can always find something to inspire me in ally types of exhibits.
I was incredibly pleased to see the various collections that were amazing and extremely inspiring.
Frida Kahlo/Diego Rivera Exhibit
They had an exhibit of Frida Kahlo and Diego Rivera pieces that I felt incredibly lucky to see. Not only were there paintings by the pair, but there were also photographs of the pair and their family. The exhibit was only going to be shown in one other place in the US (not sure what other city, sorry!) and that place was not in San Francisco.
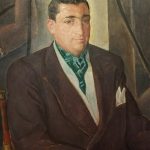
Portrait of Jacques Gelman
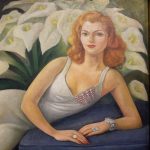
Diego Rivera Portrait of Natasha Zakolkowa Gelman detail
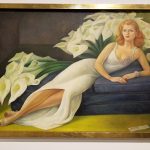
Diego Rivera Portrait of Natasha Zakolkowa Gelman
Their paintings have a simplicity, without being simplistic that I like. This was the first time I had seen the sexual aspect of their paintings, as well. This was the first time I had seen paintings of a couple of Rivera’s patrons, the Gelmans. These paintings are great examples of simplicity, without being simplistic.
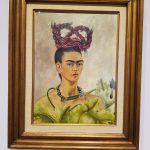
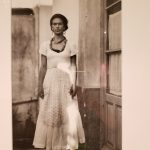
Self-portrait with a red and gold dress
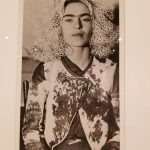
Self-portrait with a braid
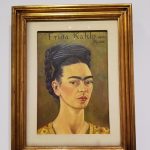
Kahlo had a number of self portraits in the exhibit. I really liked her hair in a number of them.
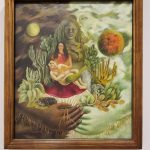
The love embrace of the universe, the Earth, Diego, me and Senor Xolotl, 1949
The love embrace of the universe, the Earth, Diego, me and Senor Xolotl, 1949 detail
She also had some pretty interesting paintings, at least to me. The above photos show a “composition that borrows from the historical motif of the Virgin and the Child with St. Anne in which the saint embraces Mary and Jesus.” (from info at the museum). This is definitely not a boring picture and there is a lot to look at in it.
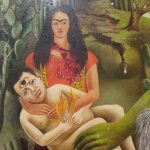
Kahlo: The Bride Who Becomes Frightened….
Kahlo: The Bride Who Becomes Frightened…. detail
Kahlo: The Bride Who Becomes Frightened…. detail
Kahlo: The Bride Who Becomes Frightened…. detail
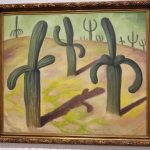
The bride who becomes frightened when she sees life opened by Kahlo and Landscape with cacti by Rivera are a couple of other interesting paintings. Again they have that simplicity (flatness of the paint application???) that I like, but are not simplistic.
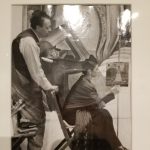
Diego observing Frida paint “Self-portrait on the borderline”
Frida by Guillermo Davila
Frida with veil on her head by Lucienne Bloch
The photographs gave a realistic glimpse into their lives and brought up the suggestion that both artists had other lovers.
Stay tuned for post coming to a blog near you of other art at the Heard Museum.
Somehow I didn’t get to working on any of my other projects on Sunday. I did do some random sewing as well as tidying up. My cutting table was a wreck. It was getting to the point where I had about six square inches in which to cut. Very difficult, I assure you. I started chopping up the scraps that were making the mess into pieces for future use.
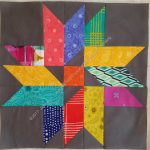
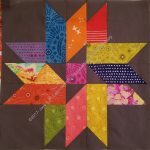
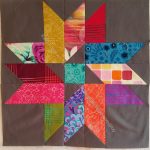
Stars #3 Donation Top
One task I did accomplish was finish the third Stars donation top on Sunday.The BAM meeting is next Saturday and I wanted to get that done, so I was pleased. I had been rummaging around in my fabric the day before and was reminded how much backing fabric I have one hand. I made a back from some of the fabric even though it made the quilt more girly than boyish. It was quicker to use a large piece than to piece a bunch of smaller pieces together.
I am pleased with the asymmetrical layout of the top. It isn’t quite ideal, but it is much more interesting than the first version of this design. I don’t know that I will make more of these blocks right at the moment. I have some blue and white 16 patches that have been hanging around waiting for their turn on the design wall that I think I will work on next for a donation quilt. We’ll see.